start stop button NISSAN MAXIMA 2006 A34 / 6.G Owners Manual
[x] Cancel search | Manufacturer: NISSAN, Model Year: 2006, Model line: MAXIMA, Model: NISSAN MAXIMA 2006 A34 / 6.GPages: 312, PDF Size: 4.88 MB
Page 85 of 312

4. Confirm that the SECURITY indicator light
comes on. The SECURITY light stays on for
about 30 seconds. The vehicle security sys-
tem is now pre-armed. After about 30 sec-
onds the vehicle security system automati-
cally shifts into the armed phase. The
SECURITY light begins to flash once every 3
seconds. If, during the 30-second pre-arm
time period, the door is unlocked by the key
or the keyfob, or the ignition key is turned to
ACC or ON, the system will not arm.
cIf the key is turned slowly when locking
the door, the system may not arm. Fur-
thermore, if the key is turned beyond
the vertical position toward the unlock
position to remove the key, the system
may be disarmed when the key is re-
moved. If the indicator light fails to
glow for 30 seconds, unlock the door
once and lock it again.
cEven when the driver and/or passen-
gers are in the vehicle, the system will
arm with all doors and trunk lid closed
and locked with the ignition key in the
OFF position.Vehicle security system activation
The vehicle security system will give the following
alarm:
cThe headlights blink and the horn sounds
intermittently.
cThe alarm automatically turns off after ap-
proximately 50 seconds. However, the alarm
reactivates if the vehicle is tampered with
again. The alarm can be shut off by unlocking
a door with the key, or by pressing the
button on the keyfob.
The alarm is activated by:
copening the door or trunk lid without using
the key or keyfob (even if the door is un-
locked by releasing the door inside lock
switch)
copening the trunk lid by operating the interior
trunk lid release.
How to stop an activated alarm
The alarm stops only by unlocking a door with the
key, or by pressing thebutton on the key-
fob.
NISSAN VEHICLE IMMOBILIZER
SYSTEM
The NISSAN Vehicle Immobilizer System will not
allow the engine to start without the use of a
registered key.
If the engine fails to start using a registered key
(for example, when interference is caused by
another registered key, an automated toll road
device or automatic payment device on the key
ring) , restart the engine using the following pro-
cedures:
1. Leave the ignition switch in the ON position
for approximately 5 seconds.
2. Turn the ignition switch to the OFF or LOCK
position, and wait approximately 10 sec-
onds.
3. Repeat steps 1 and 2.
4. Restart the engine while holding the device
(which may have caused the interference)
separate from the registered key.
If the no start condition re-occurs, NISSAN rec-
ommends placing the registered key on a sepa-
rate key ring to avoid interference from other
devices.
Instruments and controls2-17
ZREVIEW COPYÐ2006 Maxima(max)
Owners ManualÐUSA_English(nna)
06/22/05Ðtbrooks
X
Page 140 of 312
WARNING
cPositioning of the heating or air condi-
tioning controls and display controls
should not be done while driving in or-
der that full attention may be given to
the driving operation.
cDo not disassemble or modify this sys-
tem. If you do, it may result in accidents,
fire, or electrical shock.
cDo not use this system if you notice any
abnormality, such as a frozen screen or
lack of sound. Continued use of the
system may result in accident, fire or
electric shock.
cIn case you notice any foreign object in
the system hardware, spill liquid on it,
or notice smoke or smell coming from
it, stop using the system immediately
and contact your nearest NISSAN
dealer. Ignoring such conditions may
lead to accidents, fire or electrical
shock.
When you use this system, make sure the engine
is running.
If you use the system with the engine not
running (ignition ON or ACC) for a long
time, it will use up all the battery power,
and the engine will not start.Reference symbols:
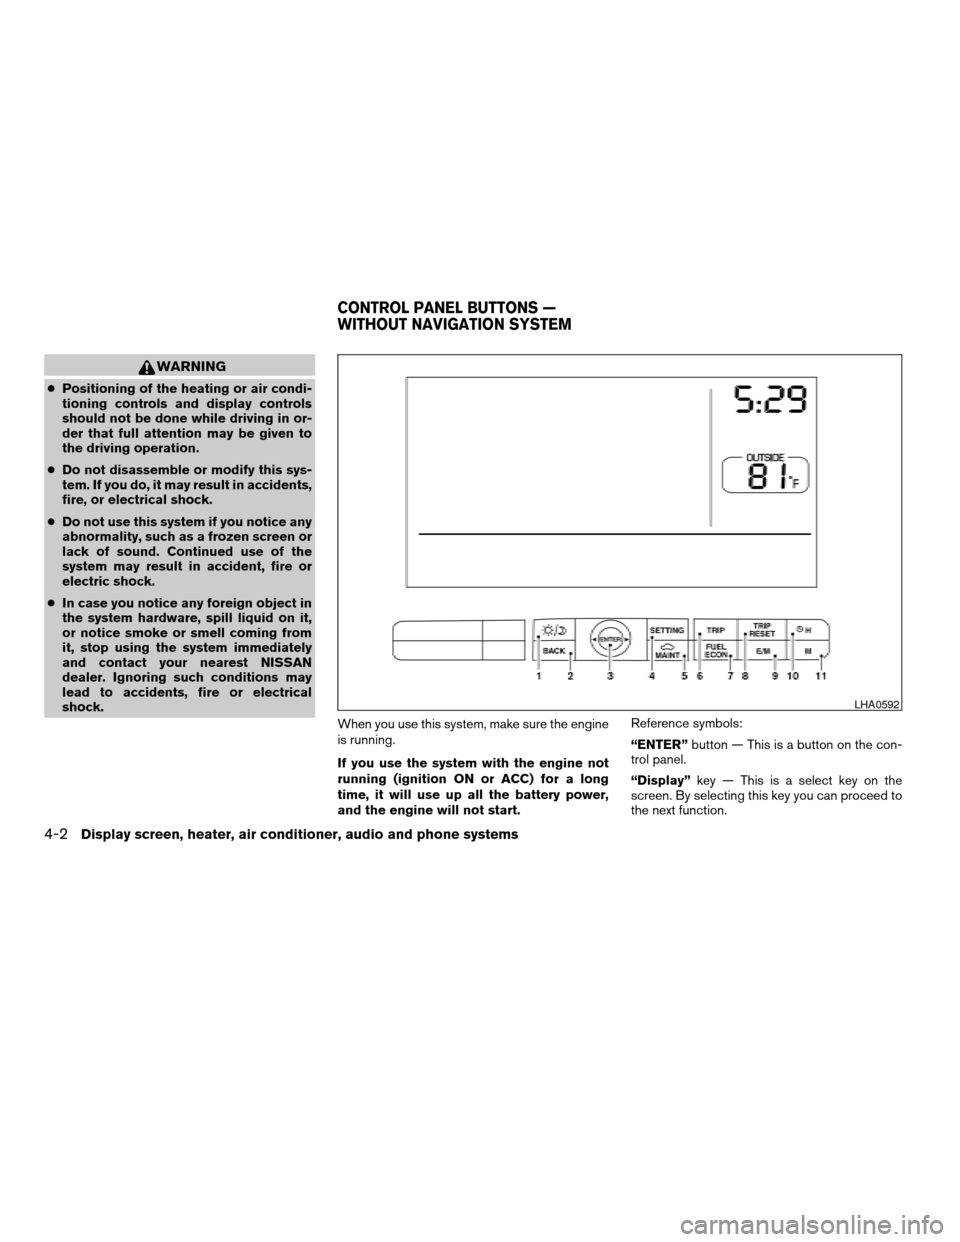
“ENTER”button — This is a button on the con-
trol panel.
“Display”key — This is a select key on the
screen. By selecting this key you can proceed to
the next function.
LHA0592
CONTROL PANEL BUTTONS —
WITHOUT NAVIGATION SYSTEM
4-2Display screen, heater, air conditioner, audio and phone systems
ZREVIEW COPYÐ2006 Maxima(max)
Owners ManualÐUSA_English(nna)
06/22/05Ðtbrooks
X
Page 145 of 312
cDo not disassemble or modify this sys-
tem. If you do, it may result in accidents,
fire, or electrical shock.
cDo not use this system if you notice any
abnormality, such as a frozen screen or
lack of sound. Continued use of the
system may result in accident, fire or
electric shock.
cIn case you notice any foreign object in
the system hardware, spill liquid on it,
or notice smoke or smell coming from
it, stop using the system immediately
and contact your nearest NISSAN
dealer. Ignoring such conditions may
lead to accidents, fire or electrical
shock.
When you use this system, make sure the engine
is running.
If you use the system with the engine not
running (ignition ON or ACC) for a long
time, it will use up all the battery power,
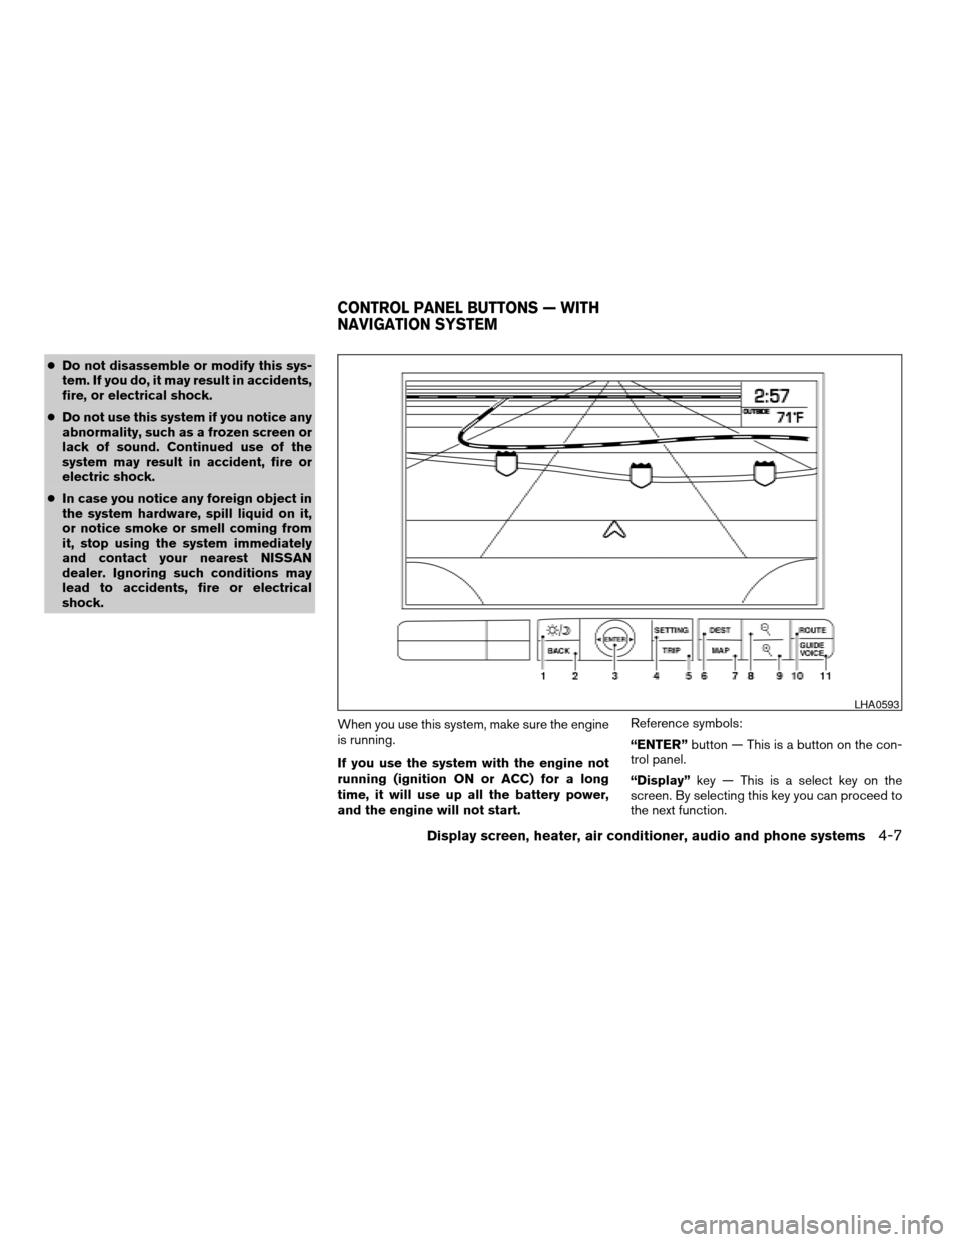
and the engine will not start.Reference symbols:
“ENTER”button — This is a button on the con-
trol panel.
“Display”key — This is a select key on the
screen. By selecting this key you can proceed to
the next function.
LHA0593
CONTROL PANEL BUTTONS — WITH
NAVIGATION SYSTEM
Display screen, heater, air conditioner, audio and phone systems4-7
ZREVIEW COPYÐ2006 Maxima(max)
Owners ManualÐUSA_English(nna)
06/22/05Ðtbrooks
X
Page 166 of 312
SEEK tuning:
3. After selecting a program type, push the
SEEK button (
or) for less than
1.5 seconds within 10 seconds. Tuning to
the PTY station will start. If you do not push
the SEEK button within the 10 second pe-
riod, the PTY mode will be canceled.
SCAN tuning:
4. Push the
orbutton for more
than 1.5 seconds to scan the PTY name
stations and stop at each broadcasting sta-
tion for 5 seconds. Pushing the button again
during this 5 second period will stop SCAN
tuning and the radio will remain tuned to that
station. If the
orbutton is not
pushed within 5 seconds, SCAN tuning
moves to the next station.
Cassette tape player operation
Turn the ignition key to ACC or ON, then lightly
insert the cassette tape into the tape door. The
cassette tape will be automatically pulled into the
player.
The radio or CD will turn off (if it is on) and the
cassette tape will begin to play.
WARNING
Do not force the cassette tape into the
tape door. This could damage the player.
If the system is turned off by pushing the
ON·OFF/VOL control knob with the cassette
tape still in the player, the tape will resume playing
when the system is turned back on.
PLAY:
cWhen the TAPE button is pushed with the
system turned off and a tape already loaded,
the system will come on and the tape will
play.
cWhen the TAPE button is pushed with either
the radio or compact disc turned on and a
tape already loaded, the compact disc or the
radio will automatically be turned off and the
tape will play.
cWhen the TAPE button is pushed with a
TAPE playing, the tape will play the program
recorded on the reverse side.
REW (Rewind) , FF (Fast
Forward):
Push the
(rewind) button to rewind the
tape. Push the(fast forward) button to fast
forward the tape. Either the REW or FF symbol
illuminates on the display window. To stop theREW or FF function, press the
(rewind)
or(fast forward) again, or press the TAPE
button.
APS (Automatic Program
Search) REW, APS FF:
When the
(APS REW) button is
pushed once for less than 1.5 seconds while a
tape is playing, the program being played will
start over from the beginning. Push the
(APS REW) button several times to skip back
several selections. The tape will go back the
number of times the button is pushed.
When the
(APS FF) button is pushed
for less than 1.5 seconds while a tape is playing,
the next program will start to play from the begin-
ning. Push the
(APS FF) button several
times to skip through programs. The tape will
advance the number of times the button is
pushed (up to 9 programs) . Either the REW or FF
symbol flashes on the display window while
searching for the selection.
When pushing the
(APS REW)
or(APS FF) button for more than 1.5
seconds, each program will play for about 10
seconds. To stop playing, push the
but-
ton again.
4-28Display screen, heater, air conditioner, audio and phone systems
ZREVIEW COPYÐ2006 Maxima(max)
Owners ManualÐUSA_English(nna)
06/22/05Ðtbrooks
X
Page 167 of 312
This system searches for the blank intervals be-
tween selections. If there is a blank interval within
a program or there is no interval between pro-
grams, the system may not stop in the desired or
expected location.
REPEAT (RPT):
When the PROG/RPT play button is pushed
while the tape is played, the tape program play is
repeated. To stop the repeat play, push the
PROG/RPT play button again.
Metal or chrome tape usage:
The cassette player will be automatically set to
high performance play when playing a metal or
chrome cassette tape.
Tape eject:
When
button is pushed with a tape
loaded, the tape will be ejected.
When a tape is ejected while it is being played,
the system will be turned off.
Compact disc (CD) player operation
(Type A)
CAUTION
cDo not force the compact disc into the
slot. This could damage the player.cTrying to load a CD with the CD door
closed could damage the CD and/or CD
changer.
Turn the ignition key to the ACC or ON position
and insert the compact disc into the slot with the
label side facing up. The compact disc will be
guided automatically into the slot and start play-
ing.
If the radio or tape is already operating, it will
automatically turn off and the compact disc will
play.
If the system has been turned off while the com-
pact disc was playing, pushing the ON·OFF/VOL
control knob will start the compact disc.
3.1 in (8 cm) diameter compact discs can also be
used without an adapter.
CD button:
When the CD button is pushed with the system
off and the compact disc loaded, the system will
turn on and the compact disc will start to play.
When the CD button is pushed with the compact
disc loaded but the tape or the radio playing, the
tape or radio will automatically be turned off and
the compact disc will start to play.
REW (Rewind) , FF (Fast
Forward):
When the
(rewind) button or(fast
forward) is pushed while the compact disc is
being played, the compact disc will play while
rewinding or fast forwarding. When the button is
released, the compact disc will return to normal
play speed.
SEEK/TRACK:
When the
button is pushed for less
than 1.5 seconds while a compact disc is playing,
the track being played returns to its beginning.
Push several times to skip back through tracks.
The compact disc will go back the number of
times the button is pushed.
When the
button is pushed for less
than 1.5 seconds while a compact disc is playing,
the next track will start to play from its beginning.
Push several times to skip through tracks. The
compact disc will advance the number of times
the button is pushed. (When the last track on the
compact disc is skipped through, the first track
will be played.)
When the
orbutton is pushed
for more than 1.5 seconds, each track will play for
about 10 seconds. To stop playing, push
the
button.
Display screen, heater, air conditioner, audio and phone systems4-29
ZREVIEW COPYÐ2006 Maxima(max)
Owners ManualÐUSA_English(nna)
06/22/05Ðtbrooks
X
Page 169 of 312

The compact disc will go back the number of
times the button is pushed.
When the
button is pushed for less
than 1.5 seconds while the compact disc is play-
ing, the next track will start to play from its begin-
ning. Push several times to skip through tracks.
The compact disc will advance the number of
times the button is pushed. (When the last track
on the compact disc is skipped through, the first
track will be played.)
When pushing the
orbutton
for more than 1.5 seconds, each track will play for
about 10 seconds. To stop playing, push
the
button again.
CD select buttons:
To play another CD that has been loaded, push a
CD select button (1 - 6) .
REPEAT (RPT):
When the PROG/RPT play button is pushed
while the compact disc is played, the play pattern
can be changed as follows:
ALL DISC RPT!1 DISC RPT!1 TRACK RPT
!ALL DISC RDM!1 DISC RDM!ALL DISC
RPT
ALL DISC RPT: All discs loaded will be repeated.
1 DISC RPT: The disc that is currently playing will
be repeated.1 TRACK RPT: The track that is currently playing
will be repeated
ALL DISC RDM: Tracks from all discs will be
played randomly
1 DISC RDM: Tracks from the disc that is cur-
rently playing will be played randomly
CD eject:
Current disc:
cPress the
button. The compact disc
will be ejected. If the disc is not removed
within 15 seconds, the disc will reload.
Select a disc:
cPress the slot number (1 - 6) for the desired
disc, then press the
button. The com-
pact disc will be ejected. If the disc is not
removed within 15 seconds, the disc will
reload.All discs:
cPress and hold the
button for more
than 1.5 seconds. The compact discs will be
ejected one by one. If a disc is not removed
within 15 seconds, or the
button is
pressed again during the eject sequence,
the entire disc eject sequence will be can-
celed.
When this button is pushed while the compact
disc is being played, the compact disc will eject
and the system will turn off.
CD IN indicator:
The slot numbers (1 - 6) will illuminate if CDs
have been loaded into the changer.
Display screen, heater, air conditioner, audio and phone systems4-31
ZREVIEW COPYÐ2006 Maxima(max)
Owners ManualÐUSA_English(nna)
06/22/05Ðtbrooks
X
Page 299 of 312
10 Index
A
Active head restraint...............1-9
Air bag
(See supplemental restraint
system).....................1-35
Air bag system
Front (See supplemental front impact
air bag system)...............1-42
Air bag warning light...........1-50, 2-12
Air cleaner housing filter............8-16
Air conditioner
Air conditioner service...........4-20
Air conditioner specification label.....9-11
Air conditioner system refrigerant and oil
recommendations..............9-6
Servicing air conditioner..........4-20
Alarm system (See vehicle security system). .2-15
Anchor point locations.............1-27
Antenna.....................4-33
Anti-lock brake system (ABS).........5-18
Anti-lock brake warning light..........2-10
Armrests.....................1-7
Audible reminders................2-15
Audio system..................4-20
AM-FM radio with cassette player.....4-28
Cassette player...............4-28
Compact Disc (CD) changer.......4-30
Compact disc (CD) player.........4-29
FM-AM-SAT radio with cassette player
and compact disc (CD) changer......4-24FM-AM-SAT radio with cassette player
and compact disc (CD) player.......4-24
Radio....................4-20
Steering wheel audio control switch. . . .4-33
Autolight switch.................2-22
Automatic
Automatic drive positioner.........3-19
Automatic power window switch.....2-38
Driving with automatic transmission.....5-7
Transmission selector lever lock
release....................5-10
B
Battery......................8-13
Charge warning light............2-11
Before starting the engine............5-6
Belts (See drive belts).............8-15
BluetoothThands-free phone system.....4-35
Booster seats..................1-31
Brake
Anti-lock brake system (ABS).......5-18
Brake booster................8-22
Brake fluid..................8-12
Brake light (See stop light).........8-28
Brake pedal.................8-21
Brake system................5-17
Brake warning light.............2-11
Brake wear indicators........2-15, 8-22
Parking brake check............8-21
Parking brake operation..........5-12Self-adjusting brakes............8-22
Break-in schedule................5-14
Brightness control
Instrument panel..............2-24
Brightness/Contrast button........4-6, 4-16
Control panel buttons.........4-6, 4-16
Bulb check/instrument panel..........2-10
Bulb replacement................8-28
C
Capacities and recommended
fuel/lubricants...................9-2
Car phone or CB radio.............4-34
Cargo (See vehicle loading information) . . .9-12
Cassette player (See audio system)......4-28
CD care and cleaning.............4-32
CD changer (See audio system)........4-30
CD player (See audio system).........4-29
Child restraint with top tether strap......1-26
Child restraints.......1-12, 1-13, 1-18, 1-25
Precautions on child restraints . . .1-18, 1-31
Top tether strap anchor point locations . .1-27
Child safety rear door lock............3-5
Chimes, audible reminders...........2-15
Cigarette lighter.................2-30
Cleaning exterior and interior..........7-2
Clock
(models with navigation system)......4-14
(models without navigation system).....4-4
ZREVIEW COPYÐ2006 Maxima(max)
Owners ManualÐUSA_English(nna)
06/23/05Ðtbrooks
X
Page 301 of 312
Fuel octane rating..............9-4
Fuel recommendation............9-3
Fuel-filler door and cap...........3-11
Fuel-filler door lock opener lever......3-11
FUEL ECON button............4-4, 4-9
Fuel Econ button
Control panel buttons..........4-4, 4-9
Fuses......................8-22
Fusible links...................8-24
G
Garage door opener, HomeLinkTUniversal
Transceiver...................2-44
Gascap.....................3-11
Gauge
Engine coolant temperature gauge.....2-5
Fuel gauge..................2-6
Odometer...................2-4
Speedometer.................2-4
Tachometer..................2-5
Trip odometer.................2-4
General maintenance..............8-2
Glove box....................2-33
Glove box lock.................2-33
Grocery hooks.................2-36
H
Hazard warning flasher switch.........2-25
Head restraints..................1-8
Active head restraint.............1-9
Headlight and turn signal switch........2-20
Headlight control switch............2-21Heated seats..................2-26
Heated steering wheel.............2-27
Heater
Heater operation..............4-19
HomeLinkTUniversal Transceiver.......2-44
Hood release...................3-9
Horn.......................2-26
I
Ignition switch..................5-4
Immobilizer system..........2-17, 3-2, 5-5
Important vehicle information label.......9-10
In-cabin microfilter...............8-17
Increasing fuel economy............5-15
Indicator lights and audible reminders
(See warning/indicator lights and audible
reminders)....................2-10
Instrument brightness control.........2-24
Instrument panel..............0-6, 2-2
Interior light...................2-42
Interior trunk lid release.............3-11
ISOFIX child restraints.............1-25
J
Jump starting...................6-6
K
Key ........................3-2
Keyfob battery replacement..........8-26Keyless entry system
(See remote keyless entry system).......3-5
L
Labels
Air conditioner specification label.....9-11
C.M.V.S.S. certification label........9-10
Emission control information label.....9-10
Engine serial number............9-10
F.M.V.S.S. certification label........9-10
Vehicle identification number (VIN) plate . .9-9
Warning labels (for SRS)..........1-49
LATCH (Lower Anchors and Tethers for CHildren)
System......................1-25
License plate
Installing the license plate.........9-12
Light
Air bag warning light.........1-50, 2-12
Brake light (See stop light).........8-28
Bulb check/instrument panel........2-10
Bulb replacement..............8-28
Charge warning light............2-11
Cornering light...............2-25
Fog light switch...............2-24
Headlight and turn signal switch......2-20
Headlight control switch..........2-21
Interior light.................2-42
Light bulbs..................8-27
Low washer fluid warning light.......2-12
Passenger air bag and status light.....1-44
Personal lights...............2-43
Trunk light..................2-44
Warning/indicator lights and audible
reminders..................2-10
10-3
ZREVIEW COPYÐ2006 Maxima(max)
Owners ManualÐUSA_English(nna)
06/23/05Ðtbrooks
X
Page 303 of 312
Recorders
Event data..................9-23
Refrigerant recommendation..........9-6
Registering your vehicle in another country. . .9-9
Remote keyless entry system..........3-5
Reporting safety defects (US only)......9-21
S
Safety
Child safety rear door lock..........3-5
Child seat belts...........1-18, 1-31
Reporting safety defects (US only). . . .9-21
Seat adjustment
Front manual seat adjustment........1-2
Front power seat adjustment........1-4
Seat belt
Child safety.................1-12
Infants and small children.........1-13
Injured Person................1-14
Larger children...............1-13
Precautions on seat belt usage......1-10
Pregnant women..............1-14
Seat belt extenders.............1-17
Seat belt maintenance...........1-17
Seat belts..................1-10
Shoulder belt height adjustment......1-16
Three-point type with retractor.......1-14
Seat belt warning light.............2-12
Seatback pockets................2-31
Seats
Adjustment..................1-2
Automatic drive positioner.........3-19
Front seats..................1-2
Heated seats................2-26Manual front seat adjustment........1-2
Rear seat...................1-6
Security system (NISSAN vehicle immobilizer
system) , engine start.........2-17, 3-2, 5-5
Self-adjusting brakes..............8-22
Service manual order form...........9-23
Servicing air conditioner............4-20
Setting button
SETTING button............4-5, 4-11
Shift lock release................5-10
Shifting
Automatic transmission...........5-8
Manual transmission............5-11
Shoulder belt height adjustment........1-16
Spark plug replacement............8-16
Speedometer...................2-4
SRS warning label...............1-49
Starting
Before starting the engine..........5-6
Jump starting.................6-6
Precautions when starting and driving . . .5-2
Push starting.................6-8
Starting the engine..............5-6
Startup Screen
Control panel buttons............4-8
Startup screen display..............4-8
Steering
Heated steering wheel...........2-27
Power steering fluid.............8-11
Power steering system...........5-17
Steering wheel audio control switch......4-33
Stop light....................8-28
Storage.....................2-31
Sun visors....................3-15
Sunglasses case................2-31
Sunglasses holder...............2-31Sunroof.....................2-39
Supplemental air bag warning light . . .1-50, 2-12
Supplemental front impact air bag system . .1-42
Supplemental restraint system
Information and warning labels.......1-49
Precautions on supplemental restraint
system....................1-35
Supplemental restraint system
(Supplemental air bag system).........1-35
Switch
Autolight switch...............2-22
Automatic power window switch.....2-38
Fog light switch...............2-24
Hazard warning flasher switch.......2-25
Headlight and turn signal switch......2-20
Headlight control switch..........2-21
Ignition switch................5-4
Power door lock switch...........3-4
Rear window and outside mirror defroster
switch....................2-20
Traction control system (TCS) off
switch....................2-28
Turn signal switch..............2-24
Vehicle dynamic control (VDC) off
switch....................2-28
Windshield wiper and washer switch . . .2-19
T
Tachometer....................2-5
Temperature gauge
Engine coolant temperature gauge.....2-5
Theft (NISSAN vehicle immobilizer system) ,
engine start..............2-17, 3-2, 5-5
Three-way catalyst................5-2
10-5
ZREVIEW COPYÐ2006 Maxima(max)
Owners ManualÐUSA_English(nna)
06/23/05Ðtbrooks
X