heating NISSAN MAXIMA 2010 Owner´s Manual
[x] Cancel search | Manufacturer: NISSAN, Model Year: 2010, Model line: MAXIMA, Model: NISSAN MAXIMA 2010Pages: 457, PDF Size: 4.66 MB
Page 156 of 457
WARNING
cObjects viewed in the outside mirror on
the passenger side are closer than they
appear. Be careful when moving to the
right. Using only this mirror could cause
an accident. Use the inside mirror or
glance over your shoulder to properly
judge distances to other objects.
cDo not adjust the mirrors while driving.
You could lose control of your vehicle
and cause an accident.
Automatic anti-glare outside mirrors (if
so equipped)
The driver’s outside mirror will automatically dim
during nighttime conditions to reduce the glare
from the headlights of trailing vehicles. The auto-
matic anti-glare feature operates only when the
ignition switch is placed in the ON position.
The automatic anti-glare feature will be on when
starting the vehicle. The indicator light on the
automatic anti-glare rearview mirror will illuminate
when the automatic anti-glare feature is on.
To turn off the automatic anti-glare feature, press:
cthe O button on rearview mirror without
compass (Type B) .cthe
button on rearview mirror with
compass (Type C) .
The indicator light will turn off.
To turn on the automatic anti-glare feature again,
press:
cthe | button on rearview mirror without
compass (Type B) .
cthe
button on rearview mirror
equipped with compass (Type C) .
The indicator light will turn on.
For information on the automatic anti-glare rear-
view mirror, see “Automatic anti-glare rearview
mirror” in this section.
Reverse tilt-down feature (if so
equipped)
The reverse tilt-down feature will turn both out-
side mirror surfaces downward to provide better
rear visibility close to the vehicle when the small
switch is in either the L or R position.
NOTE:
If the outside mirror control switch is in the
neutral position, neither mirror will turn
downward when the shift selector is moved
to R (Reverse) .Move the shift selector to R (Reverse) . Both
mirrors will turn downward.
The mirror surfaces will return to their original
position when any of the following have occurred:
cThe shift selector is moved to any position
other than R (Reverse) .
cThe outside mirror control switch is set to the
neutral or center position.
cThe ignition switch is placed in the OFF
position.
Heated mirrors (if so equipped)
The electric control type outside mirrors (if so
equipped) can be heated to defrost, defog, or
de-ice for improved visibility. Push the rear win-
dow defogger switch to activate the heating
function. Push the switch again to deactivate, or
the heating function will automatically turn off
after approximately 15 minutes.
3-28Pre-driving checks and adjustments
Page 164 of 457
WARNING
cPositioning of the heating or air condi-
tioning controls and display controls
should not be done while driving in or-
der that full attention may be given to
the driving operation.
cDo not disassemble or modify this sys-
tem. If you do, it may result in accidents,
fire, or electrical shock.
cDo not use this system if you notice any
abnormality, such as a frozen screen or
lack of sound. Continued use of the
system may result in accident, fire or
electric shock.
cIn case you notice any foreign object in
the system hardware, spill liquid on it,
or notice smoke or smell coming from
it, stop using the system immediately
and contact your nearest NISSAN
dealer. Ignoring such conditions may
lead to accidents, fire or electrical
shock.
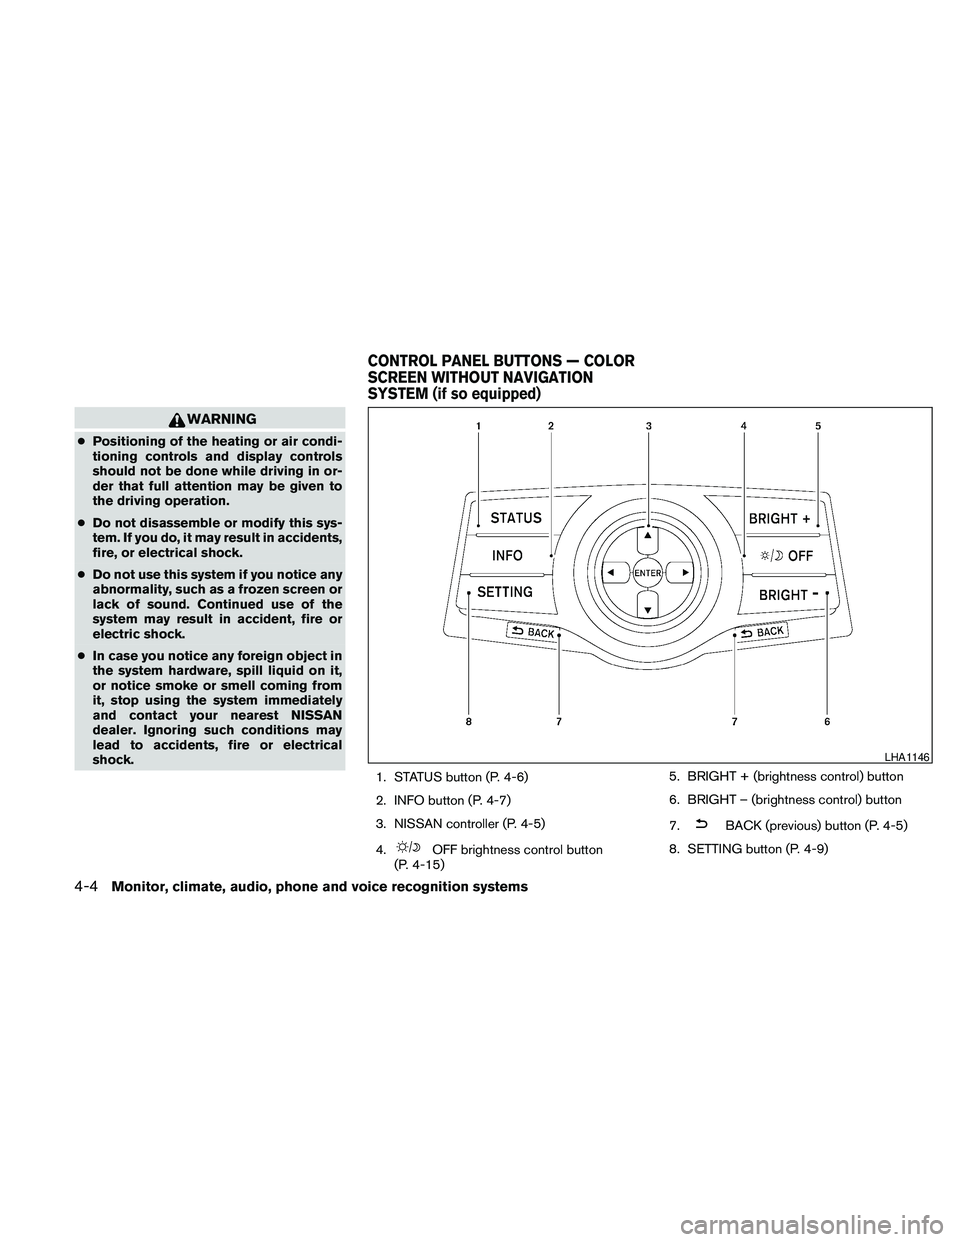
1. STATUS button (P. 4-6)
2. INFO button (P. 4-7)
3. NISSAN controller (P. 4-5)
4.
OFF brightness control button
(P. 4-15)5. BRIGHT + (brightness control) button
6. BRIGHT – (brightness control) button
7.
BACK (previous) button (P. 4-5)
8. SETTING button (P. 4-9)
LHA1146
CONTROL PANEL BUTTONS — COLOR
SCREEN WITHOUT NAVIGATION
SYSTEM (if so equipped)
4-4Monitor, climate, audio, phone and voice recognition systems
Page 201 of 457
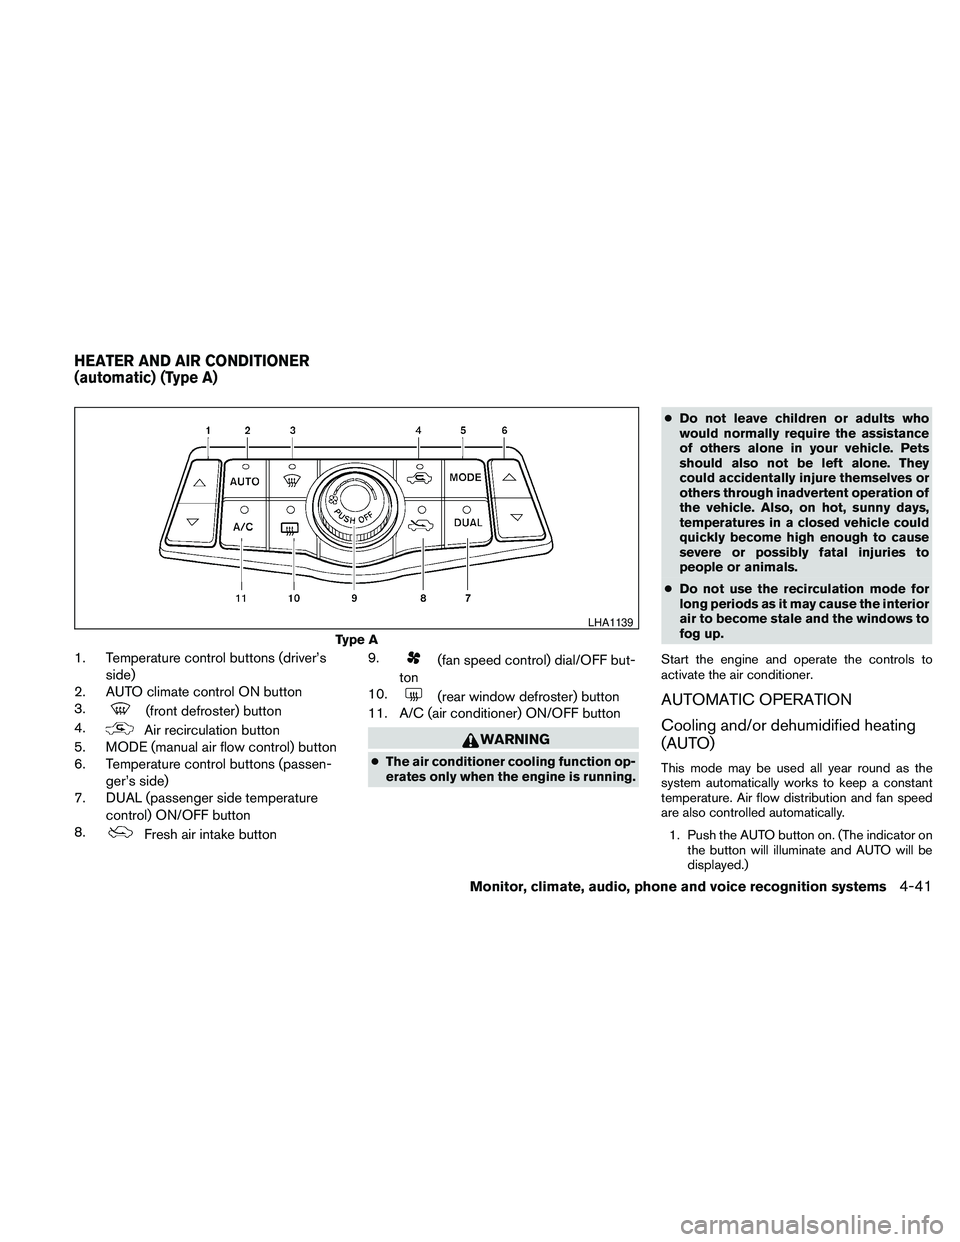
1. Temperature control buttons (driver’s
side)
2. AUTO climate control ON button
3.
(front defroster) button
4.
Air recirculation button
5. MODE (manual air flow control) button
6. Temperature control buttons (passen-
ger’s side)
7. DUAL (passenger side temperature
control) ON/OFF button
8.
Fresh air intake button9.
(fan speed control) dial/OFF but-
ton
10.
(rear window defroster) button
11. A/C (air conditioner) ON/OFF button
WARNING
cThe air conditioner cooling function op-
erates only when the engine is running.cDo not leave children or adults who
would normally require the assistance
of others alone in your vehicle. Pets
should also not be left alone. They
could accidentally injure themselves or
others through inadvertent operation of
the vehicle. Also, on hot, sunny days,
temperatures in a closed vehicle could
quickly become high enough to cause
severe or possibly fatal injuries to
people or animals.
cDo not use the recirculation mode for
long periods as it may cause the interior
air to become stale and the windows to
fog up.
Start the engine and operate the controls to
activate the air conditioner.
AUTOMATIC OPERATION
Cooling and/or dehumidified heating
(AUTO)
This mode may be used all year round as the
system automatically works to keep a constant
temperature. Air flow distribution and fan speed
are also controlled automatically.
1. Push the AUTO button on. (The indicator on
the button will illuminate and AUTO will be
displayed.)
Type A
LHA1139
HEATER AND AIR CONDITIONER
(automatic) (Type A)
Monitor, climate, audio, phone and voice recognition systems4-41
Page 202 of 457
2. Operate the driver’s side temperature con-
trol buttons.
cAdjust the temperature display to about
75°F (24°C) for normal operation.
cThe temperature of the passenger compart-
ment will be maintained automatically. Air
flow distribution and fan speed are also con-
trolled automatically.
cA visible mist may be seen coming from the
ventilators in hot, humid conditions as the air
is cooled rapidly. This does not indicate a
malfunction.
3. You can individually set driver’s and front
passenger’s side temperature using each
temperature control button. When the DUAL
button or passenger’s side temperature but-
ton is pressed, the DUAL indicator will come
on. To turn off the passenger’s side tempera-
ture control, push the DUAL button.
Heating (A/C OFF)
The air conditioner does not activate. When you
need to heat only, use this mode.
1. Push the A/C button. (A/C OFF will be dis-
played and A/C indicator will turn off.)
2. Operate the temperature control buttons to
set the desired temperature.cThe temperature of the passenger compart-
ment will be maintained automatically. Air
flow distribution and fan speed are also con-
trolled automatically.
cDo not set the temperature lower than the
outside air temperature. Otherwise the sys-
tem may not work properly.
cNot recommended if windows fog up.
Dehumidified defrosting or defogging
1. Push thefront defroster button on.
(The indicator light on the button will come
on.)
2. Operate the temperature control buttons to
set the desired temperature.
cTo quickly remove ice from the outside of the
windows, use the fan speed control dial to
set the fan speed to maximum.
cAs soon as possible after the windshield is
clean, push the AUTO button to return to the
automatic mode.cWhen the
front defroster button is
pushed, the air conditioner will automatically
be turned on at outside temperatures above
36°F (2°C) . The air recirculate mode auto-
matically turns off, allowing outside air to be
drawn into the passenger compartment to
further improve the defogging performance.
MANUAL OPERATION
Fan speed control
Turn thefan speed control dial to manually
control the fan speed.
Push the AUTO button to return to automatic
control of the fan speed.
Air recirculation
Push theair recirculation button to recir-
culate interior air inside the vehicle. The
indicator light on the button will come on.
The air recirculation cannot be activated when
the air conditioner is in the
front defrosting
mode or the
front defrosting and foot out-
let mode.
4-42Monitor, climate, audio, phone and voice recognition systems
Page 204 of 457
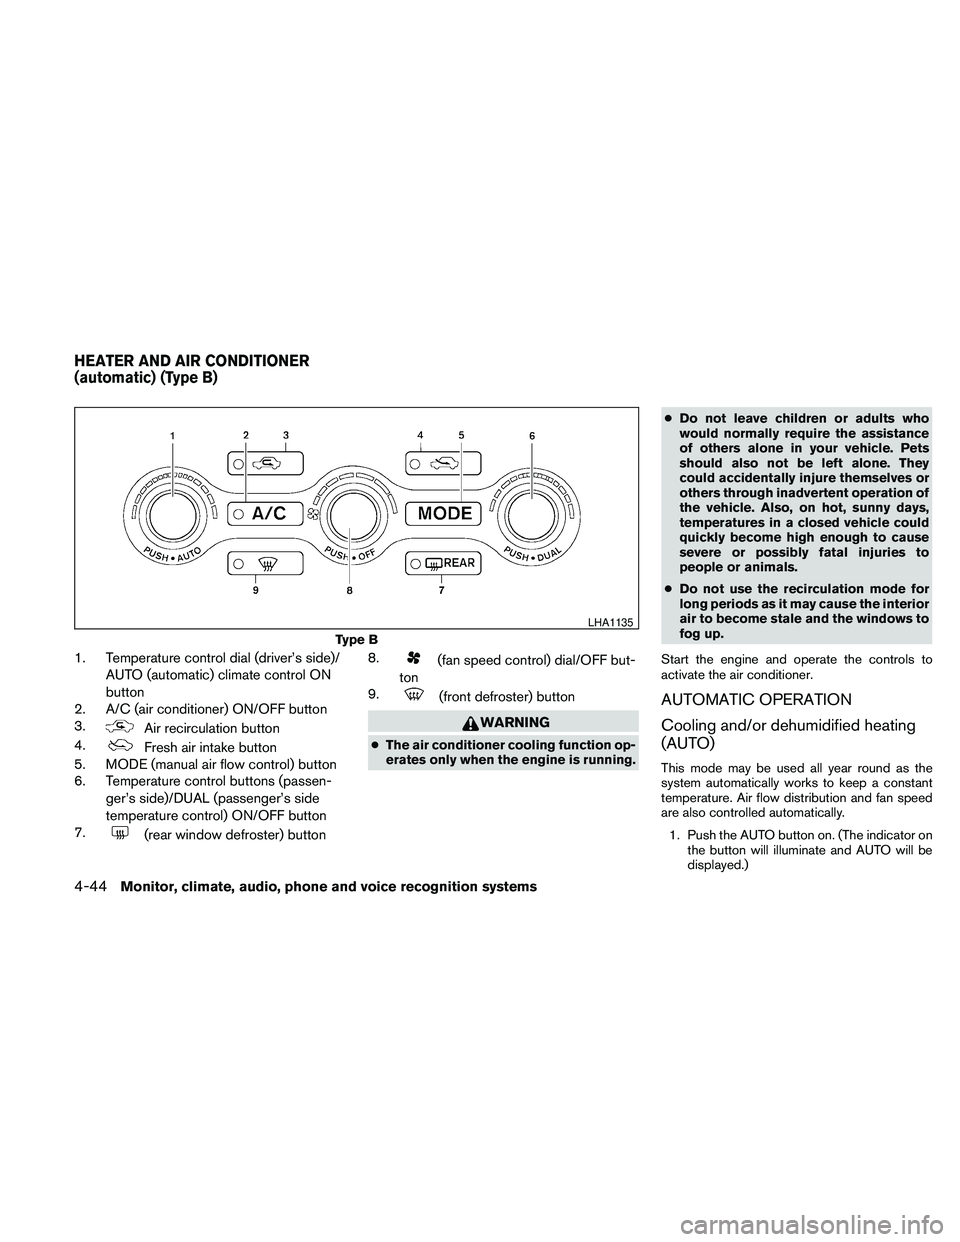
1. Temperature control dial (driver’s side)/
AUTO (automatic) climate control ON
button
2. A/C (air conditioner) ON/OFF button
3.
Air recirculation button
4.
Fresh air intake button
5. MODE (manual air flow control) button
6. Temperature control buttons (passen-
ger’s side)/DUAL (passenger’s side
temperature control) ON/OFF button
7.
(rear window defroster) button8.
(fan speed control) dial/OFF but-
ton
9.
(front defroster) button
WARNING
cThe air conditioner cooling function op-
erates only when the engine is running.cDo not leave children or adults who
would normally require the assistance
of others alone in your vehicle. Pets
should also not be left alone. They
could accidentally injure themselves or
others through inadvertent operation of
the vehicle. Also, on hot, sunny days,
temperatures in a closed vehicle could
quickly become high enough to cause
severe or possibly fatal injuries to
people or animals.
cDo not use the recirculation mode for
long periods as it may cause the interior
air to become stale and the windows to
fog up.
Start the engine and operate the controls to
activate the air conditioner.
AUTOMATIC OPERATION
Cooling and/or dehumidified heating
(AUTO)
This mode may be used all year round as the
system automatically works to keep a constant
temperature. Air flow distribution and fan speed
are also controlled automatically.
1. Push the AUTO button on. (The indicator on
the button will illuminate and AUTO will be
displayed.)
Type B
LHA1135
HEATER AND AIR CONDITIONER
(automatic) (Type B)
4-44Monitor, climate, audio, phone and voice recognition systems
Page 205 of 457
2. Turn the temperature control dial to the left
or right to set the desired temperature.
cAdjust the temperature display to about
75°F (24°C) for normal operation.
cThe temperature of the passenger compart-
ment will be maintained automatically. Air
flow distribution and fan speed are also con-
trolled automatically.
cA visible mist may be seen coming from the
vents in hot, humid conditions as the air is
cooled rapidly. This does not indicate a mal-
function.
3. You can individually set driver’s and front
passenger’s side temperature using each
temperature control dial. When the DUAL
button or passenger’s side temperature dial
is turned, the DUAL indicator will come on.
To turn off the passenger’s side temperature
control, push the DUAL button.
Heating (A/C OFF)
The air conditioner does not activate. When you
need to heat only, use this mode.
1. Push the A/C button. (A/C OFF will be dis-
played and A/C indicator will turn off.)
2. Turn the temperature control dial to set the
desired temperature.cThe temperature of the passenger compart-
ment will be maintained automatically. Air
flow distribution and fan speed are also con-
trolled automatically.
cDo not set the temperature lower than the
outside air temperature. Otherwise the sys-
tem may not work properly.
cNot recommended if windows fog up.
Dehumidified defrosting or defogging
1. Push thefront defroster button on.
(The indicator light on the button will come
on.)
2. Turn the temperature control dial to set the
desired temperature.
cTo quickly remove ice from the outside of the
windows, use the fan speed control dial to
set the fan speed to maximum.
cAs soon as possible after the windshield is
clean, push the AUTO button to return to the
automatic mode.cWhen the
front defroster button is
pushed, the air conditioner will automatically
be turned on at outside temperatures above
36°F (2°C) . The air recirculate mode auto-
matically turns off, allowing outside air to be
drawn into the passenger compartment to
further improve the defogging performance.
MANUAL OPERATION
Fan speed control
Turn thefan speed control dial to manually
control the fan speed.
Push the AUTO button to return to automatic
control of the fan speed.
Air recirculation
Push theair recirculation button to recir-
culate interior air inside the vehicle. The
indicator light on the button will come on.
The air recirculation cannot be activated when
the air conditioner is in the
front defrosting
mode or the
front defrosting and foot out-
let mode.
Monitor, climate, audio, phone and voice recognition systems4-45
Page 350 of 457
The power assisted steering uses a hydraulic
pump, driven by the engine, to assist steering.
If the engine stops or the drive belt breaks, you
will still have control of the vehicle. However,
much greater steering effort is needed, especially
in sharp turns and at low speeds.
WARNING
If the engine is not running or is turned off
while driving, the power assist for the
steering will not work. Steering will be
harder to operate.The brake system has two separate hydraulic
circuits. If one circuit malfunctions, you will still
have braking at 2 wheels.
BRAKE PRECAUTIONS
Vacuum assisted brakes
The brake booster aids braking by using engine
vacuum. If the engine stops, you can stop the
vehicle by depressing the brake pedal. However,
greater foot pressure on the brake pedal will be
required to stop the vehicle and stopping dis-
tance will be longer.
Using the brakes
Avoid resting your foot on the brake pedal while
driving. This will overheat the brakes, wear out the
brake pads faster, and reduce gas mileage.
To help reduce brake wear and to prevent the
brakes from overheating, reduce speed and
downshift to a lower gear before going down a
slope or long grade. Overheated brakes may
reduce braking performance and could result in
loss of vehicle control.
WARNING
cWhile driving on a slippery surface, be
careful when braking, accelerating or
downshifting. Abrupt braking or accel-
erating could cause the wheels to skid
and result in an accident.
cIf the engine is not running or is turned
off while driving, the power assist for
the brakes will not work. Braking will be
harder.
Wet brakes
When the vehicle is washed or driven through
water, the brakes may get wet. As a result, your
braking distance will be longer and the vehicle
may pull to one side during braking.
To dry the brakes, drive the vehicle at a safe
speed while lightly pressing the brake pedal to
heat up the brakes. Do this until the brakes return
to normal. Avoid driving the vehicle at high
speeds until the brakes function correctly.
Parking brake break-in
Break-in the parking brake shoes whenever the
stopping effect of the parking brake is weakened
or whenever the parking brake shoes and/or
drum/rotors are replaced, in order to assure the
best brake performance.
POWER STEERING BRAKE SYSTEM
5-22Starting and driving
Page 366 of 457
CAUTION
cCVT models cannot be push-started or
tow-started. Attempting to do so may
cause transmission damage.
cDo not push start this vehicle. The
three-way catalyst may be damaged.If your vehicle is overheating (indicated by an
extremely high temperature gauge reading) or if
you feel a lack of engine power, detect abnormal
noise, etc., take the following steps.
WARNING
cDo not continue to drive if your vehicle
overheats. Doing so could cause engine
damage or a vehicle fire.
c
To avoid the danger of being scalded,
never remove the radiator cap while the
engine is still hot. When the radiator cap
is removed, pressurized hot water will
spurt out, possibly causing serious injury.
cDo not open the hood if steam is com-
ing out.
1. Move the vehicle safely off the road, apply
the parking brake and move the shift selector
to P (Park) .
Do not stop the engine.
2. Turn off the air conditioner. Open all the
windows, move the heater or air conditioner
temperature control to maximum hot and fan
control to high speed.
3. Get out of the vehicle. Look and listen for
steam or coolant escaping from the radiator
before opening the hood. (If steam or cool-ant is escaping, turn off the engine.) Do not
open the hood further until no steam or
coolant can be seen.
4. Open the engine hood.
WARNING
If steam or water is coming from the en-
gine, stand clear to prevent getting
burned.
5.
Visually check drive belts for damage or
looseness. Also check if the cooling fan is
running. The radiator hoses and radiator
should not leak water. If coolant is leaking, the
water pump belt is missing or loose, or the
cooling fan does not run, stop the engine.
WARNING
Be careful not to allow your hands, hair,
jewelry or clothing to come into contact
with, or get caught in, engine belts or the
engine cooling fan. The engine cooling
fan can start at any time.
6. After the engine cools down, check the cool-
ant level in the engine coolant reservoir tank
with the engine running. Add coolant to the
engine coolant reservoir tank if necessary.
Have your vehicle repaired at a NISSAN
dealer.
PUSH STARTING IF YOUR VEHICLE OVERHEATS
6-10In case of emergency
Page 424 of 457
If any driveability problems such as engine stall-
ing and difficult hot-starting are experienced after
using oxygenate-blend fuels, immediately
change to a non-oxygenate fuel or a fuel with a
low blend of MTBE.
Take care not to spill gasoline during refu-
eling. Gasoline containing oxygenates can
cause paint damage.
E–85 fuel
E-85 fuel is a mixture of approximately 85% fuel
ethanol and 15% unleaded gasoline. E-85 can
only be used in a Flexible Fuel Vehicle (FFV) . Do
not use E-85 in your vehicle. U.S. government
regulations require fuel ethanol dispensing
pumps to be identified by a small, square, orange
and black label with the common abbreviation or
the appropriate percentage for that region.
Aftermarket fuel additives
NISSAN does not recommend the use of any
aftermarket fuel additives (for example, fuel injec-
tor cleaner, octane booster, intake valve deposit
removers, etc.) which are sold commercially.
Many of these additives intended for gum, varnish
or deposit removal may contain active solvents or
similar ingredients that can be harmful to the fuel
system and engine.
Octane rating tips
Using unleaded gasoline with an octane
rating lower than recommended can cause
persistent, heavy “spark knock.” (“Spark
knock” is a metallic rapping noise.) If se-
vere, this can lead to engine damage. If you
detect a persistent heavy spark knock even
when using gasoline of the stated octane
rating, or if you hear steady spark knock
while holding a steady speed on level
roads, have a NISSAN dealer correct the
condition. Failure to correct the condition
is misuse of the vehicle, for which NISSAN
is not responsible.
Incorrect ignition timing may result in spark
knock, after-run and/or overheating, which may
cause excessive fuel consumption or engine
damage. If any of the above symptoms are en-
countered, have your vehicle checked at a
NISSAN dealer.
However, now and then you may notice
light spark knock for a short time while
accelerating or driving up hills. This is not a
cause for concern, because you get the
greatest fuel benefit when there is light
spark knock for a short time under heavy
engine load.
CAUTION
cYour vehicle is not designed to run on
E-85 fuel. Using E-85 fuel in a vehicle
not specifically designed for E-85 fuel
can damage fuel system components
and is not covered by the NISSAN new
vehicle limited warranty.
cE-85 is a mixture of approximately 85%
fuel ethanol and 15% unleaded
gasoline.
cU.S. government regulations require
ethanol dispensing pumps to be identi-
fied by a small, square, orange and
black label with the common abbrevia-
tion or the appropriate percentage for
that region.
9-4Technical and consumer information
Page 437 of 457
Temperature conditions also can affect towing.
For example, towing a heavy trailer in high outside
temperatures on graded roads can affect engine
performance and cause overheating. The trans-
mission high fluid temperature protection mode,
which helps reduce the chance of transmission
damage, could activate and automatically de-
crease engine power. Under some conditions,
engine and vehicle speed could be reduced. Plan
your trip carefully to account for trailer and vehicle
load, weather, and road conditions.
WARNING
Overheating can result in reduced engine
power and lower vehicle speed. Also,
when the high temperature mode oper-
ates, engine and vehicle speed may be
gradually reduced. On highways, the re-
duced speed may be lower than other traf-
fic which could increase the chance of a
collision. Be especially careful when driv-
ing. If the vehicle cannot maintain a safe
driving speed, pull to the side of the road
in a safe area and allow the engine to cool
or the transmission to return to normal
operation. See “If your vehicle overheats”
in the “In case of emergency” section of
this manual.
CAUTION
Vehicle damage resulting from improper
towing procedures is not covered by
NISSAN warranties.
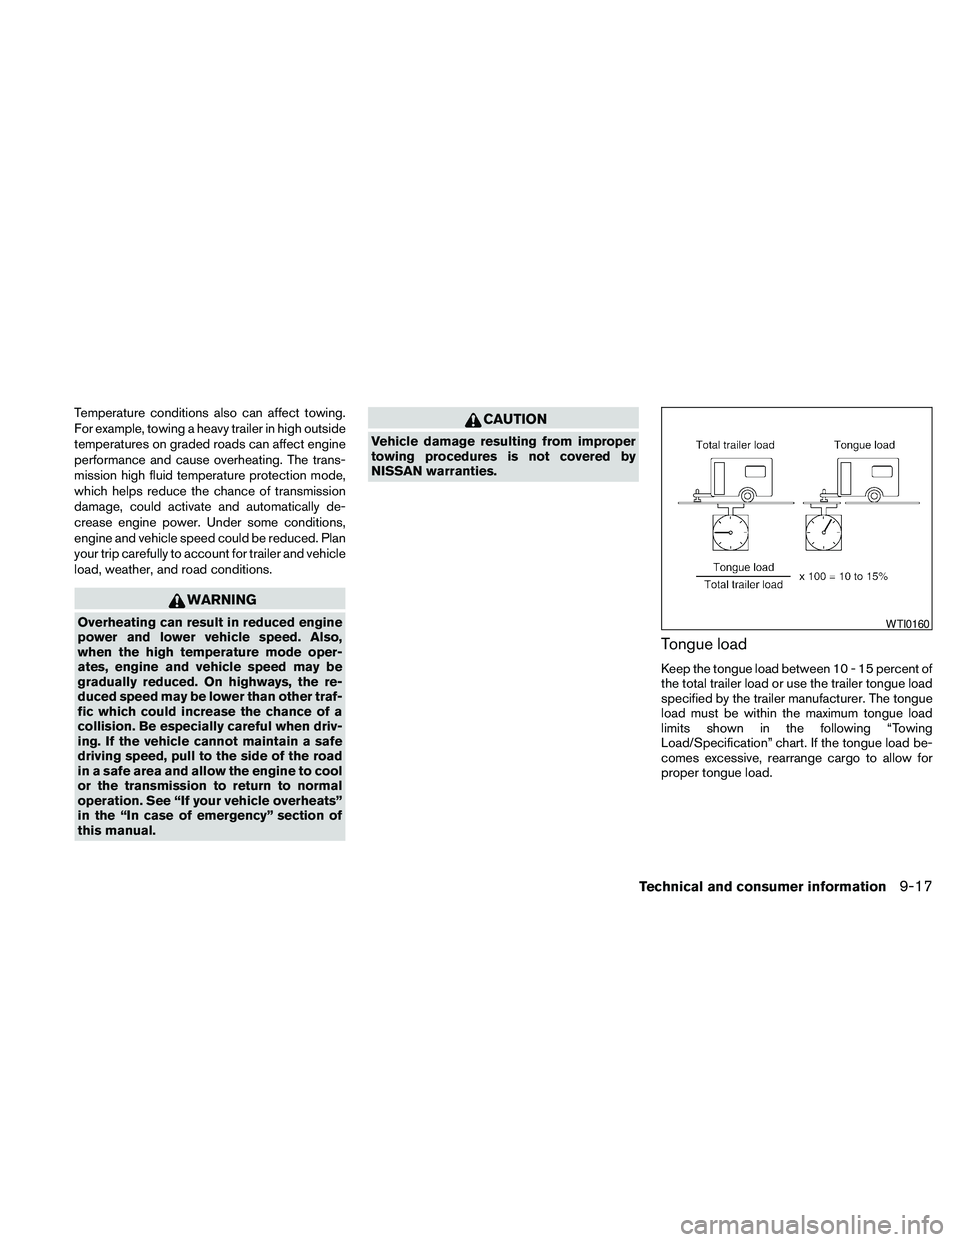
Tongue load
Keep the tongue load between 10 - 15 percent of
the total trailer load or use the trailer tongue load
specified by the trailer manufacturer. The tongue
load must be within the maximum tongue load
limits shown in the following “Towing
Load/Specification” chart. If the tongue load be-
comes excessive, rearrange cargo to allow for
proper tongue load.
WTI0160
Technical and consumer information9-17