parking brake NISSAN MAXIMA 2010 Owner´s Manual
[x] Cancel search | Manufacturer: NISSAN, Model Year: 2010, Model line: MAXIMA, Model: NISSAN MAXIMA 2010Pages: 457, PDF Size: 4.66 MB
Page 82 of 457
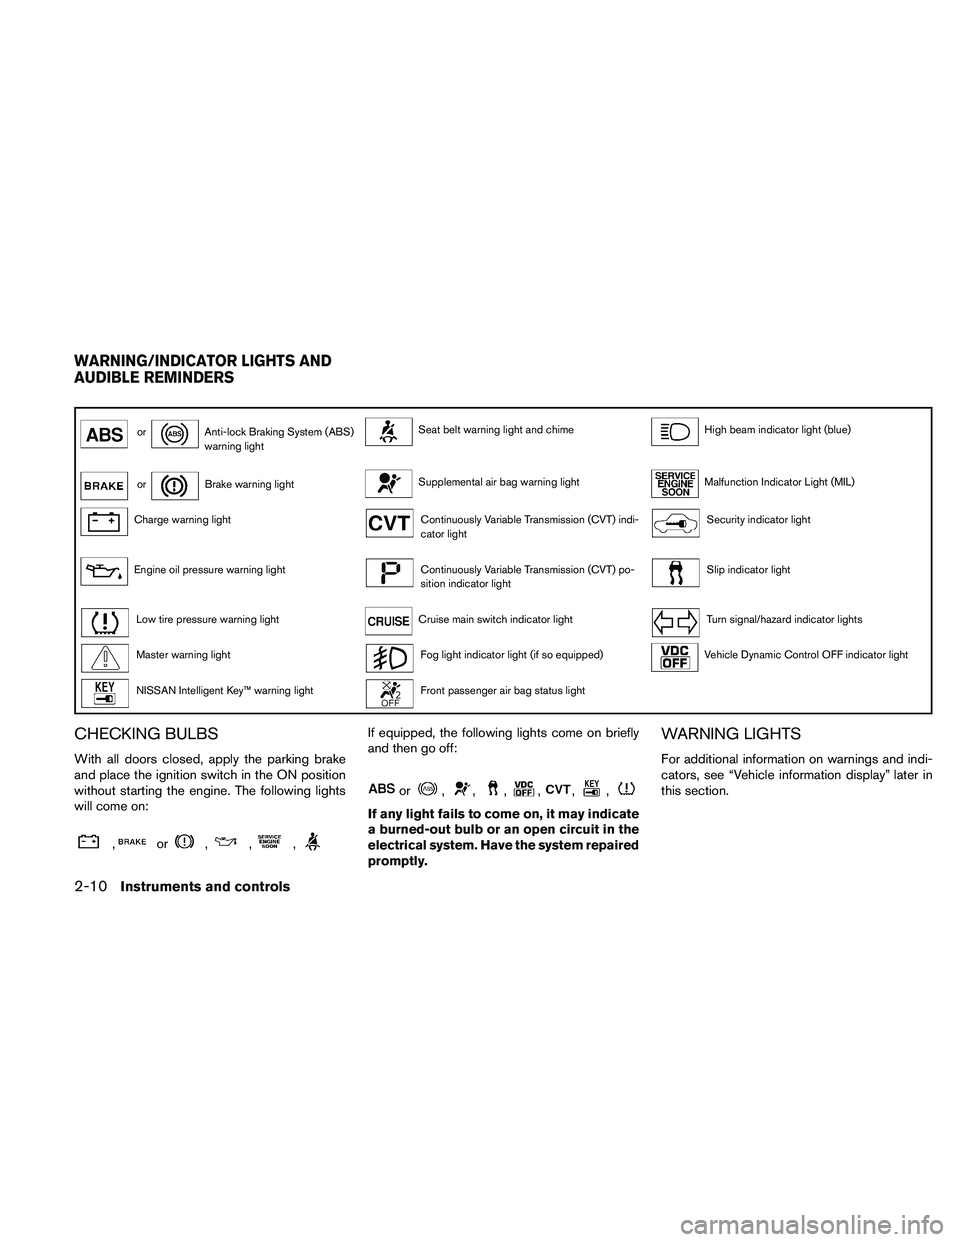
orAnti-lock Braking System (ABS)
warning lightSeat belt warning light and chimeHigh beam indicator light (blue)
orBrake warning lightSupplemental air bag warning lightMalfunction Indicator Light (MIL)
Charge warning lightContinuously Variable Transmission (CVT) indi-
cator lightSecurity indicator light
Engine oil pressure warning lightContinuously Variable Transmission (CVT) po-
sition indicator lightSlip indicator light
Low tire pressure warning lightCruise main switch indicator lightTurn signal/hazard indicator lights
Master warning lightFog light indicator light (if so equipped)Vehicle Dynamic Control OFF indicator light
NISSAN Intelligent Key™ warning lightFront passenger air bag status light
CHECKING BULBS
With all doors closed, apply the parking brake
and place the ignition switch in the ON position
without starting the engine. The following lights
will come on:
,or,,,
If equipped, the following lights come on briefly
and then go off:
or,,,,,,
If any light fails to come on, it may indicate
a burned-out bulb or an open circuit in the
electrical system. Have the system repaired
promptly.
WARNING LIGHTS
For additional information on warnings and indi-
cators, see “Vehicle information display” later in
this section.
WARNING/INDICATOR LIGHTS AND
AUDIBLE REMINDERS
2-10Instruments and controls
Page 83 of 457
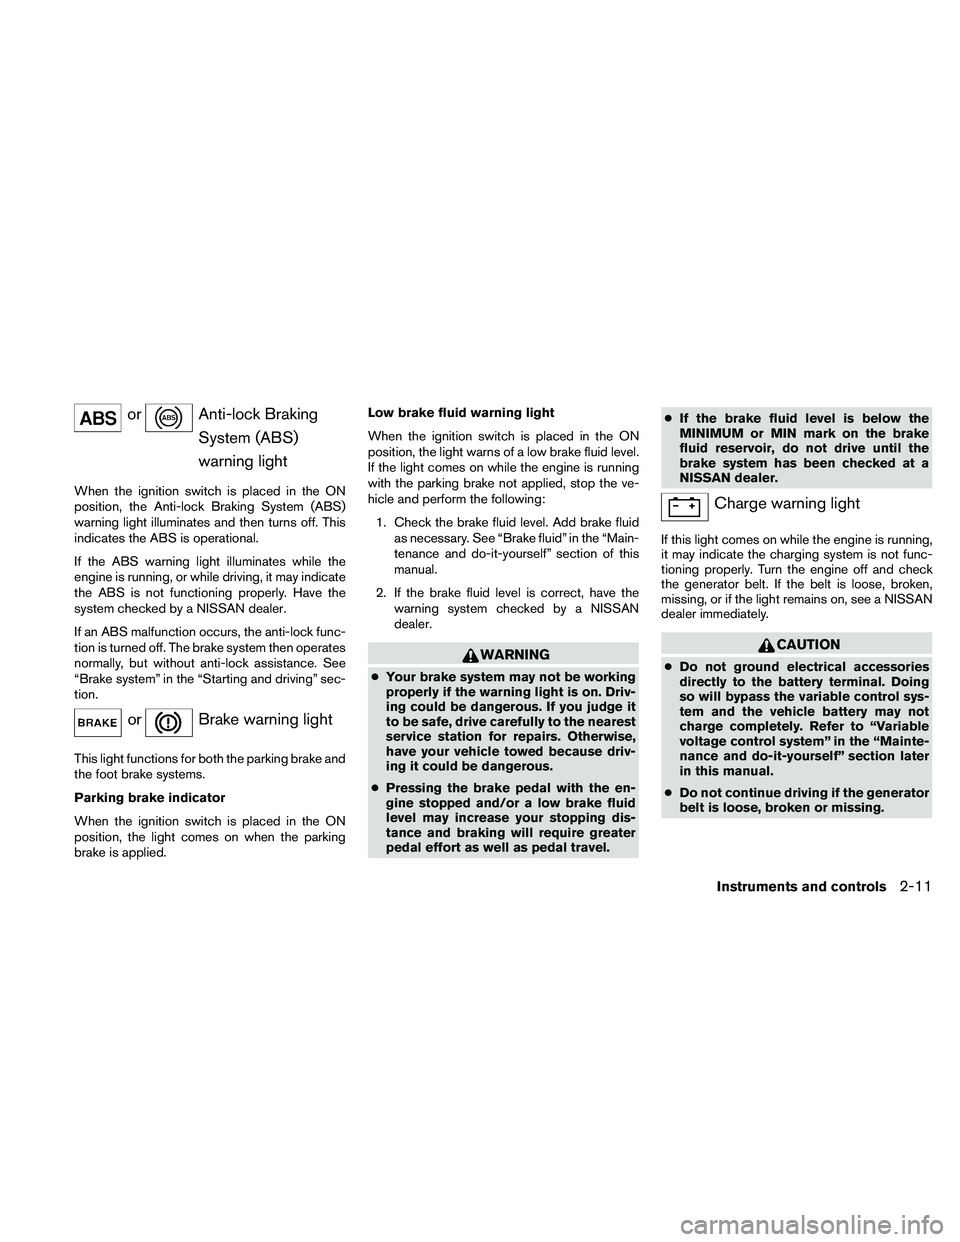
orAnti-lock Braking
System (ABS)
warning light
When the ignition switch is placed in the ON
position, the Anti-lock Braking System (ABS)
warning light illuminates and then turns off. This
indicates the ABS is operational.
If the ABS warning light illuminates while the
engine is running, or while driving, it may indicate
the ABS is not functioning properly. Have the
system checked by a NISSAN dealer.
If an ABS malfunction occurs, the anti-lock func-
tion is turned off. The brake system then operates
normally, but without anti-lock assistance. See
“Brake system” in the “Starting and driving” sec-
tion.
orBrake warning light
This light functions for both the parking brake and
the foot brake systems.
Parking brake indicator
When the ignition switch is placed in the ON
position, the light comes on when the parking
brake is applied.Low brake fluid warning light
When the ignition switch is placed in the ON
position, the light warns of a low brake fluid level.
If the light comes on while the engine is running
with the parking brake not applied, stop the ve-
hicle and perform the following:
1. Check the brake fluid level. Add brake fluid
as necessary. See “Brake fluid” in the “Main-
tenance and do-it-yourself” section of this
manual.
2. If the brake fluid level is correct, have the
warning system checked by a NISSAN
dealer.
WARNING
cYour brake system may not be working
properly if the warning light is on. Driv-
ing could be dangerous. If you judge it
to be safe, drive carefully to the nearest
service station for repairs. Otherwise,
have your vehicle towed because driv-
ing it could be dangerous.
cPressing the brake pedal with the en-
gine stopped and/or a low brake fluid
level may increase your stopping dis-
tance and braking will require greater
pedal effort as well as pedal travel.cIf the brake fluid level is below the
MINIMUM or MIN mark on the brake
fluid reservoir, do not drive until the
brake system has been checked at a
NISSAN dealer.
Charge warning light
If this light comes on while the engine is running,
it may indicate the charging system is not func-
tioning properly. Turn the engine off and check
the generator belt. If the belt is loose, broken,
missing, or if the light remains on, see a NISSAN
dealer immediately.
CAUTION
cDo not ground electrical accessories
directly to the battery terminal. Doing
so will bypass the variable control sys-
tem and the vehicle battery may not
charge completely. Refer to “Variable
voltage control system” in the “Mainte-
nance and do-it-yourself” section later
in this manual.
cDo not continue driving if the generator
belt is loose, broken or missing.
Instruments and controls2-11
Page 94 of 457
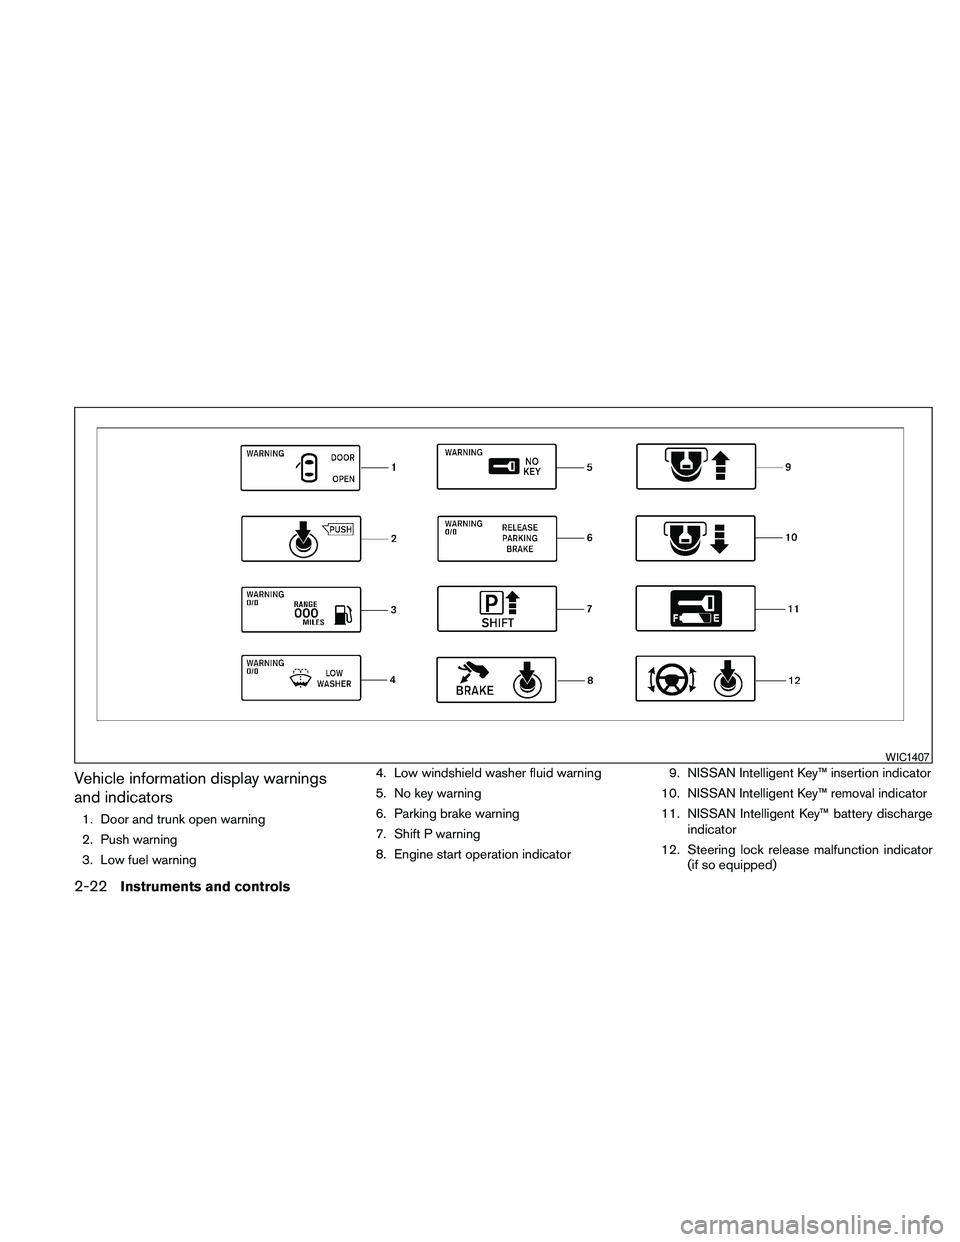
Vehicle information display warnings
and indicators
1. Door and trunk open warning
2. Push warning
3. Low fuel warning4. Low windshield washer fluid warning
5. No key warning
6. Parking brake warning
7. Shift P warning
8. Engine start operation indicator9. NISSAN Intelligent Key™ insertion indicator
10. NISSAN Intelligent Key™ removal indicator
11. NISSAN Intelligent Key™ battery discharge
indicator
12. Steering lock release malfunction indicator
(if so equipped)
WIC1407
2-22Instruments and controls
Page 95 of 457
Door and trunk open warning
This warning illuminates when a door or the trunk
has been opened when the engine is running.
Push warning
After the Shift P warning illuminates, the Push
warning will illuminate if the ignition switch is
placed in the ACC position when the shift selec-
tor is moved to the P (Park) position.
See “Shift P warning” in this section for additional
information.
To turn off the Push warning, place the ignition
switch in the ON position and then to the LOCK
position.
Low fuel warning
This warning illuminates when the fuel level in the
fuel tank is getting low. Refuel as soon as it is
convenient, preferably before the fuel gauge
reaches E (Empty) .There will be a small re-
serve of fuel in the tank when the fuel
gauge needle reaches E (Empty) .
Low windshield washer fluid warning
This warning illuminates when the windshield
washer fluid is at a low level. Add windshield
washer fluid as necessary. See “Window washer
fluid” in the “Maintenance and do-it-yourself”
section of this manual.No key warning
This warning illuminates following two condi-
tions:
1. When the ignition switch is pushed and the
Intelligent Key cannot be recognized by the
system. If this warning illuminates, you can-
not start the engine.
Check for the following causes and perform
the assigned remedies:
– The battery of the Intelligent Key carried
with you is discharged completely. Re-
place the battery with a new one.
– The Intelligent Key carried with you is not
registered to the system. Use the regis-
tered Intelligent Key.
– You do not have an Intelligent Key with
you. Carry an Intelligent Key with you.
2. When the door is closed with the Intelligent
Key left outside the vehicle and the ignition
switch is placed in the ACC or ON position.
A chime will also sound.
Parking brake warning
This warning illuminates when the parking brake
is set and the vehicle is driven.SHIFT P warning
This warning illuminates when the ignition switch
is pushed to stop the engine with the shift selec-
tor in any position except in the P (Park) position.
If this warning illuminates, the ignition switch is in
the OFF position. Move the shift selector to the P
(Park) position or push the ignition switch to the
ON position.
An inside warning chime will also sound.
If the shift selector is moved to the P (Park)
position, the Push warning will appear. Refer to
“Push warning” in this section.
For additional information about Intelligent Key,
see “NISSAN Intelligent Key™” in the “Pre-driving
checks and adjustments” section.
Engine start operation indicator
This indicator illuminates when the ignition switch
is in the LOCK, OFF, ACC or ON position with
the shift selector in the P (Park) position.
This indicator means that the engine will start by
pushing the push-button ignition switch with the
brake pedal depressed.
Instruments and controls2-23
Page 103 of 457
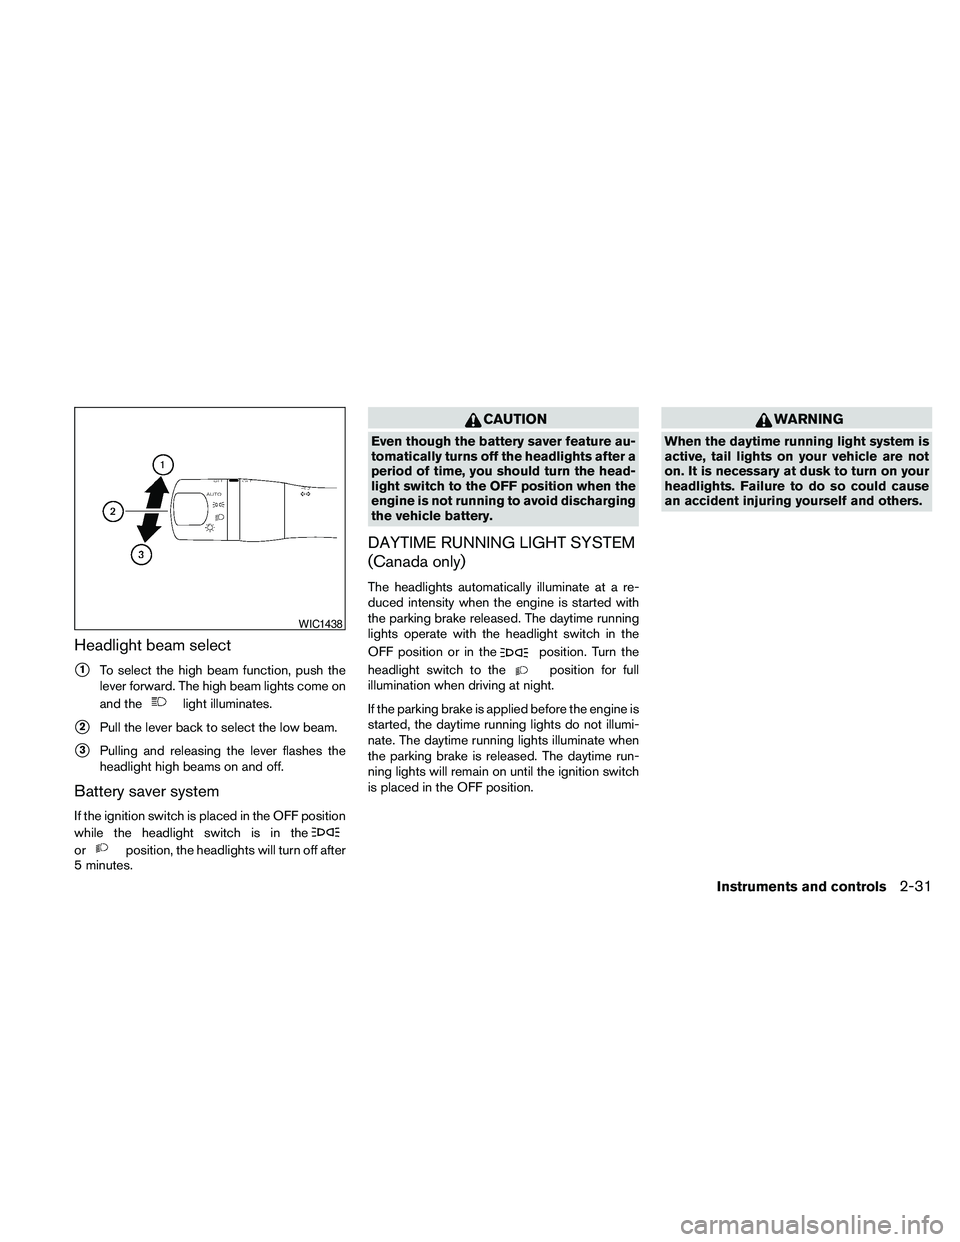
Headlight beam select
s1To select the high beam function, push the
lever forward. The high beam lights come on
and the
light illuminates.
s2Pull the lever back to select the low beam.
s3Pulling and releasing the lever flashes the
headlight high beams on and off.
Battery saver system
If the ignition switch is placed in the OFF position
while the headlight switch is in the
orposition, the headlights will turn off after
5 minutes.
CAUTION
Even though the battery saver feature au-
tomatically turns off the headlights after a
period of time, you should turn the head-
light switch to the OFF position when the
engine is not running to avoid discharging
the vehicle battery.
DAYTIME RUNNING LIGHT SYSTEM
(Canada only)
The headlights automatically illuminate at a re-
duced intensity when the engine is started with
the parking brake released. The daytime running
lights operate with the headlight switch in the
OFF position or in the
position. Turn the
headlight switch to the
position for full
illumination when driving at night.
If the parking brake is applied before the engine is
started, the daytime running lights do not illumi-
nate. The daytime running lights illuminate when
the parking brake is released. The daytime run-
ning lights will remain on until the ignition switch
is placed in the OFF position.
WARNING
When the daytime running light system is
active, tail lights on your vehicle are not
on. It is necessary at dusk to turn on your
headlights. Failure to do so could cause
an accident injuring yourself and others.
WIC1438
Instruments and controls2-31
Page 196 of 457
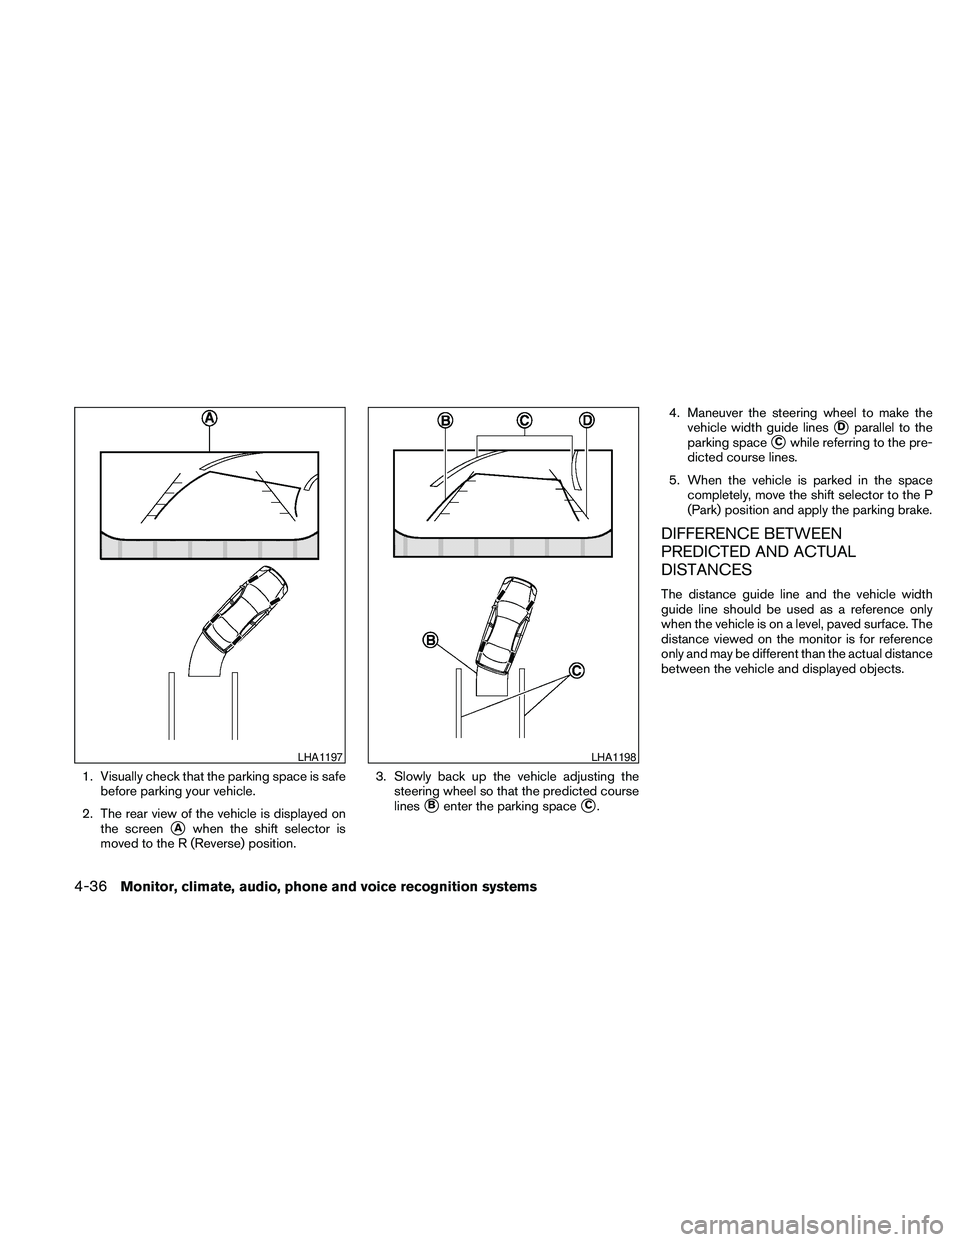
1. Visually check that the parking space is safe
before parking your vehicle.
2. The rear view of the vehicle is displayed on
the screen
sAwhen the shift selector is
moved to the R (Reverse) position.3. Slowly back up the vehicle adjusting the
steering wheel so that the predicted course
lines
sBenter the parking spacesC.4. Maneuver the steering wheel to make the
vehicle width guide lines
sDparallel to the
parking space
sCwhile referring to the pre-
dicted course lines.
5. When the vehicle is parked in the space
completely, move the shift selector to the P
(Park) position and apply the parking brake.
DIFFERENCE BETWEEN
PREDICTED AND ACTUAL
DISTANCES
The distance guide line and the vehicle width
guide line should be used as a reference only
when the vehicle is on a level, paved surface. The
distance viewed on the monitor is for reference
only and may be different than the actual distance
between the vehicle and displayed objects.
LHA1197LHA1198
4-36Monitor, climate, audio, phone and voice recognition systems
Page 234 of 457
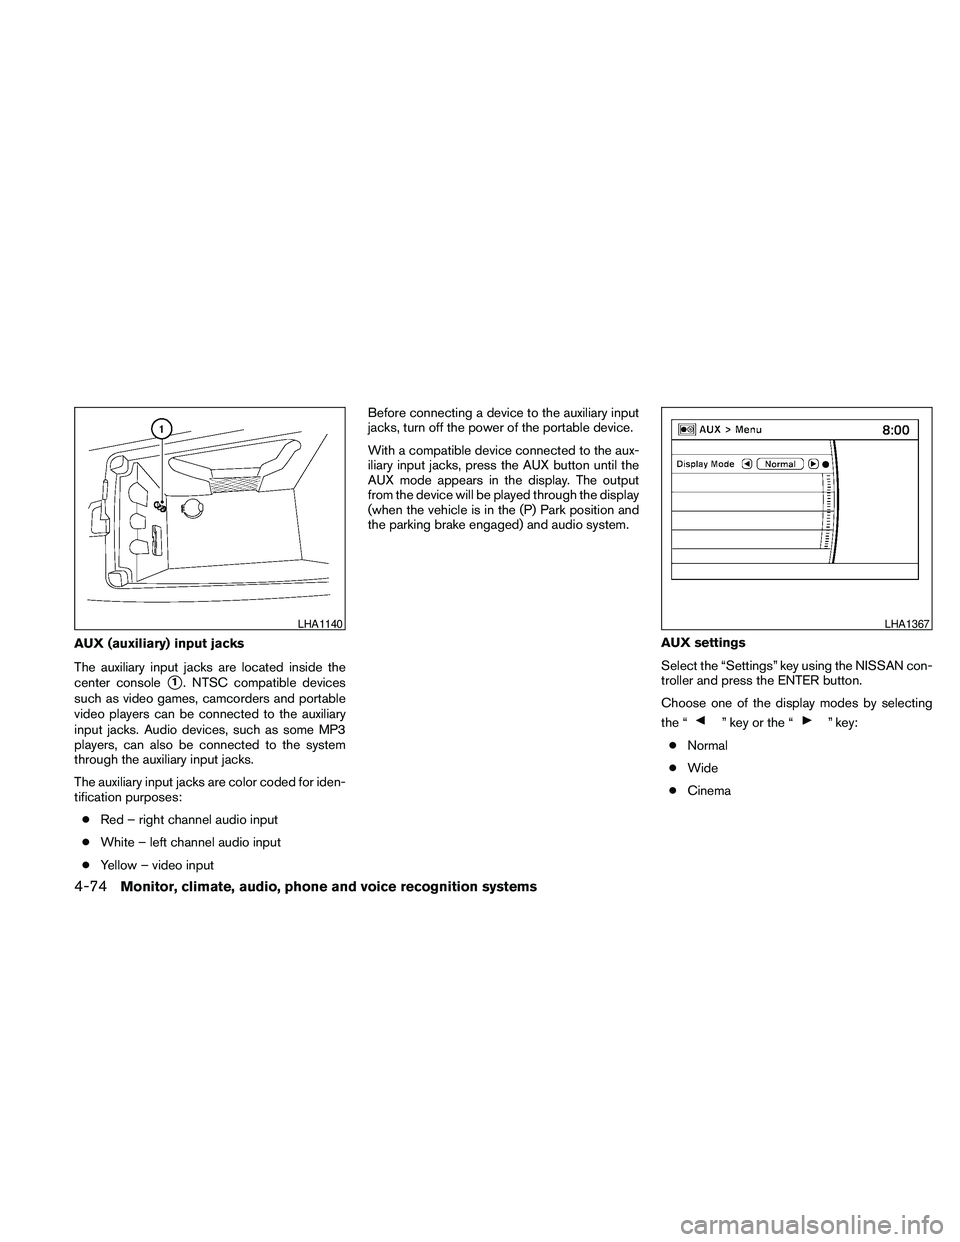
AUX (auxiliary) input jacks
The auxiliary input jacks are located inside the
center console
s1. NTSC compatible devices
such as video games, camcorders and portable
video players can be connected to the auxiliary
input jacks. Audio devices, such as some MP3
players, can also be connected to the system
through the auxiliary input jacks.
The auxiliary input jacks are color coded for iden-
tification purposes:
cRed – right channel audio input
cWhite – left channel audio input
cYellow – video inputBefore connecting a device to the auxiliary input
jacks, turn off the power of the portable device.
With a compatible device connected to the aux-
iliary input jacks, press the AUX button until the
AUX mode appears in the display. The output
from the device will be played through the display
(when the vehicle is in the (P) Park position and
the parking brake engaged) and audio system.
AUX settings
Select the “Settings” key using the NISSAN con-
troller and press the ENTER button.
Choose one of the display modes by selecting
the “
” key or the “” key:
cNormal
cWide
cCinema
LHA1140LHA1367
4-74Monitor, climate, audio, phone and voice recognition systems
Page 243 of 457
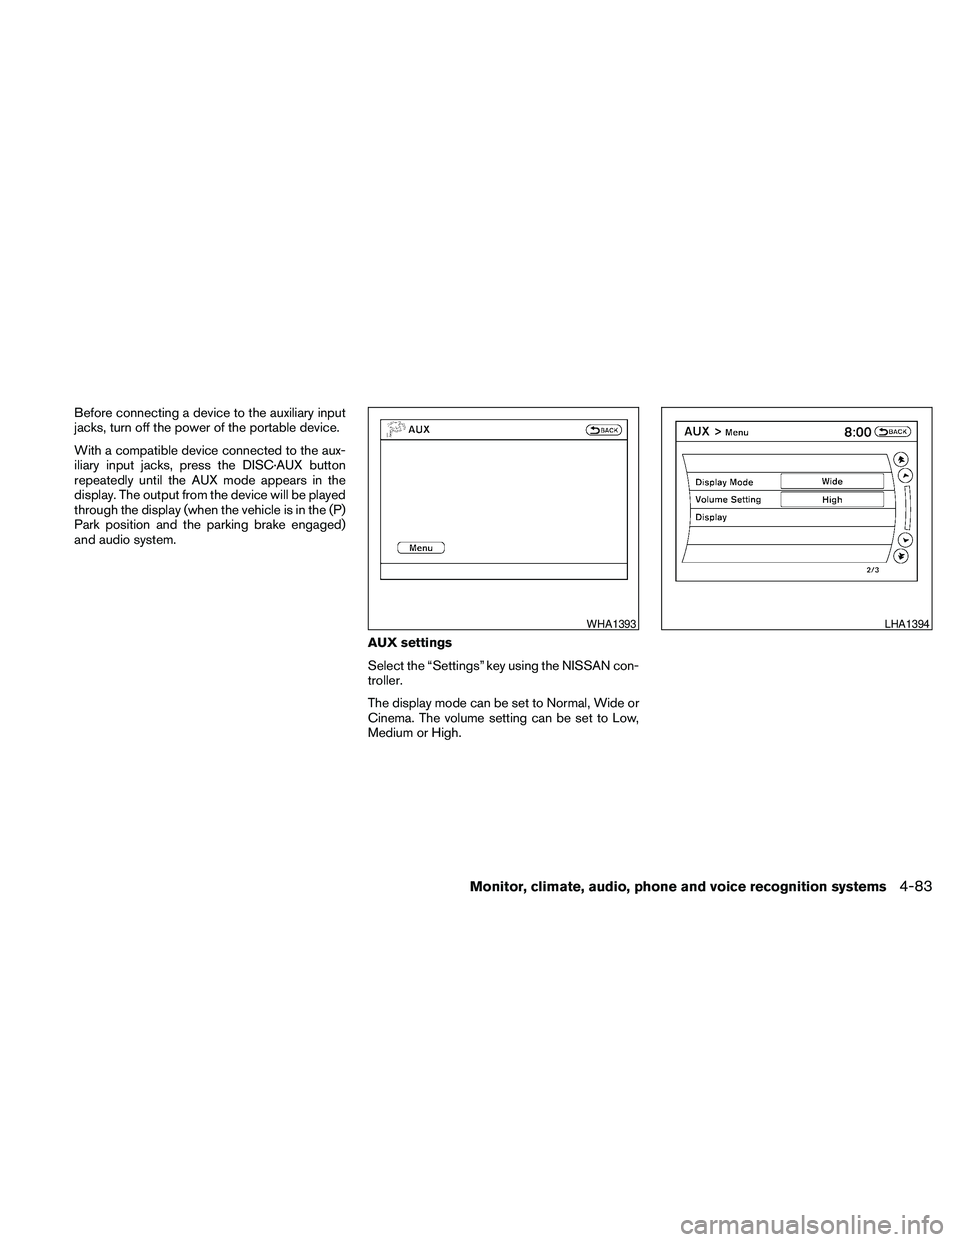
Before connecting a device to the auxiliary input
jacks, turn off the power of the portable device.
With a compatible device connected to the aux-
iliary input jacks, press the DISC·AUX button
repeatedly until the AUX mode appears in the
display. The output from the device will be played
through the display (when the vehicle is in the (P)
Park position and the parking brake engaged)
and audio system.
AUX settings
Select the “Settings” key using the NISSAN con-
troller.
The display mode can be set to Normal, Wide or
Cinema. The volume setting can be set to Low,
Medium or High.
WHA1393LHA1394
Monitor, climate, audio, phone and voice recognition systems4-83
Page 244 of 457

DIGITAL VERSATILE DISC (DVD)
PLAYER OPERATION (models with
Navigation System)
Precautions
Start the engine when using the DVD entertain-
ment system.
Movies will not be shown on the front display
while the vehicle is in any drive position to reduce
driver distraction. Audio is available when a movie
is played. To view movies on the front display,
stop the vehicle in a safe location, move the shift
selector to the P (Park) position and apply the
parking brake.
WARNING
cThe driver must not attempt to operate
the DVD system or wear the head-
phones while the vehicle is in motion so
that full attention may be given to ve-
hicle operation.
cDo not attempt to modify the system to
display a movie on the front screen
while the vehicle is being driven. Doing
so may distract the driver and may
cause a collision and serious personal
injury or death.
CAUTION
cOnly operate the DVD while the vehicle
engine is running. Operating the DVD
for extended periods of time with the
engine OFF can discharge the vehicle
battery.
cDo not allow the system to get wet.
Excessive moisture such as spilled liq-
uids may cause the system to
malfunction.
cWhile playing VIDEO-CD media, this
DVD player does not guarantee com-
plete functionality of all VIDEO-CD
formats.
Playing a DVD
DISC-AUX button
Park the vehicle in a safe location for the front
seat occupants to operate the DVD drive while
watching the images.
Press the DISC-AUX button until the DVD mode
is active on the display.
When a DVD is loaded, it will be replayed auto-
matically.
LHA1376
4-84Monitor, climate, audio, phone and voice recognition systems
Page 288 of 457
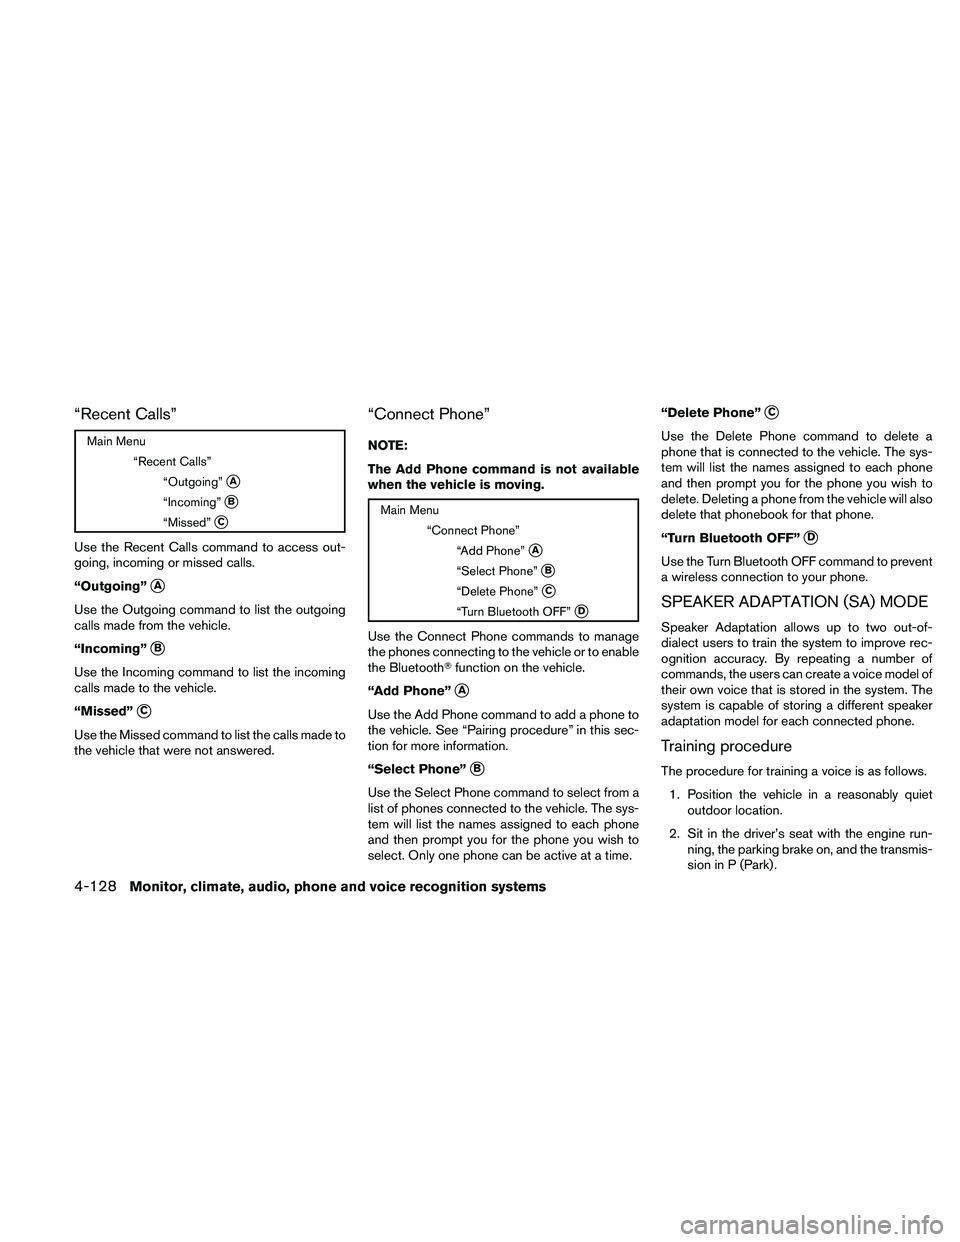
“Recent Calls”
Main Menu
“Recent Calls”
“Outgoing”
sA
“Incoming”sB
“Missed”sC
Use the Recent Calls command to access out-
going, incoming or missed calls.
“Outgoing”
sA
Use the Outgoing command to list the outgoing
calls made from the vehicle.
“Incoming”
sB
Use the Incoming command to list the incoming
calls made to the vehicle.
“Missed”
sC
Use the Missed command to list the calls made to
the vehicle that were not answered.
“Connect Phone”
NOTE:
The Add Phone command is not available
when the vehicle is moving.
Main Menu
“Connect Phone”
“Add Phone”
sA
“Select Phone”sB
“Delete Phone”sC
“Turn Bluetooth OFF”sD
Use the Connect Phone commands to manage
the phones connecting to the vehicle or to enable
the BluetoothTfunction on the vehicle.
“Add Phone”
sA
Use the Add Phone command to add a phone to
the vehicle. See “Pairing procedure” in this sec-
tion for more information.
“Select Phone”
sB
Use the Select Phone command to select from a
list of phones connected to the vehicle. The sys-
tem will list the names assigned to each phone
and then prompt you for the phone you wish to
select. Only one phone can be active at a time.“Delete Phone”
sC
Use the Delete Phone command to delete a
phone that is connected to the vehicle. The sys-
tem will list the names assigned to each phone
and then prompt you for the phone you wish to
delete. Deleting a phone from the vehicle will also
delete that phonebook for that phone.
“Turn Bluetooth OFF”
sD
Use the Turn Bluetooth OFF command to prevent
a wireless connection to your phone.
SPEAKER ADAPTATION (SA) MODE
Speaker Adaptation allows up to two out-of-
dialect users to train the system to improve rec-
ognition accuracy. By repeating a number of
commands, the users can create a voice model of
their own voice that is stored in the system. The
system is capable of storing a different speaker
adaptation model for each connected phone.
Training procedure
The procedure for training a voice is as follows.
1. Position the vehicle in a reasonably quiet
outdoor location.
2. Sit in the driver’s seat with the engine run-
ning, the parking brake on, and the transmis-
sion in P (Park) .
4-128Monitor, climate, audio, phone and voice recognition systems