cruise control NISSAN MAXIMA 2013 A35 / 7.G Owners Manual
[x] Cancel search | Manufacturer: NISSAN, Model Year: 2013, Model line: MAXIMA, Model: NISSAN MAXIMA 2013 A35 / 7.GPages: 444, PDF Size: 3.18 MB
Page 13 of 444
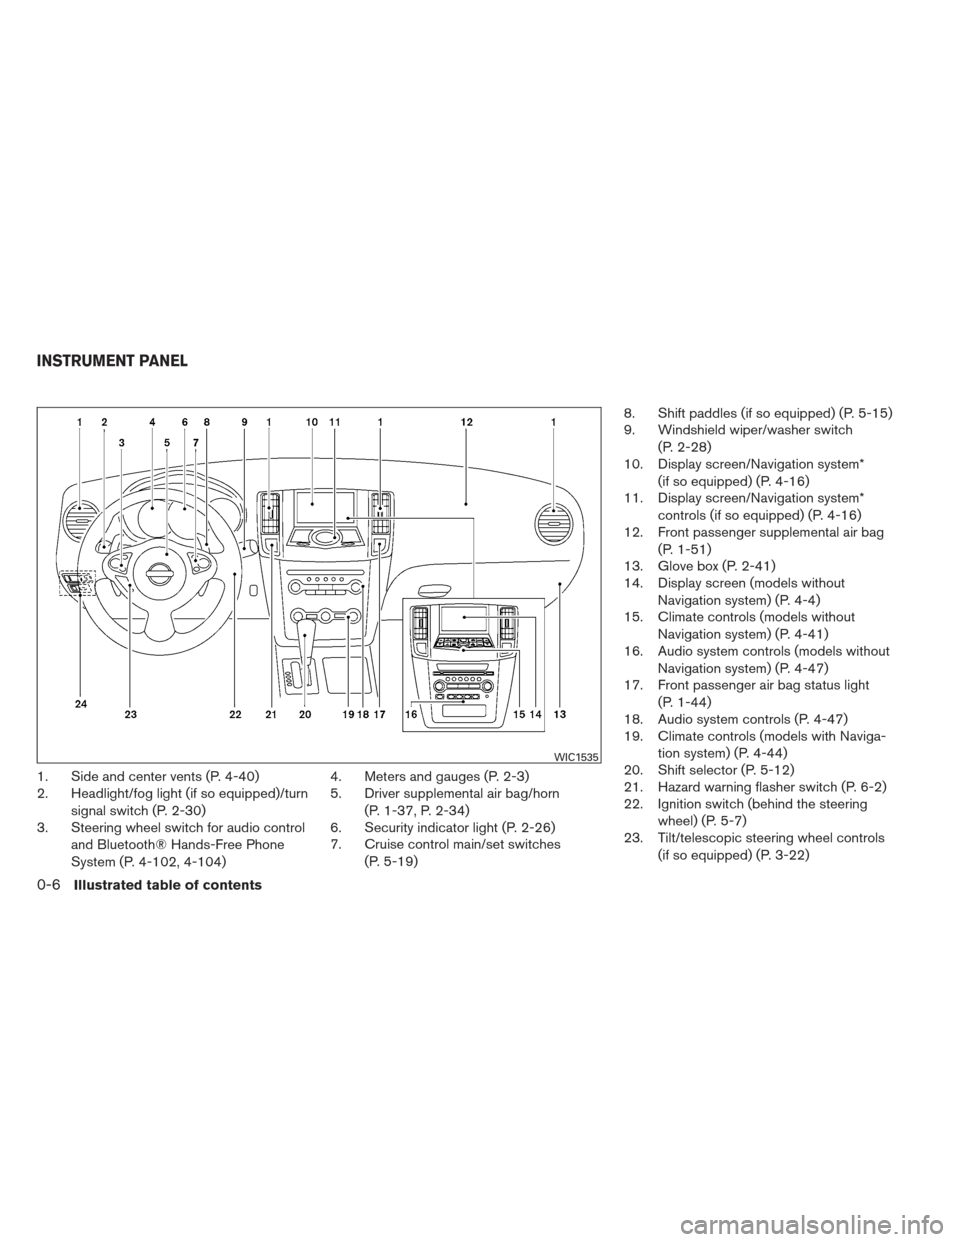
1. Side and center vents (P. 4-40)
2. Headlight/fog light (if so equipped)/turnsignal switch (P. 2-30)
3. Steering wheel switch for audio control
and Bluetooth¬ģ Hands-Free Phone
System (P. 4-102, 4-104) 4. Meters and gauges (P. 2-3)
5. Driver supplemental air bag/horn
(P. 1-37, P. 2-34)
6. Security indicator light (P. 2-26)
7. Cruise control main/set switches
(P. 5-19) 8. Shift paddles (if so equipped) (P. 5-15)
9. Windshield wiper/washer switch
(P. 2-28)
10. Display screen/Navigation system*
(if so equipped) (P. 4-16)
11. Display screen/Navigation system*
controls (if so equipped) (P. 4-16)
12. Front passenger supplemental air bag
(P. 1-51)
13. Glove box (P. 2-41)
14. Display screen (models without
Navigation system) (P. 4-4)
15. Climate controls (models without
Navigation system) (P. 4-41)
16. Audio system controls (models without
Navigation system) (P. 4-47)
17. Front passenger air bag status light
(P. 1-44)
18. Audio system controls (P. 4-47)
19. Climate controls (models with Naviga-
tion system) (P. 4-44)
20. Shift selector (P. 5-12)
21. Hazard warning flasher switch (P. 6-2)
22. Ignition switch (behind the steering
wheel) (P. 5-7)
23. Tilt/telescopic steering wheel controls
(if so equipped) (P. 3-22)
WIC1535
INSTRUMENT PANEL
0-6Illustrated table of contents
Page 16 of 444
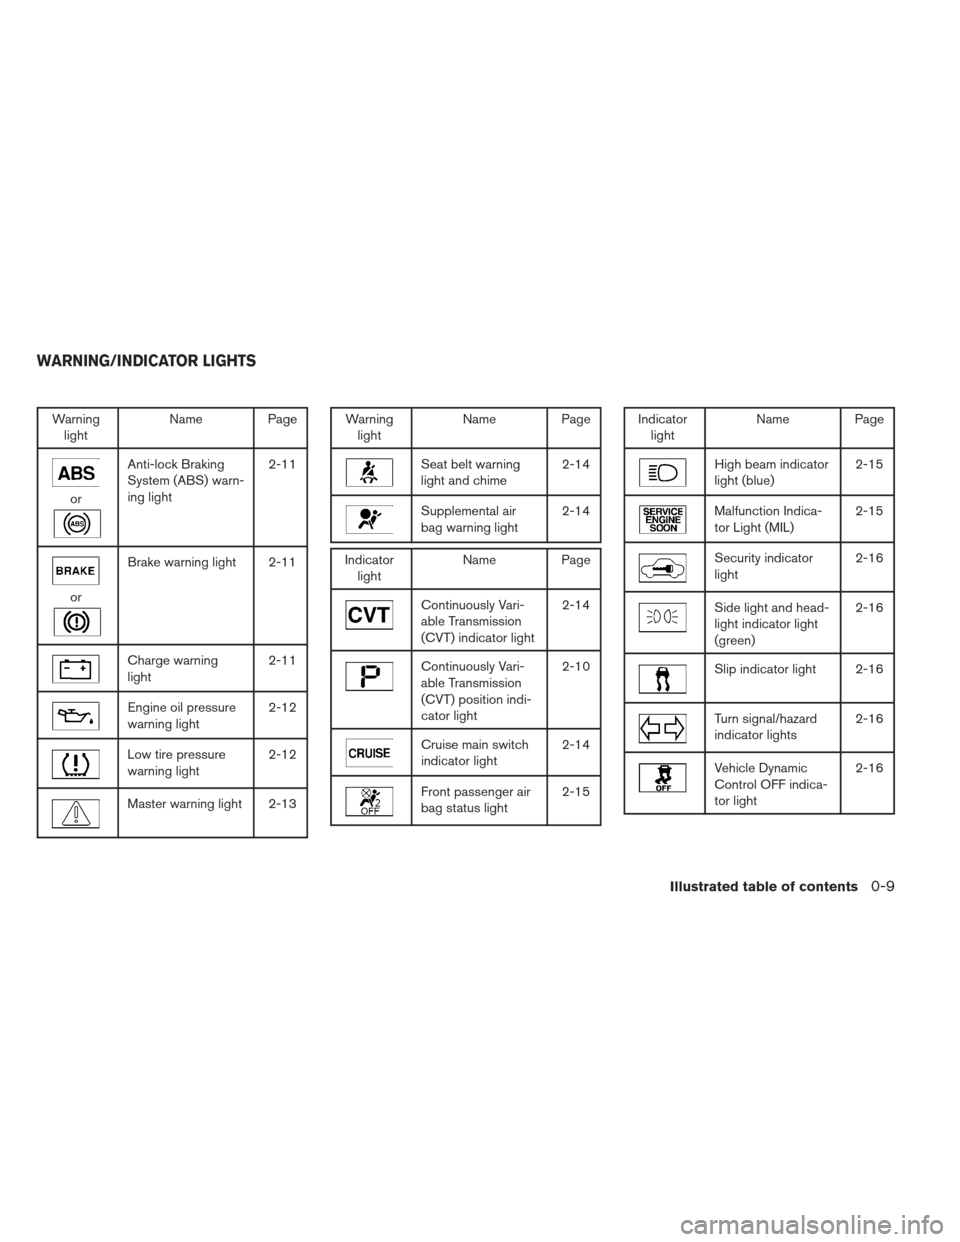
Warninglight Name Page
or
Anti-lock Braking
System (ABS) warn-
ing light 2-11
or
Brake warning light 2-11
Charge warning
light
2-11
Engine oil pressure
warning light2-12
Low tire pressure
warning light2-12
Master warning light 2-13
Warning
light Name Page
Seat belt warning
light and chime 2-14
Supplemental air
bag warning light2-14
Indicator
light Name Page
Continuously Vari-
able Transmission
(CVT) indicator light 2-14
Continuously Vari-
able Transmission
(CVT) position indi-
cator light2-10
Cruise main switch
indicator light
2-14
Front passenger air
bag status light2-15
Indicator
light Name Page
High beam indicator
light (blue) 2-15
Malfunction Indica-
tor Light (MIL)2-15
Security indicator
light2-16
Side light and head-
light indicator light
(green)2-16
Slip indicator light 2-16
Turn signal/hazard
indicator lights
2-16
Vehicle Dynamic
Control OFF indica-
tor light2-16
WARNING/INDICATOR LIGHTS
Illustrated table of contents0-9
Page 73 of 444
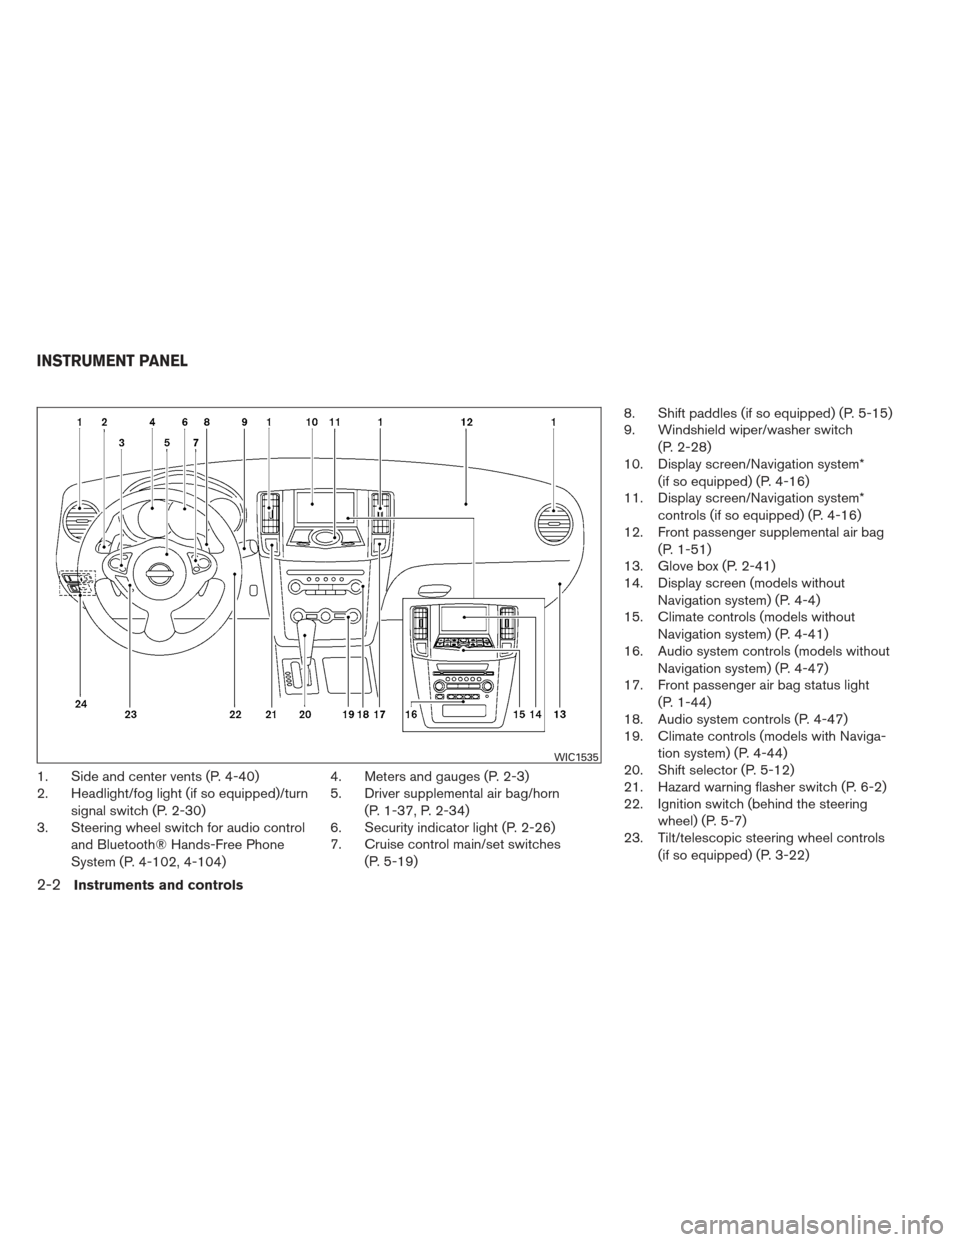
1. Side and center vents (P. 4-40)
2. Headlight/fog light (if so equipped)/turnsignal switch (P. 2-30)
3. Steering wheel switch for audio control
and Bluetooth¬ģ Hands-Free Phone
System (P. 4-102, 4-104) 4. Meters and gauges (P. 2-3)
5. Driver supplemental air bag/horn
(P. 1-37, P. 2-34)
6. Security indicator light (P. 2-26)
7. Cruise control main/set switches
(P. 5-19) 8. Shift paddles (if so equipped) (P. 5-15)
9. Windshield wiper/washer switch
(P. 2-28)
10. Display screen/Navigation system*
(if so equipped) (P. 4-16)
11. Display screen/Navigation system*
controls (if so equipped) (P. 4-16)
12. Front passenger supplemental air bag
(P. 1-51)
13. Glove box (P. 2-41)
14. Display screen (models without
Navigation system) (P. 4-4)
15. Climate controls (models without
Navigation system) (P. 4-41)
16. Audio system controls (models without
Navigation system) (P. 4-47)
17. Front passenger air bag status light
(P. 1-44)
18. Audio system controls (P. 4-47)
19. Climate controls (models with Naviga-
tion system) (P. 4-44)
20. Shift selector (P. 5-12)
21. Hazard warning flasher switch (P. 6-2)
22. Ignition switch (behind the steering
wheel) (P. 5-7)
23. Tilt/telescopic steering wheel controls
(if so equipped) (P. 3-22)
WIC1535
INSTRUMENT PANEL
2-2Instruments and controls
Page 81 of 444
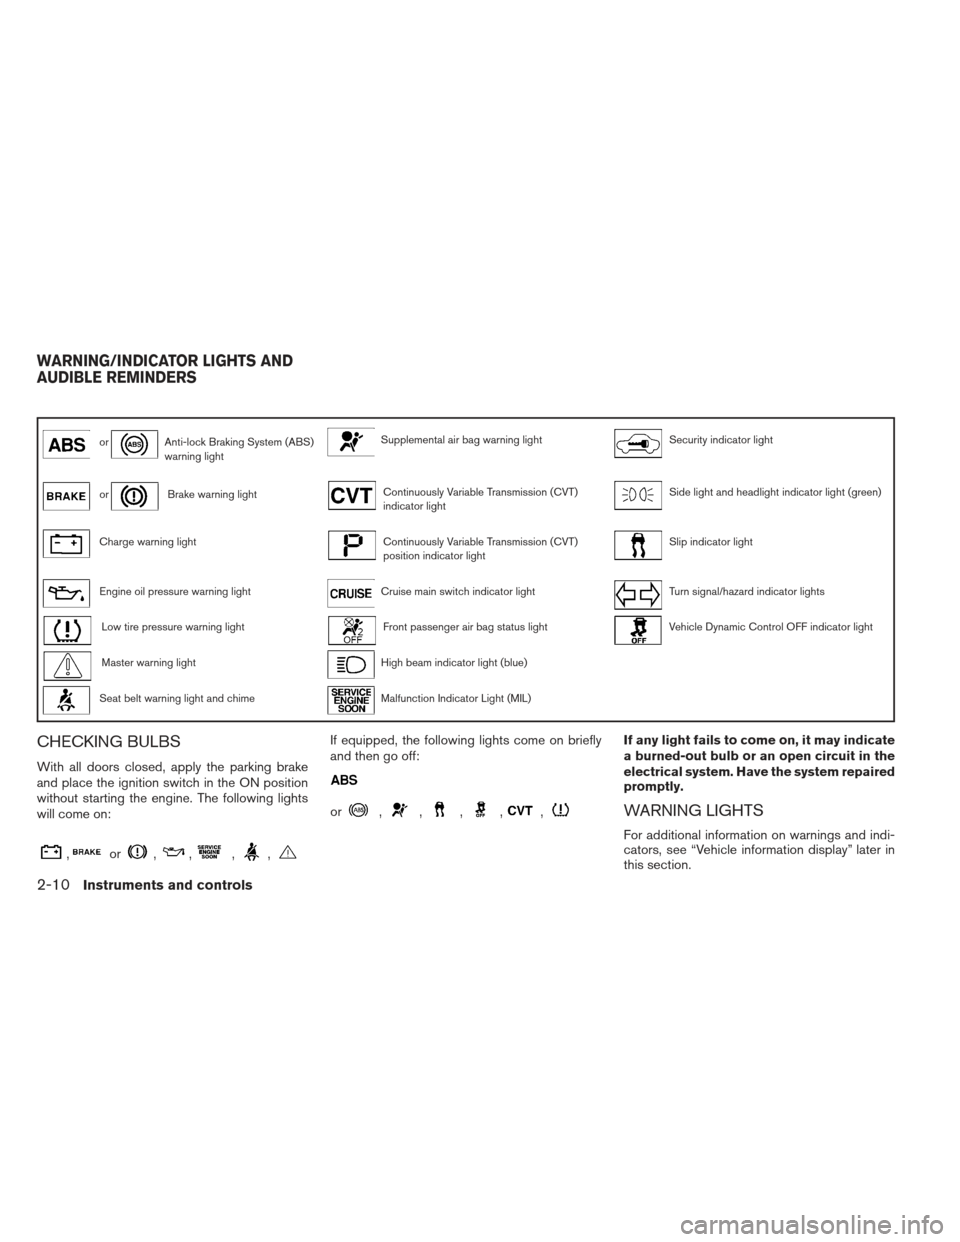
orAnti-lock Braking System (ABS)
warning lightSupplemental air bag warning lightSecurity indicator light
orBrake warning lightContinuously Variable Transmission (CVT)
indicator lightSide light and headlight indicator light (green)
Charge warning lightContinuously Variable Transmission (CVT)
position indicator lightSlip indicator light
Engine oil pressure warning lightCruise main switch indicator lightTurn signal/hazard indicator lights
Low tire pressure warning lightFront passenger air bag status lightVehicle Dynamic Control OFF indicator light
Master warning lightHigh beam indicator light (blue)
Seat belt warning light and chimeMalfunction Indicator Light (MIL)
CHECKING BULBS
With all doors closed, apply the parking brake
and place the ignition switch in the ON position
without starting the engine. The following lights
will come on:
,or,,,,
If equipped, the following lights come on briefly
and then go off:
or,,,,,
If any light fails to come on, it may indicate
a burned-out bulb or an open circuit in the
electrical system. Have the system repaired
promptly.
WARNING LIGHTS
For additional information on warnings and indi-
cators, see ‚ÄúVehicle information display‚ÄĚ later in
this section.
WARNING/INDICATOR LIGHTS AND
AUDIBLE REMINDERS
2-10Instruments and controls
Page 85 of 444
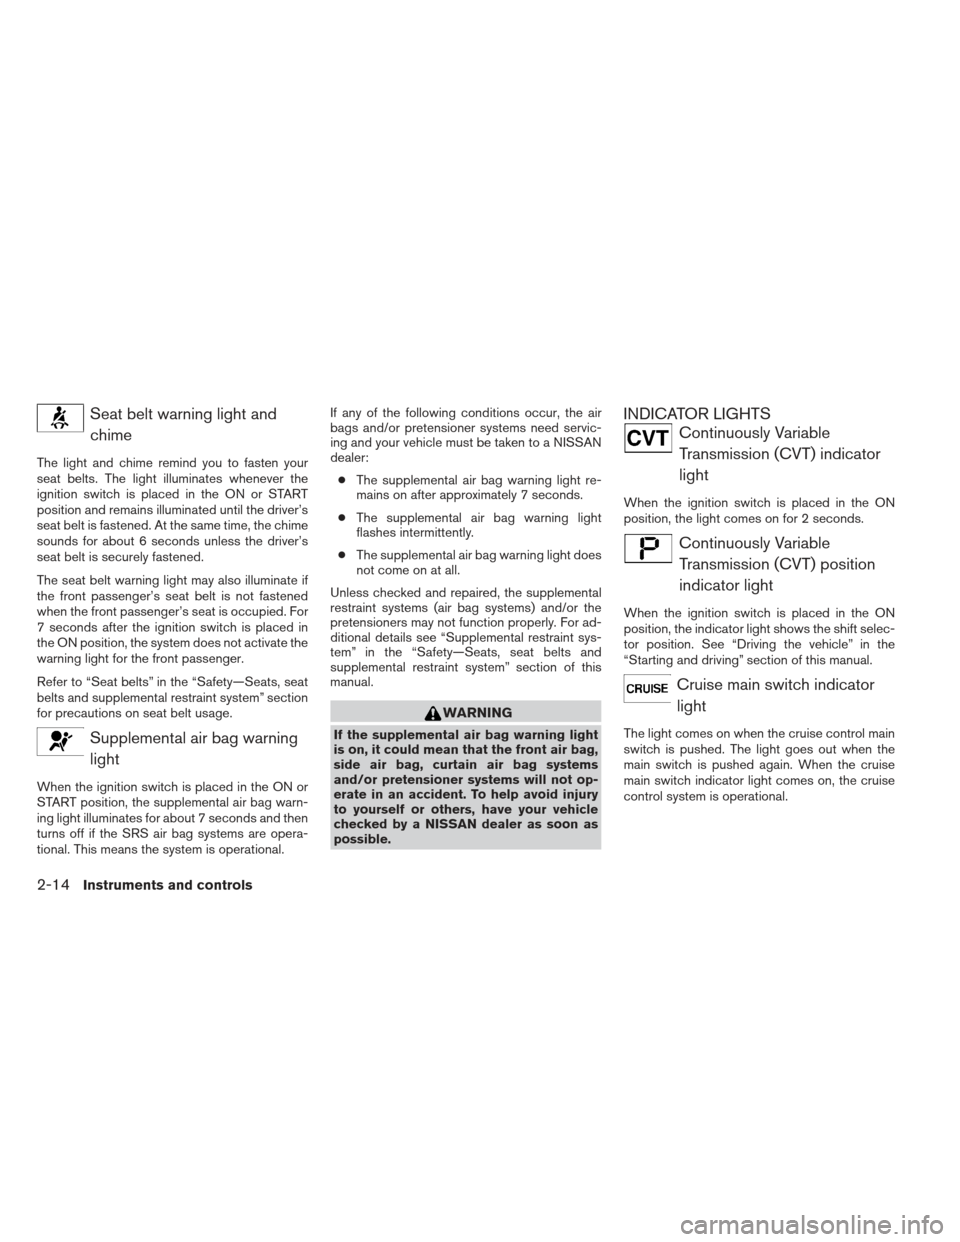
Seat belt warning light andchime
The light and chime remind you to fasten your
seat belts. The light illuminates whenever the
ignition switch is placed in the ON or START
position and remains illuminated until the driver’s
seat belt is fastened. At the same time, the chime
sounds for about 6 seconds unless the driver’s
seat belt is securely fastened.
The seat belt warning light may also illuminate if
the front passenger’s seat belt is not fastened
when the front passenger’s seat is occupied. For
7 seconds after the ignition switch is placed in
the ON position, the system does not activate the
warning light for the front passenger.
Refer to ‚ÄúSeat belts‚ÄĚ in the ‚ÄúSafety‚ÄĒSeats, seat
belts and supplemental restraint system‚ÄĚ section
for precautions on seat belt usage.
Supplemental air bag warninglight
When the ignition switch is placed in the ON or
START position, the supplemental air bag warn-
ing light illuminates for about 7 seconds and then
turns off if the SRS air bag systems are opera-
tional. This means the system is operational. If any of the following conditions occur, the air
bags and/or pretensioner systems need servic-
ing and your vehicle must be taken to a NISSAN
dealer:
‚óŹ The supplemental air bag warning light re-
mains on after approximately 7 seconds.
‚óŹ The supplemental air bag warning light
flashes intermittently.
‚óŹ The supplemental air bag warning light does
not come on at all.
Unless checked and repaired, the supplemental
restraint systems (air bag systems) and/or the
pretensioners may not function properly. For ad-
ditional details see “Supplemental restraint sys-
tem‚ÄĚ in the ‚ÄúSafety‚ÄĒSeats, seat belts and
supplemental restraint system‚ÄĚ section of this
manual.
WARNING
If the supplemental air bag warning light
is on, it could mean that the front air bag,
side air bag, curtain air bag systems
and/or pretensioner systems will not op-
erate in an accident. To help avoid injury
to yourself or others, have your vehicle
checked by a NISSAN dealer as soon as
possible.
INDICATOR LIGHTS
Continuously Variable Transmission (CVT) indicator
light
When the ignition switch is placed in the ON
position, the light comes on for 2 seconds.
Continuously VariableTransmission (CVT) position
indicator light
When the ignition switch is placed in the ON
position, the indicator light shows the shift selec-
tor position. See ‚ÄúDriving the vehicle‚ÄĚ in the
‚ÄúStarting and driving‚ÄĚ section of this manual.
Cruise main switch indicatorlight
The light comes on when the cruise control main
switch is pushed. The light goes out when the
main switch is pushed again. When the cruise
main switch indicator light comes on, the cruise
control system is operational.
2-14Instruments and controls
Page 312 of 444
5 Starting and driving
Precautions when starting and driving................5-2
Exhaust gas (carbon monoxide) ..................5-2
Three-way catalyst ..............................5-2
Tire Pressure Monitoring System (TPMS) ..........5-3
Avoiding collision and rollover ....................5-5
Off-road recovery ...............................5-6
Rapid air pressure loss ..........................5-6
Drinking alcohol/drugs and driving ................5-7
Push-Button Ignition Switch ........................5-7
Operating range ................................5-8
Push-button ignition switch positions .............5-8
Emergency engine shut off ......................5-9
NISSAN Intelligent Key¬ģ battery discharge ........5-9
NISSAN vehicle immobilizer system .............5-10
Before starting the engine ......................... 5-11
Starting the engine ............................... 5-11
Driving the vehicle ................................ 5-12
Continuously Variable Transmission (CVT) ........5-12
Parking brake .................................... 5-18
Cruise control .................................... 5-19Precautions on cruise control
...................5-19
Cruise control operations .......................5-19
Break-in schedule ................................ 5-21
Fuel efficient driving tips ........................... 5-21
Increasing fuel economy ........................... 5-22
Parking/parking on hills ............................ 5-23
Power steering ................................... 5-24
Brake system .................................... 5-24
Brake precautions ............................. 5-24
Anti-lock Braking System (ABS) .................5-25
Vehicle Dynamic Control (VDC) system .............5-26
Cold weather driving .............................. 5-28
Freeing a frozen door lock ......................5-28
Anti-freeze .................................... 5-28
Battery ....................................... 5-28
Draining of coolant water .......................5-28
Tire equipment ................................ 5-28
Special winter equipment .......................5-28
Driving on snow or ice ......................... 5-28
Engine
block heater (if so equipped) .............5-29
Page 330 of 444
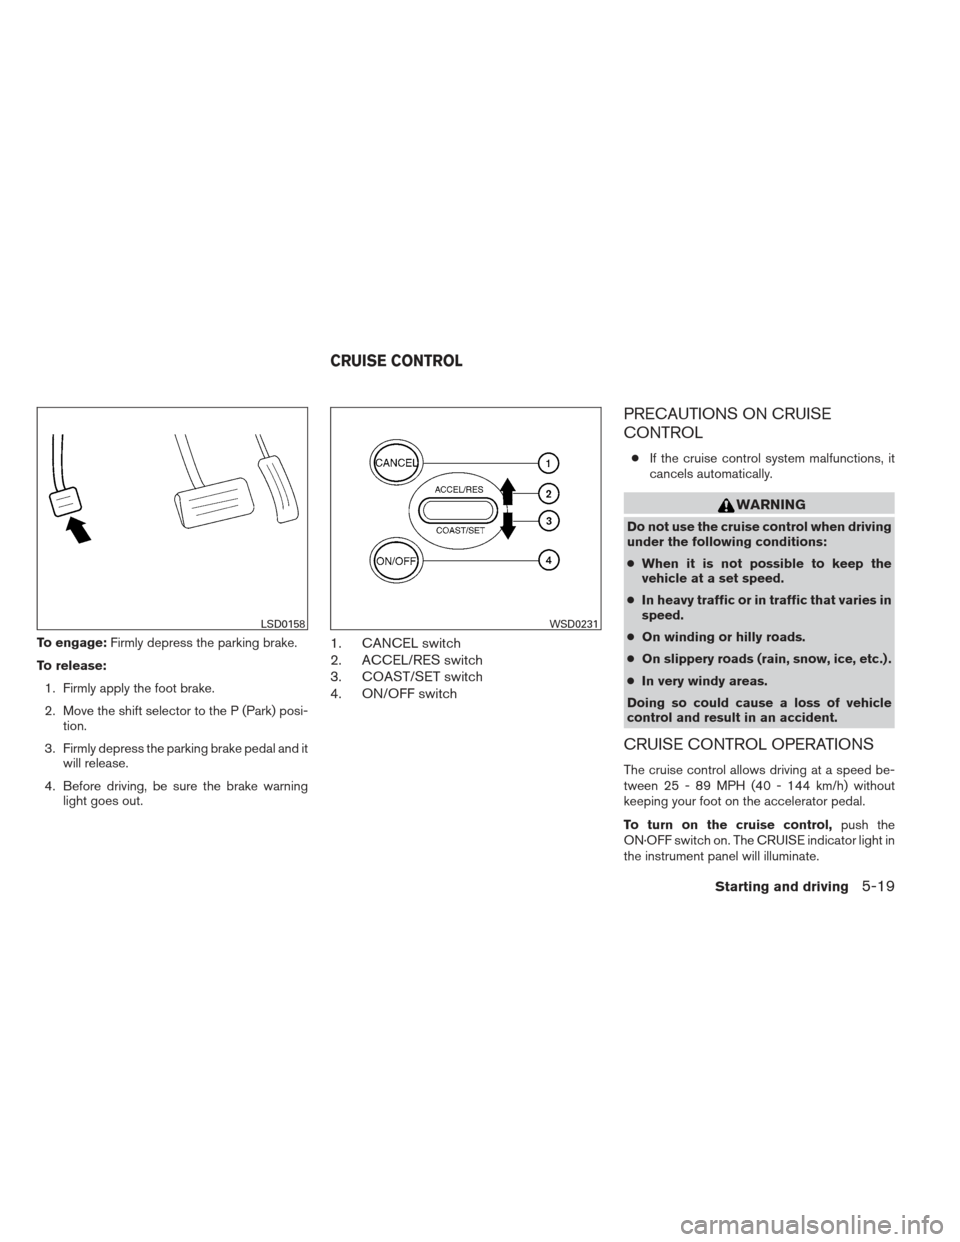
To engage:Firmly depress the parking brake.
To release: 1. Firmly apply the foot brake.
2. Move the shift selector to the P (Park) posi- tion.
3. Firmly depress the parking brake pedal and it will release.
4. Before driving, be sure the brake warning light goes out.1. CANCEL switch
2. ACCEL/RES switch
3. COAST/SET switch
4. ON/OFF switch
PRECAUTIONS ON CRUISE
CONTROL
‚óŹIf the cruise control system malfunctions, it
cancels automatically.
WARNING
Do not use the cruise control when driving
under the following conditions:
‚óŹ When it is not possible to keep the
vehicle at a set speed.
‚óŹ In heavy traffic or in traffic that varies in
speed.
‚óŹ On winding or hilly roads.
‚óŹ On slippery roads (rain, snow, ice, etc.) .
‚óŹ In very windy areas.
Doing so could cause a loss of vehicle
control and result in an accident.
CRUISE CONTROL OPERATIONS
The cruise control allows driving at a speed be-
tween 25 - 89 MPH (40 - 144 km/h) without
keeping your foot on the accelerator pedal.
To turn on the cruise control, push the
ON·OFF switch on. The CRUISE indicator light in
the instrument panel will illuminate.
LSD0158WSD0231
CRUISE CONTROL
Starting and driving5-19
Page 331 of 444
To set cruising speed,accelerate the vehicle to
the desired speed, push the COAST/SET switch
and release it. Take your foot off the accelerator
pedal. Your vehicle maintains the set speed.
‚óŹ To pass another vehicle, depress the ac-
celerator pedal. When you release the
pedal, the vehicle returns to the previously
set speed.
‚óŹ The vehicle may not maintain the set speed
when going up or down steep hills. If this
happens, drive without the cruise control.
To cancel the preset speed, use one of the
following three methods.
‚óŹ Push the CANCEL button.
‚óŹ Tap the brake pedal.
‚óŹ Push the ON¬∑OFF switch off. The CRUISE
indicator light in the instrument panel goes
out.
The cruise control is automatically canceled if: ‚óŹ you depress the brake pedal while pushing
the ACCEL/RES or SET/COAST switch.
The preset speed is deleted from memory.
‚óŹ the vehicle slows down more than 8 MPH
(13 km/h) below the set speed.
‚óŹ you move the shift selector to N (Neutral) . To reset at a faster cruising speed,
use one
of the following three methods.
‚óŹ Depress the accelerator pedal. When the
vehicle attains the desired speed, push and
release the COAST/SET switch.
‚óŹ Push and hold the ACCEL/RES switch.
When the vehicle attains the speed you de-
sire, release the switch.
‚óŹ Push and release the ACCEL/RES switch.
Each time you do this, the set speed in-
creases by about 1 MPH (1.6 km/h).
To reset at a slower cruising speed, use one
of the following three methods.
‚óŹ Lightly tap the brake pedal. When the ve-
hicle attains the desired speed, push the
COAST/SET switch and release it.
‚óŹ Push and hold the COAST/SET switch. Re-
lease the switch when the vehicle slows to
the desired speed.
‚óŹ Push and release the COAST/SET switch.
Each time you do this, the set speed de-
creases by about 1 MPH (1.6 km/h).
To resume the preset speed, push and re-
lease the ACCEL/RES switch. The vehicle re-
turns to the last set cruising speed when the
vehicle speed is over 25 MPH (40 km/h). To turn off the cruise control,
use one of the
following three methods.
‚óŹ Push the CANCEL button.
‚óŹ Tap the brake pedal.
‚óŹ Push the ON¬∑OFF switch off. The CRUISE
indicator light in the instrument panel goes
out.
5-20Starting and driving
Page 332 of 444
CAUTION
During the first 1,200 miles (2,000 km),
follow these recommendations to obtain
maximum engine performance and en-
sure the future reliability and economy of
your new vehicle. Failure to follow these
recommendations may result in short-
ened engine life and reduced engine
performance.‚óŹ Avoid driving for long periods at constant
speed, either fast or slow, and do not run the
engine over 4,000 rpm.
‚óŹ Do not accelerate at full throttle in any gear.
‚óŹ Avoid quick starts.
‚óŹ Avoid hard braking as much as possible.
‚óŹ Do not tow a trailer for the first 500 miles
(800 km) . Your engine, axle or other parts
could be damaged. Follow these easy-to-use Fuel Efficient Driving
Tips to help you achieve the most fuel economy
from your vehicle.
1. Use Smooth Accelerator and Brake
Pedal Application
‚óŹ Avoid rapid starts and stops
‚óŹ Use smooth, gentle accelerator and
brake application whenever possible
‚óŹ Maintain constant speed while commut-
ing and coast whenever possible
2. Maintain Constant Speed
‚óŹ Look ahead to try and anticipate and mini-
mize stops
‚óŹ Synchronizing your speed with traffic
lights allows you to reduce your number
of stops
‚óŹ Maintaining a steady speed can minimize
red light stops and improve fuel efficiency
3. Use Air Conditioning (A/C) at Higher
Vehicle Speeds
‚óŹ Below 40 MPH (64 km/h), it is more
efficient to open windows to cool the
vehicle due to reduced engine load ‚óŹ
Above 40 MPH (64 km/h), it is more
efficient to use A/C to cool the vehicle
due to increased aerodynamic drag
‚óŹ Recirculating the cool air in the cabin
when the A/C is on reduces cooling load
4. Drive at Economical Speeds and Dis-
tances
‚óŹ Observing the speed limit and not ex-
ceeding 60 MPH (97 km/h) (where le-
gally allowed) can improve fuel efficiency
due to reduced aerodynamic drag
‚óŹ Maintaining a safe following distance be-
hind other vehicles reduces unnecessary
braking
‚óŹ Safely monitoring traffic to anticipate
changes in speed permits reduced brak-
ing and smooth acceleration changes
‚óŹ Select a gear range suitable to road con-
ditions.
5. Use Cruise Control
‚óŹ Using cruise control during highway driv-
ing helps maintain a steady speed
‚óŹ Cruise control is particularly effective in
providing fuel savings when driving on flat
terrains
BREAK-IN SCHEDULE FUEL EFFICIENT DRIVING TIPS
Starting and driving5-21
Page 340 of 444
‚óŹWhatever the condition, drive with cau-
tion. Accelerate and slow down with
care. If accelerating or downshifting too
fast, the drive wheels will lose even
more traction.
‚óŹ Allow more stopping distance under
these conditions. Braking should be
started sooner than on dry pavement.
‚óŹ Allow greater following distances on
slippery roads.
‚óŹ Watch for slippery spots (glare ice) .
These may appear on an otherwise
clear road in shaded areas. If a patch of
ice is seen ahead, brake before reach-
ing it. Try not to brake while on the ice,
and avoid any sudden steering
maneuvers.
‚óŹ Do not use the cruise control on slip-
pery roads.
‚óŹ Snow can trap dangerous exhaust
gases under your vehicle. Keep snow
clear of the exhaust pipe and from
around your vehicle.ENGINE BLOCK HEATER (if so
equipped)
Engine block heaters are used to assist with cold
temperature starting.
The engine block heater should be used when
the outside temperature is 20¬įF (-7¬įC) or lower.
WARNING
‚óŹ Do not use your engine block heater
with an ungrounded electrical system
or a 2-pronged adapter. You can be se-
riously injured by an electrical shock if
you use an ungrounded connection.
‚óŹ Disconnect and properly store the en-
gine block heater cord before starting
the engine. Damage to the cord could
result in an electrical shock and can
cause serious injury.
‚óŹ Use a heavy-duty 3-wire, 3-pronged ex-
tension cord rated for at least 10 A. Plug
the extension cord into a Ground Fault
Interrupt (GFI) protected, grounded
110-VAC outlet. Failure to use the
proper extension cord or a grounded
outlet can result in a fire or electrical
shock and cause serious personal
injury. To use the engine block heater:
1. Turn the engine off.
2. Open the hood and unwrap the engine block heater cord.
3. Plug the engine block heater cord into a grounded 3 wire, 3 pronged extension cord.
4. Plug the extension cord into a Ground Fault Interrupt (GFI) protected, grounded 110-
volt AC (VAC) outlet.
5. The engine block heater must be plugged in for at least2-4hours, depending on outside
temperatures, to properly warm the engine
coolant. Use an appropriate timer to turn the
engine block heater on.
6. Before starting the engine, unplug and prop- erly store the cord to keep it away from
moving parts.
Starting and driving5-29