lock NISSAN MURANO 2008 Owners Manual
[x] Cancel search | Manufacturer: NISSAN, Model Year: 2008, Model line: MURANO, Model: NISSAN MURANO 2008Pages: 444, PDF Size: 6.09 MB
Page 8 of 444
Black plate (5,1)
Model "Z51-D" EDITED: 2008/ 6/ 26
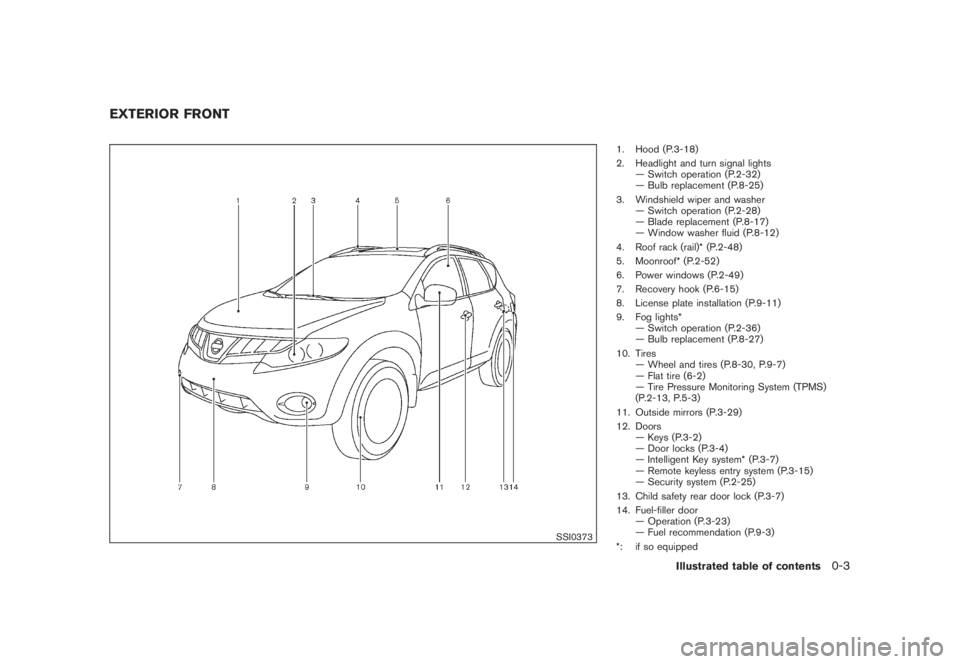
SSI0373
1. Hood (P.3-18)
2. Headlight and turn signal lights
— Switch operation (P.2-32)
— Bulb replacement (P.8-25)
3. Windshield wiper and washer
— Switch operation (P.2-28)
— Blade replacement (P.8-17)
— Window washer fluid (P.8-12)
4. Roof rack (rail)* (P.2-48)
5. Moonroof* (P.2-52)
6. Power windows (P.2-49)
7. Recovery hook (P.6-15)
8. License plate installation (P.9-11)
9. Fog lights*
— Switch operation (P.2-36)
— Bulb replacement (P.8-27)
10. Tires
— Wheel and tires (P.8-30, P.9-7)
— Flat tire (6-2)
— Tire Pressure Monitoring System (TPMS)
(P.2-13, P.5-3)
11. Outside mirrors (P.3-29)
12. Doors
— Keys (P.3-2)
— Door locks (P.3-4)
— Intelligent Key system* (P.3-7)
— Remote keyless entry system (P.3-15)
— Security system (P.2-25)
13. Child safety rear door lock (P.3-7)
14. Fuel-filler door
— Operation (P.3-23)
— Fuel recommendation (P.9-3)
*: if so equipped
EXTERIOR FRONT
Illustrated table of contents
0-3
Page 10 of 444
Black plate (7,1)
Model "Z51-D" EDITED: 2008/ 6/ 26
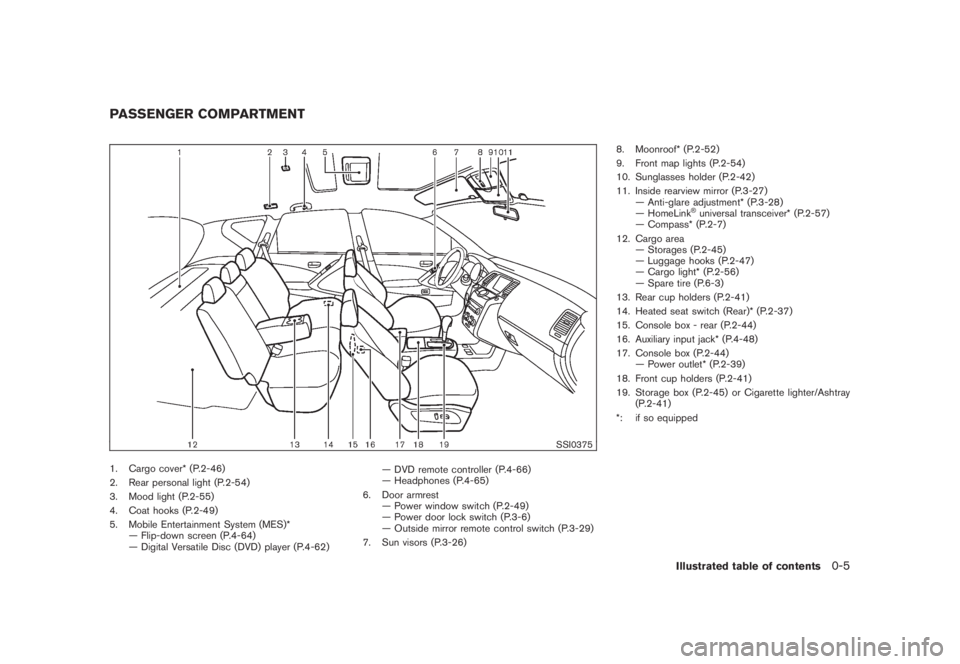
SSI0375
1. Cargo cover* (P.2-46)
2. Rear personal light (P.2-54)
3. Mood light (P.2-55)
4. Coat hooks (P.2-49)
5. Mobile Entertainment System (MES)*
— Flip-down screen (P.4-64)
— Digital Versatile Disc (DVD) player (P.4-62)— DVD remote controller (P.4-66)
— Headphones (P.4-65)
6. Door armrest
— Power window switch (P.2-49)
— Power door lock switch (P.3-6)
— Outside mirror remote control switch (P.3-29)
7. Sun visors (P.3-26)8. Moonroof* (P.2-52)
9. Front map lights (P.2-54)
10. Sunglasses holder (P.2-42)
11. Inside rearview mirror (P.3-27)
— Anti-glare adjustment* (P.3-28)
— HomeLink
®universal transceiver* (P.2-57)
— Compass* (P.2-7)
12. Cargo area
— Storages (P.2-45)
— Luggage hooks (P.2-47)
— Cargo light* (P.2-56)
— Spare tire (P.6-3)
13. Rear cup holders (P.2-41)
14. Heated seat switch (Rear)* (P.2-37)
15. Console box - rear (P.2-44)
16. Auxiliary input jack* (P.4-48)
17. Console box (P.2-44)
— Power outlet* (P.2-39)
18. Front cup holders (P.2-41)
19. Storage box (P.2-45) or Cigarette lighter/Ashtray
(P.2-41)
*: if so equipped
PASSENGER COMPARTMENT
Illustrated table of contents
0-5
Page 11 of 444
Black plate (8,1)
Model "Z51-D" EDITED: 2008/ 6/ 26
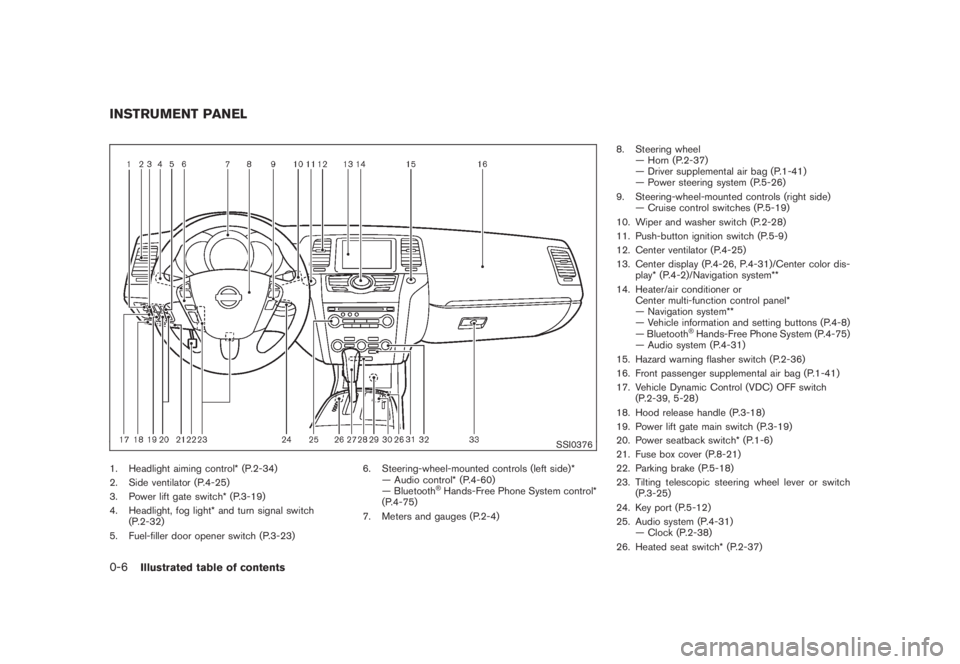
SSI0376
1. Headlight aiming control* (P.2-34)
2. Side ventilator (P.4-25)
3. Power lift gate switch* (P.3-19)
4. Headlight, fog light* and turn signal switch
(P.2-32)
5. Fuel-filler door opener switch (P.3-23)6. Steering-wheel-mounted controls (left side)*
— Audio control* (P.4-60)
— Bluetooth
®Hands-Free Phone System control*
(P.4-75)
7. Meters and gauges (P.2-4)8. Steering wheel
— Horn (P.2-37)
— Driver supplemental air bag (P.1-41)
— Power steering system (P.5-26)
9. Steering-wheel-mounted controls (right side)
— Cruise control switches (P.5-19)
10. Wiper and washer switch (P.2-28)
11. Push-button ignition switch (P.5-9)
12. Center ventilator (P.4-25)
13. Center display (P.4-26, P.4-31)/Center color dis-
play* (P.4-2)/Navigation system**
14. Heater/air conditioner or
Center multi-function control panel*
— Navigation system**
— Vehicle information and setting buttons (P.4-8)
— Bluetooth
®Hands-Free Phone System (P.4-75)
— Audio system (P.4-31)
15. Hazard warning flasher switch (P.2-36)
16. Front passenger supplemental air bag (P.1-41)
17. Vehicle Dynamic Control (VDC) OFF switch
(P.2-39, 5-28)
18. Hood release handle (P.3-18)
19. Power lift gate main switch (P.3-19)
20. Power seatback switch* (P.1-6)
21. Fuse box cover (P.8-21)
22. Parking brake (P.5-18)
23. Tilting telescopic steering wheel lever or switch
(P.3-25)
24. Key port (P.5-12)
25. Audio system (P.4-31)
— Clock (P.2-38)
26. Heated seat switch* (P.2-37)
INSTRUMENT PANEL0-6
Illustrated table of contents
Page 12 of 444
Black plate (9,1)
Model "Z51-D" EDITED: 2008/ 6/ 26
27. Selector lever (P.5-14)
28. Front passenger air bag status light (P.1-48)
29. Power outlet (P.2-39)
30. All-Wheel Drive (AWD) LOCK switch* (P.5-22)
31. Rear window and outside mirror* defroster switch
(P.2-31)
32. Heater/air conditioner control (P.4-26) or Audio
system (P.4-39)
33. Glove box (P.2-43)
*: if so equipped
**: Refer to the separate Navigation System Owner’s
Manual (if so equipped) .
Illustrated table of contents
0-7
Page 17 of 444
Black plate (14,1)
Model "Z51-D" EDITED: 2008/ 6/ 26
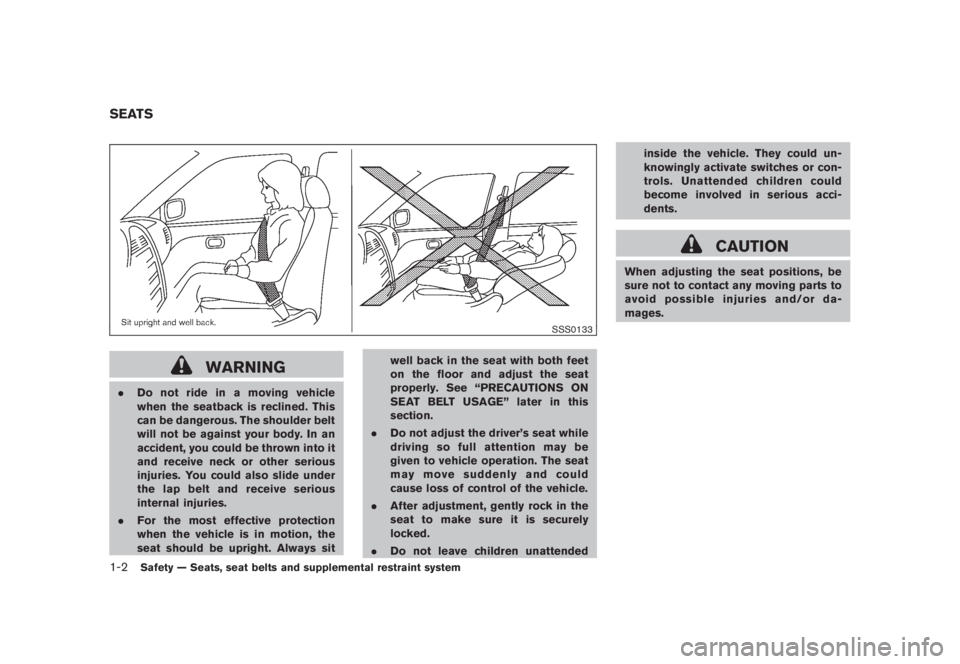
SSS0133
WARNING
.Do not ride in a moving vehicle
when the seatback is reclined. This
can be dangerous. The shoulder belt
will not be against your body. In an
accident, you could be thrown into it
and receive neck or other serious
injuries. You could also slide under
the lap belt and receive serious
internal injuries.
.For the most effective protection
when the vehicle is in motion, the
seat should be upright. Always sitwell back in the seat with both feet
on the floor and adjust the seat
properly. See “PRECAUTIONS ON
SEAT BELT USAGE” later in this
section.
.Do not adjust the driver’s seat while
driving so full attention may be
given to vehicle operation. The seat
may move suddenly and could
cause loss of control of the vehicle.
.After adjustment, gently rock in the
seat to make sure it is securely
locked.
.Do not leave children unattendedinside the vehicle. They could un-
knowingly activate switches or con-
trols. Unattended children could
become involved in serious acci-
dents.
CAUTION
When adjusting the seat positions, be
sure not to contact any moving parts to
avoid possible injuries and/or da-
mages.
SEATS1-2
Safety — Seats, seat belts and supplemental restraint system
Page 18 of 444
Black plate (15,1)
Model "Z51-D" EDITED: 2008/ 6/ 26
SSS0792
FRONT SEATS
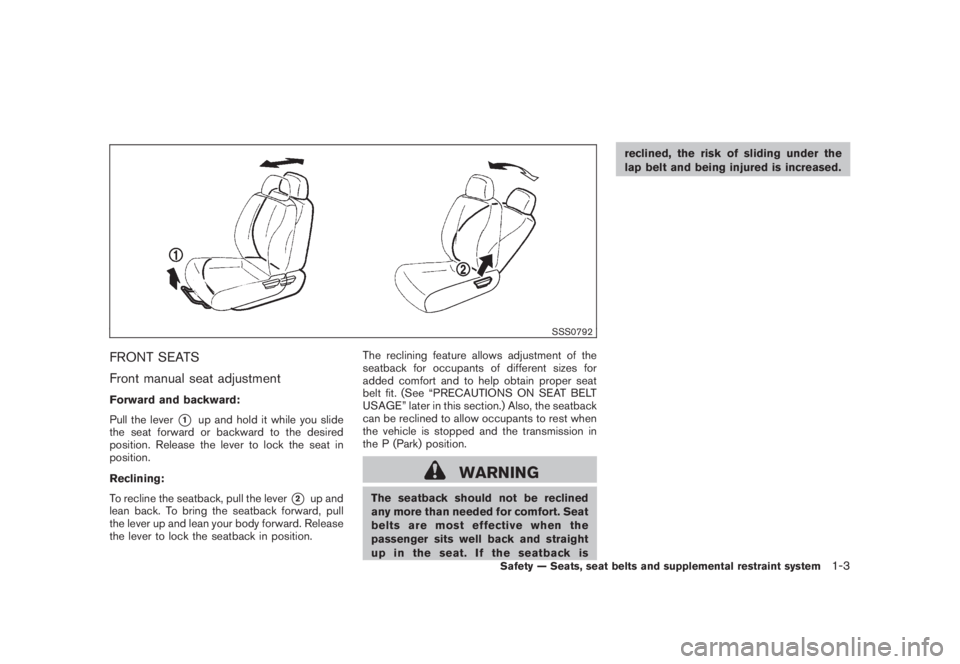
Front manual seat adjustmentForward and backward:
Pull the lever
*1
up and hold it while you slide
the seat forward or backward to the desired
position. Release the lever to lock the seat in
position.
Reclining:
To recline the seatback, pull the lever
*2
up and
lean back. To bring the seatback forward, pull
the lever up and lean your body forward. Release
the lever to lock the seatback in position.The reclining feature allows adjustment of the
seatback for occupants of different sizes for
added comfort and to help obtain proper seat
belt fit. (See “PRECAUTIONS ON SEAT BELT
USAGE” later in this section.) Also, the seatback
can be reclined to allow occupants to rest when
the vehicle is stopped and the transmission in
the P (Park) position.
WARNING
The seatback should not be reclined
any more than needed for comfort. Seat
belts are most effective when the
passenger sits well back and straight
up in the seat. If the seatback isreclined, the risk of sliding under the
lap belt and being injured is increased.
Safety — Seats, seat belts and supplemental restraint system
1-3
Page 23 of 444
Black plate (20,1)
Model "Z51-D" EDITED: 2008/ 6/ 26
center seat belt connector is com-
pletely secured.
.If the rear center seat belt connector
and the seatbacks are not secured
in the correct position, serious per-
sonal injury may result in an acci-
dent or sudden stop.
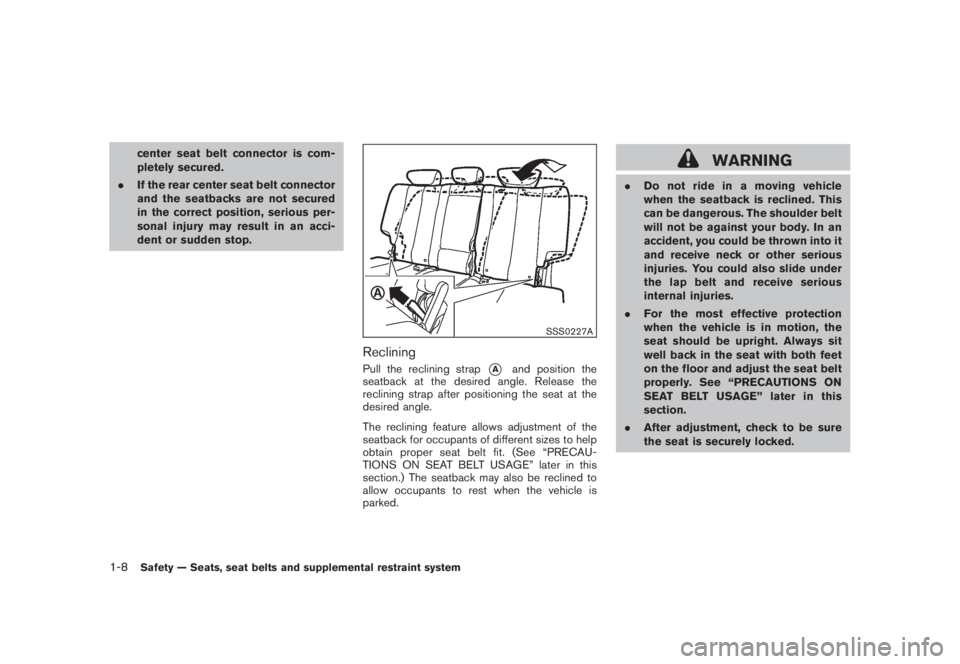
SSS0227A
RecliningPull the reclining strap
*A
and position the
seatback at the desired angle. Release the
reclining strap after positioning the seat at the
desired angle.
The reclining feature allows adjustment of the
seatback for occupants of different sizes to help
obtain proper seat belt fit. (See “PRECAU-
TIONS ON SEAT BELT USAGE” later in this
section.) The seatback may also be reclined to
allow occupants to rest when the vehicle is
parked.
WARNING
.Do not ride in a moving vehicle
when the seatback is reclined. This
can be dangerous. The shoulder belt
will not be against your body. In an
accident, you could be thrown into it
and receive neck or other serious
injuries. You could also slide under
the lap belt and receive serious
internal injuries.
.For the most effective protection
when the vehicle is in motion, the
seat should be upright. Always sit
well back in the seat with both feet
on the floor and adjust the seat belt
properly. See “PRECAUTIONS ON
SEAT BELT USAGE” later in this
section.
.After adjustment, check to be sure
the seat is securely locked.
1-8
Safety — Seats, seat belts and supplemental restraint system
Page 24 of 444
Black plate (21,1)
Model "Z51-D" EDITED: 2008/ 6/ 26
HEAD RESTRAINTS
WARNING
Head restraints should be adjusted
properly as they may provide significant
protection against injury in an accident.
Do not remove them. Check the adjust-
ment after someone else uses the seat.
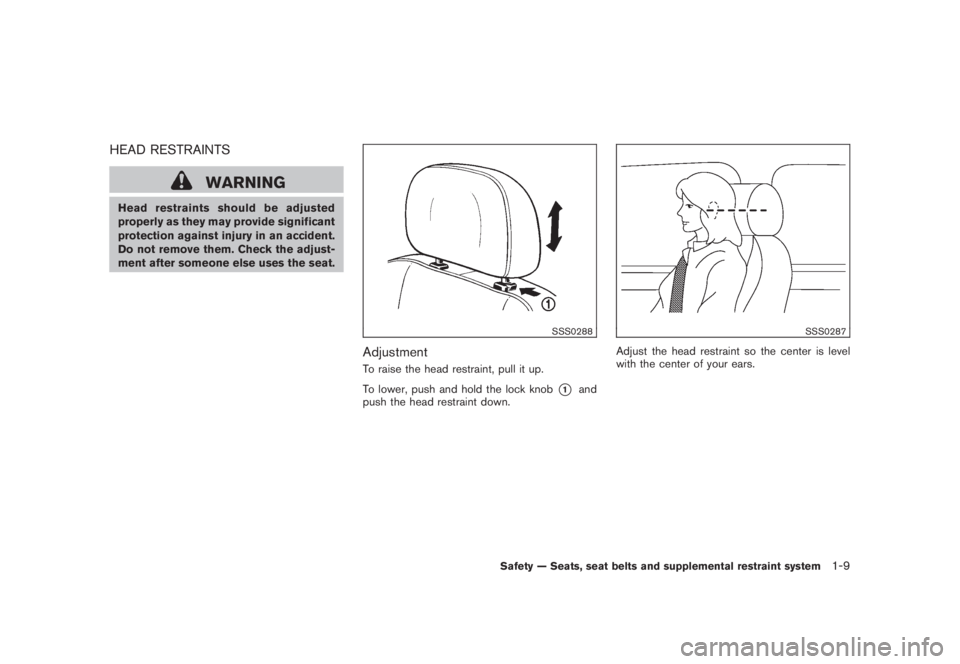
SSS0288
AdjustmentTo raise the head restraint, pull it up.
To lower, push and hold the lock knob
*1
and
push the head restraint down.
SSS0287
Adjust the head restraint so the center is level
with the center of your ears.
Safety — Seats, seat belts and supplemental restraint system
1-9
Page 30 of 444
Black plate (27,1)
Model "Z51-D" EDITED: 2008/ 6/ 26
properly.
SSS0292
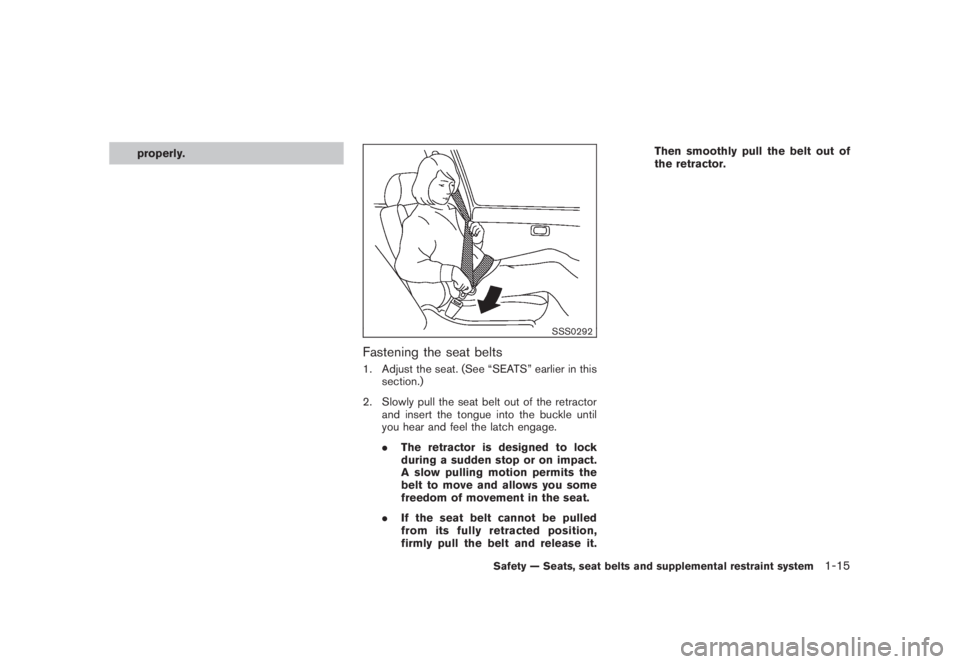
Fastening the seat belts1. Adjust the seat. (See “SEATS” earlier in this
section.)
2. Slowly pull the seat belt out of the retractor
and insert the tongue into the buckle until
you hear and feel the latch engage.
.The retractor is designed to lock
during a sudden stop or on impact.
A slow pulling motion permits the
belt to move and allows you some
freedom of movement in the seat.
.If the seat belt cannot be pulled
from its fully retracted position,
firmly pull the belt and release it.Then smoothly pull the belt out of
the retractor.
Safety — Seats, seat belts and supplemental restraint system
1-15
Page 31 of 444
Black plate (28,1)
Model "Z51-D" EDITED: 2008/ 6/ 26
SSS0290
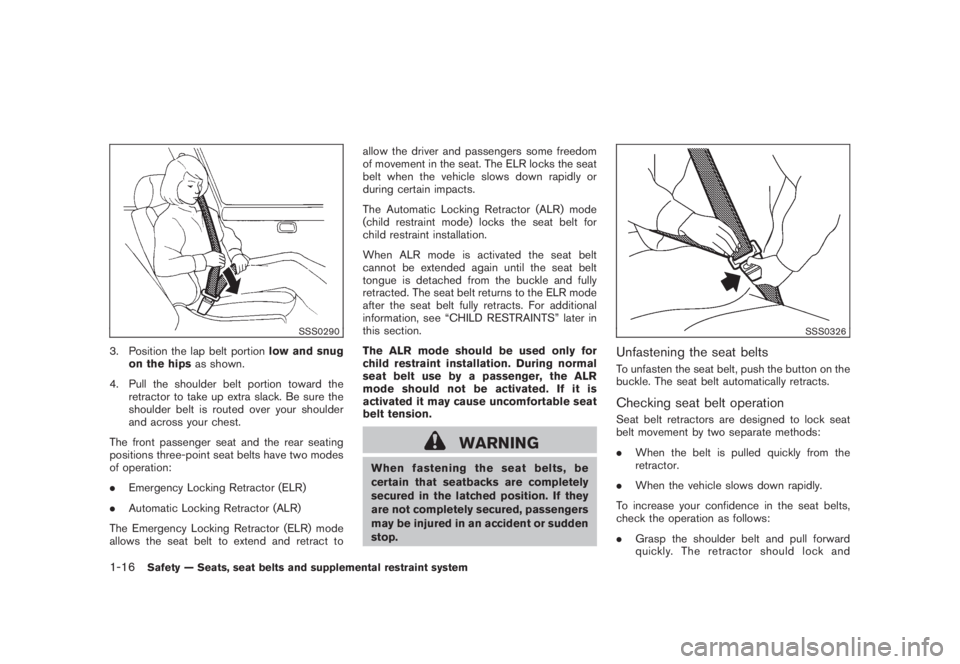
3. Position the lap belt portionlow and snug
on the hipsas shown.
4. Pull the shoulder belt portion toward the
retractor to take up extra slack. Be sure the
shoulder belt is routed over your shoulder
and across your chest.
The front passenger seat and the rear seating
positions three-point seat belts have two modes
of operation:
.Emergency Locking Retractor (ELR)
.Automatic Locking Retractor (ALR)
The Emergency Locking Retractor (ELR) mode
allows the seat belt to extend and retract toallow the driver and passengers some freedom
of movement in the seat. The ELR locks the seat
belt when the vehicle slows down rapidly or
during certain impacts.
The Automatic Locking Retractor (ALR) mode
(child restraint mode) locks the seat belt for
child restraint installation.
When ALR mode is activated the seat belt
cannot be extended again until the seat belt
tongue is detached from the buckle and fully
retracted. The seat belt returns to the ELR mode
after the seat belt fully retracts. For additional
information, see “CHILD RESTRAINTS” later in
this section.
The ALR mode should be used only for
child restraint installation. During normal
seat belt use by a passenger, the ALR
mode should not be activated. If it is
activated it may cause uncomfortable seat
belt tension.
WARNING
When fastening the seat belts, be
certain that seatbacks are completely
secured in the latched position. If they
are not completely secured, passengers
may be injured in an accident or sudden
stop.
SSS0326
Unfastening the seat beltsTo unfasten the seat belt, push the button on the
buckle. The seat belt automatically retracts.Checking seat belt operationSeat belt retractors are designed to lock seat
belt movement by two separate methods:
.When the belt is pulled quickly from the
retractor.
.When the vehicle slows down rapidly.
To increase your confidence in the seat belts,
check the operation as follows:
.Grasp the shoulder belt and pull forward
quickly. The retractor should lock and
1-16
Safety — Seats, seat belts and supplemental restraint system