tire pressure NISSAN MURANO 2011 Owner´s Manual
[x] Cancel search | Manufacturer: NISSAN, Model Year: 2011, Model line: MURANO, Model: NISSAN MURANO 2011Pages: 433, PDF Size: 3.7 MB
Page 337 of 433
Black plate (335,1)
Model "Z51-D" EDITED: 2010/ 7/ 23
as this may cause a malfunction of
the tire pressure sensors.
CHANGING A FLAT TIREIf you have a flat tire, follow the instructions
below.Stopping the vehicle1. Safely move the vehicle off the road andaway from traffic.
2. Turn on the hazard warning flashers.
3. Park on a level surface and apply the parking brake. Move the selector lever to the P
(Park) position.
4. Turn off the engine.
5. Raise the hood to warn other traffic, and to signal professional road assistance person-
nel that you need assistance.
6. Have all passengers get out of the vehicle and stand in a safe place, away from traffic
and clear of the vehicle.
WARNING
.Make sure the parking brake is
securely applied and the transmis-
sion is shifted into the P (Park)
position. .
Never change tires when the vehicle
is on a slope, ice or slippery areas.
This is hazardous.
. Never change tires if oncoming
traffic is close to your vehicle. Wait
for professional road assistance.
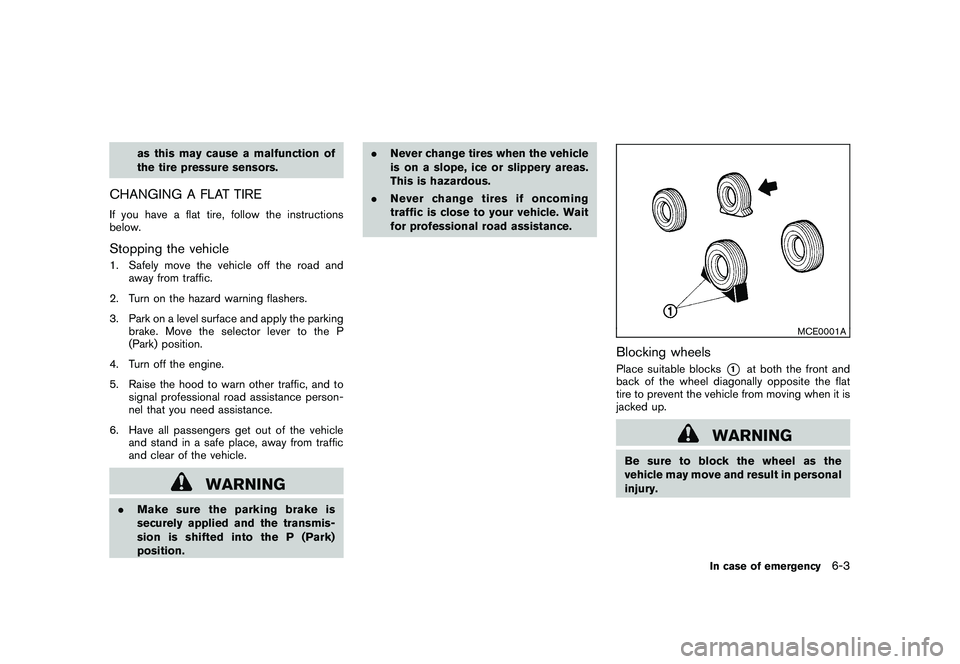
MCE0001A
Blocking wheelsPlace suitable blocks
*1
at both the front and
back of the wheel diagonally opposite the flat
tire to prevent the vehicle from moving when it is
jacked up.
WARNING
Be sure to block the wheel as the
vehicle may move and result in personal
injury.
In case of emergency
6-3
Page 342 of 433
Black plate (340,1)
Model "Z51-D" EDITED: 2010/ 7/ 23
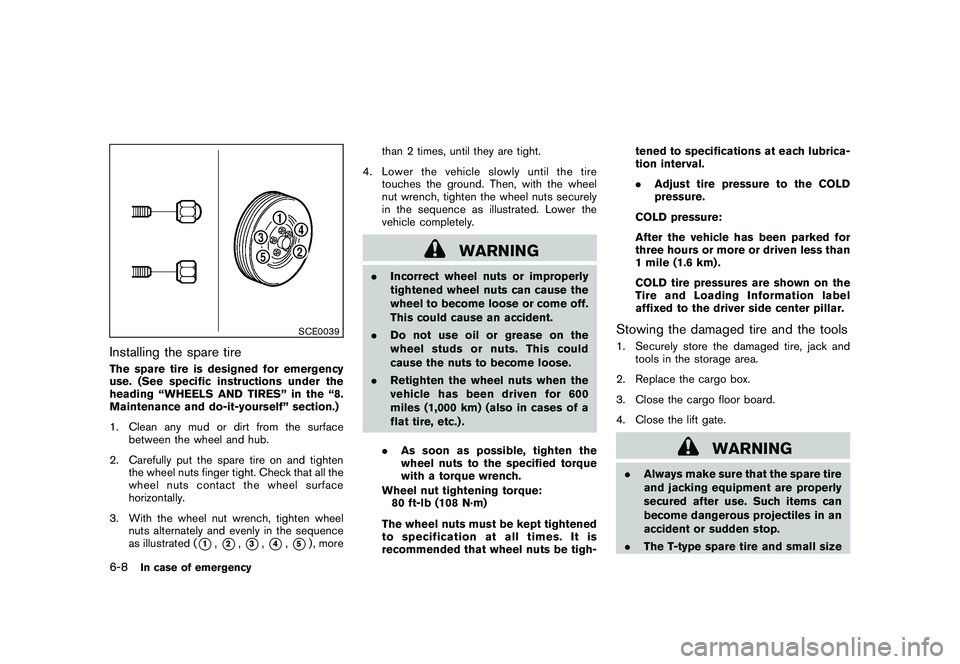
SCE0039
Installing the spare tireThe spare tire is designed for emergency
use. (See specific instructions under the
heading “WHEELS AND TIRES” in the “8.
Maintenance and do-it-yourself” section.)
1. Clean any mud or dirt from the surfacebetween the wheel and hub.
2. Carefully put the spare tire on and tighten the wheel nuts finger tight. Check that all the
wheel nuts contact the wheel surface
horizontally.
3. With the wheel nut wrench, tighten wheel nuts alternately and evenly in the sequence
as illustrated (
*1,*2,*3,*4,*5) , more than 2 times, until they are tight.
4. Lower the vehicle slowly until the tire touches the ground. Then, with the wheel
nut wrench, tighten the wheel nuts securely
in the sequence as illustrated. Lower the
vehicle completely.
WARNING
.Incorrect wheel nuts or improperly
tightened wheel nuts can cause the
wheel to become loose or come off.
This could cause an accident.
. Do not use oil or grease on the
wheel studs or nuts. This could
cause the nuts to become loose.
. Retighten the wheel nuts when the
vehicle has been driven for 600
miles (1,000 km) (also in cases of a
flat tire, etc.) .
. As soon as possible, tighten the
wheel nuts to the specified torque
with a torque wrench.
Wheel nut tightening torque: 80 ft-lb (108 N·m)
The wheel nuts must be kept tightened
to specification at all times. It is
recommended that wheel nuts be tigh- tened to specifications at each lubrica-
tion interval.
.
Adjust tire pressure to the COLD
pressure.
COLD pressure:
After the vehicle has been parked for
three hours or more or driven less than
1 mile (1.6 km) .
COLD tire pressures are shown on the
Tire and Loading Information label
affixed to the driver side center pillar.
Stowing the damaged tire and the tools1. Securely store the damaged tire, jack and tools in the storage area.
2. Replace the cargo box.
3. Close the cargo floor board.
4. Close the lift gate.
WARNING
. Always make sure that the spare tire
and jacking equipment are properly
secured after use. Such items can
become dangerous projectiles in an
accident or sudden stop.
. The T-type spare tire and small size
6-8
In case of emergency
Page 357 of 433
Black plate (25,1)
8 Maintenance and do-it-yourself
Model "Z51-D" EDITED: 2010/ 7/ 23
Maintenance requirement..................................... 8-2
Scheduled maintenance ................................... 8-2
General maintenance ...................................... 8-2
Where to go for service ................................... 8-2
General maintenance .......................................... 8-2
Explanation of maintenance items ....................... 8-2
Maintenance precautions ..................................... 8-5
Engine compartment check locations ...................... 8-6
VQ35DE engine ............................................ 8-6
Engine cooling system ......................................... 8-7
Checking engine coolant level ........................... 8-7
Changing engine coolant ................................. 8-8
Engine oil ......................................................... 8-8
Checking engine oil level ................................. 8-8
Changing engine oil and filter ............................ 8-8
Continuously Variable Transmission (CVT) fluid ........ 8-11
Power steering fluid .......................................... 8-11
Brake fluid ...................................................... 8-12
Window washer fluid ........................................ 8-12
Battery .......................................................... 8-13
Jump starting .............................................. 8-14
Variable voltage control system (if so equipped) ...... 8-15
Drive belt ....................................................... 8-15 Spark plugs
.................................................... 8-16
Replacing spark plugs ................................... 8-16
Air cleaner ...................................................... 8-16
Windshield wiper blades .................................... 8-17
Cleaning .................................................... 8-17
Replacing ................................................... 8-18
Rear window wiper blade ................................... 8-19
Brakes ........................................................... 8-19
Self-adjusting brakes .................................... 8-19
Brake pad wear warning ................................ 8-19
Fuses ............................................................ 8-20
Engine compartment ..................................... 8-20
Passenger compartment ................................ 8-21
Intelligent Key battery replacement ....................... 8-22
Lights ............................................................ 8-24
Headlights .................................................. 8-25
Exterior and interior lights ............................... 8-27
Wheels and tires .............................................. 8-30
Tire pressure ............................................... 8-30
Tire labeling ................................................ 8-33
Types of tires .............................................. 8-35
Tire chains .................................................. 8-36
Changing wheels and tires ............................. 8-36
Page 359 of 433
Black plate (361,1)
Model "Z51-D" EDITED: 2010/ 7/ 23
Lights*:Clean the headlights on a regular basis.
Make sure that the headlights, stop lights, tail
lights, turn signal lights, and other lights are all
operating properly and installed securely. Also
check headlight aim.
Road wheel nuts (lug nuts)*: When checking
the tires, make sure no wheel nuts are missing,
and check for any loose wheel nuts. Tighten if
necessary.
Tire rotation*: Tires should be rotated every
7,500 miles (12,000 km).
Tires*: Check the pressure with a gauge often
and always prior to long distance trips. If
necessary, adjust the pressure in all tires,
including the spare, to the pressure specified.
Check carefully for damage, cuts or excessive
wear.
Tire Pressure Monitoring System (TPMS)
transmitter components: Replace the TPMS
transmitter grommet seal, valve core and cap
when the tires are replaced due to wear or age.
Wheel alignment and balance: If the vehicle
should pull to either side while driving on a
straight and level road, or if you detect uneven or
abnormal tire wear, there may be a need for
wheel alignment.
If the steering wheel or seat vibrates at normal
highway speeds, wheel balancing may be
needed. For additional information regarding tires, refer
to “Important Tire Safety Information” (US) or
“Tire Safety Information” (Canada) in the War-
ranty Information Booklet.
Windshield:
Clean the windshield on a regular
basis. Check the windshield at least every six
months for cracks or other damage. Have a
damaged windshield repaired by a qualified
repair facility.
Windshield wiper blades*: Check for cracks
or wear if they do not wipe properly.
Inside the vehicleThe maintenance items listed here should be
checked on a regular basis, such as when
performing scheduled maintenance, cleaning
the vehicle, etc.
Accelerator pedal: Check the pedal for
smooth operation and make sure the pedal
does not catch or require uneven effort. Keep
the floor mat away from the pedal.
Brake pedal: Check the pedal for smooth
operation. If the brake pedal suddenly goes
down further than normal, the pedal feels
spongy or the vehicle seems to take longer to
stop, see a NISSAN dealer immediately. Keep
the floor mat away from the pedal.
Brakes: Check that the brakes do not pull the
vehicle to one side when applied. Continuously Variable Transmission (CVT)
P (Park) position mechanism:
On a fairly
steep hill, check that the vehicle is held securely
with the selector lever in the P (Park) position
without applying any brakes.
Parking brake: Check the parking brake
operation regularly. The vehicle should be
securely held on a fairly steep hill with only the
parking brake applied. If the parking brake needs
adjustment, see a NISSAN dealer.
Seat belts: Check that all parts of the seat belt
system (for example, buckles, anchors, adjusters
and retractors) operate properly and smoothly,
and are installed securely. Check the belt
webbing for cuts, fraying, wear or damage.
Seats: Check seat position controls such as
seat adjusters, seatback recliner, etc. to ensure
they operate smoothly and that all latches lock
securely in every position. Check that the head
restraints/headrests move up and down
smoothly and that the locks (if so equipped)
hold securely in all latched positions.
Steering wheel: Check for changes in the
steering conditions, such as excessive free play,
hard steering or strange noises.
Warning lights and chimes: Make sure that
all warning lights and chimes are operating
properly.
Maintenance and do-it-yourself
8-3
Page 386 of 433
Black plate (388,1)
Model "Z51-D" EDITED: 2010/ 7/ 23
If you have a flat tire, see “FLAT TIRE” in
the “6. In case of emergency” section.TIRE PRESSURE
Tire Pressure Monitoring System (TPMS)This vehicle is equipped with the Tire Pressure
Monitoring System (TPMS) . It monitors tire
pressure of all tires except the spare. When
the low tire pressure warning light is lit and the
CHECK TIRE PRESSURE warning appears on
the dot matrix liquid crystal display, one or more
of your tires is significantly under-inflated.
The TPMS will activate only when the vehicle is
driven at speeds above 16 MPH (25 km/h) .
Also, this system may not detect a sudden drop
in tire pressure (for example a flat tire while
driving) .
For more details, see “Low tire pressure warning
light” in the “2. Instruments and controls”
section, “TIRE PRESSURE MONITORING SYS-
TEM (TPMS)” in the “5. Starting and driving”
section and “TIRE PRESSURE MONITORING
SYSTEM (TPMS)” in the “6. In case of
emergency” section.Tire inflation pressureCheck the pressure of the tires (including
the spare) often and always prior to long
distance trips. The recommended tire
pressure specifications are shown on theTire and Loading Information label under
the “Cold Tire Pressure” heading. The Tire
and Loading Information label is affixed to
the driver side center pillar. Tire pressures
should be checked regularly because:
.
Most tires naturally lose air over time.
.
Tires can lose air suddenly when driven
over potholes or other objects or if the
vehicle strikes a curb while parking.
The tire pressures should be checked
when the tires are cold. The tires are
considered COLD after the vehicle has
been parked for 3 or more hours, or driven
less than 1 mile (1.6 km) at moderate
speeds.
Incorrect tire pressure, including un-
der inflation, may adversely affect tire
life and vehicle handling.
WARNING
.
Improperly inflated tires can fail
suddenly and cause an accident.
.
The Gross Vehicle Weight rating
(GVWR) is located on the F.M.V.
S.S./C.M.V.S.S. certification la-
bel. The vehicle weight capacity is indicated on the Tire and
Loading Information label. Do
not load your vehicle beyond
this capacity. Overloading your
vehicle may result in reduced
tire life, unsafe operating condi-
tions due to premature tire fail-
ure, or unfavorable handling
characteristics and could also
lead to a serious accident. Load-
ing beyond the specified capa-
city may also result in failure of
other vehicle components.
.
Before taking a long trip, or
whenever you heavily load your
vehicle, use a tire pressure
gauge to ensure that the tire
pressures are at the specified
level.
.
For additional information re-
garding tires, refer to “Important
Tire Safety Information” (US) or
“Tire Safety Information” (Cana-
da) in the Warranty Information
Booklet.
WHEELS AND TIRES8-30
Maintenance and do-it-yourself
Page 387 of 433
Black plate (389,1)
Model "Z51-D" EDITED: 2010/ 7/ 23
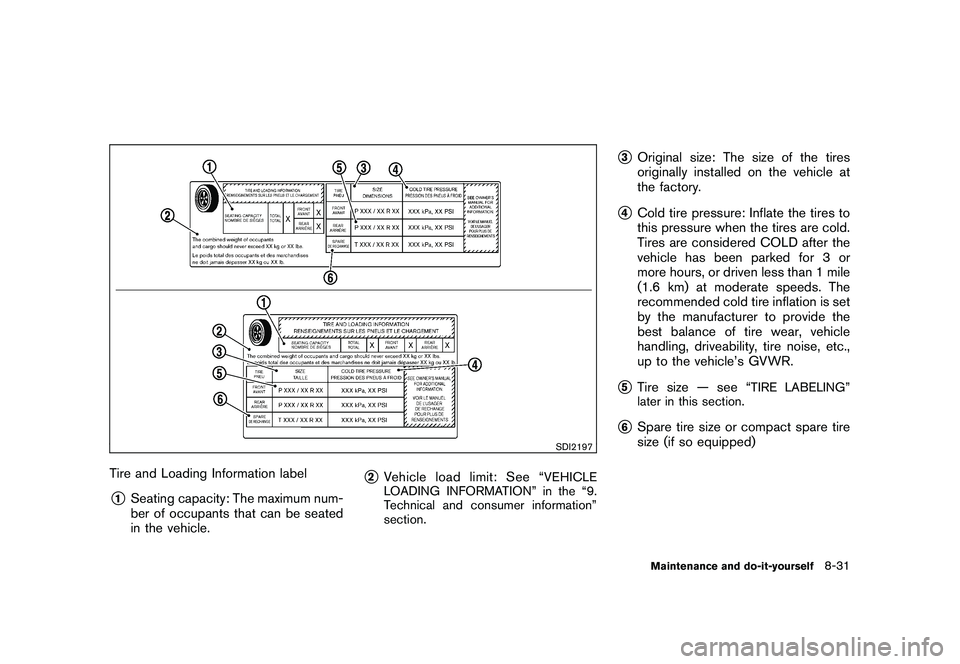
SDI2197
Tire and Loading Information label*1
Seating capacity: The maximum num-
ber of occupants that can be seated
in the vehicle.
*2
Vehicle load limit: See “
VEHICLE
LOADING INFORMATION” in the “9.
Technical and consumer information”
section.
*3
Original size: The size of the tires
originally installed on the vehicle at
the factory.
*4
Cold tire pressure: Inflate the tires to
this pressure when the tires are cold.
Tires are considered COLD after the
vehicle has been parked for 3 or
more hours, or driven less than 1 mile
(1.6 km) at moderate speeds. The
recommended cold tire inflation is set
by the manufacturer to provide the
best balance of tire wear, vehicle
handling, driveability, tire noise, etc.,
up to the vehicle’s GVWR.
*5
Tire size — see “
TIRE LABELING”
later in this section.
*6
Spare tire size or compact spare tire
size (if so equipped)Maintenance and do-it-yourself
8-31
Page 388 of 433
Black plate (390,1)
Model "Z51-D" EDITED: 2010/ 7/ 23
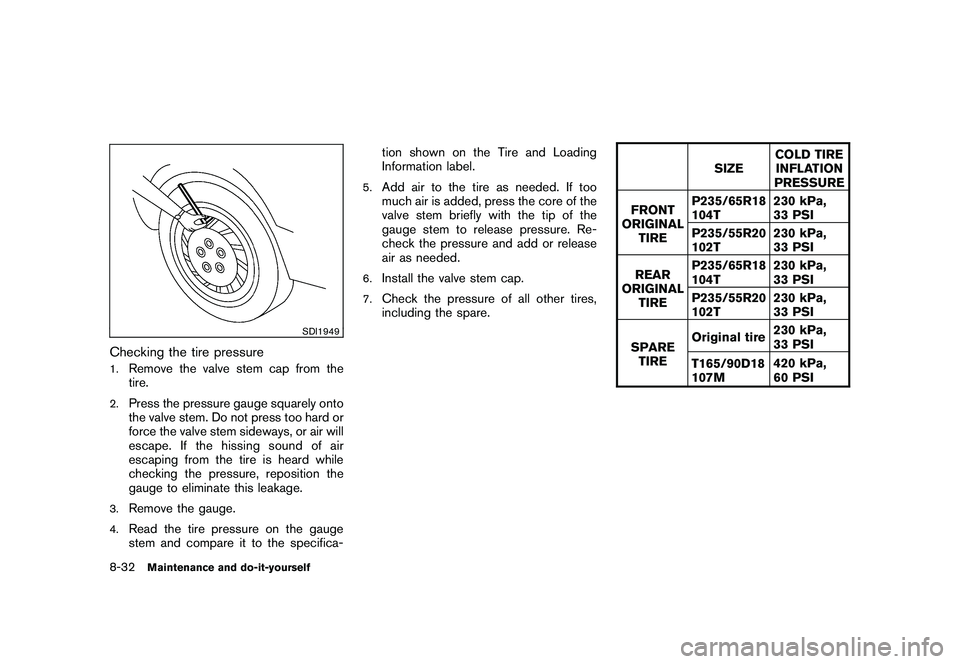
SDI1949
Checking the tire pressure1.
Remove the valve stem cap from the
tire.
2.
Press the pressure gauge squarely onto
the valve stem. Do not press too hard or
force the valve stem sideways, or air will
escape. If the hissing sound of air
escaping from the tire is heard while
checking the pressure, reposition the
gauge to eliminate this leakage.
3.
Remove the gauge.
4.
Read the tire pressure on the gauge
stem and compare it to the specifica-tion shown on the Tire and Loading
Information label.
5.
Add air to the tire as needed. If too
much air is added, press the core of the
valve stem briefly with the tip of the
gauge stem to release pressure. Re-
check the pressure and add or release
air as needed.
6.
Install the valve stem cap.
7.
Check the pressure of all other tires,
including the spare.
SIZE
COLD TIRE
INFLATION
PRESSURE
FRONT
ORIGINAL TIRE P235/65R18
104T
230 kPa,
33 PSI
P235/55R20
102T 230 kPa,
33 PSI
REAR
ORIGINAL
TIRE P235/65R18
104T
230 kPa,
33 PSI
P235/55R20
102T 230 kPa,
33 PSI
SPARE TIRE Original tire
230 kPa,
33 PSI
T165/90D18
107M 420 kPa,
60 PSI
8-32
Maintenance and do-it-yourself
Page 390 of 433
Black plate (392,1)
Model "Z51-D" EDITED: 2010/ 7/ 23
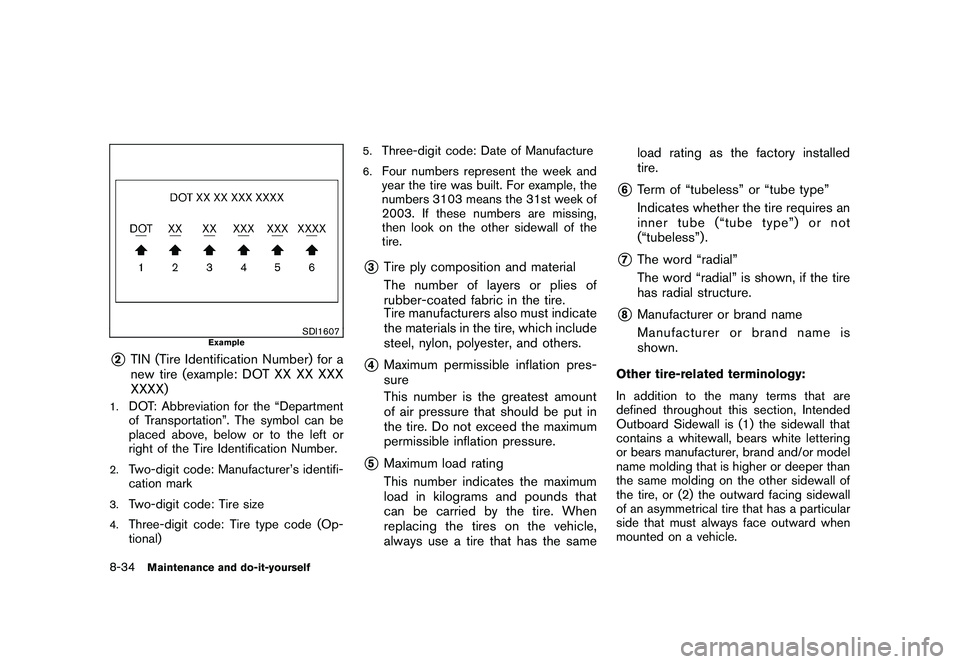
SDI1607
Example
*2
TIN (Tire Identification Number) for a
new tire (example: DOT XX XX XXX
XXXX)
1.
DOT: Abbreviation for the “Department
of Transportation”. The symbol can be
placed above, below or to the left or
right of the Tire Identification Number.
2.
Two-digit code: Manufacturer’s identifi-
cation mark
3.
Two-digit code: Tire size
4.
Three-digit code: Tire type code (Op-
tional)
5.
Three-digit code: Date of Manufacture
6.
Four numbers represent the week and
year the tire was built. For example, the
numbers 3103 means the 31st week of
2003. If these numbers are missing,
then look on the other sidewall of the
tire.
*3
Tire ply composition and material
The number of layers or plies of
rubber-coated fabric in the tire.
Tire manufacturers also must indicate
the materials in the tire, which include
steel, nylon, polyester, and others.
*4
Maximum permissible inflation pres-
sure
This number is the greatest amount
of air pressure that should be put in
the tire. Do not exceed the maximum
permissible inflation pressure.
*5
Maximum load rating
This number indicates the maximum
load in kilograms and pounds that
can be carried by the tire. When
replacing the tires on the vehicle,
always use a tire that has the sameload rating as the factory installed
tire.
*6
Term of “tubeless” or “tube type”
Indicates whether the tire requires an
inner tube (“tube type”) or not
(“tubeless”) .
*7
The word “radial”
The word “radial” is shown, if the tire
has radial structure.
*8
Manufacturer or brand name
Manufacturer or brand name is
shown.
Other tire-related terminology:
In addition to the many terms that are
defined throughout this section, Intended
Outboard Sidewall is (1) the sidewall that
contains a whitewall, bears white lettering
or bears manufacturer, brand and/or model
name molding that is higher or deeper than
the same molding on the other sidewall of
the tire, or (2) the outward facing sidewall
of an asymmetrical tire that has a particular
side that must always face outward when
mounted on a vehicle.
8-34
Maintenance and do-it-yourself
Page 392 of 433
Black plate (394,1)
Model "Z51-D" EDITED: 2010/ 7/ 23
.ONLY use spare tires specified for
the AWD model.
If excessive tire wear is found, it is recom-
mended that all four tires be replaced with tires
of the same size, brand, construction and tread
pattern. The tire pressure and wheel alignment
should also be checked and corrected as
necessary. Contact a NISSAN dealer.TIRE CHAINSUse of tire chains may be prohibited according
to location. Check the local laws before instal-
ling tire chains. When installing tire chains, make
sure they are the proper size for the tires on your
vehicle and are installed according to the chain
manufacturer’s suggestions. Use only SAE
Class S chains. Class “S” chains are used on
vehicles with restricted tire to vehicle clearance.
Vehicles that can use Class “S” chains are
designed to meet the SAE standard minimum
clearances between the tire and the closest
vehicle suspension or body component required
to accommodate the use of a winter traction
device (tire chains or cables) . The minimum
clearances are determined using the factory
equipped tire size. Other types may damage
your vehicle. Use chain tensioners when re-
commended by the tire chain manufacturer to
ensure a tight fit. Loose end links of the tire
chain must be secured or removed to prevent
the possibility of whipping action damage to the fenders or underbody. If possible, avoid fully
loading your vehicle when using tire chains. In
addition, drive at a reduced speed. Otherwise,
your vehicle may be damaged and/or vehicle
handling and performance may be adversely
affected.
Tire chains must be installed only on the
front wheels and not on the rear wheels.
Never install tire chains on a TEMPORARY USE
ONLY spare tire.
Do not use tire chains on dry roads. Driving with
tire chains in such conditions can cause damage
to the various mechanisms of the vehicle due to
some overstress.
SDI1662
CHANGING WHEELS AND TIRES
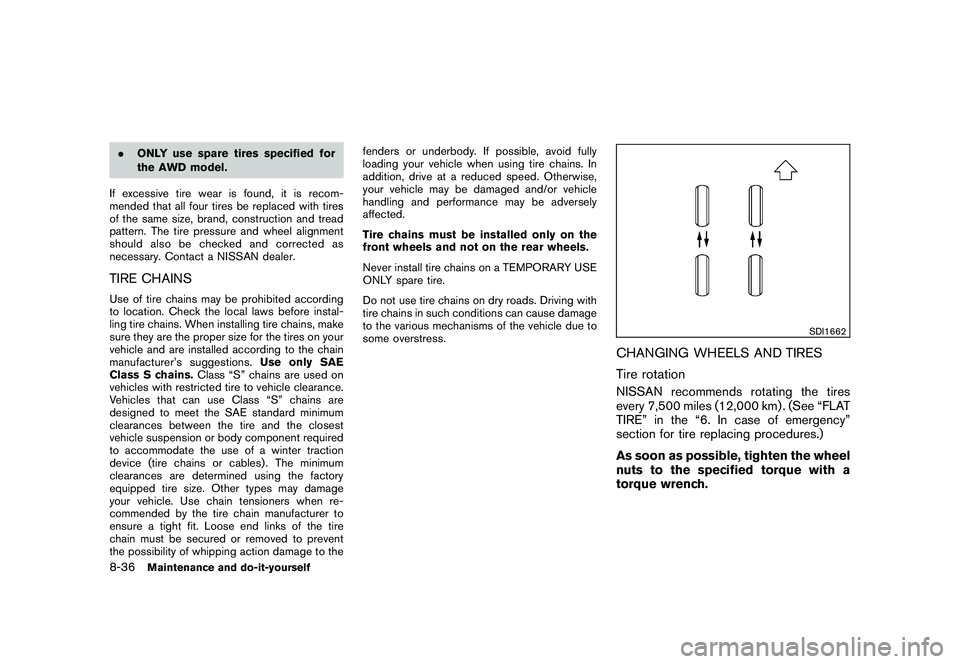
Tire rotationNISSAN recommends rotating the tires
every 7,500 miles (12,000 km) . (See “FLAT
TIRE” in the “6. In case of emergency”
section for tire replacing procedures.)
As soon as possible, tighten the wheel
nuts to the specified torque with a
torque wrench.
8-36
Maintenance and do-it-yourself
Page 393 of 433
Black plate (395,1)
Model "Z51-D" EDITED: 2010/ 7/ 23
Wheel nut tightening torque:80 ft-lb (108 N·m)
The wheel nuts must be kept tigh-
tened to the specification at all times.
It is recommended that wheel nuts be
tightened to the specification at each
tire rotation interval.
WARNING
.
After rotating the tires, check
and adjust the tire pressure.
.
Retighten the wheel nuts when
the vehicle has been driven for
600 miles (1,000 km) (also in
cases of a flat tire, etc.) .
.
Do not include the spare tire or
any other small size spare tire in
the tire rotation.
.
For additional information re-
garding tires, refer to “Important
Tire Safety Information” (US) or
“Tire Safety Information” (Cana-
da) in the Warranty Information
Booklet.
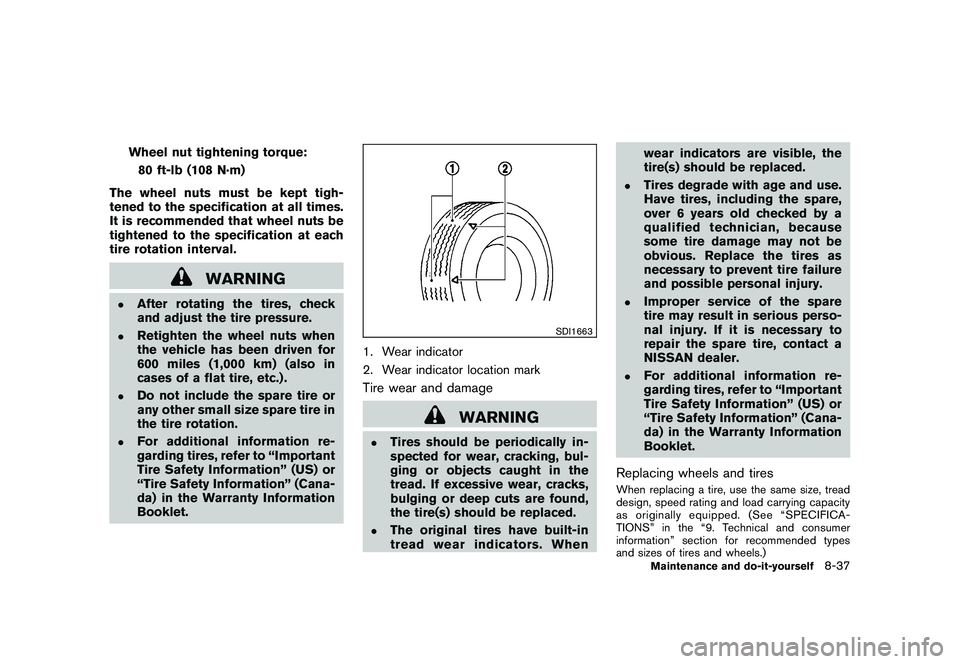
SDI1663
1. Wear indicator
2. Wear indicator location markTire wear and damage
WARNING
.
Tires should be periodically in-
spected for wear, cracking, bul-
ging or objects caught in the
tread. If excessive wear, cracks,
bulging or deep cuts are found,
the tire(s) should be replaced.
.
The original tires have built-in
tread wear indicators. When wear indicators are visible, the
tire(s) should be replaced.
.
Tires degrade with age and use.
Have tires, including the spare,
over 6 years old checked by a
qualified technician, because
some tire damage may not be
obvious. Replace the tires as
necessary to prevent tire failure
and possible personal injury.
.
Improper service of the spare
tire may result in serious perso-
nal injury. If it is necessary to
repair the spare tire, contact a
NISSAN dealer.
.
For additional information re-
garding tires, refer to “Important
Tire Safety Information” (US) or
“Tire Safety Information” (Cana-
da) in the Warranty Information
Booklet.
Replacing wheels and tiresWhen replacing a tire, use the same size, tread
design, speed rating and load carrying capacity
as originally equipped. (See “SPECIFICA-
TIONS” in the “9. Technical and consumer
information” section for recommended types
and sizes of tires and wheels.)
Maintenance and do-it-yourself
8-37