automatic NISSAN MURANO 2016 3.G Workshop Manual
[x] Cancel search | Manufacturer: NISSAN, Model Year: 2016, Model line: MURANO, Model: NISSAN MURANO 2016 3.GPages: 465, PDF Size: 6.59 MB
Page 218 of 465
NOTE:
●Odors from inside and outside the ve-
hicle can build up in the air conditioner
unit. Odor can enter the passenger
compartment through the vents.
●When parking, set the heater and air
conditioner controls to turn off air re-
circulation to allow fresh air into the
passenger compartment. This should
help reduce odors inside the vehicle.
AUTOMATIC OPERATION
Cooling and/or dehumidified heating
(AUTO)
This mode may be used all year round as the
system automatically works to keep a constant
temperature. Air flow distribution and fan speed
are also controlled automatically.
1. Press the AUTO button on. The indicator on
the button will illuminate.
2. Turn the temperature control dial to the left
or right to set the desired temperature.
●The temperature of the passenger compart-
ment will be maintained automatically. Air
flow distribution and fan speed are also con-
trolled automatically.●A visible mist may be seen coming from the
vents in hot, humid conditions as the air is
cooled rapidly. This does not indicate a mal-
function.
3.
You can individually set driver’s and front pas-
senger’s side temperature using each tem-
perature control dial. When the DUAL button
is pressed or passenger’s side temperature
dial is turned, the DUAL indicator will come
on. To turn off the passenger’s side tempera-
ture control, press the DUAL button.
Heating (A/C OFF)
The air conditioner does not activate. When you
need to heat only, use this mode.
1. Press the AUTO button.
2. Turn the temperature control dial to set the
desired temperature.
●The temperature of the passenger compart-
ment will be maintained automatically. Air
flow distribution and fan speed are also con-
trolled automatically.
●Do not set the temperature lower than the
outside air temperature. Otherwise, the sys-
tem may not work properly.
●Not recommended if windows fog up.
Dehumidified defrosting or defogging
1. Press thefront defroster button on.
The indicator light on the button will come
on.
2. Turn the temperature control dial to set the
maximum temperature to aid in defrosting or
defogging.
●To quickly remove ice from the outside of the
windows, use the
fan speed control
buttons to set the fan speed to maximum.
●As soon as possible after the windshield is
clean, press the AUTO button to return to
the automatic mode.
●When the
front defroster button is
pressed, the air conditioner will automati-
cally be turned on at outside temperatures
above 36°F (2°C) . The air recirculate mode
automatically turns off, allowing outside air
to be drawn into the passenger compart-
ment to further improve the defogging per-
formance. When the air recirculate mode
automatically turns off, the air fresh mode will
automatically turn on.
Display screen, heater, air conditioner, audio and phone systems4-27
Page 219 of 465
Remote engine start logic (if so
equipped)
Vehicles equipped with automatic climate con-
trols and remote start function may go into auto-
matic heating or cooling mode when remote start
is activated depending on outside and cabin tem-
peratures. Automatic temperature depends on
outside and cabin temperatures. During this pe-
riod, the climate control display and buttons will
be inoperable until the ignition switch is turned
on.
MANUAL OPERATION
Fan speed control
Press thefan speed control buttons to
manually control the fan speed.
Press the AUTO button to return to automatic
control of the fan speed.
Air recirculation
Press theair recirculation button to recir-
culate interior air inside the vehicle. The
indicator light on the button will come on.
The air recirculation cannot be activated when
the air conditioner is in the
front defrosting
mode.
Fresh air intake
Press thefresh air intake button to draw
outside air into the passenger compartment.
Air flow control
Pressing the MODE button manually controls air
flow and selects the air outlet:
— Air flows mainly from center and
side vents.
— Air flows mainly from center and
side vents and foot outlets.
— Air flows mainly from foot outlets
and partly from defroster.
— Air flows mainly from defroster
and foot outlets.
To turn system off
Press the ON-OFF button.
Rear window and outside mirror (if so
equipped) defroster switch
For additional information, refer to “Rear window
and outside mirror (if so equipped) defroster
switch” in the “Instruments and controls” section
of this manual.
OPERATING TIPS
●When the engine coolant temperature and
outside air temperature are low, the air flow
from the foot outlets may not operate for a
maximum of 150 seconds. However, this is
not a malfunction. After the coolant tempera-
ture warms up, air flow from the foot outlets
will operate normally.
●Keep the moonroof (if so equipped) closed
while the air conditioner is in operation.
●If you feel that the air flow mode you have
selected and the outlets the air is coming out
do not match, select the
mode.
●When you change the air flow mode, you
may feel air flow from the feet vents for just a
moment. This is not a malfunction.
4-28Display screen, heater, air conditioner, audio and phone systems
Page 227 of 465
USB (Universal Serial Bus)
Connection Port
WARNING
Do not connect, disconnect, or operate the
USB device while driving. Doing so can be
a distraction. If distracted you could lose
control of your vehicle and cause an acci-
dent or serious injury.
CAUTION
●Do not force the USB device into the
USB port. Inserting the USB device
tilted or up-side-down into the port may
damage the port. Make sure that the
USB device is connected correctly into
the USB port.
●Do not grab the USB port cover (if so
equipped) when pulling the USB device
out of the port. This could damage the
port and the cover.
●Do not leave the USB cable in a place
where it can be pulled unintentionally.
Pulling the cable may damage the port.
The vehicle is not equipped with a USB device.
USB devices should be purchased separately as
necessary.This system cannot be used to format USB de-
vices. To format a USB device, use a personal
computer.
In some jurisdictions, the USB device for the front
seats plays only sound without images for regu-
latory reasons, even when the vehicle is parked.
This system supports various USB memory de-
vices, USB hard drives and iPod® players. Some
USB devices may not be supported by this sys-
tem.
●Partitioned USB devices may not play cor-
rectly.
●Some characters used in other languages
(Chinese, Japanese, etc.) may not appear
properly in the display. Using English lan-
guage characters with a USB device is rec-
ommended.
●Not all Android devices are supported for
USB audio.
●For Apple products, only Apple or Apple
certified USB cables are supported. Some
aftermarket cables may not be supported.
General notes for USB use
●For additional information, refer to your de-
vice manufacturer’s owner information re-
garding the proper use and care of the de-
vice.Notes for iPod® use
iPod® is a trademark of Apple Inc., registered in
the U.S. and other countries.
●Improperly plugging in the iPod® may cause
a checkmark to be displayed on and off
(flickering) . Always make sure that the
iPod® is connected properly.
●An iPod® nano (1st Generation) may remain
in fast forward or rewind mode if it is con-
nected during a seek operation. In this case,
please manually reset the iPod®.
●An iPod® nano (2nd Generation) will con-
tinue to fast-forward or rewind if it is discon-
nected during a seek operation.
●An incorrect song title may appear when the
Play Mode is changed while using an iPod®
nano (2nd Generation) .
●Audiobooks may not play in the same order
as they appear on an iPod®.
●Large video files cause slow responses in an
iPod®. The vehicle center display may mo-
mentarily black out, but will soon recover.
●If an iPod® automatically selects large video
files while in the shuffle mode, the vehicle
center display may momentarily black out,
but will soon recover.
4-36Display screen, heater, air conditioner, audio and phone systems
Page 231 of 465
Bass, treble, balance and fade can also be ad-
justed by pressing the SETTING button and turn-
ing the TUNE-SCROLL knob to select the item to
adjust. When the desired item is shown on the
display, turn the tuning to adjust and then press
the SETTING button until the display returns to
the main audio screen. If the button is not
pressed for approximately 10 seconds, the radio
or CD display will automatically reappear.
Apps button
Press the Apps button to launch the Smartphone
Integration Mode. For additional information, re-
fer to “NissanConnect
SMMobile Apps” in this
section regarding this feature.
For additional information, refer to “Bluetooth®
Hands-Free Phone system without Navigation” in
this section regarding connecting your phone.
BACK button
Press the BACK button to return to the previous
menu screen.
DISP (display) button
The DISP (display) button turns the display
screen on or off.
FM/AM/SAT radio operation
FM·AM button
Press the FM·AM button to change the band as
follows:
AM→FM1→FM2→AM
If another audio source is playing when the
FM·AM button is pressed, the audio source play-
ing will automatically be turned off and the last
radio station played will begin playing.
The FM stereo indicator (STEREO) is shown on
the screen during FM stereo reception. When the
stereo broadcast signal is weak, the radio auto-
matically changes from stereo to monaural re-
ception.
XM band select
Press the XM button to change the band as
follows:
XM1*→XM2*→XM3*→XM1
When the XM button is pressed while the ignition
switch is in the ACC or ON position, the radio will
come on at the station last played.
The last station played will also come on when
the
(power) button is pressed on.
*When the XM button is pressed, the satellite
radio reception will not be available unless an
optional satellite receiver and antenna are in-stalled and a SiriusXM® Satellite Radio service
subscription is active. Satellite radio is not avail-
able in Alaska, Hawaii and Guam.
If a compact disc is playing when the XM button
is pressed, the compact disc will automatically be
turned off and the last radio station played will
come on.
TUNE-SCROLL knob (Tuning)
Turn the TUNE-SCROLL knob to the left or right
for manual tuning.
SEEK tuning
Press the
orSEEK buttons to tune
from low to high or high to low frequencies and to
stop at the next broadcasting station.
SCAN tuning
Press the SCAN button to stop at each broad-
casting station for 5 seconds. SCAN will appear
on the screen while the radio is scan tuning.
Pressing the button again during this 5 second
period will stop SCAN tuning and the radio will
remain tuned to that station. If the SCAN button is
not pressed within 5 seconds, SCAN tuning
moves to the next station.
4-40Display screen, heater, air conditioner, audio and phone systems
Page 232 of 465
1 to 6 Station memory operations
Six stations can be set for the AM band. Twelve
stations can be set for the FM band (six for FM1,
six for FM2) .
1. Choose the radio band AM, FM1 or FM2
using the FM·AM button.
2. Tune to the desired station using the
SEEK button or theTRACK button.
Press and hold any of the desired station
memory buttons (1 – 6) until the preset
number is updated on the display and a
beep is heard.
3. Programming is now complete.
4. Other buttons can be set in the same man-
ner.
If the battery cable is disconnected, or if the fuse
opens, the radio memory will be canceled. In that
case, reset the desired stations.
Compact disc (CD) player operation
If the radio is already operating, it automatically
turns off and the compact disc begins to play.
MEDIA button
With a CD loaded, press the MEDIA button until
the CD mode is displayed on the screen.CD/MP3 display mode
While listening to an MP3/WMA CD, certain text
may be displayed on the screen if the CD has
been encoded with text information. Depending
on how the MP3/WMA CD is encoded, informa-
tion such as Artist, Song and Folder will be dis-
played.
The track number and the total number of tracks
in the current folder or on the current disc are
displayed on the screen as well.
SEEK/TRACK (Reverse or
Fast Forward) button
Press and hold the
orSEEK/TRACK button for 1.5 seconds while the
compact disc is playing to reverse or fast forward
the track being played. The compact disc plays at
an increased speed while reversing or fast for-
warding. When the button is released, the com-
pact disc returns to normal play speed.
SEEK/TRACK button
Press the
SEEK/TRACK button while a CD
or MP3/WMA CD is playing to return to the
beginning of the current track. Press
the
SEEK/TRACK button several times to
skip backward several tracks.Press the
SEEK/TRACK button while a CD
or MP3/WMA CD is playing to advance one
track. Press the
SEEK/TRACK button sev-
eral times to skip forward several tracks. If the last
track on a CD is skipped, the first track on the
disc is played. If the last track in a folder of an
MP3/WMA CD is skipped, the first track of the
next folder is played.
TUNE-SCROLL knob (MP3/WMA CD only)
If an MP3/WMA CD with multiple folders is play-
ing, turn the TUNE-SCROLL knob to change
folders. Turn the knob to the left to skip back a
folder. Turn the knob to the right to skip ahead a
folder.
RPT (repeat) button
When the RPT (repeat) button is pressed while a
compact disc is playing, the play pattern can be
changed as follows:
CD:
1 Track Repeat←→OFF
CD with MP3 or WMA:
1 Folder Repeat→1 Track Repeat→OFF
1 Track Repeat: the current track will be re-
peated.
1 Folder Repeat: the current folder will be re-
peated.
Display screen, heater, air conditioner, audio and phone systems4-41
Page 243 of 465
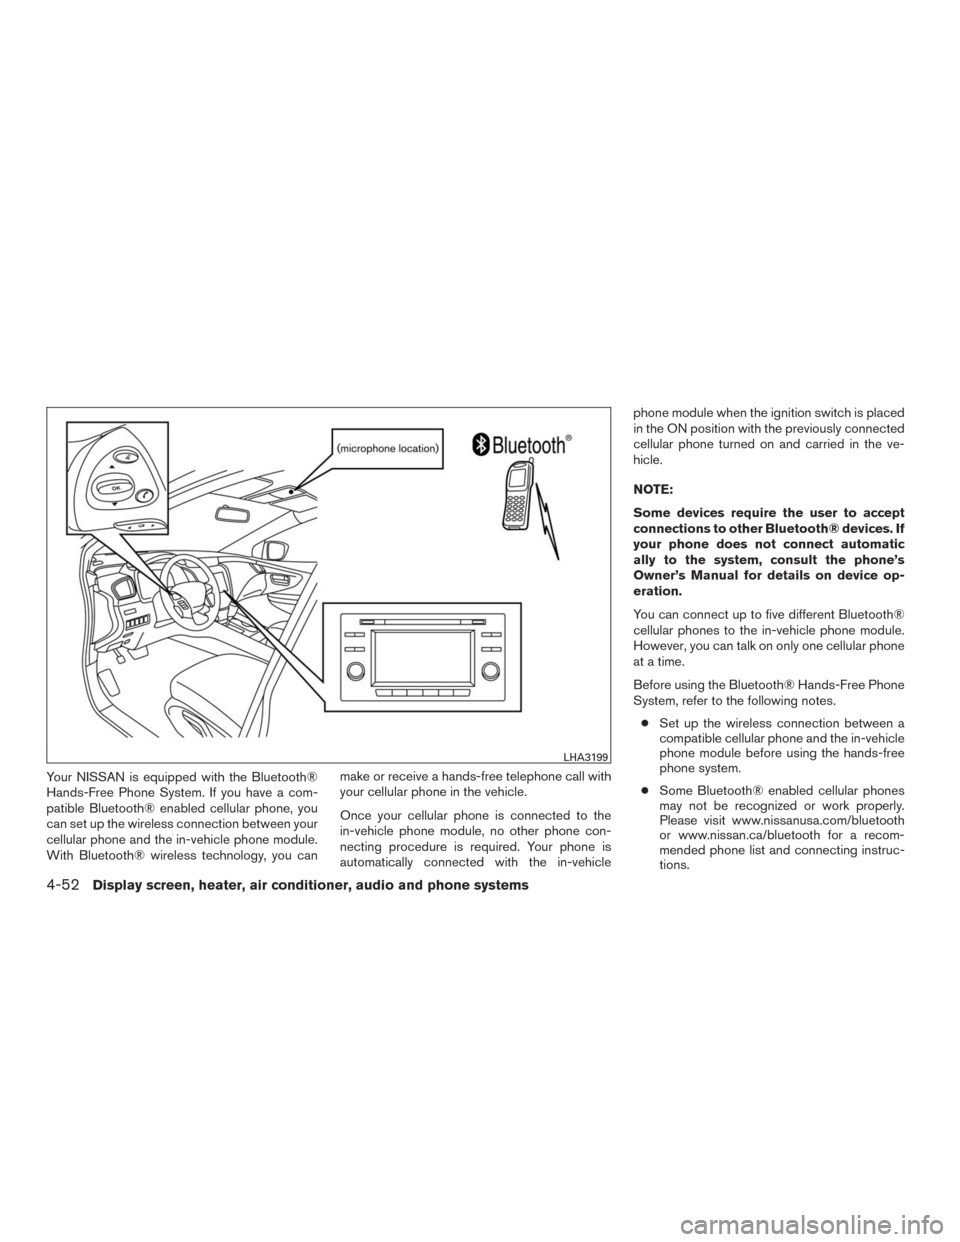
Your NISSAN is equipped with the Bluetooth®
Hands-Free Phone System. If you have a com-
patible Bluetooth® enabled cellular phone, you
can set up the wireless connection between your
cellular phone and the in-vehicle phone module.
With Bluetooth® wireless technology, you canmake or receive a hands-free telephone call with
your cellular phone in the vehicle.
Once your cellular phone is connected to the
in-vehicle phone module, no other phone con-
necting procedure is required. Your phone is
automatically connected with the in-vehiclephone module when the ignition switch is placed
in the ON position with the previously connected
cellular phone turned on and carried in the ve-
hicle.
NOTE:
Some devices require the user to accept
connections to other Bluetooth® devices. If
your phone does not connect automatic
ally to the system, consult the phone’s
Owner’s Manual for details on device op-
eration.
You can connect up to five different Bluetooth®
cellular phones to the in-vehicle phone module.
However, you can talk on only one cellular phone
at a time.
Before using the Bluetooth® Hands-Free Phone
System, refer to the following notes.
●Set up the wireless connection between a
compatible cellular phone and the in-vehicle
phone module before using the hands-free
phone system.
●Some Bluetooth® enabled cellular phones
may not be recognized or work properly.
Please visit www.nissanusa.com/bluetooth
or www.nissan.ca/bluetooth for a recom-
mended phone list and connecting instruc-
tions.
LHA3199
4-52Display screen, heater, air conditioner, audio and phone systems
Page 252 of 465
●Send Text
Speak this command to send a text message
response to the sender of the text message.
●Read Text
Speak this command to read the text mes-
sage again.
●Previous Text
Speak this command to move to the previ-
ous text message (if available) .
●Next Text
Speak this command to move to the next text
message (if available) .
NOTE:
Text messages are only displayed if the
vehicle speed is less than 5 mph (8 km/h).
BLUETOOTH® SETTINGS
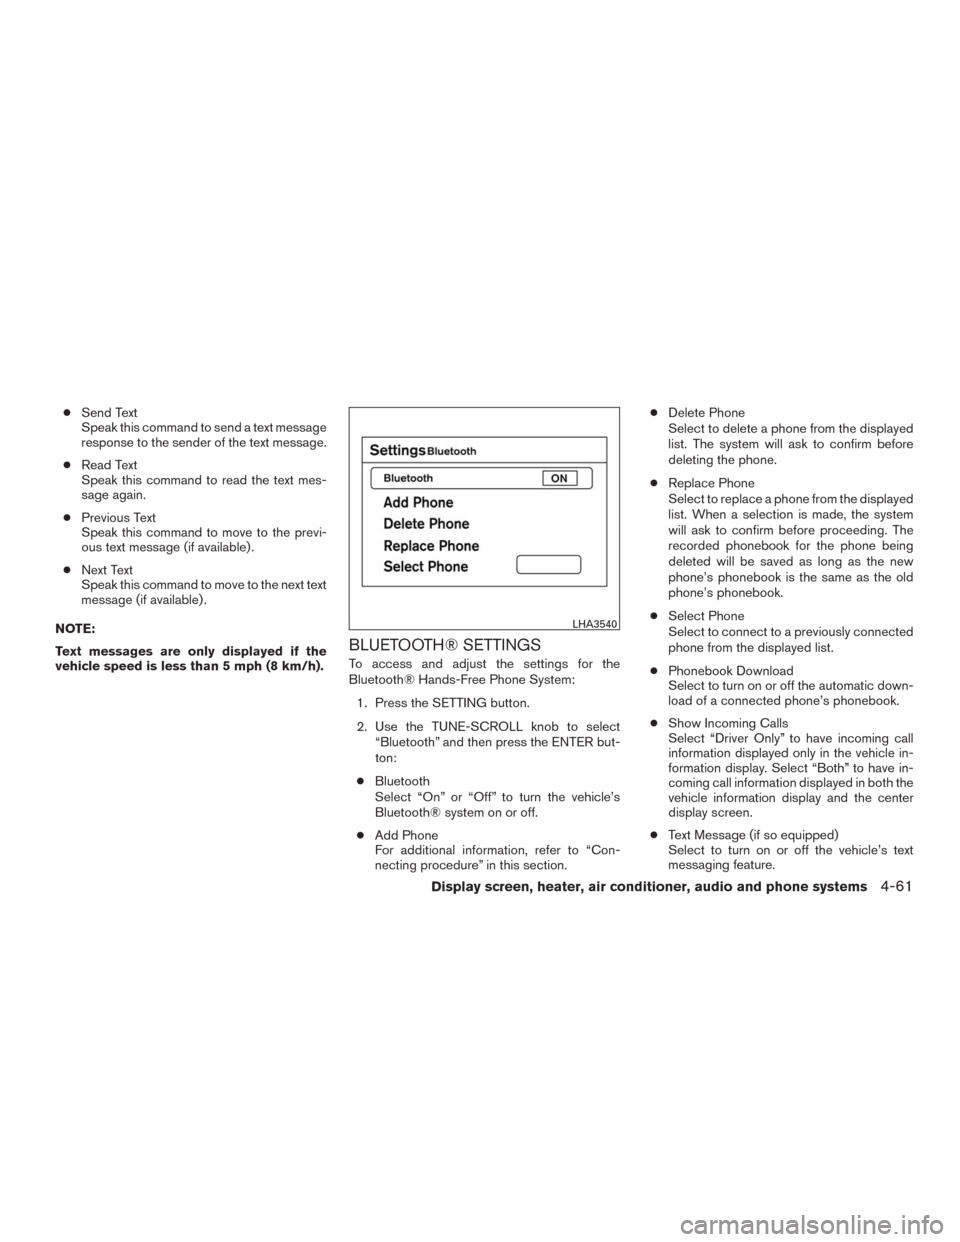
To access and adjust the settings for the
Bluetooth® Hands-Free Phone System:
1. Press the SETTING button.
2. Use the TUNE-SCROLL knob to select
“Bluetooth” and then press the ENTER but-
ton:
●Bluetooth
Select “On” or “Off” to turn the vehicle’s
Bluetooth® system on or off.
●Add Phone
For additional information, refer to “Con-
necting procedure” in this section.●Delete Phone
Select to delete a phone from the displayed
list. The system will ask to confirm before
deleting the phone.
●Replace Phone
Select to replace a phone from the displayed
list. When a selection is made, the system
will ask to confirm before proceeding. The
recorded phonebook for the phone being
deleted will be saved as long as the new
phone’s phonebook is the same as the old
phone’s phonebook.
●Select Phone
Select to connect to a previously connected
phone from the displayed list.
●Phonebook Download
Select to turn on or off the automatic down-
load of a connected phone’s phonebook.
●Show Incoming Calls
Select “Driver Only” to have incoming call
information displayed only in the vehicle in-
formation display. Select “Both” to have in-
coming call information displayed in both the
vehicle information display and the center
display screen.
●Text Message (if so equipped)
Select to turn on or off the vehicle’s text
messaging feature.
LHA3540
Display screen, heater, air conditioner, audio and phone systems4-61
Page 259 of 465
Additional information:
●Since the spare tire is not equipped with the
TPMS, the TPMS does not monitor the tire
pressure of the spare tire.
●The TPMS will activate only when the vehicle
is driven at speeds above 16 mph (25 km/h).
Also, this system may not detect a sudden
drop in tire pressure (for example a flat tire
while driving) .
●The low tire pressure warning light does not
automatically turn off when the tire pressure
is adjusted. After the tire is inflated to the
recommended pressure, the vehicle must be
driven at speeds above 16 mph (25 km/h) to
activate the TPMS and turn off the low tire
pressure warning light. Use a tire pressure
gauge to check the tire pressure.
●The “Tire Pressure Low — Add Air” warning
appears in the vehicle information display
when the low tire pressure warning light is
illuminated and low tire pressure is detected.
The “Tire Pressure Low — Add Air” warning
turns off when the low tire pressure warning
light turns off.●The “Tire Pressure Low — Add Air” warning
appears each time the ignition switch is
placed in the ON position as long as the low
tire pressure warning light remains illumi-
nated.
●The “Tire Pressure Low — Add Air” warning
does not appear if the low tire pressure
warning light illuminates to indicate a TPMS
malfunction.
●Tire pressure rises and falls depending on
the heat caused by the vehicle’s operation
and the outside temperature. Do not reduce
the tire pressure after driving because the
tire pressure rises after driving. Low outside
temperature can lower the temperature of
the air inside the tire which can cause a
lower tire inflation pressure. This may cause
the low tire pressure warning light to illumi-
nate. If the warning light illuminates, check
the tire pressure for all four tires.
●The Tire and Loading Information label (also
referred to as the vehicle placard or tire
inflation pressure label) is located in the
driver’s door opening.●You can also check the pressure of all tires
(except the spare tire) on the vehicle infor-
mation display screen. The order of the tire
pressure figures displayed on the screen
corresponds with the actual order of the tire
position.
For additional information, refer to “Low tire pres-
sure warning light” in the “Instruments and con-
trols” section and “Tire Pressure Monitoring Sys-
tem (TPMS)” in the “In case of emergency”
section of this manual.
WARNING
●Radio waves could adversely affect
electric medical equipment. Those who
use a pacemaker should contact the
electric medical equipment manufac-
turer for the possible influences before
use.
5-4Starting and driving
Page 264 of 465
DRIVING SAFETY PRECAUTIONS
Your NISSAN is designed for both normal and
off-road use. However, avoid driving in deep wa-
ter or mud as your NISSAN is mainly designed for
leisure use, unlike a conventional off-road ve-
hicle.
Remember that 2-wheel drive models are less
capable than all-wheel drive models for rough
road driving and extrication when stuck in deep
snow or mud, or the like.
Please observe the following precautions:
WARNING
●Spinning the front wheels on slippery
surface may cause the AWD warning
message to display and the AWD sys-
tem to automatically switch from the
AWD to the 2WD mode. This could re-
duce the traction. Be especially careful
when towing a trailer. (AWD models)
●Drive carefully when off the road and
avoid dangerous areas. Every person
who drives or rides in this vehicle
should be seated with their seat belt
fastened. This will keep you and your
passengers in position when driving
over rough terrain.●Do not drive across steep slopes. In-
stead drive either straight up or straight
down the slopes. Off-road vehicles can
tip over sideways much more easily
than they can forward or backward.
●Many hills are too steep for any vehicle.
If you drive up them, you may stall. If
you drive down them, you may not be
able to control your speed. If you drive
across them, you may roll over.
●Do not shift gears while driving on
downhill grades as this could cause
loss of control of the vehicle.
●Stay alert when driving to the top of a
hill. At the top there could be a drop-off
or other hazard that could cause an
accident.
●If your engine stalls or you cannot make
it to the top of a steep hill, never at-
tempt to turn around. Your vehicle could
tip or roll over. Always back straight
down in R (Reverse) gear and apply
brakes to control your speed.
●Heavy braking going down a hill could
cause your brakes to overheat and fade,
resulting in loss of control and an acci-
dent. Apply brakes lightly and use a low
gear to control your speed.●Unsecured cargo can be thrown around
when driving over rough terrain. Prop-
erly secure all cargo so it will not be
thrown forward and cause injury to you
or your passengers.
●Exceeding the roof rack capacity can
raise the center of gravity excessively
and affect the handling and stability of
the vehicle.
●Secure heavy loads in the cargo area as
far forward and as low as possible. Do
not equip the vehicle with tires larger
than specified in this manual. This could
cause your vehicle to roll over.
●Do not grip the inside or spokes of the
steering wheel when driving off-road.
The steering wheel could move sud-
denly and injure your hands. Instead
drive with your fingers and thumbs on
the outside of the rim.
●Before operating the vehicle, ensure
that the driver and all passengers have
their seat belts fastened.
●Always drive with the floor mats in place
as the floor may become hot.
Starting and driving5-9
Page 269 of 465
(After step 3 is performed, when the ignition
switch is pushed without depressing the
brake pedal, the ignition switch position will
change to ON.)
4. Push the ignition switch while depressing
the brake pedal within ten seconds after the
chime sounds. The engine will start.
NOTE:
●When the ignition switch is pushed to the
ON position or the engine is started by the
above procedure, the Intelligent Key battery
discharge indicator appears in the vehicle
information display even when the Intelligent
Key is inside the vehicle. This is not a mal-
function. To turn off the Intelligent Key bat-
tery discharge indicator, touch the ignition
switch with the Intelligent Key again.
●If the Intelligent Key battery discharge indi-
cator appears, replace the battery as soon
as possible. For additional information, refer
to “Battery Replacement” in the “Mainte-
nance and do-it-yourself” section of this
manual.NISSAN VEHICLE IMMOBILIZER
SYSTEM
The NISSAN Vehicle Immobilizer System will not
allow the engine to start without the use of the
registered key.
If the engine fails to start using a registered key
(for example, when interference is caused by
another registered key, an automated toll road
device or automatic payment device on the key
ring) , restart the engine using the following pro-
cedure:
1. Leave the ignition switch in the ON position
for approximately 5 seconds.
2. Place the ignition switch in the OFF or
LOCK position, and wait approximately
10 seconds.
3. Repeat steps 1 and 2.
4. Restart the engine while holding the device
(which may have caused the interference)
separate from the registered key.
If the no start condition re-occurs, NISSAN rec-
ommends placing the registered key on a sepa-
rate key ring to avoid interference from other
devices.●Make sure the area around the vehicle is
clear.
●Check fluid levels such as engine oil, cool-
ant, brake fluid, and windshield-washer fluid
as frequently as possible, or at least when-
ever you refuel.
●Check that all windows and lights are clean.
●Visually inspect tires for their appearance
and condition. Also check tires for proper
inflation.
●Check that all doors are closed.
●Position seat and adjust head
restraints/headrests.
●Adjust inside and outside mirrors.
●Fasten seat belts and ask all passengers to
do likewise.
●Check the operation of warning lights when
the ignition switch is placed in the ON posi-
tion. For additional information, refer to
“Warning lights, indicator lights and audible
reminders” in the “Instruments and controls”
section of this manual.
BEFORE STARTING THE ENGINE
5-14Starting and driving