horn NISSAN MURANO 2018 Owner´s Manual
[x] Cancel search | Manufacturer: NISSAN, Model Year: 2018, Model line: MURANO, Model: NISSAN MURANO 2018Pages: 460, PDF Size: 5.06 MB
Page 16 of 460
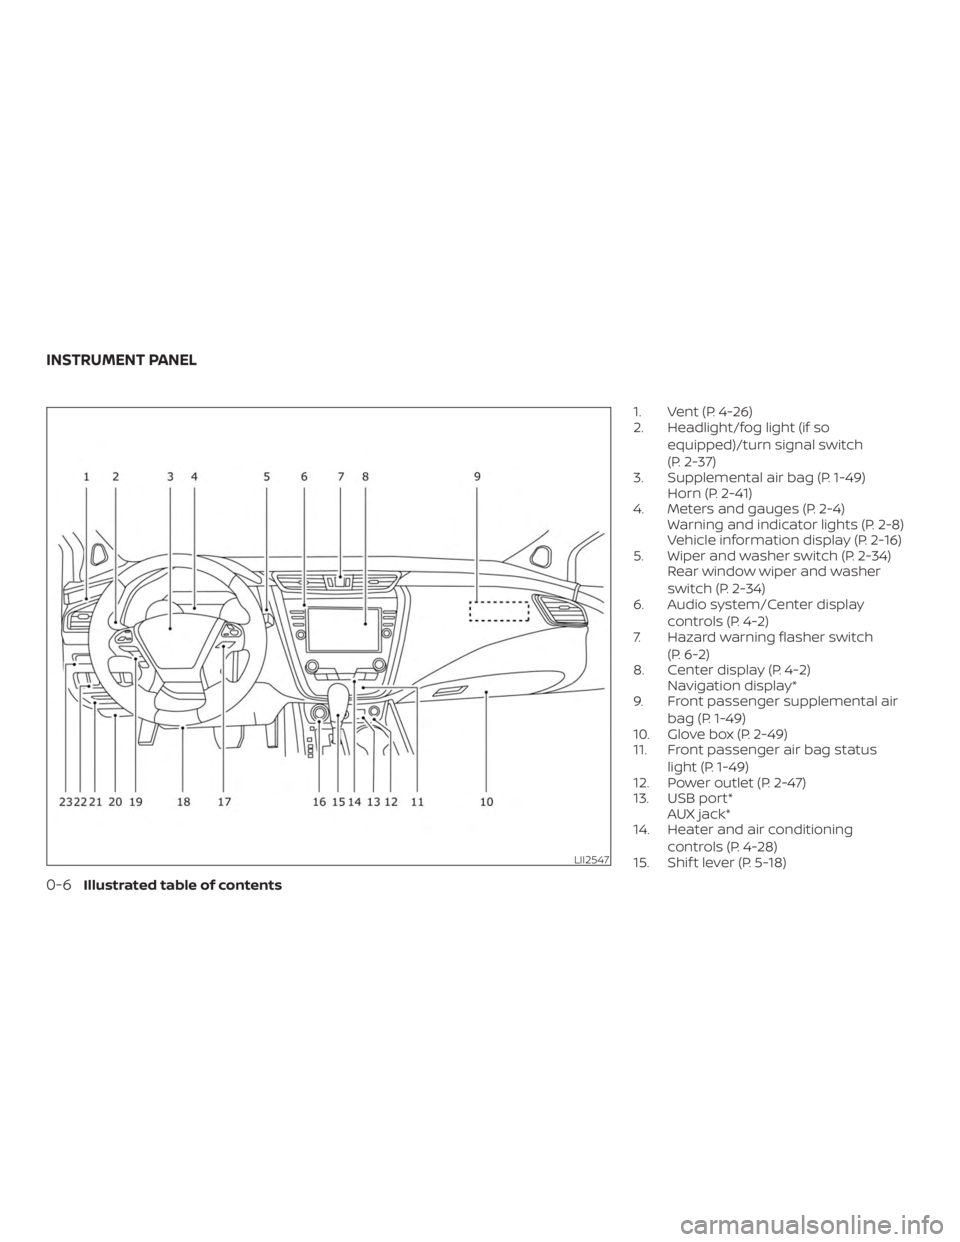
1. Vent (P. 4-26)
2. Headlight/fog light (if soequipped)/turn signal switch
(P. 2-37)
3. Supplemental air bag (P. 1-49) Horn (P. 2-41)
4. Meters and gauges (P. 2-4) Warning and indicator lights (P. 2-8)
Vehicle information display (P. 2-16)
5. Wiper and washer switch (P. 2-34) Rear window wiper and washer
switch (P. 2-34)
6. Audio system/Center display
controls (P. 4-2)
7. Hazard warning flasher switch
(P. 6-2)
8. Center display (P. 4-2) Navigation display*
9. Front passenger supplemental air
bag (P. 1-49)
10. Glove box (P. 2-49)
11. Front passenger air bag status
light (P. 1-49)
12. Power outlet (P. 2-47)
13. USB port* AUX jack*
14. Heater and air conditioning
controls (P. 4-28)
15. Shif t lever (P. 5-18)
LII2547
INSTRUMENT PANEL
0-6Illustrated table of contents
Page 92 of 460
2 Instruments and controls
Instrument panel................................2-2
Meters and gauges ..............................2-4
Speedometer and odometer .................2-4
Tachometer ..................................2-6
Engine coolant temperature gauge ..........2-6
Fuel gauge ................................... 2-7
Warning lights, indicator lights and audible
reminders .......................................2-8
Checking lights ...............................2-8
Warning lights ................................2-9
Indicator lights .............................. 2-13
Audible reminders ........................... 2-16
Vehicle information display .....................2-16
How to use the vehicle information
display ...................................... 2-17
Startup display .............................. 2-18
Settings ..................................... 2-18
Vehicle information display warnings
and indicators ............................... 2-27
Security systems ............................... 2-31
Vehicle security system .....................2-31
NISSAN Vehicle Immobilizer System .........2-32
Wiper and washer switch .......................2-34
Switch operation ............................ 2-34Rear switch operation
.......................2-35
Rear window and outside mirror
(if so equipped) defroster switch ................2-36
Headlight and turn signal switch ...............2-37
Headlight control switch .....................2-37
Daytime Running Lights (DRL) system
(Type A) (if so equipped) .....................2-39
LED Daytime Running Lights (DRL)
system (Type B) (if so equipped) .............2-39
Instrument brightness control ...............2-40
Turn signal switch ........................... 2-40
Fog light switch (if so equipped) .............2-41
Horn ........................................... 2-41
Climate controlled seat switches
(if so equipped) ................................. 2-42
Heated seat switches (if so equipped) ..........2-43
Heated rear seat switches (if so equipped) ......2-44
Heated steering wheel switch (if so equipped) . . 2-45
Vehicle Dynamic Control (VDC) OFF switch ......2-46
E-c
all (SOS) switch (if so equipped) ..............2-47
Power outlets ..................................2-47
12v outlets ...................................2-47
Extended storage switch .......................2-48
Storage ........................................ 2-49
Page 94 of 460
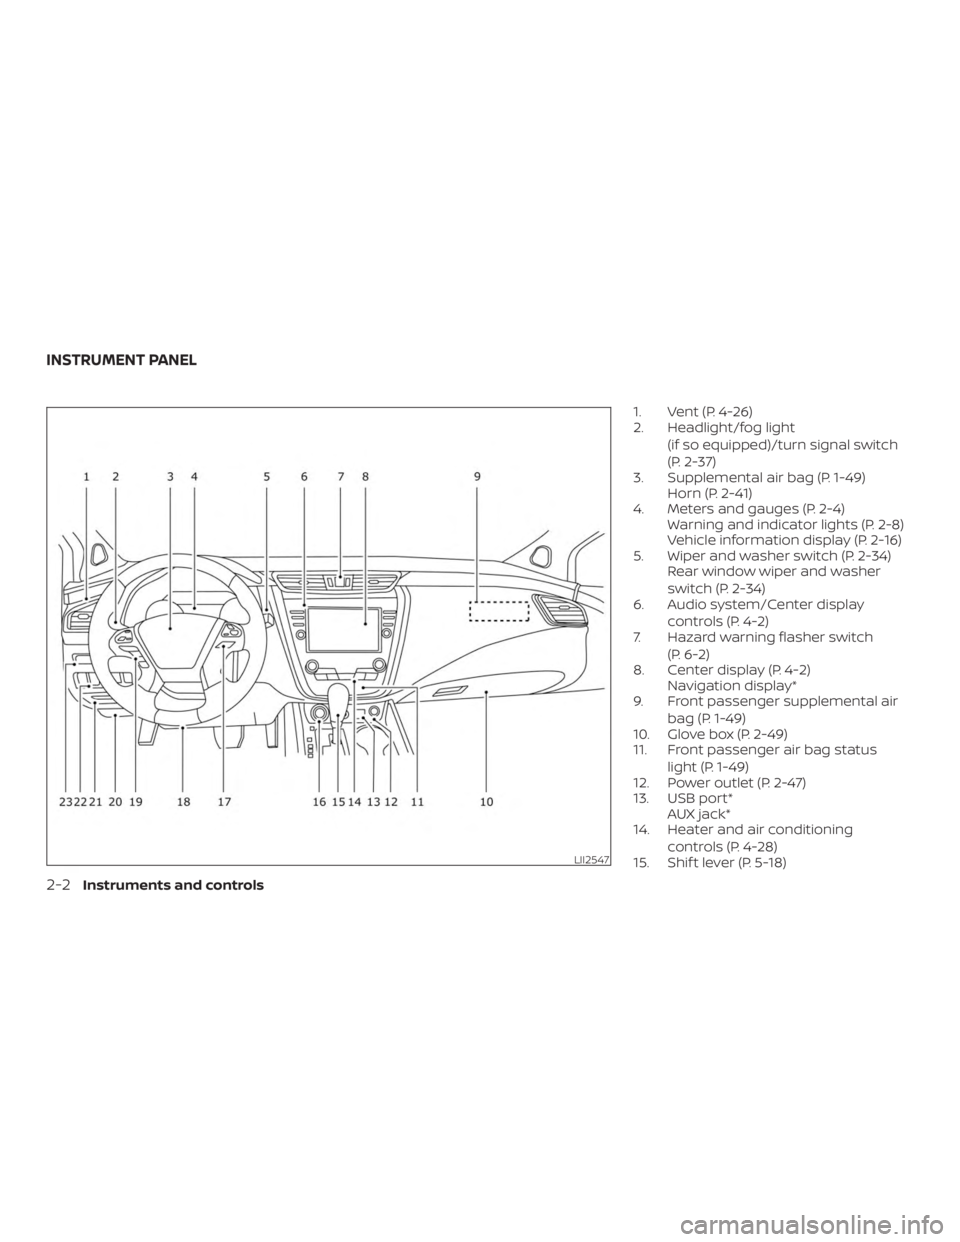
1. Vent (P. 4-26)
2. Headlight/fog light(if so equipped)/turn signal switch
(P. 2-37)
3. Supplemental air bag (P. 1-49) Horn (P. 2-41)
4. Meters and gauges (P. 2-4) Warning and indicator lights (P. 2-8)
Vehicle information display (P. 2-16)
5. Wiper and washer switch (P. 2-34) Rear window wiper and washer
switch (P. 2-34)
6. Audio system/Center display
controls (P. 4-2)
7. Hazard warning flasher switch
(P. 6-2)
8. Center display (P. 4-2) Navigation display*
9. Front passenger supplemental air
bag (P. 1-49)
10. Glove box (P. 2-49)
11. Front passenger air bag status
light (P. 1-49)
12. Power outlet (P. 2-47)
13. USB port* AUX jack*
14. Heater and air conditioning
controls (P. 4-28)
15. Shif t lever (P. 5-18)
LII2547
INSTRUMENT PANEL
2-2Instruments and controls
Page 113 of 460
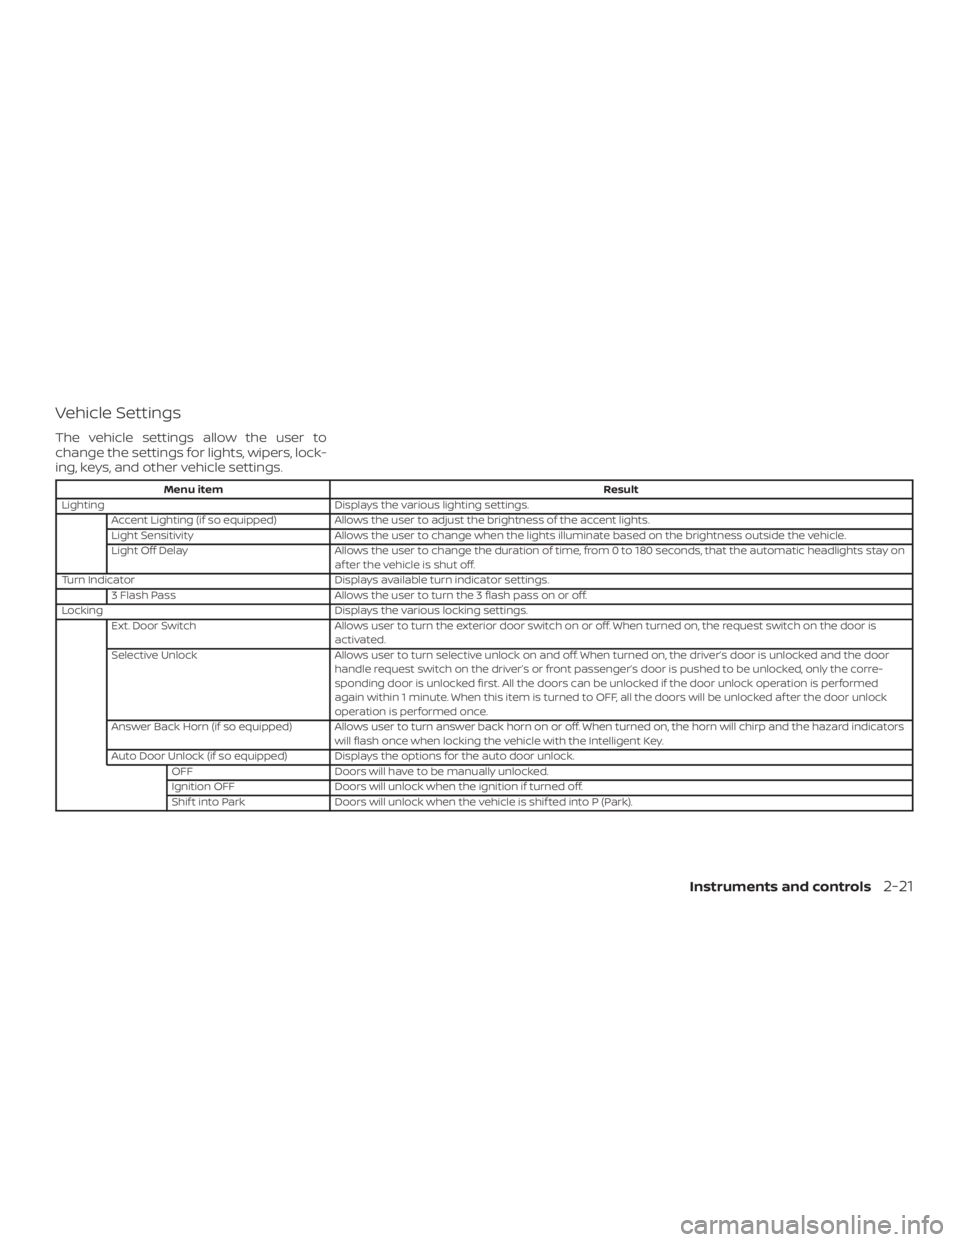
Vehicle Settings
The vehicle settings allow the user to
change the settings for lights, wipers, lock-
ing, keys, and other vehicle settings.
Menu itemResult
Lighting Displays the various lighting settings.
Accent Lighting (if so equipped) Allows the user to adjust the brightness of the accent lights.
Light Sensitivity Allows the user to change when the lights illuminate based on the brightness outside the vehicle.
Light Off Delay Allows the user to change the duration of time, from 0 to 180 seconds, that the automatic headlights stay on
af ter the vehicle is shut off.
Turn Indicator Displays available turn indicator settings.
3 Flash Pass Allows the user to turn the 3 flash pass on or off.
Locking Displays the various locking settings.
Ext. Door Switch Allows user to turn the exterior door switch on or off. When turned on, the request switch on the door is
activated.
Selective Unlock Allows user to turn selective unlock on and off. When turned on, the driver’s door is unlocked and the door
handle request switch on the driver’s or front passenger’s door is pushed to be unlocked, only the corre-
sponding door is unlocked first. All the doors can be unlocked if the door unlock operation is performed
again within 1 minute. When this item is turned to OFF, all the doors will be unlocked af ter the door unlock
operation is performed once.
Answer Back Horn (if so equipped) Allows user to turn answer back horn on or off. When turned on, the horn will chirp and the hazard indicators will flash once when locking the vehicle with the Intelligent Key.
Auto Door Unlock (if so equipped) Displays the options for the auto door unlock. OFF Doors will have to be manually unlocked.
Ignition OFF Doors will unlock when the ignition if turned off.
Shif t into Park Doors will unlock when the vehicle is shif ted into P (Park).
Instruments and controls2-21
Page 124 of 460
3. Close all doors, hood and lif tgate. Lockall doors. The doors can be locked with
the Intelligent Key, door handle request
switch, or mechanical key.
4. Confirm that the
security indica-
tor light stays on for about 30 seconds.
The vehicle security system is now pre-
armed. The vehicle security system will
automatically shif t into the armed
phase. The
security light begins
to flash once every three seconds. If
during the pre-armed phase one of the
following occurs, the system will not
arm:
∙ Any door is unlocked with the mechani- cal key, the Intelligent Key or door re-
quest switch.
∙ Ignition switch is placed in ACC or ON position.
∙ Even when the driver and/or passen-
gers are in the vehicle, the system will
activate with all the doors, hood and
lif tgate locked with the ignition
switch placed in the LOCK position.
When placing the ignition switch in
the ACC or ON position, the system
will be released.
Vehicle security system activation
The vehicle security system will give the
following alarm:
∙ The headlights blink and the horn sounds intermittently but synchro-
nously.
∙ The alarm automatically turns off af ter a period of time. However, the alarm
reactivates if the vehicle is tampered
with again.
The alarm is activated by: ∙ opening any door or hood without us- ing the key or Intelligent Key (even if the
door is unlocked by releasing the door
inside lock knob).
How to stop an activated alarm
The alarm stops only by unlocking a door
or the lif tgate with the mechanical key,
pressing the
button on the Intelligent
Key, or pressing the request switch on the
driver’s or passenger’s door with the Intel-
ligent Key in range of the door handle.
NISSAN VEHICLE IMMOBILIZER
SYSTEM
The NISSAN Vehicle Immobilizer System
will not allow the engine to start without
the use of a registered key.
Never leave these keys in the vehicle.
FCC Notice:
For USA:
This device complies with Part 15 of the
FCC Rules. Operation is subject to the fol-
lowing two conditions: (1) This device
may not cause harmful interference, and
(2) this device must accept any interfer-
ence received, including interference
that may cause undesired operation.
NOTE:
Changes or modifications not expressly
approved by the party responsible for
compliance could void the user’s author-
ity to operate the equipment.
2-32Instruments and controls
Page 133 of 460
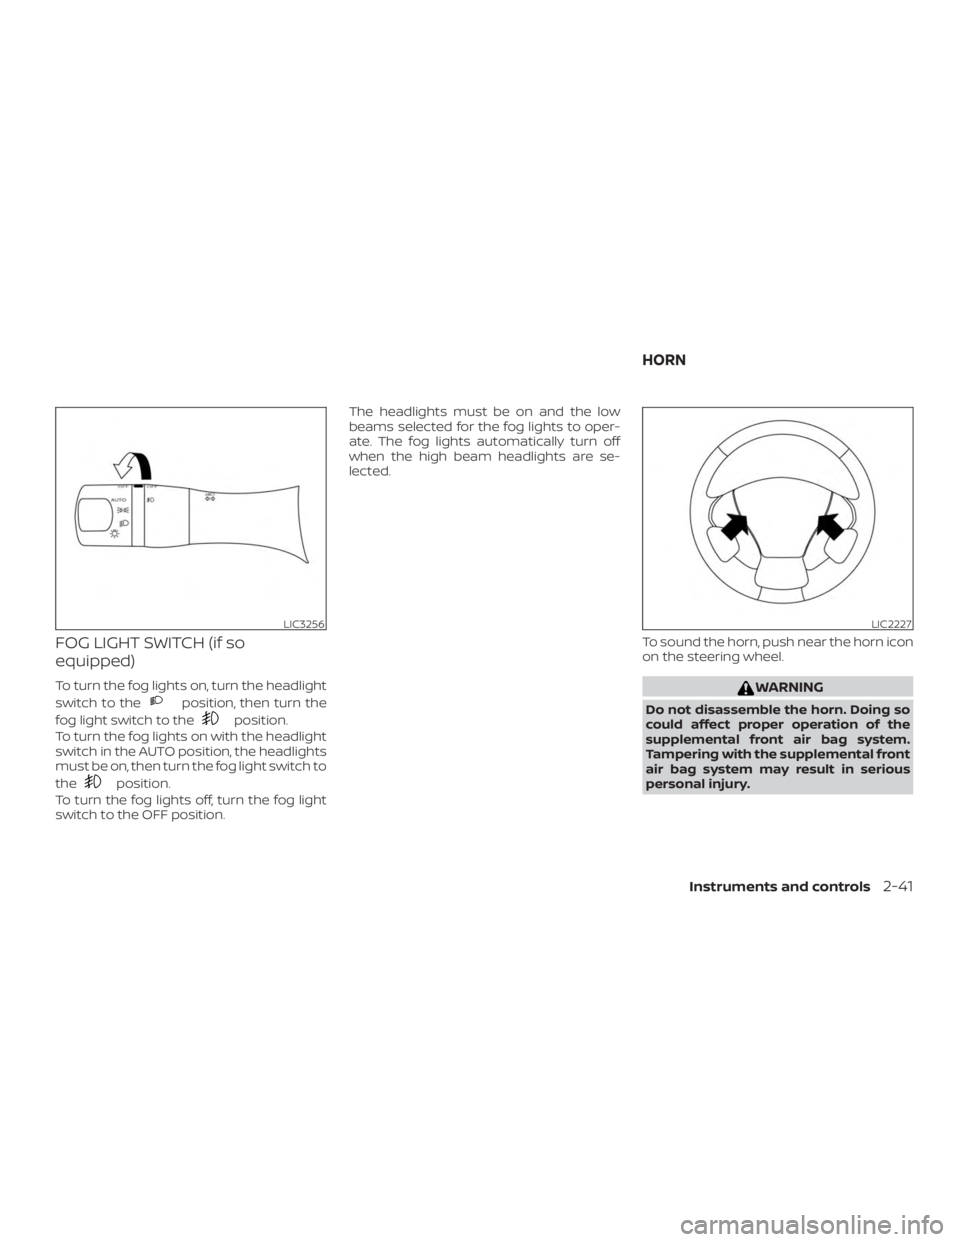
FOG LIGHT SWITCH (if so
equipped)
To turn the fog lights on, turn the headlight
switch to the
position, then turn the
fog light switch to the
position.
To turn the fog lights on with the headlight
switch in the AUTO position, the headlights
must be on, then turn the fog light switch to
the
position.
To turn the fog lights off, turn the fog light
switch to the OFF position. The headlights must be on and the low
beams selected for the fog lights to oper-
ate. The fog lights automatically turn off
when the high beam headlights are se-
lected.
To sound the horn, push near the horn icon
on the steering wheel.
WARNING
Do not disassemble the horn. Doing so
could affect proper operation of the
supplemental front air bag system.
Tampering with the supplemental front
air bag system may result in serious
personal injury.
LIC3256LIC2227
HORN
Instruments and controls2-41
Page 172 of 460
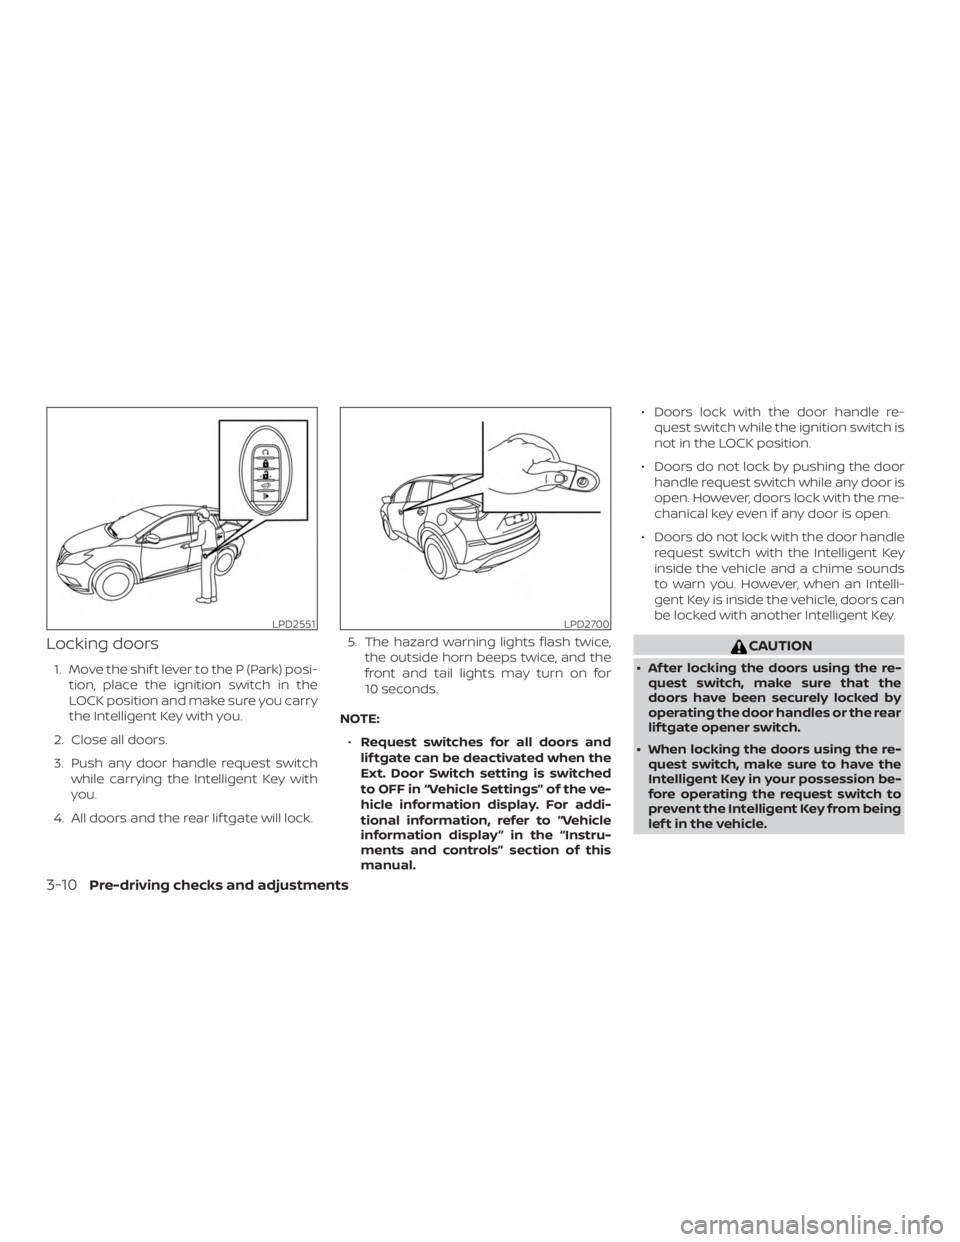
Locking doors
1. Move the shif t lever to the P (Park) posi-tion, place the ignition switch in the
LOCK position and make sure you carry
the Intelligent Key with you.
2. Close all doors.
3. Push any door handle request switch while carrying the Intelligent Key with
you.
4. All doors and the rear lif tgate will lock. 5. The hazard warning lights flash twice,
the outside horn beeps twice, and the
front and tail lights may turn on for
10 seconds.
NOTE: ∙ Request switches for all doors and
lif tgate can be deactivated when the
Ext. Door Switch setting is switched
to OFF in “Vehicle Settings” of the ve-
hicle information display. For addi-
tional information, refer to “Vehicle
information display ” in the “Instru-
ments and controls” section of this
manual. ∙ Doors lock with the door handle re-
quest switch while the ignition switch is
not in the LOCK position.
∙ Doors do not lock by pushing the door handle request switch while any door is
open. However, doors lock with the me-
chanical key even if any door is open.
∙ Doors do not lock with the door handle request switch with the Intelligent Key
inside the vehicle and a chime sounds
to warn you. However, when an Intelli-
gent Key is inside the vehicle, doors can
be locked with another Intelligent Key.
CAUTION
∙ Af ter locking the doors using the re-quest switch, make sure that the
doors have been securely locked by
operating the door handles or the rear
lif tgate opener switch.
∙ When locking the doors using the re- quest switch, make sure to have the
Intelligent Key in your possession be-
fore operating the request switch to
prevent the Intelligent Key from being
lef t in the vehicle.
LPD2551LPD2700
3-10Pre-driving checks and adjustments
Page 175 of 460
The remote keyless entry function will not
function under the following conditions:∙ When the Intelligent Key is not within the operational range.
∙ When the Intelligent Key battery is dis- charged.
∙ When the doors or the lif tgate are open or not closed securely.
CAUTION
When locking the doors using the Intel-
ligent Key, be sure not to leave the key in
the vehicle.
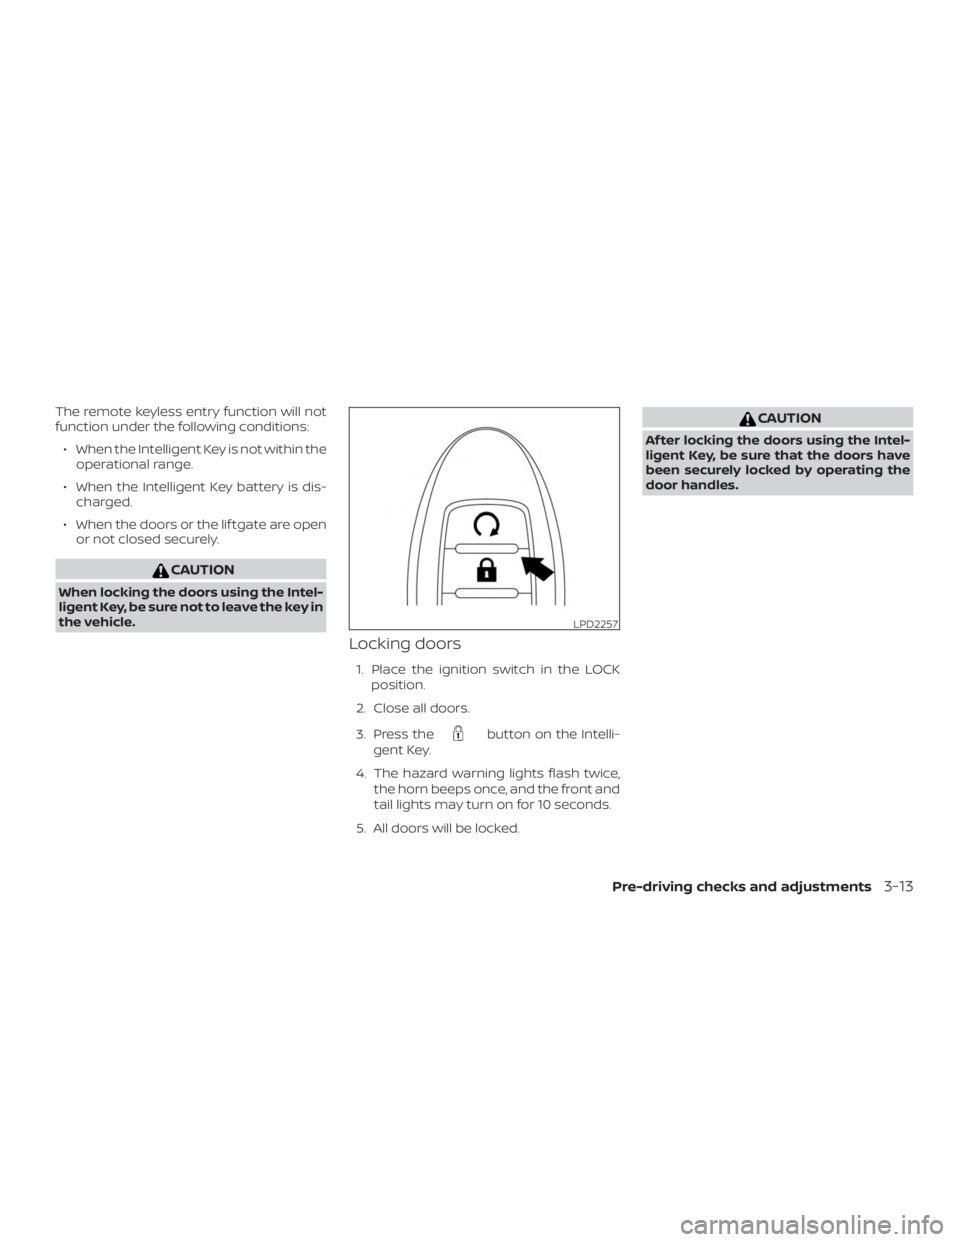
Locking doors
1. Place the ignition switch in the LOCK
position.
2. Close all doors.
3. Press the
button on the Intelli-
gent Key.
4. The hazard warning lights flash twice, the horn beeps once, and the front and
tail lights may turn on for 10 seconds.
5. All doors will be locked.
CAUTION
Af ter locking the doors using the Intel-
ligent Key, be sure that the doors have
been securely locked by operating the
door handles.
LPD2257
Pre-driving checks and adjustments3-13
Page 178 of 460
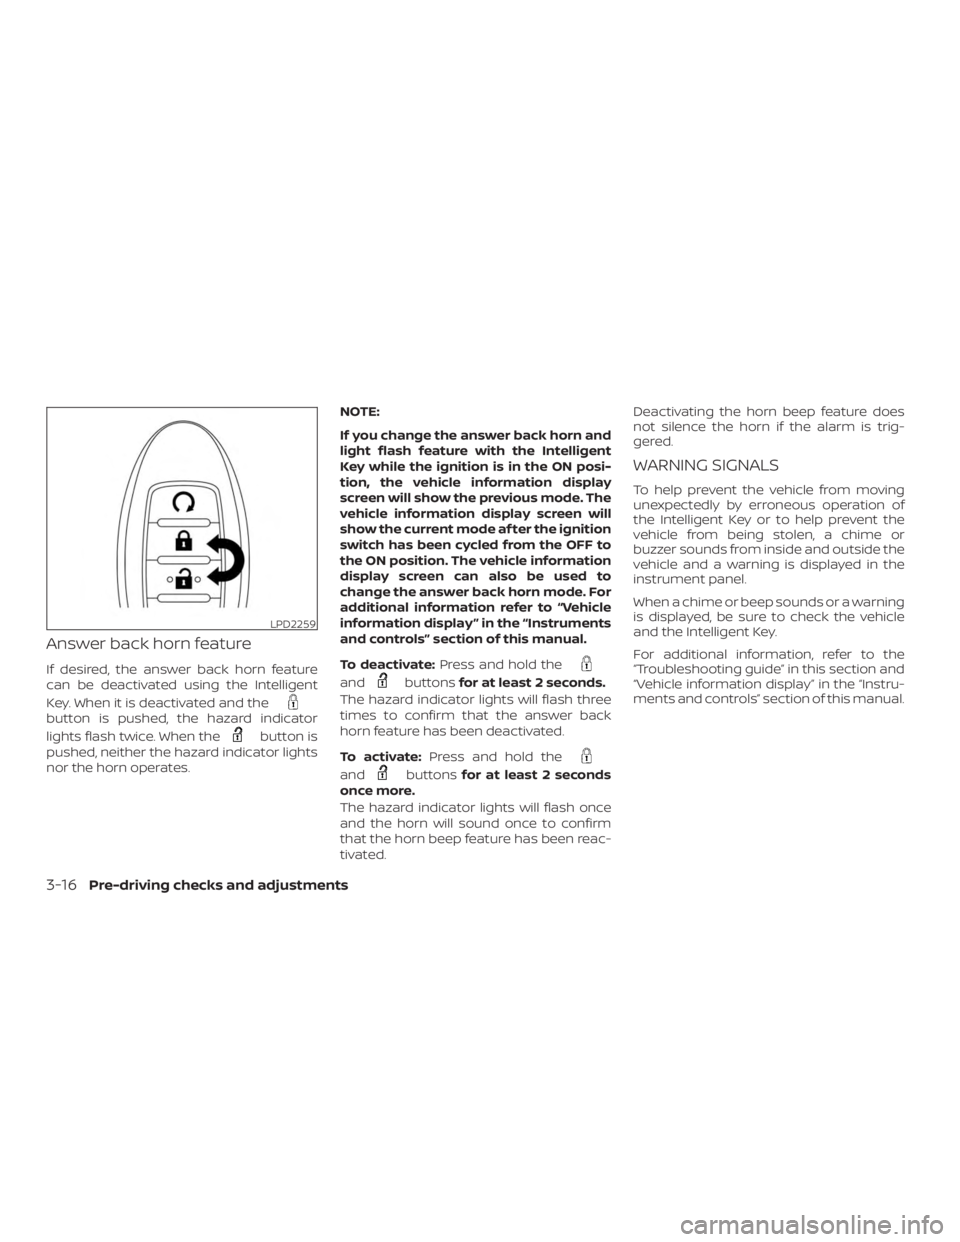
Answer back horn feature
If desired, the answer back horn feature
can be deactivated using the Intelligent
Key. When it is deactivated and the
button is pushed, the hazard indicator
lights flash twice. When the
button is
pushed, neither the hazard indicator lights
nor the horn operates. NOTE:
If you change the answer back horn and
light flash feature with the Intelligent
Key while the ignition is in the ON posi-
tion, the vehicle information display
screen will show the previous mode. The
vehicle information display screen will
show the current mode af ter the ignition
switch has been cycled from the OFF to
the ON position. The vehicle information
display screen can also be used to
change the answer back horn mode. For
additional information refer to “Vehicle
information display ” in the “Instruments
and controls” section of this manual.
To deactivate:
Press and hold the
andbuttonsfor at least 2 seconds.
The hazard indicator lights will flash three
times to confirm that the answer back
horn feature has been deactivated.
To activate: Press and hold the
andbuttonsfor at least 2 seconds
once more.
The hazard indicator lights will flash once
and the horn will sound once to confirm
that the horn beep feature has been reac-
tivated. Deactivating the horn beep feature does
not silence the horn if the alarm is trig-
gered.
WARNING SIGNALS
To help prevent the vehicle from moving
unexpectedly by erroneous operation of
the Intelligent Key or to help prevent the
vehicle from being stolen, a chime or
buzzer sounds from inside and outside the
vehicle and a warning is displayed in the
instrument panel.
When a chime or beep sounds or a warning
is displayed, be sure to check the vehicle
and the Intelligent Key.
For additional information, refer to the
“Troubleshooting guide” in this section and
“Vehicle information display” in the “Instru-
ments and controls” section of this manual.
LPD2259
3-16Pre-driving checks and adjustments
Page 246 of 460
∙ If the wheel is not originally specified byNISSAN.
FCC Notice:
For USA:
This device complies with Part 15 of the
FCC Rules. Operation is subject to the fol-
lowing two conditions: (1) This device
may not cause harmful interference, and
(2) this device must accept any interfer-
ence received, including interference
that may cause undesired operation.
NOTE:
Changes or modifications not expressly
approved by the party responsible for
compliance could void the user’s author-
ity to operate the equipment.
For Canada:
This device complies with Industry
Canada licence-exempt RSS standard(s).
Operation is subject to the following two
conditions: (1) this device may not cause
interference, and (2) this device must ac-
cept any interference, including interfer-
ence that may cause undesired opera-
tion of the device.TPMS with Easy-Fill Tire Alert
When adding air to an under-inflated tire,
the TPMS with Easy-Fill Tire Alert provides
visual and audible signals outside the ve-
hicle to help you inflate the tires to the rec-
ommended COLD tire pressure.
Vehicle set-up 1. Park the vehicle in a safe and level place.
2. Apply the parking brake and place the shif t lever in the P (Park) position.
3. Place the ignition switch in the ON po- sition. Do not start the engine.
Operation 1. Add air to the tire.
2. Af ter a few seconds, the hazard indica- tors will start flashing.
3. When the designated pressure is reached, the horn beeps once and the
hazard indicators stop flashing.
4. Perform the above steps for each tire. ∙ If the tire is over-inflated more thanapproximately 4 psi (30 kPa), the horn
beeps and the hazard indicators
flash three times. To correct the pres-
sure, push the core of the valve stem on the tire briefly to release pressure.
When the pressure reaches the des-
ignated pressure, the horn beeps
once.
∙ If the hazard indicator does not flash within approximately 15 seconds af-
ter starting to inflate the tire, it indi-
cates that the Easy-Fill Tire Alert is
not operating.
∙ The TPMS will not activate the Easy- Fill Tire Alert under the following con-
ditions:
– If there is interference from an exter- nal device or transmitter.
– The air pressure from the inflation device is not sufficient to inflate the
tire.
– There is a malfunction in the TPMS.
– There is a malfunction in the horn or hazard indicators.
– The identification code of the tire pressure sensor is not registered to
the system.
– The battery of the tire pressure sen- sor is low.
5-8Starting and driving