seat adjustment NISSAN MURANO 2020 Owner´s Manual
[x] Cancel search | Manufacturer: NISSAN, Model Year: 2020, Model line: MURANO, Model: NISSAN MURANO 2020Pages: 518, PDF Size: 3.52 MB
Page 130 of 518
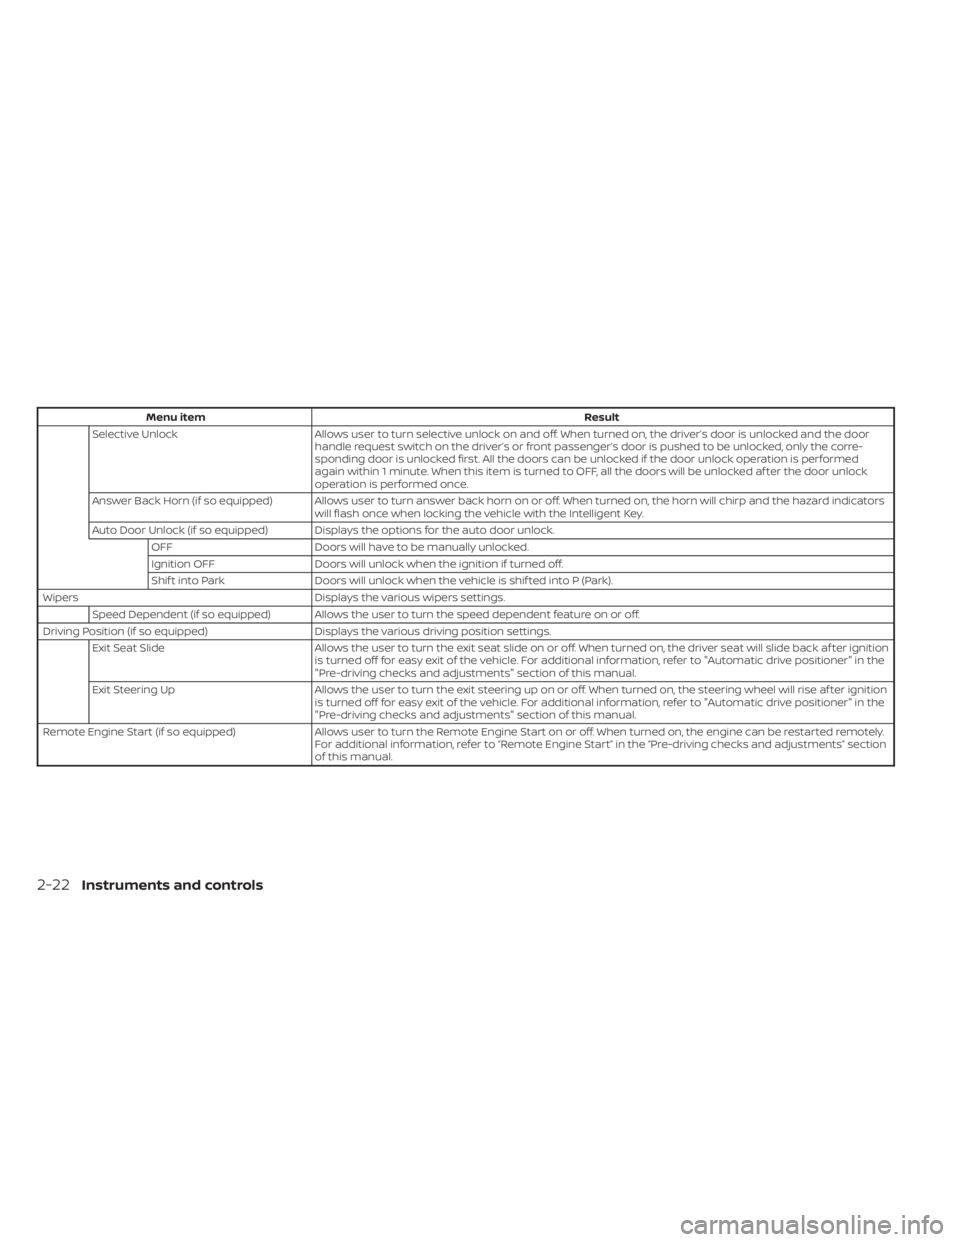
Menu itemResult
Selective Unlock Allows user to turn selective unlock on and off. When turned on, the driver’s door is unlocked and the door
handle request switch on the driver’s or front passenger’s door is pushed to be unlocked, only the corre-
sponding door is unlocked first. All the doors can be unlocked if the door unlock operation is performed
again within 1 minute. When this item is turned to OFF, all the doors will be unlocked af ter the door unlock
operation is performed once.
Answer Back Horn (if so equipped) Allows user to turn answer back horn on or off. When turned on, the horn will chirp and the hazard indicators will flash once when locking the vehicle with the Intelligent Key.
Auto Door Unlock (if so equipped) Displays the options for the auto door unlock. OFF Doors will have to be manually unlocked.
Ignition OFF Doors will unlock when the ignition if turned off.
Shif t into Park Doors will unlock when the vehicle is shif ted into P (Park).
Wipers Displays the various wipers settings.
Speed Dependent (if so equipped) Allows the user to turn the speed dependent feature on or off.
Driving Position (if so equipped) Displays the various driving position settings.
Exit Seat Slide Allows the user to turn the exit seat slide on or off. When turned on, the driver seat will slide back af ter ignition
is turned off for easy exit of the vehicle. For additional information, refer to "Automatic drive positioner" in the
"Pre-driving checks and adjustments" section of this manual.
Exit Steering Up Allows the user to turn the exit steering up on or off. When turned on, the steering wheel will rise af ter ignition
is turned off for easy exit of the vehicle. For additional information, refer to "Automatic drive positioner" in the
"Pre-driving checks and adjustments" section of this manual.
Remote Engine Start (if so equipped) Allows user to turn the Remote Engine Start on or off. When turned on, the engine can be restarted remotely.
For additional information, refer to “Remote Engine Start” in the “Pre-driving checks and adjustments” section
of this manual.
2-22Instruments and controls
Page 187 of 518
When the doors are locked using one of the
following methods, the doors cannot be
opened using the inside or outside door
handles. The doors must be unlocked to
open the doors.
WARNING
• Always have the doors locked while
driving. Along with the use of seat
belts, this provides greater safety in
the event of an accident by helping to
prevent persons from being thrown
from the vehicle. This also helps keep
children and others from uninten-
tionally opening the doors, and will
help keep out intruders.
• Before opening any door, always look
for and avoid oncoming traffic. •
To help avoid risk of injury or death
through unintended operation of the
vehicle and/or its systems, including
entrapment in windows or inadver-
tent door lock activation, do not
leave children, people who require
the assistance of others or pets unat-
tended in your vehicle. Additionally,
the temperature inside a closed ve-
hicle on a warm day can quickly be-
come high enough to cause a signifi-
cant risk of injury or death to people
and pets.
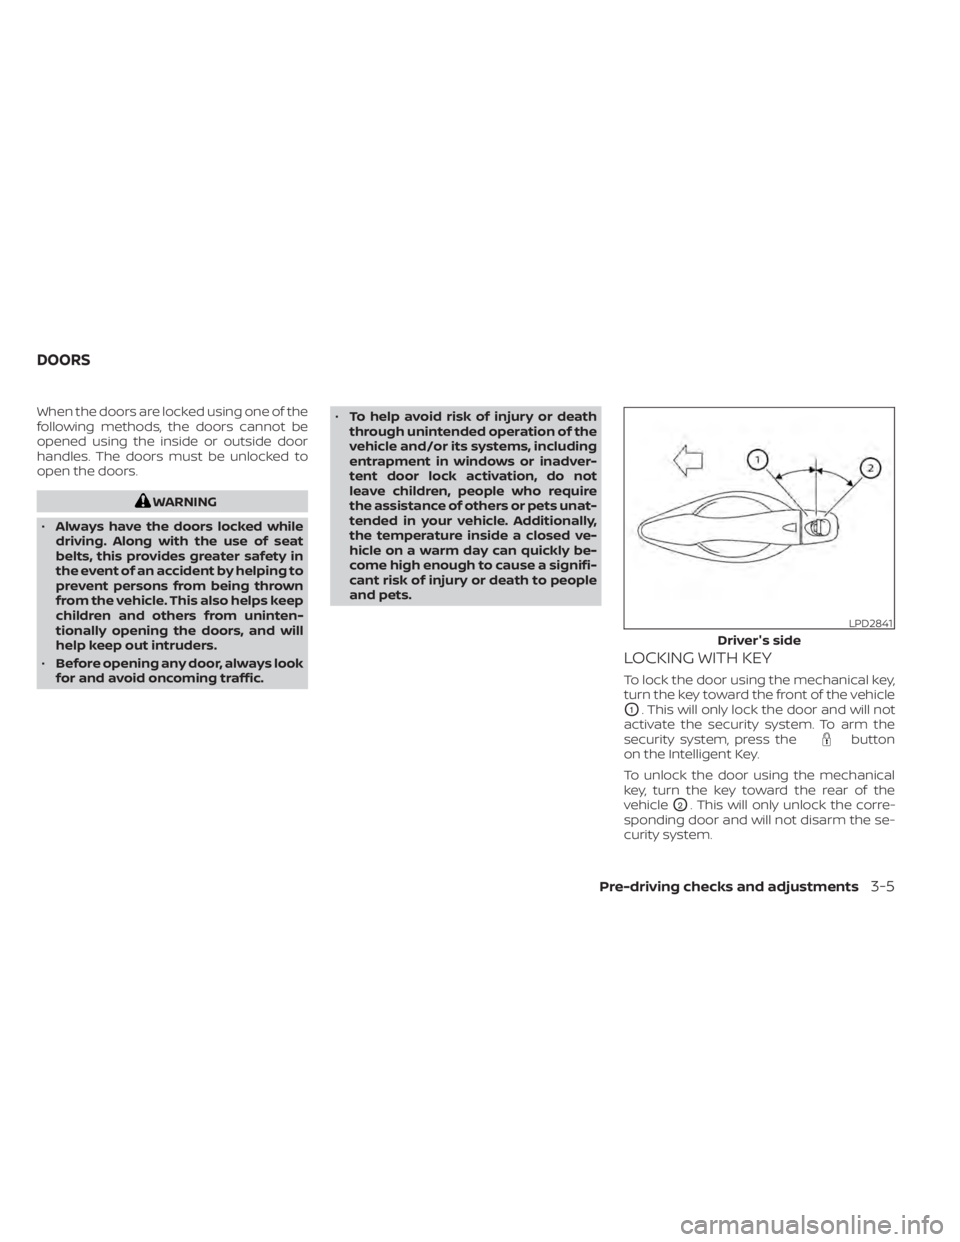
LOCKING WITH KEY
To lock the door using the mechanical key,
turn the key toward the front of the vehicle
O1. This will only lock the door and will not
activate the security system. To arm the
security system, press the
button
on the Intelligent Key.
To unlock the door using the mechanical
key, turn the key toward the rear of the
vehicle
O2. This will only unlock the corre-
sponding door and will not disarm the se-
curity system.
LPD2841
Driver's side
DOORS
Pre-driving checks and adjustments3-5
Page 199 of 518
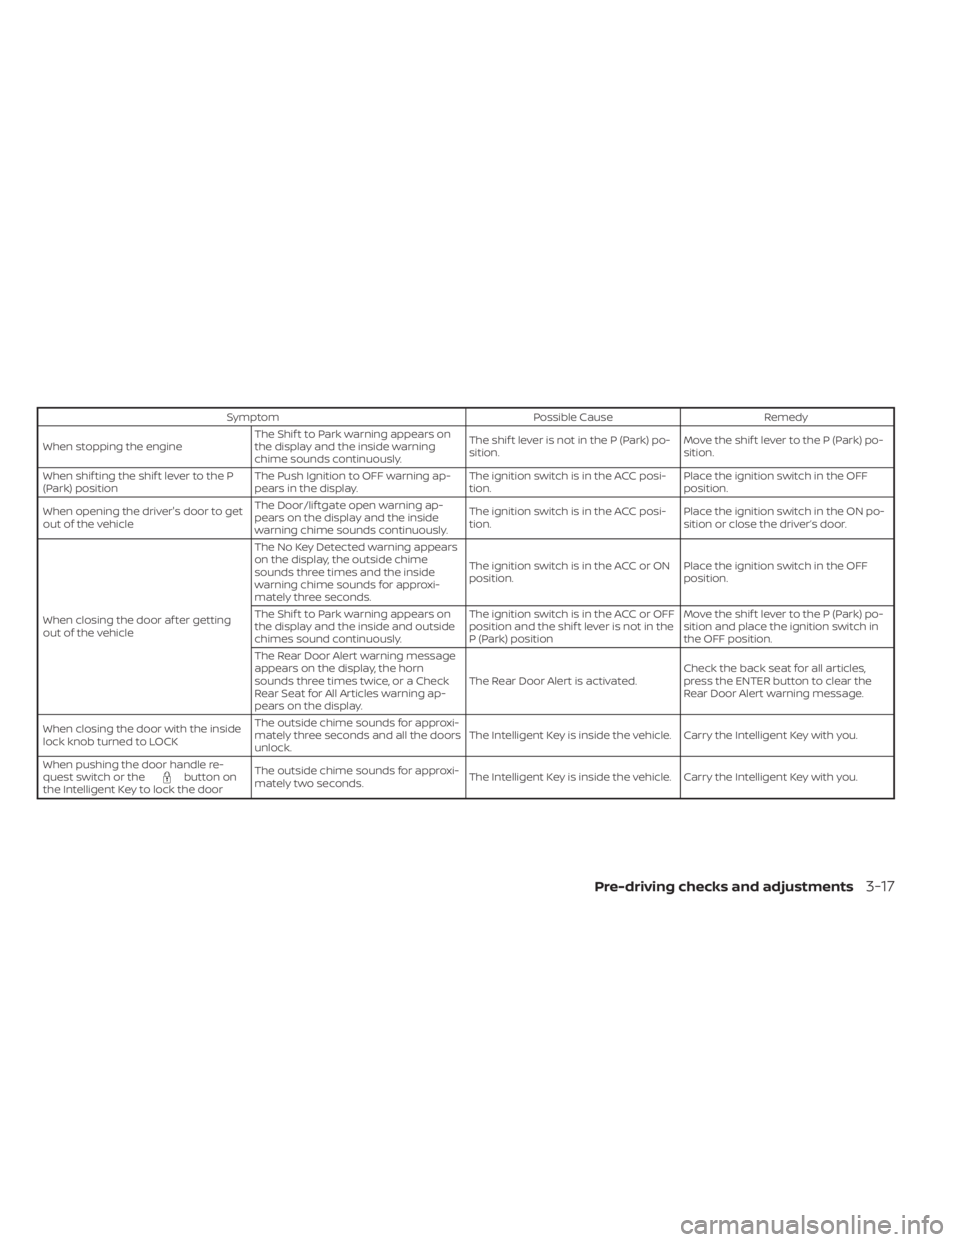
SymptomPossible CauseRemedy
When stopping the engine The Shif t to Park warning appears on
the display and the inside warning
chime sounds continuously. The shif t lever is not in the P (Park) po-
sition.
Move the shif t lever to the P (Park) po-
sition.
When shif ting the shif t lever to the P
(Park) position The Push Ignition to OFF warning ap-
pears in the display. The ignition switch is in the ACC posi-
tion.Place the ignition switch in the OFF
position.
When opening the driver's door to get
out of the vehicle The Door/lif tgate open warning ap-
pears on the display and the inside
warning chime sounds continuously. The ignition switch is in the ACC posi-
tion.
Place the ignition switch in the ON po-
sition or close the driver’s door.
When closing the door af ter getting
out of the vehicle The No Key Detected warning appears
on the display, the outside chime
sounds three times and the inside
warning chime sounds for approxi-
mately three seconds.
The ignition switch is in the ACC or ON
position.
Place the ignition switch in the OFF
position.
The Shif t to Park warning appears on
the display and the inside and outside
chimes sound continuously. The ignition switch is in the ACC or OFF
position and the shif t lever is not in the
P (Park) positionMove the shif t lever to the P (Park) po-
sition and place the ignition switch in
the OFF position.
The Rear Door Alert warning message
appears on the display, the horn
sounds three times twice, or a Check
Rear Seat for All Articles warning ap-
pears on the display. The Rear Door Alert is activated.
Check the back seat for all articles,
press the ENTER button to clear the
Rear Door Alert warning message.
When closing the door with the inside
lock knob turned to LOCK The outside chime sounds for approxi-
mately three seconds and all the doors
unlock.
The Intelligent Key is inside the vehicle. Carry the Intelligent Key with you.
When pushing the door handle re-
quest switch or the
button on
the Intelligent Key to lock the door The outside chime sounds for approxi-
mately two seconds.
The Intelligent Key is inside the vehicle. Carry the Intelligent Key with you.
Pre-driving checks and adjustments3-17
Page 210 of 518
CAUTION
• If the power lif tgate does not stay
open or if the lif tgate unexpectedly
closes at any time while a continuous
warning chime sounds, do not oper-
ate the lif tgate. There may be a pres-
sure loss in one or both of the lif tgate
struts. It is recommended that you
have the lif tgate inspected. It is rec-
ommended that you visit a NISSAN
dealer for this service.
• Do not activate the power lif tgate if
one or both of the lif tgate struts are
removed. Damage to the lif tgate or
power lif tgate mechanisms may
occur.
Lif tgate release (manual and
power)
The lif tgate release mechanism allows the
lif tgate to be opened in the event of a dis-
charged battery.
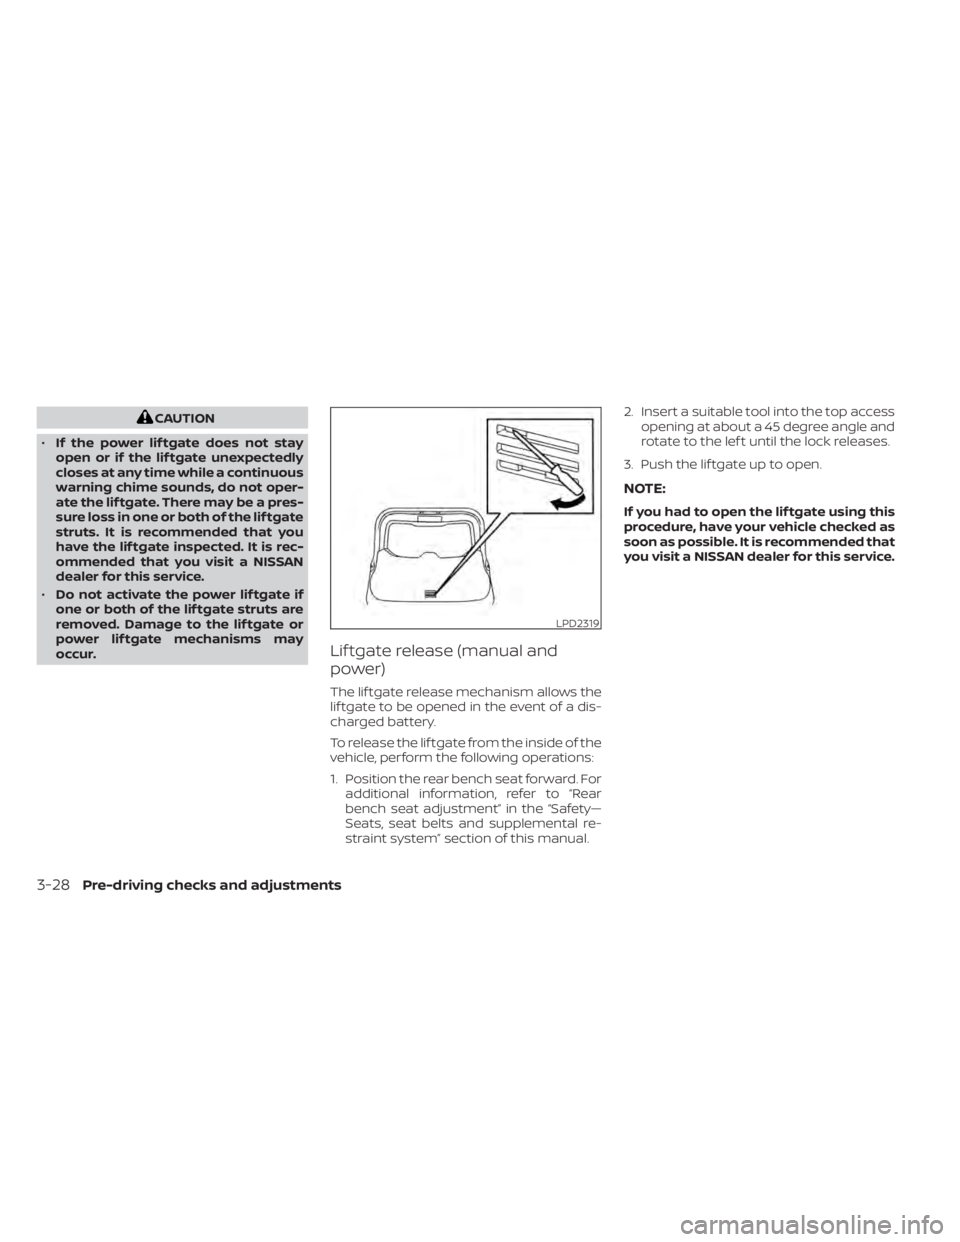
To release the lif tgate from the inside of the
vehicle, perform the following operations:
1. Position the rear bench seat forward. For additional information, refer to “Rear
bench seat adjustment” in the “Safety—
Seats, seat belts and supplemental re-
straint system” section of this manual. 2. Insert a suitable tool into the top access
opening at about a 45 degree angle and
rotate to the lef t until the lock releases.
3. Push the lif tgate up to open.
NOTE:
If you had to open the lif tgate using this
procedure, have your vehicle checked as
soon as possible. It is recommended that
you visit a NISSAN dealer for this service.
LPD2319
3-28Pre-driving checks and adjustments
Page 214 of 518
3. Press the OK button on the steeringwheel for about one second to turn off
the Loose Fuel Cap warning message
af ter tightening the fuel-filler cap.WARNING
• Do not adjust the steering wheel
while driving. You could lose control
of your vehicle and cause an
accident.
• Do not adjust the steering wheel any
closer to you than is necessary for
proper steering operation and com-
fort. The driver's air bag inflates with
great force. If you are unrestrained,
leaning forward, sitting sideways or
out of position in any way, you are at
greater risk of injury or death in a
crash. You may also receive serious
or fatal injuries from the air bag if you
are up against it when it inflates. Al-
ways sit back against the seatback
and as far away as practical from the
steering wheel. Always use the seat
belts.
MANUAL OPERATION (if so
equipped)
Tilt and telescopic operation
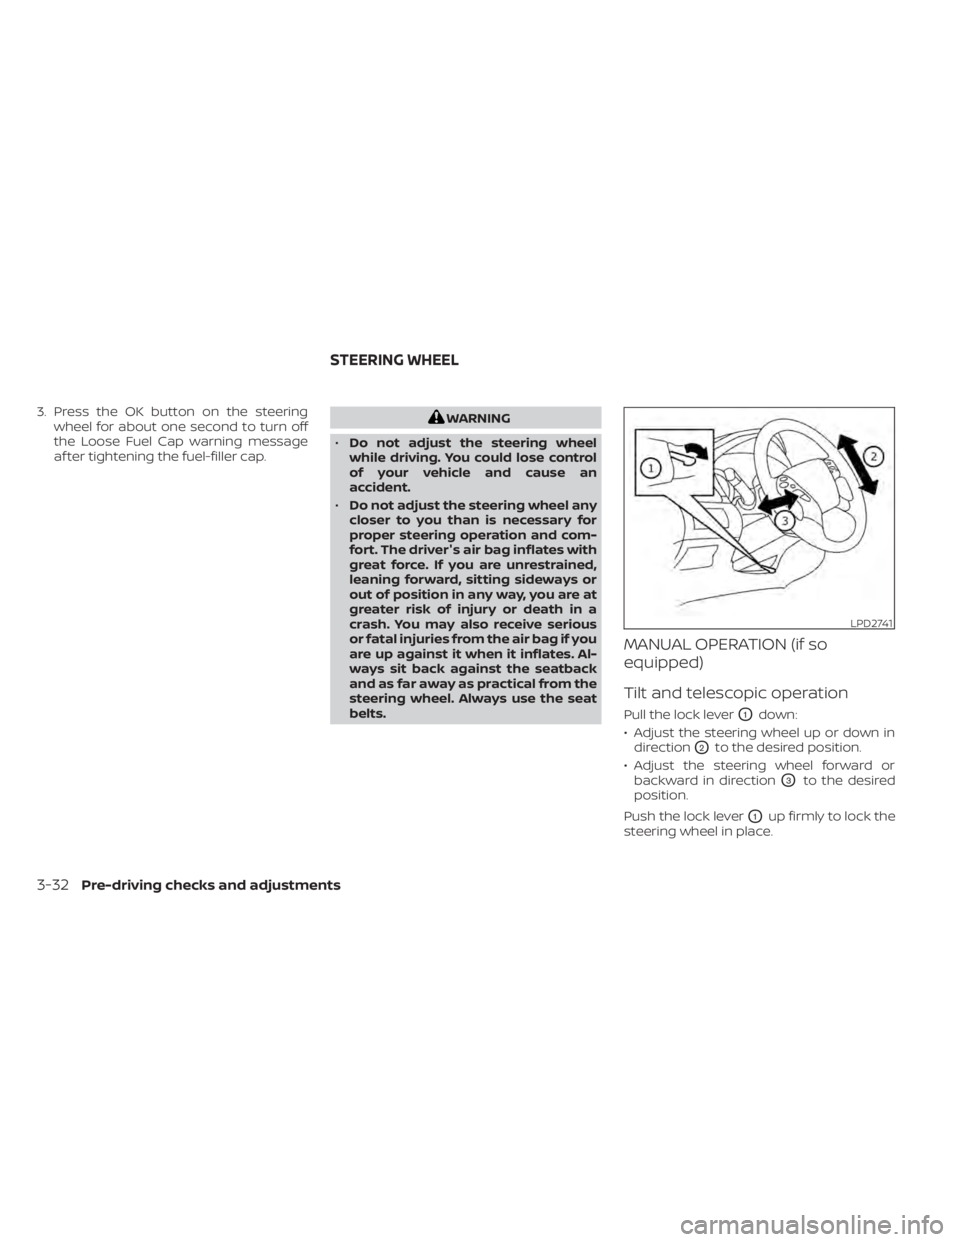
Pull the lock leverO1down:
• Adjust the steering wheel up or down in direction
O2to the desired position.
• Adjust the steering wheel forward or backward in direction
O3to the desired
position.
Push the lock lever
O1up firmly to lock the
steering wheel in place.
LPD2741
STEERING WHEEL
3-32Pre-driving checks and adjustments
Page 215 of 518
AUTOMATIC OPERATION (if so
equipped)
Tilt and telescopic operation
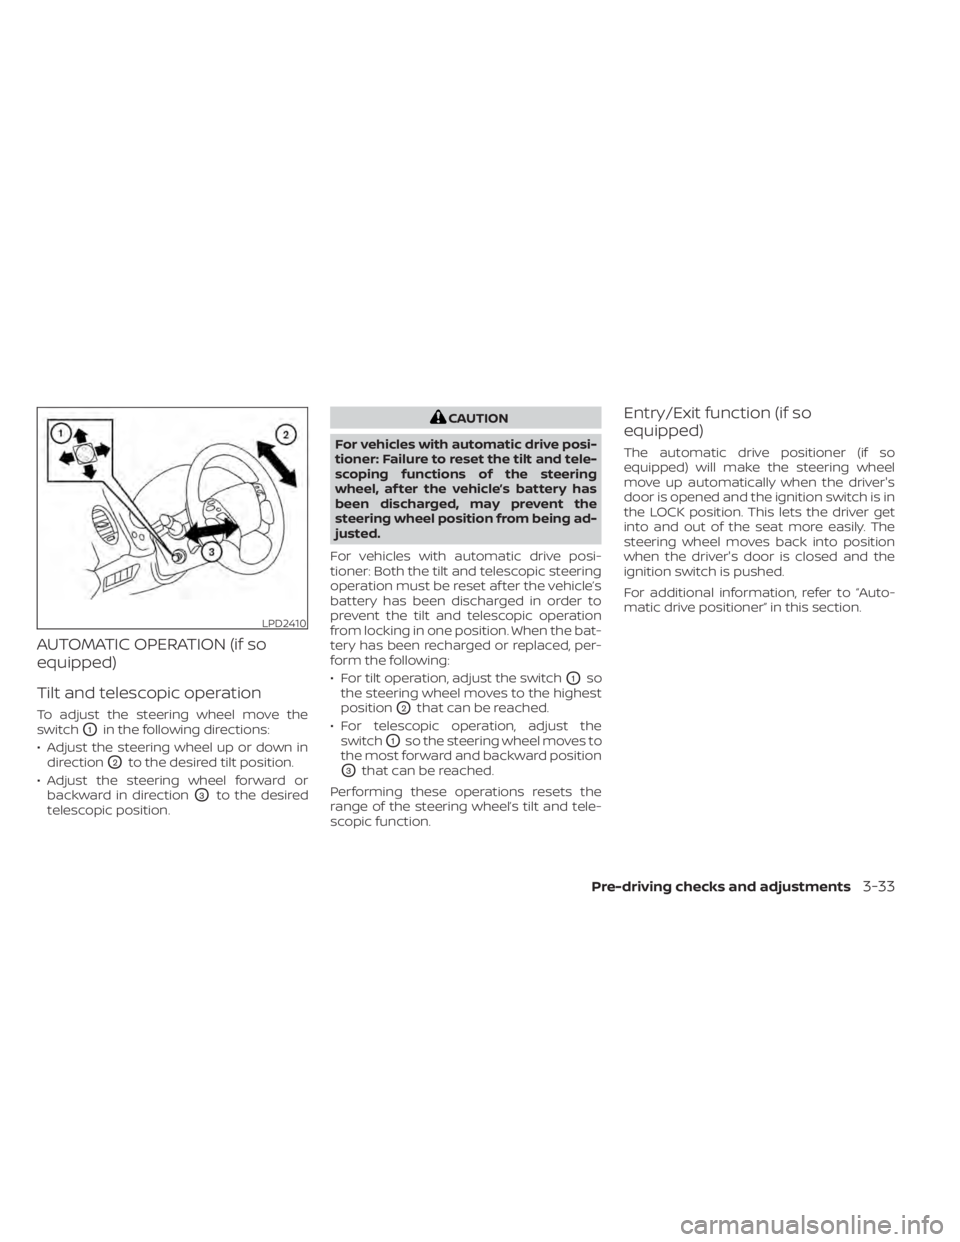
To adjust the steering wheel move the
switch
O1in the following directions:
• Adjust the steering wheel up or down in direction
O2to the desired tilt position.
• Adjust the steering wheel forward or backward in direction
O3to the desired
telescopic position.
CAUTION
For vehicles with automatic drive posi-
tioner: Failure to reset the tilt and tele-
scoping functions of the steering
wheel, af ter the vehicle’s battery has
been discharged, may prevent the
steering wheel position from being ad-
justed.
For vehicles with automatic drive posi-
tioner: Both the tilt and telescopic steering
operation must be reset af ter the vehicle’s
battery has been discharged in order to
prevent the tilt and telescopic operation
from locking in one position. When the bat-
tery has been recharged or replaced, per-
form the following:
• For tilt operation, adjust the switch
O1so
the steering wheel moves to the highest
position
O2that can be reached.
• For telescopic operation, adjust the switch
O1so the steering wheel moves to
the most forward and backward position
O3that can be reached.
Performing these operations resets the
range of the steering wheel’s tilt and tele-
scopic function.
Entry/Exit function (if so
equipped)
The automatic drive positioner (if so
equipped) will make the steering wheel
move up automatically when the driver's
door is opened and the ignition switch is in
the LOCK position. This lets the driver get
into and out of the seat more easily. The
steering wheel moves back into position
when the driver's door is closed and the
ignition switch is pushed.
For additional information, refer to “Auto-
matic drive positioner” in this section.
LPD2410
Pre-driving checks and adjustments3-33
Page 220 of 518
The automatic drive positioner system has
three features:
• Memory storage function (key-link)
• Memory storage function (switch)
• Entry/exit function (if so equipped)
Key-link, when enabled, automatically re-
tains the driver’s last seat and automatic
steering wheel positions for that specific
key when the ignition is turned from ON to
OFF.
Each memory switch button (1 or 2) on the
driver’s door can also store one additional
position which is independent of the key-
linked position.
MEMORY STORAGE FUNCTION
(key-link)
Use the following process to setup key-link:
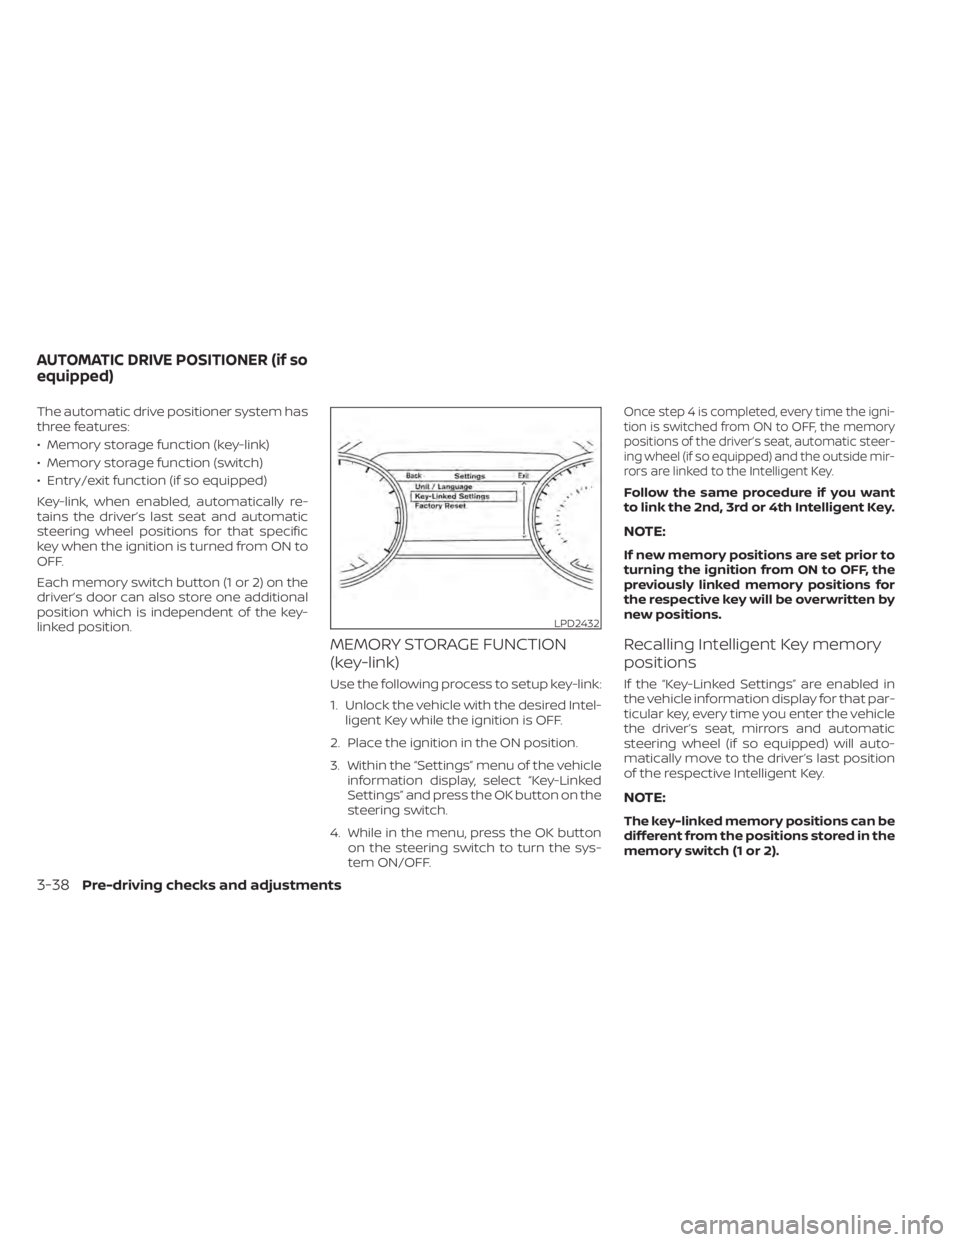
1. Unlock the vehicle with the desired Intel-ligent Key while the ignition is OFF.
2. Place the ignition in the ON position.
3. Within the “Settings” menu of the vehicle information display, select “Key-Linked
Settings” and press the OK button on the
steering switch.
4. While in the menu, press the OK button on the steering switch to turn the sys-
tem ON/OFF.
Once step 4 is completed, every time the igni-
tion is switched from ON to OFF, the memory
positions of the driver’s seat, automatic steer-
ing wheel (if so equipped) and the outside mir-
rors are linked to the Intelligent Key.
Follow the same procedure if you want
to link the 2nd, 3rd or 4th Intelligent Key.
NOTE:
If new memory positions are set prior to
turning the ignition from ON to OFF, the
previously linked memory positions for
the respective key will be overwritten by
new positions.
Recalling Intelligent Key memory
positions
If the “Key-Linked Settings” are enabled in
the vehicle information display for that par-
ticular key, every time you enter the vehicle
the driver’s seat, mirrors and automatic
steering wheel (if so equipped) will auto-
matically move to the driver’s last position
of the respective Intelligent Key.
NOTE:
The key-linked memory positions can be
different from the positions stored in the
memory switch (1 or 2).
LPD2432
AUTOMATIC DRIVE POSITIONER (if so
equipped)
3-38Pre-driving checks and adjustments
Page 221 of 518
MEMORY STORAGE FUNCTION
(switch)
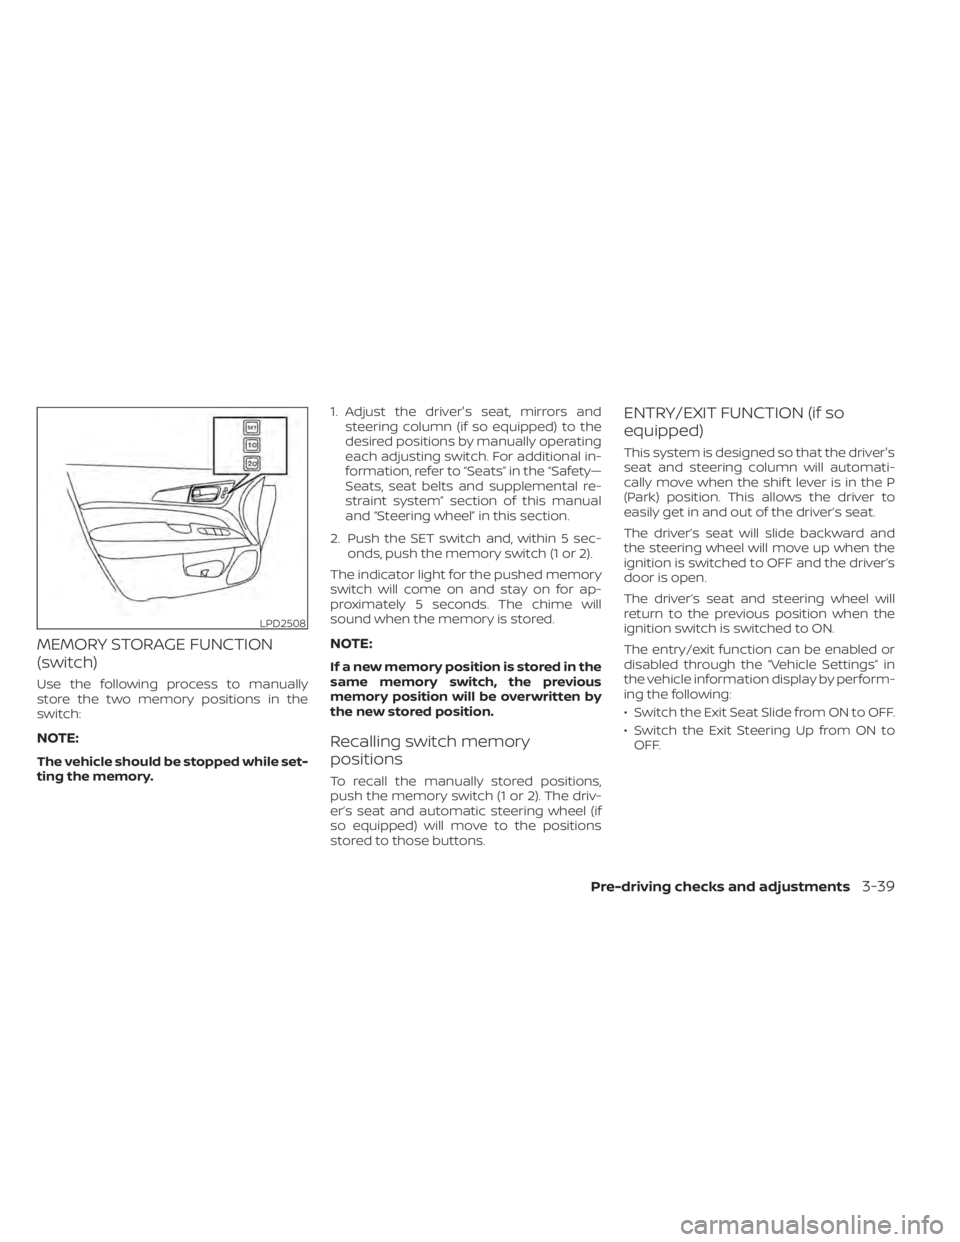
Use the following process to manually
store the two memory positions in the
switch:
NOTE:
The vehicle should be stopped while set-
ting the memory.1. Adjust the driver's seat, mirrors and
steering column (if so equipped) to the
desired positions by manually operating
each adjusting switch. For additional in-
formation, refer to “Seats” in the “Safety—
Seats, seat belts and supplemental re-
straint system” section of this manual
and “Steering wheel” in this section.
2. Push the SET switch and, within 5 sec- onds, push the memory switch (1 or 2).
The indicator light for the pushed memory
switch will come on and stay on for ap-
proximately 5 seconds. The chime will
sound when the memory is stored.
NOTE:
If a new memory position is stored in the
same memory switch, the previous
memory position will be overwritten by
the new stored position.
Recalling switch memory
positions
To recall the manually stored positions,
push the memory switch (1 or 2). The driv-
er’s seat and automatic steering wheel (if
so equipped) will move to the positions
stored to those buttons.
ENTRY/EXIT FUNCTION (if so
equipped)
This system is designed so that the driver's
seat and steering column will automati-
cally move when the shif t lever is in the P
(Park) position. This allows the driver to
easily get in and out of the driver’s seat.
The driver’s seat will slide backward and
the steering wheel will move up when the
ignition is switched to OFF and the driver’s
door is open.
The driver’s seat and steering wheel will
return to the previous position when the
ignition switch is switched to ON.
The entry/exit function can be enabled or
disabled through the “Vehicle Settings” in
the vehicle information display by perform-
ing the following:
• Switch the Exit Seat Slide from ON to OFF.
• Switch the Exit Steering Up from ON to OFF.
LPD2508
Pre-driving checks and adjustments3-39
Page 222 of 518
Restarting the entry/exit function
If the battery cable is disconnected or if the
fuse opens, the stored memory positions
may be lost and some of the functions will
be restricted.
1. Drive the vehicle over 25 mph (40 km/h).
OR
2. Open and close the driver's door morethan two times with the ignition switch
in the OFF position.
The entry/exit function should now work
properly.
SYSTEM OPERATION
The Memory Seat system will not work or
will stop operating under the following
conditions:
• When the vehicle speed is above 4 mph (7 km/h).
• When any of the memory switches are pushed while the Memory Seat is operat-
ing.
• When the switch for the driver’s seat and steering column is pushed while the
Memory Seat is operating.
• When the seat has already been moved to the memorized position. • When no seat position is stored in the
memory switch.
• When the shif t lever is moved from P (Park) to any other position.
3-40Pre-driving checks and adjustments
Page 462 of 518
the parking brake applied. If the parking
brake needs adjustment, it is recom-
mended that you visit a NISSAN dealer for
this service.
Seats:Check seat position controls such
as seat adjusters, seatback recliner, etc., to
ensure they operate smoothly and all
latches lock securely in every position.
Check that the head restraints/headrests
move up and down smoothly and the locks
(if so equipped) hold securely in all latched
positions.
Seat belts: Check that all parts of the seat
belt system (for example, buckles, anchors,
adjusters and retractors) operate properly
and smoothly, and are installed securely.
Check the belt webbing for cuts, fraying,
wear or damage.
Steering wheel: Check for changes in the
steering system, such as excessive free
play, hard steering or strange noises.
Warning lights and chimes: Make sure all
warning lights and chimes are operating
properly.
Windshield defroster: Check that the air
comes out of the defroster outlets properly
and in sufficient quantity when operating
the heater or air conditioner. Windshield wiper and washer*:
Check
that the wipers and washer operate prop-
erly and that the wipers do not streak.
Under the hood and vehicle
The maintenance items listed here should
be checked periodically (for example, each
time you check the engine oil or refuel).
Battery* (for maintenance free batter-
ies): This vehicle is equipped with a sealed
maintenance free battery. It is recom-
mended that you visit a NISSAN dealer for
service.
NOTE:
Care should be taken to avoid situations
that can lead to potential battery dis-
charge and potential no-start conditions
such as:
1. Installation or extended use of elec-
tronic accessories that consume bat-
tery power when the engine is not run-
ning (Phone chargers, GPS, DVD
players, etc.).
2. Vehicle is not driven regularly and/or
only driven short distances.
In these cases, the battery may need to
be charged to maintain battery health. Brake fluid level*:
Make sure that the brake
fluid level is between the MAX and MIN lines
on the reservoir.
Engine coolant level*: Check the coolant
level when the engine is cold.
Engine drive belt*: Make sure the drive
belts are not frayed, worn, cracked or oily.
Engine oil level*: Check the level af ter
parking the vehicle on a level spot and
turning off the engine. Wait more than 15
minutes for the oil to drain back into the oil
pan.
Exhaust system: Make sure there are no
loose supports, cracks or holes. If the
sound of the exhaust seems unusual or
there is a smell of exhaust fumes, immedi-
ately have the exhaust system inspected. It
is recommended that you visit a NISSAN
dealer for this service. For additional infor-
mation, refer to “Exhaust gas (carbon mon-
oxide)” in the “Starting and driving” section
of this manual.
Fluid leaks: Check under the vehicle for
fuel, oil, water or other fluid leaks af ter the
vehicle has been parked for a while. Water
dripping from the air conditioner af ter use
is normal. If you should notice any leaks or if
fuel fumes are evident, check for the cause
and have it corrected immediately.
9-4Maintenance and schedules