key NISSAN MURANO 2021 Owner´s Manual
[x] Cancel search | Manufacturer: NISSAN, Model Year: 2021, Model line: MURANO, Model: NISSAN MURANO 2021Pages: 508, PDF Size: 3.5 MB
Page 11 of 508

1. Front view camera (if so equipped)(P. 4-10)
2. Engine hood (P. 3-21) 3. Wiper and washer switch (P. 2-32)
4. Windshield (P. 8-17)
5. Power windows (P. 2-59)6. Door locks (P. 3-5)
NISSAN Intelligent Key® system (P. 3-7)
Keys (P. 3-2)
7. Mirrors (P. 3-34) Side view camera (if so equipped)
(P. 4-10)
8. Tire pressure (P. 8-27) Flat tire (P. 6-3)
Tire chains (P. 8-27)
9. Replacing bulbs (P. 8-25) Headlight and turn signal switch
(P. 2-35)
LED Daytime Running Lights (DRL)
system (P. 2-35)
10. Fog light switch (if so equipped) (P. 2-35)
11. Front sonar sensors (if so equipped)
(P. 5-124)
Refer to the page number indicated in
parentheses for operating details.
LII2613
EXTERIOR FRONT
Illustrated table of contents0-3
Page 39 of 508
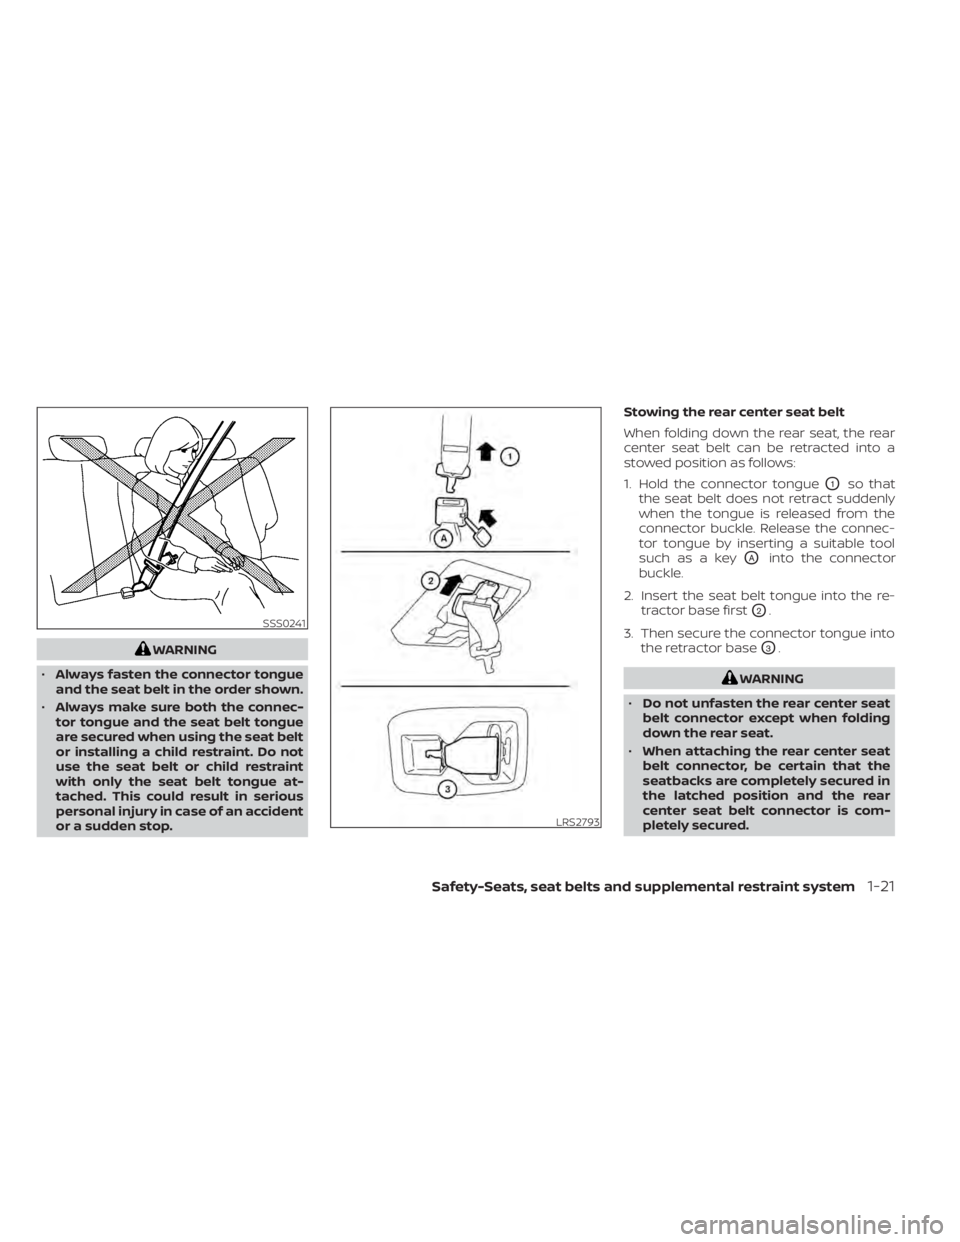
WARNING
• Always fasten the connector tongue
and the seat belt in the order shown.
• Always make sure both the connec-
tor tongue and the seat belt tongue
are secured when using the seat belt
or installing a child restraint. Do not
use the seat belt or child restraint
with only the seat belt tongue at-
tached. This could result in serious
personal injury in case of an accident
or a sudden stop. Stowing the rear center seat belt
When folding down the rear seat, the rear
center seat belt can be retracted into a
stowed position as follows:
1. Hold the connector tongue
O1so that
the seat belt does not retract suddenly
when the tongue is released from the
connector buckle. Release the connec-
tor tongue by inserting a suitable tool
such as a key
OAinto the connector
buckle.
2. Insert the seat belt tongue into the re- tractor base first
O2.
3. Then secure the connector tongue into the retractor base
O3.
WARNING
• Do not unfasten the rear center seat
belt connector except when folding
down the rear seat.
• When attaching the rear center seat
belt connector, be certain that the
seatbacks are completely secured in
the latched position and the rear
center seat belt connector is com-
pletely secured.
SSS0241
LRS2793
Safety-Seats, seat belts and supplemental restraint system1-21
Page 106 of 508
Operation
The MIL will come on in one of two ways:
• MIL on steady — An emission control sys-tem malfunction has been detected.
Check the fuel-filler cap if the Loose Fuel
Cap warning appears in the vehicle infor-
mation display. If the fuel-filler cap is loose
or missing, tighten or install the cap and
continue to drive the vehicle. The
light should turn off af ter a few driving
trips. If thelight does not turn off
af ter a few driving trips, have the vehicle
inspected. It is recommended that you
visit a NISSAN dealer for this service. You
do not need to have your vehicle towed
to the dealer.
• MIL blinking — An engine misfire has been detected which may damage the emis-
sion control system. To reduce or avoid
emission control system damage:– do not drive at speeds above 45 mph (72 km/h).
– avoid hard acceleration or deceleration.
– avoid steep uphill grades.
– if possible, reduce the amount of cargo being hauled or towed. The MIL may stop blinking and come on
steady. Have the vehicle inspected. It is rec-
ommended that you visit a NISSAN dealer
for this service. You do not need to have
your vehicle towed to the dealer.
CAUTION
Continued vehicle operation without
having the emission control system
checked and repaired as necessary
could lead to poor driveability, reduced
fuel economy, and possible damage to
the emission control system.
Master warning light
When the ignition switch is in the ON posi-
tion, the master warning light illuminates if
any of the following are displayed on the
vehicle information display:
• No Key Detected warning
• Low windshield washer fluid warning
• Door open warning (when vehicle is stopped)
• Low tire pressure warning
• Loose Fuel Cap warning
• Traffic Sign Recognition system fault (if so equipped) • Driver Attention Alert system fault (if so
equipped)
• Push Engine Start Lock warning
• Incorrect Key warning
• I-Key System Fault warning
• CVT warning
• Sonar Parking Sensor Error warning
• LED Headlight Failure warning (when no other red warnings are on)
• Chassis Control warning
• Tire size incorrect warning
• AWD system error warning
• AWD high temperature warning
For additional information, see “Vehicle in-
formation display” (P. 2-17).
Power steering warning
light
WARNING
• If the engine is not running or is
turned off while driving, the power
assist for the steering will not work.
Steering will be harder to operate.
2-14Instruments and controls
Page 108 of 508
While the VDC system is operating, you
might feel a slight vibration or hear the sys-
tem working when starting the vehicle or
accelerating, but this is normal.
WARNING/INDICATOR LIGHTS
(other)
For additional information, see “Vehicle in-
formation display” (P. 2-17).
Front fog light indicator
light (green) (if so
equipped)
The front fog light indicator light illumi-
nates when the front fog lights are on. For
additional information, see “Fog light
switch” (P. 2-41).
High Beam Assist indicator
light (green)
This indicator light illuminates when the
headlights come on while the headlight
switch is in the AUTO position with the high
beams selected. This indicates that the
high beam assist is operational.
For additional information, see “Headlight
and turn signal switch” (P. 2-35).
High beam indicator light
(blue)
This blue light comes on when the head-
light high beams are on and goes out when
the low beams are selected.
Side light and headlight
indicator light (green)
The side light and headlight indicator light
illuminates when the side light or headlight
position is selected. For additional informa-
tion, see “Headlight and turn signal switch”
(P. 2-35).
Turn signal/hazard
indicator lights (green)
The appropriate light flashes when the turn
signal switch is activated.
Both lights flash when the hazard switch is
turned on.
AUDIBLE REMINDERS
Brake pad wear warning
The disc brake pads have audible wear
warnings. When a disc brake pad requires
replacement, it makes a high pitched
scraping sound when the vehicle is in mo-tion, whether or not the brake pedal is de-
pressed. Have the brakes checked as soon
as possible if the warning sound is heard.
Light reminder chime
With the ignition switch placed in the OFF
position, a chime sounds when the driver's
door is opened if the headlights or parking
lights are on.
Turn the headlight control switch off before
leaving the vehicle.
NISSAN Intelligent Key® door
buzzer (if so equipped)
The Intelligent Key door buzzer sounds if
any one of the following improper opera-
tions is found.
• The Intelligent Key is lef t inside the vehicle
when locking the doors.
• The Intelligent Key is taken outside the vehicle when operating the vehicle.
When the buzzer sounds, be sure to check
both the vehicle and the Intelligent Key. For
additional information, see “NISSAN Intelli-
gent Key®” (P. 3-7).
2-16Instruments and controls
Page 110 of 508
2.— go back or forward
through the vehicle information menu
items or to change from one display
screen to the next (i.e. trip, TPMS, fuel
economy).
The OK and
buttons also
control audio and control panel functions
in some conditions. Most screens and
menus offer instruction prompts of the
steering switch buttons to indicate how to
control the vehicle information display. An
orange cursor is shown to indicate where
you are in the available menu items. A scroll
bar with up and down arrows will appear if
there is more than one page of menu
items. For additional information, refer to
the separate NissanConnect® Owner’s
Manual.
STARTUP DISPLAY
When the vehicle in placed in the ON or ACC
position the screens that display in the ve-
hicle information display include:
• Home
• Audio
• Navigation (if so equipped)
• Drive computer
• Fuel economy
• Driving aids (if so equipped)
• Speed Limit Sign (if so equipped)
• Tire pressure information
• Warning review
• Settings
The warnings review title screen will show
how many active warnings exist, or “No
items to review” in the event that no warn-
ings are active. For additional information
on warnings and indicators, see “Vehicle
information display warnings and indica-
tors” (P. 2-24).
To control what items display in the vehicle
information display, see “Customize Dis-
play ” (P. 2-20).
SETTINGS
The setting mode allows you to change the
information displayed in the vehicle infor-
mation display:
• Driver Assistance
• Customize Display
• Vehicle Settings
• Maintenance
• Clock
• TPMS Settings
• Unit / Language
• Key-Linked Settings
• Factory Reset
2-18Instruments and controls
Page 113 of 508
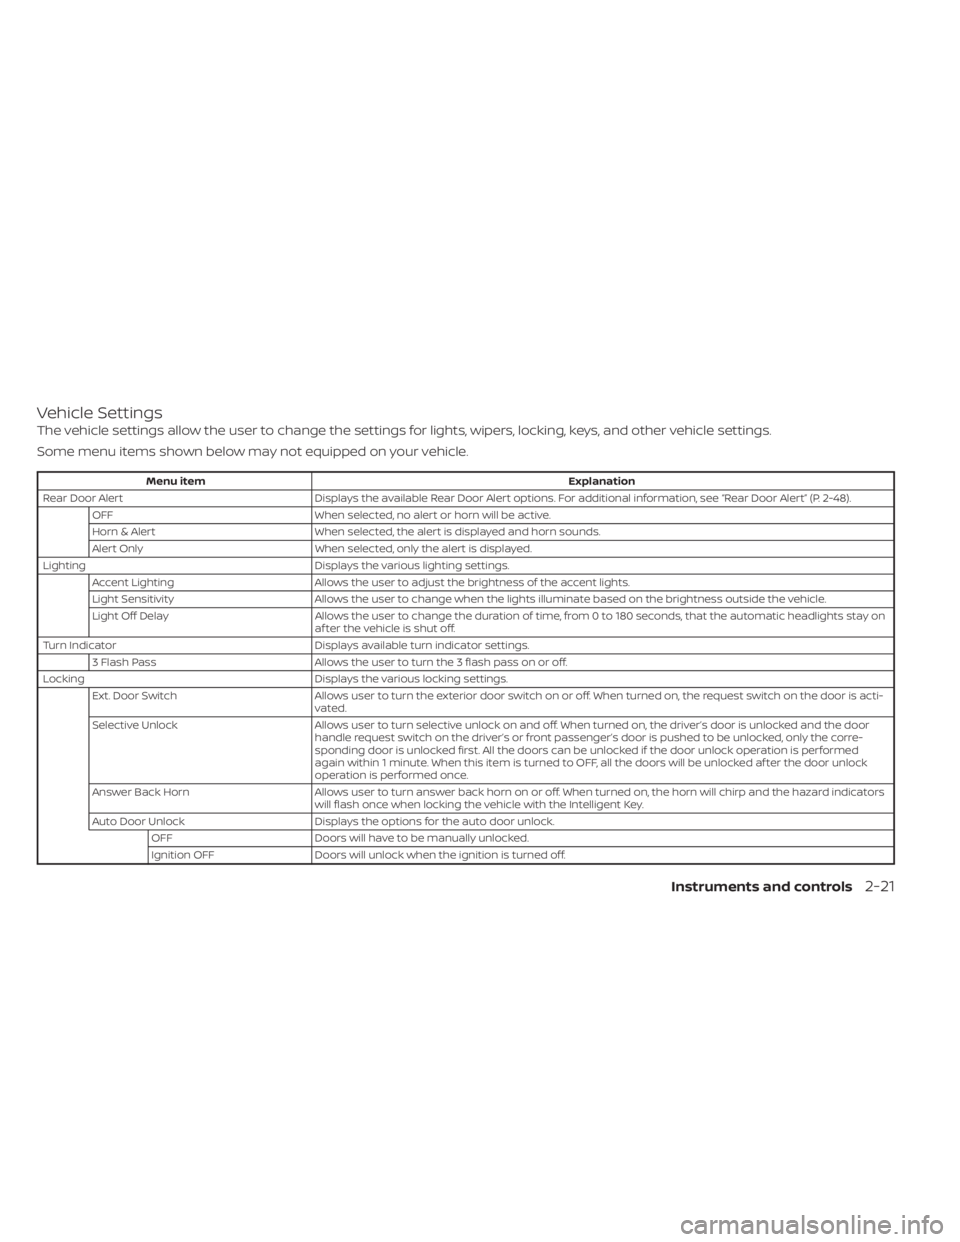
Vehicle Settings
The vehicle settings allow the user to change the settings for lights, wipers, locking, keys, and other vehicle settings.
Some menu items shown below may not equipped on your vehicle.
Menu itemExplanation
Rear Door Alert Displays the available Rear Door Alert options. For additional information, see “Rear Door Alert” (P. 2-48).
OFF When selected, no alert or horn will be active.
Horn & Alert When selected, the alert is displayed and horn sounds.
Alert Only When selected, only the alert is displayed.
Lighting Displays the various lighting settings.
Accent Lighting Allows the user to adjust the brightness of the accent lights.
Light Sensitivity Allows the user to change when the lights illuminate based on the brightness outside the vehicle.
Light Off Delay Allows the user to change the duration of time, from 0 to 180 seconds, that the automatic headlights stay on
af ter the vehicle is shut off.
Turn Indicator Displays available turn indicator settings.
3 Flash Pass Allows the user to turn the 3 flash pass on or off.
Locking Displays the various locking settings.
Ext. Door Switch Allows user to turn the exterior door switch on or off. When turned on, the request switch on the door is acti-
vated.
Selective Unlock Allows user to turn selective unlock on and off. When turned on, the driver’s door is unlocked and the door
handle request switch on the driver’s or front passenger’s door is pushed to be unlocked, only the corre-
sponding door is unlocked first. All the doors can be unlocked if the door unlock operation is performed
again within 1 minute. When this item is turned to OFF, all the doors will be unlocked af ter the door unlock
operation is performed once.
Answer Back Horn Allows user to turn answer back horn on or off. When turned on, the horn will chirp and the hazard indicators
will flash once when locking the vehicle with the Intelligent Key.
Auto Door Unlock Displays the options for the auto door unlock.
OFF Doors will have to be manually unlocked.
Ignition OFF Doors will unlock when the ignition is turned off.
Instruments and controls2-21
Page 115 of 508
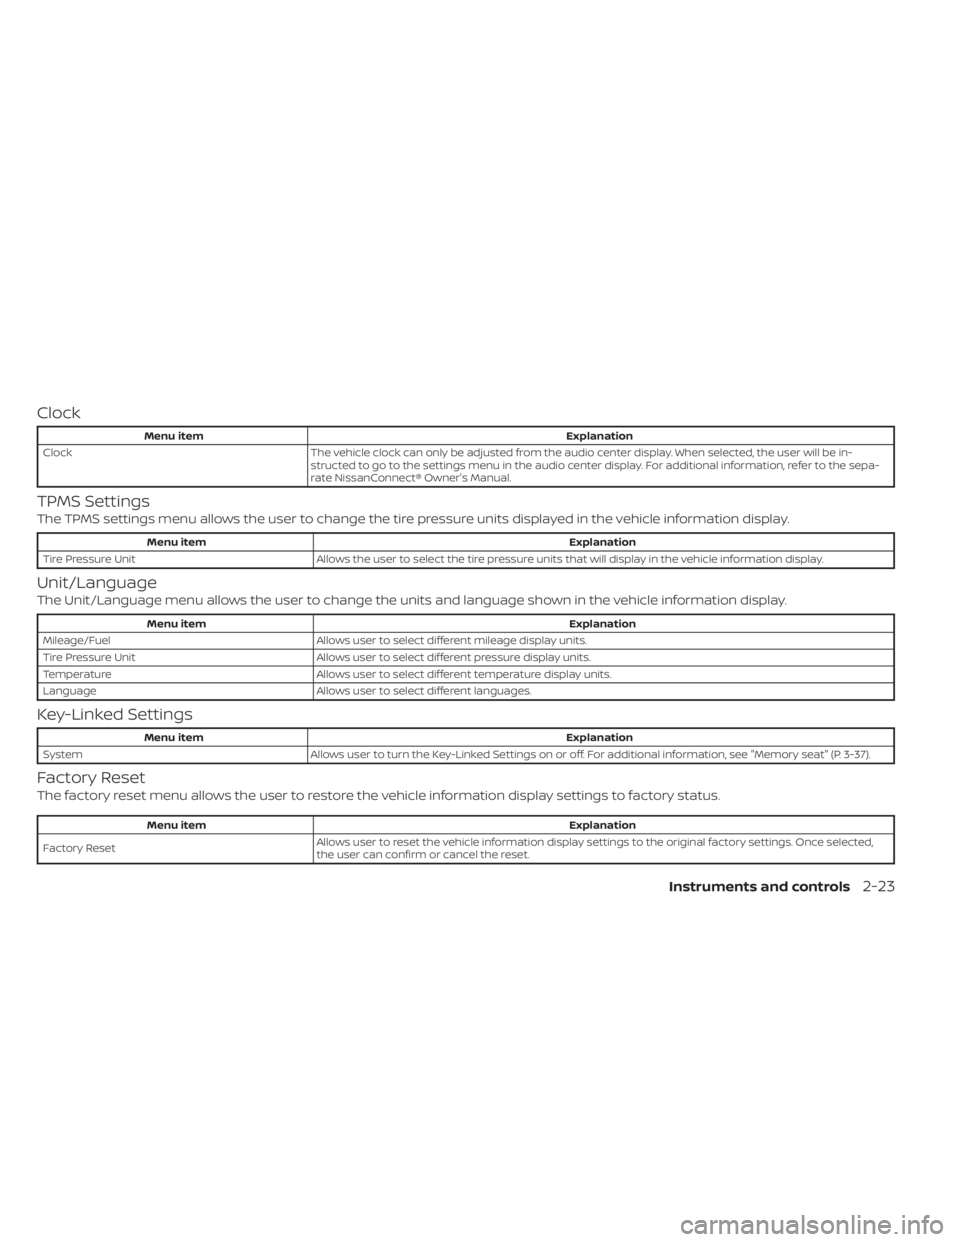
Clock
Menu itemExplanation
Clock The vehicle clock can only be adjusted from the audio center display. When selected, the user will be in-
structed to go to the settings menu in the audio center display. For additional information, refer to the sepa-
rate NissanConnect® Owner's Manual.
TPMS Settings
The TPMS settings menu allows the user to change the tire pressure units displayed in the vehicle information display.
Menu item Explanation
Tire Pressure Unit Allows the user to select the tire pressure units that will display in the vehicle information display.
Unit/Language
The Unit/Language menu allows the user to change the units and language shown in the vehicle information display.
Menu item Explanation
Mileage/Fuel Allows user to select different mileage display units.
Tire Pressure Unit Allows user to select different pressure display units.
Temperature Allows user to select different temperature display units.
Language Allows user to select different languages.
Key-Linked Settings
Menu item Explanation
System Allows user to turn the Key-Linked Settings on or off. For additional information, see "Memory seat" (P. 3-37).
Factory Reset
The factory reset menu allows the user to restore the vehicle information display settings to factory status.
Menu item Explanation
Factory Reset Allows user to reset the vehicle information display setti
ngs to the original factory settings. Once selected,
the user can confirm or cancel the reset.
Instruments and controls2-23
Page 116 of 508
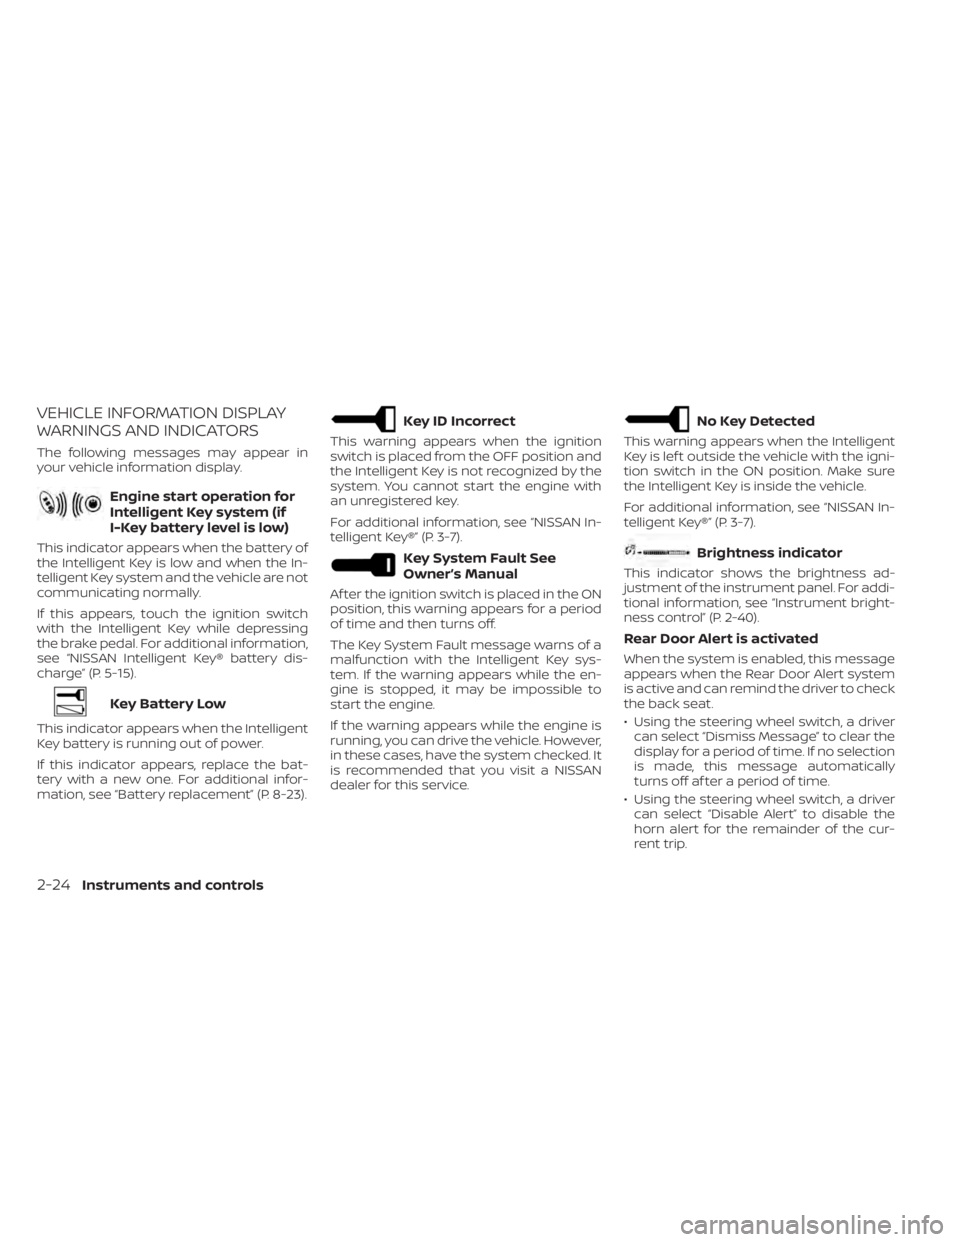
VEHICLE INFORMATION DISPLAY
WARNINGS AND INDICATORS
The following messages may appear in
your vehicle information display.
Engine start operation for
Intelligent Key system (if
I-Key battery level is low)
This indicator appears when the battery of
the Intelligent Key is low and when the In-
telligent Key system and the vehicle are not
communicating normally.
If this appears, touch the ignition switch
with the Intelligent Key while depressing
the brake pedal. For additional information,
see “NISSAN Intelligent Key® battery dis-
charge” (P. 5-15).
Key Battery Low
This indicator appears when the Intelligent
Key battery is running out of power.
If this indicator appears, replace the bat-
tery with a new one. For additional infor-
mation, see “Battery replacement” (P. 8-23).
Key ID Incorrect
This warning appears when the ignition
switch is placed from the OFF position and
the Intelligent Key is not recognized by the
system. You cannot start the engine with
an unregistered key.
For additional information, see “NISSAN In-
telligent Key®” (P. 3-7).
Key System Fault See
Owner’s Manual
Af ter the ignition switch is placed in the ON
position, this warning appears for a period
of time and then turns off.
The Key System Fault message warns of a
malfunction with the Intelligent Key sys-
tem. If the warning appears while the en-
gine is stopped, it may be impossible to
start the engine.
If the warning appears while the engine is
running, you can drive the vehicle. However,
in these cases, have the system checked. It
is recommended that you visit a NISSAN
dealer for this service.
No Key Detected
This warning appears when the Intelligent
Key is lef t outside the vehicle with the igni-
tion switch in the ON position. Make sure
the Intelligent Key is inside the vehicle.
For additional information, see “NISSAN In-
telligent Key®” (P. 3-7).
Brightness indicator
This indicator shows the brightness ad-
justment of the instrument panel. For addi-
tional information, see “Instrument bright-
ness control” (P. 2-40).
Rear Door Alert is activated
When the system is enabled, this message
appears when the Rear Door Alert system
is active and can remind the driver to check
the back seat.
• Using the steering wheel switch, a drivercan select “Dismiss Message” to clear the
display for a period of time. If no selection
is made, this message automatically
turns off af ter a period of time.
• Using the steering wheel switch, a driver can select “Disable Alert” to disable the
horn alert for the remainder of the cur-
rent trip.
2-24Instruments and controls
Page 122 of 508
Your vehicle has two types of security
systems:
• Vehicle security system
• NISSAN Vehicle Immobilizer System
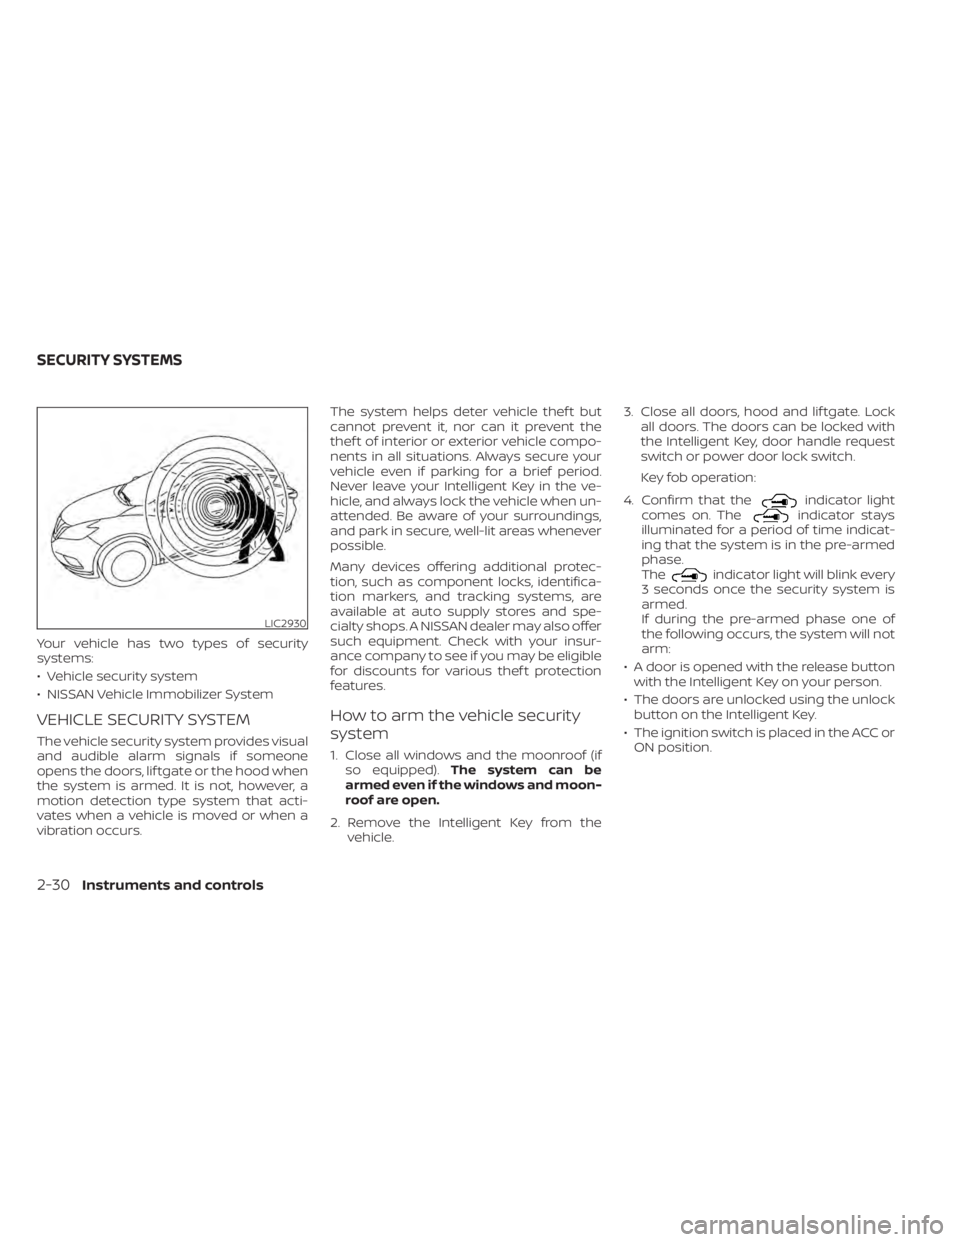
VEHICLE SECURITY SYSTEM
The vehicle security system provides visual
and audible alarm signals if someone
opens the doors, lif tgate or the hood when
the system is armed. It is not, however, a
motion detection type system that acti-
vates when a vehicle is moved or when a
vibration occurs.The system helps deter vehicle thef t but
cannot prevent it, nor can it prevent the
thef t of interior or exterior vehicle compo-
nents in all situations. Always secure your
vehicle even if parking for a brief period.
Never leave your Intelligent Key in the ve-
hicle, and always lock the vehicle when un-
attended. Be aware of your surroundings,
and park in secure, well-lit areas whenever
possible.
Many devices offering additional protec-
tion, such as component locks, identifica-
tion markers, and tracking systems, are
available at auto supply stores and spe-
cialty shops. A NISSAN dealer may also offer
such equipment. Check with your insur-
ance company to see if you may be eligible
for discounts for various thef t protection
features.
How to arm the vehicle security
system
1. Close all windows and the moonroof (if
so equipped). The system can be
armed even if the windows and moon-
roof are open.
2. Remove the Intelligent Key from the vehicle. 3. Close all doors, hood and lif tgate. Lock
all doors. The doors can be locked with
the Intelligent Key, door handle request
switch or power door lock switch.
Key fob operation:
4. Confirm that the
indicator light
comes on. Theindicator stays
illuminated for a period of time indicat-
ing that the system is in the pre-armed
phase.
The
indicator light will blink every
3 seconds once the security system is
armed.
If during the pre-armed phase one of
the following occurs, the system will not
arm:
• A door is opened with the release button with the Intelligent Key on your person.
• The doors are unlocked using the unlock button on the Intelligent Key.
• The ignition switch is placed in the ACC or ON position.
LIC2930
SECURITY SYSTEMS
2-30Instruments and controls
Page 123 of 508
•Even when the driver and/or passen-
gers are in the vehicle, the system will
activate when all the doors, hood and
lif tgate are locked with the ignition
switch placed in the LOCK position.
When placing the ignition switch in the
ACC or ON position, the system will be
released.
Vehicle security system activation
The vehicle security system will give the
following alarm:
• The turn signals blink and the horn sounds intermittently.
• The alarm automatically turns off af ter a period of time. However, the alarm reacti-
vates if the vehicle is tampered with
again. The alarm can be shut off by un-
locking the driver's door or lif tgate by
pressing the
button on the Intelli-
gent Key.
The alarm is activated by:
• Opening the door or lif tgate without us- ing the Intelligent Key (even if the door is
unlocked by releasing the door inside
lock switch).
How to stop an activated alarm
The alarm stops only by unlocking the driv-
er’s door or the lif tgate by pressing the
button on the Intelligent Key or push-
ing the request switch on the driver's or
passenger's door with the Intelligent Key in
range of the door handle.
NISSAN VEHICLE IMMOBILIZER
SYSTEM
The NISSAN Vehicle Immobilizer System
will not allow the engine to start without
the use of a registered key.
Never leave these keys in the vehicle.
FCC Notice:
For USA:
This device complies with Part 15 of the
FCC Rules. Operation is subject to the fol-
lowing two conditions: (1) This device
may not cause harmful interference, and
(2) this device must accept any interfer-
ence received, including interference
that may cause undesired operation.
NOTE:
Changes or modifications not expressly
approved by the party responsible for
compliance could void the user's author-
ity to operate the equipment.
For Canada:
This device complies with Industry
Canada licence-exempt RSS standard(s).
Operation is subject to the following two
conditions: (1) this device may not cause
interference, and (2) this device must ac-
cept any interference received, including
interference that may cause undesired
operation of the device.
Instruments and controls2-31