turn signal NISSAN NOTE 2006 User Guide
[x] Cancel search | Manufacturer: NISSAN, Model Year: 2006, Model line: NOTE, Model: NISSAN NOTE 2006Pages: 235, PDF Size: 2.29 MB
Page 104 of 235
For additional information, see “User set up menu”
later in this section for how to switch this mode on
or off.
The following functions operate when the AF mode
is on:
Automatic switching function
This function compares the strengths of the signals
and selects the station with the optimum reception
conditions.
Enhanced Other Network (EON) data
update (this function also operates when
the AF mode is off.)
When EON data is being received, this enables au-
tomatic retuning of other preset stations on the same
network. Also, network linked services can be used
such as traffic announcement. EON indicator lights
up when receiving RDS EON stations in the FM
waveband.
Programme Service (PS) function
(station name display function)
When an RDS station is tuned in with seek or manual
tuning, the programme station name will be dis-
played immediately after receiving the RDS data.
Emergency broadcast interrupt function
[ALARM INTERRUPTION – EBU
(European Broadcasting Union) SPEC
FOR INFO]
When the radio receives PTY code 31 (an emer-
gency broadcast code), the sound is interrupted,
the emergency broadcast is heard, and ALARM is
displayed. Once the emergency broadcast is fin-
ished, the unit immediately returns to the previous
source.
REG (Regional) mode
When the REG mode is activated in the FM wave-
band and the radio receiver is tuned to a regional
radio station which is transmitting local (regional)
programmes, then it will keep receiving this radio
station without switching to another regional station.
For additional information, see “User set up menu”
later in this section for how to de/activate this mode.
Traffic announcement (TA)
This function operates in both the FM (radio) and
the CD modes.
•The TA mode is selected when the TA button is
pressed. The TA indicator is displayed in the TA
ON mode.
•When the TA mode button is pressed again, the
mode will be switched off and TA indicator dis-
appears from the display.
•When the TA mode is not activated, a T-indica-
tor appears on the display, indicating that the
current radio station broadcasts trafficannouncements. Pressing the TA button will ac-
tivate the TA mode and the indicator changes
fromTtoTA.
NOTE
The TA mode operates regardless of whether the
AF mode is on or off.
Traffic announcement interrupt function
When a traffic announcement is received, the an-
nouncement is tuned in and the volume increases to
the set level. TRAFFIC is displayed and the TA indi-
cator blinks.
Once the traffic announcement is finished, the unit
returns to the source which was set before the traf-
fic announcement started, and the volume returns to
the previous level. For EON stations, the radio is
interrupted by another EON station with traffic an-
nouncements.
The traffic announcement interrupt mode is can-
celled if the TA, BAND or SRC button is pressed
during a traffic announcement. The TA mode re-
turns to the standby mode.
Volume level for traffic announcements
The volume for traffic announcements can be set as
described in the “User set up menu” later in this
section.
NEWS mode
To enable or disable the news mode in the FM band,
press thebutton. When the news mode is
enabled, the NEWS icon will be displayed.
4-20Heater and air conditioner, and audio system
Page 105 of 235
When the news mode is activated and the radio
receives a news code from a FM broadcasting sta-
tion, the actual playing mode will be interrupted.
Once the news broadcast has finished, the audio
unit will return to the previous source. During the
interruption, the display alternates between NEWS
and the broadcasting station name.
1. NEWS standby mode
•The news standby mode can be activated while
in FM (radio) or CD mode (if FM was previously
selected in the radio mode).
•Pressing thebutton, the news standby
mode will switch off and the NEWS icon will dis-
appear from the display.
2. NEWS interruption mode
•A news interruption will be announced and
NEWS will be displayed when the radio detects
the news code from the tuned station or EON
stations. The audio system will change to the
interrupting station and the name of the interrupt-
ing station will be displayed.
•Pressing thebutton during a news inter-
ruption will cause the audio unit to return to the
previous source. However, news standby mode
remains active.
•When the CD button is pressed during a news
interruption mode, the radio will change to CD
mode and news stand-by mode is not cancelled.
If the radio wave band changes to the MW or LW,
then the news standby mode will be switched off.
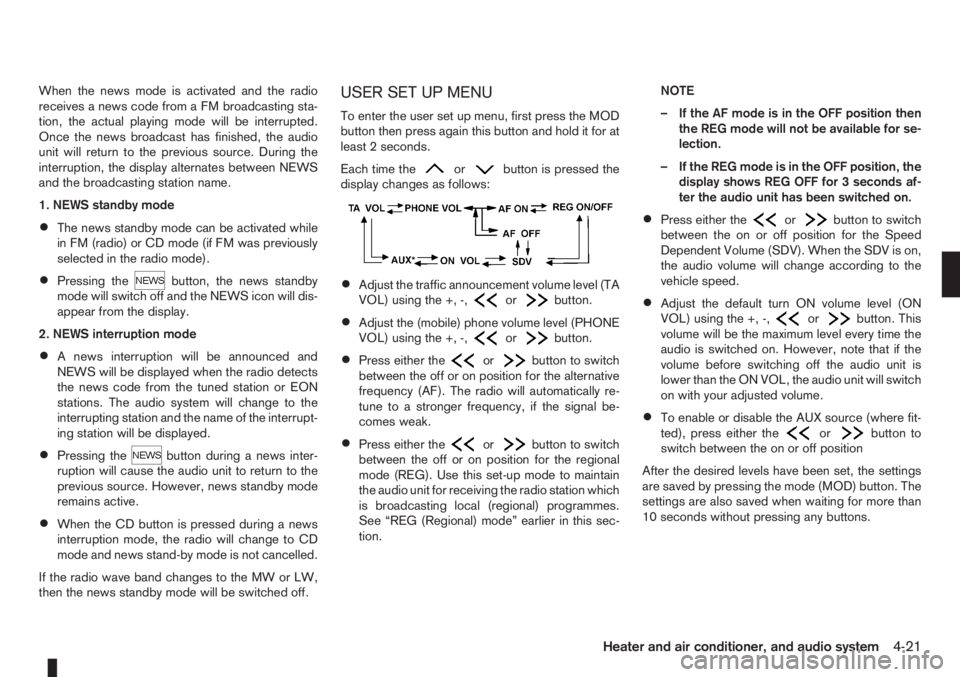
USER SET UP MENU
To enter the user set up menu, first press the MOD
button then press again this button and hold it for at
least 2 seconds.
Each time the
orbutton is pressed the
display changes as follows:
•Adjust the traffic announcement volume level (TA
VOL) using the +, -,orbutton.
•Adjust the (mobile) phone volume level (PHONE
VOL) using the +, -,orbutton.
•Press either theorbutton to switch
between the off or on position for the alternative
frequency (AF). The radio will automatically re-
tune to a stronger frequency, if the signal be-
comes weak.
•Press either theorbutton to switch
between the off or on position for the regional
mode (REG). Use this set-up mode to maintain
the audio unit for receiving the radio station which
is broadcasting local (regional) programmes.
See “REG (Regional) mode” earlier in this sec-
tion.NOTE
– If the AF mode is in the OFF position then
the REG mode will not be available for se-
lection.
– If the REG mode is in the OFF position, the
display shows REG OFF for 3 seconds af-
ter the audio unit has been switched on.
•Press either theorbutton to switch
between the on or off position for the Speed
Dependent Volume (SDV). When the SDV is on,
the audio volume will change according to the
vehicle speed.
•Adjust the default turn ON volume level (ON
VOL) using the +, -,orbutton. This
volume will be the maximum level every time the
audio is switched on. However, note that if the
volume before switching off the audio unit is
lower than the ON VOL, the audio unit will switch
on with your adjusted volume.
•To enable or disable the AUX source (where fit-
ted), press either theorbutton to
switch between the on or off position
After the desired levels have been set, the settings
are saved by pressing the mode (MOD) button. The
settings are also saved when waiting for more than
10 seconds without pressing any buttons.
Heater and air conditioner, and audio system4-21
Page 109 of 235
– Turn the
– Press the
RADIO OPERATION
When the<>(power ON/OFF) button is
pressed, the audio unit will switch on with the last
received radio station, if the audio unit was previ-
ously switched off in radio mode.
Radio band select
buttons
Press the
wave band as follows:
FM1→FM2→FMT→AM→FM1
When
come on at the last received radio station. If the CD
or AUX source mode is already playing, pressing
the
source mode and the last received radio station will
be selected.
FM Auto store
When the
than 1.5 seconds the six stations with the strongest
frequencies are stored in the preset (1 to 6) buttons
of the FMT band. During the search, a notification
message [AUTOSTORE] appears in the display and
the sound is muted until the operation is complete.
Once completed, the radio selects preset button
j1.
Manual tuning
When adjusting the broadcasting station frequency
manually, turn the
sired station is tuned in.
The frequency increases or decreases in steps of
100 kHz on the FM band, and 9 kHz on the AM
band.
WARNING
The radio should not be tuned while driving in
order for full attention to be given to the driving
operation.
SEEK tuning buttons
Pressing the<>or<>button starts the tun-
ing mode. The radio tuner seeks from low to high or
high to low frequencies and stops at the next broad-
casting station. During seek mode, the audio output
is muted. If no broadcasting station can be found
within the complete band cycle, it will return to the
initial frequency.
Preset station buttonsj1j2j3j4j5j6
Pressing a preset button for less than 2 seconds will
select the stored radio station.
Pressing a preset button for more than 2 seconds
will cause the station currently being received to be
stored against that preset button.
•Eighteen stations can be stored in the FM band.
(Six each for FM1, FM2 and FMT)
•Six stations can be set for the AM band.
If the battery is disconnected, or if the fuse blows,
the radio memory will be erased. In that case, reset
the desired stations after battery connection or fuse
replacement.
Radio data system (RDS) operation
The RDS is a system through which encoded digital
information is transmitted by FM radio stations in
addition to the normal FM radio broadcasting. The
RDS provides information services such as station
name, traffic information, or news.
NOTE
In some countries or regions, some of these ser-
vices may not be available.
Alternative Frequency (AF) mode:
The AF mode operates in the FM (radio) mode.
•The AF mode operates both in the FM (radio)
and CD mode (if FM was previously selected in
the radio mode).
•The AF function compares signal strengths and
selects the station with the optimum reception
conditions for the currently tuned-in station.
RDS functions
Programme Service (PS) function (station name
display function):
When an RDS station is tuned in with seek or manual
tuning, the RDS data is received and the PS name
is displayed.
Heater and air conditioner, and audio system4-25
Page 116 of 235
![NISSAN NOTE 2006 User Guide [Pair Device]:
1. Press the<SETUP>button. Select the [Blue-
tooth] key using the<TUNE/MENU>dial. Then
press the<ENTER>button.
You can register up to 5 different Bluetooth mo-
bile phones. However, you NISSAN NOTE 2006 User Guide [Pair Device]:
1. Press the<SETUP>button. Select the [Blue-
tooth] key using the<TUNE/MENU>dial. Then
press the<ENTER>button.
You can register up to 5 different Bluetooth mo-
bile phones. However, you](/img/5/56797/w960_56797-115.png)
[Pair Device]:
1. Press the
tooth] key using the
press the
You can register up to 5 different Bluetooth mo-
bile phones. However, you can only use one de-
vice at a time. If you have 5 different Bluetooth
registered devices, a new device can only re-
place one of the 5 existing paired devices. Use
[Delete Device] key to delete one of the existing
paired devices. For details, see “[Delete Device]”
later in this section.
2. Select the [Pair Device] key.
The pairing procedure depends on the
connected device:
•Mobile phone:
The message [Ready to Pair Pin:1234] will
be displayed.
•Audio device without PIN code:
The Bluetooth connection will be automati-
cally connected without any further input.
•Audio device with PIN code:
A new screen will appear. Assign the 4 digit
PIN code by turning the
to each code and press the
to confirm. Then select [Validate] and press
made.
The 4–digit PIN code is provided with the
audio device, see the owner’s manual of the
audio device.
3. On Bluetooth® audio/mobile phone devices.
1) Switch on the Bluetooth® connection, if not
already switched on.
2) Switch on the search mode for Bluetooth®
devices. If the search mode finds a device it
will be shown on the device display.
3) When a device is found use the
to select [My Car].
4) Enter the number code shown on the relevant
device with the device’s own keypad, and
press the confirmation key on the device it-
self. Refer to the relevant Bluetooth® device
owner’s manual for further details.
When successfully paired a notification message
will be displayed, then the audio system displaywill return to the current audio source display.
During connection the following status icons will
be displayed (top left of the display): Signal
strength (), Battery status* () and Blue-
tooth “ON” ().
*: If the low battery message comes on, the
Bluetooth® device must be recharged soon.
The pairing procedure and operation may vary ac-
cording to device type and compatibility. See the
Bluetooth® owner’s manual for further details.
NOTE
•For device details, see your audio/mobile
phone Owner’s Manual.
•For assistance with the Bluetooth® audio/
mobile phone integration, please visit your lo-
cal NISSAN dealer.
[Select Device]:
The paired device list shows which Bluetooth® au-
dio or mobile phone devices have been paired or
registered with the Bluetooth® audio system. If the
list contains devices then select the appropriate de-
vice to connect to the Bluetooth® audio system.
The following symbols (where fitted) indicate the
capability of the registered device:
•: Mobile phone integration
•: Audio streaming (A2DP- Advanced Audio
Distribution Profile)
NAA1202
4-32Heater and air conditioner, and audio system
Page 117 of 235
![NISSAN NOTE 2006 User Guide [Delete Device]:
A registered device can be removed from the Blue-
tooth audio system. Select a registered device then
press<ENTER>to confirm to deletion.
[On/Off]:
If Bluetooth® has been switched of NISSAN NOTE 2006 User Guide [Delete Device]:
A registered device can be removed from the Blue-
tooth audio system. Select a registered device then
press<ENTER>to confirm to deletion.
[On/Off]:
If Bluetooth® has been switched of](/img/5/56797/w960_56797-116.png)
[Delete Device]:
A registered device can be removed from the Blue-
tooth audio system. Select a registered device then
press
[On/Off]:
If Bluetooth® has been switched off a notification
message [On/Off] appears when you select [Blue-
tooth] from the setup menu screen, or press<
>.
To switch the Bluetooth® signal on, press
and a follow up screen will appear. Then select [On]
and press
tings menu screen.
Bluetooth® audio streaming main
operation
Turn the ignition switch to the Acc or ON position.
If the audio system was turned off while the Blue-
tooth® audio was playing, pressing the<
> but-
ton will start the Bluetooth® audio streaming.
To operate the Bluetooth audio streaming use one
of the following methods:
•Press the
•Press
lighted, then press
The type of display,
jAorjB , shown on the audio
system can vary depending on the Bluetooth® ver-
sion of the device.
Fast Forward (Cue), Fast
Reverse (Review) buttons:
When the<
>(Cue) or<>(Review) button
is pressed continuously, the track will be played at
high speed. When the button is released, the track
will be played at normal playing speed.
Track up/down buttons:
Pressing the <
>or<> button once, the
track will be skipped forward to the next track or
backward to the beginning of the current played
track. Press the<
>or<>button more than
once to skip through the tracks.
Play/Pause:
Press the
press
button (Type B display
screen only)
If the song contains music information tags (ID3–
tags), the title of the played song will be displayed.
If tags are not provided then the display will not
show any messages.
When the<
/j5>button is pressed repeatedly
further information about the song can be displayed
along with the song title.
A long press on<
/j5>will turn the display
into a detailed overview which after a few seconds
returns to the main display; or press<
/j5>
briefly.
BLUETOOTH®MOBILE PHONE
FEATURE
This system offers a hands-free facility for your mo-
bile telephone with Bluetooth® to enhance driving
safety, and comfort.
For details, see “Mobile phone integration (where
fitted)” later in this section.
NAA1203
Heater and air conditioner, and audio system4-33
Page 120 of 235
For details, see “FM AM radio with CD player
(where fitted)” earlier in this section.
When successfully paired, a notification message
will be displayed. During the connection the follow-
ing status icons will be displayed (top left of dis-
play): Signal strength (
), Battery status (), and
Bluetooth ().
*: If the low battery message comes on, the Blue-
tooth® device must be recharged soon.
HANDS-FREE TELEPHONE
CONTROL
The hands-free mode can be operated using the
telephone<>button on the audio system, or
(where fitted) on the steering wheel.
Initiating a call
A call can be initiated using one of the following
methods:
– Redial
– Phone book
– Manual dialling
– Missed calls
– Dialled calls
– Received callsRedial:
To redial or call the last number dialled, press<
>
for more than 2 seconds.
Making a call from the phone book:
Once the Bluetooth
®connection has been made,
between the registered mobile phone and the audio
system, phone book data will be transferred auto-
matically to the audio system. The transfer may take
a while before completion.
NOTE
Phone book data will be erased when:
•Switching to another registered mobile
phone.
•Mobile phone is disconnected.
•The registered mobile phone is deleted from
the audio system.
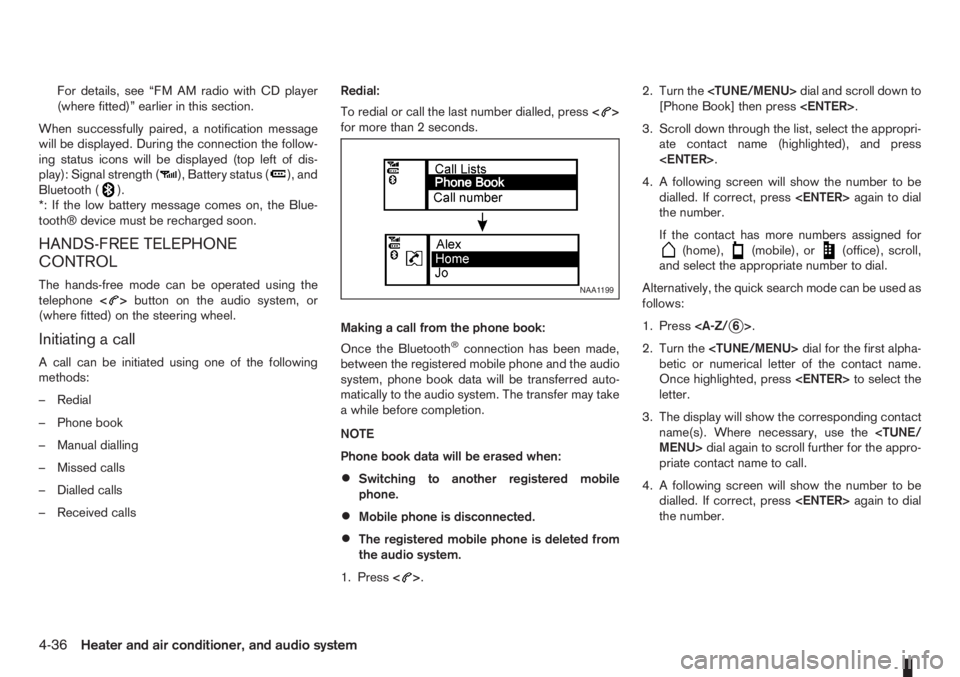
1. Press<
>.2. Turn the
[Phone Book] then press
3. Scroll down through the list, select the appropri-
ate contact name (highlighted), and press
4. A following screen will show the number to be
dialled. If correct, press
the number.
If the contact has more numbers assigned for
(home),(mobile), or(office), scroll,
and select the appropriate number to dial.
Alternatively, the quick search mode can be used as
follows:
1. Press
2. Turn the
betic or numerical letter of the contact name.
Once highlighted, press
letter.
3. The display will show the corresponding contact
name(s). Where necessary, use the
priate contact name to call.
4. A following screen will show the number to be
dialled. If correct, press
the number.
NAA1199
4-36Heater and air conditioner, and audio system
Page 149 of 235
•Trailer towing requires more fuel than under nor-
mal circumstances because of a considerable
increase in traction power required and resis-
tance.
•When towing a trailer, observe the following re-
stricted towing speeds:
Speed: below 100 km/h (62 MPH)
CAUTION
While towing a trailer, make sure the engine cool-
ant temperature warning light does not come on,
in order to prevent engine overheating.
TYRE PRESSURE
When towing a trailer, inflate the vehicle tyres to the
maximum recommended COLD tyre pressure, as
indicated on the tyre placard (for full loading). Make
sure the trailer tyre pressures are correct.
CAUTION
Do not tow a trailer when the vehicle is installed
with a temporary-use spare tyre.
SAFETY CHAINS
Always use a suitable chain between the vehicle
and trailer. The chain should be attached to the hitch
and not to the vehicle bumper or axle. Be sure to
leave enough slack in the chain to permit turning
corners. The chain should not drag on the ground:
passing the chain across the trailer hitch may be the
best practice depending on your trailer.
TRAILER BRAKES
Ensure that trailer brakes are installed as required
by local regulations. Also check that all other trailer
equipment conforms to local regulations.
TRAILER DETECTION (where fitted)
When towing a trailer and the turn signal switch is
used, the electrical system of the vehicle will detect
an additional electrical load of the trailer lighting. As
a result, the direction indicator tone will sound dif-
ferently.
INSTALLATION OF COUPLING
DEVICE
NISSAN recommends that the coupling device for
trailer towing be installed under the following condi-
tions:
•Maximum permissible vertical load on the cou-
pling device: 490N (50 kg, 110 lb)
•The coupling device, mounting points and instal-
lation parts on your vehicle: as shown as an ex-
ample in the illustration.
Follow all of the coupling device manufacturer’s in-
structions for installation and use.
Starting and driving5-25
Page 159 of 235
In case of a flat tyre, follow the instructions as de-
scribed below:
STOPPING THE VEHICLE
WARNING
•Make sure that the handbrake is securely ap-
plied.
•For Manual Transmission (MT) models: Make
sure the gear lever is in the R (Reverse) posi-
tion.
For Automatic Transmission (AT) models:
Make sure that the selector lever is in the P
(Park) position.
•Never change tyres when the vehicle is on a
slope, ice or a slippery area. This is hazard-
ous.
•Never change tyres if oncoming traffic is close
to your vehicle. Wait for professional road as-
sistance.
1. Safely move the vehicle off the road, away from
traffic.
2. Switch on the hazard warning flashers.
3. Park on a level surface.
4. Apply the handbrake.
5. Shift the gear lever (MT models) into the R (Re-
verse) position [AT models, move the selector
lever to the P (Park) position].
6. Turn off the engine.7. Open the bonnet (for details, see “Bonnet
release” in the “3. Pre-driving checks and
adjustments” section) in order to:
•Warn other traffic.
•Signal to professional road assistance that
you require assistance.
8. Have all passengers exit the vehicle and stand in
a safe place, away from traffic and clear of the
vehicle.
CHANGING FLAT TYRE (Models with
spare wheel, where fitted)
Blocking the wheels
WARNING
Make sure to block the appropriate wheel to pre-
vent the vehicle from moving, which may cause
personal injury.
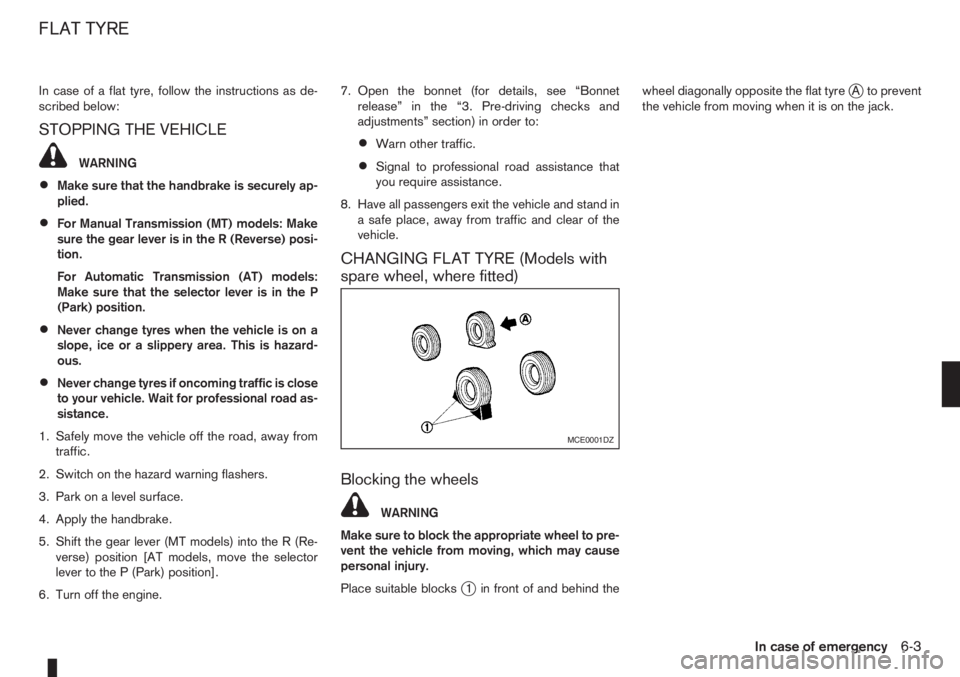
Place suitable blocks
j1 in front of and behind thewheel diagonally opposite the flat tyre
jA to prevent
the vehicle from moving when it is on the jack.
MCE0001DZ
FLAT TYRE
In case of emergency6-3
Page 179 of 235
Lights*:
Clean the headlights on a regular basis. Make sure
that the headlights, stop lights, tail lights, turn signal
lights, and other lights are all operating properly and
installed securely. Also check headlight aim.
Tyres*:
Check the pressure with a gauge periodically when
at a service station (including the spare) and adjust
to the specified pressure if necessary. Check care-
fully for damage, cuts or excessive wear.
Tyre rotation*:
Tyres should be rotated at least every 10,000 km
(6,000 miles). However, the timing for tyre rotation
may vary according to your driving habits and road
surface conditions.
Wheel alignment and balance:
If the vehicle pull to either side while driving on a
straight and level road, or if you detect uneven or
abnormal tyre wear, there may be a need for wheel
alignment. If the steering wheel or seat vibrates at
normal highway speeds, wheel balancing may be
needed.
Wheel bolts:
When checking the tyres, make sure no wheel bolts
are missing, and check for any loose wheel bolts.
Tighten if necessary.Windscreen:
Clean the windscreen on a regular basis. Check the
windscreen at least every six months for cracks or
other damage. Have a damaged windscreen re-
paired by a qualified repair facility.
Wiper blades*:
Check for cracks or wear if they do not wipe prop-
erly.
Under the bonnet and vehicle
The maintenance items listed here should be
checked periodically, e.g. each time you check the
engine oil or refuel.
Battery*:
Check if the green indicator on the top of the main-
tenance free battery is visible. If it is not visible,
replace the battery as soon as possible.
Vehicles operated in high temperatures or under
severe conditions, check the fluid level frequently.
Brake and clutch fluid level*:
Make sure that the brake and clutch fluid level is
between the MAX and MIN lines on the reservoir.
Engine coolant level*:
Check the coolant level when the engine is cold.
Engine drive belts*:
Make sure that the drive belts are not frayed, worn,
cracked or oily.Engine oil level*:
Check the level after parking the vehicle on a level
surface and turning off the engine.
Fluid leaks:
Check under the vehicle for fuel, oil, water or other
fluid leaks after the vehicle has been parked for a
while. Water dripping from the air conditioner after
use is normal. If you should notice any leaks or if
petrol fumes are evident, check for the cause and
have it corrected immediately.
Window washer fluid*:
Check that there is adequate fluid in the tank.
Inside the vehicle
The maintenance items listed here should be
checked on a regular basis, such as when perform-
ing periodic maintenance, cleaning the vehicle, etc.
Accelerator pedal:
Check the pedal for smooth operation and make
sure that the pedal does not catch or require uneven
effort. Keep the floor mats away from the pedal.
Brake pedal*:
Check the pedal for smooth operation. If the brake
pedal suddenly goes down further than normal, the
pedal feels spongy or the vehicle seems to take
longer to stop, contact a NISSAN dealer or qualified
workshop immediately. Keep the floor mat away
from the pedal.
Maintenance and do-it-yourself8-3
Page 200 of 235
3. Disconnect the electrical connector from the rear
end of the headlight bulb.
4. Remove the cap.
5. Push and turn the retaining spring to loosen it.
6. Remove the headlight bulb. Do not shake or ro-
tate the bulb during the removal.
7. Install the new bulb in the reverse order of re-
moval and make sure that the cap is securely
sealed with the headlight body.
8. Reconnect the negative (—) battery cable and
close the bonnet.
Contact a NISSAN dealer or qualified workshop, if
you need assistance for bulb replacement.
NOTE
Fog may temporarily form inside the lens of the
exterior lights in the rain or in a car wash. The fog
is caused by a temperature difference between
the inside and the outside of the lens. This is not
a malfunction. If large droplets can be seen, then
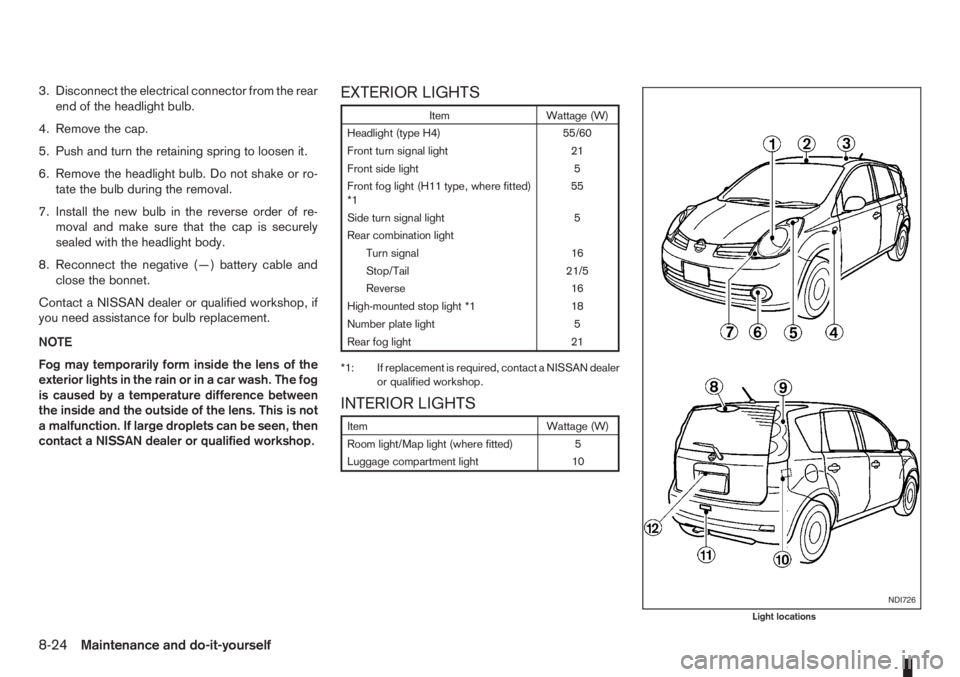
contact a NISSAN dealer or qualified workshop.EXTERIOR LIGHTS
Item Wattage (W)
Headlight (type H4) 55/60
Front turn signal light 21
Front side light 5
Front fog light (H11 type, where fitted)
*155
Side turn signal light 5
Rear combination light
Turn signal 16
Stop/Tail 21/5
Reverse 16
High-mounted stop light *1 18
Number plate light 5
Rear fog light 21
*1: If replacement is required, contact a NISSAN dealer
or qualified workshop.
INTERIOR LIGHTS
Item Wattage (W)
Room light/Map light (where fitted) 5
Luggage compartment light 10
NDI726
Light locations
8-24Maintenance and do-it-yourself