window NISSAN NOTE 2006 User Guide
[x] Cancel search | Manufacturer: NISSAN, Model Year: 2006, Model line: NOTE, Model: NISSAN NOTE 2006Pages: 235, PDF Size: 2.29 MB
Page 68 of 235
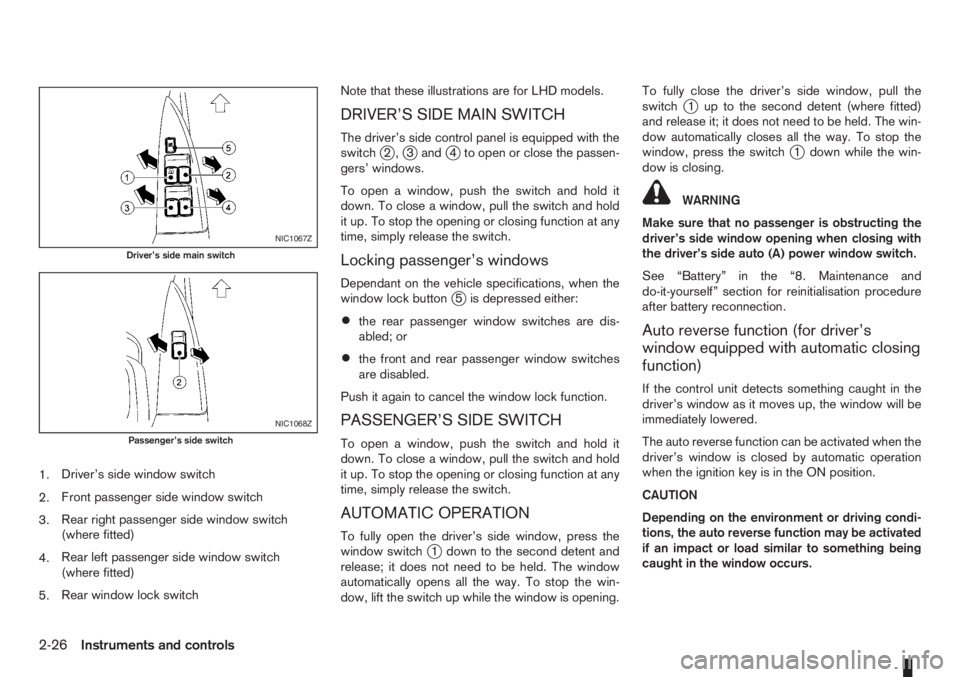
1.Driver’s side window switch
2.Front passenger side window switch
3.Rear right passenger side window switch
(where fitted)
4.Rear left passenger side window switch
(where fitted)
5.Rear window lock switchNote that these illustrations are for LHD models.
DRIVER’S SIDE MAIN SWITCH
The driver’s side control panel is equipped with the
switchj2,j3andj4 to open or close the passen-
gers’ windows.
To open a window, push the switch and hold it
down. To close a window, pull the switch and hold
it up. To stop the opening or closing function at any
time, simply release the switch.
Locking passenger’s windows
Dependant on the vehicle specifications, when the
window lock buttonj5 is depressed either:
•the rear passenger window switches are dis-
abled; or
•the front and rear passenger window switches
are disabled.
Push it again to cancel the window lock function.
PASSENGER’S SIDE SWITCH
To open a window, push the switch and hold it
down. To close a window, pull the switch and hold
it up. To stop the opening or closing function at any
time, simply release the switch.
AUTOMATIC OPERATION
To fully open the driver’s side window, press the
window switchj1 down to the second detent and
release; it does not need to be held. The window
automatically opens all the way. To stop the win-
dow, lift the switch up while the window is opening.To fully close the driver’s side window, pull the
switch
j1 up to the second detent (where fitted)
and release it; it does not need to be held. The win-
dow automatically closes all the way. To stop the
window, press the switch
j1 down while the win-
dow is closing.
WARNING
Make sure that no passenger is obstructing the
driver’s side window opening when closing with
the driver’s side auto (A) power window switch.
See “Battery” in the “8. Maintenance and
do-it-yourself” section for reinitialisation procedure
after battery reconnection.
Auto reverse function (for driver’s
window equipped with automatic closing
function)
If the control unit detects something caught in the
driver’s window as it moves up, the window will be
immediately lowered.
The auto reverse function can be activated when the
driver’s window is closed by automatic operation
when the ignition key is in the ON position.
CAUTION
Depending on the environment or driving condi-
tions, the auto reverse function may be activated
if an impact or load similar to something being
caught in the window occurs.
NIC1067Z
Driver’s side main switch
NIC1068Z
Passenger’s side switch
2-26Instruments and controls
Page 73 of 235
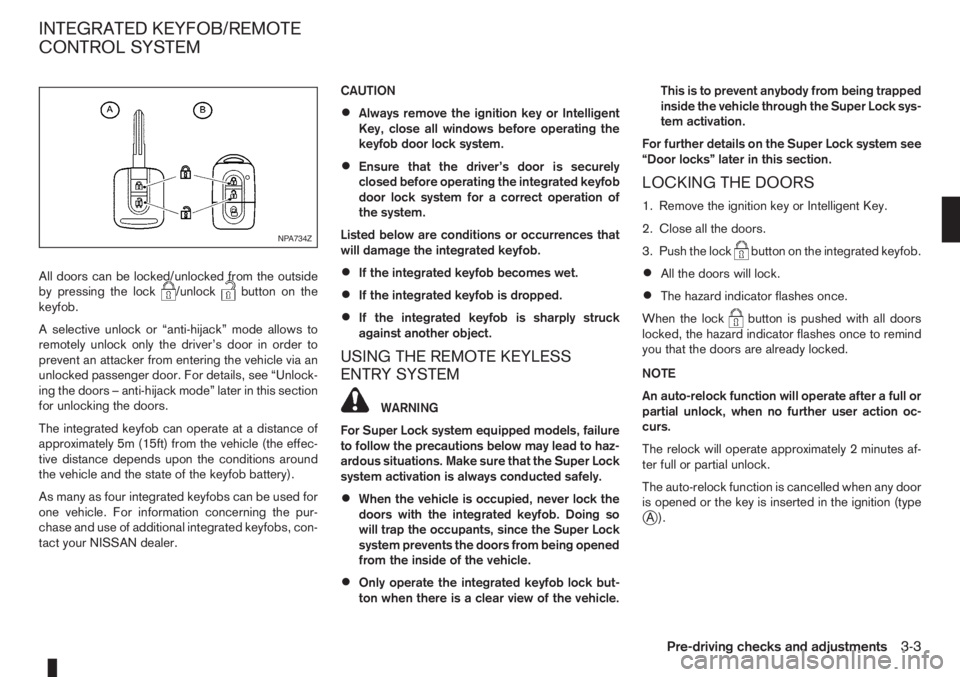
All doors can be locked/unlocked from the outside
by pressing the lock/unlockbutton on the
keyfob.
A selective unlock or “anti-hijack” mode allows to
remotely unlock only the driver’s door in order to
prevent an attacker from entering the vehicle via an
unlocked passenger door. For details, see “Unlock-
ing the doors – anti-hijack mode” later in this section
for unlocking the doors.
The integrated keyfob can operate at a distance of
approximately 5m (15ft) from the vehicle (the effec-
tive distance depends upon the conditions around
the vehicle and the state of the keyfob battery).
As many as four integrated keyfobs can be used for
one vehicle. For information concerning the pur-
chase and use of additional integrated keyfobs, con-
tact your NISSAN dealer.CAUTION
•Always remove the ignition key or Intelligent
Key, close all windows before operating the
keyfob door lock system.
•Ensure that the driver’s door is securely
closed before operating the integrated keyfob
door lock system for a correct operation of
the system.
Listed below are conditions or occurrences that
will damage the integrated keyfob.
•If the integrated keyfob becomes wet.
•If the integrated keyfob is dropped.
•If the integrated keyfob is sharply struck
against another object.
USING THE REMOTE KEYLESS
ENTRY SYSTEM
WARNING
For Super Lock system equipped models, failure
to follow the precautions below may lead to haz-
ardous situations. Make sure that the Super Lock
system activation is always conducted safely.
•When the vehicle is occupied, never lock the
doors with the integrated keyfob. Doing so
will trap the occupants, since the Super Lock
system prevents the doors from being opened
from the inside of the vehicle.
•Only operate the integrated keyfob lock but-
ton when there is a clear view of the vehicle.This is to prevent anybody from being trapped
inside the vehicle through the Super Lock sys-
tem activation.
For further details on the Super Lock system see
“Door locks” later in this section.
LOCKING THE DOORS
1. Remove the ignition key or Intelligent Key.
2. Close all the doors.
3. Push the lock
button on the integrated keyfob.
•All the doors will lock.
•The hazard indicator flashes once.
When the lock
button is pushed with all doors
locked, the hazard indicator flashes once to remind
you that the doors are already locked.
NOTE
An auto-relock function will operate after a full or
partial unlock, when no further user action oc-
curs.
The relock will operate approximately 2 minutes af-
ter full or partial unlock.
The auto-relock function is cancelled when any door
is opened or the key is inserted in the ignition (type
jA).
NPA734Z
INTEGRATED KEYFOB/REMOTE
CONTROL SYSTEM
Pre-driving checks and adjustments3-3
Page 76 of 235
•The Intelligent Key contains a miniature radio
transmitter that may be affected when placed
near metal objects.
•Keep the Intelligent Key away from mobile
phones, lap-top computers and other metal
objects or electronics.
STARTING THE ENGINE WITH THE
INTELLIGENT KEY
See “Ignition knob (where fitted)” in the “5. Starting
and driving” section.
CAUTION
•Make sure you carry the Intelligent Key with
you when starting and driving the vehicle.
•If the Intelligent Key is too far away from the
passenger compartment, the vehicle may not
start.
WARNING
•Always look before opening any doors, to
avoid an accident with oncoming traffic.
•Never leave children or adults who would nor-
mally require the support of others alone in
the vehicle. They could unknowingly activate
switches or controls and inadvertently
become involved in a serious accident.
SUPER LOCK SYSTEM (Right-hand
drive models)
WARNING
For Super Lock System equipped models, failure
to follow the precautions below may lead to haz-
ardous situations. Make sure the Super Lock Sys-
tem activation is always safely conducted.
•When the vehicle is occupied, never lock the
doors with the integrated keyfob. Doing so
will trap the occupants, since the Super Lock
System prevents the doors from being opened
from the inside of the vehicle.
•Only operate the integrated keyfob lock but-
ton when there is a clear view of the vehicle.
This is to prevent anybody from being trapped
inside the vehicle through the Super Lock
System activation.
Locking the doors with the integrated keyfob will
lock all doors including the back door and activate
the Super Lock System. This means that none ofthe doors can be opened from the inside, adding
extra security in case of break-in or theft.
The system will be released when the door is un-
locked with the integrated keyfob.
The Super Lock System will not activate when the
doors are locked with the power door lock switch or
the key.
Emergency situations
If the Super Lock System is activated due to a traf-
fic accident or other unexpected circumstances
while you are in the vehicle:
•Insert the key/emergency key in the ignition
switch, turn it to the ON position, the Super Lock
system will be released and all doors can be
unlocked.
•Open or break the door window on the front
passenger’s side, remove the protection cap on
the passenger’s side door handle, insert the key
into the passenger’s side door key cylinder and
turn it to the unlock position, after which you will
be able to open the door.
•Remove the key from the ignition switch and un-
lock the door using the integrated keyfob.
DOOR LOCKS
3-6Pre-driving checks and adjustments
Page 86 of 235
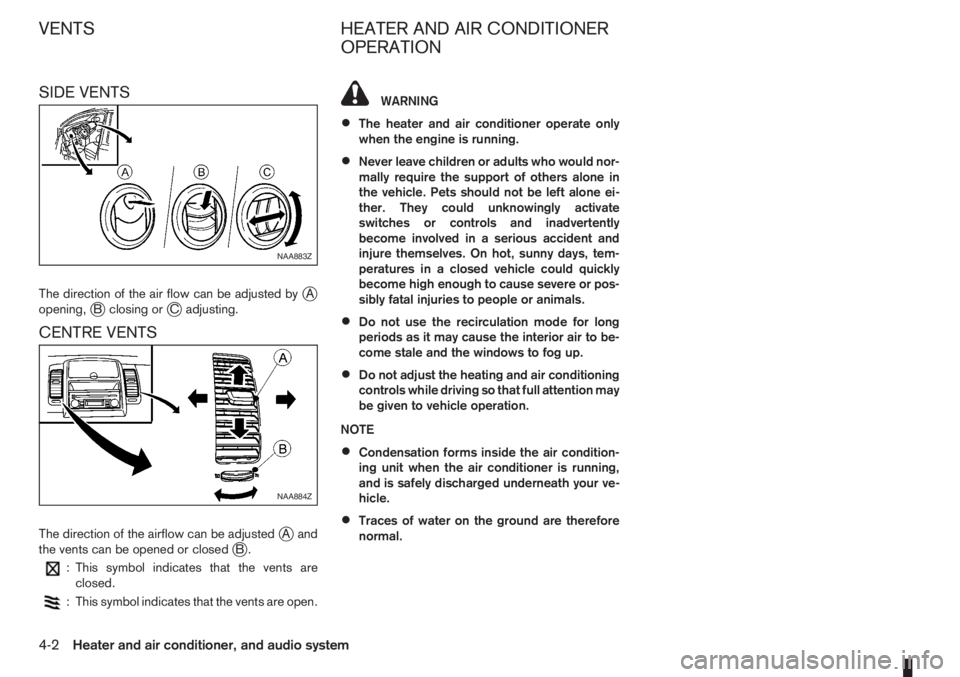
SIDE VENTS
The direction of the air flow can be adjusted byjA
opening,jB closing orjC adjusting.
CENTRE VENTS
The direction of the airflow can be adjustedjAand
the vents can be opened or closedjB.
: This symbol indicates that the vents are
closed.
: This symbol indicates that the vents are open.
WARNING
•The heater and air conditioner operate only
when the engine is running.
•Never leave children or adults who would nor-
mally require the support of others alone in
the vehicle. Pets should not be left alone ei-
ther. They could unknowingly activate
switches or controls and inadvertently
become involved in a serious accident and
injure themselves. On hot, sunny days, tem-
peratures in a closed vehicle could quickly
become high enough to cause severe or pos-
sibly fatal injuries to people or animals.
•Do not use the recirculation mode for long
periods as it may cause the interior air to be-
come stale and the windows to fog up.
•Do not adjust the heating and air conditioning
controls while driving so that full attention may
be given to vehicle operation.
NOTE
•Condensation forms inside the air condition-
ing unit when the air conditioner is running,
and is safely discharged underneath your ve-
hicle.
•Traces of water on the ground are therefore
normal.
NAA883Z
NAA884Z
VENTS HEATER AND AIR CONDITIONER
OPERATION
4-2Heater and air conditioner, and audio system
Page 87 of 235
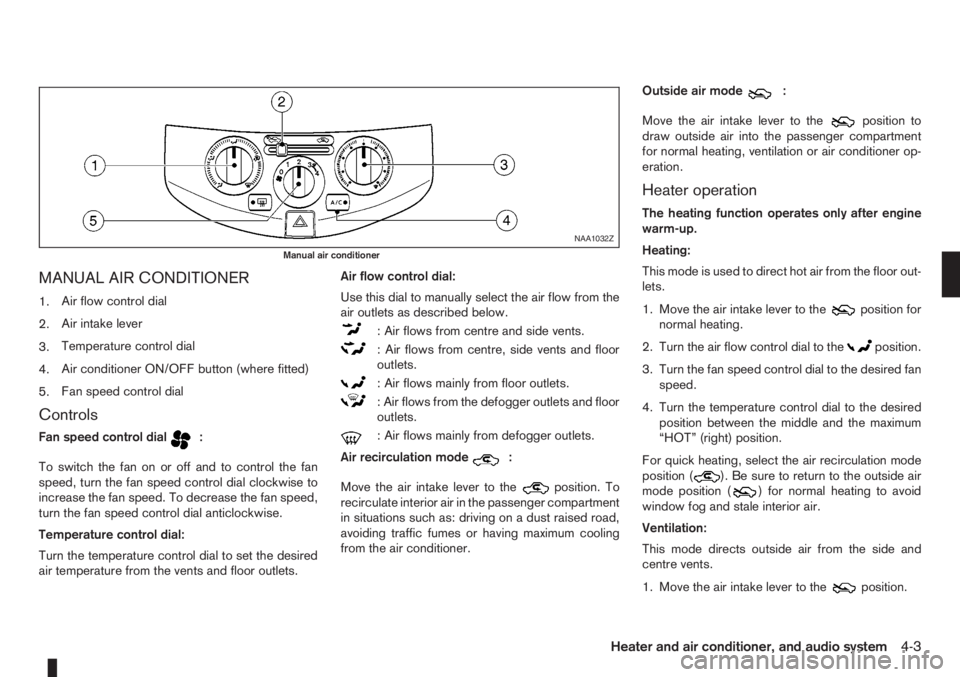
MANUAL AIR CONDITIONER
1.Air flow control dial
2.Air intake lever
3.Temperature control dial
4.Air conditioner ON/OFF button (where fitted)
5.Fan speed control dial
Controls
Fan speed control dialm:
To switch the fan on or off and to control the fan
speed, turn the fan speed control dial clockwise to
increase the fan speed. To decrease the fan speed,
turn the fan speed control dial anticlockwise.
Temperature control dial:
Turn the temperature control dial to set the desired
air temperature from the vents and floor outlets.Air flow control dial:
Use this dial to manually select the air flow from the
air outlets as described below.
: Air flows from centre and side vents.
: Air flows from centre, side vents and floor
outlets.
: Air flows mainly from floor outlets.
: Air flows from the defogger outlets and floor
outlets.
: Air flows mainly from defogger outlets.
Air recirculation mode
m:
Move the air intake lever to the
position. To
recirculate interior air in the passenger compartment
in situations such as: driving on a dust raised road,
avoiding traffic fumes or having maximum cooling
from the air conditioner.Outside air mode
m:
Move the air intake lever to the
position to
draw outside air into the passenger compartment
for normal heating, ventilation or air conditioner op-
eration.
Heater operation
The heating function operates only after engine
warm-up.
Heating:
This mode is used to direct hot air from the floor out-
lets.
1. Move the air intake lever to the
position for
normal heating.
2. Turn the air flow control dial to the
position.
3. Turn the fan speed control dial to the desired fan
speed.
4. Turn the temperature control dial to the desired
position between the middle and the maximum
“HOT” (right) position.
For quick heating, select the air recirculation mode
position (
). Be sure to return to the outside air
mode position () for normal heating to avoid
window fog and stale interior air.
Ventilation:
This mode directs outside air from the side and
centre vents.
1. Move the air intake lever to the
position.
NAA1032Z
Manual air conditioner
Heater and air conditioner, and audio system4-3
Page 88 of 235
2. Turn the air flow control dial to theposition.
3. Turn the fan speed control dial to the desired fan
speed.
4. Turn the temperature control dial to the desired
position.
Defrosting or defogging:
This mode is used to defrost/defog the windows.
1. Move the air intake lever to the
position.
2. Turn the air flow control dial to the
position.
3. Turn the fan speed control dial to speed position
2 or above.
4. Turn the temperature control dial to the desired
position between the middle and the maximum
“HOT” (right) position.
To quickly defrost/defog the windscreen, turn the
fan speed control dial to the maximum position and
the temperature control dial to the maximum “HOT”
(right) position.
Heating and defogging:
This mode heats the interior and defogs the wind-
screen.
1. Move the air intake lever to outside air mode
position (
).
2. Turn the air flow control dial to the
position.
3. Turn the fan speed control dial to speed position
2 or above.4. Turn the temperature control dial between the
middle and the maximum “HOT” (right) position.
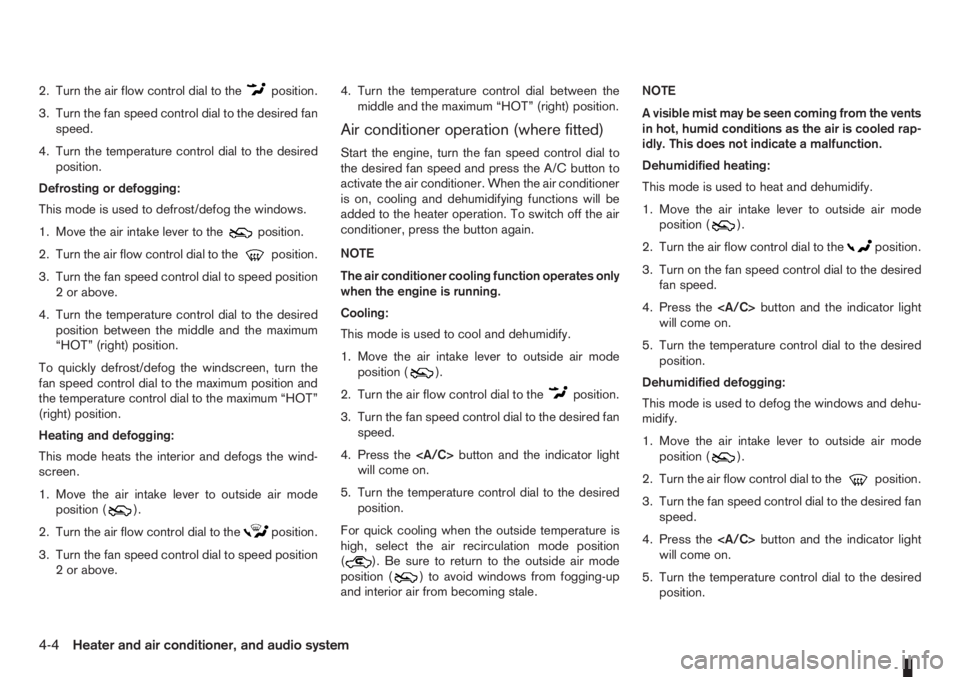
Air conditioner operation (where fitted)
Start the engine, turn the fan speed control dial to
the desired fan speed and press the A/C button to
activate the air conditioner. When the air conditioner
is on, cooling and dehumidifying functions will be
added to the heater operation. To switch off the air
conditioner, press the button again.
NOTE
The air conditioner cooling function operates only
when the engine is running.
Cooling:
This mode is used to cool and dehumidify.
1. Move the air intake lever to outside air mode
position (
).
2. Turn the air flow control dial to the
position.
3. Turn the fan speed control dial to the desired fan
speed.
4. Press thebutton and the indicator light
will come on.
5. Turn the temperature control dial to the desired
position.
For quick cooling when the outside temperature is
high, select the air recirculation mode position
(
). Be sure to return to the outside air mode
position () to avoid windows from fogging-up
and interior air from becoming stale.NOTE
A visible mist may be seen coming from the vents
in hot, humid conditions as the air is cooled rap-
idly. This does not indicate a malfunction.
Dehumidified heating:
This mode is used to heat and dehumidify.
1. Move the air intake lever to outside air mode
position (
).
2. Turn the air flow control dial to the
position.
3. Turn on the fan speed control dial to the desired
fan speed.
4. Press thebutton and the indicator light
will come on.
5. Turn the temperature control dial to the desired
position.
Dehumidified defogging:
This mode is used to defog the windows and dehu-
midify.
1. Move the air intake lever to outside air mode
position (
).
2. Turn the air flow control dial to the
position.
3. Turn the fan speed control dial to the desired fan
speed.
4. Press thebutton and the indicator light
will come on.
5. Turn the temperature control dial to the desired
position.
4-4Heater and air conditioner, and audio system
Page 89 of 235
Operating tips
•In order to improve the heater operation, clear
the snow and ice from the wiper blade and air
inlet in front of the windscreen.
•After parking in the sun, drive for two or three
minutes with the windows open to vent hot air
from the passenger compartment. Then close
the windows to allow the acceleration of the air
conditioner’s cooling operation.
•Keep the windows closed while the air condi-
tioner is operating.
•The air conditioning system should be operated
for about 10 minutes, at least once a month. This
helps prevent damage to the system due to lack
of lubrication.
•If the coolant temperature warning light comes
on, turn the air conditioner off. For additional
information, see “Engine overheat” in the “6. In
case of emergency” section.
•If the engine coolant reaches an extremely high
temperature, the air conditioning system will au-
tomatically turn off. This may happen for example
if the engine runs at idle speed for a long time on
a hot day.
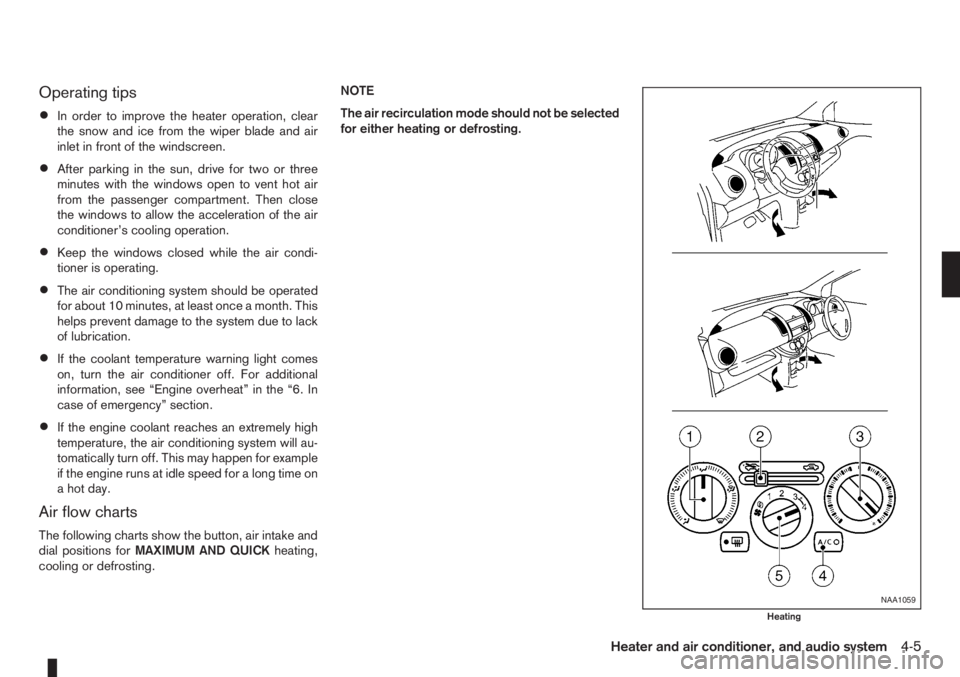
Air flow charts
The following charts show the button, air intake and
dial positions forMAXIMUM AND QUICKheating,
cooling or defrosting.NOTE
The air recirculation mode should not be selected
for either heating or defrosting.
NAA1059
Heating
Heater and air conditioner, and audio system4-5
Page 91 of 235
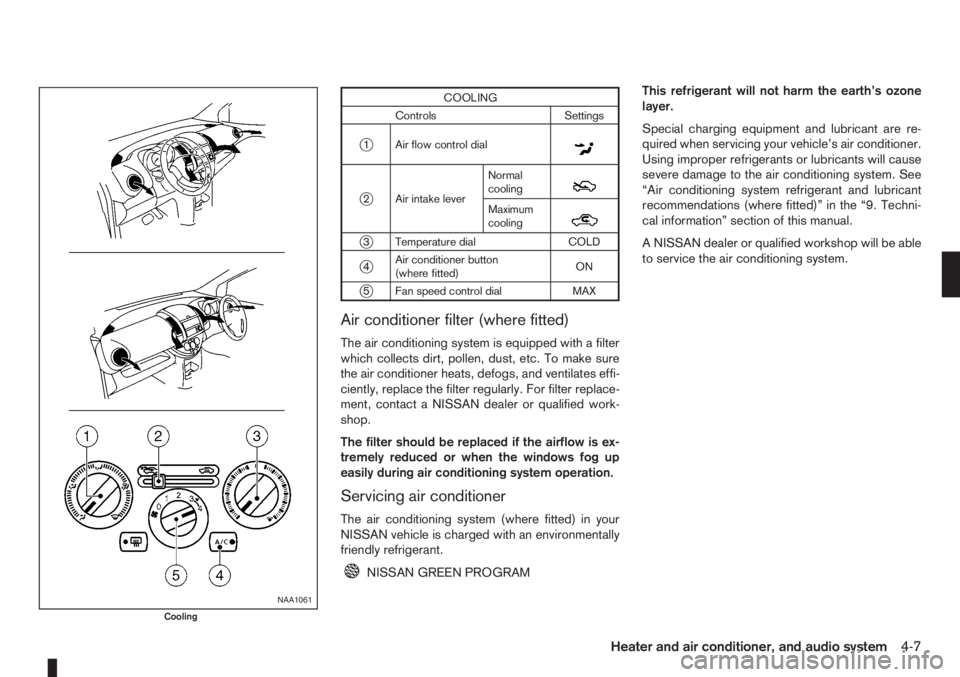
COOLING
Controls Settings
j1 Air flow control dialm
j2 Air intake leverNormal
coolingm
Maximum
coolingm
j3 Temperature dial COLD
j4Air conditioner button
(where fitted)ON
j5 Fan speed control dial MAX
Air conditioner filter (where fitted)
The air conditioning system is equipped with a filter
which collects dirt, pollen, dust, etc. To make sure
the air conditioner heats, defogs, and ventilates effi-
ciently, replace the filter regularly. For filter replace-
ment, contact a NISSAN dealer or qualified work-
shop.
The filter should be replaced if the airflow is ex-
tremely reduced or when the windows fog up
easily during air conditioning system operation.
Servicing air conditioner
The air conditioning system (where fitted) in your
NISSAN vehicle is charged with an environmentally
friendly refrigerant.
NISSAN GREEN PROGRAMThis refrigerant will not harm the earth’s ozone
layer.
Special charging equipment and lubricant are re-
quired when servicing your vehicle’s air conditioner.
Using improper refrigerants or lubricants will cause
severe damage to the air conditioning system. See
“Air conditioning system refrigerant and lubricant
recommendations (where fitted)” in the “9. Techni-
cal information” section of this manual.
A NISSAN dealer or qualified workshop will be able
to service the air conditioning system.
NAA1061
Cooling
Heater and air conditioner, and audio system4-7
Page 92 of 235
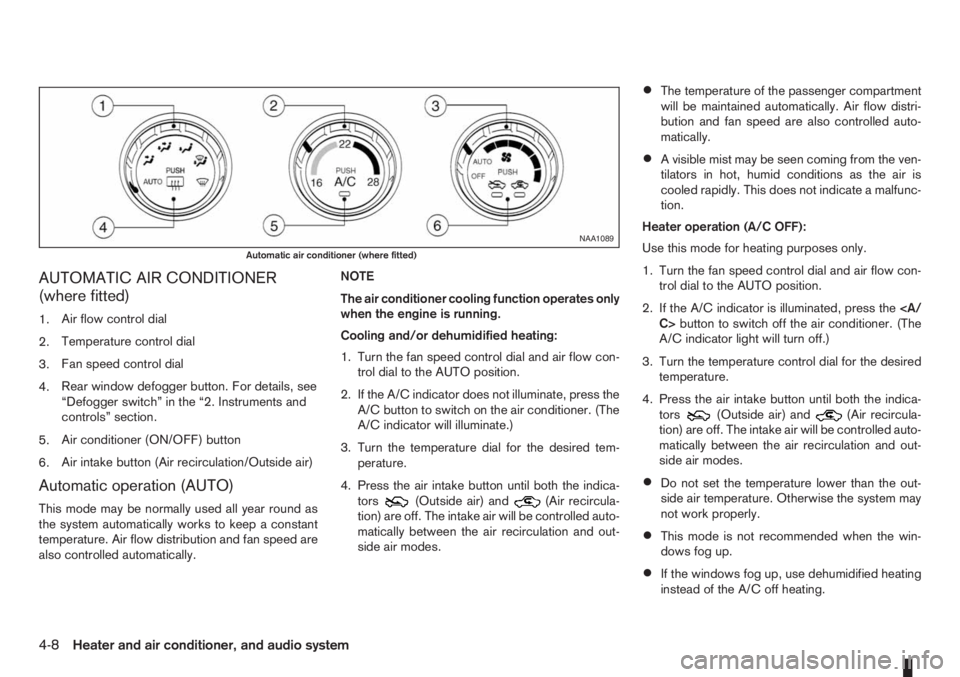
AUTOMATIC AIR CONDITIONER
(where fitted)
1.Air flow control dial
2.Temperature control dial
3.Fan speed control dial
4.Rear window defogger button. For details, see
“Defogger switch” in the “2. Instruments and
controls” section.
5.Air conditioner (ON/OFF) button
6.Air intake button (Air recirculation/Outside air)
Automatic operation (AUTO)
This mode may be normally used all year round as
the system automatically works to keep a constant
temperature. Air flow distribution and fan speed are
also controlled automatically.NOTE
The air conditioner cooling function operates only
when the engine is running.
Cooling and/or dehumidified heating:
1. Turn the fan speed control dial and air flow con-
trol dial to the AUTO position.
2. If the A/C indicator does not illuminate, press the
A/C button to switch on the air conditioner. (The
A/C indicator will illuminate.)
3. Turn the temperature dial for the desired tem-
perature.
4. Press the air intake button until both the indica-
tors(Outside air) and(Air recircula-
tion) are off. The intake air will be controlled auto-
matically between the air recirculation and out-
side air modes.
•The temperature of the passenger compartment
will be maintained automatically. Air flow distri-
bution and fan speed are also controlled auto-
matically.
•A visible mist may be seen coming from the ven-
tilators in hot, humid conditions as the air is
cooled rapidly. This does not indicate a malfunc-
tion.
Heater operation (A/C OFF):
Use this mode for heating purposes only.
1. Turn the fan speed control dial and air flow con-
trol dial to the AUTO position.
2. If the A/C indicator is illuminated, press the
C>button to switch off the air conditioner. (The
A/C indicator light will turn off.)
3. Turn the temperature control dial for the desired
temperature.
4. Press the air intake button until both the indica-
tors
(Outside air) and(Air recircula-
tion) are off. The intake air will be controlled auto-
matically between the air recirculation and out-
side air modes.
•Do not set the temperature lower than the out-
side air temperature. Otherwise the system may
not work properly.
•This mode is not recommended when the win-
dows fog up.
•If the windows fog up, use dehumidified heating
instead of the A/C off heating.
NAA1089
Automatic air conditioner (where fitted)
4-8Heater and air conditioner, and audio system
Page 93 of 235
Dehumidified defrosting or defogging:
1. Turn the air flow control dial to the
position.
2. Turn the fan speed control dial to the desired
position.
3. Turn the temperature control dial for the desired
temperature.
•To quickly remove ice from the outside of the
windscreen, turn the fan speed control dial to
the maximum position.
•As soon as possible after the windscreen has
been cleared of ice, turn the fan speed control
dial to the AUTO position for the automatic mode.
•When the air flow control dial is turned to theorposition, the outside air mode and
the air conditioner will automatically switch on
(except when the fan speed control dial is in the
OFF position) when the outside temperatures is
above −5°C (23°F) to defog the windscreen.
Outside air is drawn into the passenger com-
partment to improve the defogging performance.
Manual operation
Fan speed controlm:
Turn the fan speed control dial:
– to the OFF position to switch off the heater and
air conditioner system.
– to the AUTO position for automatic control of the
fan speed.
– to adjust the fan speed.Temperature control:
Turn temperature dial to set the desired air tempera-
ture.
Air flow control:
Turn the air flow control dial to one of following air
mode.
m
Air flows from centre and side vents.
m
Air flows from centre, side vents and
floor outlets.
mAir flows mainly from floor outlets.
m
Air flows from the defogger outlets and
floor outlets.
mAir flows mainly from defogger outlets.
Air recirculation
m:
Press the air intake button until the air recirculation
indicator light (
) comes on. When selected,
interior air will be recirculated inside the vehicle and
the air conditioner will switch on.
Use this mode to recirculate interior air inside the
passenger compartment in situations such as: driv-
ing on a dust raised road, avoiding traffic fumes or
having maximum cooling from the air conditioner.Outside air circulation
m:
Press the air intake button until outside air indicator
light (
) comes on. When selected, outside air
will be drawn into the vehicle.
Use this mode to draw outside air into the passen-
ger compartment for normal heating, ventilation or
air conditioner operation.
Operating tips
•In order to improve the heater operation, clear
the snow and ice from the wiper blade and air
inlet in front of the windscreen.
•When the engine coolant temperature and out-
side air temperature are low, the air flow from
the floor outlets may not operate for a maximum
of approximately 150 seconds. However, this is
not a malfunction. After the coolant temperature
has warmed up, the air flow from the floor outlets
will operate normally.
•After parking in the sun, drive for two or three
minutes with the windows open to vent hot air
from the passenger compartment. Then, close
the windows. This will allow the acceleration of
the air conditioner’s cooling operation.
•Keep the windows closed while the air condi-
tioner is operating.
•The air conditioning system should be operated
for approximately 10 minutes at least once a
month. This helps prevent damage to the system
due to lack of lubrication.
Heater and air conditioner, and audio system4-9