wheel NISSAN NOTE 2006 Owner's Manual
[x] Cancel search | Manufacturer: NISSAN, Model Year: 2006, Model line: NOTE, Model: NISSAN NOTE 2006Pages: 235, PDF Size: 2.29 MB
Page 123 of 235
C.Telephone button
D.Scrolling switch
E.Source button
The audio unit can be operated by using the con-
trols on the steering wheel.
To use the steering wheel audio switch, push the
power “ON” button of the audio unit with the ignition
switch in either the Acc or ON position.
mormScrolling switch
– Preset station change (radio mode)
Push the up/down scrolling switch (
or) for
less than 1.5 seconds to select one of the preset
radio stations.
– Seek tuning (radio mode)
Push the up/down scrolling switch (
or) for
more than 1.5 seconds to seek for the next or
previous radio station.
– Track up/down (CD mode)
Push the up/down scrolling switch (
or) for
less than 1.5 seconds to select the next track or
to return to the beginning of the present track.
Push (up/down) several times to skip through or
skip back the tracks.
– DISC change (where fitted, CD mode)
Push the up/down scrolling switch (
or) for
more than 1.5 seconds to change the playing
disc.
mINFO button
For additional information about thebutton,
see “Meters and gauges” in the “2. Instruments and
controls” section.
SOURCE button
When the SRC (or SOURCE) button is pressed
repeatedly, the source will change as follows:
Radio⇒CD⇒AUX *⇒Radio
* where fitted
mTelephone button
For additional information of the telephone button,
see “Mobile phone integration (where fitted)” earlier
in this section.
mVolume control buttons
Press the + or — button to adjust the volume level.When installing large capacity wireless equipment
or a car phone in your NISSAN, be sure to observe
the following as it may adversely affect the Engine
control system and other electronic parts depend-
ing on its installation location.
CAUTION
•Keep the antenna as far as possible away from
the Electric Control Module.
•Also keep the antenna wire more than 20 cm
(8 inches) away from the Electro Injection har-
ness. Do not route the antenna wire next to
any harness.
•Adjust the antenna standing-wave ratio as rec-
ommended by the manufacturer.
•Connect the ground wire from the radio chas-
sis to the body.
For details, consult a NISSAN dealer or qualified
workshop.
CAR PHONE OR CB RADIO
Heater and air conditioner, and audio system4-39
Page 130 of 235
•Avoid starting off, accelerating or stopping sud-
denly.
•Avoid sharp turns or lane changes.
•Avoid sudden steering actions.
•Extra distance should be kept from the vehicle in
front.
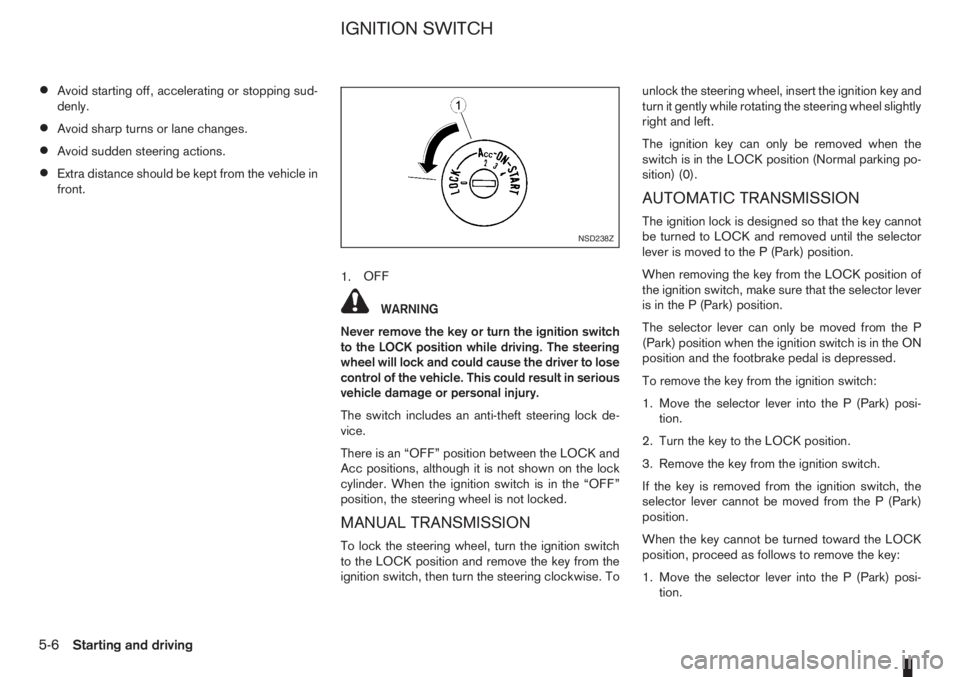
1.OFF
WARNING
Never remove the key or turn the ignition switch
to the LOCK position while driving. The steering
wheel will lock and could cause the driver to lose
control of the vehicle. This could result in serious
vehicle damage or personal injury.
The switch includes an anti-theft steering lock de-
vice.
There is an “OFF” position between the LOCK and
Acc positions, although it is not shown on the lock
cylinder. When the ignition switch is in the “OFF”
position, the steering wheel is not locked.
MANUAL TRANSMISSION
To lock the steering wheel, turn the ignition switch
to the LOCK position and remove the key from the
ignition switch, then turn the steering clockwise. Tounlock the steering wheel, insert the ignition key and
turn it gently while rotating the steering wheel slightly
right and left.
The ignition key can only be removed when the
switch is in the LOCK position (Normal parking po-
sition) (0).
AUTOMATIC TRANSMISSION
The ignition lock is designed so that the key cannot
be turned to LOCK and removed until the selector
lever is moved to the P (Park) position.
When removing the key from the LOCK position of
the ignition switch, make sure that the selector lever
is in the P (Park) position.
The selector lever can only be moved from the P
(Park) position when the ignition switch is in the ON
position and the footbrake pedal is depressed.
To remove the key from the ignition switch:
1. Move the selector lever into the P (Park) posi-
tion.
2. Turn the key to the LOCK position.
3. Remove the key from the ignition switch.
If the key is removed from the ignition switch, the
selector lever cannot be moved from the P (Park)
position.
When the key cannot be turned toward the LOCK
position, proceed as follows to remove the key:
1. Move the selector lever into the P (Park) posi-
tion.NSD238Z
IGNITION SWITCH
5-6Starting and driving
Page 131 of 235
2. Turn the key slightly in the ON direction.
3. Turn the key towards the LOCK position.
4. Remove the key.
STEERING LOCK
To lock the steering wheel
1. Turn the key to the LOCK position.
2. Remove the key from the ignition switch.
3. Turn the steering wheel 1/6 of a turn clockwise
from the straight up position.
To unlock the steering wheel
1. Insert the key into the ignition switch.
2. Gently turn the key while rotating the steering
wheel slightly right and left.
KEY POSITIONS
LOCK (Normal parking position) (0)
The ignition key can only be removed when in this
position.
The steering lock can only be locked in this position.
“OFF” (1)
The engine is turned off without locking the steering
wheel.
Acc (Accessories) (2)
This position activates electrical accessories, such
as the radio, when the engine is not running.
ON (Normal operating position) (3)
This position turns on the ignition system and elec-
trical accessories.
START (4)
The engine starter activates and the engine will start.
As soon as the engine has started, release the key
immediately. It will return to the ON position.
NISSAN ANTI-THEFT SYSTEM (NATS)
The NISSAN Anti Theft System (NATS)* will stop
the engine if someone tries to start the engine with-
out using the registered NATS key.
* Immobilizer
If you failed to start the engine using the NATS Key,
turn the ignition knob to the LOCK position, wait for
5 seconds and turn the key to the START position
again to start the engine.
For additional information, see “Security system” in
the “3. Pre-driving checks and adjustments” sec-
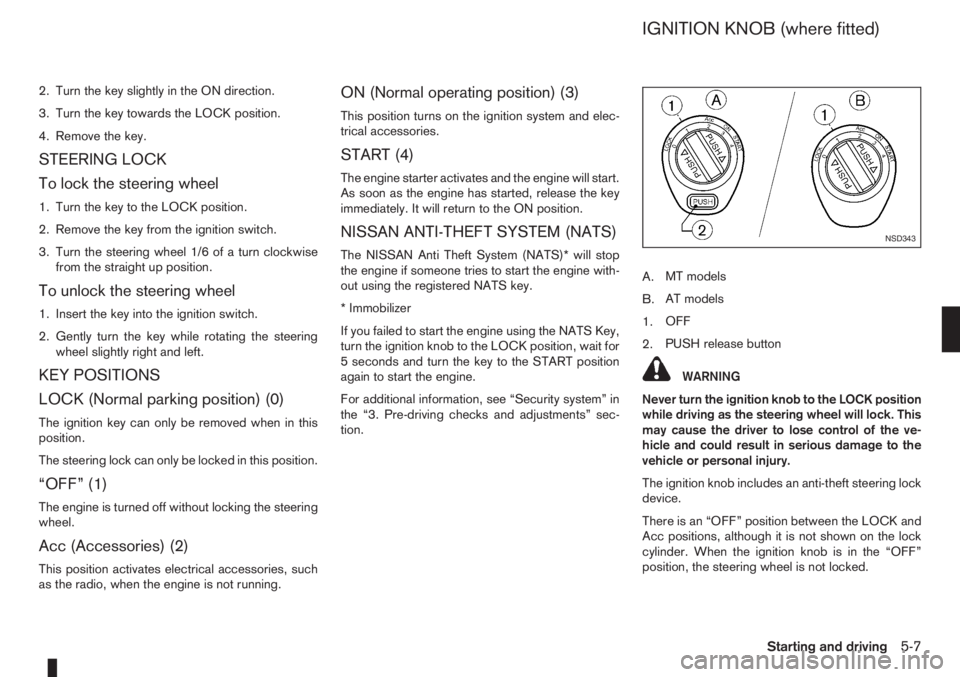
tion.A.MT models
B.AT models
1.OFF
2.PUSH release button
WARNING
Never turn the ignition knob to the LOCK position
while driving as the steering wheel will lock. This
may cause the driver to lose control of the ve-
hicle and could result in serious damage to the
vehicle or personal injury.
The ignition knob includes an anti-theft steering lock
device.
There is an “OFF” position between the LOCK and
Acc positions, although it is not shown on the lock
cylinder. When the ignition knob is in the “OFF”
position, the steering wheel is not locked.
NSD343
IGNITION KNOB (where fitted)
Starting and driving5-7
Page 132 of 235
CAUTION
•Make sure you carry the Intelligent Key with
you when operating the vehicle.
•Never leave the Intelligent Key inside the ve-
hicle when you leave the vehicle.
•If the Intelligent Key is too far away from the
driver, the vehicle may not start.
MANUAL TRANSMISSION
The ignition lock is designed so that the knob can
ONLY be turned to the LOCK position when the
PUSH release button has first been depressed.
NOTE
•The ignition knob warning light () blinks
and the buzzer sounds twice when the igni-
tion knob is turned to the “OFF” position. De-
press the PUSH release button
j2 , then turn
the ignition knob to the LOCK position. See
“Warning/indicator lights and audible
reminders” in the “2. Instruments and
controls” section for further details regarding
the functionality of the ignition knob warning
light.
•When the emergency key is being used, the
PUSH release buttonj2 must be depressed
in order to turn the ignition knob to the LOCK
position although the ignition knob warning
light (
) will not blink and the buzzer will not
sound.
AUTOMATIC TRANSMISSION
The ignition knob is designed so that it cannot be
turned to the LOCK position until the selector lever
is moved to the P (Park) position. The selector lever
can only be moved from the P (Park) position when
the ignition knob is in the ON position and the
footbrake pedal is depressed.
NOTE
The ignition knob warning light (
) blinks and a
buzzer sounds twice when the ignition knob is
turned to the “OFF” position. Make sure that the
selector lever is in the P (Park) position, then turn
the ignition knob to the LOCK position. See
“Warning/indicator lights and audible reminders”
in the “2. Instruments and controls” section for
further details regarding the functionality of the
ignition knob warning light.
STEERING LOCK
To lock the steering wheel
In the LOCK position, turn the steering wheel 1/6 of
a turn from the straight up position.
To unlock the steering wheel
Depress the brake pedal, push the ignition knob and
turn it towards the Acc position while gently rotating
the steering wheel right or left.
IGNITION KNOB POSITION
LOCK (Normal parking position) (0)
The steering lock can be only be locked from this
position.
“OFF” (1)
The engine can be turned off without locking the
steering wheel.
Acc (Accessories) (2)
This position activates electrical accessories, such
as the radio, when the engine is not running.
ON (Normal operating position) (3)
This position turns on the ignition system and the
electrical accessories.
START (4)
The engine starter activates and the engine will start.
As soon as the engine has started, release the knob
immediately. It will return to the ON position.
5-8Starting and driving
Page 134 of 235
ligent Key, turn the ignition knob to the LOCK posi-
tion, wait for 5 seconds and turn the knob to the
START position again to start the engine.
For additional information, see “Security system” in
the “3. Pre-driving checks and adjustments” sec-
tion.1. Apply the handbrake.
2.Manual transmission models:
Move the gear lever to N (Neutral) position, and
depress the clutch pedal to the floor while start-
ing the engine.
Automatic transmission models:
Depress the brake pedal and move the selector
lever to the P (Park) or N (Neutral) position. (P
position is preferred).
NOTE
The starter is designed not to operate if the
selector lever is out of the P (Park) or N (Neu-
tral) position.
3. Models without Intelligent Key:
Rotate the steering wheel left to right to release
the ignition lock whilst turning the ignition switch
to the ON position.
Models with Intelligent key:
•MT models – keep the clutch pedal
depressed and/or depress the brake pedal
then:
•AT – depress the brake pedal then:
1) Push the ignition knob.
2) Rotate the steering wheel left to right to
release the ignition lock whilst turning the
ignition knob to the ON position.CAUTION
•Make sure you carry the Intelligent Key with
you when operating the vehicle.
•If the Intelligent Key is too far away from
the driver, the vehicle may not start.
4. For diesel engine models: Wait until the glow
indicator light
goes out.
5. Start the engine with your foot on the brake pedal,
not on the accelerator pedal, by turning the
ignition switch to START.
6. Release the ignition switch when the engine
starts. If the engine starts, but fails to run, repeat
the above procedure.
For petrol engine models:
•If the engine is very hard to start for example
in extremely cold or hot weather, or when
restarting, Proceed as follows:
a. Depress the accelerator pedal a little (ap-
proximately 1/3 to the floor) and hold it
and then start the engine.
b. Release the ignition switch and the accel-
erator pedal when the engine starts.
•If the engine is very hard to start because it is
flooded. Proceed as follows:
a. Depress the accelerator pedal all the way
to the floor and hold it.
b. Start the engine for 5-6 seconds and stop.
After starting the engine, release the ac-
celerator pedal.
STARTING THE ENGINE
5-10Starting and driving
Page 135 of 235
c. Start the engine with your foot off the ac-
celerator pedal. Release the ignition
switch when the engine starts.
If the engine starts, but fails to run, repeat
the procedure from step a.
CAUTION
•Do not operate the starter for more than 15
seconds at a time. If the engine does not start,
turn the ignition switch to the “OFF” position
and wait 10 seconds (Petrol engine models)
or 20 seconds (Diesel engine models) before
cranking again, otherwise the starter could be
damaged.
•If it becomes necessary to start the engine
with a booster battery and jumper leads, the
instructions and cautions contained in the
“Jump-starting” in the “6. In case of
emergency” section should be carefully fol-
lowed.
7.Warm-up
Allow the engine to idle for at least 30 seconds
after starting. Drive at moderate speed for a short
distance first, especially in cold weather.
WARNING
Do not leave the vehicle unattended while the
engine is warming up.
DRIVING WITH MANUAL
TRANSMISSION
CAUTION
•Do not rest your foot on the clutch pedal while
driving. This may cause clutch damage.
•Stop your vehicle completely before shifting
into the R (Reverse) position.
•When you are shifting from one gear to an-
other, be certain to depress the clutch pedal
all the way to the floor to avoid clashing or
chipping the gears.
•Avoid abrupt starts and acceleration for your
safety.
•When quick acceleration is required for some
reason, shift to a lower gear and accelerate
until the vehicle reaches the maximum speed
in each gear. Do not exceed the speed limit of
any gear. Pay special attention when acceler-
ating or when shifting into a lower gear on
slippery surfaces. Sudden acceleration or
down shifting could cause the wheels to skid
and result in loss of control.
A.RHD models
B.LHD models
1.Gear lever ring
Shifting
To change gears, fully depress the clutch pedal,
shift into the appropriate gear, then release the
clutch slowly and smoothly.
NSD340
5–speed MT
NSD292Z
6–speed MT (where fitted)
DRIVING
Starting and driving5-11
Page 136 of 235
To ensure smooth gear changes, fully depress the
clutch pedal before operating the gear lever. If the
clutch pedal is not fully depressed before the trans-
mission is shifted, a gear noise may be heard. This
could result in damage to the transmission.
Start the vehicle in 1st gear and shift through the
gears in sequence according to the vehicle speed.
Reverse gear:
•To reverse with 5–speed manual transmission,
stop the vehicle and shift the gear lever into the
“N” (Neutral) position then to the R (Reverse)
position.
•To reverse with 6–speed manual transmission,
proceed as follows:
1) Stop the vehicle.
2) Move the gear lever into the “N” position.
3) Pull and hold the gear lever ring
j1 up.
4) Move the gear lever into the R position.
5) Release the gear lever ring and safely drive
the vehicle backwards.
The gear lever ring returns to its original posi-
tion when the gear lever is moved to the “N”
position.
If it is difficult to move the gear lever into R (Re-
verse) or 1st. Shift into “N” (Neutral), then release
the clutch pedal. Fully depress the clutch pedal
again and shift into R (Reverse) or 1st.
DRIVING WITH AUTOMATIC
TRANSMISSION
CAUTION
•The cold engine idle speed is high, so use
caution when shifting into a forward or re-
verse gear before the engine has warmed up.
•Avoid revving up the engine while the vehicle
is stopped. This could cause unexpected ve-
hicle movement.
Driving precautions
•Never shift to P (Park) or R (Reverse) while
the vehicle is moving, this could result in dam-
age to the transmission.
•Start the engine in the P (Park) or N (Neutral)
position. The engine will not start in any other
selector position. If it does, have your vehicle
checked by a NISSAN dealer or qualified
workshop.
•Do not depress the accelerator pedal while
shifting from P (Park) or N (Neutral) to R (Re-
verse), D (Drive), 2 (Second gear) or 1 (Low
gear).
•On an uphill grade, do not hold the vehicle by
depressing the accelerator pedal. The foot-
brake should be used for this purpose, in or-
der to hold the vehicle in place and to prevent
overheating of the transmission.
•Shift into the N (Neutral) position and apply
the handbrake when at a standstill for longer
than a short waiting period.
•Keep the engine at idling speed while shifting
from the N (Neutral) position to any driving
position.
CAUTION (when starting the vehicle):
•DEPRESS THE FOOTBRAKE PEDAL
When the engine is running, shifting the se-
lector lever into the R (Reverse), D (Drive), 2
(Second gear) or 1 (Low gear) position with-
out depressing the brake pedal causes the
vehicle to move slowly. Be sure the brake
pedal is fully depressed and the vehicle is
stopped, before shifting the selector lever.
•BE AWARE OF THE SELECTOR LEVER POSI-
TION
Make sure that the selector lever is in the
desired position. Use the D (Drive), 2 (Second
gear) or 1 (Low gear) to move forwards and
the R (Reverse) to move backwards. Release
the handbrake lever and the footbrake pedal,
then depress the accelerator pedal to start
the vehicle in motion and merge with traffic
(avoid abrupt starting and spinning the
wheels).
•Avoid revving up the engine while the vehicle
is stopped, this could cause unexpected ve-
hicle movement [if the selector lever is in the
R (Reverse), D (Drive), 2 (Second gear) or 1
(Low gear) position] or damage the engine [if
the selector lever is in the N (Neutral) or P
(Park) position].
•WARM THE ENGINE UP
5-12Starting and driving
Page 138 of 235
Accelerator downshift – In the D (Drive)
position
For rapid passing or driving uphill, fully depress the
accelerator pedal to the floor. This shifts the trans-
mission down into a lower gear, depending on the
vehicle speed.
A.RHD models
B.LHD models
Overdrive switch
ON: For normal driving, push the overdrive
switchto“ON
” with the selector lever in
the D (Drive) position. The transmission is
shifted up into OVERDRIVE as the vehicle
speed increases.
The overdrive will not engage until the engine
has warmed up.
OFF: For driving up and down long slopes where
engine braking is necessary, push the over-
drive switch “OFF
”. The overdrive off in-dicator light
in the instrument panel
illuminates.
When cruising at low speeds or climbing a
gentle slope, you may feel an uncomfortable
shift shock as the transmission shifts in and
out of the overdrive position repeatedly. In
this case, push the overdrive switch to turn
the Overdrive “OFF”.
When driving conditions change, push the overdrive
switch to turn the overdrive “ON”. The overdrive off
indicator light
in the instrument panel will turn
off.
Remember not to drive at high speeds for extended
periods of time with the overdrive “OFF”. This re-
duces fuel economy.
A.RHD models
B.LHD models
Shift lock release
If the battery is discharged, the selector lever can-
not be moved from the P (Park) position even with
the brake pedal depressed and the ignition switch in
the ON position.
To move the selector lever, push the shift lock re-
lease button
j1 (as illustrated) and press the selec-
tor lever buttonj2 . It is now possible to move the
selector lever to the N (Neutral) position.
For your safety, make sure the handbrake is applied
and the brake pedal is depressed during the opera-
tion.
If there is any problem moving the lever out of the P
(Park) position, have a NISSAN dealer or qualified
workshop to check the automatic transmission sys-
tem as soon as possible.
Fail-safe
When the Fail-safe operation occurs, the automatic
transmission will be locked in the third gear.
If the vehicle is driven under extreme conditions,
such as excessive wheel spinning and subse-
quent hard braking, the Fail-safe system may be
activated. This will occur even if all electrical cir-
cuits are functioning properly. In this case, turn
the ignition switch “OFF” and wait for 3 seconds.
Then turn the key back to the ON position. The
vehicle should return to its normal operating con-
dition. If it does not return to its normal operating
condition have your NISSAN dealer or qualified
NSD309Z
NSD310Z
5-14Starting and driving
Page 139 of 235
workshop check the transmission and have the
transmission repaired by a NISSAN dealer or
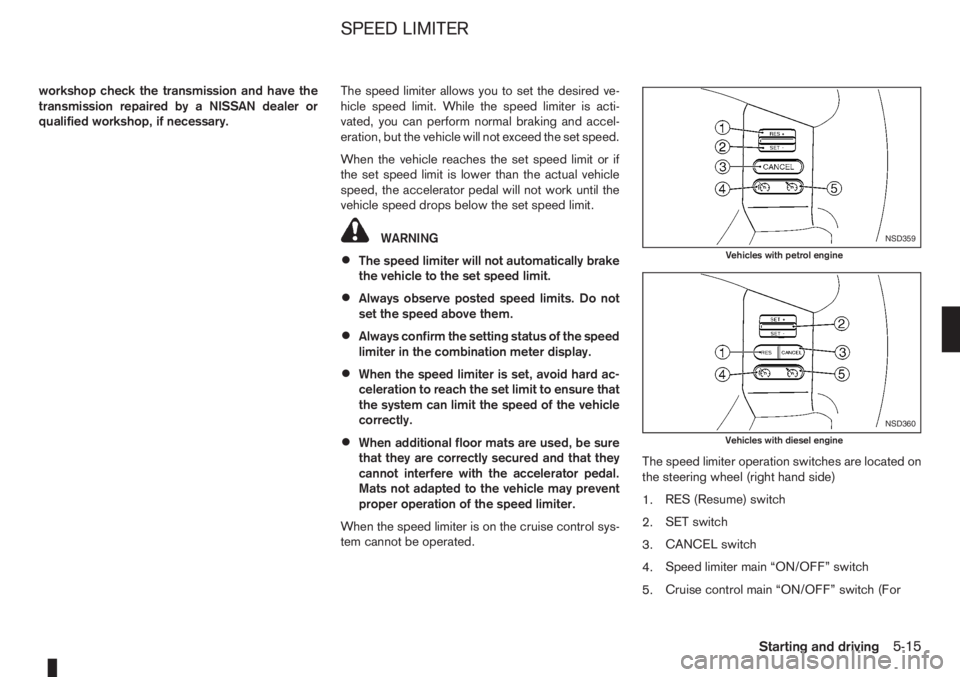
qualified workshop, if necessary.The speed limiter allows you to set the desired ve-
hicle speed limit. While the speed limiter is acti-
vated, you can perform normal braking and accel-
eration, but the vehicle will not exceed the set speed.
When the vehicle reaches the set speed limit or if
the set speed limit is lower than the actual vehicle
speed, the accelerator pedal will not work until the
vehicle speed drops below the set speed limit.
WARNING
•The speed limiter will not automatically brake
the vehicle to the set speed limit.
•Always observe posted speed limits. Do not
set the speed above them.
•Always confirm the setting status of the speed
limiter in the combination meter display.
•When the speed limiter is set, avoid hard ac-
celeration to reach the set limit to ensure that
the system can limit the speed of the vehicle
correctly.
•When additional floor mats are used, be sure
that they are correctly secured and that they
cannot interfere with the accelerator pedal.
Mats not adapted to the vehicle may prevent
proper operation of the speed limiter.
When the speed limiter is on the cruise control sys-
tem cannot be operated.The speed limiter operation switches are located on
the steering wheel (right hand side)
1.RES (Resume) switch
2.SET switch
3.CANCEL switch
4.Speed limiter main “ON/OFF” switch
5.Cruise control main “ON/OFF” switch (For
NSD359
Vehicles with petrol engine
NSD360
Vehicles with diesel engine
SPEED LIMITER
Starting and driving5-15
Page 143 of 235
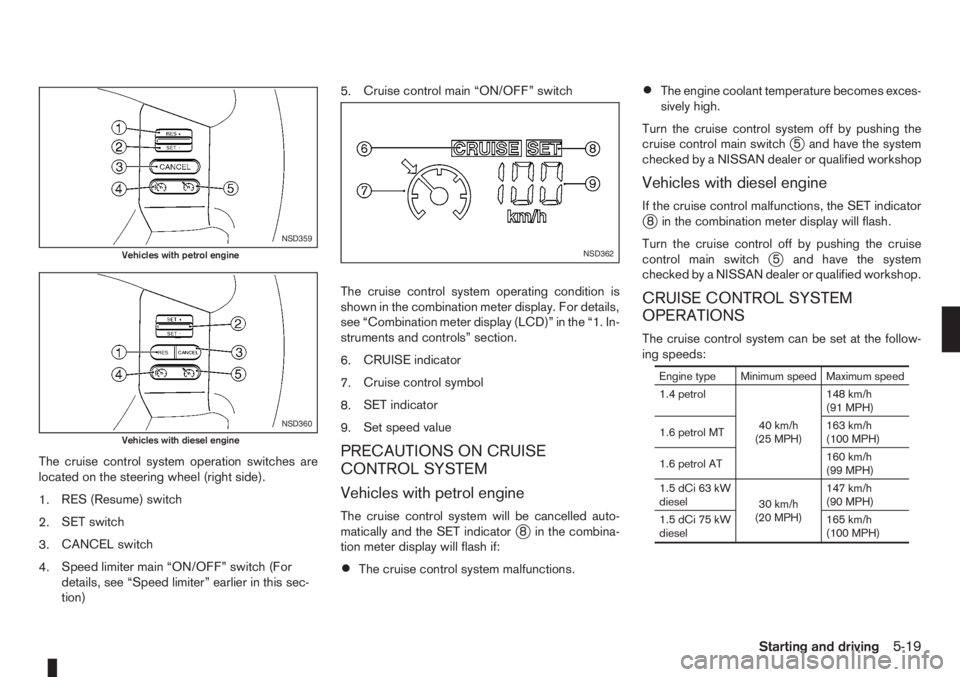
The cruise control system operation switches are
located on the steering wheel (right side).
1.RES (Resume) switch
2.SET switch
3.CANCEL switch
4.Speed limiter main “ON/OFF” switch (For
details, see “Speed limiter” earlier in this sec-
tion)5.Cruise control main “ON/OFF” switch
The cruise control system operating condition is
shown in the combination meter display. For details,
see “Combination meter display (LCD)” in the “1. In-
struments and controls” section.
6.CRUISE indicator
7.Cruise control symbol
8.SET indicator
9.Set speed valuePRECAUTIONS ON CRUISE
CONTROL SYSTEM
Vehicles with petrol engine
The cruise control system will be cancelled auto-
matically and the SET indicatorj8 in the combina-
tion meter display will flash if:
•The cruise control system malfunctions.
•The engine coolant temperature becomes exces-
sively high.
Turn the cruise control system off by pushing the
cruise control main switch
j5 and have the system
checked by a NISSAN dealer or qualified workshop
Vehicles with diesel engine
If the cruise control malfunctions, the SET indicatorj8 in the combination meter display will flash.
Turn the cruise control off by pushing the cruise
control main switch
j5 and have the system
checked by a NISSAN dealer or qualified workshop.
CRUISE CONTROL SYSTEM
OPERATIONS
The cruise control system can be set at the follow-
ing speeds:
Engine type Minimum speed Maximum speed
1.4 petrol
40 km/h
(25 MPH)148 km/h
(91 MPH)
1.6 petrol MT163 km/h
(100 MPH)
1.6 petrol AT160 km/h
(99 MPH)
1.5 dCi 63 kW
diesel
30 km/h
(20 MPH)147 km/h
(90 MPH)
1.5 dCi 75 kW
diesel165 km/h
(100 MPH)
NSD359
Vehicles with petrol engine
NSD360
Vehicles with diesel engine
NSD362
Starting and driving5-19