engine cooling system NISSAN NOTE 2006 Owners Manual
[x] Cancel search | Manufacturer: NISSAN, Model Year: 2006, Model line: NOTE, Model: NISSAN NOTE 2006Pages: 235, PDF Size: 2.29 MB
Page 87 of 235
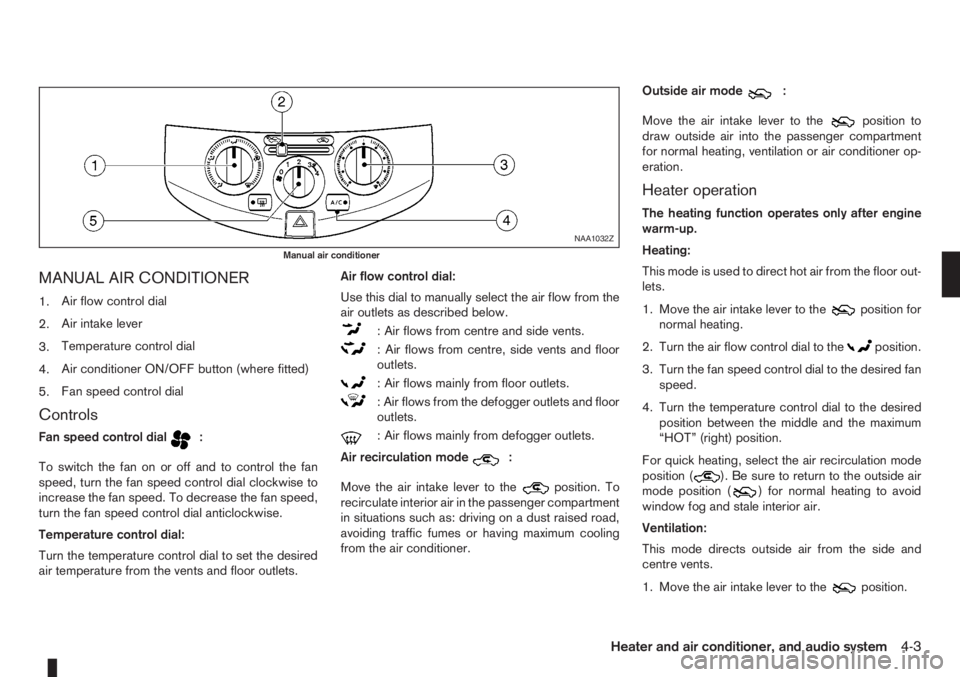
MANUAL AIR CONDITIONER
1.Air flow control dial
2.Air intake lever
3.Temperature control dial
4.Air conditioner ON/OFF button (where fitted)
5.Fan speed control dial
Controls
Fan speed control dialm:
To switch the fan on or off and to control the fan
speed, turn the fan speed control dial clockwise to
increase the fan speed. To decrease the fan speed,
turn the fan speed control dial anticlockwise.
Temperature control dial:
Turn the temperature control dial to set the desired
air temperature from the vents and floor outlets.Air flow control dial:
Use this dial to manually select the air flow from the
air outlets as described below.
: Air flows from centre and side vents.
: Air flows from centre, side vents and floor
outlets.
: Air flows mainly from floor outlets.
: Air flows from the defogger outlets and floor
outlets.
: Air flows mainly from defogger outlets.
Air recirculation mode
m:
Move the air intake lever to the
position. To
recirculate interior air in the passenger compartment
in situations such as: driving on a dust raised road,
avoiding traffic fumes or having maximum cooling
from the air conditioner.Outside air mode
m:
Move the air intake lever to the
position to
draw outside air into the passenger compartment
for normal heating, ventilation or air conditioner op-
eration.
Heater operation
The heating function operates only after engine
warm-up.
Heating:
This mode is used to direct hot air from the floor out-
lets.
1. Move the air intake lever to the
position for
normal heating.
2. Turn the air flow control dial to the
position.
3. Turn the fan speed control dial to the desired fan
speed.
4. Turn the temperature control dial to the desired
position between the middle and the maximum
“HOT” (right) position.
For quick heating, select the air recirculation mode
position (
). Be sure to return to the outside air
mode position () for normal heating to avoid
window fog and stale interior air.
Ventilation:
This mode directs outside air from the side and
centre vents.
1. Move the air intake lever to the
position.
NAA1032Z
Manual air conditioner
Heater and air conditioner, and audio system4-3
Page 88 of 235
2. Turn the air flow control dial to theposition.
3. Turn the fan speed control dial to the desired fan
speed.
4. Turn the temperature control dial to the desired
position.
Defrosting or defogging:
This mode is used to defrost/defog the windows.
1. Move the air intake lever to the
position.
2. Turn the air flow control dial to the
position.
3. Turn the fan speed control dial to speed position
2 or above.
4. Turn the temperature control dial to the desired
position between the middle and the maximum
“HOT” (right) position.
To quickly defrost/defog the windscreen, turn the
fan speed control dial to the maximum position and
the temperature control dial to the maximum “HOT”
(right) position.
Heating and defogging:
This mode heats the interior and defogs the wind-
screen.
1. Move the air intake lever to outside air mode
position (
).
2. Turn the air flow control dial to the
position.
3. Turn the fan speed control dial to speed position
2 or above.4. Turn the temperature control dial between the
middle and the maximum “HOT” (right) position.
Air conditioner operation (where fitted)
Start the engine, turn the fan speed control dial to
the desired fan speed and press the A/C button to
activate the air conditioner. When the air conditioner
is on, cooling and dehumidifying functions will be
added to the heater operation. To switch off the air
conditioner, press the button again.
NOTE
The air conditioner cooling function operates only
when the engine is running.
Cooling:
This mode is used to cool and dehumidify.
1. Move the air intake lever to outside air mode
position (
).
2. Turn the air flow control dial to the
position.
3. Turn the fan speed control dial to the desired fan
speed.
4. Press thebutton and the indicator light
will come on.
5. Turn the temperature control dial to the desired
position.
For quick cooling when the outside temperature is
high, select the air recirculation mode position
(
). Be sure to return to the outside air mode
position () to avoid windows from fogging-up
and interior air from becoming stale.NOTE
A visible mist may be seen coming from the vents
in hot, humid conditions as the air is cooled rap-
idly. This does not indicate a malfunction.
Dehumidified heating:
This mode is used to heat and dehumidify.
1. Move the air intake lever to outside air mode
position (
).
2. Turn the air flow control dial to the
position.
3. Turn on the fan speed control dial to the desired
fan speed.
4. Press thebutton and the indicator light
will come on.
5. Turn the temperature control dial to the desired
position.
Dehumidified defogging:
This mode is used to defog the windows and dehu-
midify.
1. Move the air intake lever to outside air mode
position (
).
2. Turn the air flow control dial to the
position.
3. Turn the fan speed control dial to the desired fan
speed.
4. Press thebutton and the indicator light
will come on.
5. Turn the temperature control dial to the desired
position.
4-4Heater and air conditioner, and audio system
Page 89 of 235
Operating tips
•In order to improve the heater operation, clear
the snow and ice from the wiper blade and air
inlet in front of the windscreen.
•After parking in the sun, drive for two or three
minutes with the windows open to vent hot air
from the passenger compartment. Then close
the windows to allow the acceleration of the air
conditioner’s cooling operation.
•Keep the windows closed while the air condi-
tioner is operating.
•The air conditioning system should be operated
for about 10 minutes, at least once a month. This
helps prevent damage to the system due to lack
of lubrication.
•If the coolant temperature warning light comes
on, turn the air conditioner off. For additional
information, see “Engine overheat” in the “6. In
case of emergency” section.
•If the engine coolant reaches an extremely high
temperature, the air conditioning system will au-
tomatically turn off. This may happen for example
if the engine runs at idle speed for a long time on
a hot day.
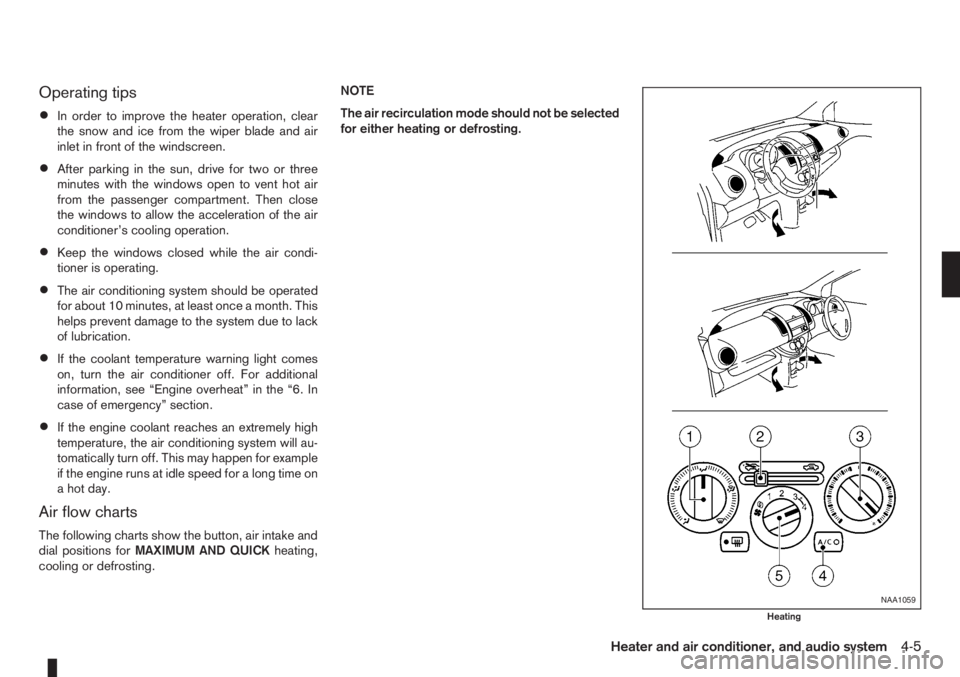
Air flow charts
The following charts show the button, air intake and
dial positions forMAXIMUM AND QUICKheating,
cooling or defrosting.NOTE
The air recirculation mode should not be selected
for either heating or defrosting.
NAA1059
Heating
Heater and air conditioner, and audio system4-5
Page 92 of 235
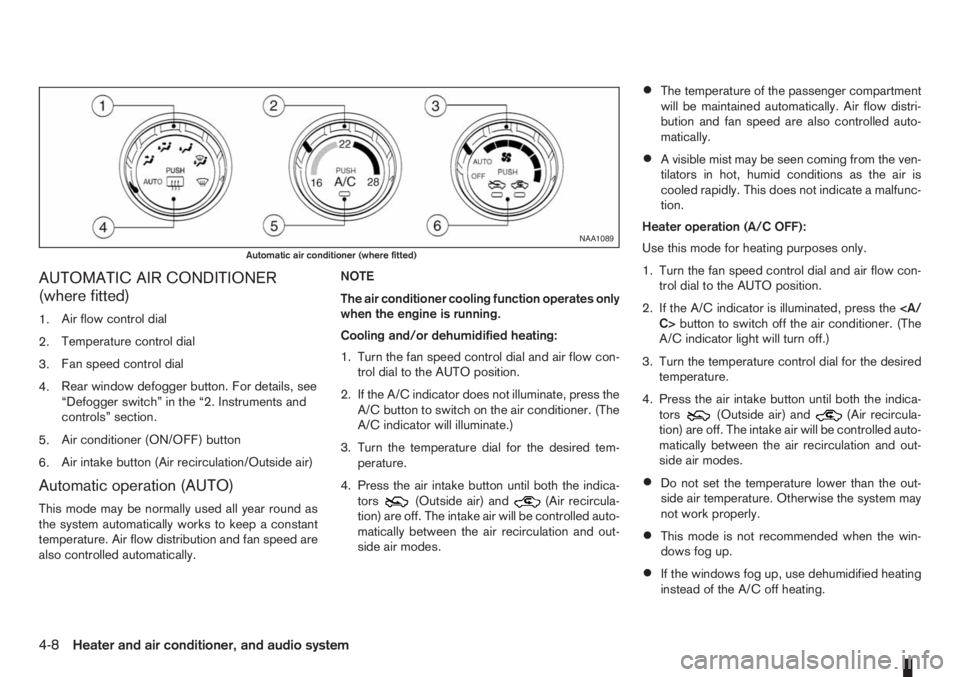
AUTOMATIC AIR CONDITIONER
(where fitted)
1.Air flow control dial
2.Temperature control dial
3.Fan speed control dial
4.Rear window defogger button. For details, see
“Defogger switch” in the “2. Instruments and
controls” section.
5.Air conditioner (ON/OFF) button
6.Air intake button (Air recirculation/Outside air)
Automatic operation (AUTO)
This mode may be normally used all year round as
the system automatically works to keep a constant
temperature. Air flow distribution and fan speed are
also controlled automatically.NOTE
The air conditioner cooling function operates only
when the engine is running.
Cooling and/or dehumidified heating:
1. Turn the fan speed control dial and air flow con-
trol dial to the AUTO position.
2. If the A/C indicator does not illuminate, press the
A/C button to switch on the air conditioner. (The
A/C indicator will illuminate.)
3. Turn the temperature dial for the desired tem-
perature.
4. Press the air intake button until both the indica-
tors(Outside air) and(Air recircula-
tion) are off. The intake air will be controlled auto-
matically between the air recirculation and out-
side air modes.
•The temperature of the passenger compartment
will be maintained automatically. Air flow distri-
bution and fan speed are also controlled auto-
matically.
•A visible mist may be seen coming from the ven-
tilators in hot, humid conditions as the air is
cooled rapidly. This does not indicate a malfunc-
tion.
Heater operation (A/C OFF):
Use this mode for heating purposes only.
1. Turn the fan speed control dial and air flow con-
trol dial to the AUTO position.
2. If the A/C indicator is illuminated, press the
C>button to switch off the air conditioner. (The
A/C indicator light will turn off.)
3. Turn the temperature control dial for the desired
temperature.
4. Press the air intake button until both the indica-
tors
(Outside air) and(Air recircula-
tion) are off. The intake air will be controlled auto-
matically between the air recirculation and out-
side air modes.
•Do not set the temperature lower than the out-
side air temperature. Otherwise the system may
not work properly.
•This mode is not recommended when the win-
dows fog up.
•If the windows fog up, use dehumidified heating
instead of the A/C off heating.
NAA1089
Automatic air conditioner (where fitted)
4-8Heater and air conditioner, and audio system
Page 93 of 235
Dehumidified defrosting or defogging:
1. Turn the air flow control dial to the
position.
2. Turn the fan speed control dial to the desired
position.
3. Turn the temperature control dial for the desired
temperature.
•To quickly remove ice from the outside of the
windscreen, turn the fan speed control dial to
the maximum position.
•As soon as possible after the windscreen has
been cleared of ice, turn the fan speed control
dial to the AUTO position for the automatic mode.
•When the air flow control dial is turned to theorposition, the outside air mode and
the air conditioner will automatically switch on
(except when the fan speed control dial is in the
OFF position) when the outside temperatures is
above −5°C (23°F) to defog the windscreen.
Outside air is drawn into the passenger com-
partment to improve the defogging performance.
Manual operation
Fan speed controlm:
Turn the fan speed control dial:
– to the OFF position to switch off the heater and
air conditioner system.
– to the AUTO position for automatic control of the
fan speed.
– to adjust the fan speed.Temperature control:
Turn temperature dial to set the desired air tempera-
ture.
Air flow control:
Turn the air flow control dial to one of following air
mode.
m
Air flows from centre and side vents.
m
Air flows from centre, side vents and
floor outlets.
mAir flows mainly from floor outlets.
m
Air flows from the defogger outlets and
floor outlets.
mAir flows mainly from defogger outlets.
Air recirculation
m:
Press the air intake button until the air recirculation
indicator light (
) comes on. When selected,
interior air will be recirculated inside the vehicle and
the air conditioner will switch on.
Use this mode to recirculate interior air inside the
passenger compartment in situations such as: driv-
ing on a dust raised road, avoiding traffic fumes or
having maximum cooling from the air conditioner.Outside air circulation
m:
Press the air intake button until outside air indicator
light (
) comes on. When selected, outside air
will be drawn into the vehicle.
Use this mode to draw outside air into the passen-
ger compartment for normal heating, ventilation or
air conditioner operation.
Operating tips
•In order to improve the heater operation, clear
the snow and ice from the wiper blade and air
inlet in front of the windscreen.
•When the engine coolant temperature and out-
side air temperature are low, the air flow from
the floor outlets may not operate for a maximum
of approximately 150 seconds. However, this is
not a malfunction. After the coolant temperature
has warmed up, the air flow from the floor outlets
will operate normally.
•After parking in the sun, drive for two or three
minutes with the windows open to vent hot air
from the passenger compartment. Then, close
the windows. This will allow the acceleration of
the air conditioner’s cooling operation.
•Keep the windows closed while the air condi-
tioner is operating.
•The air conditioning system should be operated
for approximately 10 minutes at least once a
month. This helps prevent damage to the system
due to lack of lubrication.
Heater and air conditioner, and audio system4-9
Page 128 of 235
NISSAN GREEN PROGRAM
The three-way catalyst is an emission control device
installed in the exhaust system. In the converter,
exhaust gases are burned at high temperatures to
help reduce pollutants.
CAUTION
•The exhaust gas and the exhaust system are
very hot. While the engine is running, keep
people or flammable materials away from the
exhaust pipe.
•Do not stop or park the vehicle over flam-
mable materials such as dry grass, waste pa-
per or rags, as they may burn easily.
•When parking, ensure that people or flam-
mable materials are kept away from the ex-
haust pipe.
TO HELP PREVENT DAMAGE
CAUTION
•Use UNLEADED PETROL ONLY, specifically
the recommended type. For details, see “Ca-
pacities and recommended fuel/lubricants” in
the “9. Technical information” section.
•Do not use leaded petrol. Leaded petrol will
seriously damage three-way catalyst.
Deposits from leaded petrol will seriously re-
duce the three-way catalyst’s ability to help
reduce exhaust pollutants.
•Keep your engine tuned up. Malfunctions in
the ignition, fuel injection, or electrical sys-
tems can cause over-rich fuel flow into the
converter, causing it to overheat.
•Avoid driving with an extremely low fuel level.
Running out of fuel could cause the engine to
misfire, damaging the three-way catalyst.
•Do not keep driving if the engine misfires, or
if noticeable loss of performance or other un-
usual operating conditions are detected. Have
the vehicle inspected promptly by a NISSAN
dealer or qualified workshop.
•Do not race the engine while warming it up.
•Do not push or tow your vehicle to start the
engine.The turbocharger system uses engine oil for lubrica-
tion and cooling of its rotating components. The tur-
bocharger turbine turns at extremely high speeds
and it can reach an extremely high temperature. It is
essential to maintain a flow of clean oil through the
turbocharger system. A sudden interruption to the
oil supply may cause a malfunction in the turbo-
charger.
To ensure prolonged life and performance of the
turbocharger, it is essential to comply with the fol-
lowing maintenance procedure:
CAUTION
•Change the engine oil of the turbo-charged
diesel engine as prescribed. See the sepa-
rately provided Warranty Information & Main-
tenance Booklet for additional information.
•Use only the recommended engine oil. See
“Capacities and recommended fuel/
lubricants” in the “9. Technical information”
section.
•If the engine has been operating at high rpm
for an extended period of time, let it idle for a
few minutes prior to shutdown.
•Do not accelerate the engine to high rpm im-
mediately after starting it.
THREE-WAY CATALYST (Petrol
engine models)TURBOCHARGER SYSTEM
(Diesel engine models)
5-4Starting and driving
Page 155 of 235
NOTE
The ESP system cannot be switched off when
the ESP system is operating and the “SLIP” indi-
cator light (
) is blinking.
Push the ESP OFF switch again, or restart the en-
gine, to turn the system ON. See “Electronic Stabil-
ity Programme (ESP) system (where fitted)” earlier
in this section for operational details.
WARNING
•Whatever the conditions, drive with caution.
Accelerate and decelerate with great care. If
accelerating or decelerating too fast, the drive
wheels will lose even more traction.
•Allow more stopping distance in cold weather
driving. Braking should be started sooner than
on dry surfaces.
•Keep at a greater distance from the vehicle in
front of you on slippery roads.
•Wet ice (0°C, 32°F and freezing rain), very cold
snow and ice can be slick and very difficult to
drive on. The vehicle will have a lot less trac-
tion or grip under these conditions. Try to
avoid driving on wet ice until the road is salted
or sanded.
•Watch for slippery spots (black ice). These
may appear on an otherwise clear road in
shaded areas. If a patch of ice is seen ahead,
brake before driving on it. Try not to brake
while actually on the ice and avoid any sud-
den steering manoeuvres.
•Snow can trap dangerous exhaust gas under
your vehicle. Keep snow clear of the exhaust
pipe and from around your vehicle.
BATTERY
If the battery is not fully charged during extremely
cold weather conditions, the battery fluid may freeze
and damage the battery. To maintain maximum effi-ciency, the battery should be checked regularly. For
details, see “Battery” in the “8. Maintenance and
do-it-yourself” section.
ENGINE COOLANT
If the vehicle is to be left outside without anti-freeze,
drain the cooling system. Refill before operating the
vehicle. For details, see “Engine cooling system” in
the “8. Maintenance and do-it-yourself” section.
TYRE EQUIPMENT
1) The SUMMER tyres are of a tread design to pro-
vide superior performance on dry surfaces. How-
ever, the performance of these tyres will be sub-
stantially reduced in snowy and icy conditions. If
you operate your vehicle on snowy or icy roads,
NISSAN recommends the use of MUD & SNOW
or ALL SEASON tyres on all four wheels. Please
consult a NISSAN dealer or qualified workshop
for tyre type, size, speed rating and availability
information.
2) For additional traction on icy roads, studded
tyres may be used. However, some countries,
provinces and states prohibit their use. Check
applicable laws before installing studded tyres.
CAUTION
Skid and traction capabilities of studded snow
tyres on wet or dry surfaces may be poorer
than that of non-studded snow tyres.
3) Snow chains may be used, if desired. But the
use of snow chains may be prohibited in some
areas. Therefore, check the local laws before
COLD WEATHER DRIVING
Starting and driving5-31
Page 167 of 235
CAUTION
•Three-way catalyst equipped models should
not be started by pushing the vehicle as the
three-way catalyst may be damaged.
•Automatic transmission (AT) models cannot
be started by pushing the vehicle. This may
cause transmission damage.
•Never try to start the vehicle by towing it; when
the engine starts, the forward surge could
cause the vehicle to collide with the tow ve-
hicle.
WARNING
•Never continue driving if the engine of your
vehicle overheats. Doing so could cause a ve-
hicle fire.
•Never open the bonnet if steam is coming
out.
•Never remove the radiator cap (where fitted)
or engine coolant reservoir cap when the en-
gine is hot. If the radiator cap (where fitted) or
engine coolant reservoir cap is removed while
the engine is hot, pressurised hot water will
spurt out and possibly cause burning, scald-
ing or serious injury.
•If steam or coolant is coming out of the en-
gine, stand clear of the vehicle to prevent get-
ting injured.
•The engine cooling fan will start whenever the
coolant temperature exceeds preset degrees.
•Be careful not to allow your hands, hair, jewel-
lery or clothing to come into contact with, or
get caught in, the cooling fan or drive belts.
If the engine of your vehicle is overheating (indi-
cated by the engine coolant temperature warning
light (red)) or if you feel a lack of engine power,
detect an unusual noise, etc., proceed as follows:
1. Move and park the vehicle safely off the road and
away from traffic.
2. Turn on the hazard warning flasher lights.
3. Apply the handbrake.4. Shift the gear lever (M/T models) into the N (Neu-
tral) position [AT models, move the selector lever
to the P (Park) position].
DO NOT STOP THE ENGINE.
5. Open all windows.
6. Switch off the air conditioner system (where fit-
ted).
7. Set the heater or air conditioner temperature
control to maximum “HOT” and fan speed con-
trol to maximum speed.
8. Exit the vehicle.
9. Visually inspect and listen for steam or coolant
escaping from the radiator before opening the
bonnet. Wait until no steam or coolant can be
seen before proceeding.
10. Open the bonnet. For details, see “Bonnet
release” in the “3. Pre-driving checks and
adjustments” section.
11. Visually check if the cooling fan is running.
12. Visually check the radiator and radiator hoses
for leakage.
WARNING
If coolant is leaking, the cooling fan belt is
missing or loose or the cooling fan is not run-
ning, stop the engine.
PUSH-STARTING ENGINE OVERHEAT
In case of emergency6-11
Page 176 of 235
8Maintenance and do-it-yourselfMaintenance and do-it-yourself
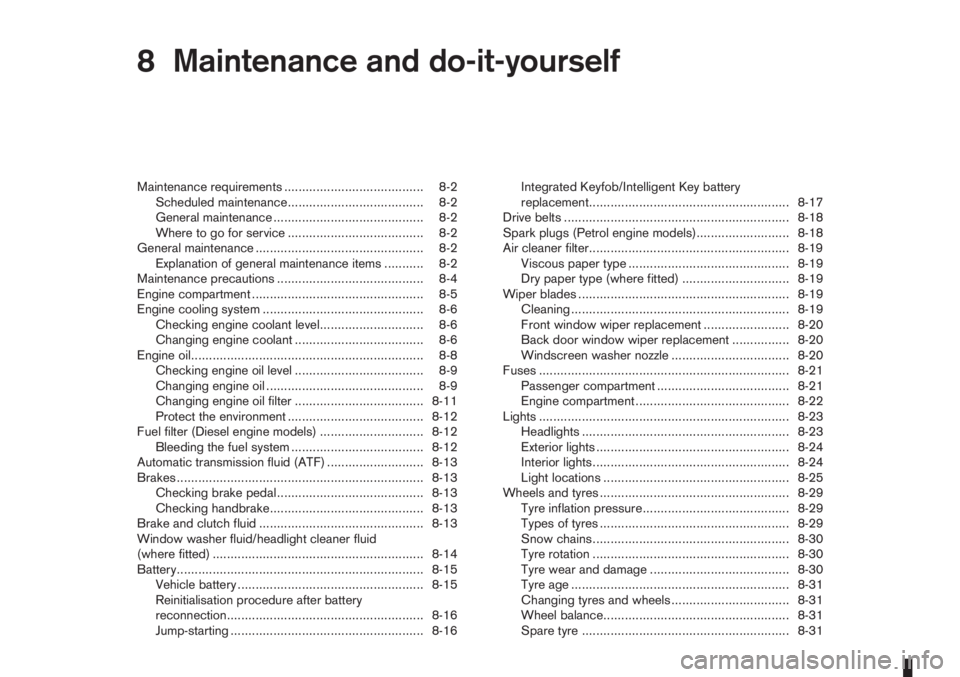
Maintenance requirements ....................................... 8-2
Scheduled maintenance...................................... 8-2
General maintenance .......................................... 8-2
Where to go for service ...................................... 8-2
General maintenance ............................................... 8-2
Explanation of general maintenance items ........... 8-2
Maintenance precautions ......................................... 8-4
Engine compartment ................................................ 8-5
Engine cooling system ............................................. 8-6
Checking engine coolant level............................. 8-6
Changing engine coolant .................................... 8-6
Engine oil................................................................. 8-8
Checking engine oil level .................................... 8-9
Changing engine oil ............................................ 8-9
Changing engine oil filter .................................... 8-11
Protect the environment ...................................... 8-12
Fuel filter (Diesel engine models) ............................. 8-12
Bleeding the fuel system ..................................... 8-12
Automatic transmission fluid (ATF) ........................... 8-13
Brakes ..................................................................... 8-13
Checking brake pedal......................................... 8-13
Checking handbrake........................................... 8-13
Brake and clutch fluid .............................................. 8-13
Window washer fluid/headlight cleaner fluid
(where fitted) ........................................................... 8-14
Battery..................................................................... 8-15
Vehicle battery .................................................... 8-15
Reinitialisation procedure after battery
reconnection....................................................... 8-16
Jump-starting ...................................................... 8-16Integrated Keyfob/Intelligent Key battery
replacement........................................................ 8-17
Drive belts ............................................................... 8-18
Spark plugs (Petrol engine models).......................... 8-18
Air cleaner filter........................................................ 8-19
Viscous paper type ............................................. 8-19
Dry paper type (where fitted) .............................. 8-19
Wiper blades ........................................................... 8-19
Cleaning ............................................................. 8-19
Front window wiper replacement ........................ 8-20
Back door window wiper replacement ................ 8-20
Windscreen washer nozzle ................................. 8-20
Fuses ...................................................................... 8-21
Passenger compartment ..................................... 8-21
Engine compartment ........................................... 8-22
Lights ...................................................................... 8-23
Headlights .......................................................... 8-23
Exterior lights ...................................................... 8-24
Interior lights....................................................... 8-24
Light locations .................................................... 8-25
Wheels and tyres ..................................................... 8-29
Tyre inflation pressure......................................... 8-29
Types of tyres ..................................................... 8-29
Snow chains....................................................... 8-30
Tyre rotation ....................................................... 8-30
Tyre wear and damage ....................................... 8-30
Tyre age ............................................................. 8-31
Changing tyres and wheels ................................. 8-31
Wheel balance.................................................... 8-31
Spare tyre .......................................................... 8-31
Page 180 of 235
Handbrake*:
Confirm that your vehicle is held securely on a fairly
steep hill with only the handbrake applied.
Seats:
Check seat position controls such as seat adjust-
ers, seatback recliner, etc. to ensure they operate
smoothly and all latches lock securely in every posi-
tion. Check that the head restraints move up and
down smoothly and the locks hold securely in all
latched positions.
Seat belts:
Check that all parts of the seat belt system (e.g.
buckles, anchors, adjusters and retractors) operate
properly and smoothly, and are installed securely.
Check the belt webbing for cuts, fraying, wear or
damage. See “Seat belt maintenance” in the
“1. Safety — seats, seat belts and supplemental
restraint system” section for further details.
Steering wheel:
Check for any change in the steering conditions,
such as excessive free play, hard steering or strange
noises.
Warning lights and audible reminders:
Make sure that all warning/indicator lights and au-
dible reminders are operating properly.
Windscreen defogger:
Check that the air comes out of the defogger outlets
properly when operating the heater or air condi-
tioner.Windscreen wiper and washer*:
Check that the wipers and washer operate properly
and that the wipers do not streak.When performing any inspection or maintenance
work on your vehicle, always take care to prevent
serious accidental injury to yourself or damage to
the vehicle. The following are general precautions
which should be closely observed.
•Park the vehicle on a level surface, apply the
handbrake securely and block the wheels to
prevent the vehicle from moving. For a manual
transmission models, move the gear lever to
N (Neutral) position. [For automatic transmis-
sion models, move the selector lever to P
(Park) position.]
•Do not work under the engine bonnet while
the engine is hot. Turn off the engine and wait
until it cools down.
•Be sure to turn the ignition switch to the “OFF”
or LOCK position.
When the ignition switch is in the ON or Acc
position, the cooling fan may start to operate
suddenly even when the engine is not run-
ning. To avoid injury, always disconnect the
negative battery cable before working near
the engine.
•If you must work with the engine running,
keep your hands, clothing, hair and tools away
from moving fans, belts and any other moving
parts.
•It is advisable to remove ties and any jewel-
lery, such as rings, watches, etc. before work-
ing on your vehicle.
MAINTENANCE PRECAUTIONS
8-4Maintenance and do-it-yourself