head light NISSAN NOTE 2007 Owner's Manual
[x] Cancel search | Manufacturer: NISSAN, Model Year: 2007, Model line: NOTE, Model: NISSAN NOTE 2007Pages: 235, PDF Size: 2.29 MB
Page 155 of 235
NOTE
The ESP system cannot be switched off when
the ESP system is operating and the “SLIP” indi-
cator light (
) is blinking.
Push the ESP OFF switch again, or restart the en-
gine, to turn the system ON. See “Electronic Stabil-
ity Programme (ESP) system (where fitted)” earlier
in this section for operational details.
WARNING
•Whatever the conditions, drive with caution.
Accelerate and decelerate with great care. If
accelerating or decelerating too fast, the drive
wheels will lose even more traction.
•Allow more stopping distance in cold weather
driving. Braking should be started sooner than
on dry surfaces.
•Keep at a greater distance from the vehicle in
front of you on slippery roads.
•Wet ice (0°C, 32°F and freezing rain), very cold
snow and ice can be slick and very difficult to
drive on. The vehicle will have a lot less trac-
tion or grip under these conditions. Try to
avoid driving on wet ice until the road is salted
or sanded.
•Watch for slippery spots (black ice). These
may appear on an otherwise clear road in
shaded areas. If a patch of ice is seen ahead,
brake before driving on it. Try not to brake
while actually on the ice and avoid any sud-
den steering manoeuvres.
•Snow can trap dangerous exhaust gas under
your vehicle. Keep snow clear of the exhaust
pipe and from around your vehicle.
BATTERY
If the battery is not fully charged during extremely
cold weather conditions, the battery fluid may freeze
and damage the battery. To maintain maximum effi-ciency, the battery should be checked regularly. For
details, see “Battery” in the “8. Maintenance and
do-it-yourself” section.
ENGINE COOLANT
If the vehicle is to be left outside without anti-freeze,
drain the cooling system. Refill before operating the
vehicle. For details, see “Engine cooling system” in
the “8. Maintenance and do-it-yourself” section.
TYRE EQUIPMENT
1) The SUMMER tyres are of a tread design to pro-
vide superior performance on dry surfaces. How-
ever, the performance of these tyres will be sub-
stantially reduced in snowy and icy conditions. If
you operate your vehicle on snowy or icy roads,
NISSAN recommends the use of MUD & SNOW
or ALL SEASON tyres on all four wheels. Please
consult a NISSAN dealer or qualified workshop
for tyre type, size, speed rating and availability
information.
2) For additional traction on icy roads, studded
tyres may be used. However, some countries,
provinces and states prohibit their use. Check
applicable laws before installing studded tyres.
CAUTION
Skid and traction capabilities of studded snow
tyres on wet or dry surfaces may be poorer
than that of non-studded snow tyres.
3) Snow chains may be used, if desired. But the
use of snow chains may be prohibited in some
areas. Therefore, check the local laws before
COLD WEATHER DRIVING
Starting and driving5-31
Page 166 of 235
•Never lean over the battery while jump-start-
ing.
•Never allow battery fluid to come into contact
with eyes, skin, clothes or the vehicle’s
painted surfaces. Battery fluid is a corrosive
sulphuric acid which can cause severe burns.
If the fluid comes into contact with anything,
immediately flush the contacted area with
plenty of water.
•Keep the battery out of the reach of children.
•The booster battery must be rated at 12 volts.
Use of an incorrectly rated battery will dam-
age your vehicle.
•Never attempt to jump-start a frozen battery.
It could explode and cause serious injury.
1. Prepare vehicle
jA with the booster battery for
the vehiclejB being jump-started.
CAUTION
Do not allow the two vehicles to touch.
2. Apply the handbrake.
3. Shift the gear lever (MT models) into the N (Neu-
tral) position [AT models, move the selector lever
to the P (Park) position].
4. Switch off all unnecessary electrical systems
(headlights, hazard lights etc,).
5. Ensure that the ignition switch of the vehicle be-
ing jump-started is in the LOCK position.6. Open the bonnet. For details, see “Bonnet
release” in the “3. Pre-driving checks and
adjustments” section.
7. Remove the vent caps (where fitted) on the bat-
tery and cover the battery with an old cloth.
8. Connect the jump leads in the sequence (
j1→j2→j3→j4 ) as illustrated.
CAUTION
•Always connect positivej+ to positivej+
and negativej- to body ground (for ex-
ample, engine lift bracket, etc.) – not to
the battery’s negative
j-.
•An incorrect connection could damage the
charging system.
•Be sure that the jumper cables do not
touch moving parts in the engine compart-
ment.
•Be careful not to allow contact between
the positive jump lead connector and the
vehicle or the negative lead during con-
nection and disconnection.
9. Start the engine of the other vehicle
jA and let it
run for a few minutes. Keep the engine speed at
about 2,000 rpm.
10. Start the engine of your vehicle
jB in the nor-
mal way.
CAUTION
Do not keep the starter motor engaged formore than 10 seconds. If the engine does not
start immediately, turn the ignition switch to
“OFF” and wait 10 seconds before trying
again.
11. After starting the engine of your vehicle, care-
fully disconnect the negative lead and then the
positive lead (
j4→j3→j2→j1).
12. Remove and dispose of the cloth that was used
to cover the vent holes as it may be contami-
nated with corrosive acid.
13. Install the vent caps (where fitted).
14. Close the bonnet.
6-10In case of emergency
Page 172 of 235
In order to maintain the appearance of your vehicle,
it is important to take proper care of it.
Whenever possible, park your vehicle inside a ga-
rage or in a covered area to minimise the chances
of damaging the paint surface of your vehicle.
When it is necessary to park outside, park in a shady
area or protect the vehicle with a body cover.Be
careful not to scratch the paint surface when put-
ting on or removing the body cover.
WASHING
In the following instances, wash your vehicle as soon
as possible to protect the paint surface:
•After a rainfall, to prevent possible damage from
acid rain.
•After driving on coastal roads.
•When contaminants such as soot, bird drop-
pings, tree sap, metal particles or insects get on
the paint surface.
•When dust or mud builds up on the paint sur-
face.
1. Wash the vehicle surface with a wet sponge and
plenty of water.
2. Clean the vehicle surface gently and thoroughly
using a mild soap or a special vehicle wash sham-
poo mixed with clean, lukewarm (never hot) wa-
ter.CAUTION
•Do not wash the vehicle with strong house-
hold soap, strong chemical detergents, petrol
or solvents.
•Do not wash the vehicle in direct sunlight or
while the vehicle body is hot, as the paint sur-
face may become water-spotted.
•Avoid using tight-napped or rough cloths,
such as washing mitts. Care must be taken
when removing caked-on dirt or other foreign
substances so the paint surface is not
scratched or damaged.
3. Rinse the vehicle thoroughly with plenty of clean
water.
4. Use a damp chamois to dry the paint surface to
avoid leaving water spots.
When washing the vehicle, take care of the follow-
ing:
•Inside flanges, joints and folds on the doors, back
door and bonnet are particularly vulnerable to
the effects of road salt. Therefore, these areas
must be cleaned regularly.
•Be sure that the drain holes in the lower edge of
the doors are not clogged.
•Spray water to the underbody and in the wheel
wells to loosen the dirt and/or wash away road
salt.
•If using a high pressure washer always follow
the recommendations on the equipment (pres-
sure and spraying distance).
•If there are damaged areas on the vehicle (e.g.
painted bumpers or headlamp assembly), it is
not recommended to direct the high pressure jet
on to them. Carefully wash these areas by hand.
•Avoid the entry of water into the locks.
REMOVING SPOTS
Remove tar and oil spots, industrial dust, insects,
and tree sap as quickly as possible from the paint
surface to avoid lasting damage or staining. Special
cleaning products are available at a NISSAN dealer
or any automotive accessory store.
WAXING
Regular waxing protects the paint surface and helps
to retain a new vehicle appearance.
After waxing, polishing is recommended to remove
built-up residue.
A NISSAN dealer or qualified workshop can assist
you in choosing the appropriate waxing products.
CAUTION
•Wash your vehicle thoroughly and completely
before applying wax to the paint surface.
•Always follow the manufacturer’s instructions
supplied with the wax.
CLEANING EXTERIOR
7-2Appearance and care
Page 176 of 235
8Maintenance and do-it-yourselfMaintenance and do-it-yourself
Maintenance requirements ....................................... 8-2
Scheduled maintenance...................................... 8-2
General maintenance .......................................... 8-2
Where to go for service ...................................... 8-2
General maintenance ............................................... 8-2
Explanation of general maintenance items ........... 8-2
Maintenance precautions ......................................... 8-4
Engine compartment ................................................ 8-5
Engine cooling system ............................................. 8-6
Checking engine coolant level............................. 8-6
Changing engine coolant .................................... 8-6
Engine oil................................................................. 8-8
Checking engine oil level .................................... 8-9
Changing engine oil ............................................ 8-9
Changing engine oil filter .................................... 8-11
Protect the environment ...................................... 8-12
Fuel filter (Diesel engine models) ............................. 8-12
Bleeding the fuel system ..................................... 8-12
Automatic transmission fluid (ATF) ........................... 8-13
Brakes ..................................................................... 8-13
Checking brake pedal......................................... 8-13
Checking handbrake........................................... 8-13
Brake and clutch fluid .............................................. 8-13
Window washer fluid/headlight cleaner fluid
(where fitted) ........................................................... 8-14
Battery..................................................................... 8-15
Vehicle battery .................................................... 8-15
Reinitialisation procedure after battery
reconnection....................................................... 8-16
Jump-starting ...................................................... 8-16Integrated Keyfob/Intelligent Key battery
replacement........................................................ 8-17
Drive belts ............................................................... 8-18
Spark plugs (Petrol engine models).......................... 8-18
Air cleaner filter........................................................ 8-19
Viscous paper type ............................................. 8-19
Dry paper type (where fitted) .............................. 8-19
Wiper blades ........................................................... 8-19
Cleaning ............................................................. 8-19
Front window wiper replacement ........................ 8-20
Back door window wiper replacement ................ 8-20
Windscreen washer nozzle ................................. 8-20
Fuses ...................................................................... 8-21
Passenger compartment ..................................... 8-21
Engine compartment ........................................... 8-22
Lights ...................................................................... 8-23
Headlights .......................................................... 8-23
Exterior lights ...................................................... 8-24
Interior lights....................................................... 8-24
Light locations .................................................... 8-25
Wheels and tyres ..................................................... 8-29
Tyre inflation pressure......................................... 8-29
Types of tyres ..................................................... 8-29
Snow chains....................................................... 8-30
Tyre rotation ....................................................... 8-30
Tyre wear and damage ....................................... 8-30
Tyre age ............................................................. 8-31
Changing tyres and wheels ................................. 8-31
Wheel balance.................................................... 8-31
Spare tyre .......................................................... 8-31
Page 179 of 235
Lights*:
Clean the headlights on a regular basis. Make sure
that the headlights, stop lights, tail lights, turn signal
lights, and other lights are all operating properly and
installed securely. Also check headlight aim.
Tyres*:
Check the pressure with a gauge periodically when
at a service station (including the spare) and adjust
to the specified pressure if necessary. Check care-
fully for damage, cuts or excessive wear.
Tyre rotation*:
Tyres should be rotated at least every 10,000 km
(6,000 miles). However, the timing for tyre rotation
may vary according to your driving habits and road
surface conditions.
Wheel alignment and balance:
If the vehicle pull to either side while driving on a
straight and level road, or if you detect uneven or
abnormal tyre wear, there may be a need for wheel
alignment. If the steering wheel or seat vibrates at
normal highway speeds, wheel balancing may be
needed.
Wheel bolts:
When checking the tyres, make sure no wheel bolts
are missing, and check for any loose wheel bolts.
Tighten if necessary.Windscreen:
Clean the windscreen on a regular basis. Check the
windscreen at least every six months for cracks or
other damage. Have a damaged windscreen re-
paired by a qualified repair facility.
Wiper blades*:
Check for cracks or wear if they do not wipe prop-
erly.
Under the bonnet and vehicle
The maintenance items listed here should be
checked periodically, e.g. each time you check the
engine oil or refuel.
Battery*:
Check if the green indicator on the top of the main-
tenance free battery is visible. If it is not visible,
replace the battery as soon as possible.
Vehicles operated in high temperatures or under
severe conditions, check the fluid level frequently.
Brake and clutch fluid level*:
Make sure that the brake and clutch fluid level is
between the MAX and MIN lines on the reservoir.
Engine coolant level*:
Check the coolant level when the engine is cold.
Engine drive belts*:
Make sure that the drive belts are not frayed, worn,
cracked or oily.Engine oil level*:
Check the level after parking the vehicle on a level
surface and turning off the engine.
Fluid leaks:
Check under the vehicle for fuel, oil, water or other
fluid leaks after the vehicle has been parked for a
while. Water dripping from the air conditioner after
use is normal. If you should notice any leaks or if
petrol fumes are evident, check for the cause and
have it corrected immediately.
Window washer fluid*:
Check that there is adequate fluid in the tank.
Inside the vehicle
The maintenance items listed here should be
checked on a regular basis, such as when perform-
ing periodic maintenance, cleaning the vehicle, etc.
Accelerator pedal:
Check the pedal for smooth operation and make
sure that the pedal does not catch or require uneven
effort. Keep the floor mats away from the pedal.
Brake pedal*:
Check the pedal for smooth operation. If the brake
pedal suddenly goes down further than normal, the
pedal feels spongy or the vehicle seems to take
longer to stop, contact a NISSAN dealer or qualified
workshop immediately. Keep the floor mat away
from the pedal.
Maintenance and do-it-yourself8-3
Page 180 of 235
Handbrake*:
Confirm that your vehicle is held securely on a fairly
steep hill with only the handbrake applied.
Seats:
Check seat position controls such as seat adjust-
ers, seatback recliner, etc. to ensure they operate
smoothly and all latches lock securely in every posi-
tion. Check that the head restraints move up and
down smoothly and the locks hold securely in all
latched positions.
Seat belts:
Check that all parts of the seat belt system (e.g.
buckles, anchors, adjusters and retractors) operate
properly and smoothly, and are installed securely.
Check the belt webbing for cuts, fraying, wear or
damage. See “Seat belt maintenance” in the
“1. Safety — seats, seat belts and supplemental
restraint system” section for further details.
Steering wheel:
Check for any change in the steering conditions,
such as excessive free play, hard steering or strange
noises.
Warning lights and audible reminders:
Make sure that all warning/indicator lights and au-
dible reminders are operating properly.
Windscreen defogger:
Check that the air comes out of the defogger outlets
properly when operating the heater or air condi-
tioner.Windscreen wiper and washer*:
Check that the wipers and washer operate properly
and that the wipers do not streak.When performing any inspection or maintenance
work on your vehicle, always take care to prevent
serious accidental injury to yourself or damage to
the vehicle. The following are general precautions
which should be closely observed.
•Park the vehicle on a level surface, apply the
handbrake securely and block the wheels to
prevent the vehicle from moving. For a manual
transmission models, move the gear lever to
N (Neutral) position. [For automatic transmis-
sion models, move the selector lever to P
(Park) position.]
•Do not work under the engine bonnet while
the engine is hot. Turn off the engine and wait
until it cools down.
•Be sure to turn the ignition switch to the “OFF”
or LOCK position.
When the ignition switch is in the ON or Acc
position, the cooling fan may start to operate
suddenly even when the engine is not run-
ning. To avoid injury, always disconnect the
negative battery cable before working near
the engine.
•If you must work with the engine running,
keep your hands, clothing, hair and tools away
from moving fans, belts and any other moving
parts.
•It is advisable to remove ties and any jewel-
lery, such as rings, watches, etc. before work-
ing on your vehicle.
MAINTENANCE PRECAUTIONS
8-4Maintenance and do-it-yourself
Page 190 of 235
•Brake and clutch fluids are poisonous and
should be stored carefully in marked contain-
ers out of the reach of children.
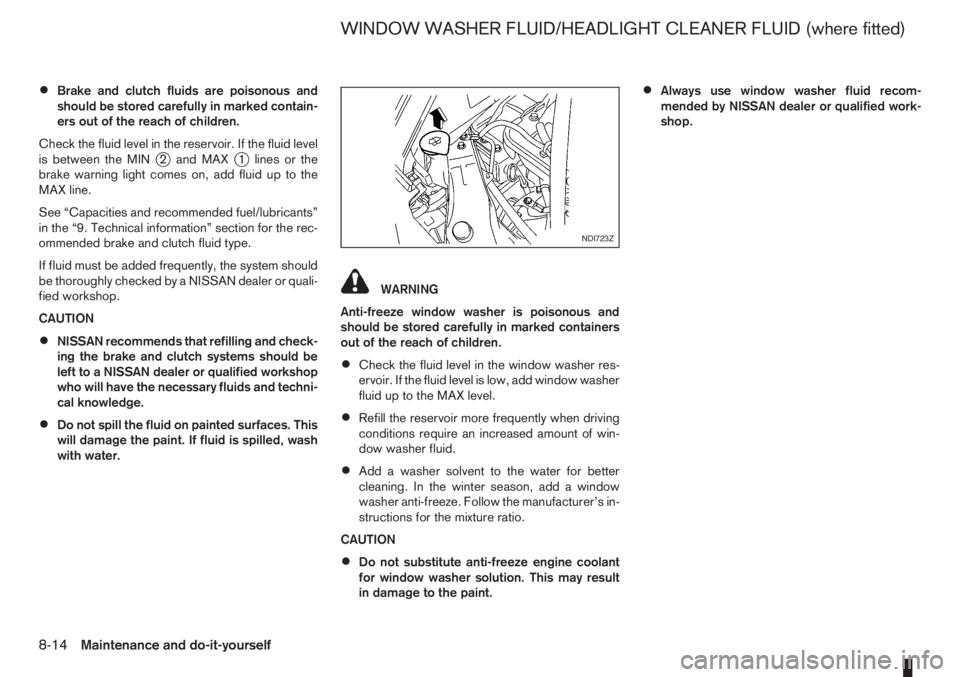
Check the fluid level in the reservoir. If the fluid level
is between the MIN
j2 and MAXj1 lines or the
brake warning light comes on, add fluid up to the
MAX line.
See “Capacities and recommended fuel/lubricants”
in the “9. Technical information” section for the rec-
ommended brake and clutch fluid type.
If fluid must be added frequently, the system should
be thoroughly checked by a NISSAN dealer or quali-
fied workshop.
CAUTION
•NISSAN recommends that refilling and check-
ing the brake and clutch systems should be
left to a NISSAN dealer or qualified workshop
who will have the necessary fluids and techni-
cal knowledge.
•Do not spill the fluid on painted surfaces. This
will damage the paint. If fluid is spilled, wash
with water.
WARNING
Anti-freeze window washer is poisonous and
should be stored carefully in marked containers
out of the reach of children.
•Check the fluid level in the window washer res-
ervoir. If the fluid level is low, add window washer
fluid up to the MAX level.
•Refill the reservoir more frequently when driving
conditions require an increased amount of win-
dow washer fluid.
•Add a washer solvent to the water for better
cleaning. In the winter season, add a window
washer anti-freeze. Follow the manufacturer’s in-
structions for the mixture ratio.
CAUTION
•Do not substitute anti-freeze engine coolant
for window washer solution. This may result
in damage to the paint.
•Always use window washer fluid recom-
mended by NISSAN dealer or qualified work-
shop.
NDI723Z
WINDOW WASHER FLUID/HEADLIGHT CLEANER FLUID (where fitted)
8-14Maintenance and do-it-yourself
Page 197 of 235
PASSENGER COMPARTMENT
CAUTION
Never use a fuse of higher or lower amperage
rating than that specified on the fuse box cover.
If any electrical equipment does not operate, check
for an open fuse.
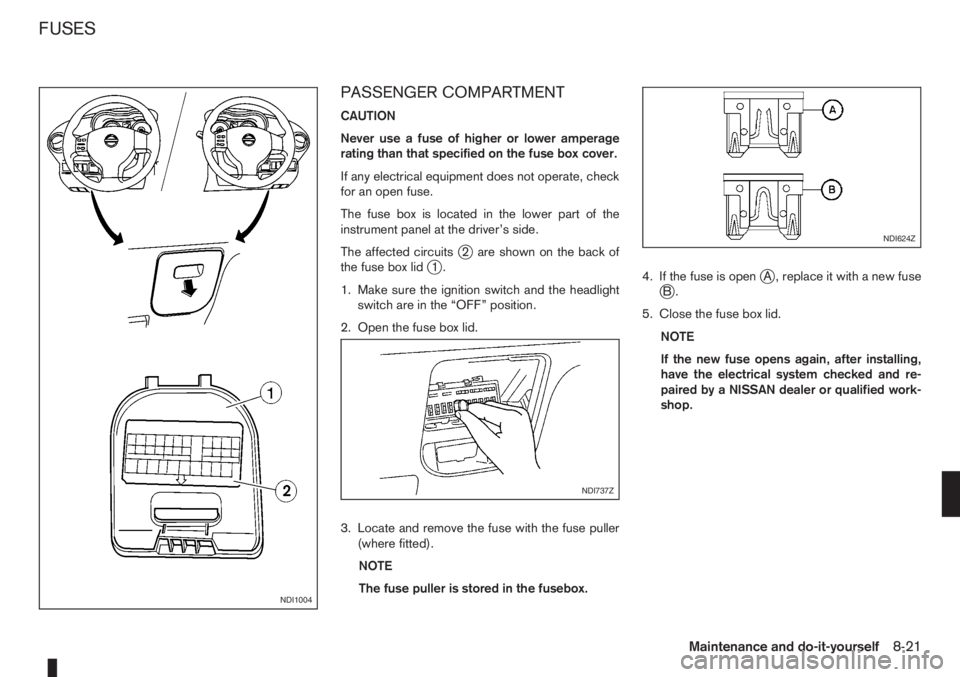
The fuse box is located in the lower part of the
instrument panel at the driver’s side.
The affected circuits
j2 are shown on the back of
the fuse box lidj1.
1. Make sure the ignition switch and the headlight
switch are in the “OFF” position.
2. Open the fuse box lid.
3. Locate and remove the fuse with the fuse puller
(where fitted).
NOTE
The fuse puller is stored in the fusebox.4. If the fuse is openjA , replace it with a new fusejB.
5. Close the fuse box lid.
NOTE
If the new fuse opens again, after installing,
have the electrical system checked and re-
paired by a NISSAN dealer or qualified work-
shop.
NDI1004
NDI737Z
NDI624Z
FUSES
Maintenance and do-it-yourself8-21
Page 198 of 235
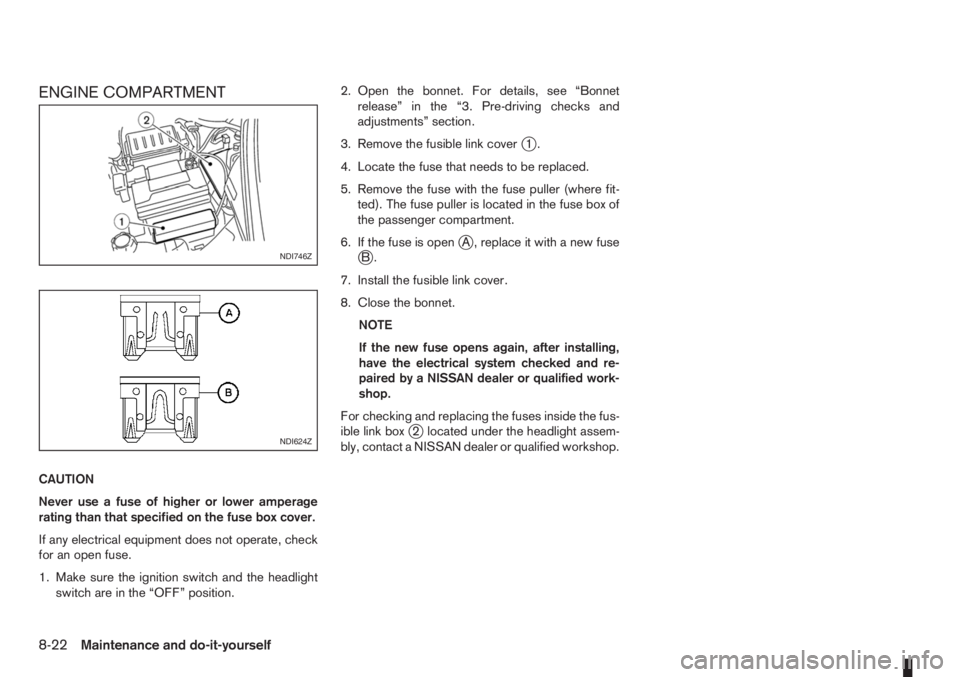
ENGINE COMPARTMENT
CAUTION
Never use a fuse of higher or lower amperage
rating than that specified on the fuse box cover.
If any electrical equipment does not operate, check
for an open fuse.
1. Make sure the ignition switch and the headlight
switch are in the “OFF” position.2. Open the bonnet. For details, see “Bonnet
release” in the “3. Pre-driving checks and
adjustments” section.
3. Remove the fusible link cover
j1.
4. Locate the fuse that needs to be replaced.
5. Remove the fuse with the fuse puller (where fit-
ted). The fuse puller is located in the fuse box of
the passenger compartment.
6. If the fuse is open
jA , replace it with a new fusejB.
7. Install the fusible link cover.
8. Close the bonnet.
NOTE
If the new fuse opens again, after installing,
have the electrical system checked and re-
paired by a NISSAN dealer or qualified work-
shop.
For checking and replacing the fuses inside the fus-
ible link box
j2 located under the headlight assem-
bly, contact a NISSAN dealer or qualified workshop.
NDI746Z
NDI624Z
8-22Maintenance and do-it-yourself
Page 199 of 235
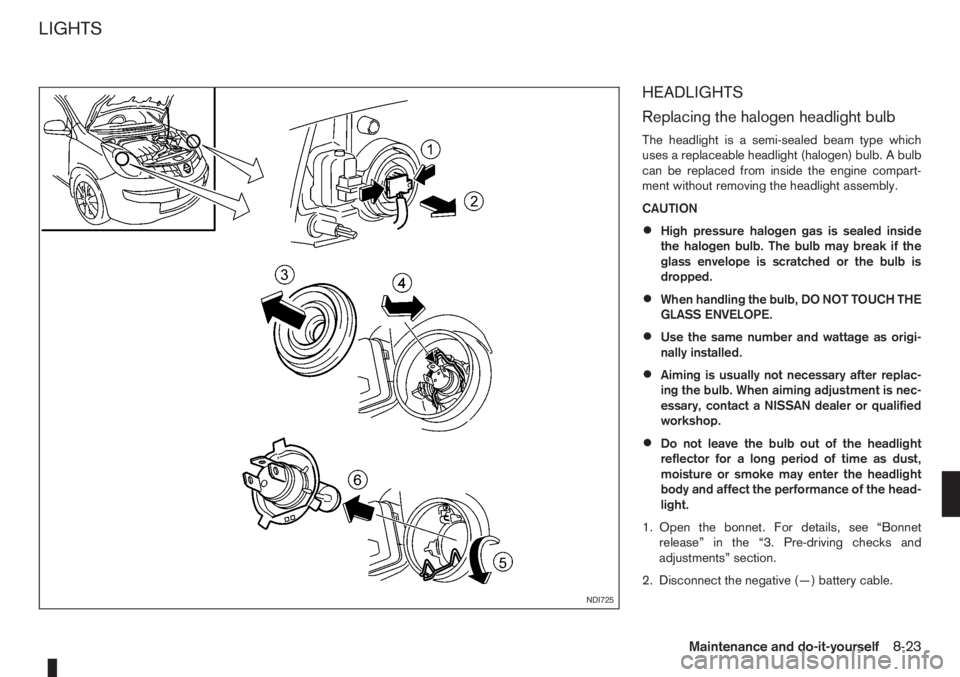
HEADLIGHTS
Replacing the halogen headlight bulb
The headlight is a semi-sealed beam type which
uses a replaceable headlight (halogen) bulb. A bulb
can be replaced from inside the engine compart-
ment without removing the headlight assembly.
CAUTION
•High pressure halogen gas is sealed inside
the halogen bulb. The bulb may break if the
glass envelope is scratched or the bulb is
dropped.
•When handling the bulb, DO NOT TOUCH THE
GLASS ENVELOPE.
•Use the same number and wattage as origi-
nally installed.
•Aiming is usually not necessary after replac-
ing the bulb. When aiming adjustment is nec-
essary, contact a NISSAN dealer or qualified
workshop.
•Do not leave the bulb out of the headlight
reflector for a long period of time as dust,
moisture or smoke may enter the headlight
body and affect the performance of the head-
light.
1. Open the bonnet. For details, see “Bonnet
release” in the “3. Pre-driving checks and
adjustments” section.
2. Disconnect the negative (—) battery cable.
NDI725
LIGHTS
Maintenance and do-it-yourself8-23