bulb NISSAN NOTE 2007 Owners Manual
[x] Cancel search | Manufacturer: NISSAN, Model Year: 2007, Model line: NOTE, Model: NISSAN NOTE 2007Pages: 235, PDF Size: 2.29 MB
Page 9 of 235
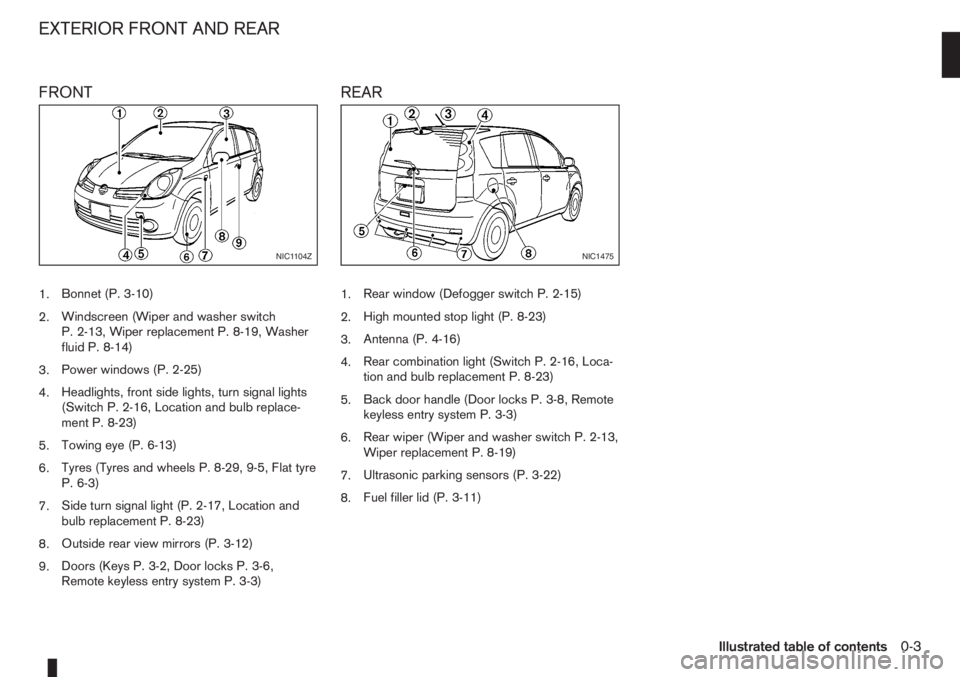
FRONT
1.Bonnet (P. 3-10)
2.Windscreen (Wiper and washer switch
P. 2-13, Wiper replacement P. 8-19, Washer
fluid P. 8-14)
3.Power windows (P. 2-25)
4.Headlights, front side lights, turn signal lights
(Switch P. 2-16, Location and bulb replace-
ment P. 8-23)
5.Towing eye (P. 6-13)
6.Tyres (Tyres and wheels P. 8-29, 9-5, Flat tyre
P. 6-3)
7.Side turn signal light (P. 2-17, Location and
bulb replacement P. 8-23)
8.Outside rear view mirrors (P. 3-12)
9.Doors (Keys P. 3-2, Door locks P. 3-6,
Remote keyless entry system P. 3-3)
REAR
1.Rear window (Defogger switch P. 2-15)
2.High mounted stop light (P. 8-23)
3.Antenna (P. 4-16)
4.Rear combination light (Switch P. 2-16, Loca-
tion and bulb replacement P. 8-23)
5.Back door handle (Door locks P. 3-8, Remote
keyless entry system P. 3-3)
6.Rear wiper (Wiper and washer switch P. 2-13,
Wiper replacement P. 8-19)
7.Ultrasonic parking sensors (P. 3-22)
8.Fuel filler lid (P. 3-11)
NIC1104ZNIC1475
EXTERIOR FRONT AND REAR
Illustrated table of contents0-3
Page 17 of 235
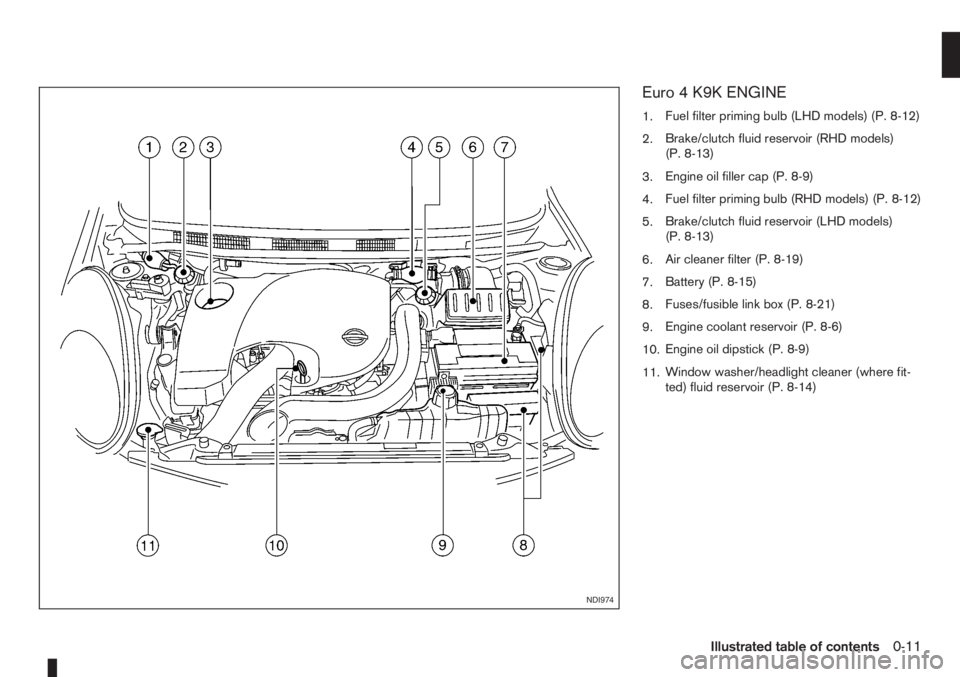
Euro 4 K9K ENGINE
1.Fuel filter priming bulb (LHD models) (P. 8-12)
2.Brake/clutch fluid reservoir (RHD models)
(P. 8-13)
3.Engine oil filler cap (P. 8-9)
4.Fuel filter priming bulb (RHD models) (P. 8-12)
5.Brake/clutch fluid reservoir (LHD models)
(P. 8-13)
6.Air cleaner filter (P. 8-19)
7.Battery (P. 8-15)
8.Fuses/fusible link box (P. 8-21)
9.Engine coolant reservoir (P. 8-6)
10.Engine oil dipstick (P. 8-9)
11.Window washer/headlight cleaner (where fit-
ted) fluid reservoir (P. 8-14)
NDI974
Illustrated table of contents0-11
Page 18 of 235
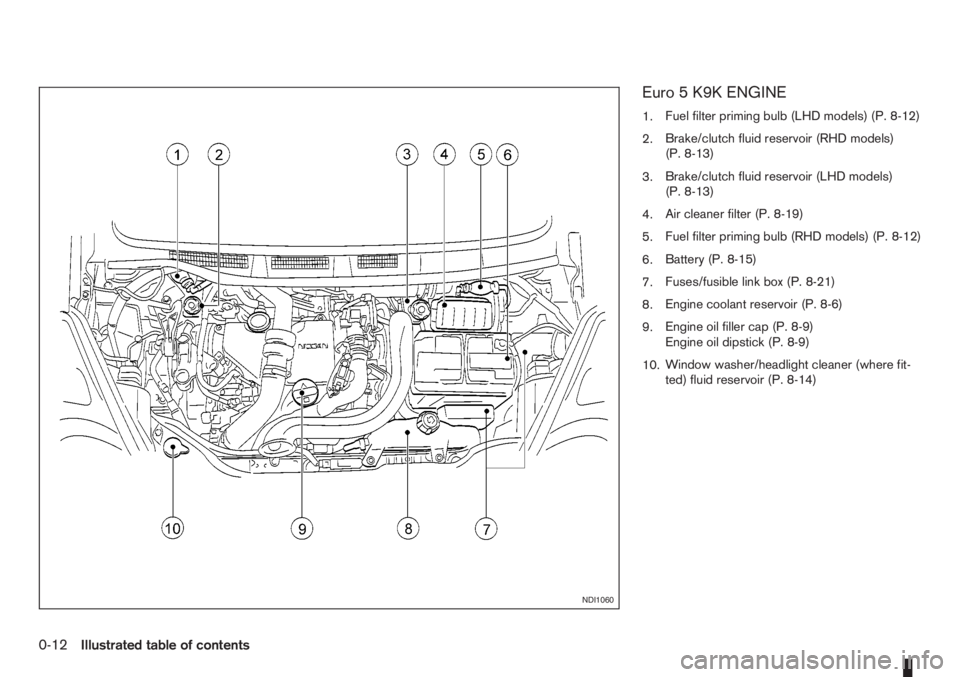
Euro 5 K9K ENGINE
1.Fuel filter priming bulb (LHD models) (P. 8-12)
2.Brake/clutch fluid reservoir (RHD models)
(P. 8-13)
3.Brake/clutch fluid reservoir (LHD models)
(P. 8-13)
4.Air cleaner filter (P. 8-19)
5.Fuel filter priming bulb (RHD models) (P. 8-12)
6.Battery (P. 8-15)
7.Fuses/fusible link box (P. 8-21)
8.Engine coolant reservoir (P. 8-6)
9.Engine oil filler cap (P. 8-9)
Engine oil dipstick (P. 8-9)
10.Window washer/headlight cleaner (where fit-
ted) fluid reservoir (P. 8-14)
NDI1060
0-12Illustrated table of contents
Page 43 of 235
2Instruments and controlsInstruments and controls
Meters and gauges .................................................. 2-2
Speedometer...................................................... 2-2
Tachometer ........................................................ 2-2
Fuel gauge ......................................................... 2-2
Combination meter display (LCD) ....................... 2-3
Odometer/twin trip odometer .............................. 2-3
Trip computer (where fitted)................................ 2-3
Outside temperature display ............................... 2-4
Engine oil level information (where fitted)............. 2-4
Digital clock ........................................................ 2-5
Warning/indicator lights and audible reminders ........ 2-7
Checking bulbs .................................................. 2-7
Warning lights .................................................... 2-7
Indicator lights .................................................... 2-11
Audible reminders............................................... 2-12
Wiper and washer switch ........................................ 2-13
Windscreen wiper and washer switch ................. 2-13
Rear window ...................................................... 2-14
Defogger switch ...................................................... 2-15
Rear window defogger ....................................... 2-15
Outside mirror defogger (where fitted) ................ 2-15
Headlight and turn signal switch............................... 2-16
Headlight switch ................................................. 2-16
Turn signal switch ............................................... 2-17
Fog light switch ....................................................... 2-17
Front fog light (where fitted) ................................ 2-17Rear fog light switch ........................................... 2-18
Headlight aiming control .......................................... 2-18
Headlight aiming control switch........................... 2-18
Hazard warning flasher switch ................................. 2-19
Horn ........................................................................ 2-19
Seat heating (where fitted) ....................................... 2-19
Power outlet ............................................................ 2-20
Storage ................................................................... 2-21
Glove box ........................................................... 2-21
Centre console storage box ................................ 2-22
Cup holder ......................................................... 2-22
Rear foldable tables (where fitted)....................... 2-23
Seat pockets (where fitted) ................................. 2-23
Convenience hook (where fitted)......................... 2-23
Under seat storage tray (where fitted) ................. 2-23
“Flexi-board” System (where fitted) ..................... 2-24
Utility hooks (where fitted)................................... 2-25
Power windows ....................................................... 2-25
Driver’s side main switch .................................... 2-26
Passenger’s side switch ..................................... 2-26
Automatic operation ............................................ 2-26
Interior lights ............................................................ 2-27
Room light .......................................................... 2-27
Map light (where fitted) ....................................... 2-28
Luggage compartment light ................................ 2-28
Page 49 of 235
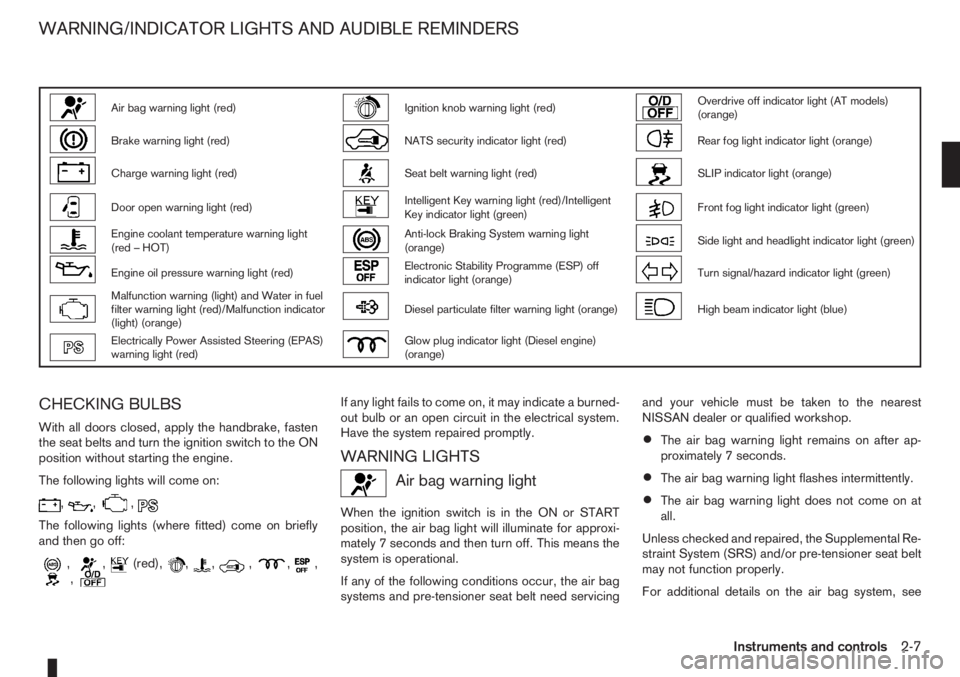
Air bag warning light (red)Ignition knob warning light (red)Overdrive off indicator light (AT models)
(orange)
Brake warning light (red)NATS security indicator light (red)Rear fog light indicator light (orange)
Charge warning light (red)Seat belt warning light (red)SLIP indicator light (orange)
Door open warning light (red)Intelligent Key warning light (red)/Intelligent
Key indicator light (green)Front fog light indicator light (green)
Engine coolant temperature warning light
(red – HOT)Anti-lock Braking System warning light
(orange)Side light and headlight indicator light (green)
Engine oil pressure warning light (red)Electronic Stability Programme (ESP) off
indicator light (orange)Turn signal/hazard indicator light (green)
Malfunction warning (light) and Water in fuel
filter warning light (red)/Malfunction indicator
(light) (orange)Diesel particulate filter warning light (orange)High beam indicator light (blue)
Electrically Power Assisted Steering (EPAS)
warning light (red)Glow plug indicator light (Diesel engine)
(orange)
CHECKING BULBS
With all doors closed, apply the handbrake, fasten
the seat belts and turn the ignition switch to the ON
position without starting the engine.
The following lights will come on:
,,,
The following lights (where fitted) come on briefly
and then go off:
,,(red),,,,,,,
If any light fails to come on, it may indicate a burned-
out bulb or an open circuit in the electrical system.
Have the system repaired promptly.
WARNING LIGHTS
Air bag warning light
When the ignition switch is in the ON or START
position, the air bag light will illuminate for approxi-
mately 7 seconds and then turn off. This means the
system is operational.
If any of the following conditions occur, the air bag
systems and pre-tensioner seat belt need servicingand your vehicle must be taken to the nearest
NISSAN dealer or qualified workshop.
•The air bag warning light remains on after ap-
proximately 7 seconds.
•The air bag warning light flashes intermittently.
•The air bag warning light does not come on at
all.
Unless checked and repaired, the Supplemental Re-
straint System (SRS) and/or pre-tensioner seat belt
may not function properly.
For additional details on the air bag system, see
WARNING/INDICATOR LIGHTS AND AUDIBLE REMINDERS
Instruments and controls2-7
Page 188 of 235

8. Turn the engine off and wait several minutes.
Check the oil level and add engine oil, if neces-
sary.
9. Install the engine compartment under cover
(where fitted).
10. Lower the vehicle carefully to the ground.
11. Close the bonnet.
PROTECT THE ENVIRONMENT
NISSAN GREEN PROGRAM
It is illegal to pollute drains, water courses and soil.
Use authorised waste collection facilities, including
civic amenity sites and garages providing facilities
for the disposal of used oil and used oil filters. If in
doubt, contact your local authority for advice on dis-
posal.
The regulations concerning the pollution of the
environment will vary from country to country.
BLEEDING THE FUEL SYSTEM
Bleed the air out of the fuel system after refilling an
empty fuel tank by the following procedure:
1. Squeeze the priming bulb
jA several times until
there is a sudden resistance felt in the pressure,
then stop.
2. Crank the engine until the engine starts.NOTE
•If the engine does not start, stop cranking
and repeat step 1 of the procedure.
•If the engine does not operate smoothly
after it has started, race it two or three
times.
NDI1062
K9K engine (LHD models)
NDI1063
K9K engine (RHD models)
FUEL FILTER (Diesel engine
models)
8-12Maintenance and do-it-yourself
Page 199 of 235
HEADLIGHTS
Replacing the halogen headlight bulb
The headlight is a semi-sealed beam type which
uses a replaceable headlight (halogen) bulb. A bulb
can be replaced from inside the engine compart-
ment without removing the headlight assembly.
CAUTION
•High pressure halogen gas is sealed inside
the halogen bulb. The bulb may break if the
glass envelope is scratched or the bulb is
dropped.
•When handling the bulb, DO NOT TOUCH THE
GLASS ENVELOPE.
•Use the same number and wattage as origi-
nally installed.
•Aiming is usually not necessary after replac-
ing the bulb. When aiming adjustment is nec-
essary, contact a NISSAN dealer or qualified
workshop.
•Do not leave the bulb out of the headlight
reflector for a long period of time as dust,
moisture or smoke may enter the headlight
body and affect the performance of the head-
light.
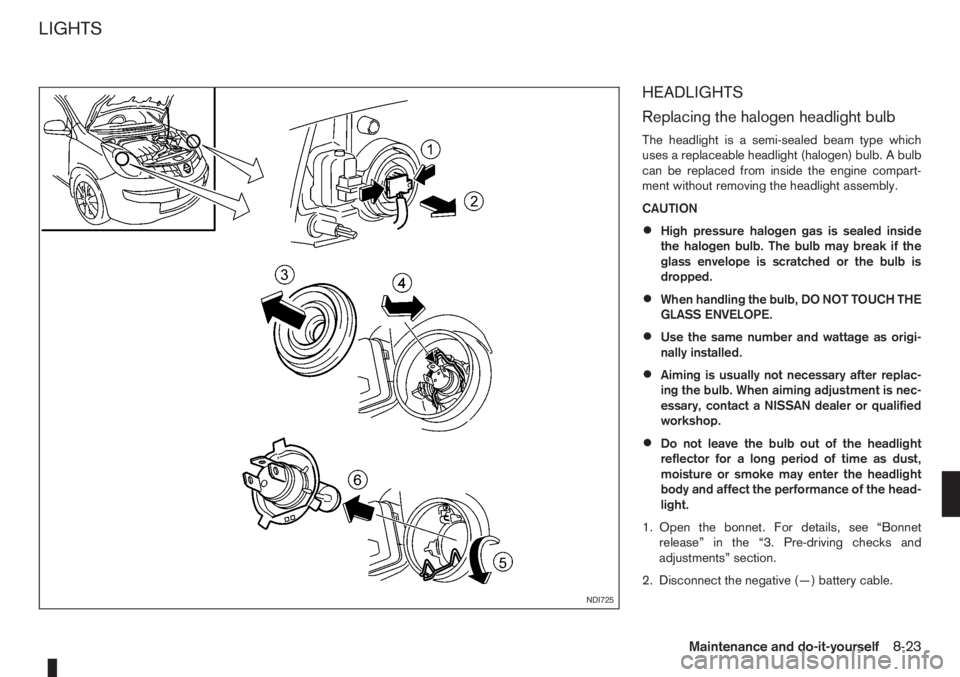
1. Open the bonnet. For details, see “Bonnet
release” in the “3. Pre-driving checks and
adjustments” section.
2. Disconnect the negative (—) battery cable.
NDI725
LIGHTS
Maintenance and do-it-yourself8-23
Page 200 of 235
3. Disconnect the electrical connector from the rear
end of the headlight bulb.
4. Remove the cap.
5. Push and turn the retaining spring to loosen it.
6. Remove the headlight bulb. Do not shake or ro-
tate the bulb during the removal.
7. Install the new bulb in the reverse order of re-
moval and make sure that the cap is securely
sealed with the headlight body.
8. Reconnect the negative (—) battery cable and
close the bonnet.
Contact a NISSAN dealer or qualified workshop, if
you need assistance for bulb replacement.
NOTE
Fog may temporarily form inside the lens of the
exterior lights in the rain or in a car wash. The fog
is caused by a temperature difference between
the inside and the outside of the lens. This is not
a malfunction. If large droplets can be seen, then
contact a NISSAN dealer or qualified workshop.EXTERIOR LIGHTS
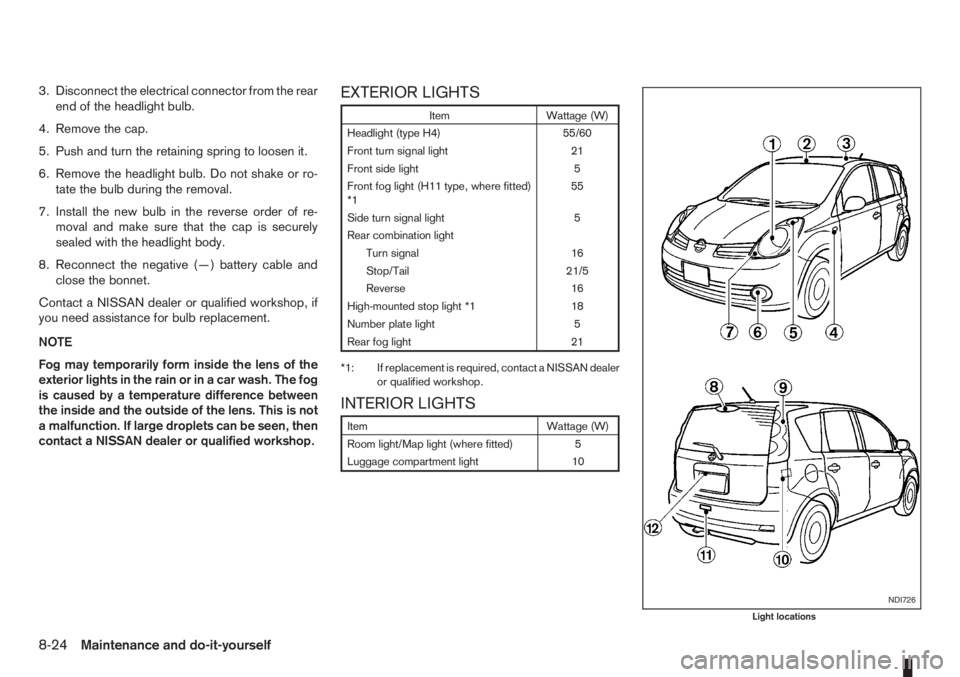
Item Wattage (W)
Headlight (type H4) 55/60
Front turn signal light 21
Front side light 5
Front fog light (H11 type, where fitted)
*155
Side turn signal light 5
Rear combination light
Turn signal 16
Stop/Tail 21/5
Reverse 16
High-mounted stop light *1 18
Number plate light 5
Rear fog light 21
*1: If replacement is required, contact a NISSAN dealer
or qualified workshop.
INTERIOR LIGHTS
Item Wattage (W)
Room light/Map light (where fitted) 5
Luggage compartment light 10
NDI726
Light locations
8-24Maintenance and do-it-yourself
Page 201 of 235
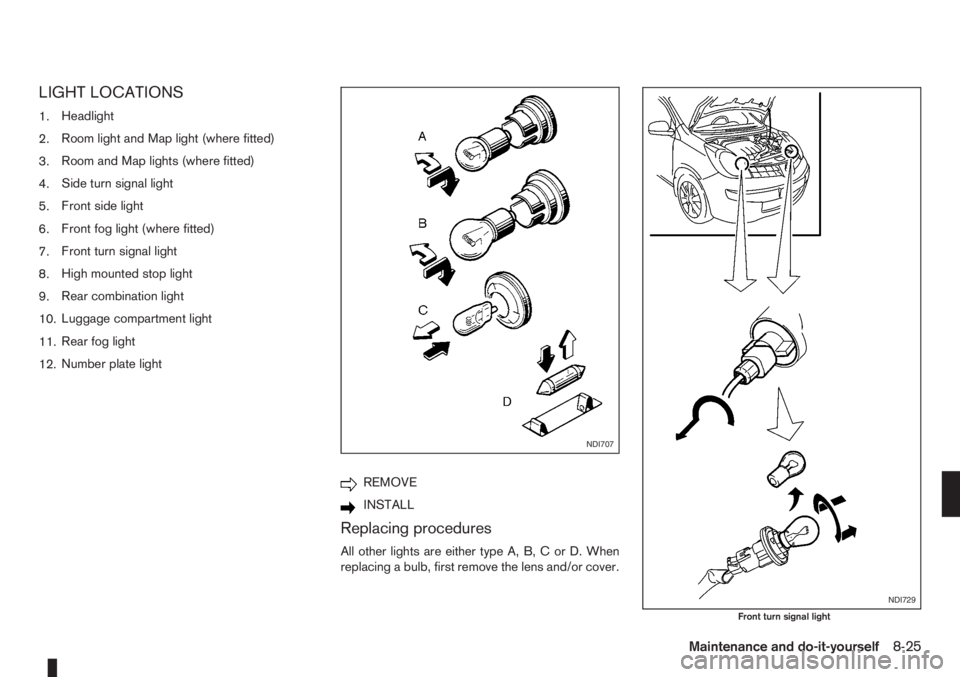
LIGHT LOCATIONS
1.Headlight
2.Room light and Map light (where fitted)
3.Room and Map lights (where fitted)
4.Side turn signal light
5.Front side light
6.Front fog light (where fitted)
7.Front turn signal light
8.High mounted stop light
9.Rear combination light
10.Luggage compartment light
11.Rear fog light
12.Number plate light
REMOVE
INSTALL
Replacing procedures
All other lights are either type A, B, C or D. When
replacing a bulb, first remove the lens and/or cover.
NDI707
NDI729
Front turn signal light
Maintenance and do-it-yourself8-25
Page 205 of 235

A.Turn signal light
B.Stop/Tail light
C.Reverse light
Rear combination light
1. Open the backdoor.
2. Remove the bolts
j1 with a suitable tool.
3. Hold firmly the outboard edge of the light unit
j2
then pull carefully with force straight towards the
rear of the vehicle, as illustrated.
NOTE
If in doubt or you encounter any difficulties
when removing the light unit from its attach-
ments
jD , contact a NISSAN dealer or quali-
fied workshop.
CAUTION
In order to prevent body and paint damage,
ensure the vehicle body around the light unit
is protected when using lever tools to remove
the light unit.
4. Install the new bulb and check afterwards the
light operation.
5. Install the light unit in the reverse order of re-
moval (step 3 and 2) and close the backdoor.In case of a flat tyre, see “Flat tyre” in the “6. In case
of emergency” section.
TYRE INFLATION PRESSURE
Periodically check the tyre pressure (including the
spare tyre). An incorrect tyre pressure may ad-
versely affect tyre life and vehicle handling.
NOTE
Incorrectly inflated tyres can also lead to poor
steering ability and make the driver suspect a
steering problem: keep the vehicle’s tyres in-
flated to the correct pressure at all times.
The tyre pressure should be checked when tyres
are COLD. Tyres are considered COLD after the
vehicle has been parked for three or more hours, or
driven less than 1.6 km (1 mile). COLD tyre pres-
sures are shown on the tyre placard affixed to the
driver’s side centre pillar.
Insufficient pressure can lead to an overheating of
the tyre and subsequent internal damage. At high
speeds, this could result in tread separation and
even bursting of the tyre.
TYPES OF TYRES
CAUTION
•When changing or replacing tyres, be sure all
four tyres are of the same type (i.e., summer,
all season or snow) and construction.
•A NISSAN dealer or qualified workshop may
be able to help you with information about
tyre type, size, speed rating and availability.
•Replacement tyres may have a lower speed
rating than the factory equipped tyres, and
may not match the potential maximum vehicle
speed. Never exceed the maximum speed rat-
ing of the tyre.
All season tyres
NISSAN specifies all season tyres on some models
to provide good performance for use all year around,
including snowy and icy road conditions. All season
tyres are identified by ALL SEASON and/or M&S
on the tyre sidewall. Snow tyres have better snow
traction than all season tyres and may be more ap-
propriate in some areas.
Summer tyres
NISSAN specifies summer tyres as standard fit.
These tyres provide superior performance under
typical mild weather conditions.
If you plan to operate your vehicle in snowy or icy
conditions, NISSAN recommends the use of SNOW
or ALL SEASON tyres on all four wheels.
Snow tyres
If snow tyres are needed, it is necessary to select
tyres equivalent in size and load rating to the original
equipment tyres. If you do not, it can adversely af-
fect the safety and handling of your vehicle.
Generally, snow tyres will have lower speed ratings
than factory equipped tyres and may not match the
potential maximum vehicle speed. Never exceed the
maximum speed rating of the tyre.
For additional traction on icy roads, studded tyres
WHEELS AND TYRES
Maintenance and do-it-yourself8-29