heater fan NISSAN NOTE 2008 Owners Manual
[x] Cancel search | Manufacturer: NISSAN, Model Year: 2008, Model line: NOTE, Model: NISSAN NOTE 2008Pages: 235, PDF Size: 2.29 MB
Page 62 of 235
5. When the vehicle’s interior has warmed-up, or
before you leave the vehicle, be sure to turn the
seat heater system off.
CAUTION
•Do not use the seat heater system for a long
period of time when the engine is not running,
otherwise the battery could run down.
•Do not put anything on the seat that insulates
the heat, such as a blanket, cushion, seat
cover, etc. Otherwise, the seat may overheat.
•Do not place anything hard or heavy on the
seat or pierce it with a pin or similar object.
This may damage the heater.
•Any liquid spilled on a heated seat should be
removed immediately with a dry cloth.
•When cleaning the seat, never use benzine,
thinner or any similar materials.
•If any abnormalities are found or the heating
does not operate, turn off the switch and have
the system checked by a NISSAN dealer or
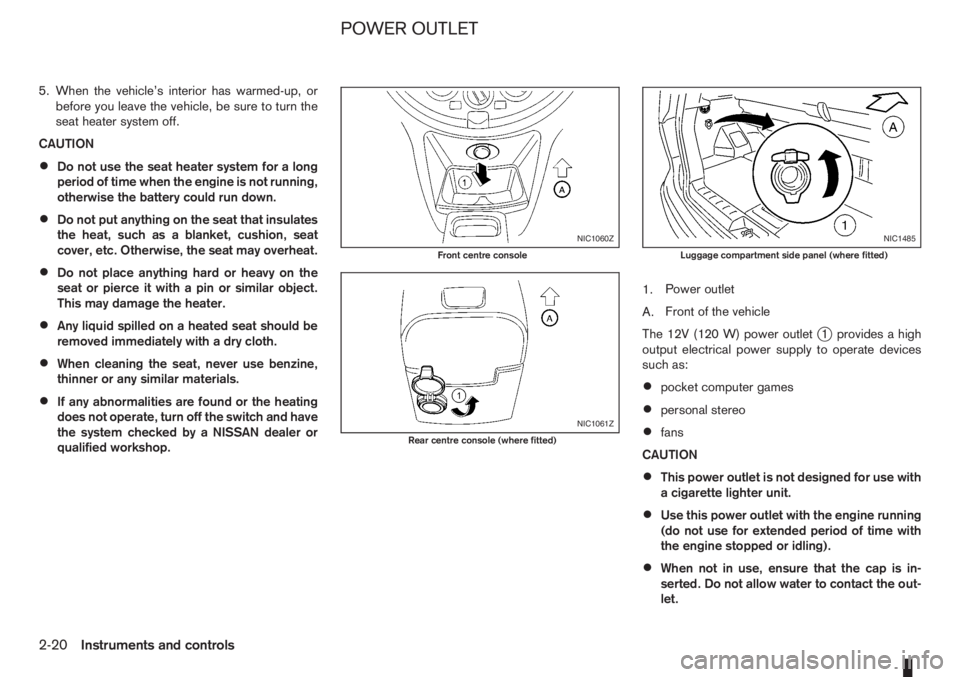
qualified workshop.1.Power outlet
A.Front of the vehicle
The 12V (120 W) power outlet
j1 provides a high
output electrical power supply to operate devices
such as:
•pocket computer games
•personal stereo
•fans
CAUTION
•This power outlet is not designed for use with
a cigarette lighter unit.
•Use this power outlet with the engine running
(do not use for extended period of time with
the engine stopped or idling).
•When not in use, ensure that the cap is in-
serted. Do not allow water to contact the out-
let.
NIC1060Z
Front centre console
NIC1061Z
Rear centre console (where fitted)
NIC1485
Luggage compartment side panel (where fitted)
POWER OUTLET
2-20Instruments and controls
Page 87 of 235
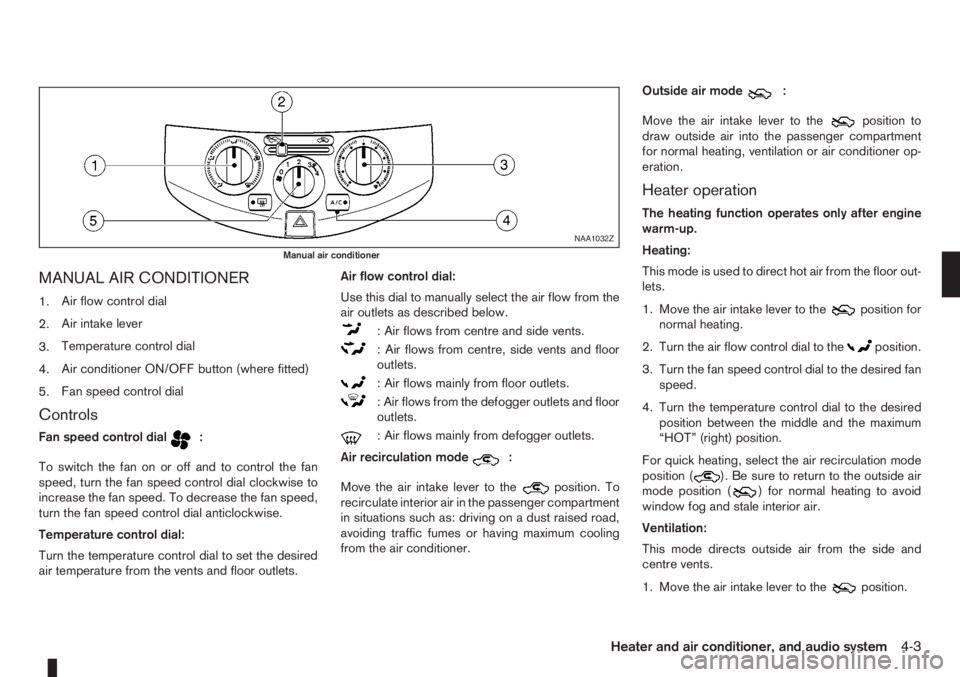
MANUAL AIR CONDITIONER
1.Air flow control dial
2.Air intake lever
3.Temperature control dial
4.Air conditioner ON/OFF button (where fitted)
5.Fan speed control dial
Controls
Fan speed control dialm:
To switch the fan on or off and to control the fan
speed, turn the fan speed control dial clockwise to
increase the fan speed. To decrease the fan speed,
turn the fan speed control dial anticlockwise.
Temperature control dial:
Turn the temperature control dial to set the desired
air temperature from the vents and floor outlets.Air flow control dial:
Use this dial to manually select the air flow from the
air outlets as described below.
: Air flows from centre and side vents.
: Air flows from centre, side vents and floor
outlets.
: Air flows mainly from floor outlets.
: Air flows from the defogger outlets and floor
outlets.
: Air flows mainly from defogger outlets.
Air recirculation mode
m:
Move the air intake lever to the
position. To
recirculate interior air in the passenger compartment
in situations such as: driving on a dust raised road,
avoiding traffic fumes or having maximum cooling
from the air conditioner.Outside air mode
m:
Move the air intake lever to the
position to
draw outside air into the passenger compartment
for normal heating, ventilation or air conditioner op-
eration.
Heater operation
The heating function operates only after engine
warm-up.
Heating:
This mode is used to direct hot air from the floor out-
lets.
1. Move the air intake lever to the
position for
normal heating.
2. Turn the air flow control dial to the
position.
3. Turn the fan speed control dial to the desired fan
speed.
4. Turn the temperature control dial to the desired
position between the middle and the maximum
“HOT” (right) position.
For quick heating, select the air recirculation mode
position (
). Be sure to return to the outside air
mode position () for normal heating to avoid
window fog and stale interior air.
Ventilation:
This mode directs outside air from the side and
centre vents.
1. Move the air intake lever to the
position.
NAA1032Z
Manual air conditioner
Heater and air conditioner, and audio system4-3
Page 88 of 235
2. Turn the air flow control dial to theposition.
3. Turn the fan speed control dial to the desired fan
speed.
4. Turn the temperature control dial to the desired
position.
Defrosting or defogging:
This mode is used to defrost/defog the windows.
1. Move the air intake lever to the
position.
2. Turn the air flow control dial to the
position.
3. Turn the fan speed control dial to speed position
2 or above.
4. Turn the temperature control dial to the desired
position between the middle and the maximum
“HOT” (right) position.
To quickly defrost/defog the windscreen, turn the
fan speed control dial to the maximum position and
the temperature control dial to the maximum “HOT”
(right) position.
Heating and defogging:
This mode heats the interior and defogs the wind-
screen.
1. Move the air intake lever to outside air mode
position (
).
2. Turn the air flow control dial to the
position.
3. Turn the fan speed control dial to speed position
2 or above.4. Turn the temperature control dial between the
middle and the maximum “HOT” (right) position.
Air conditioner operation (where fitted)
Start the engine, turn the fan speed control dial to
the desired fan speed and press the A/C button to
activate the air conditioner. When the air conditioner
is on, cooling and dehumidifying functions will be
added to the heater operation. To switch off the air
conditioner, press the button again.
NOTE
The air conditioner cooling function operates only
when the engine is running.
Cooling:
This mode is used to cool and dehumidify.
1. Move the air intake lever to outside air mode
position (
).
2. Turn the air flow control dial to the
position.
3. Turn the fan speed control dial to the desired fan
speed.
4. Press thebutton and the indicator light
will come on.
5. Turn the temperature control dial to the desired
position.
For quick cooling when the outside temperature is
high, select the air recirculation mode position
(
). Be sure to return to the outside air mode
position () to avoid windows from fogging-up
and interior air from becoming stale.NOTE
A visible mist may be seen coming from the vents
in hot, humid conditions as the air is cooled rap-
idly. This does not indicate a malfunction.
Dehumidified heating:
This mode is used to heat and dehumidify.
1. Move the air intake lever to outside air mode
position (
).
2. Turn the air flow control dial to the
position.
3. Turn on the fan speed control dial to the desired
fan speed.
4. Press thebutton and the indicator light
will come on.
5. Turn the temperature control dial to the desired
position.
Dehumidified defogging:
This mode is used to defog the windows and dehu-
midify.
1. Move the air intake lever to outside air mode
position (
).
2. Turn the air flow control dial to the
position.
3. Turn the fan speed control dial to the desired fan
speed.
4. Press thebutton and the indicator light
will come on.
5. Turn the temperature control dial to the desired
position.
4-4Heater and air conditioner, and audio system
Page 90 of 235

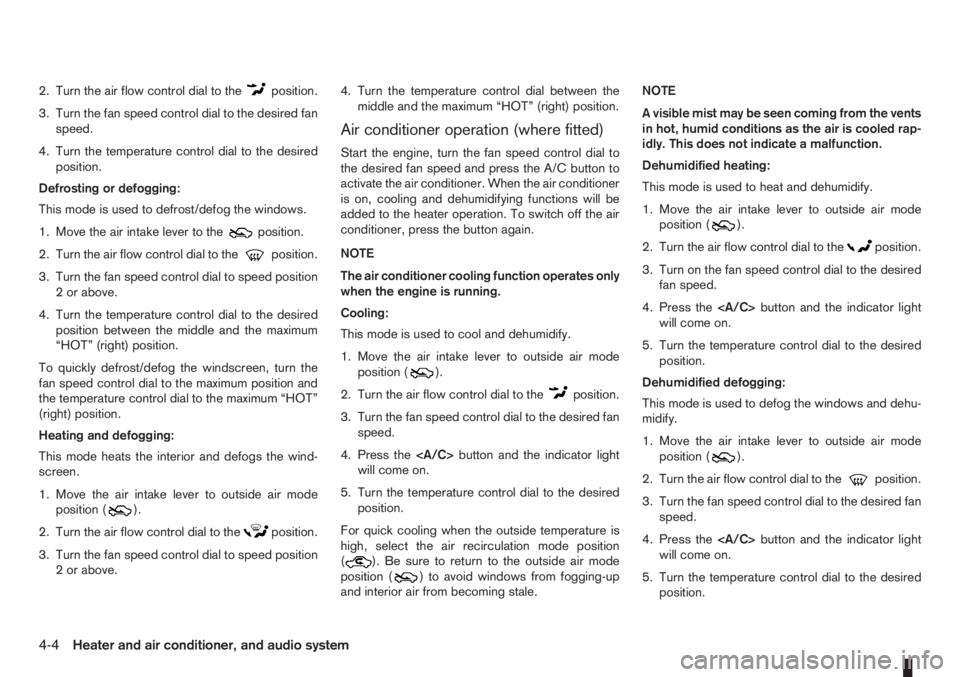
HEATING
Controls Settings
j1 Air flow control dialm
j2 Air intake leverm
j3 Temperature control dial HOT
j4Air conditioner button
(where fitted)OFF
j5 Fan speed control dial MAX
DEFROSTING/DEFOGGING
Controls Settings
j1 Air flow control dialm
j2 Air intake leverm
j3 Temperature control dial HOT
j4Air conditioner button
(where fitted)ON
j5 Fan speed control dial MAX
NAA1060
Defrosting/Defogging
4-6Heater and air conditioner, and audio system
Page 91 of 235
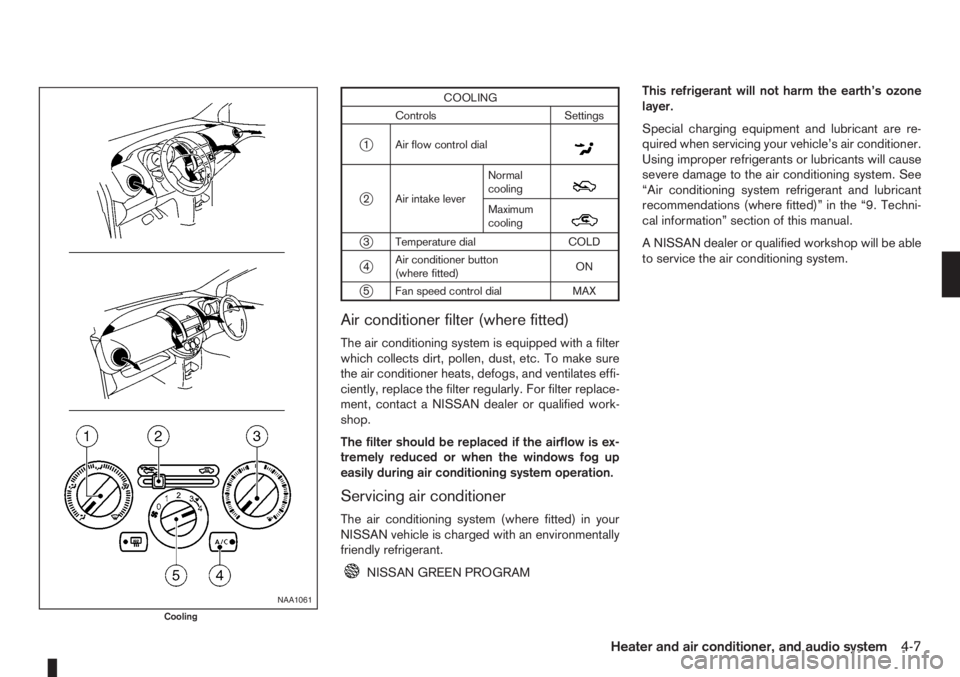
COOLING
Controls Settings
j1 Air flow control dialm
j2 Air intake leverNormal
coolingm
Maximum
coolingm
j3 Temperature dial COLD
j4Air conditioner button
(where fitted)ON
j5 Fan speed control dial MAX
Air conditioner filter (where fitted)
The air conditioning system is equipped with a filter
which collects dirt, pollen, dust, etc. To make sure
the air conditioner heats, defogs, and ventilates effi-
ciently, replace the filter regularly. For filter replace-
ment, contact a NISSAN dealer or qualified work-
shop.
The filter should be replaced if the airflow is ex-
tremely reduced or when the windows fog up
easily during air conditioning system operation.
Servicing air conditioner
The air conditioning system (where fitted) in your
NISSAN vehicle is charged with an environmentally
friendly refrigerant.
NISSAN GREEN PROGRAMThis refrigerant will not harm the earth’s ozone
layer.
Special charging equipment and lubricant are re-
quired when servicing your vehicle’s air conditioner.
Using improper refrigerants or lubricants will cause
severe damage to the air conditioning system. See
“Air conditioning system refrigerant and lubricant
recommendations (where fitted)” in the “9. Techni-
cal information” section of this manual.
A NISSAN dealer or qualified workshop will be able
to service the air conditioning system.
NAA1061
Cooling
Heater and air conditioner, and audio system4-7
Page 92 of 235
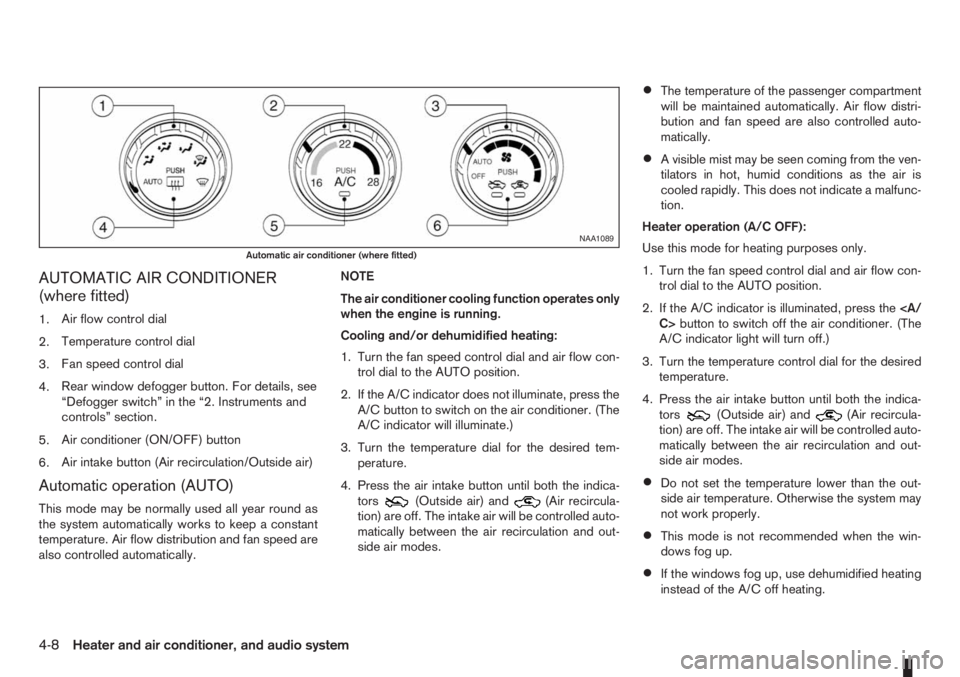
AUTOMATIC AIR CONDITIONER
(where fitted)
1.Air flow control dial
2.Temperature control dial
3.Fan speed control dial
4.Rear window defogger button. For details, see
“Defogger switch” in the “2. Instruments and
controls” section.
5.Air conditioner (ON/OFF) button
6.Air intake button (Air recirculation/Outside air)
Automatic operation (AUTO)
This mode may be normally used all year round as
the system automatically works to keep a constant
temperature. Air flow distribution and fan speed are
also controlled automatically.NOTE
The air conditioner cooling function operates only
when the engine is running.
Cooling and/or dehumidified heating:
1. Turn the fan speed control dial and air flow con-
trol dial to the AUTO position.
2. If the A/C indicator does not illuminate, press the
A/C button to switch on the air conditioner. (The
A/C indicator will illuminate.)
3. Turn the temperature dial for the desired tem-
perature.
4. Press the air intake button until both the indica-
tors(Outside air) and(Air recircula-
tion) are off. The intake air will be controlled auto-
matically between the air recirculation and out-
side air modes.
•The temperature of the passenger compartment
will be maintained automatically. Air flow distri-
bution and fan speed are also controlled auto-
matically.
•A visible mist may be seen coming from the ven-
tilators in hot, humid conditions as the air is
cooled rapidly. This does not indicate a malfunc-
tion.
Heater operation (A/C OFF):
Use this mode for heating purposes only.
1. Turn the fan speed control dial and air flow con-
trol dial to the AUTO position.
2. If the A/C indicator is illuminated, press the
C>button to switch off the air conditioner. (The
A/C indicator light will turn off.)
3. Turn the temperature control dial for the desired
temperature.
4. Press the air intake button until both the indica-
tors
(Outside air) and(Air recircula-
tion) are off. The intake air will be controlled auto-
matically between the air recirculation and out-
side air modes.
•Do not set the temperature lower than the out-
side air temperature. Otherwise the system may
not work properly.
•This mode is not recommended when the win-
dows fog up.
•If the windows fog up, use dehumidified heating
instead of the A/C off heating.
NAA1089
Automatic air conditioner (where fitted)
4-8Heater and air conditioner, and audio system
Page 93 of 235
Dehumidified defrosting or defogging:
1. Turn the air flow control dial to the
position.
2. Turn the fan speed control dial to the desired
position.
3. Turn the temperature control dial for the desired
temperature.
•To quickly remove ice from the outside of the
windscreen, turn the fan speed control dial to
the maximum position.
•As soon as possible after the windscreen has
been cleared of ice, turn the fan speed control
dial to the AUTO position for the automatic mode.
•When the air flow control dial is turned to theorposition, the outside air mode and
the air conditioner will automatically switch on
(except when the fan speed control dial is in the
OFF position) when the outside temperatures is
above −5°C (23°F) to defog the windscreen.
Outside air is drawn into the passenger com-
partment to improve the defogging performance.
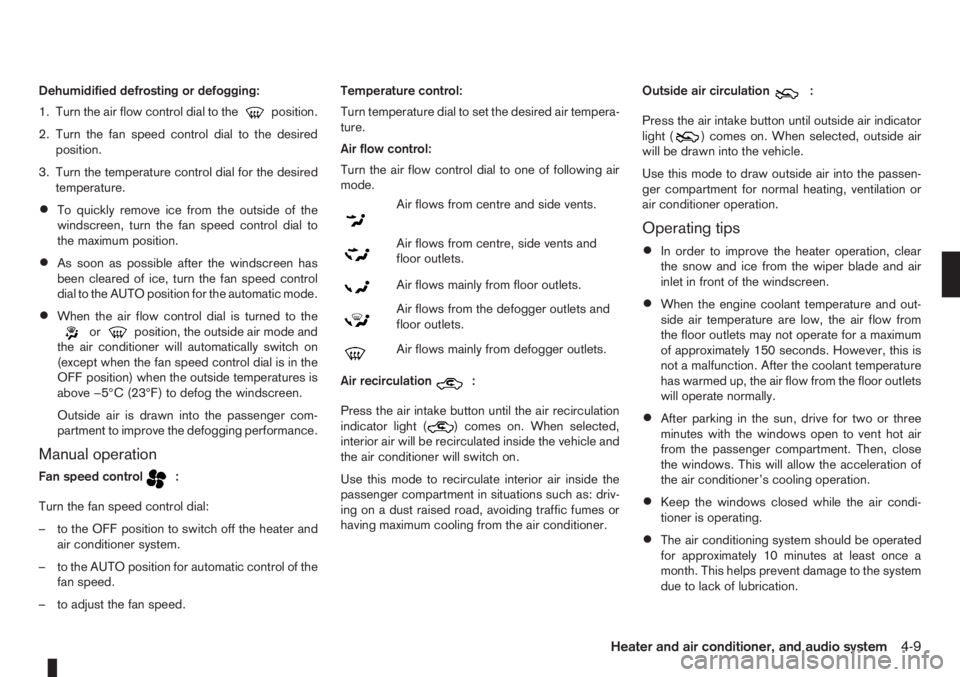
Manual operation
Fan speed controlm:
Turn the fan speed control dial:
– to the OFF position to switch off the heater and
air conditioner system.
– to the AUTO position for automatic control of the
fan speed.
– to adjust the fan speed.Temperature control:
Turn temperature dial to set the desired air tempera-
ture.
Air flow control:
Turn the air flow control dial to one of following air
mode.
m
Air flows from centre and side vents.
m
Air flows from centre, side vents and
floor outlets.
mAir flows mainly from floor outlets.
m
Air flows from the defogger outlets and
floor outlets.
mAir flows mainly from defogger outlets.
Air recirculation
m:
Press the air intake button until the air recirculation
indicator light (
) comes on. When selected,
interior air will be recirculated inside the vehicle and
the air conditioner will switch on.
Use this mode to recirculate interior air inside the
passenger compartment in situations such as: driv-
ing on a dust raised road, avoiding traffic fumes or
having maximum cooling from the air conditioner.Outside air circulation
m:
Press the air intake button until outside air indicator
light (
) comes on. When selected, outside air
will be drawn into the vehicle.
Use this mode to draw outside air into the passen-
ger compartment for normal heating, ventilation or
air conditioner operation.
Operating tips
•In order to improve the heater operation, clear
the snow and ice from the wiper blade and air
inlet in front of the windscreen.
•When the engine coolant temperature and out-
side air temperature are low, the air flow from
the floor outlets may not operate for a maximum
of approximately 150 seconds. However, this is
not a malfunction. After the coolant temperature
has warmed up, the air flow from the floor outlets
will operate normally.
•After parking in the sun, drive for two or three
minutes with the windows open to vent hot air
from the passenger compartment. Then, close
the windows. This will allow the acceleration of
the air conditioner’s cooling operation.
•Keep the windows closed while the air condi-
tioner is operating.
•The air conditioning system should be operated
for approximately 10 minutes at least once a
month. This helps prevent damage to the system
due to lack of lubrication.
Heater and air conditioner, and audio system4-9
Page 167 of 235
CAUTION
•Three-way catalyst equipped models should
not be started by pushing the vehicle as the
three-way catalyst may be damaged.
•Automatic transmission (AT) models cannot
be started by pushing the vehicle. This may
cause transmission damage.
•Never try to start the vehicle by towing it; when
the engine starts, the forward surge could
cause the vehicle to collide with the tow ve-
hicle.
WARNING
•Never continue driving if the engine of your
vehicle overheats. Doing so could cause a ve-
hicle fire.
•Never open the bonnet if steam is coming
out.
•Never remove the radiator cap (where fitted)
or engine coolant reservoir cap when the en-
gine is hot. If the radiator cap (where fitted) or
engine coolant reservoir cap is removed while
the engine is hot, pressurised hot water will
spurt out and possibly cause burning, scald-
ing or serious injury.
•If steam or coolant is coming out of the en-
gine, stand clear of the vehicle to prevent get-
ting injured.
•The engine cooling fan will start whenever the
coolant temperature exceeds preset degrees.
•Be careful not to allow your hands, hair, jewel-
lery or clothing to come into contact with, or
get caught in, the cooling fan or drive belts.
If the engine of your vehicle is overheating (indi-
cated by the engine coolant temperature warning
light (red)) or if you feel a lack of engine power,
detect an unusual noise, etc., proceed as follows:
1. Move and park the vehicle safely off the road and
away from traffic.
2. Turn on the hazard warning flasher lights.
3. Apply the handbrake.4. Shift the gear lever (M/T models) into the N (Neu-
tral) position [AT models, move the selector lever
to the P (Park) position].
DO NOT STOP THE ENGINE.
5. Open all windows.
6. Switch off the air conditioner system (where fit-
ted).
7. Set the heater or air conditioner temperature
control to maximum “HOT” and fan speed con-
trol to maximum speed.
8. Exit the vehicle.
9. Visually inspect and listen for steam or coolant
escaping from the radiator before opening the
bonnet. Wait until no steam or coolant can be
seen before proceeding.
10. Open the bonnet. For details, see “Bonnet
release” in the “3. Pre-driving checks and
adjustments” section.
11. Visually check if the cooling fan is running.
12. Visually check the radiator and radiator hoses
for leakage.
WARNING
If coolant is leaking, the cooling fan belt is
missing or loose or the cooling fan is not run-
ning, stop the engine.
PUSH-STARTING ENGINE OVERHEAT
In case of emergency6-11
Page 180 of 235
Handbrake*:
Confirm that your vehicle is held securely on a fairly
steep hill with only the handbrake applied.
Seats:
Check seat position controls such as seat adjust-
ers, seatback recliner, etc. to ensure they operate
smoothly and all latches lock securely in every posi-
tion. Check that the head restraints move up and
down smoothly and the locks hold securely in all
latched positions.
Seat belts:
Check that all parts of the seat belt system (e.g.
buckles, anchors, adjusters and retractors) operate
properly and smoothly, and are installed securely.
Check the belt webbing for cuts, fraying, wear or
damage. See “Seat belt maintenance” in the
“1. Safety — seats, seat belts and supplemental
restraint system” section for further details.
Steering wheel:
Check for any change in the steering conditions,
such as excessive free play, hard steering or strange
noises.
Warning lights and audible reminders:
Make sure that all warning/indicator lights and au-
dible reminders are operating properly.
Windscreen defogger:
Check that the air comes out of the defogger outlets
properly when operating the heater or air condi-
tioner.Windscreen wiper and washer*:
Check that the wipers and washer operate properly
and that the wipers do not streak.When performing any inspection or maintenance
work on your vehicle, always take care to prevent
serious accidental injury to yourself or damage to
the vehicle. The following are general precautions
which should be closely observed.
•Park the vehicle on a level surface, apply the
handbrake securely and block the wheels to
prevent the vehicle from moving. For a manual
transmission models, move the gear lever to
N (Neutral) position. [For automatic transmis-
sion models, move the selector lever to P
(Park) position.]
•Do not work under the engine bonnet while
the engine is hot. Turn off the engine and wait
until it cools down.
•Be sure to turn the ignition switch to the “OFF”
or LOCK position.
When the ignition switch is in the ON or Acc
position, the cooling fan may start to operate
suddenly even when the engine is not run-
ning. To avoid injury, always disconnect the
negative battery cable before working near
the engine.
•If you must work with the engine running,
keep your hands, clothing, hair and tools away
from moving fans, belts and any other moving
parts.
•It is advisable to remove ties and any jewel-
lery, such as rings, watches, etc. before work-
ing on your vehicle.
MAINTENANCE PRECAUTIONS
8-4Maintenance and do-it-yourself
Page 183 of 235

WARNING
•To avoid the danger of being scalded, never
change the coolant when the engine is hot.
•Avoid direct skin contact with used coolant. If
skin contact is made, wash thoroughly with
soap or hand cleaner and plenty of water as
soon as possible.
•Keep coolant out of reach of children and
pets.
NISSAN GREEN PROGRAM
Engine coolant must be disposed of properly.
Check your local regulations.
CR14DE or HR16DE engine
1. Set the heater or air conditioner temperature
control to the maximum “HOT” position.
2. Open the bonnet. For details, see “Bonnet
release” in the “3. Pre-driving checks and
adjustments” section.
3. Open the radiator cap
j1 (where fitted) or en-
gine coolant reservoir cap to help to drain the
coolant.
4. Slacken off the radiator lower hose clip
j2and
remove the lower hosej3 to drain the coolant.
5. Flush the cooling system by running clean water
through the radiator filler opening (where fitted)
or engine coolant reservoir.
6. Install the radiator lower hose on the radiator
securely.7. Fill the radiator through the filler opening (where
applicable) slowly with coolant and fill the cool-
ant reservoir up to the MAX level. See “Capaci-
ties and recommended fuel/lubricants” in the
“9. Technical information” section for cooling
system capacity.
8. Install the radiator cap (where fitted) and the en-
gine coolant reservoir cap.
9. Start the engine, and warm it up until the radiator
fan operates. Then rev the engine two or three
times under no load. Observe the coolant tem-
perature warning light for signs of overheating.
10. Stop the engine. After it has completely cooled
down, refill the radiator up to the filler opening
(where fitted). If the coolant level lowered, fill
the engine coolant reservoir up to the MAX level.
11. Check radiator lower hose for any signs of leak-
age.
12. Close the bonnet.
K9K engine
1. Set the heater or air conditioner temperature
control to the maximum “HOT” position.
2. Open the bonnet. For details, see “Bonnet
release” in the “3. Pre-driving checks and
adjustments” section.
3. Disconnect the radiator lower hose
j1 and open
the drain plugj2 on the engine block.
4. Open the engine coolant reservoir cap to help to
drain the coolant.
5. Flush the cooling system by running fresh water
through the radiator.
6. Install the radiator lower hose to the radiator and
securely tighten the engine block drain plug.
7. Fill the reservoir up to the MAX level with cool-
ant. See “Capacities and recommended
fuel/lubricants” in the “9. Technical information”
section for cooling system capacity.
8. Install the engine coolant reservoir cap.
9. Start the engine and run the engine at about
2,000 rpm for 1 minute.
10. Stop the engine and check coolant level, allow
to cool and refill up to the MAX level.
11. Warm up the engine at about 2,000 rpm until it
reaches the normal operational temperature
(fan cycles).
Check heater core (below instrument panel) for
gurgling, refill if necessary.
NDI671Z
K9K engine
Maintenance and do-it-yourself8-7