key NISSAN NOTE 2012 Owner's Manual
[x] Cancel search | Manufacturer: NISSAN, Model Year: 2012, Model line: NOTE, Model: NISSAN NOTE 2012Pages: 235, PDF Size: 2.29 MB
Page 116 of 235
![NISSAN NOTE 2012 Owners Manual [Pair Device]:
1. Press the<SETUP>button. Select the [Blue-
tooth] key using the<TUNE/MENU>dial. Then
press the<ENTER>button.
You can register up to 5 different Bluetooth mo-
bile phones. However, you NISSAN NOTE 2012 Owners Manual [Pair Device]:
1. Press the<SETUP>button. Select the [Blue-
tooth] key using the<TUNE/MENU>dial. Then
press the<ENTER>button.
You can register up to 5 different Bluetooth mo-
bile phones. However, you](/img/5/56792/w960_56792-115.png)
[Pair Device]:
1. Press the
tooth] key using the
press the
You can register up to 5 different Bluetooth mo-
bile phones. However, you can only use one de-
vice at a time. If you have 5 different Bluetooth
registered devices, a new device can only re-
place one of the 5 existing paired devices. Use
[Delete Device] key to delete one of the existing
paired devices. For details, see “[Delete Device]”
later in this section.
2. Select the [Pair Device] key.
The pairing procedure depends on the
connected device:
•Mobile phone:
The message [Ready to Pair Pin:1234] will
be displayed.
•Audio device without PIN code:
The Bluetooth connection will be automati-
cally connected without any further input.
•Audio device with PIN code:
A new screen will appear. Assign the 4 digit
PIN code by turning the
to each code and press the
to confirm. Then select [Validate] and press
made.
The 4–digit PIN code is provided with the
audio device, see the owner’s manual of the
audio device.
3. On Bluetooth® audio/mobile phone devices.
1) Switch on the Bluetooth® connection, if not
already switched on.
2) Switch on the search mode for Bluetooth®
devices. If the search mode finds a device it
will be shown on the device display.
3) When a device is found use the
to select [My Car].
4) Enter the number code shown on the relevant
device with the device’s own keypad, and
press the confirmation key on the device it-
self. Refer to the relevant Bluetooth® device
owner’s manual for further details.
When successfully paired a notification message
will be displayed, then the audio system displaywill return to the current audio source display.
During connection the following status icons will
be displayed (top left of the display): Signal
strength (), Battery status* () and Blue-
tooth “ON” ().
*: If the low battery message comes on, the
Bluetooth® device must be recharged soon.
The pairing procedure and operation may vary ac-
cording to device type and compatibility. See the
Bluetooth® owner’s manual for further details.
NOTE
•For device details, see your audio/mobile
phone Owner’s Manual.
•For assistance with the Bluetooth® audio/
mobile phone integration, please visit your lo-
cal NISSAN dealer.
[Select Device]:
The paired device list shows which Bluetooth® au-
dio or mobile phone devices have been paired or
registered with the Bluetooth® audio system. If the
list contains devices then select the appropriate de-
vice to connect to the Bluetooth® audio system.
The following symbols (where fitted) indicate the
capability of the registered device:
•: Mobile phone integration
•: Audio streaming (A2DP- Advanced Audio
Distribution Profile)
NAA1202
4-32Heater and air conditioner, and audio system
Page 119 of 235
Bluetooth®is a wireless radio communication stan-
dard. This system offers a hands-free facility for your
mobile telephone to enhance driving comfort.
In order to use your mobile phone with the Blue-
tooth
®of the audio system, the mobile phone must
first be setup. For details, see “BLUETOOTH®
settings” later in this section or “BLUETOOTH®
settings” earlier in this section. Once it has been
setup, the hands-free mode is automatically acti-
vated on the registered mobile phone (via Blue-
tooth
®) when it comes into range.
A notification message appears on the audio display
when the phone is connected, when an incoming
call is being received, as well as when a call is initi-
ated.
When a call is active, the audio system, microphone
(located in the ceiling in front of the rear view mir-
ror), and steering wheel switches enable hands-free
communication.
If the audio system is in use at the time, the radio,
CD, or AUX source mode will be muted and will stay
muted until the active call has ended.
The Bluetooth
®system may be not be able to con-
nect with your mobile phone for the following rea-
sons:
•The mobile phone is too far away from the ve-
hicle.
•The Bluetooth®mode on your mobile phone has
not been activated.
•Your mobile phone has not been paired with the
Bluetooth®system of the audio unit.
•The mobile phone does not support Bluetooth®
technology (BT Core v2.0).
NOTE
•For models with NISSAN Connect (Audio with
Navigation system) see the separately pro-
vided Owner’s Manual.
•For details, see your mobile phone’s Owner’s
Manual.
•For assistance with your mobile phone inte-
gration, please visit your local NISSAN dealer.
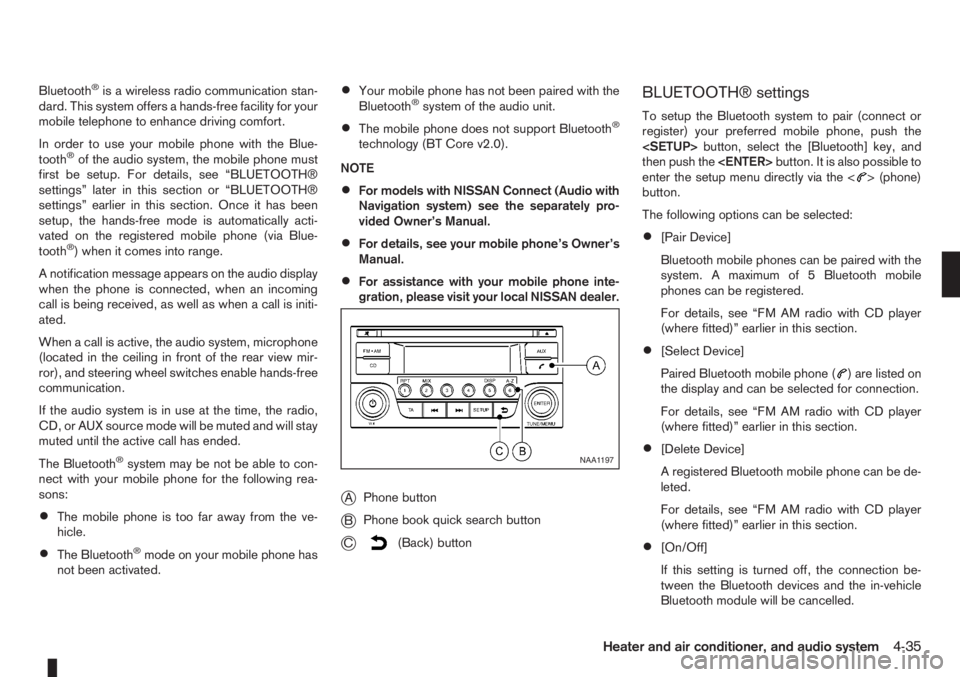
jAPhone button
jBPhone book quick search button
jC(Back) button
BLUETOOTH® settings
To setup the Bluetooth system to pair (connect or
register) your preferred mobile phone, push the
then push the
enter the setup menu directly via the <
> (phone)
button.
The following options can be selected:
•[Pair Device]
Bluetooth mobile phones can be paired with the
system. A maximum of 5 Bluetooth mobile
phones can be registered.
For details, see “FM AM radio with CD player
(where fitted)” earlier in this section.
•[Select Device]
Paired Bluetooth mobile phone (
) are listed on
the display and can be selected for connection.
For details, see “FM AM radio with CD player
(where fitted)” earlier in this section.
•[Delete Device]
A registered Bluetooth mobile phone can be de-
leted.
For details, see “FM AM radio with CD player
(where fitted)” earlier in this section.
•[On/Off]
If this setting is turned off, the connection be-
tween the Bluetooth devices and the in-vehicle
Bluetooth module will be cancelled.
NAA1197
Heater and air conditioner, and audio system4-35
Page 121 of 235
Manually dialling a phone number:
WARNING
Park the vehicle in a safe location, and apply the
handbrake before making a call.
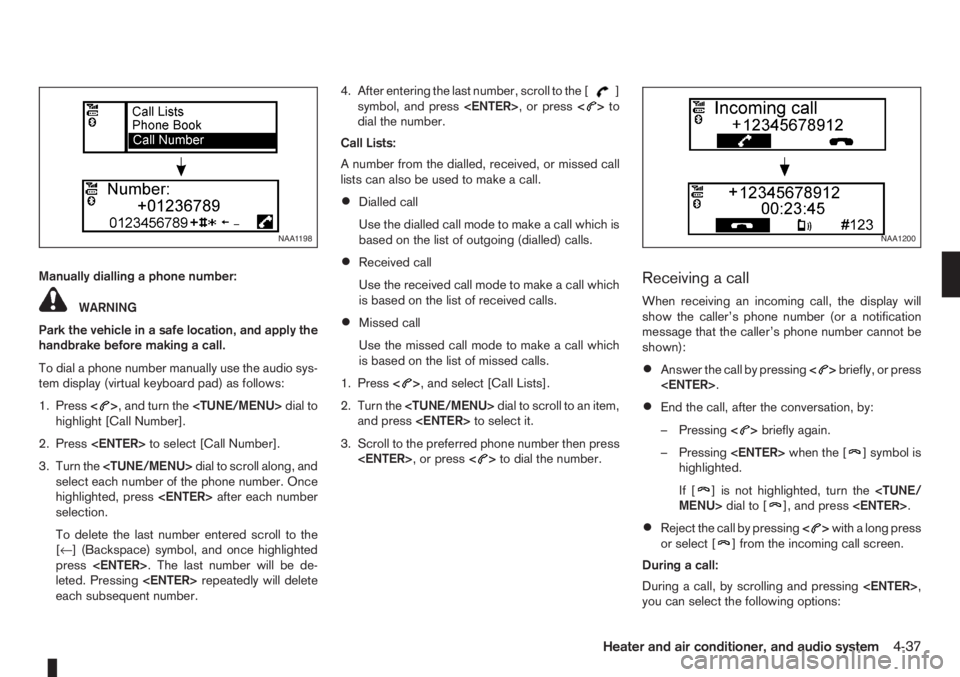
To dial a phone number manually use the audio sys-
tem display (virtual keyboard pad) as follows:
1. Press<
>, and turn the
highlight [Call Number].
2. Press
3. Turn the
select each number of the phone number. Once
highlighted, press
selection.
To delete the last number entered scroll to the
[←] (Backspace) symbol, and once highlighted
press
leted. Pressing
each subsequent number.4. After entering the last number, scroll to the [
]
symbol, and press
dial the number.
Call Lists:
A number from the dialled, received, or missed call
lists can also be used to make a call.
•Dialled call
Use the dialled call mode to make a call which is
based on the list of outgoing (dialled) calls.
•Received call
Use the received call mode to make a call which
is based on the list of received calls.
•Missed call
Use the missed call mode to make a call which
is based on the list of missed calls.
1. Press<
>, and select [Call Lists].
2. Turn the
and press
3. Scroll to the preferred phone number then press
>to dial the number.
Receiving a call
When receiving an incoming call, the display will
show the caller’s phone number (or a notification
message that the caller’s phone number cannot be
shown):
•Answer the call by pressing<>briefly, or press
•End the call, after the conversation, by:
– Pressing<
>briefly again.
– Pressing
] symbol is
highlighted.
If [
] is not highlighted, turn the
•Reject the call by pressing<>with a long press
or select [] from the incoming call screen.
During a call:
During a call, by scrolling and pressing
you can select the following options:
NAA1198NAA1200
Heater and air conditioner, and audio system4-37
Page 125 of 235
5Starting and drivingStarting and driving
Running-in schedule ................................................ 5-2
Before starting the engine ........................................ 5-2
Precautions when starting and driving ...................... 5-3
Exhaust gas (Carbon Monoxide) ......................... 5-3
Three-way catalyst (Petrol engine models)................ 5-4
To help prevent damage ..................................... 5-4
Turbocharger system (Diesel engine models) ........... 5-4
Diesel particulate filter (where fitted) ........................ 5-5
Care when driving ................................................... 5-5
Engine cold start period ...................................... 5-5
Loading luggage ................................................. 5-5
Driving on wet roads ........................................... 5-5
Driving under winter conditions ........................... 5-5
Ignition switch.......................................................... 5-6
Manual transmission ........................................... 5-6
Automatic transmission ....................................... 5-6
Steering lock ...................................................... 5-7
Key positions ...................................................... 5-7
NISSAN Anti-Theft System (NATS)..................... 5-7
Ignition knob (where fitted)....................................... 5-7
Manual transmission ........................................... 5-8
Automatic transmission ....................................... 5-8
Steering lock ...................................................... 5-8
Ignition knob position .......................................... 5-8
Emergency key – Intelligent Key dead battery
situation .............................................................. 5-9
NISSAN Anti-Theft System (NATS)..................... 5-9
Starting the engine................................................... 5-10
Driving ..................................................................... 5-11
Driving with manual transmission......................... 5-11Driving with automatic transmission..................... 5-12
Speed limiter ........................................................... 5-15
Speed limiter operations ..................................... 5-16
Cruise control system .............................................. 5-18
Precautions on cruise control system .................. 5-19
Cruise control system operations ........................ 5-19
Ultrasonic Parking Sensor (where fitted) .................. 5-22
Parking .................................................................... 5-22
Trailer towing ........................................................... 5-24
Operating precautions ........................................ 5-24
Tyre pressure ..................................................... 5-25
Safety chains ...................................................... 5-25
Trailer brakes...................................................... 5-25
Trailer detection (where fitted) ............................ 5-25
Installation of coupling device ............................. 5-25
Vehicle security........................................................ 5-26
Power steering system............................................. 5-27
Brake system ........................................................... 5-27
Brake precautions .............................................. 5-27
Anti-lock Braking System (ABS).......................... 5-28
Electronic Stability Programme (ESP) system
(where fitted) ........................................................... 5-29
Electronic Stability Programme (ESP) OFF
switch................................................................. 5-30
Cold weather driving................................................ 5-31
Battery ............................................................... 5-31
Engine coolant .................................................... 5-31
Tyre equipment ................................................... 5-31
Special winter equipment.................................... 5-32
Corrosion protection ........................................... 5-32
Page 130 of 235
•Avoid starting off, accelerating or stopping sud-
denly.
•Avoid sharp turns or lane changes.
•Avoid sudden steering actions.
•Extra distance should be kept from the vehicle in
front.
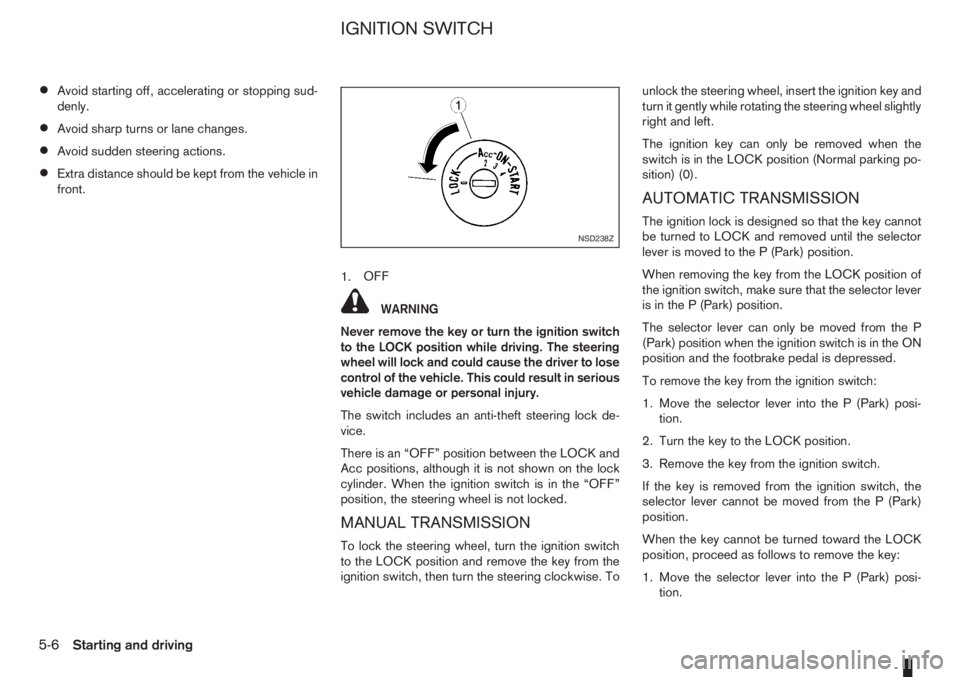
1.OFF
WARNING
Never remove the key or turn the ignition switch
to the LOCK position while driving. The steering
wheel will lock and could cause the driver to lose
control of the vehicle. This could result in serious
vehicle damage or personal injury.
The switch includes an anti-theft steering lock de-
vice.
There is an “OFF” position between the LOCK and
Acc positions, although it is not shown on the lock
cylinder. When the ignition switch is in the “OFF”
position, the steering wheel is not locked.
MANUAL TRANSMISSION
To lock the steering wheel, turn the ignition switch
to the LOCK position and remove the key from the
ignition switch, then turn the steering clockwise. Tounlock the steering wheel, insert the ignition key and
turn it gently while rotating the steering wheel slightly
right and left.
The ignition key can only be removed when the
switch is in the LOCK position (Normal parking po-
sition) (0).
AUTOMATIC TRANSMISSION
The ignition lock is designed so that the key cannot
be turned to LOCK and removed until the selector
lever is moved to the P (Park) position.
When removing the key from the LOCK position of
the ignition switch, make sure that the selector lever
is in the P (Park) position.
The selector lever can only be moved from the P
(Park) position when the ignition switch is in the ON
position and the footbrake pedal is depressed.
To remove the key from the ignition switch:
1. Move the selector lever into the P (Park) posi-
tion.
2. Turn the key to the LOCK position.
3. Remove the key from the ignition switch.
If the key is removed from the ignition switch, the
selector lever cannot be moved from the P (Park)
position.
When the key cannot be turned toward the LOCK
position, proceed as follows to remove the key:
1. Move the selector lever into the P (Park) posi-
tion.NSD238Z
IGNITION SWITCH
5-6Starting and driving
Page 131 of 235
2. Turn the key slightly in the ON direction.
3. Turn the key towards the LOCK position.
4. Remove the key.
STEERING LOCK
To lock the steering wheel
1. Turn the key to the LOCK position.
2. Remove the key from the ignition switch.
3. Turn the steering wheel 1/6 of a turn clockwise
from the straight up position.
To unlock the steering wheel
1. Insert the key into the ignition switch.
2. Gently turn the key while rotating the steering
wheel slightly right and left.
KEY POSITIONS
LOCK (Normal parking position) (0)
The ignition key can only be removed when in this
position.
The steering lock can only be locked in this position.
“OFF” (1)
The engine is turned off without locking the steering
wheel.
Acc (Accessories) (2)
This position activates electrical accessories, such
as the radio, when the engine is not running.
ON (Normal operating position) (3)
This position turns on the ignition system and elec-
trical accessories.
START (4)
The engine starter activates and the engine will start.
As soon as the engine has started, release the key
immediately. It will return to the ON position.
NISSAN ANTI-THEFT SYSTEM (NATS)
The NISSAN Anti Theft System (NATS)* will stop
the engine if someone tries to start the engine with-
out using the registered NATS key.
* Immobilizer
If you failed to start the engine using the NATS Key,
turn the ignition knob to the LOCK position, wait for
5 seconds and turn the key to the START position
again to start the engine.
For additional information, see “Security system” in
the “3. Pre-driving checks and adjustments” sec-
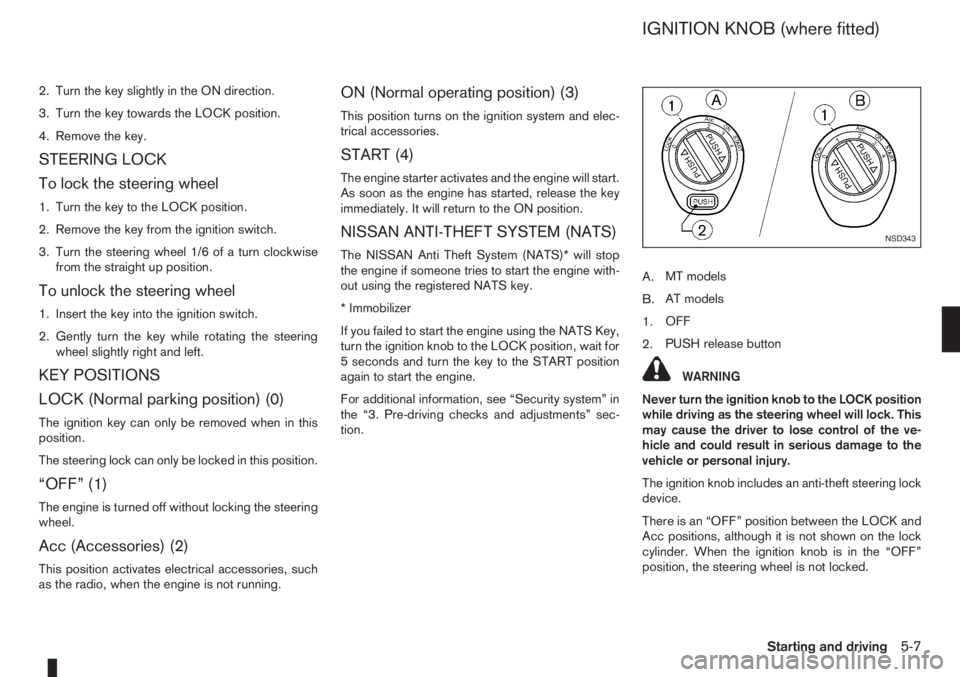
tion.A.MT models
B.AT models
1.OFF
2.PUSH release button
WARNING
Never turn the ignition knob to the LOCK position
while driving as the steering wheel will lock. This
may cause the driver to lose control of the ve-
hicle and could result in serious damage to the
vehicle or personal injury.
The ignition knob includes an anti-theft steering lock
device.
There is an “OFF” position between the LOCK and
Acc positions, although it is not shown on the lock
cylinder. When the ignition knob is in the “OFF”
position, the steering wheel is not locked.
NSD343
IGNITION KNOB (where fitted)
Starting and driving5-7
Page 132 of 235
CAUTION
•Make sure you carry the Intelligent Key with
you when operating the vehicle.
•Never leave the Intelligent Key inside the ve-
hicle when you leave the vehicle.
•If the Intelligent Key is too far away from the
driver, the vehicle may not start.
MANUAL TRANSMISSION
The ignition lock is designed so that the knob can
ONLY be turned to the LOCK position when the
PUSH release button has first been depressed.
NOTE
•The ignition knob warning light () blinks
and the buzzer sounds twice when the igni-
tion knob is turned to the “OFF” position. De-
press the PUSH release button
j2 , then turn
the ignition knob to the LOCK position. See
“Warning/indicator lights and audible
reminders” in the “2. Instruments and
controls” section for further details regarding
the functionality of the ignition knob warning
light.
•When the emergency key is being used, the
PUSH release buttonj2 must be depressed
in order to turn the ignition knob to the LOCK
position although the ignition knob warning
light (
) will not blink and the buzzer will not
sound.
AUTOMATIC TRANSMISSION
The ignition knob is designed so that it cannot be
turned to the LOCK position until the selector lever
is moved to the P (Park) position. The selector lever
can only be moved from the P (Park) position when
the ignition knob is in the ON position and the
footbrake pedal is depressed.
NOTE
The ignition knob warning light (
) blinks and a
buzzer sounds twice when the ignition knob is
turned to the “OFF” position. Make sure that the
selector lever is in the P (Park) position, then turn
the ignition knob to the LOCK position. See
“Warning/indicator lights and audible reminders”
in the “2. Instruments and controls” section for
further details regarding the functionality of the
ignition knob warning light.
STEERING LOCK
To lock the steering wheel
In the LOCK position, turn the steering wheel 1/6 of
a turn from the straight up position.
To unlock the steering wheel
Depress the brake pedal, push the ignition knob and
turn it towards the Acc position while gently rotating
the steering wheel right or left.
IGNITION KNOB POSITION
LOCK (Normal parking position) (0)
The steering lock can be only be locked from this
position.
“OFF” (1)
The engine can be turned off without locking the
steering wheel.
Acc (Accessories) (2)
This position activates electrical accessories, such
as the radio, when the engine is not running.
ON (Normal operating position) (3)
This position turns on the ignition system and the
electrical accessories.
START (4)
The engine starter activates and the engine will start.
As soon as the engine has started, release the knob
immediately. It will return to the ON position.
5-8Starting and driving
Page 133 of 235
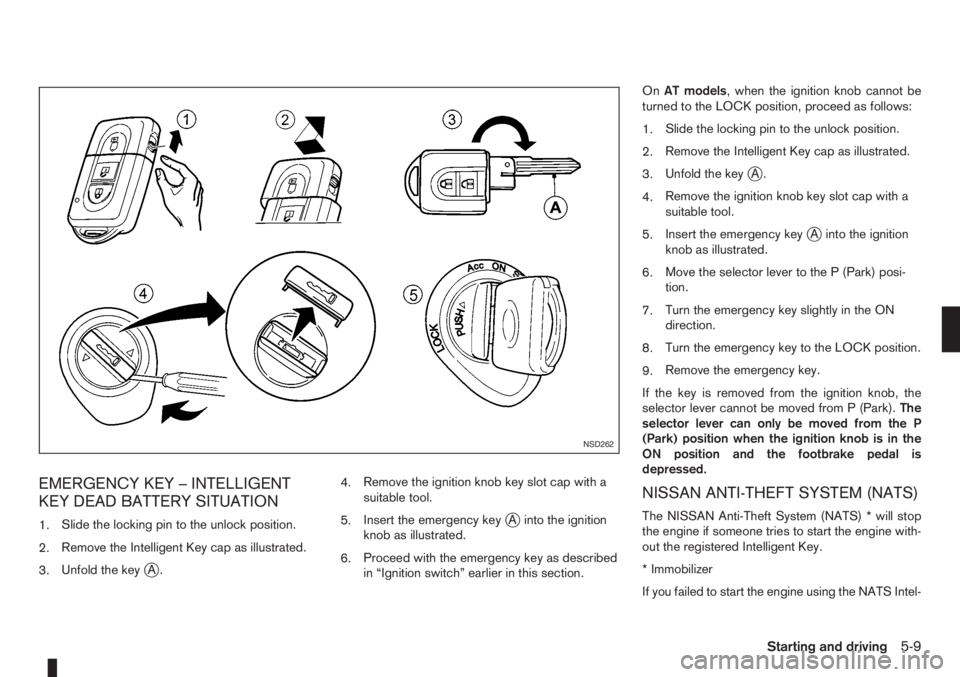
EMERGENCY KEY – INTELLIGENT
KEY DEAD BATTERY SITUATION
1.Slide the locking pin to the unlock position.
2.Remove the Intelligent Key cap as illustrated.
3.Unfold the key
jA.4.Remove the ignition knob key slot cap with a
suitable tool.
5.Insert the emergency key
jA into the ignition
knob as illustrated.
6.Proceed with the emergency key as described
in “Ignition switch” earlier in this section.OnAT models, when the ignition knob cannot be
turned to the LOCK position, proceed as follows:
1.Slide the locking pin to the unlock position.
2.Remove the Intelligent Key cap as illustrated.
3.Unfold the key
jA.
4.Remove the ignition knob key slot cap with a
suitable tool.
5.Insert the emergency key
jA into the ignition
knob as illustrated.
6.Move the selector lever to the P (Park) posi-
tion.
7.Turn the emergency key slightly in the ON
direction.
8.Turn the emergency key to the LOCK position.
9.Remove the emergency key.
If the key is removed from the ignition knob, the
selector lever cannot be moved from P (Park).The
selector lever can only be moved from the P
(Park) position when the ignition knob is in the
ON position and the footbrake pedal is
depressed.
NISSAN ANTI-THEFT SYSTEM (NATS)
The NISSAN Anti-Theft System (NATS) * will stop
the engine if someone tries to start the engine with-
out the registered Intelligent Key.
* Immobilizer
If you failed to start the engine using the NATS Intel-
NSD262
Starting and driving5-9
Page 134 of 235
ligent Key, turn the ignition knob to the LOCK posi-
tion, wait for 5 seconds and turn the knob to the
START position again to start the engine.
For additional information, see “Security system” in
the “3. Pre-driving checks and adjustments” sec-
tion.1. Apply the handbrake.
2.Manual transmission models:
Move the gear lever to N (Neutral) position, and
depress the clutch pedal to the floor while start-
ing the engine.
Automatic transmission models:
Depress the brake pedal and move the selector
lever to the P (Park) or N (Neutral) position. (P
position is preferred).
NOTE
The starter is designed not to operate if the
selector lever is out of the P (Park) or N (Neu-
tral) position.
3. Models without Intelligent Key:
Rotate the steering wheel left to right to release
the ignition lock whilst turning the ignition switch
to the ON position.
Models with Intelligent key:
•MT models – keep the clutch pedal
depressed and/or depress the brake pedal
then:
•AT – depress the brake pedal then:
1) Push the ignition knob.
2) Rotate the steering wheel left to right to
release the ignition lock whilst turning the
ignition knob to the ON position.CAUTION
•Make sure you carry the Intelligent Key with
you when operating the vehicle.
•If the Intelligent Key is too far away from
the driver, the vehicle may not start.
4. For diesel engine models: Wait until the glow
indicator light
goes out.
5. Start the engine with your foot on the brake pedal,
not on the accelerator pedal, by turning the
ignition switch to START.
6. Release the ignition switch when the engine
starts. If the engine starts, but fails to run, repeat
the above procedure.
For petrol engine models:
•If the engine is very hard to start for example
in extremely cold or hot weather, or when
restarting, Proceed as follows:
a. Depress the accelerator pedal a little (ap-
proximately 1/3 to the floor) and hold it
and then start the engine.
b. Release the ignition switch and the accel-
erator pedal when the engine starts.
•If the engine is very hard to start because it is
flooded. Proceed as follows:
a. Depress the accelerator pedal all the way
to the floor and hold it.
b. Start the engine for 5-6 seconds and stop.
After starting the engine, release the ac-
celerator pedal.
STARTING THE ENGINE
5-10Starting and driving
Page 138 of 235
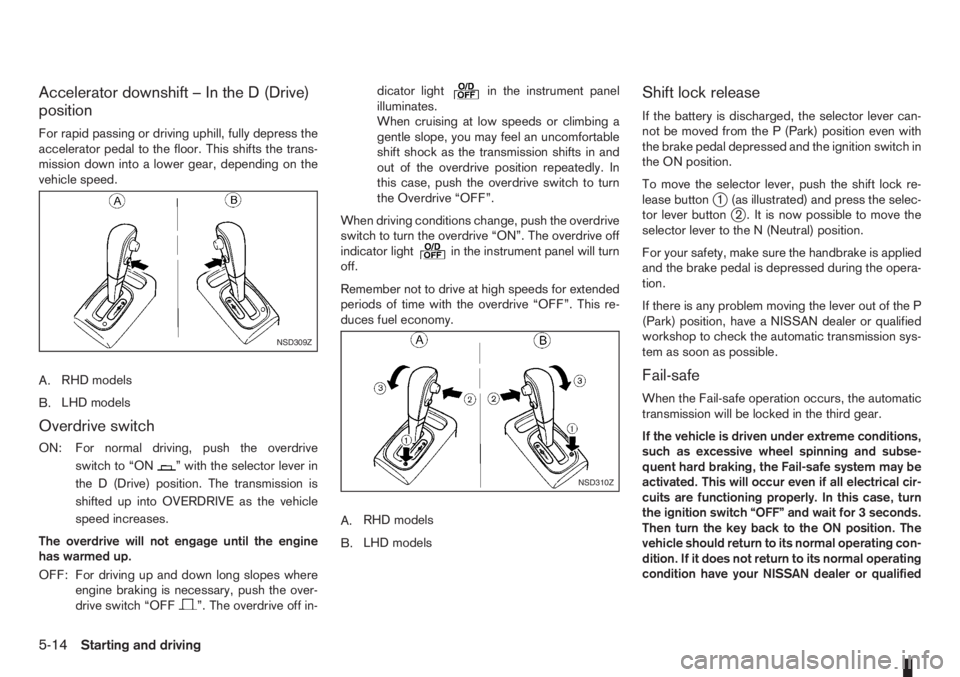
Accelerator downshift – In the D (Drive)
position
For rapid passing or driving uphill, fully depress the
accelerator pedal to the floor. This shifts the trans-
mission down into a lower gear, depending on the
vehicle speed.
A.RHD models
B.LHD models
Overdrive switch
ON: For normal driving, push the overdrive
switchto“ON
” with the selector lever in
the D (Drive) position. The transmission is
shifted up into OVERDRIVE as the vehicle
speed increases.
The overdrive will not engage until the engine
has warmed up.
OFF: For driving up and down long slopes where
engine braking is necessary, push the over-
drive switch “OFF
”. The overdrive off in-dicator light
in the instrument panel
illuminates.
When cruising at low speeds or climbing a
gentle slope, you may feel an uncomfortable
shift shock as the transmission shifts in and
out of the overdrive position repeatedly. In
this case, push the overdrive switch to turn
the Overdrive “OFF”.
When driving conditions change, push the overdrive
switch to turn the overdrive “ON”. The overdrive off
indicator light
in the instrument panel will turn
off.
Remember not to drive at high speeds for extended
periods of time with the overdrive “OFF”. This re-
duces fuel economy.
A.RHD models
B.LHD models
Shift lock release
If the battery is discharged, the selector lever can-
not be moved from the P (Park) position even with
the brake pedal depressed and the ignition switch in
the ON position.
To move the selector lever, push the shift lock re-
lease button
j1 (as illustrated) and press the selec-
tor lever buttonj2 . It is now possible to move the
selector lever to the N (Neutral) position.
For your safety, make sure the handbrake is applied
and the brake pedal is depressed during the opera-
tion.
If there is any problem moving the lever out of the P
(Park) position, have a NISSAN dealer or qualified
workshop to check the automatic transmission sys-
tem as soon as possible.
Fail-safe
When the Fail-safe operation occurs, the automatic
transmission will be locked in the third gear.
If the vehicle is driven under extreme conditions,
such as excessive wheel spinning and subse-
quent hard braking, the Fail-safe system may be
activated. This will occur even if all electrical cir-
cuits are functioning properly. In this case, turn
the ignition switch “OFF” and wait for 3 seconds.
Then turn the key back to the ON position. The
vehicle should return to its normal operating con-
dition. If it does not return to its normal operating
condition have your NISSAN dealer or qualified
NSD309Z
NSD310Z
5-14Starting and driving