REF NISSAN NOTE 2012 Owners Manual
[x] Cancel search | Manufacturer: NISSAN, Model Year: 2012, Model line: NOTE, Model: NISSAN NOTE 2012Pages: 235, PDF Size: 2.29 MB
Page 2 of 235
Foreword
Welcome to the growing family of new NISSAN owners. This vehicle has been delivered to you with confidence. It has been produced using the latest techniques
and strict quality control.
This manual was prepared to help you understand the operation and maintenance of your vehicle so that you may enjoy many kilometres (miles) of driving pleasure.
Please read through this manual before operating your vehicle.
A separate Warranty Information & Maintenance Booklet explains in detail the warranty coverage that applies to your vehicle.
Your NISSAN dealer knows your vehicle best. When you require any service or have any questions, your NISSAN dealer will be glad to assist you with the extensive
resources available for you.
IMPORTANT SAFETY INFORMATION
REMINDERS FOR SAFETY!
Follow these important driving rules to help ensure a safe and complete trip for
you and your passengers!
•NEVER drive under the influence of alcohol or drugs.
•ALWAYS observe posted speed limits and never drive too fast for condi-
tions.
•ALWAYS use your seat belts and appropriate child restraint systems.
Preteen children should be seated in the rear seat.
•ALWAYS provide information about the proper use of vehicle safety fea-
tures to all occupants of the vehicle.
•ALWAYS review this Owner’s Manual for important safety information.
WHEN READING THE MANUAL
This manual includes information for all options available on this model. There-
fore, you may find some information that does not apply to your vehicle.
All information, specifications and illustrations in this manual are those in effect
at the time of printing. NISSAN reserves the right to change specifications or
designs at any time without notice and without obligation.
MODIFICATION OF YOUR VEHICLE
This vehicle should not be modified. Modifications could affect its performance,
safety or durability, and may even violate governmental regulations. In addition,
damage or performance problems resulting from modifications may not be cov-
ered under NISSAN warranties.
READ FIRST — THEN DRIVE SAFELY
Before driving your vehicle, read this Owner’s Manual carefully. This will ensure
familiarity with controls and maintenance requirements, assisting you in the safe
operation of your vehicle.
Throughout this manual the following symbols and words are used:
WARNING
Indicates the presence of a hazard that could cause death or serious per-
sonal injury. To avoid or reduce the risk, the procedures described must be
followed precisely.
CAUTION
Indicates the presence of a hazard that could cause minor or moderate per-
sonal injury, or damage to your vehicle. To avoid or reduce the risk, the pro-
cedures described must be followed carefully.
NOTE
Indicates additional helpful information.
Page 11 of 235
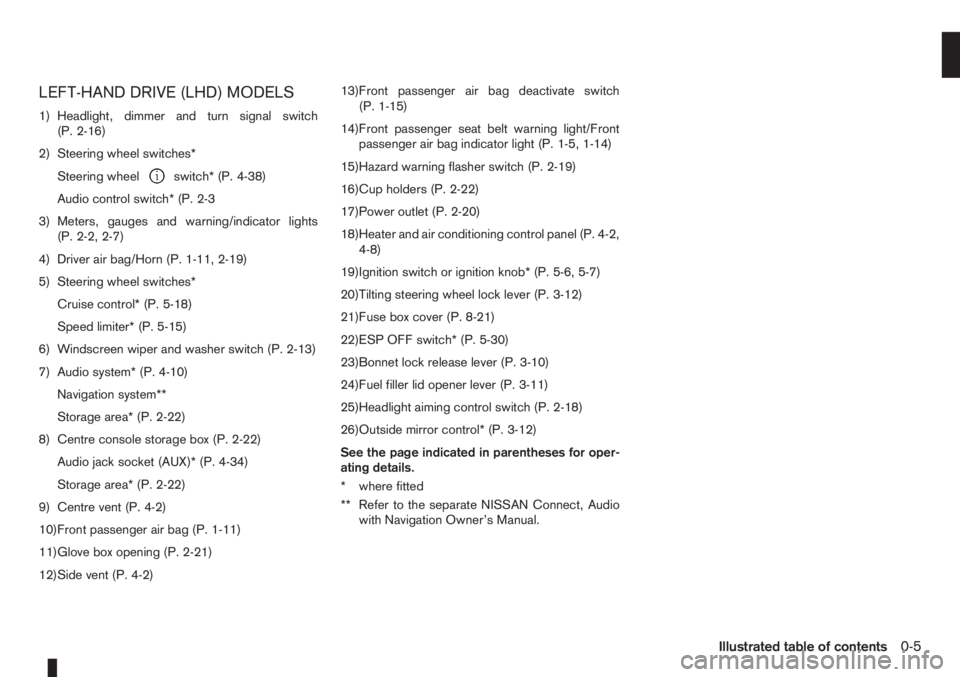
LEFT-HAND DRIVE (LHD) MODELS
1) Headlight, dimmer and turn signal switch
(P. 2-16)
2) Steering wheel switches*
Steering wheel
switch* (P. 4-38)
Audio control switch* (P. 2-3
3) Meters, gauges and warning/indicator lights
(P. 2-2, 2-7)
4) Driver air bag/Horn (P. 1-11, 2-19)
5) Steering wheel switches*
Cruise control* (P. 5-18)
Speed limiter* (P. 5-15)
6) Windscreen wiper and washer switch (P. 2-13)
7) Audio system* (P. 4-10)
Navigation system**
Storage area* (P. 2-22)
8) Centre console storage box (P. 2-22)
Audio jack socket (AUX)* (P. 4-34)
Storage area* (P. 2-22)
9) Centre vent (P. 4-2)
10)Front passenger air bag (P. 1-11)
11)Glove box opening (P. 2-21)
12)Side vent (P. 4-2)13)Front passenger air bag deactivate switch
(P. 1-15)
14)Front passenger seat belt warning light/Front
passenger air bag indicator light (P. 1-5, 1-14)
15)Hazard warning flasher switch (P. 2-19)
16)Cup holders (P. 2-22)
17)Power outlet (P. 2-20)
18)Heater and air conditioning control panel (P. 4-2,
4-8)
19)Ignition switch or ignition knob* (P. 5-6, 5-7)
20)Tilting steering wheel lock lever (P. 3-12)
21)Fuse box cover (P. 8-21)
22)ESP OFF switch* (P. 5-30)
23)Bonnet lock release lever (P. 3-10)
24)Fuel filler lid opener lever (P. 3-11)
25)Headlight aiming control switch (P. 2-18)
26)Outside mirror control* (P. 3-12)
See the page indicated in parentheses for oper-
ating details.
* where fitted
** Refer to the separate NISSAN Connect, Audio
with Navigation Owner’s Manual.
Illustrated table of contents0-5
Page 13 of 235
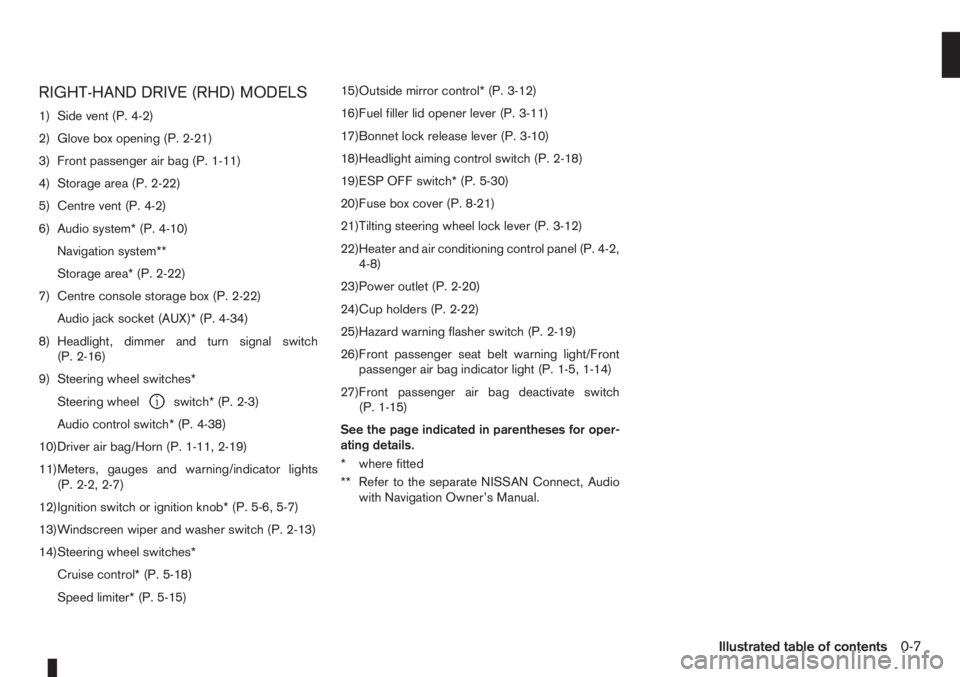
RIGHT-HAND DRIVE (RHD) MODELS
1) Side vent (P. 4-2)
2) Glove box opening (P. 2-21)
3) Front passenger air bag (P. 1-11)
4) Storage area (P. 2-22)
5) Centre vent (P. 4-2)
6) Audio system* (P. 4-10)
Navigation system**
Storage area* (P. 2-22)
7) Centre console storage box (P. 2-22)
Audio jack socket (AUX)* (P. 4-34)
8) Headlight, dimmer and turn signal switch
(P. 2-16)
9) Steering wheel switches*
Steering wheel
switch* (P. 2-3)
Audio control switch* (P. 4-38)
10)Driver air bag/Horn (P. 1-11, 2-19)
11)Meters, gauges and warning/indicator lights
(P. 2-2, 2-7)
12)Ignition switch or ignition knob* (P. 5-6, 5-7)
13)Windscreen wiper and washer switch (P. 2-13)
14)Steering wheel switches*
Cruise control* (P. 5-18)
Speed limiter* (P. 5-15)15)Outside mirror control* (P. 3-12)
16)Fuel filler lid opener lever (P. 3-11)
17)Bonnet lock release lever (P. 3-10)
18)Headlight aiming control switch (P. 2-18)
19)ESP OFF switch* (P. 5-30)
20)Fuse box cover (P. 8-21)
21)Tilting steering wheel lock lever (P. 3-12)
22)Heater and air conditioning control panel (P. 4-2,
4-8)
23)Power outlet (P. 2-20)
24)Cup holders (P. 2-22)
25)Hazard warning flasher switch (P. 2-19)
26)Front passenger seat belt warning light/Front
passenger air bag indicator light (P. 1-5, 1-14)
27)Front passenger air bag deactivate switch
(P. 1-15)
See the page indicated in parentheses for oper-
ating details.
* where fitted
** Refer to the separate NISSAN Connect, Audio
with Navigation Owner’s Manual.
Illustrated table of contents0-7
Page 29 of 235
WARNING
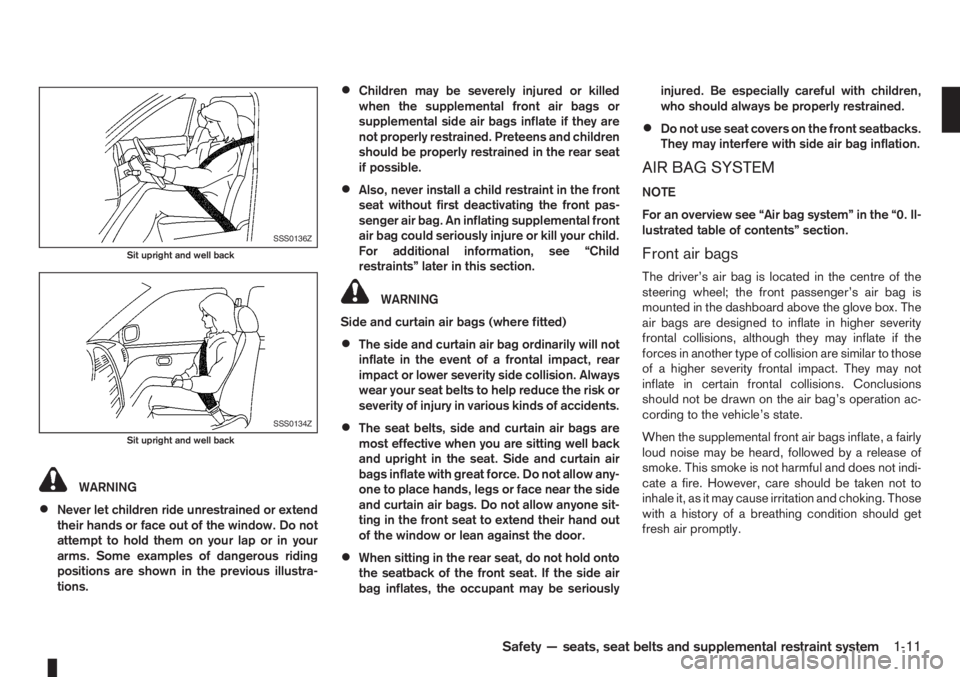
•Never let children ride unrestrained or extend
their hands or face out of the window. Do not
attempt to hold them on your lap or in your
arms. Some examples of dangerous riding
positions are shown in the previous illustra-
tions.
•Children may be severely injured or killed
when the supplemental front air bags or
supplemental side air bags inflate if they are
not properly restrained. Preteens and children
should be properly restrained in the rear seat
if possible.
•Also, never install a child restraint in the front
seat without first deactivating the front pas-
senger air bag. An inflating supplemental front
air bag could seriously injure or kill your child.
For additional information, see “Child
restraints” later in this section.
WARNING
Side and curtain air bags (where fitted)
•The side and curtain air bag ordinarily will not
inflate in the event of a frontal impact, rear
impact or lower severity side collision. Always
wear your seat belts to help reduce the risk or
severity of injury in various kinds of accidents.
•The seat belts, side and curtain air bags are
most effective when you are sitting well back
and upright in the seat. Side and curtain air
bags inflate with great force. Do not allow any-
one to place hands, legs or face near the side
and curtain air bags. Do not allow anyone sit-
ting in the front seat to extend their hand out
of the window or lean against the door.
•When sitting in the rear seat, do not hold onto
the seatback of the front seat. If the side air
bag inflates, the occupant may be seriouslyinjured. Be especially careful with children,
who should always be properly restrained.
•Do not use seat covers on the front seatbacks.
They may interfere with side air bag inflation.
AIR BAG SYSTEM
NOTE
For an overview see “Air bag system” in the “0. Il-
lustrated table of contents” section.
Front air bags
The driver’s air bag is located in the centre of the
steering wheel; the front passenger’s air bag is
mounted in the dashboard above the glove box. The
air bags are designed to inflate in higher severity
frontal collisions, although they may inflate if the
forces in another type of collision are similar to those
of a higher severity frontal impact. They may not
inflate in certain frontal collisions. Conclusions
should not be drawn on the air bag’s operation ac-
cording to the vehicle’s state.
When the supplemental front air bags inflate, a fairly
loud noise may be heard, followed by a release of
smoke. This smoke is not harmful and does not indi-
cate a fire. However, care should be taken not to
inhale it, as it may cause irritation and choking. Those
with a history of a breathing condition should get
fresh air promptly.
SSS0136Z
Sit upright and well back
SSS0134Z
Sit upright and well back
Safety — seats, seat belts and supplemental restraint system1-11
Page 31 of 235
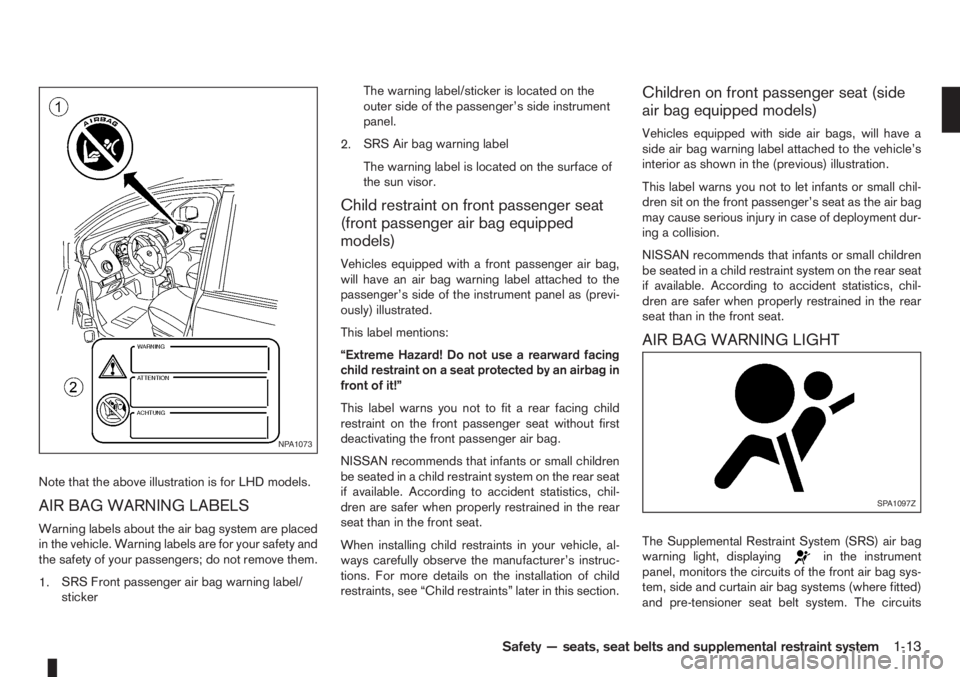
Note that the above illustration is for LHD models.
AIR BAG WARNING LABELS
Warning labels about the air bag system are placed
in the vehicle. Warning labels are for your safety and
the safety of your passengers; do not remove them.
1.SRS Front passenger air bag warning label/
stickerThe warning label/sticker is located on the
outer side of the passenger’s side instrument
panel.
2.SRS Air bag warning label
The warning label is located on the surface of
the sun visor.
Child restraint on front passenger seat
(front passenger air bag equipped
models)
Vehicles equipped with a front passenger air bag,
will have an air bag warning label attached to the
passenger’s side of the instrument panel as (previ-
ously) illustrated.
This label mentions:
“Extreme Hazard! Do not use a rearward facing
child restraint on a seat protected by an airbag in
front of it!”
This label warns you not to fit a rear facing child
restraint on the front passenger seat without first
deactivating the front passenger air bag.
NISSAN recommends that infants or small children
be seated in a child restraint system on the rear seat
if available. According to accident statistics, chil-
dren are safer when properly restrained in the rear
seat than in the front seat.
When installing child restraints in your vehicle, al-
ways carefully observe the manufacturer’s instruc-
tions. For more details on the installation of child
restraints, see “Child restraints” later in this section.
Children on front passenger seat (side
air bag equipped models)
Vehicles equipped with side air bags, will have a
side air bag warning label attached to the vehicle’s
interior as shown in the (previous) illustration.
This label warns you not to let infants or small chil-
dren sit on the front passenger’s seat as the air bag
may cause serious injury in case of deployment dur-
ing a collision.
NISSAN recommends that infants or small children
be seated in a child restraint system on the rear seat
if available. According to accident statistics, chil-
dren are safer when properly restrained in the rear
seat than in the front seat.
AIR BAG WARNING LIGHT
The Supplemental Restraint System (SRS) air bag
warning light, displayingin the instrument
panel, monitors the circuits of the front air bag sys-
tem, side and curtain air bag systems (where fitted)
and pre-tensioner seat belt system. The circuits
NPA1073
SPA1097Z
Safety — seats, seat belts and supplemental restraint system1-13
Page 34 of 235
3. Turn the ignition switch to the ON position and
make sure the front passenger air bag indicator
light
illuminates for a few seconds and then
turns off.
WARNING
If any of the following conditions occur after the
ignition switch has been turned to the ON posi-
tion, the front passenger air bag system needs
servicing and your vehicle must be taken to the
nearest NISSAN dealer or qualified workshop.
•The front passenger air bag indicator light
comes on and remains illuminated after ap-
proximately 7 seconds while the front pas-
senger air bag switch is ON.
•The front passenger air bag indicator light
does not come on at all while the front pas-
senger air bag switch is ON.
Unless checked and repaired, the front passenger
air bag system may not function properly.
PRECAUTIONS ON CHILD
RESTRAINT USAGE
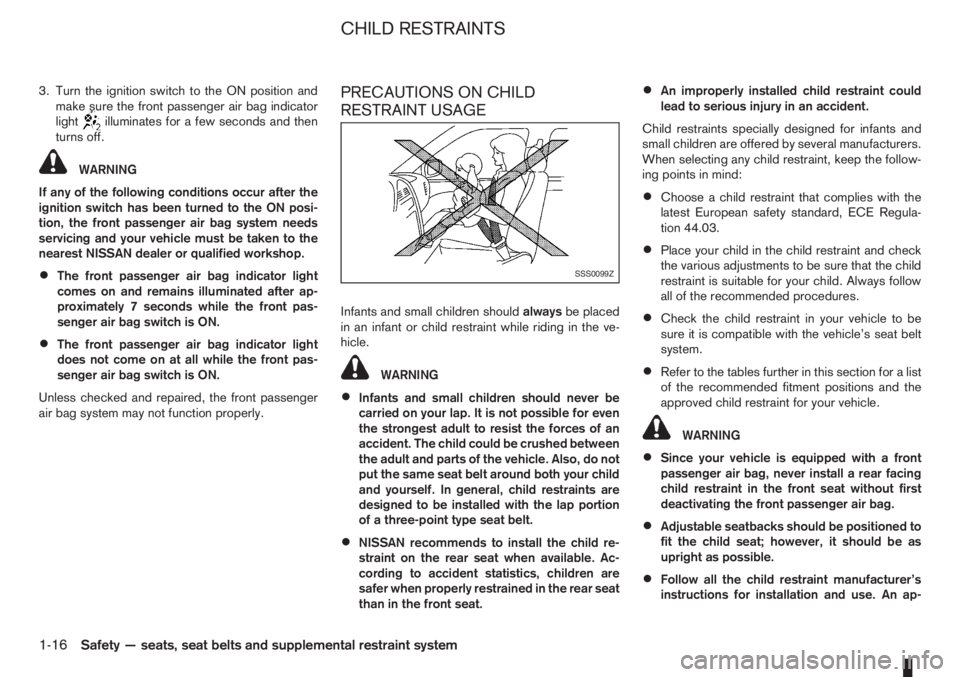
Infants and small children shouldalwaysbe placed
in an infant or child restraint while riding in the ve-
hicle.
WARNING
•Infants and small children should never be
carried on your lap. It is not possible for even
the strongest adult to resist the forces of an
accident. The child could be crushed between
the adult and parts of the vehicle. Also, do not
put the same seat belt around both your child
and yourself. In general, child restraints are
designed to be installed with the lap portion
of a three-point type seat belt.
•NISSAN recommends to install the child re-
straint on the rear seat when available. Ac-
cording to accident statistics, children are
safer when properly restrained in the rear seat
than in the front seat.
•An improperly installed child restraint could
lead to serious injury in an accident.
Child restraints specially designed for infants and
small children are offered by several manufacturers.
When selecting any child restraint, keep the follow-
ing points in mind:
•Choose a child restraint that complies with the
latest European safety standard, ECE Regula-
tion 44.03.
•Place your child in the child restraint and check
the various adjustments to be sure that the child
restraint is suitable for your child. Always follow
all of the recommended procedures.
•Check the child restraint in your vehicle to be
sure it is compatible with the vehicle’s seat belt
system.
•Refer to the tables further in this section for a list
of the recommended fitment positions and the
approved child restraint for your vehicle.
WARNING
•Since your vehicle is equipped with a front
passenger air bag, never install a rear facing
child restraint in the front seat without first
deactivating the front passenger air bag.
•Adjustable seatbacks should be positioned to
fit the child seat; however, it should be as
upright as possible.
•Follow all the child restraint manufacturer’s
instructions for installation and use. An ap-
SSS0099Z
CHILD RESTRAINTS
1-16Safety — seats, seat belts and supplemental restraint system
Page 36 of 235
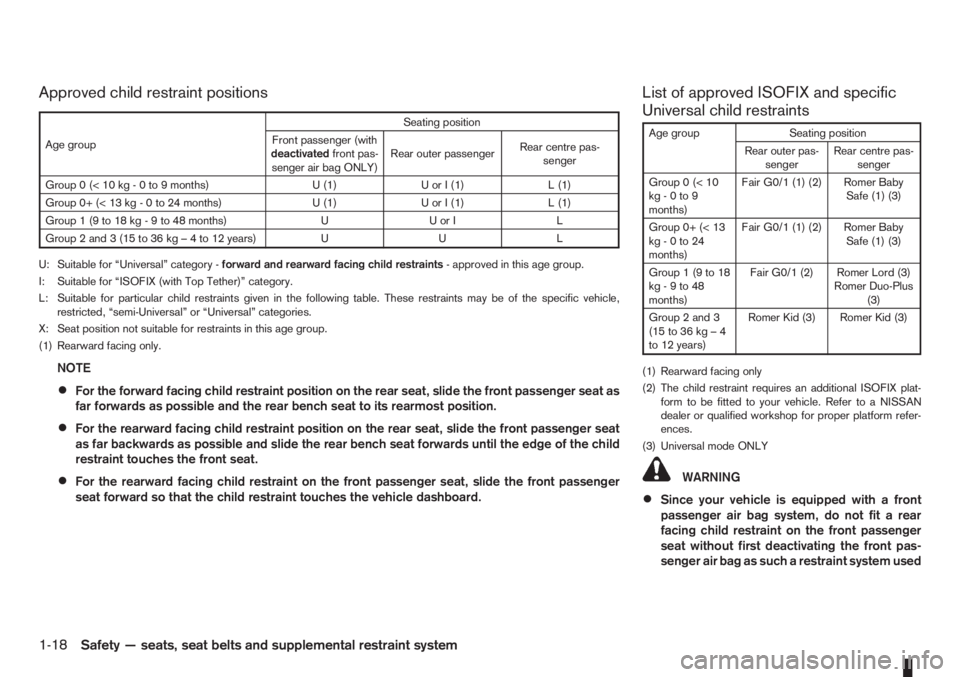
Approved child restraint positions List of approved ISOFIX and specific
Universal child restraints
Age group Seating position
Rear outer pas-
sengerRear centre pas-
senger
Group0(<10
kg - 0 to 9
months)Fair G0/1 (1) (2) Romer Baby
Safe (1) (3)
Group 0+ (< 13
kg - 0 to 24
months)Fair G0/1 (1) (2) Romer Baby
Safe (1) (3)
Group1(9to18
kg - 9 to 48
months)Fair G0/1 (2) Romer Lord (3)
Romer Duo-Plus
(3)
Group 2 and 3
(15to36kg–4
to 12 years)Romer Kid (3) Romer Kid (3)
(1) Rearward facing only
(2) The child restraint requires an additional ISOFIX plat-
form to be fitted to your vehicle. Refer to a NISSAN
dealer or qualified workshop for proper platform refer-
ences.
(3) Universal mode ONLY
WARNING
•Since your vehicle is equipped with a front
passenger air bag system, do not fit a rear
facing child restraint on the front passenger
seat without first deactivating the front pas-
senger air bag as such a restraint system used
Age groupSeating position
Front passenger (with
deactivatedfront pas-
senger air bag ONLY)Rear outer passengerRear centre pas-
senger
Group 0 (< 10 kg - 0 to 9 months) U (1) U or I (1) L (1)
Group 0+ (< 13 kg - 0 to 24 months) U (1) U or I (1) L (1)
Group 1 (9 to 18 kg - 9 to 48 months) U U or I L
Group2and3(15to36kg–4to12years) U U L
U: Suitable for “Universal” category -forward and rearward facing child restraints- approved in this age group.
I: Suitable for “ISOFIX (with Top Tether)” category.
L: Suitable for particular child restraints given in the following table. These restraints may be of the specific vehicle,
restricted, “semi-Universal” or “Universal” categories.
X: Seat position not suitable for restraints in this age group.
(1) Rearward facing only.
NOTE
•For the forward facing child restraint position on the rear seat, slide the front passenger seat as
far forwards as possible and the rear bench seat to its rearmost position.
•For the rearward facing child restraint position on the rear seat, slide the front passenger seat
as far backwards as possible and slide the rear bench seat forwards until the edge of the child
restraint touches the front seat.
•For the rearward facing child restraint on the front passenger seat, slide the front passenger
seat forward so that the child restraint touches the vehicle dashboard.
1-18Safety — seats, seat belts and supplemental restraint system
Page 41 of 235
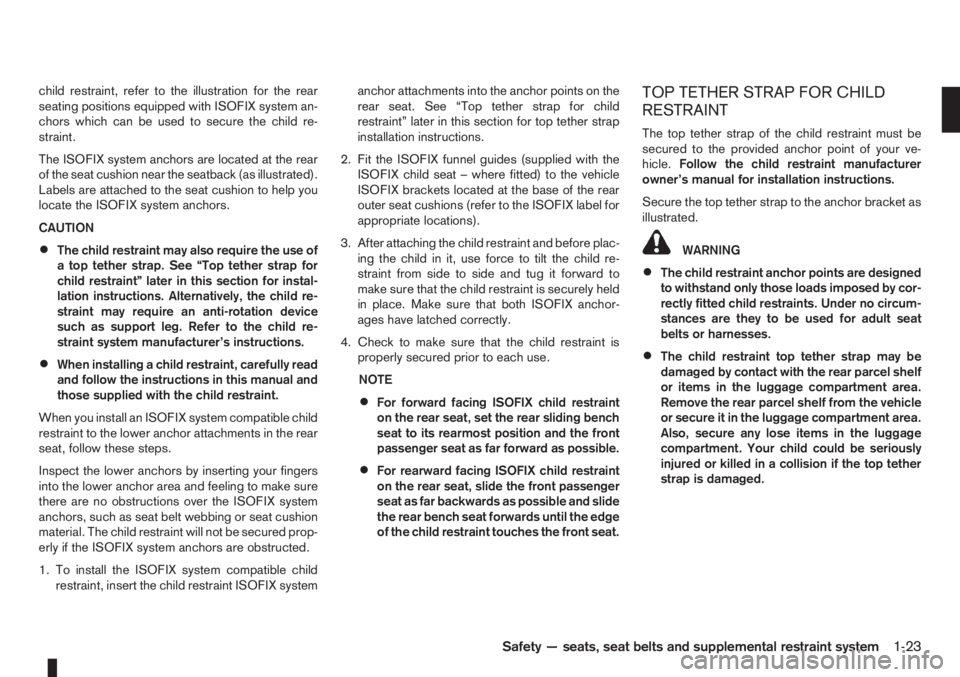
child restraint, refer to the illustration for the rear
seating positions equipped with ISOFIX system an-
chors which can be used to secure the child re-
straint.
The ISOFIX system anchors are located at the rear
of the seat cushion near the seatback (as illustrated).
Labels are attached to the seat cushion to help you
locate the ISOFIX system anchors.
CAUTION
•The child restraint may also require the use of
a top tether strap. See “Top tether strap for
child restraint” later in this section for instal-
lation instructions. Alternatively, the child re-
straint may require an anti-rotation device
such as support leg. Refer to the child re-
straint system manufacturer’s instructions.
•When installing a child restraint, carefully read
and follow the instructions in this manual and
those supplied with the child restraint.
When you install an ISOFIX system compatible child
restraint to the lower anchor attachments in the rear
seat, follow these steps.
Inspect the lower anchors by inserting your fingers
into the lower anchor area and feeling to make sure
there are no obstructions over the ISOFIX system
anchors, such as seat belt webbing or seat cushion
material. The child restraint will not be secured prop-
erly if the ISOFIX system anchors are obstructed.
1. To install the ISOFIX system compatible child
restraint, insert the child restraint ISOFIX systemanchor attachments into the anchor points on the
rear seat. See “Top tether strap for child
restraint” later in this section for top tether strap
installation instructions.
2. Fit the ISOFIX funnel guides (supplied with the
ISOFIX child seat – where fitted) to the vehicle
ISOFIX brackets located at the base of the rear
outer seat cushions (refer to the ISOFIX label for
appropriate locations).
3. After attaching the child restraint and before plac-
ing the child in it, use force to tilt the child re-
straint from side to side and tug it forward to
make sure that the child restraint is securely held
in place. Make sure that both ISOFIX anchor-
ages have latched correctly.
4. Check to make sure that the child restraint is
properly secured prior to each use.
NOTE
•For forward facing ISOFIX child restraint
on the rear seat, set the rear sliding bench
seat to its rearmost position and the front
passenger seat as far forward as possible.
•For rearward facing ISOFIX child restraint
on the rear seat, slide the front passenger
seat as far backwards as possible and slide
the rear bench seat forwards until the edge
of the child restraint touches the front seat.
TOP TETHER STRAP FOR CHILD
RESTRAINT
The top tether strap of the child restraint must be
secured to the provided anchor point of your ve-
hicle.Follow the child restraint manufacturer
owner’s manual for installation instructions.
Secure the top tether strap to the anchor bracket as
illustrated.
WARNING
•The child restraint anchor points are designed
to withstand only those loads imposed by cor-
rectly fitted child restraints. Under no circum-
stances are they to be used for adult seat
belts or harnesses.
•The child restraint top tether strap may be
damaged by contact with the rear parcel shelf
or items in the luggage compartment area.
Remove the rear parcel shelf from the vehicle
or secure it in the luggage compartment area.
Also, secure any lose items in the luggage
compartment. Your child could be seriously
injured or killed in a collision if the top tether
strap is damaged.
Safety — seats, seat belts and supplemental restraint system1-23
Page 42 of 235
Anchor point locations
Anchor points are located at the base of the rear
back seat (luggage compartment side).
WARNING
•Refer to the child restraint manufacturer own-
er’s manual for proper installation of the child
restraint’s top tether on the rear bench seat.
If in doubt, consult a NISSAN dealer or quali-
fied workshop.
•Only two anchor points identified by the top
tether labels can be used for top tether strap
anchorage. Under no circumstances should
the luggage hooks be used for top tether strap
anchorage.
CAUTION
If you have any questions when installing a top
tether strap child restraint on the rear seat, con-
sult a NISSAN dealer or qualified workshop for
details.
1-24Safety — seats, seat belts and supplemental restraint system
Page 44 of 235
For an overview of the instruments of the instru-
ments and controls, see “Instrument and control
layout” in the “0. Illustrated table of contents” sec-
tion.
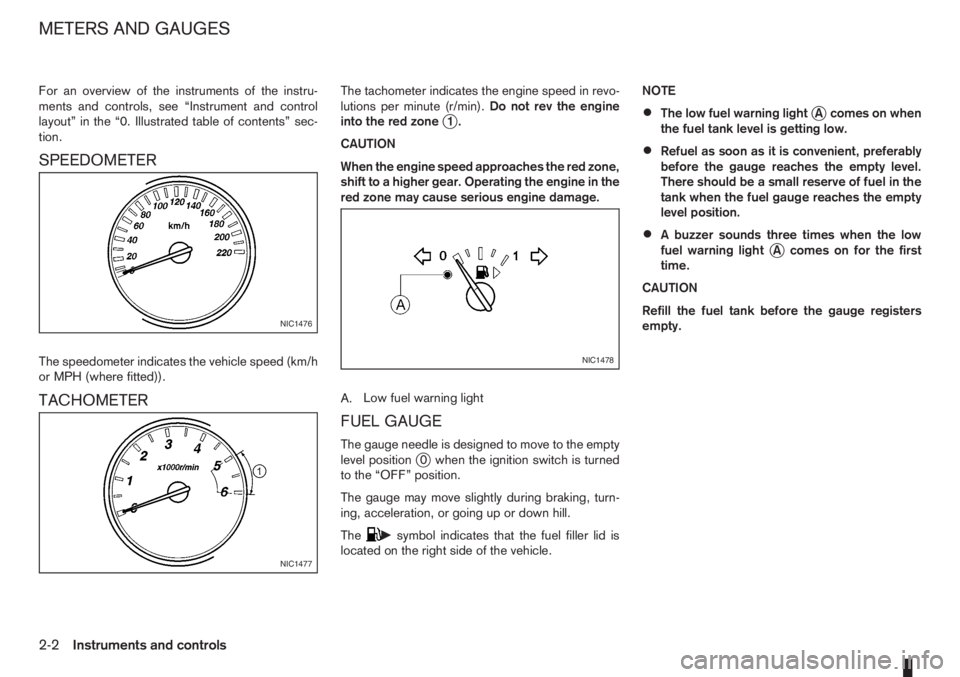
SPEEDOMETER
The speedometer indicates the vehicle speed (km/h
or MPH (where fitted)).
TACHOMETER
The tachometer indicates the engine speed in revo-
lutions per minute (r/min).Do not rev the engine
into the red zone
j1.
CAUTION
When the engine speed approaches the red zone,
shift to a higher gear. Operating the engine in the
red zone may cause serious engine damage.
A.Low fuel warning light
FUEL GAUGE
The gauge needle is designed to move to the empty
level positionj0 when the ignition switch is turned
to the “OFF” position.
The gauge may move slightly during braking, turn-
ing, acceleration, or going up or down hill.
The
csymbol indicates that the fuel filler lid is
located on the right side of the vehicle.NOTE
•The low fuel warning lightjA comes on when
the fuel tank level is getting low.
•Refuel as soon as it is convenient, preferably
before the gauge reaches the empty level.
There should be a small reserve of fuel in the
tank when the fuel gauge reaches the empty
level position.
•A buzzer sounds three times when the low
fuel warning lightjA comes on for the first
time.
CAUTION
Refill the fuel tank before the gauge registers
empty.
NIC1476
NIC1477
NIC1478
METERS AND GAUGES
2-2Instruments and controls