belt NISSAN NV200 2021 Service Manual
[x] Cancel search | Manufacturer: NISSAN, Model Year: 2021, Model line: NV200, Model: NISSAN NV200 2021Pages: 300, PDF Size: 1.9 MB
Page 78 of 300
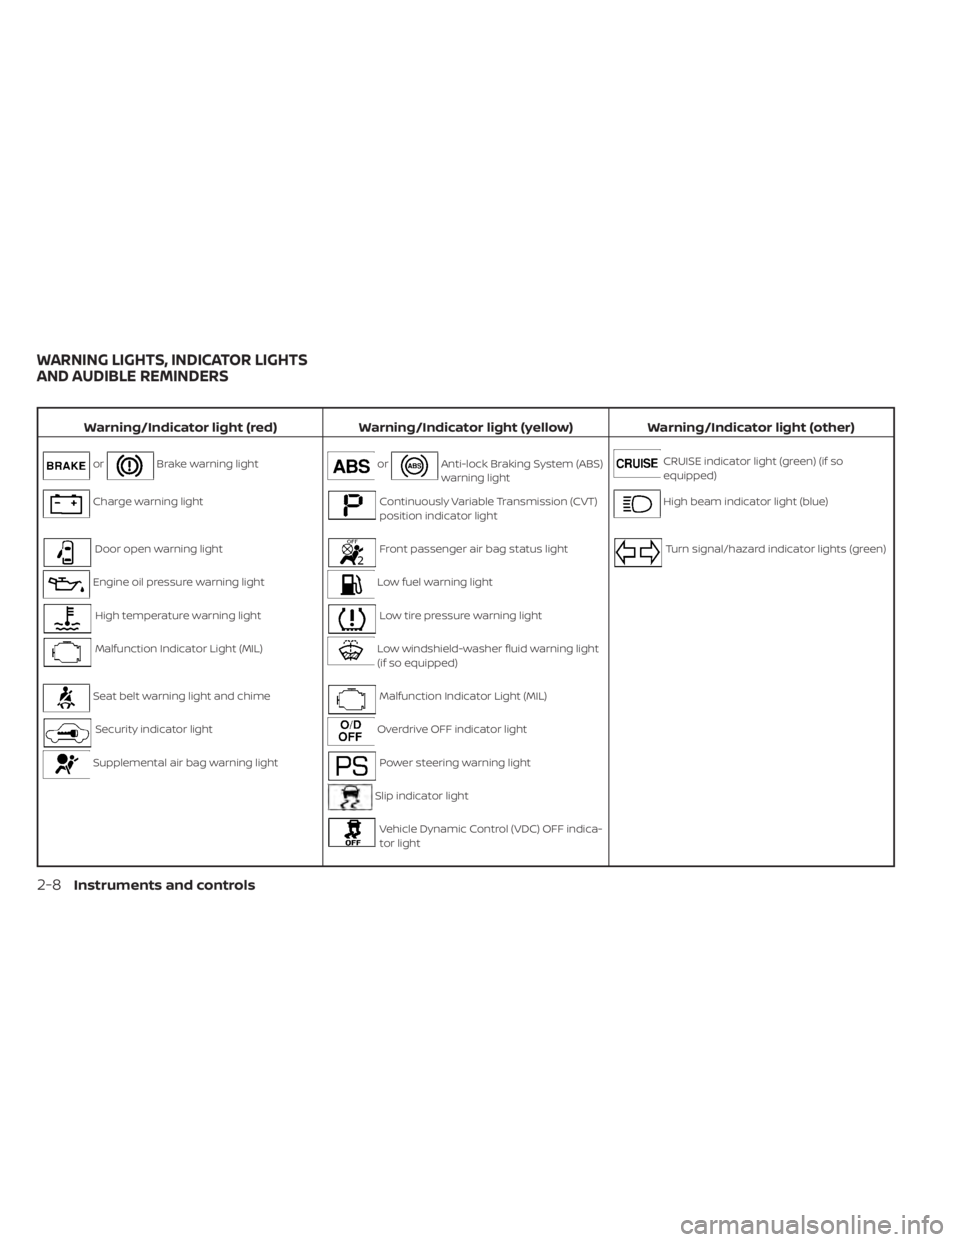
Brake warning lightorAnti-lock Braking System (ABS)
warning lightCRUISE indicator light (green) (if so
equipped)
Charge warning lightContinuously Variable Transmission (CVT)
position indicator lightHigh beam indicator light (blue)
Door open warning lightFront passenger air bag status lightTurn signal/hazard indicator lights (green)
Engine oil pressure warning lightLow fuel warning light
High temperature warning lightLow tire pressure warning light
Malfunction Indicator Light (MIL)Low windshield-washer fluid warning light
(if so equipped)
Seat belt warning light and chimeMalfunction Indicator Light (MIL)
Security indicator lightOverdrive OFF indicator light
Supplemental air bag warning lightPower steering warning light
Slip indicator light
Vehicle Dynamic Control (VDC) OFF indica-
tor light
WARNING LIGHTS, INDICATOR LIGHTS
AND AUDIBLE REMINDERS
2-8Instruments and controls
Page 79 of 300
CHECKING LIGHTS
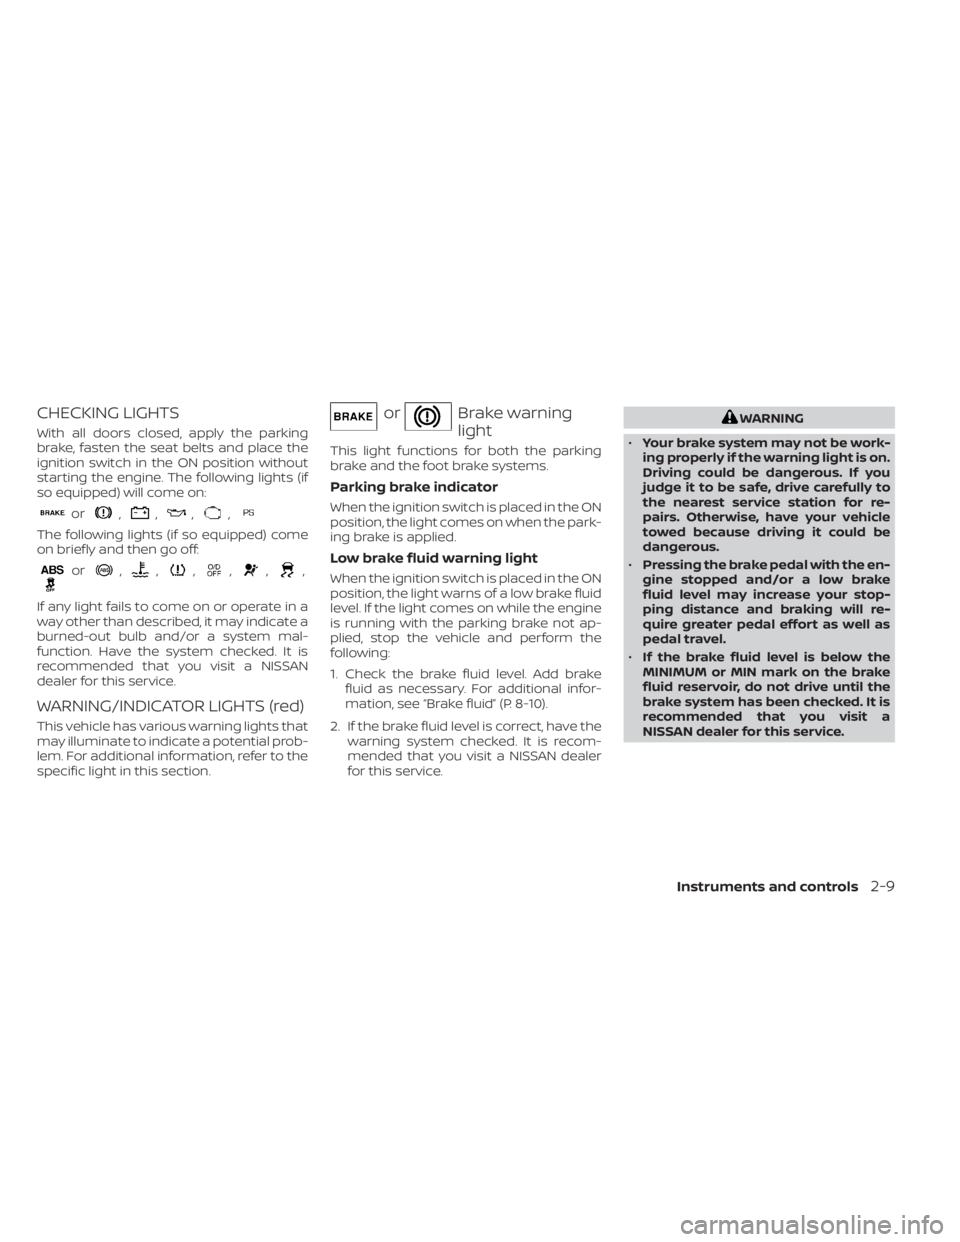
With all doors closed, apply the parking
brake, fasten the seat belts and place the
ignition switch in the ON position without
starting the engine. The following lights (if
so equipped) will come on:
or,,,,
The following lights (if so equipped) come
on briefly and then go off:
or,,,,,,
If any light fails to come on or operate in a
way other than described, it may indicate a
burned-out bulb and/or a system mal-
function. Have the system checked. It is
recommended that you visit a NISSAN
dealer for this service.
WARNING/INDICATOR LIGHTS (red)
This vehicle has various warning lights that
may illuminate to indicate a potential prob-
lem. For additional information, refer to the
specific light in this section.
orBrake warning
light
This light functions for both the parking
brake and the foot brake systems.
Parking brake indicator
When the ignition switch is placed in the ON
position, the light comes on when the park-
ing brake is applied.
Low brake fluid warning light
When the ignition switch is placed in the ON
position, the light warns of a low brake fluid
level. If the light comes on while the engine
is running with the parking brake not ap-
plied, stop the vehicle and perform the
following:
1. Check the brake fluid level. Add brakefluid as necessary. For additional infor-
mation, see “Brake fluid” (P. 8-10).
2. If the brake fluid level is correct, have the warning system checked. It is recom-
mended that you visit a NISSAN dealer
for this service.
Page 80 of 300
Charge warning light
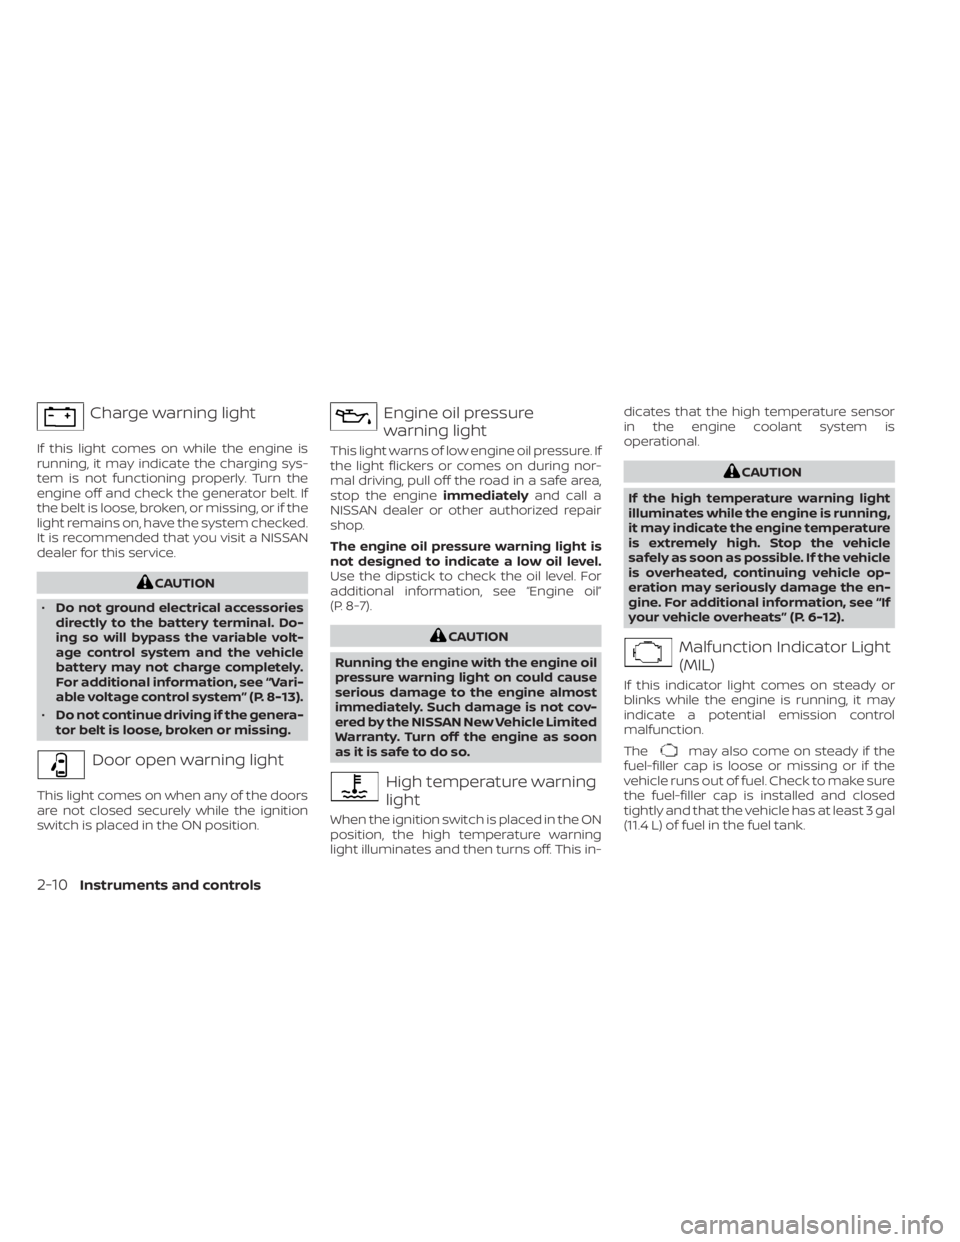
If this light comes on while the engine is
running, it may indicate the charging sys-
tem is not functioning properly. Turn the
engine off and check the generator belt. If
the belt is loose, broken, or missing, or if the
light remains on, have the system checked.
It is recommended that you visit a NISSAN
dealer for this service.
Engine oil pressure
warning light
This light warns of low engine oil pressure. If
the light flickers or comes on during nor-
mal driving, pull off the road in a safe area,
stop the engineimmediatelyand call a
NISSAN dealer or other authorized repair
shop.
The engine oil pressure warning light is
not designed to indicate a low oil level.
Use the dipstick to check the oil level. For
additional information, see “Engine oil”
(P. 8-7).
may also come on steady if the
fuel-filler cap is loose or missing or if the
vehicle runs out of fuel. Check to make sure
the fuel-filler cap is installed and closed
tightly and that the vehicle has at least 3 gal
(11.4 L) of fuel in the fuel tank.
2-10Instruments and controls
Page 81 of 300
Af ter a few driving trips, thelight
should turn off if no other potential emis-
sion control system malfunction exists.
If this indicator light comes on steady for 20
seconds and then blinks for 10 seconds
when the engine is not running, it indicates
that the vehicle is not ready for an emission
control system inspection/maintenance
test. For additional information, see “Readi-
ness for Inspection/Maintenance (I/M) test”
(P. 10-22).
Seat belt warning light and
chime
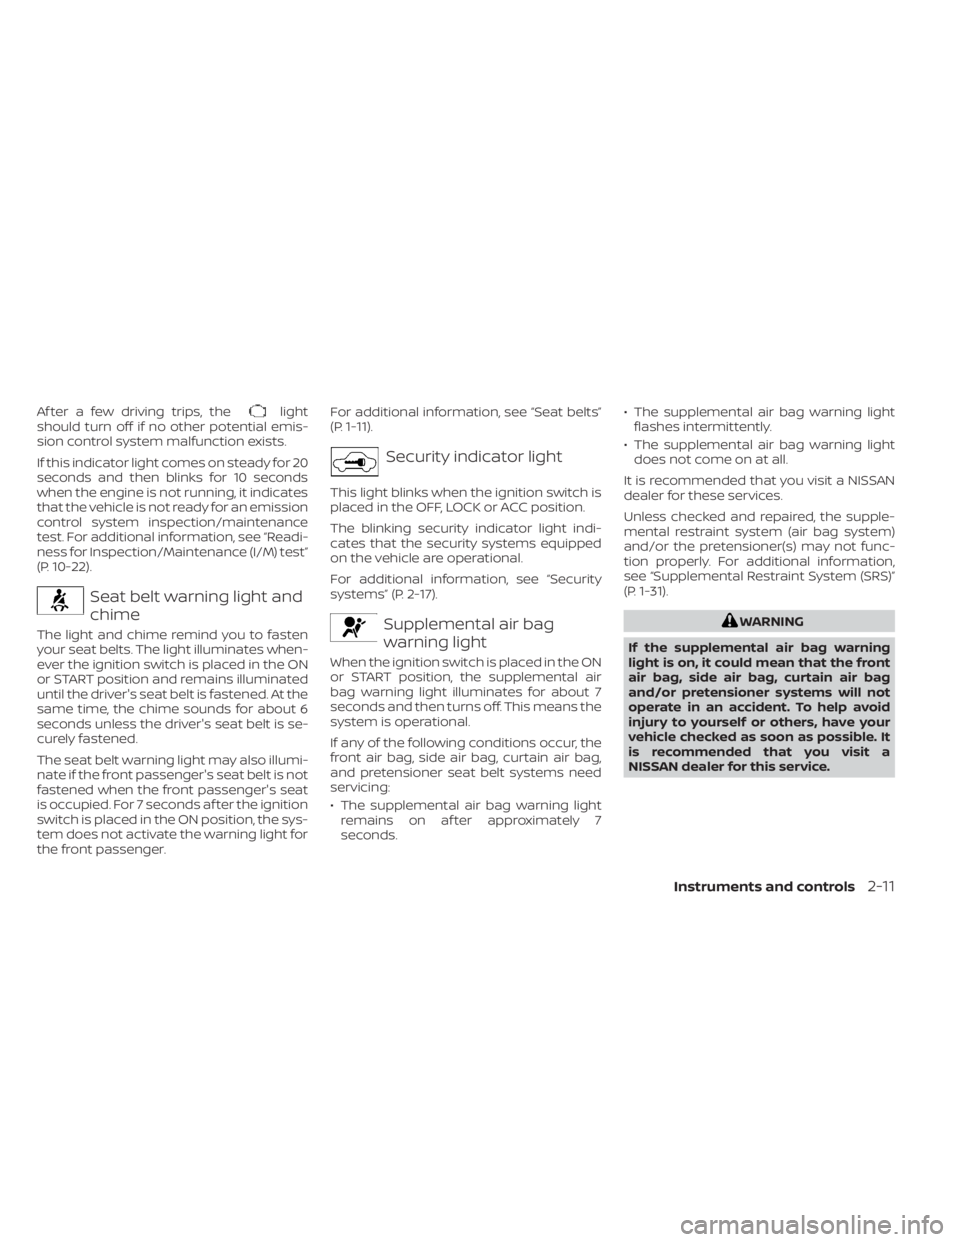
The light and chime remind you to fasten
your seat belts. The light illuminates when-
ever the ignition switch is placed in the ON
or START position and remains illuminated
until the driver's seat belt is fastened. At the
same time, the chime sounds for about 6
seconds unless the driver's seat belt is se-
curely fastened.
The seat belt warning light may also illumi-
nate if the front passenger's seat belt is not
fastened when the front passenger's seat
is occupied. For 7 seconds af ter the ignition
switch is placed in the ON position, the sys-
tem does not activate the warning light for
the front passenger. For additional information, see “Seat belts”
(P. 1-11).
Security indicator light
This light blinks when the ignition switch is
placed in the OFF, LOCK or ACC position.
The blinking security indicator light indi-
cates that the security systems equipped
on the vehicle are operational.
For additional information, see “Security
systems” (P. 2-17).
Supplemental air bag
warning light
When the ignition switch is placed in the ON
or START position, the supplemental air
bag warning light illuminates for about 7
seconds and then turns off. This means the
system is operational.
If any of the following conditions occur, the
front air bag, side air bag, curtain air bag,
and pretensioner seat belt systems need
servicing:
• The supplemental air bag warning light
remains on af ter approximately 7
seconds. • The supplemental air bag warning light
flashes intermittently.
• The supplemental air bag warning light does not come on at all.
It is recommended that you visit a NISSAN
dealer for these services.
Unless checked and repaired, the supple-
mental restraint system (air bag system)
and/or the pretensioner(s) may not func-
tion properly. For additional information,
see “Supplemental Restraint System (SRS)”
(P. 1-31).
Page 99 of 300
CAUTION
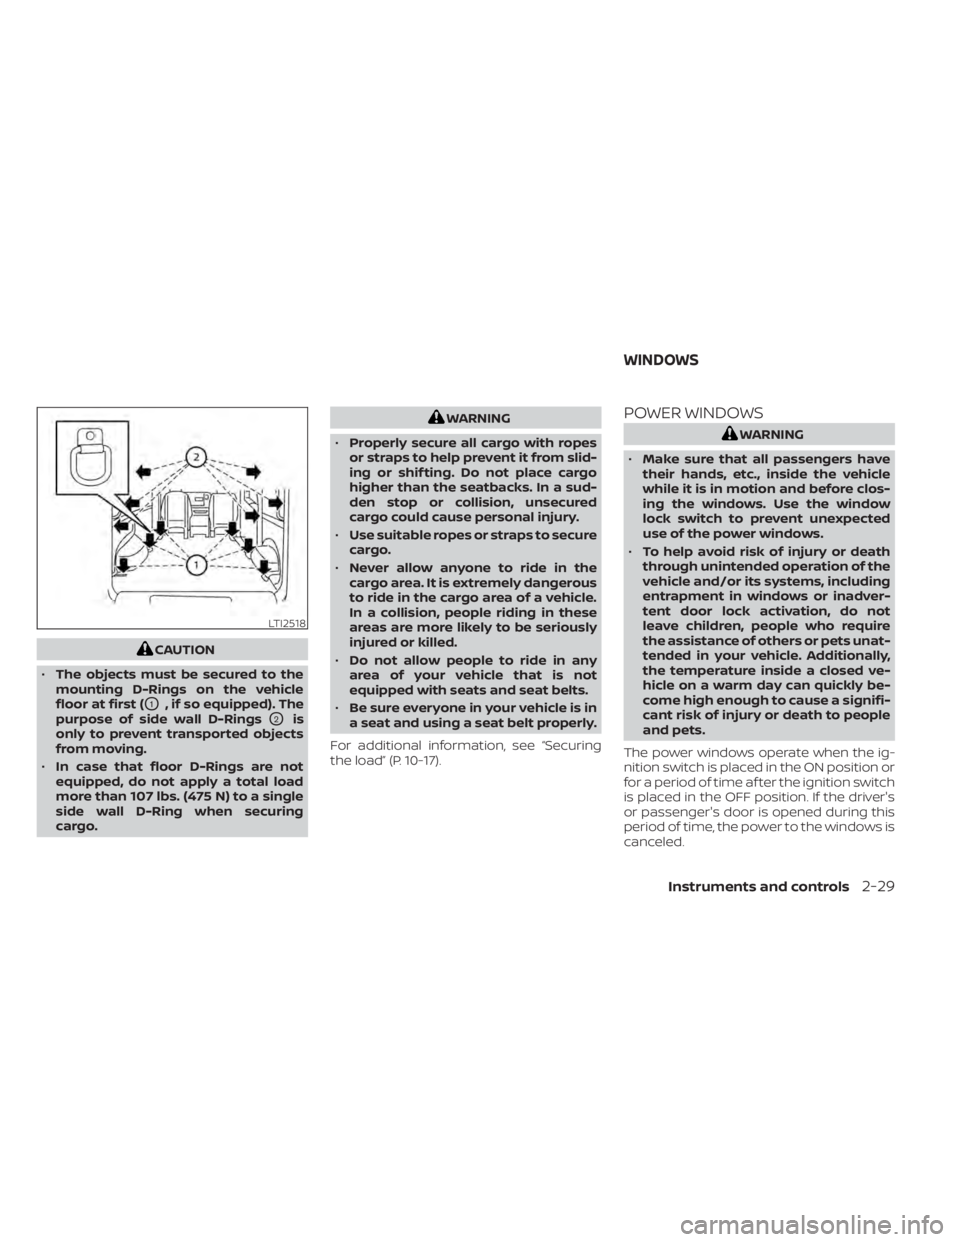
• The objects must be secured to the
mounting D-Rings on the vehicle
floor at first (
O1, if so equipped). The
purpose of side wall D-Rings
O2is
only to prevent transported objects
from moving.
• In case that floor D-Rings are not
equipped, do not apply a total load
more than 107 lbs. (475 N) to a single
side wall D-Ring when securing
cargo.
WARNING
• Properly secure all cargo with ropes
or straps to help prevent it from slid-
ing or shif ting. Do not place cargo
higher than the seatbacks. In a sud-
den stop or collision, unsecured
cargo could cause personal injury.
• Use suitable ropes or straps to secure
cargo.
• Never allow anyone to ride in the
cargo area. It is extremely dangerous
to ride in the cargo area of a vehicle.
In a collision, people riding in these
areas are more likely to be seriously
injured or killed.
• Do not allow people to ride in any
area of your vehicle that is not
equipped with seats and seat belts.
• Be sure everyone in your vehicle is in
a seat and using a seat belt properly.
For additional information, see “Securing
the load” (P. 10-17).POWER WINDOWS
LTI2518
WINDOWS
Instruments and controls2-29
Page 189 of 300
WARNING
Be careful not to allow your hands, hair,
jewelry or clothing to come into con-
tact with, or get caught in, engine belts
or the engine cooling fan. The engine
cooling fan can start at any time.
6. Af ter the engine cools down, check the coolant level in the engine coolant res-
ervoir tank with the engine running. Add
coolant to the engine coolant reservoir
tank if necessary. It is recommended
that you visit a NISSAN dealer for this
service. When towing your vehicle, all jurisdictional
and local regulations for towing must be
followed. Incorrect towing equipment
could damage your vehicle. Towing in-
structions are available from a NISSAN
dealer. Local service operators are gener-
ally familiar with the applicable laws and
procedures for towing. To assure proper
towing and to prevent accidental damage
to your vehicle, NISSAN recommends hav-
ing a service operator tow your vehicle. It is
advisable to have the service operator
carefully read the following precautions:
CAUTION
• When towing, make sure that the
transmission, axles, steering system
and powertrain are in working condi-
tion. If any of these conditions apply,
dollies or a flatbed tow truck must be
used.
• Always attach safety chains before
towing. For additional information about towing
your vehicle behind a Recreational Vehicle
(RV), see “Flat towing” (P. 10-19).
TOWING RECOMMENDED BY
NISSAN
NISSAN recommends towing your vehicle
based upon the type of drivetrain. For addi-
tional information, refer to the diagrams in
this section to ensure that your vehicle is
properly towed.
TOWING YOUR VEHICLE
In case of emergency6-13
Page 197 of 300
•Properly position the mats in the
floorwell using the floor mat posi-
tioning hook. For additional informa-
tion, see "Floor mat installation"
(P. 7-5).
• Make sure the floor mat does not in-
terfere with pedal operation.
• Periodically check the floor mats to
make sure they are properly
installed.
• Af ter cleaning the vehicle interior,
check the floor mats to make sure
they are properly installed.
The use of Genuine NISSAN floor mats can
extend the life of your vehicle carpet and
make it easier to clean the interior. Mats
should be maintained with regular clean-
ing and replaced if they become exces-
sively worn.
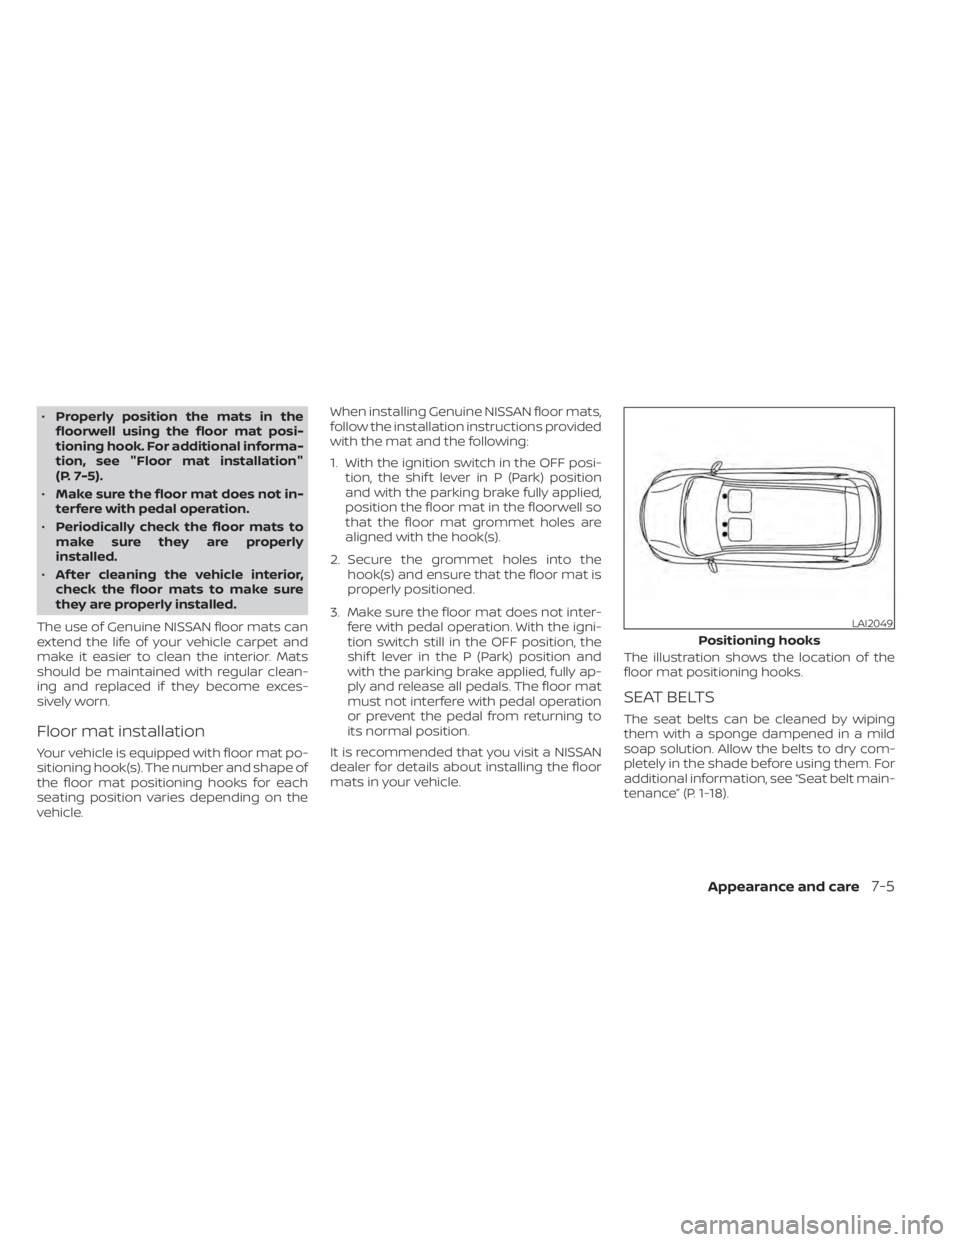
Floor mat installation
Your vehicle is equipped with floor mat po-
sitioning hook(s). The number and shape of
the floor mat positioning hooks for each
seating position varies depending on the
vehicle. When installing Genuine NISSAN floor mats,
follow the installation instructions provided
with the mat and the following:
1. With the ignition switch in the OFF posi-
tion, the shif t lever in P (Park) position
and with the parking brake fully applied,
position the floor mat in the floorwell so
that the floor mat grommet holes are
aligned with the hook(s).
2. Secure the grommet holes into the hook(s) and ensure that the floor mat is
properly positioned.
3. Make sure the floor mat does not inter- fere with pedal operation. With the igni-
tion switch still in the OFF position, the
shif t lever in the P (Park) position and
with the parking brake applied, fully ap-
ply and release all pedals. The floor mat
must not interfere with pedal operation
or prevent the pedal from returning to
its normal position.
It is recommended that you visit a NISSAN
dealer for details about installing the floor
mats in your vehicle. The illustration shows the location of the
floor mat positioning hooks.
SEAT BELTS
The seat belts can be cleaned by wiping
them with a sponge dampened in a mild
soap solution. Allow the belts to dry com-
pletely in the shade before using them. For
additional information, see “Seat belt main-
tenance” (P. 1-18).
LAI2049
Positioning hooks
Appearance and care7-5
Page 198 of 300
WARNING
Do not allow wet seat belts to roll up in
the retractor. NEVER use bleach, dye or
chemical solvents to clean the seat
belts, since these materials may se-
verely weaken the seat belt webbing.MOST COMMON FACTORS
CONTRIBUTING TO VEHICLE
CORROSION
Most vehicle corrosion is caused by:
• The accumulation of moisture-retaining dirt and debris in body panel sections,
cavities, and other areas.
• Damage to paint and other protective coatings caused by gravel and stone
chips or minor traffic collisions.
ENVIRONMENTAL FACTORS
INFLUENCE THE RATE OF
CORROSION
Moisture
Accumulation of sand, dirt and water on
the vehicle body underside can accelerate
corrosion. Wet floor coverings will not dry
completely inside the vehicle and should
be removed for drying to avoid floor panel
corrosion.
Relative humidity
Corrosion will be accelerated in areas of
high relative humidity, especially those ar-
eas where the temperatures stay above
freezing and where atmospheric pollution
exists and road salt is used.
Temperature
High temperatures accelerate the rate of
corrosion to those parts which are not well
ventilated.
Air pollution
Industrial pollution, the presence of salt in
the air in coastal areas, or heavy road salt
use accelerates the corrosion process.
Road salt also accelerates the disintegra-
tion of paint surfaces.
PROTECT YOUR VEHICLE FROM
CORROSION
• Wash and wax your vehicle of ten to keepthe vehicle clean.
• Always check for minor damage to the paint and repair it as soon as possible.
• Keep drain holes at the bottom of the doors open to avoid water accumulation.
• Check the underbody for accumulation of sand, dirt or salt. If present, wash with
water as soon as possible.
CORROSION PROTECTION
7-6Appearance and care
Page 214 of 300
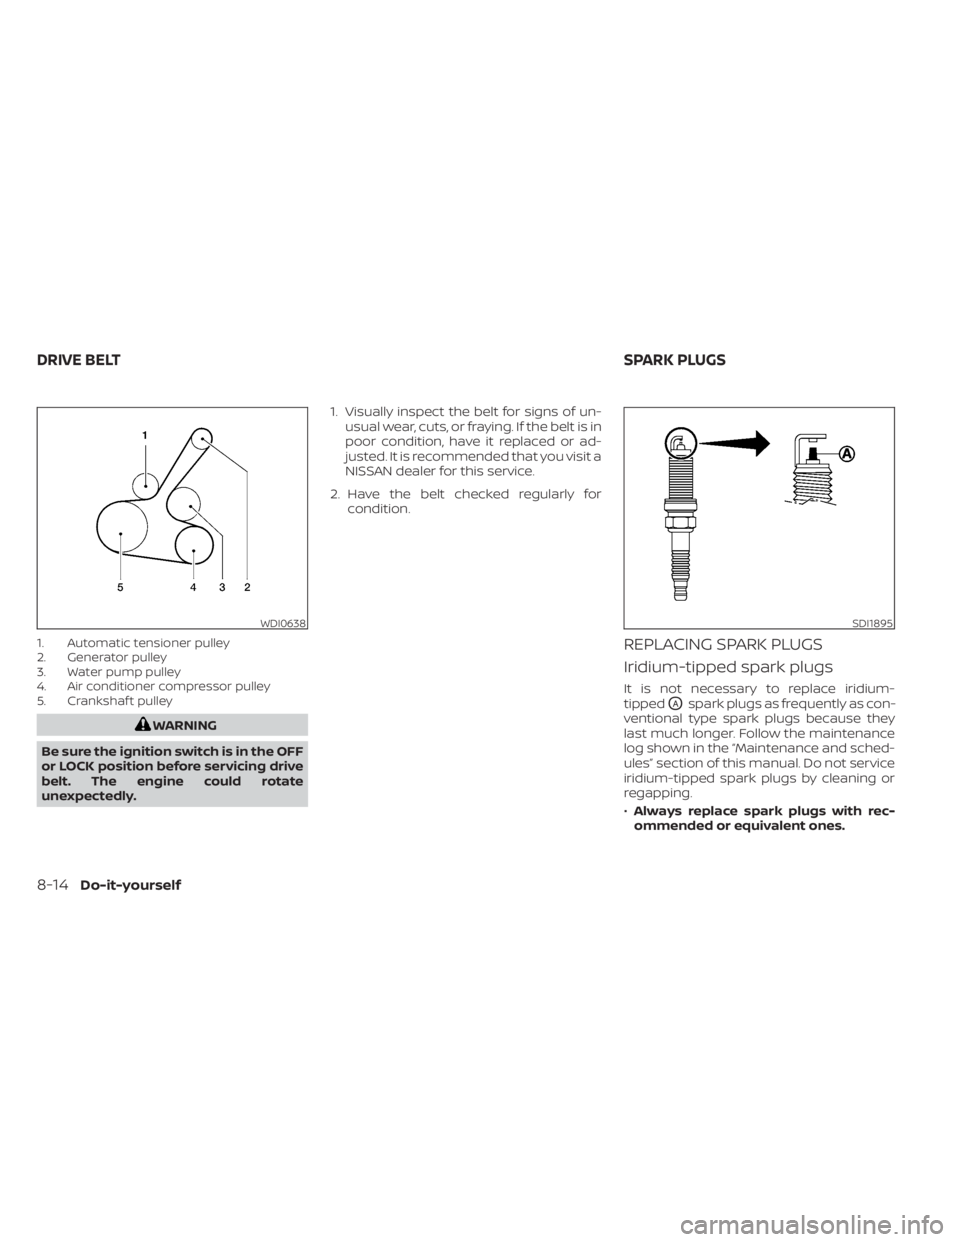
1. Automatic tensioner pulley
2. Generator pulley
3. Water pump pulley
4. Air conditioner compressor pulley
5. Crankshaf t pulley
SDI1895
DRIVE BELTSPARK PLUGS
Page 292 of 300
Cruise control..................5-17Cup holders..................2-28
D
D-ring..................2-28,10-17Daytime light system.............2-22Defroster switchRear window and outside mirror defroster
switch
.....................2-21Dimensions and weights..........10-9Dimmer switch for instrument panel. . .2-23Door locks................ .3-3, 3-4Door open warning light...........2-10Drive belt....................8-14Driving
Cold weather driving...........5-32Driving with Continuously Variable
Transmission (CVT)..........5-8, 5-12Precautions when starting and
driving.....................5-2Driving the vehicle...............5-11
E
Economy - fuel................5-20Emission control information label. . . .10-11Emission control system warranty. . . .10-21EngineBefore starting the engine........5-9Capacities and recommended
fuel/lubricants...............10-2Changing engine coolant.........8-6
Changing engine oil.............8-7Changing engine oil filter.........8-7Checking engine coolant level......8-6Checking engine oil level..........8-7Engine cooling system...........8-5Engine oil...................8-7Engine oil and oil filter
recommendation.............10-6Engine oil pressure warning light. . . .2-10Engine oil viscosity.............10-6Engine serial number..........10-10Engine specifications...........10-8Starting the engine............5-10Engine Block Heater.............5-34Event Data recorders............10-23Exhaust gas (Carbon monoxide)......5-2Explanation of maintenance items.....9-2Explanation of scheduled maintenance
items...................... .9-5Extended storage switch..........8-20
F
F.M.V.S.S. certification label.........10-11Flashers (See hazard warning flasher
switch)......................6-2Flat tire...................6-2,6-3Floor mat positioning aid...........7-5Fluid
Brake fluid..................8-10Capacities and recommended
fuel/lubricants...............10-2
Continuously Variable Transmission (CVT)
fluid......................8-10Engine coolant................8-5Engine oil...................8-7Windshield-washer fluid..........8-11Front air bag system (See supplemental
restraint system)...............1-38Front seats....................1-2Front-door pocket...............2-27FuelCapacities and recommended
fuel/lubricants
...............10-2Fuel economy...............5-20Fuel gauge................. .2-6Fuel octane rating.............10-5Fuel recommendation..........10-3Fuel-filler door and cap..........3-14Fuel-filler door lock opener lever. . . .3-14Loose fuel cap warning..........2-5Fuel efficient driving tips...........5-19Fuel gauge................... .2-6Fuel-filler door.................3-14Fuses.......................8-18Fusible links...................8-19
G
Gas cap.....................3-14Gauge
Fuel gauge................. .2-6Speedometer..............2-3, 2-4Tachometer.................2-6Trip computer................2-7
11-2