remove seats NISSAN PATHFINDER 1998 R50 / 2.G Owners Manual
[x] Cancel search | Manufacturer: NISSAN, Model Year: 1998, Model line: PATHFINDER, Model: NISSAN PATHFINDER 1998 R50 / 2.GPages: 249, PDF Size: 2.14 MB
Page 13 of 249
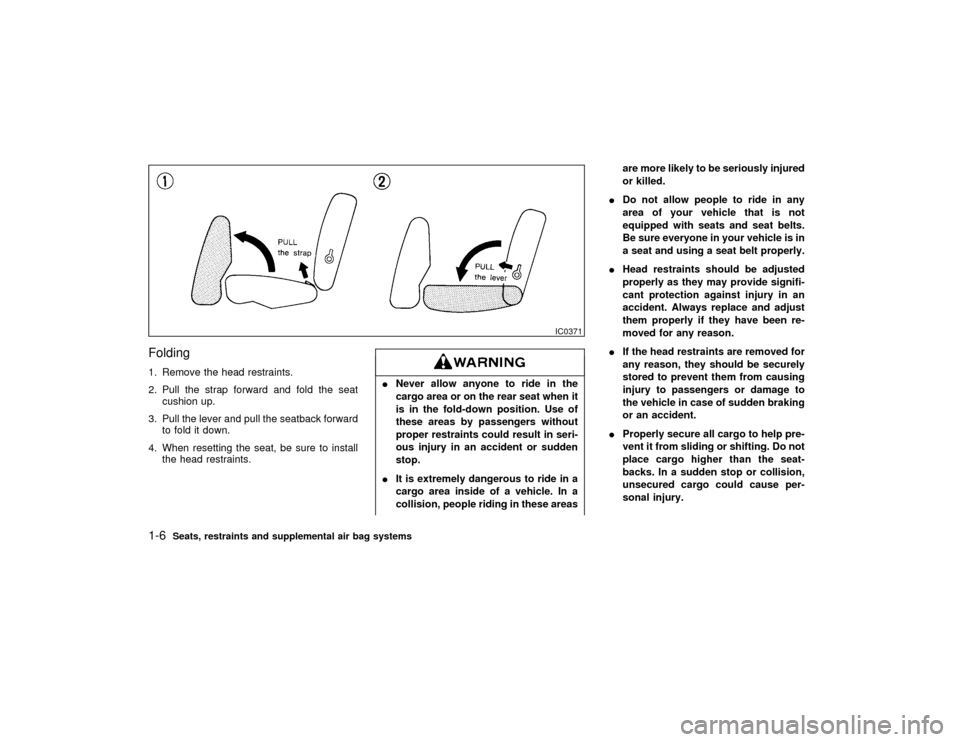
Folding1. Remove the head restraints.
2. Pull the strap forward and fold the seat
cushion up.
3. Pull the lever and pull the seatback forward
to fold it down.
4. When resetting the seat, be sure to install
the head restraints.
INever allow anyone to ride in the
cargo area or on the rear seat when it
is in the fold-down position. Use of
these areas by passengers without
proper restraints could result in seri-
ous injury in an accident or sudden
stop.
IIt is extremely dangerous to ride in a
cargo area inside of a vehicle. In a
collision, people riding in these areasare more likely to be seriously injured
or killed.
IDo not allow people to ride in any
area of your vehicle that is not
equipped with seats and seat belts.
Be sure everyone in your vehicle is in
a seat and using a seat belt properly.
IHead restraints should be adjusted
properly as they may provide signifi-
cant protection against injury in an
accident. Always replace and adjust
them properly if they have been re-
moved for any reason.
IIf the head restraints are removed for
any reason, they should be securely
stored to prevent them from causing
injury to passengers or damage to
the vehicle in case of sudden braking
or an accident.
IProperly secure all cargo to help pre-
vent it from sliding or shifting. Do not
place cargo higher than the seat-
backs. In a sudden stop or collision,
unsecured cargo could cause per-
sonal injury.
IC0371
1-6
Seats, restraints and supplemental air bag systems
Z
01.1.31/R50-D
X
Page 15 of 249
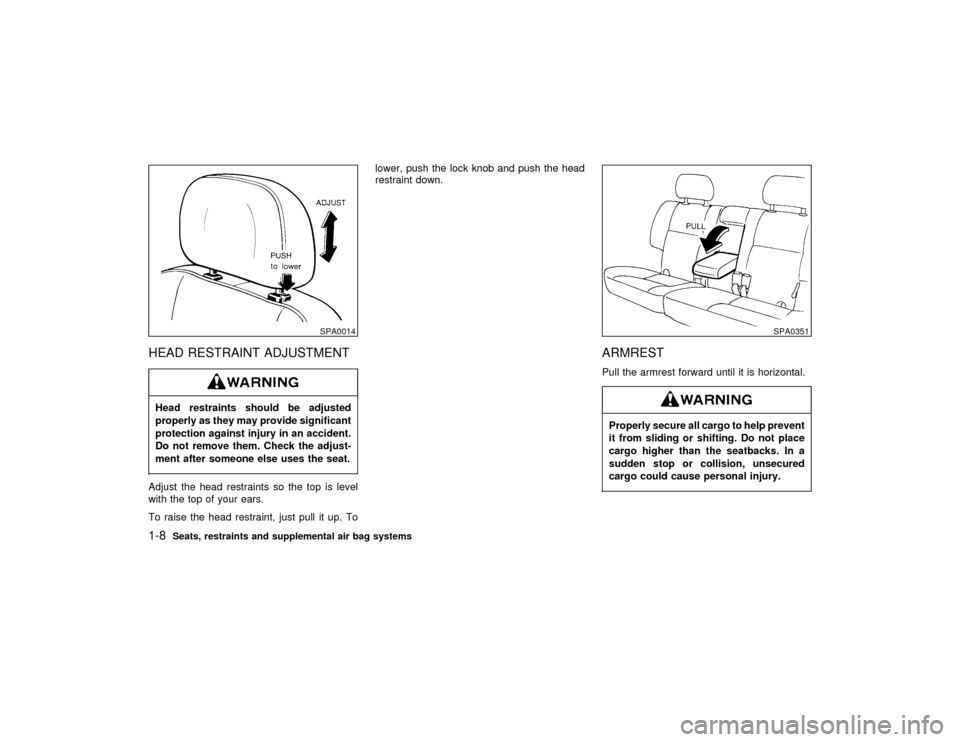
HEAD RESTRAINT ADJUSTMENTHead restraints should be adjusted
properly as they may provide significant
protection against injury in an accident.
Do not remove them. Check the adjust-
ment after someone else uses the seat.Adjust the head restraints so the top is level
with the top of your ears.
To raise the head restraint, just pull it up. Tolower, push the lock knob and push the head
restraint down.
ARMRESTPull the armrest forward until it is horizontal.Properly secure all cargo to help prevent
it from sliding or shifting. Do not place
cargo higher than the seatbacks. In a
sudden stop or collision, unsecured
cargo could cause personal injury.
SPA0014
SPA0351
1-8
Seats, restraints and supplemental air bag systems
Z
01.1.31/R50-D
X
Page 35 of 249
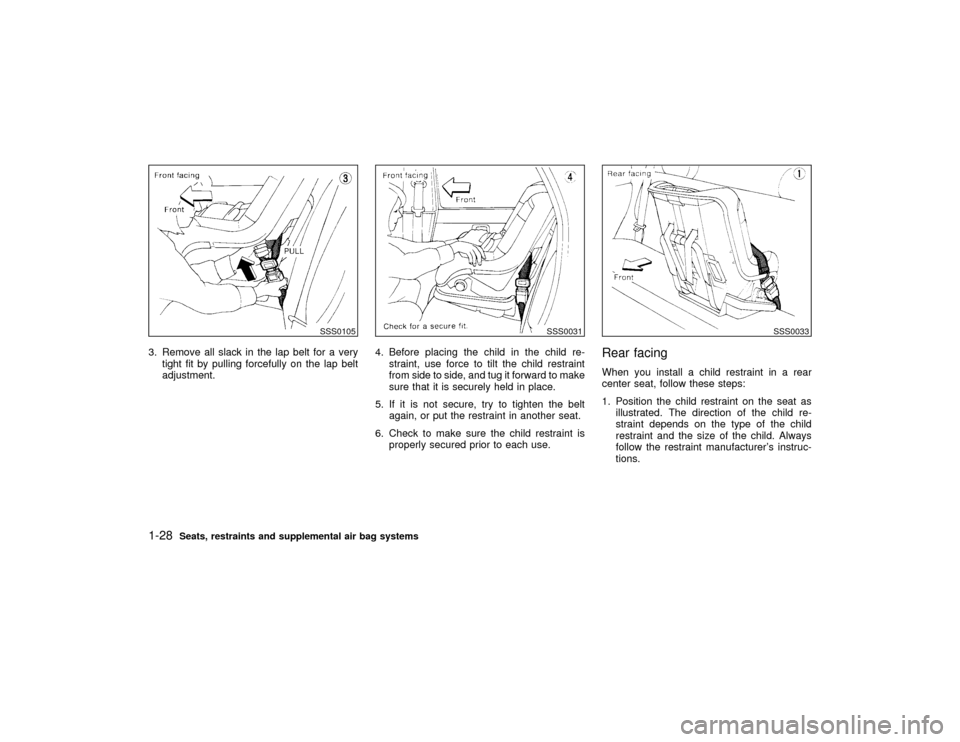
3. Remove all slack in the lap belt for a very
tight fit by pulling forcefully on the lap belt
adjustment.4. Before placing the child in the child re-
straint, use force to tilt the child restraint
from side to side, and tug it forward to make
sure that it is securely held in place.
5. If it is not secure, try to tighten the belt
again, or put the restraint in another seat.
6. Check to make sure the child restraint is
properly secured prior to each use.
Rear facingWhen you install a child restraint in a rear
center seat, follow these steps:
1. Position the child restraint on the seat as
illustrated. The direction of the child re-
straint depends on the type of the child
restraint and the size of the child. Always
follow the restraint manufacturer's instruc-
tions.
SSS0105
SSS0031
SSS0033
1-28
Seats, restraints and supplemental air bag systems
Z
01.1.31/R50-D
X
Page 36 of 249
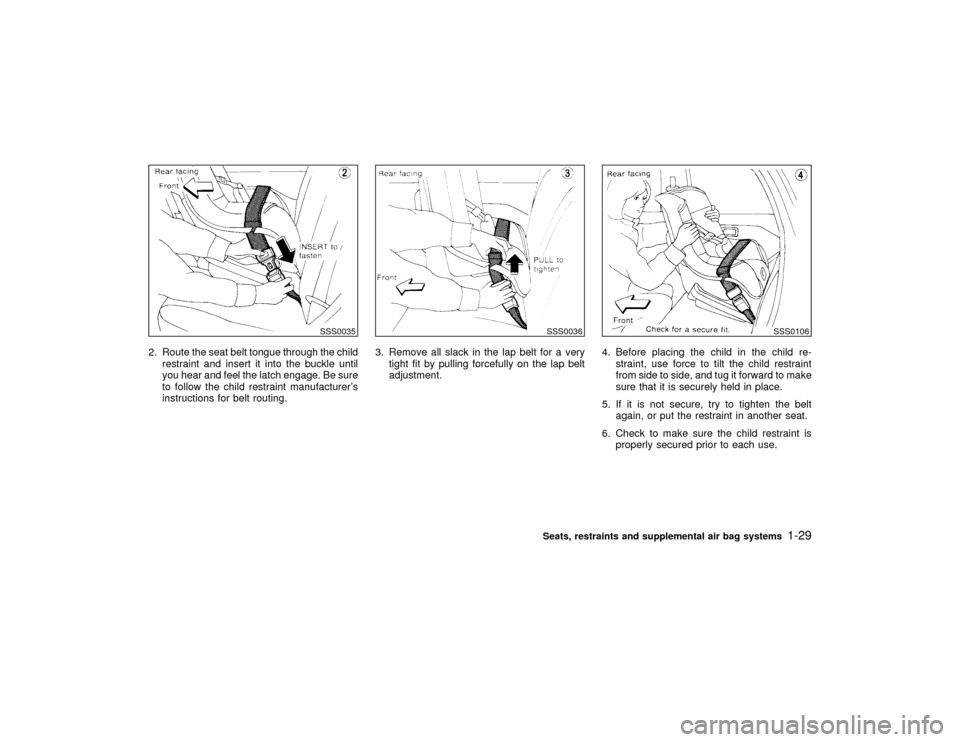
2. Route the seat belt tongue through the child
restraint and insert it into the buckle until
you hear and feel the latch engage. Be sure
to follow the child restraint manufacturer's
instructions for belt routing.3. Remove all slack in the lap belt for a very
tight fit by pulling forcefully on the lap belt
adjustment.4. Before placing the child in the child re-
straint, use force to tilt the child restraint
from side to side, and tug it forward to make
sure that it is securely held in place.
5. If it is not secure, try to tighten the belt
again, or put the restraint in another seat.
6. Check to make sure the child restraint is
properly secured prior to each use.
SSS0035
SSS0036
SSS0106
Seats, restraints and supplemental air bag systems
1-29
Z
01.1.31/R50-D
X
Page 38 of 249
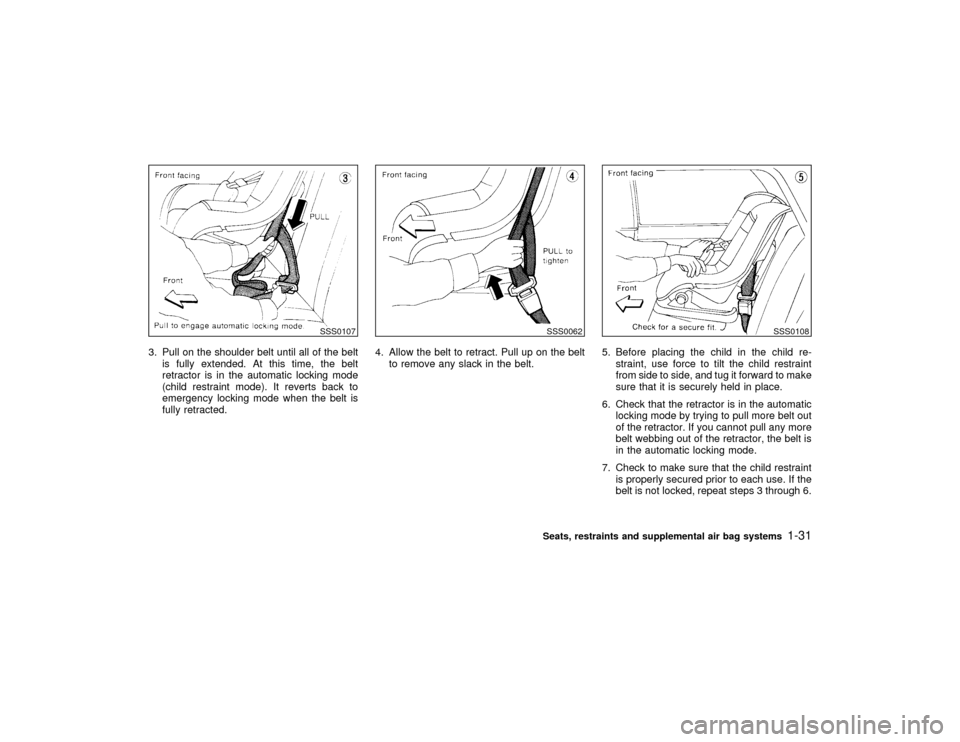
3. Pull on the shoulder belt until all of the belt
is fully extended. At this time, the belt
retractor is in the automatic locking mode
(child restraint mode). It reverts back to
emergency locking mode when the belt is
fully retracted.4. Allow the belt to retract. Pull up on the belt
to remove any slack in the belt.5. Before placing the child in the child re-
straint, use force to tilt the child restraint
from side to side, and tug it forward to make
sure that it is securely held in place.
6. Check that the retractor is in the automatic
locking mode by trying to pull more belt out
of the retractor. If you cannot pull any more
belt webbing out of the retractor, the belt is
in the automatic locking mode.
7. Check to make sure that the child restraint
is properly secured prior to each use. If the
belt is not locked, repeat steps 3 through 6.
SSS0107
SSS0062
SSS0108
Seats, restraints and supplemental air bag systems
1-31
Z
01.1.31/R50-D
X
Page 39 of 249
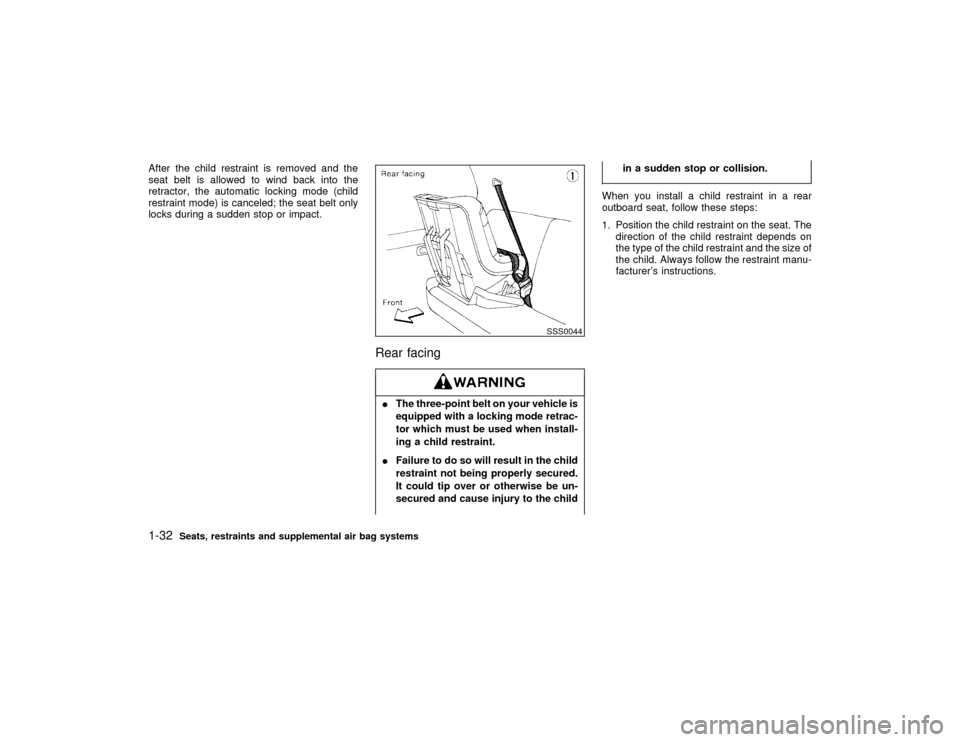
After the child restraint is removed and the
seat belt is allowed to wind back into the
retractor, the automatic locking mode (child
restraint mode) is canceled; the seat belt only
locks during a sudden stop or impact.
Rear facingIThe three-point belt on your vehicle is
equipped with a locking mode retrac-
tor which must be used when install-
ing a child restraint.
IFailure to do so will result in the child
restraint not being properly secured.
It could tip over or otherwise be un-
secured and cause injury to the childin a sudden stop or collision.
When you install a child restraint in a rear
outboard seat, follow these steps:
1. Position the child restraint on the seat. The
direction of the child restraint depends on
the type of the child restraint and the size of
the child. Always follow the restraint manu-
facturer's instructions.
SSS0044
1-32
Seats, restraints and supplemental air bag systems
Z
01.1.31/R50-D
X
Page 40 of 249
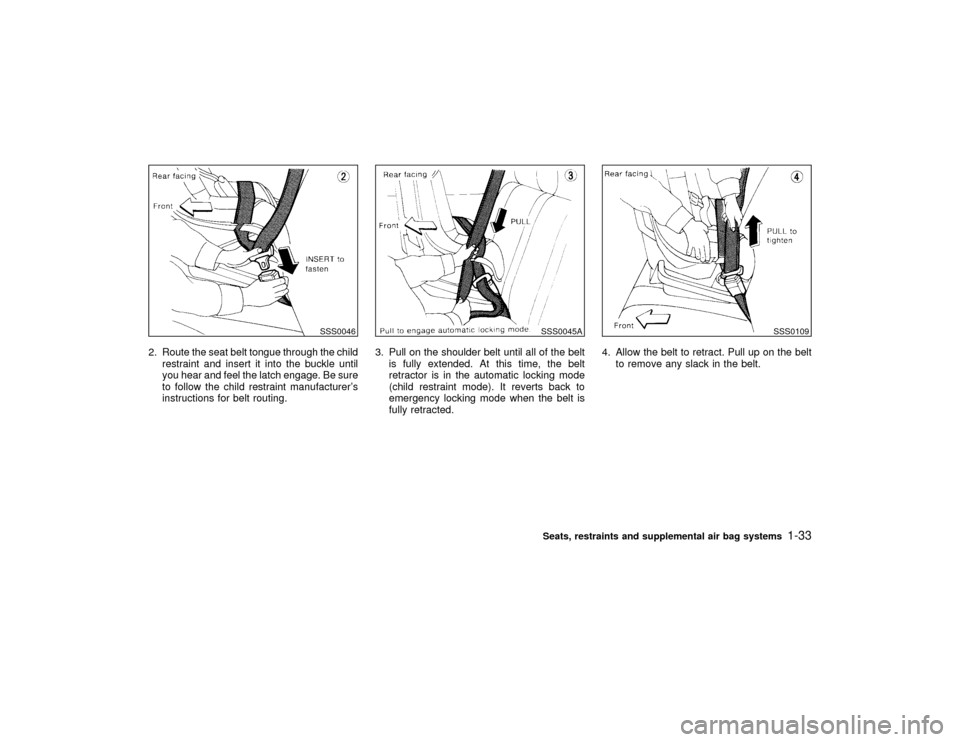
2. Route the seat belt tongue through the child
restraint and insert it into the buckle until
you hear and feel the latch engage. Be sure
to follow the child restraint manufacturer's
instructions for belt routing.3. Pull on the shoulder belt until all of the belt
is fully extended. At this time, the belt
retractor is in the automatic locking mode
(child restraint mode). It reverts back to
emergency locking mode when the belt is
fully retracted.4. Allow the belt to retract. Pull up on the belt
to remove any slack in the belt.
SSS0046
SSS0045A
SSS0109
Seats, restraints and supplemental air bag systems
1-33
Z
01.1.31/R50-D
X
Page 41 of 249
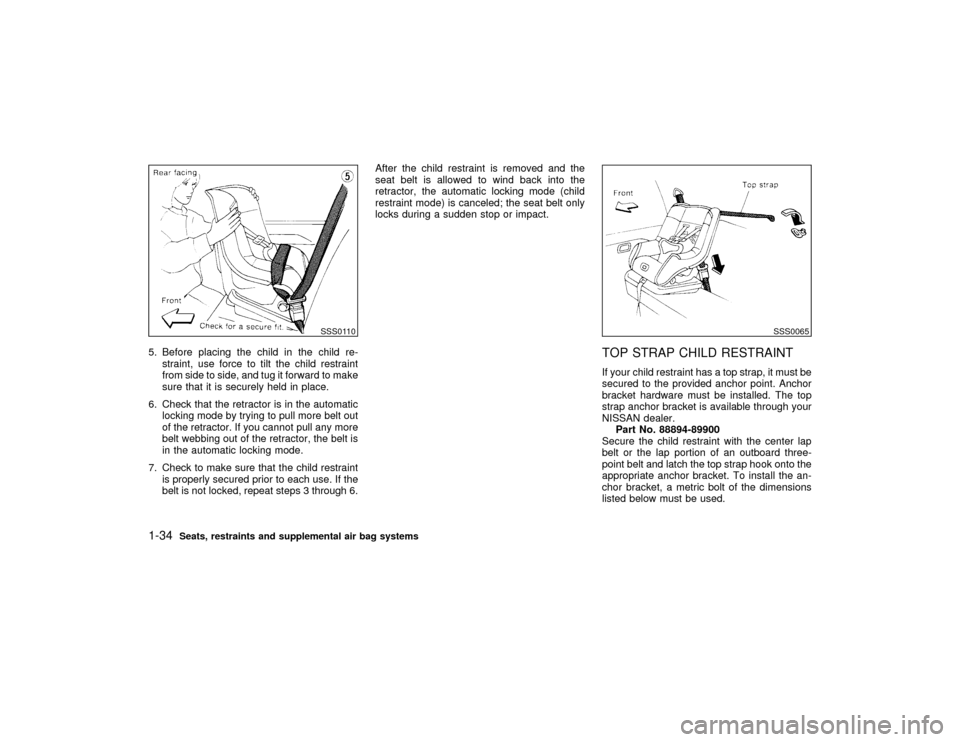
5. Before placing the child in the child re-
straint, use force to tilt the child restraint
from side to side, and tug it forward to make
sure that it is securely held in place.
6. Check that the retractor is in the automatic
locking mode by trying to pull more belt out
of the retractor. If you cannot pull any more
belt webbing out of the retractor, the belt is
in the automatic locking mode.
7. Check to make sure that the child restraint
is properly secured prior to each use. If the
belt is not locked, repeat steps 3 through 6.After the child restraint is removed and the
seat belt is allowed to wind back into the
retractor, the automatic locking mode (child
restraint mode) is canceled; the seat belt only
locks during a sudden stop or impact.
TOP STRAP CHILD RESTRAINTIf your child restraint has a top strap, it must be
secured to the provided anchor point. Anchor
bracket hardware must be installed. The top
strap anchor bracket is available through your
NISSAN dealer.
Part No. 88894-89900
Secure the child restraint with the center lap
belt or the lap portion of an outboard three-
point belt and latch the top strap hook onto the
appropriate anchor bracket. To install the an-
chor bracket, a metric bolt of the dimensions
listed below must be used.
SSS0110
SSS0065
1-34
Seats, restraints and supplemental air bag systems
Z
01.1.31/R50-D
X
Page 45 of 249
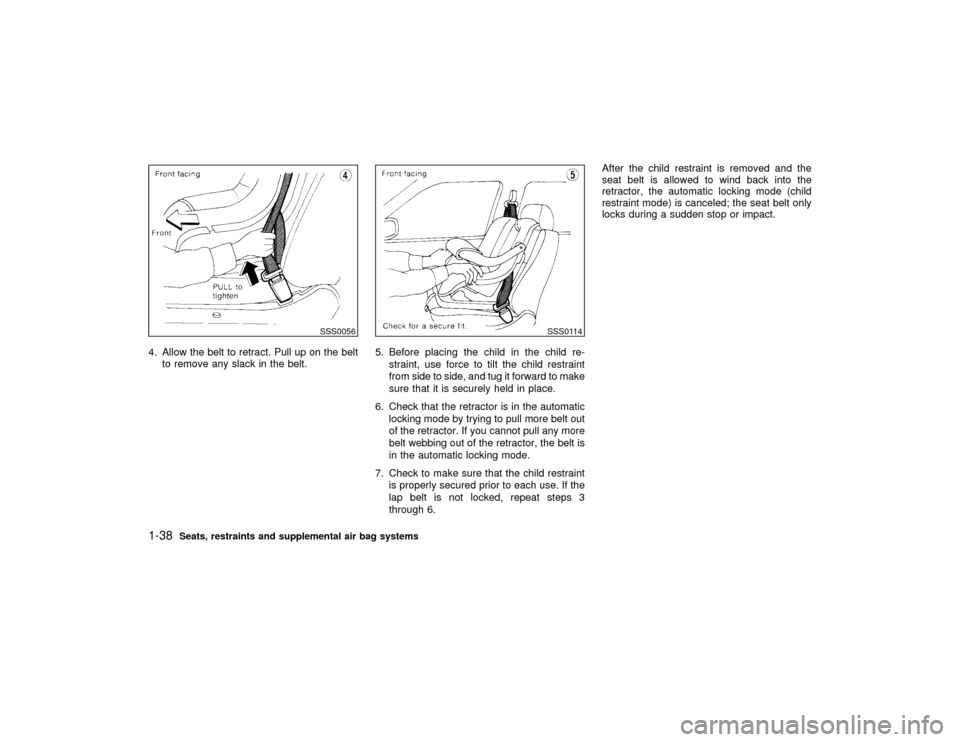
4. Allow the belt to retract. Pull up on the belt
to remove any slack in the belt.5. Before placing the child in the child re-
straint, use force to tilt the child restraint
from side to side, and tug it forward to make
sure that it is securely held in place.
6. Check that the retractor is in the automatic
locking mode by trying to pull more belt out
of the retractor. If you cannot pull any more
belt webbing out of the retractor, the belt is
in the automatic locking mode.
7. Check to make sure that the child restraint
is properly secured prior to each use. If the
lap belt is not locked, repeat steps 3
through 6.After the child restraint is removed and the
seat belt is allowed to wind back into the
retractor, the automatic locking mode (child
restraint mode) is canceled; the seat belt only
locks during a sudden stop or impact.
SSS0056
SSS0114
1-38
Seats, restraints and supplemental air bag systems
Z
01.1.31/R50-D
X
Page 173 of 249
Occasionally remove loose dust from the inte-
rior trim, plastic parts and seats using a
vacuum cleaner or soft brush. Wipe the vinyl
and leather surfaces with a clean, soft cloth
dampened in mild soap solution, then wipe
clean with a dry soft cloth. Before using any
fabric protector, read the manufacturer's rec-
ommendations. Some fabric protectors con-
tains chemicals that stain or bleach the seat
material.INever use benzine, thinner or any
similar material.
IThe leather seats should be regularly
coated with a leather wax like saddle
soap. Never use car wax.
INever use fabric protectors unless
recommended by the manufacturer.
FLOOR MATSThe use of Genuine Nissan floor mats can
extend the life of your vehicle carpet and make
it easier to clean the interior.No matter what
mats are used, be sure they are fitted for
your vehicle and are properly positioned in
the footwell to prevent interference with
pedal operation.Mats should be maintained
with regular cleaning and replaced if they
become excessively worn.
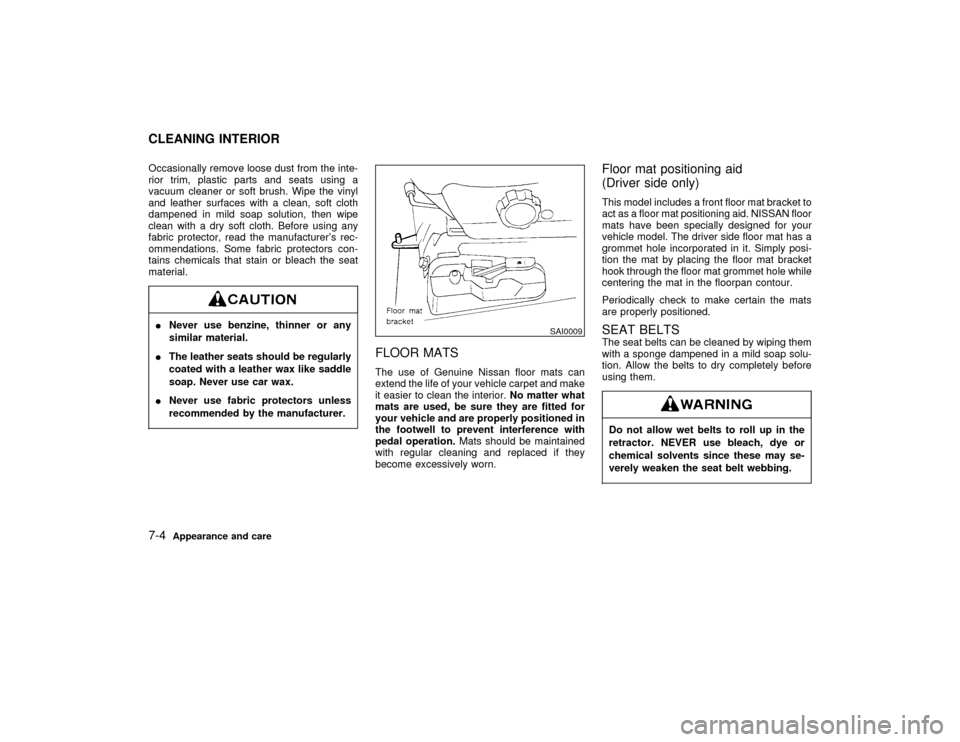
Floor mat positioning aid
(Driver side only)This model includes a front floor mat bracket to
act as a floor mat positioning aid. NISSAN floor
mats have been specially designed for your
vehicle model. The driver side floor mat has a
grommet hole incorporated in it. Simply posi-
tion the mat by placing the floor mat bracket
hook through the floor mat grommet hole while
centering the mat in the floorpan contour.
Periodically check to make certain the mats
are properly positioned.SEAT BELTSThe seat belts can be cleaned by wiping them
with a sponge dampened in a mild soap solu-
tion. Allow the belts to dry completely before
using them.Do not allow wet belts to roll up in the
retractor. NEVER use bleach, dye or
chemical solvents since these may se-
verely weaken the seat belt webbing.
SAI0009
CLEANING INTERIOR7-4
Appearance and care
Z
01.1.31/R50-D
X