Eps NISSAN PATHFINDER 1999 R50 / 2.G Owners Manual
[x] Cancel search | Manufacturer: NISSAN, Model Year: 1999, Model line: PATHFINDER, Model: NISSAN PATHFINDER 1999 R50 / 2.GPages: 274, PDF Size: 2.34 MB
Page 39 of 274
tioned to fit the child restraint, but as
upright as possible.
IAfter attaching the child restraint,
test it before you place the child in it.
Tilt it from side to side. Try to tug it
forward and check to see if the belt
holds the restraint in place. If the
restraint is not secure, tighten the
belt as necessary, or put the restraint
in another seat and test it again.
IFor a front facing child restraint, if the
seat position where it is installed has
a three-point type lap/shoulder belt,
check to make sure the shoulder belt
does not go in front of the child's face
or neck. If it does, put the shoulder
belt behind the child restraint. If you
must install a front facing child re-
straint in the front seat. See later in
ªChild restraintsº for installation on
front passenger seat.
IWhen your child restraint is not in
use, store it in the trunk or keep it
secured with a seat belt to prevent it
from being thrown around in case of
a sudden stop or accident.
Remember that a child restraint left in a
closed vehicle can become very hot.
Check the seating surface and buckles
before placing your child in the child
restraint.
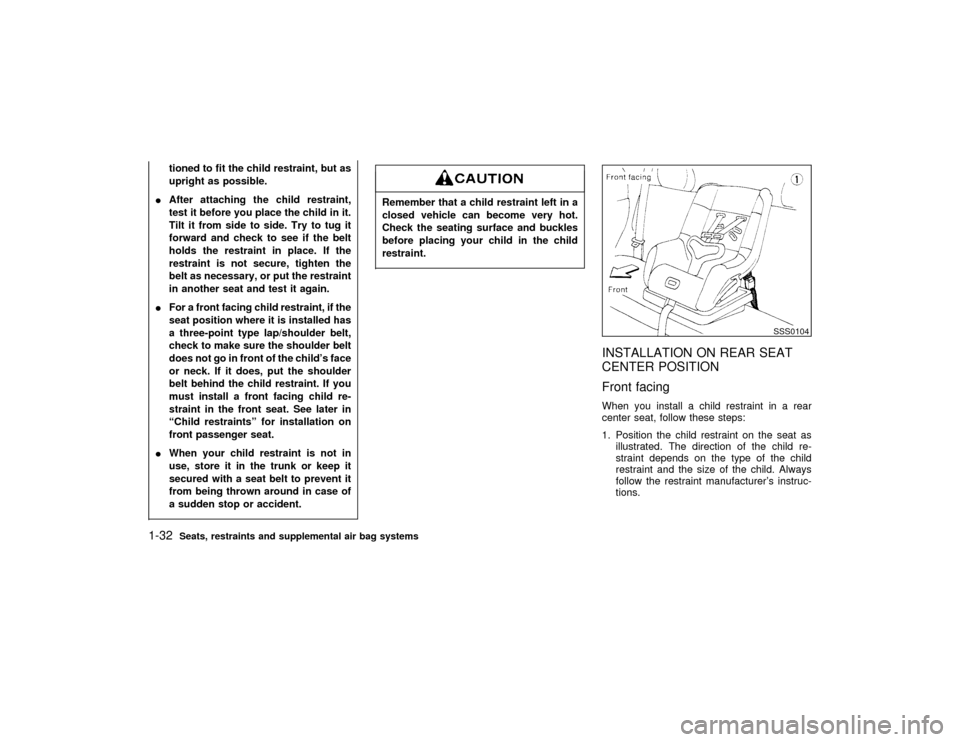
INSTALLATION ON REAR SEAT
CENTER POSITION
Front facingWhen you install a child restraint in a rear
center seat, follow these steps:
1. Position the child restraint on the seat as
illustrated. The direction of the child re-
straint depends on the type of the child
restraint and the size of the child. Always
follow the restraint manufacturer's instruc-
tions.
SSS0104
1-32
Seats, restraints and supplemental air bag systems
Z
01.1.22/R50-D/V5
X
Page 41 of 274
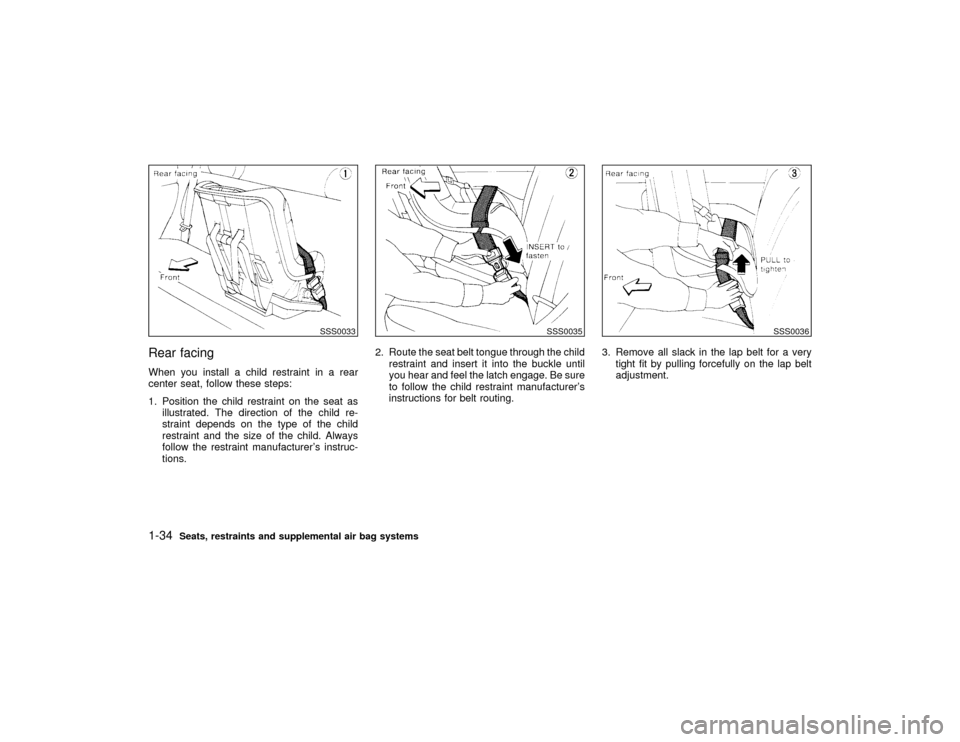
Rear facingWhen you install a child restraint in a rear
center seat, follow these steps:
1. Position the child restraint on the seat as
illustrated. The direction of the child re-
straint depends on the type of the child
restraint and the size of the child. Always
follow the restraint manufacturer's instruc-
tions.2. Route the seat belt tongue through the child
restraint and insert it into the buckle until
you hear and feel the latch engage. Be sure
to follow the child restraint manufacturer's
instructions for belt routing.3. Remove all slack in the lap belt for a very
tight fit by pulling forcefully on the lap belt
adjustment.
SSS0033
SSS0035
SSS0036
1-34
Seats, restraints and supplemental air bag systems
Z
01.1.22/R50-D/V5
X
Page 42 of 274
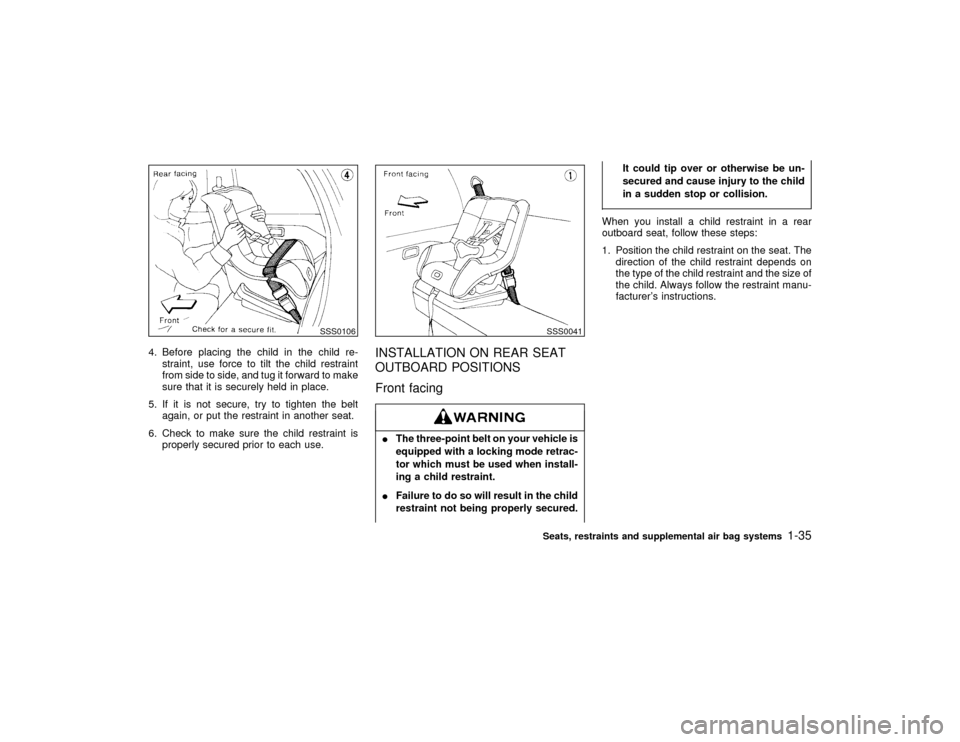
4. Before placing the child in the child re-
straint, use force to tilt the child restraint
from side to side, and tug it forward to make
sure that it is securely held in place.
5. If it is not secure, try to tighten the belt
again, or put the restraint in another seat.
6. Check to make sure the child restraint is
properly secured prior to each use.
INSTALLATION ON REAR SEAT
OUTBOARD POSITIONS
Front facingIThe three-point belt on your vehicle is
equipped with a locking mode retrac-
tor which must be used when install-
ing a child restraint.
IFailure to do so will result in the child
restraint not being properly secured.It could tip over or otherwise be un-
secured and cause injury to the child
in a sudden stop or collision.
When you install a child restraint in a rear
outboard seat, follow these steps:
1. Position the child restraint on the seat. The
direction of the child restraint depends on
the type of the child restraint and the size of
the child. Always follow the restraint manu-
facturer's instructions.
SSS0106
SSS0041Seats, restraints and supplemental air bag systems
1-35
Z
01.1.22/R50-D/V5
X
Page 44 of 274
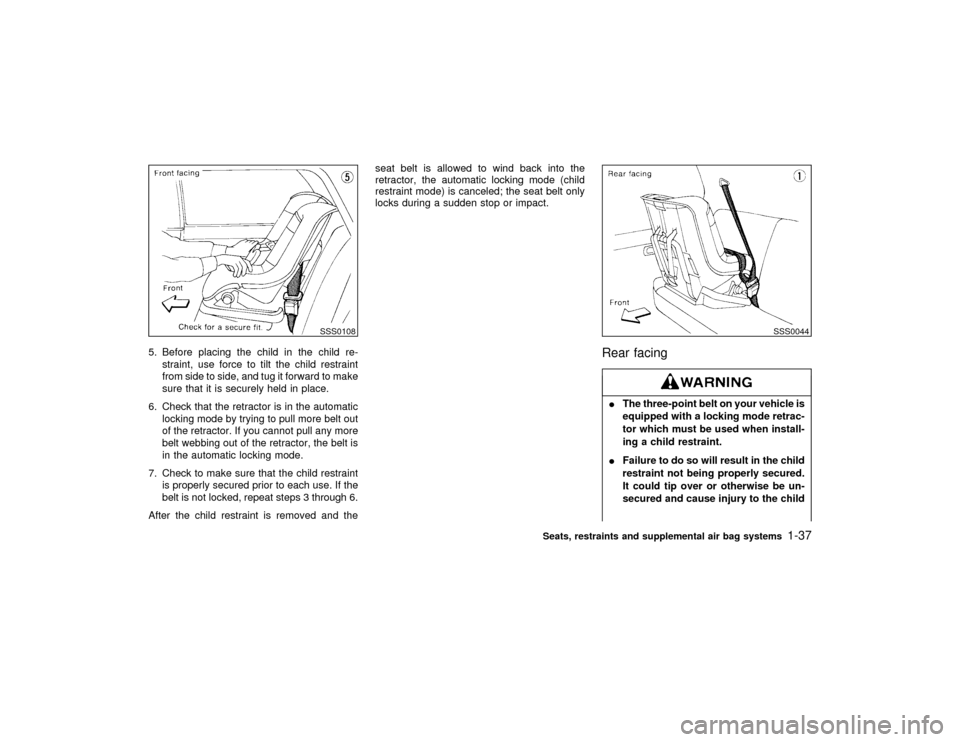
5. Before placing the child in the child re-
straint, use force to tilt the child restraint
from side to side, and tug it forward to make
sure that it is securely held in place.
6. Check that the retractor is in the automatic
locking mode by trying to pull more belt out
of the retractor. If you cannot pull any more
belt webbing out of the retractor, the belt is
in the automatic locking mode.
7. Check to make sure that the child restraint
is properly secured prior to each use. If the
belt is not locked, repeat steps 3 through 6.
After the child restraint is removed and theseat belt is allowed to wind back into the
retractor, the automatic locking mode (child
restraint mode) is canceled; the seat belt only
locks during a sudden stop or impact.
Rear facingIThe three-point belt on your vehicle is
equipped with a locking mode retrac-
tor which must be used when install-
ing a child restraint.
IFailure to do so will result in the child
restraint not being properly secured.
It could tip over or otherwise be un-
secured and cause injury to the child
SSS0108
SSS0044
Seats, restraints and supplemental air bag systems
1-37
Z
01.1.22/R50-D/V5
X
Page 45 of 274
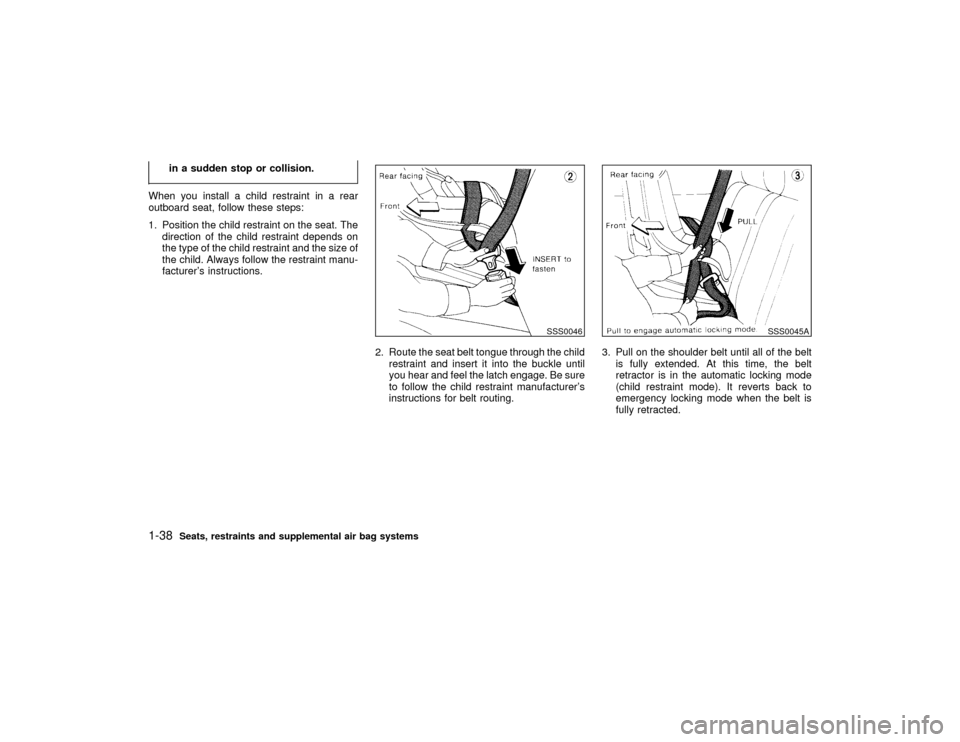
in a sudden stop or collision.
When you install a child restraint in a rear
outboard seat, follow these steps:
1. Position the child restraint on the seat. The
direction of the child restraint depends on
the type of the child restraint and the size of
the child. Always follow the restraint manu-
facturer's instructions.
2. Route the seat belt tongue through the child
restraint and insert it into the buckle until
you hear and feel the latch engage. Be sure
to follow the child restraint manufacturer's
instructions for belt routing.3. Pull on the shoulder belt until all of the belt
is fully extended. At this time, the belt
retractor is in the automatic locking mode
(child restraint mode). It reverts back to
emergency locking mode when the belt is
fully retracted.
SSS0046
SSS0045A
1-38
Seats, restraints and supplemental air bag systems
Z
01.1.22/R50-D/V5
X
Page 46 of 274
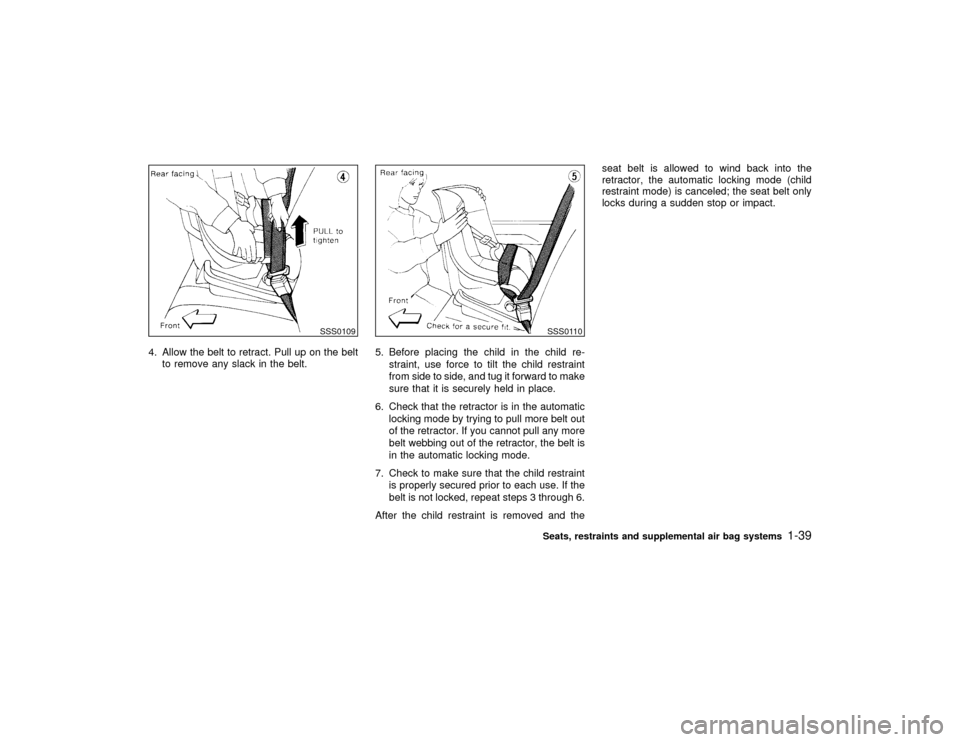
4. Allow the belt to retract. Pull up on the belt
to remove any slack in the belt.5. Before placing the child in the child re-
straint, use force to tilt the child restraint
from side to side, and tug it forward to make
sure that it is securely held in place.
6. Check that the retractor is in the automatic
locking mode by trying to pull more belt out
of the retractor. If you cannot pull any more
belt webbing out of the retractor, the belt is
in the automatic locking mode.
7. Check to make sure that the child restraint
is properly secured prior to each use. If the
belt is not locked, repeat steps 3 through 6.
After the child restraint is removed and theseat belt is allowed to wind back into the
retractor, the automatic locking mode (child
restraint mode) is canceled; the seat belt only
locks during a sudden stop or impact.
SSS0109
SSS0110Seats, restraints and supplemental air bag systems
1-39
Z
01.1.22/R50-D/V5
X
Page 49 of 274
equipped with a locking mode retrac-
tor which must be used when install-
ing a child restraint.
IFailure to use the retractor's locking
mode may result in the child restraint
not being properly secured. The child
restraint could tip over or otherwise
be unsecured and cause injury to the
child in a sudden stop or collision.
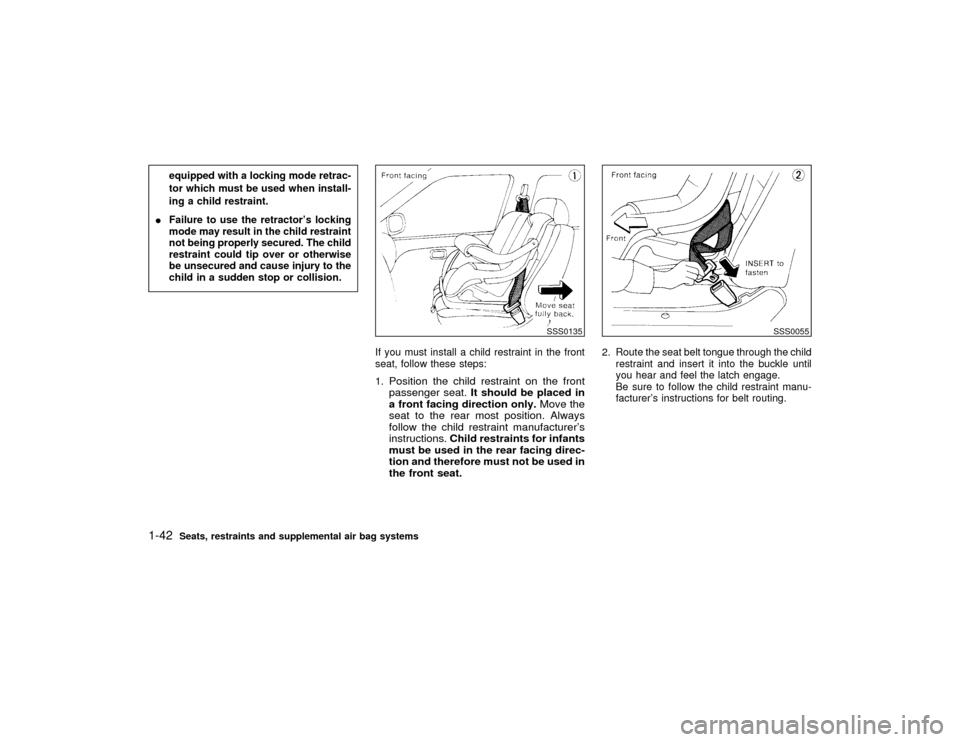
If you must install a child restraint in the front
seat, follow these steps:
1.
Position the child restraint on the front
passenger seat.It should be placed in
a front facing direction only.Move the
seat to the rear most position. Always
follow the child restraint manufacturer's
instructions.Child restraints for infants
must be used in the rear facing direc-
tion and therefore must not be used in
the front seat.
2. Route the seat belt tongue through the child
restraint and insert it into the buckle until
you hear and feel the latch engage.
Be sure to follow the child restraint manu-
facturer's instructions for belt routing.
SSS0135
SSS0055
1-42
Seats, restraints and supplemental air bag systems
Z
01.1.22/R50-D/V5
X
Page 50 of 274
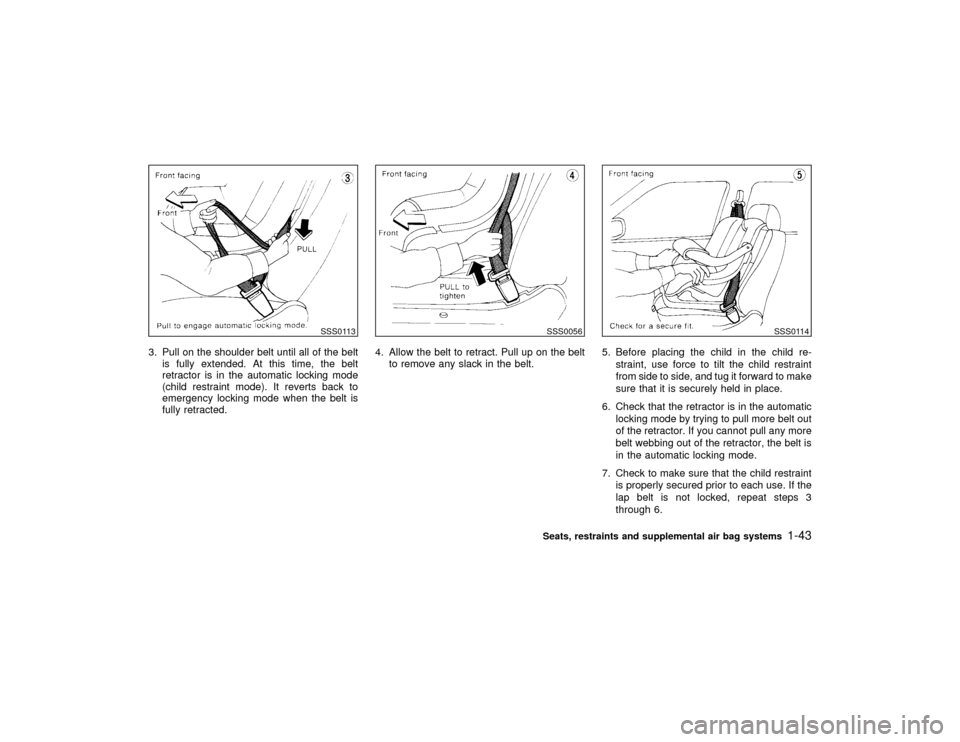
3. Pull on the shoulder belt until all of the belt
is fully extended. At this time, the belt
retractor is in the automatic locking mode
(child restraint mode). It reverts back to
emergency locking mode when the belt is
fully retracted.4. Allow the belt to retract. Pull up on the belt
to remove any slack in the belt.5. Before placing the child in the child re-
straint, use force to tilt the child restraint
from side to side, and tug it forward to make
sure that it is securely held in place.
6. Check that the retractor is in the automatic
locking mode by trying to pull more belt out
of the retractor. If you cannot pull any more
belt webbing out of the retractor, the belt is
in the automatic locking mode.
7. Check to make sure that the child restraint
is properly secured prior to each use. If the
lap belt is not locked, repeat steps 3
through 6.
SSS0113
SSS0056
SSS0114
Seats, restraints and supplemental air bag systems
1-43
Z
01.1.22/R50-D/V5
X
Page 84 of 274
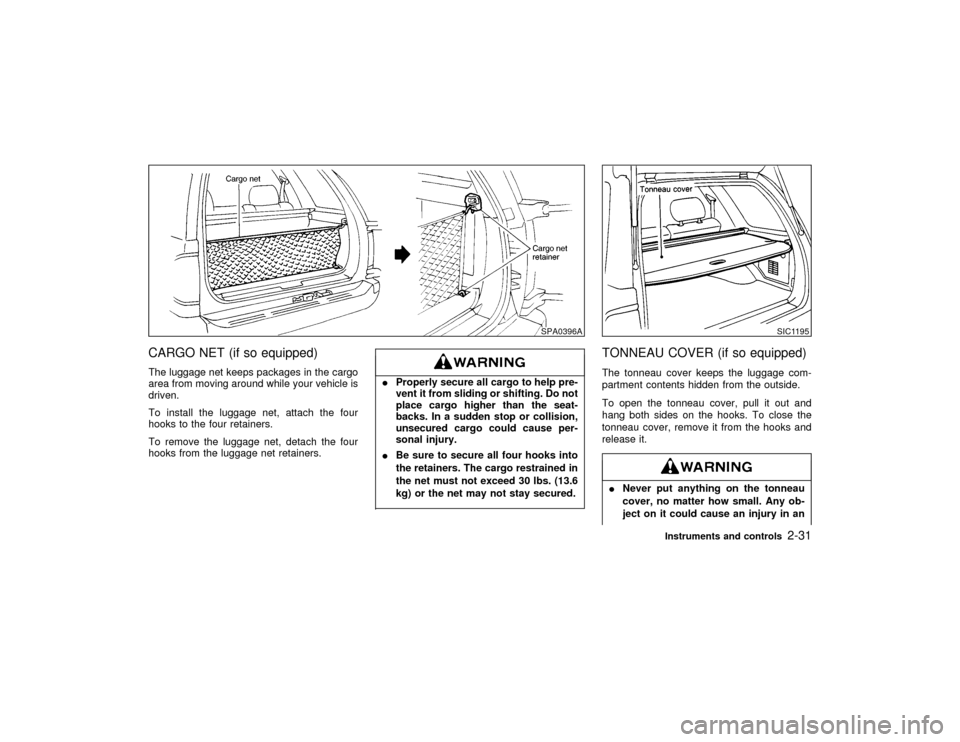
CARGO NET (if so equipped)The luggage net keeps packages in the cargo
area from moving around while your vehicle is
driven.
To install the luggage net, attach the four
hooks to the four retainers.
To remove the luggage net, detach the four
hooks from the luggage net retainers.
IProperly secure all cargo to help pre-
vent it from sliding or shifting. Do not
place cargo higher than the seat-
backs. In a sudden stop or collision,
unsecured cargo could cause per-
sonal injury.
IBe sure to secure all four hooks into
the retainers. The cargo restrained in
the net must not exceed 30 lbs. (13.6
kg) or the net may not stay secured.
TONNEAU COVER (if so equipped)The tonneau cover keeps the luggage com-
partment contents hidden from the outside.
To open the tonneau cover, pull it out and
hang both sides on the hooks. To close the
tonneau cover, remove it from the hooks and
release it.INever put anything on the tonneau
cover, no matter how small. Any ob-
ject on it could cause an injury in an
SPA0396A
SIC1195
Instruments and controls
2-31
Z
01.1.22/R50-D/V5
X
Page 92 of 274

3. Using both hands, simultaneously push the
hand-held transmitter button and the de-
sired HomeLink
button. Do not release the
buttons until step 4 has been completed.
NOTE:
Some garage door openers may require
the procedures noted under ªCanadian
Programmingº.
4. The HomeLinkindicator light will flash,
first slowly and then rapidly. When the
indicator light flashes rapidly, both buttons
may be released. The rapid flashing light
indicates the Integrated HomeLink
Univer-
sal Transceiver has been successfully pro-
grammed.
To program the remaining two buttons, follow
steps 2 through 4.
If, after repeated attempts, you do not suc-
cessfully program the Integrated HomeLink
Universal Transceiver to learn the signal of the
hand-held transmitter, refer to ªRolling Code
Programmingº later in this section.CANADIAN PROGRAMMINGPrior to 1992, D.O.C. regulations required
hand-held transmitters to stop transmitting af-
ter 2 seconds. To program your hand-held
transmitter to HomeLink
, continue to pressand hold the HomeLink
button (note steps 2
through 4 under ªProgramming HomeLink
º)
while you press and re-press (ªcycleº) your
hand-held transmitter every 2 seconds until
the indicator light flashes rapidly (indicating
successful programming).
NOTE:
If programming a garage door opener, etc.,
it is advised to unplug the device during
the ªcyclingº process to prevent possible
damage to the garage door opener compo-
nents.
OPERATING THE INTEGRATED
HomeLink
UNIVERSAL
TRANSCEIVER
The Integrated HomeLink
Universal Trans-
ceiver (once programmed) may now be used
to activate the garage door, etc. To operate,
simply press the appropriate programmed In-
tegrated HomeLink
Universal Transceiver
button. The red indicator light will illuminate
while the signal is being transmitted.
PROGRAMMING
PROBLEM-DIAGNOSISIf the HomeLink
does not quickly learn the
hand-held transmitter information:Ireplace the hand-held transmitter batteries
with new batteries.
Iposition the hand-held transmitter with its
battery area facing away from the
HomeLink
surface.
Ipress and hold both the HomeLink
and
hand-held transmitter buttons without inter-
ruption.
Iposition the hand-held transmitter 2 to 5
inches (50 to 127 mm) away from the
HomeLink
surface. Hold the transmitter in
that position for up to 15 seconds. If
HomeLinkis not programmed within that
time, try holding the transmitter in another
position - keeping the indicator light in view
at all times.
If you continue to have programming difficul-
ties, please contact the NISSAN Consumer
Affairs Department. The phone numbers are
located in the Foreword of this Owner's
Manual.
CLEARING THE PROGRAMMED
INFORMATIONIndividual buttons cannot be cleared, however
to clear all programming, press and hold the
two outside buttons and release when the
Instruments and controls
2-39
Z
01.1.22/R50-D/V5
X