NISSAN PATHFINDER 2000 R50 / 2.G Owners Manual
Manufacturer: NISSAN, Model Year: 2000, Model line: PATHFINDER, Model: NISSAN PATHFINDER 2000 R50 / 2.GPages: 265, PDF Size: 2.2 MB
Page 101 of 265
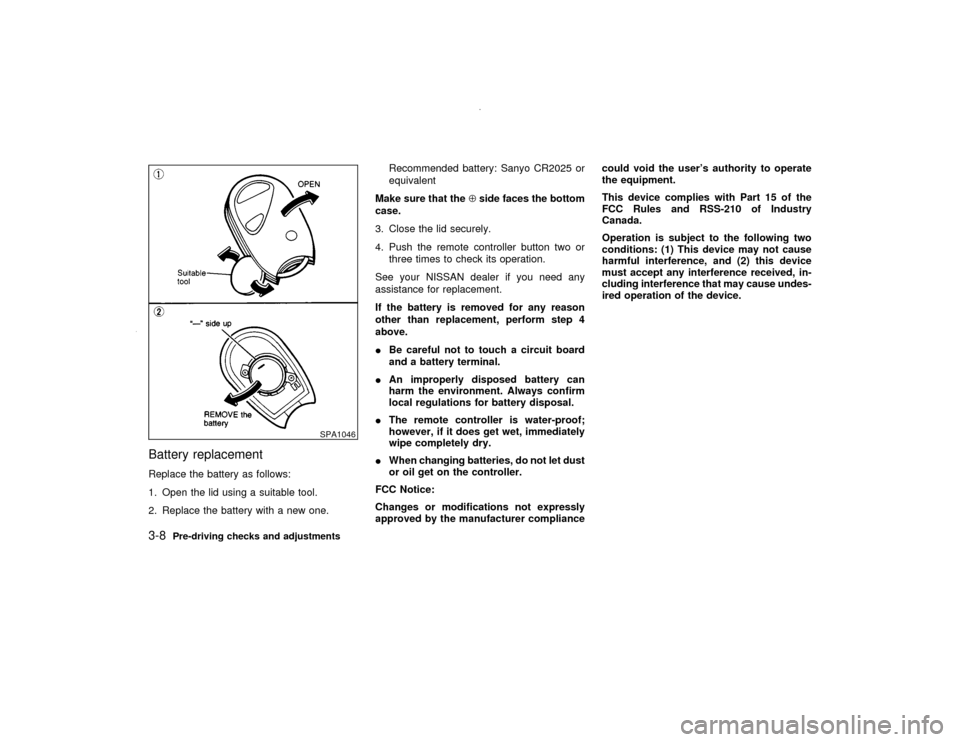
Battery replacementReplace the battery as follows:
1. Open the lid using a suitable tool.
2. Replace the battery with a new one.Recommended battery: Sanyo CR2025 or
equivalent
Make sure that theÅside faces the bottom
case.
3. Close the lid securely.
4. Push the remote controller button two or
three times to check its operation.
See your NISSAN dealer if you need any
assistance for replacement.
If the battery is removed for any reason
other than replacement, perform step 4
above.
IBe careful not to touch a circuit board
and a battery terminal.
IAn improperly disposed battery can
harm the environment. Always confirm
local regulations for battery disposal.
IThe remote controller is water-proof;
however, if it does get wet, immediately
wipe completely dry.
IWhen changing batteries, do not let dust
or oil get on the controller.
FCC Notice:
Changes or modifications not expressly
approved by the manufacturer compliancecould void the user's authority to operate
the equipment.
This device complies with Part 15 of the
FCC Rules and RSS-210 of Industry
Canada.
Operation is subject to the following two
conditions: (1) This device may not cause
harmful interference, and (2) this device
must accept any interference received, in-
cluding interference that may cause undes-
ired operation of the device.
SPA1046
3-8
Pre-driving checks and adjustments
Z
00.1.17/R50-D/V5
X
Page 102 of 265
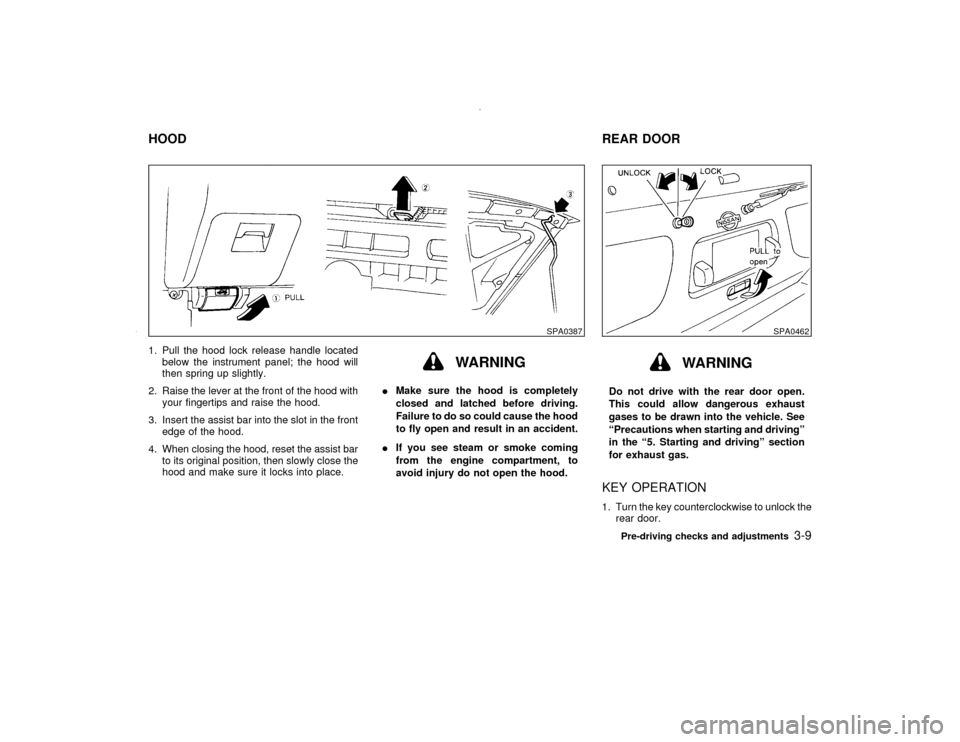
1. Pull the hood lock release handle located
below the instrument panel; the hood will
then spring up slightly.
2. Raise the lever at the front of the hood with
your fingertips and raise the hood.
3. Insert the assist bar into the slot in the front
edge of the hood.
4. When closing the hood, reset the assist bar
to its original position, then slowly close the
hood and make sure it locks into place.
WARNING
IMake sure the hood is completely
closed and latched before driving.
Failure to do so could cause the hood
to fly open and result in an accident.
IIf you see steam or smoke coming
from the engine compartment, to
avoid injury do not open the hood.
WARNING
Do not drive with the rear door open.
This could allow dangerous exhaust
gases to be drawn into the vehicle. See
ªPrecautions when starting and drivingº
in the ª5. Starting and drivingº section
for exhaust gas.KEY OPERATION1. Turn the key counterclockwise to unlock the
rear door.
SPA0387
SPA0462
HOODREAR DOOR
Pre-driving checks and adjustments
3-9
Z
00.1.17/R50-D/V5
X
Page 103 of 265
Turning the rear door key one time coun-
terclockwise will unlock the rear door.
From that position, returning the key to
neutral (where the key can only the re-
moved and inserted.) and turning it coun-
terclockwise again within 5 seconds will
unlock all doors.
2. Pull the opener handle to open the rear
door.
3. To lock the rear door, push it down firmly
and turn the key clockwise.
The power door lock system allows you to
lock or unlock all doors including the rear
door simultaneously.
ITurning the front door key to the front of
the vehicle will lock all doors.
ITurning the front door key one time to
the rear of the vehicle will unlock the
corresponding door. From that position,
returning the key to neutral (where the
key can only be removed and inserted.)
and turning it to the rear again within 5
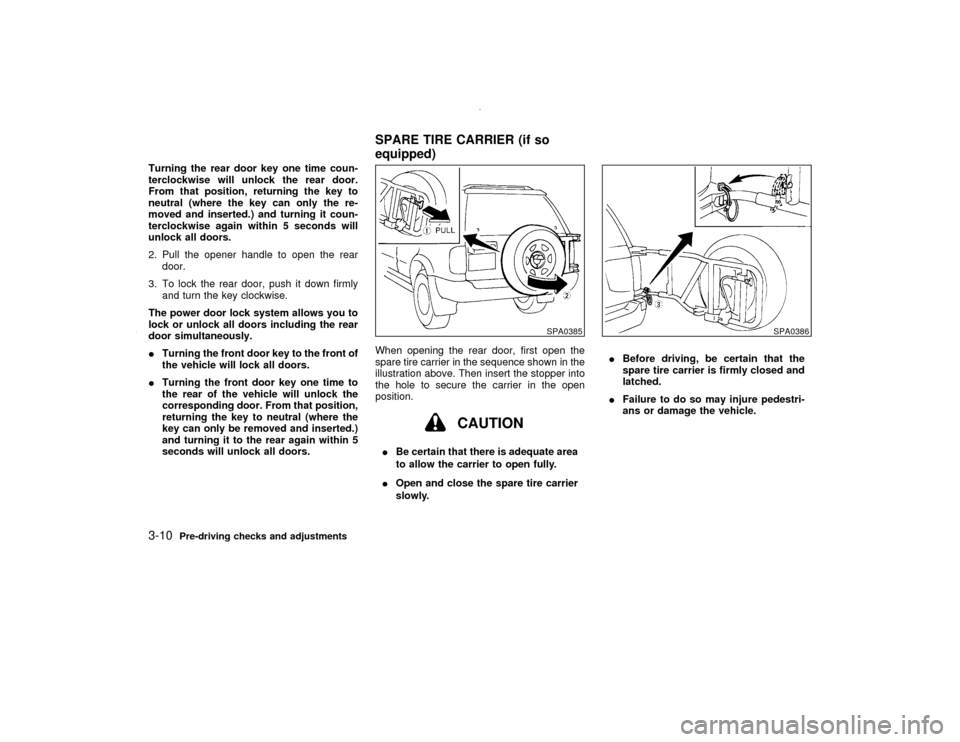
seconds will unlock all doors.When opening the rear door, first open the
spare tire carrier in the sequence shown in the
illustration above. Then insert the stopper into
the hole to secure the carrier in the open
position.
CAUTION
IBe certain that there is adequate area
to allow the carrier to open fully.
IOpen and close the spare tire carrier
slowly.IBefore driving, be certain that the
spare tire carrier is firmly closed and
latched.
IFailure to do so may injure pedestri-
ans or damage the vehicle.
SPA0385
SPA0386
SPARE TIRE CARRIER (if so
equipped)
3-10
Pre-driving checks and adjustments
Z
00.1.17/R50-D/V5
X
Page 104 of 265
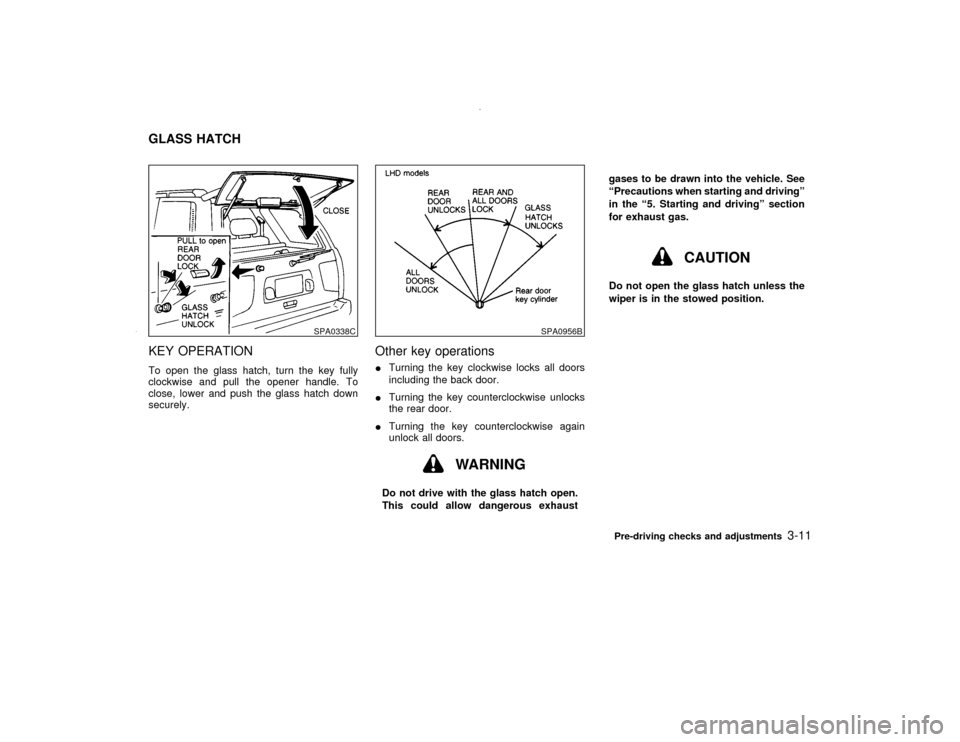
KEY OPERATIONTo open the glass hatch, turn the key fully
clockwise and pull the opener handle. To
close, lower and push the glass hatch down
securely.
Other key operationsITurning the key clockwise locks all doors
including the back door.
ITurning the key counterclockwise unlocks
the rear door.
ITurning the key counterclockwise again
unlock all doors.
WARNING
Do not drive with the glass hatch open.
This could allow dangerous exhaustgases to be drawn into the vehicle. See
ªPrecautions when starting and drivingº
in the ª5. Starting and drivingº section
for exhaust gas.
CAUTION
Do not open the glass hatch unless the
wiper is in the stowed position.
SPA0338C
SPA0956B
GLASS HATCH
Pre-driving checks and adjustments
3-11
Z
00.1.17/R50-D/V5
X
Page 105 of 265
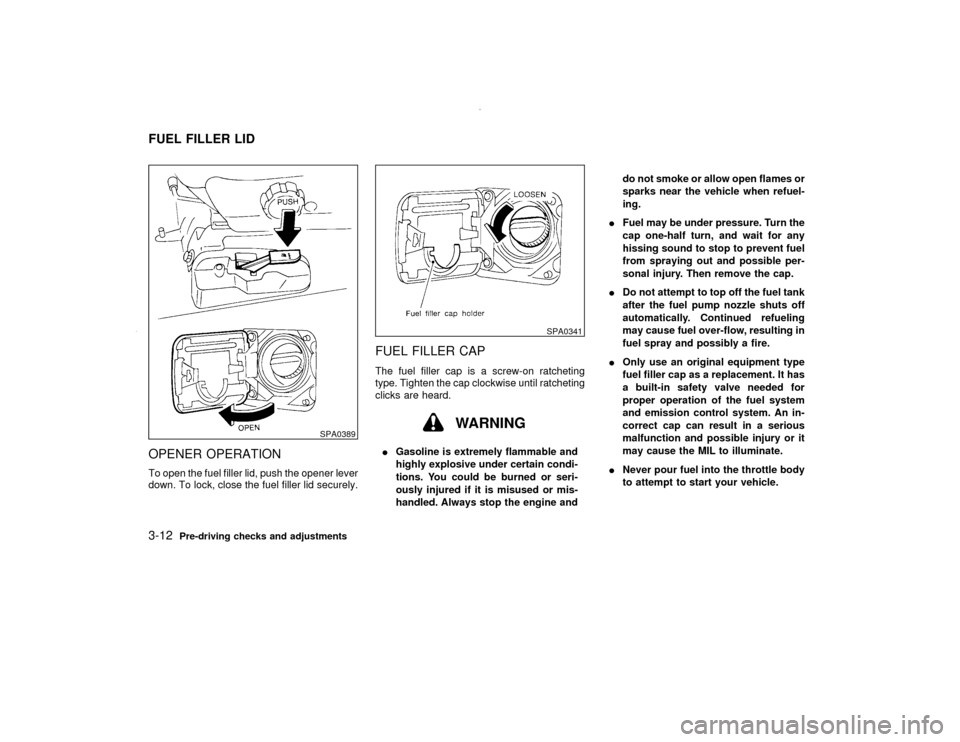
OPENER OPERATIONTo open the fuel filler lid, push the opener lever
down. To lock, close the fuel filler lid securely.
FUEL FILLER CAPThe fuel filler cap is a screw-on ratcheting
type. Tighten the cap clockwise until ratcheting
clicks are heard.
WARNING
IGasoline is extremely flammable and
highly explosive under certain condi-
tions. You could be burned or seri-
ously injured if it is misused or mis-
handled. Always stop the engine anddo not smoke or allow open flames or
sparks near the vehicle when refuel-
ing.
IFuel may be under pressure. Turn the
cap one-half turn, and wait for any
hissing sound to stop to prevent fuel
from spraying out and possible per-
sonal injury. Then remove the cap.
IDo not attempt to top off the fuel tank
after the fuel pump nozzle shuts off
automatically. Continued refueling
may cause fuel over-flow, resulting in
fuel spray and possibly a fire.
IOnly use an original equipment type
fuel filler cap as a replacement. It has
a built-in safety valve needed for
proper operation of the fuel system
and emission control system. An in-
correct cap can result in a serious
malfunction and possible injury or it
may cause the MIL to illuminate.
INever pour fuel into the throttle body
to attempt to start your vehicle.
SPA0389
SPA0341
FUEL FILLER LID3-12
Pre-driving checks and adjustments
Z
00.1.17/R50-D/V5
X
Page 106 of 265
CAUTION
IIf fuel is spilled on the vehicle body,
flush it away with water to avoid paint
damage.
ITighten until cap clicks, failure to
tighten fuel cap properly may cause
the
malfunction indicator lamp
(MIL) to illuminate. If this occurs, se-
curely close the fuel filler cap. After
driven for a while, the lamp should
turn off. If the lamp remains on, have
the vehicle inspected by an autho-
rized NISSAN dealer.
For additional information, see the
ªMalfunction indicator lamp (MIL)º in
the ª2. Instruments and controlsº
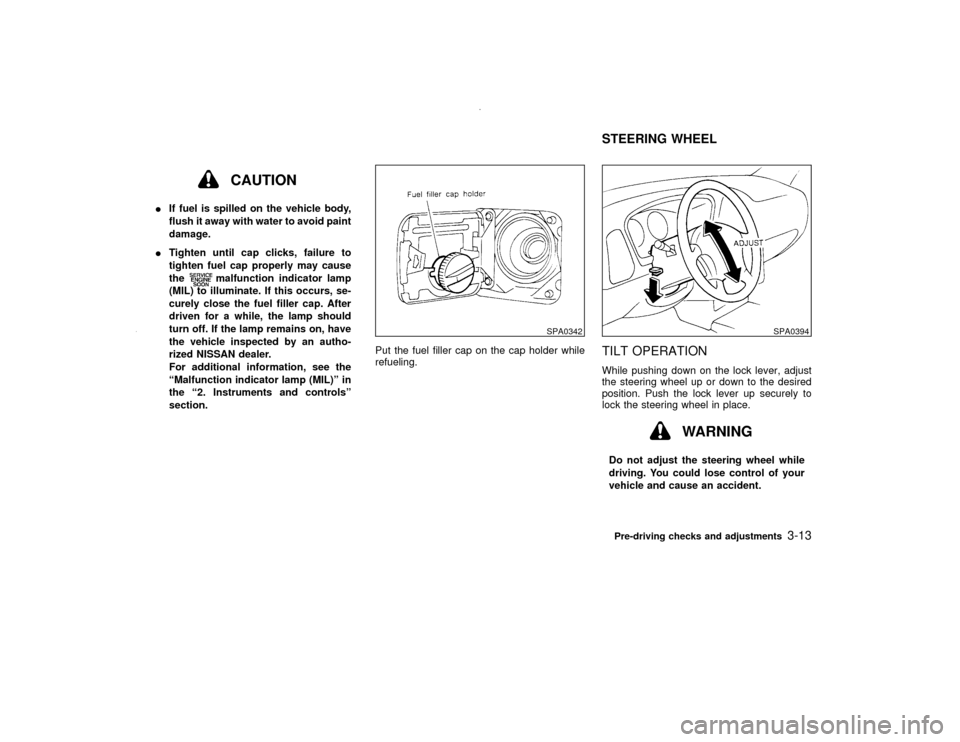
section.Put the fuel filler cap on the cap holder while
refueling.
TILT OPERATIONWhile pushing down on the lock lever, adjust
the steering wheel up or down to the desired
position. Push the lock lever up securely to
lock the steering wheel in place.
WARNING
Do not adjust the steering wheel while
driving. You could lose control of your
vehicle and cause an accident.
SPA0342
SPA0394
STEERING WHEEL
Pre-driving checks and adjustments
3-13
Z
00.1.17/R50-D/V5
X
Page 107 of 265
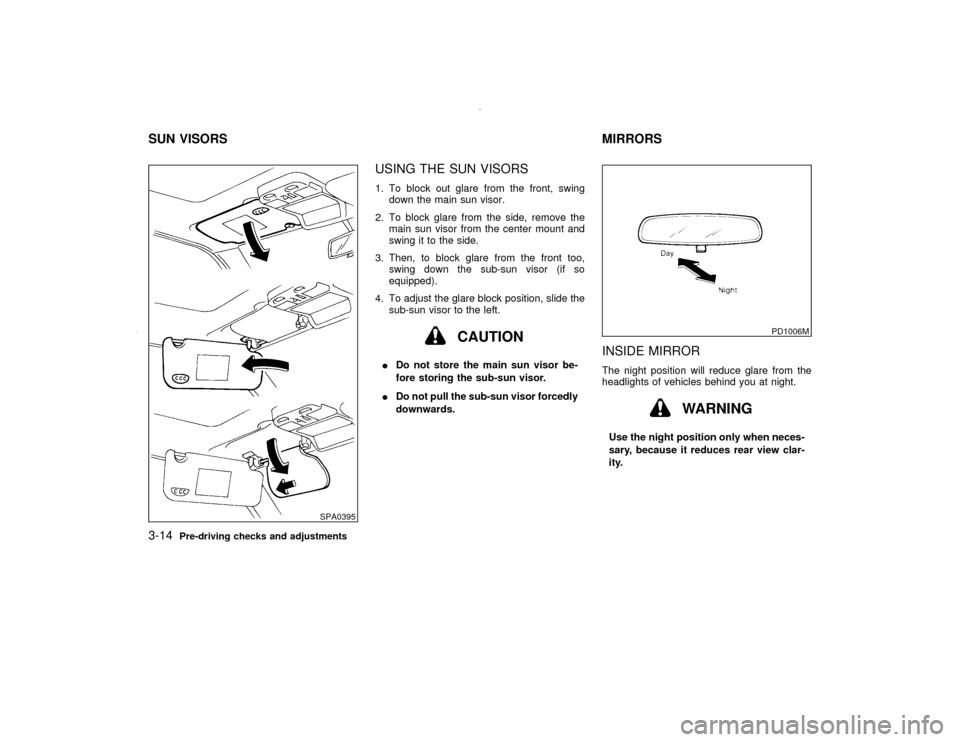
USING THE SUN VISORS1. To block out glare from the front, swing
down the main sun visor.
2. To block glare from the side, remove the
main sun visor from the center mount and
swing it to the side.
3. Then, to block glare from the front too,
swing down the sub-sun visor (if so
equipped).
4. To adjust the glare block position, slide the
sub-sun visor to the left.
CAUTION
IDo not store the main sun visor be-
fore storing the sub-sun visor.
IDo not pull the sub-sun visor forcedly
downwards.
INSIDE MIRRORThe night position will reduce glare from the
headlights of vehicles behind you at night.
WARNING
Use the night position only when neces-
sary, because it reduces rear view clar-
ity.
SPA0395
PD1006M
SUN VISORS MIRRORS3-14
Pre-driving checks and adjustments
Z
00.1.17/R50-D/V5
X
Page 108 of 265
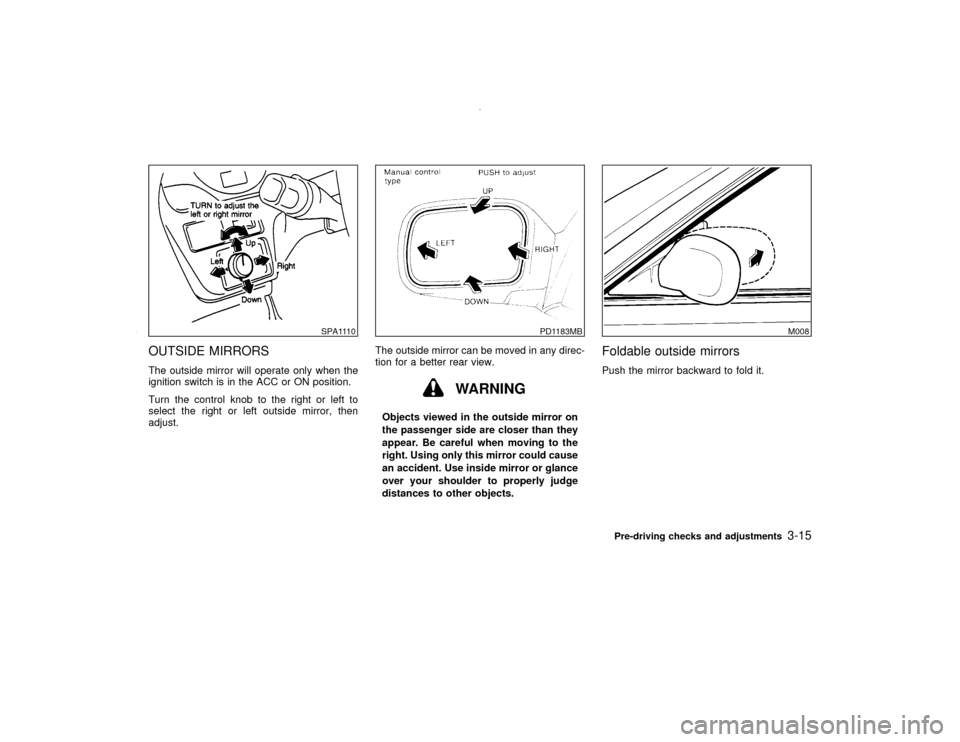
OUTSIDE MIRRORSThe outside mirror will operate only when the
ignition switch is in the ACC or ON position.
Turn the control knob to the right or left to
select the right or left outside mirror, then
adjust.The outside mirror can be moved in any direc-
tion for a better rear view.
WARNING
Objects viewed in the outside mirror on
the passenger side are closer than they
appear. Be careful when moving to the
right. Using only this mirror could cause
an accident. Use inside mirror or glance
over your shoulder to properly judge
distances to other objects.
Foldable outside mirrorsPush the mirror backward to fold it.
SPA1110
PD1183MB
M008
Pre-driving checks and adjustments
3-15
Z
00.1.17/R50-D/V5
X
Page 109 of 265

MEMO3-16
Pre-driving checks and adjustments
Z
00.1.17/R50-D/V5
X
Page 110 of 265

4 Heater, air conditioner and audio systemsVentilators ................................................................. 4-2
Heater and air conditioner (Manual) ......................... 4-3
Controls ..................................................................... 4-3
Heater operation ....................................................... 4-4
Air conditioner operation ........................................... 4-5
Air flow charts ........................................................... 4-6
Heater and air conditioner (Automatic) ..................... 4-9
Automatic operation ................................................ 4-10
Manual operation .................................................... 4-10
Operating tips .......................................................... 4-11Servicing air conditioner .......................................... 4-11
Audio system........................................................... 4-12
FM radio reception .................................................. 4-12
AM radio reception .................................................. 4-13
FM-AM radio with cassette player .......................... 4-14
FM-AM radio with cassette player and compact disc
(CD) player .............................................................. 4-19
Antenna ................................................................... 4-25
CB radio or car phone ............................................ 4-26
Z
00.1.17/R50-D/V5
X