display NISSAN PATHFINDER 2000 R50 / 2.G User Guide
[x] Cancel search | Manufacturer: NISSAN, Model Year: 2000, Model line: PATHFINDER, Model: NISSAN PATHFINDER 2000 R50 / 2.GPages: 265, PDF Size: 2.2 MB
Page 126 of 265
CAUTION
Do not force the cassette tape into the
tape door. This could cause player dam-
age.
The cassette tape automatically changes di-
rections to play the other side when the first
side is complete. At this time, the moving
digital squares illuminate on the left side of the
display window.
Precaution on cassette player operation:
ITo maintain good quality sound, NISSAN
recommends using cassette tapes of 60
minutes or shorter in length.
ICassette tapes should be removed from the
player when not in use. Store cassettes in
their protective cases and away from direct
sunlight, heat, moisture and magnetic
sources.
IDirect sunlight can cause the cassette to
become deformed. The use of deformed
cassettes may cause the cassette to jam in
the player.
IDo not use cassettes with labels which arepeeling and loose. If used, the label could
jam in the player.
IIf a cassette has loose tape, insert a pencil
through one of the cassette hubs and re-
wind the tape firmly around the hubs. Loose
tape may cause tape jamming and waver-
ing sound quality.
IOver a period of time, the playback head,
capstan and pinch roller may collect a tape
coating residue as the tape is played. This
residue accumulation can cause weak or
wavering sound, and should be removed
periodically with a head cleaning tape. If the
residue is not removed periodically, the
player may need to be disassembled for
cleaning.
PLAY/STOP:
Push the PLAY/STOP button while the cas-
sette tape is playing to stop the tape. Push the
button again to play the tape.
FF (Fast Forward), REW
(Rewind):
Push either the FF or REW button for the
desired direction.
The FF or REW symbol illuminates in the
display.
To stop the FF or REW function, press the
or
again, or the
button.
APS (Automatic
Program Search) FF,
APS REW:
Push either the APS FF or APS REW button
while the cassette tape is playing. The tape
runs quickly, stops, then plays the next selec-
tion. Either the FF or REW symbol flashes in
the display while searching for the selection.
This system searches at the blank intervals
between selections. If there is a blank interval
within one selection or there is no interval
between selections, the system may not stop
in the desired or expected location.
PROG (Program):
Push the PROG (program) select button. The
moving digital squares illuminate on either the
right or left side of the display window to
indicate the side of program play.Dolby NR (Noise Reduction):
Push the Dolby NR button for Dolby NR en-
coded tapes to reduce high frequency tape
noise. The
indicator light comes on.
If in the clock display is in priority mode when
the Dolby NR button is pressed,
and
TAPE illuminate in the display window for
about 10 seconds. The clock mode then re-
Heater, air conditioner and audio systems
4-17
Z
00.1.17/R50-D/V5
X
Page 127 of 265
turns to the display window.
Dolby NR is manufactured under license from
Dolby Laboratories Licensing Corporation.
DOLBY NR and the double-D symbol are
trademarks of Dolby Laboratories Licensing
Corporation.
Metal or chrome tape usage:
The cassette player is automatically set to high
performance play when playing a metal or
chrome cassette tape.
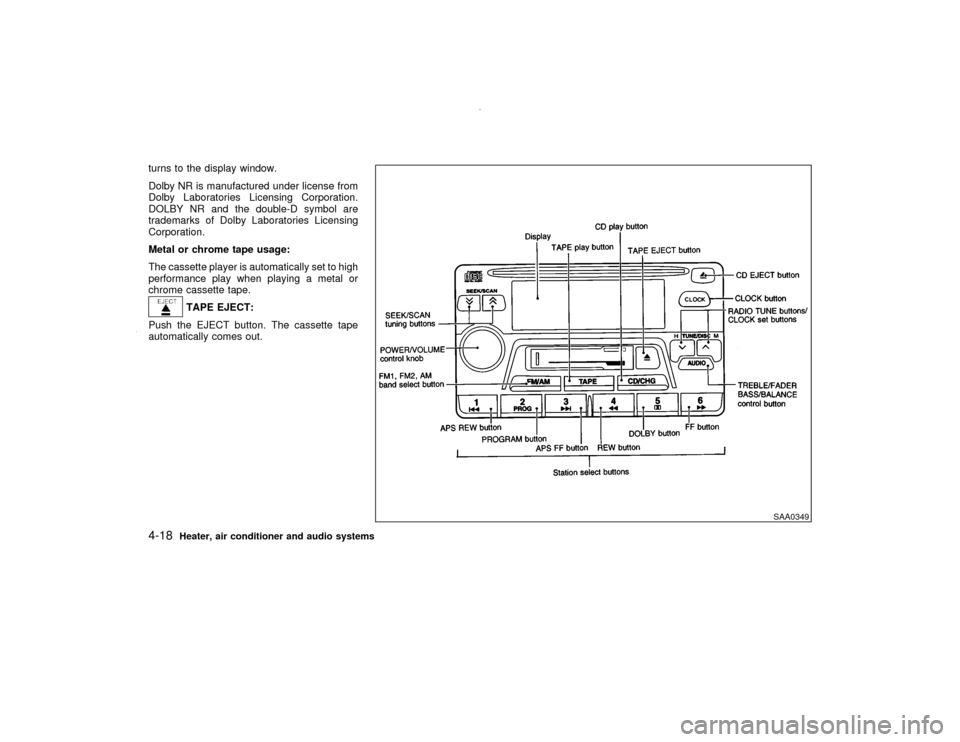
TAPE EJECT:
Push the EJECT button. The cassette tape
automatically comes out.
SAA0349
4-18
Heater, air conditioner and audio systems
Z
00.1.17/R50-D/V5
X
Page 129 of 265
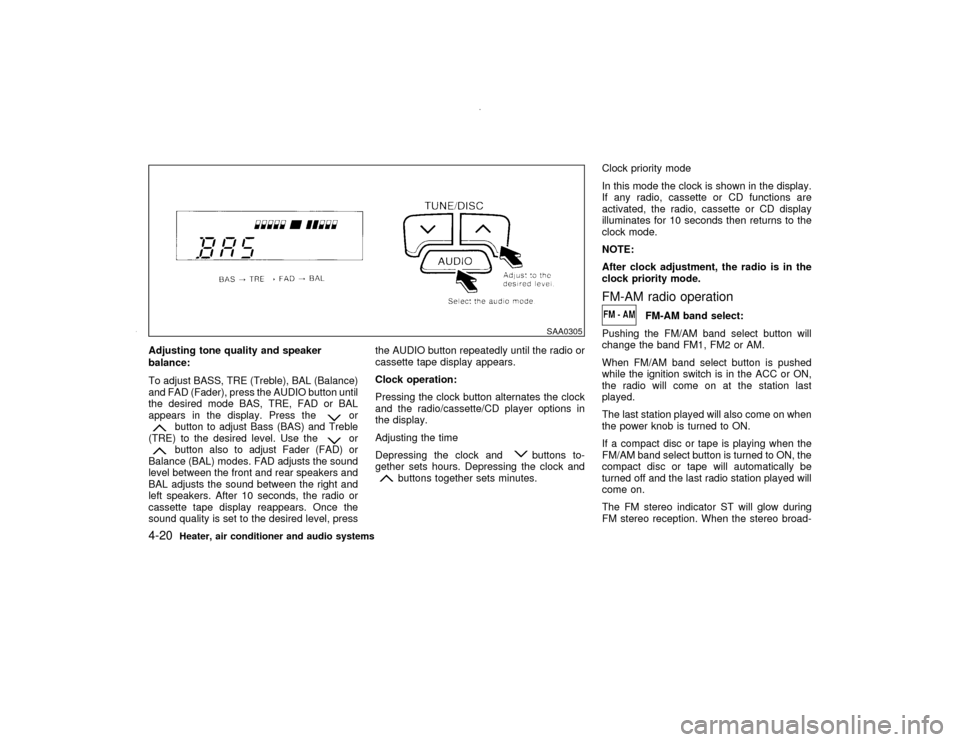
Adjusting tone quality and speaker
balance:
To adjust BASS, TRE (Treble), BAL (Balance)
and FAD (Fader), press the AUDIO button until
the desired mode BAS, TRE, FAD or BAL
appears in the display. Press the
or
button to adjust Bass (BAS) and Treble
(TRE) to the desired level. Use the
or
button also to adjust Fader (FAD) or
Balance (BAL) modes. FAD adjusts the sound
level between the front and rear speakers and
BAL adjusts the sound between the right and
left speakers. After 10 seconds, the radio or
cassette tape display reappears. Once the
sound quality is set to the desired level, pressthe AUDIO button repeatedly until the radio or
cassette tape display appears.
Clock operation:
Pressing the clock button alternates the clock
and the radio/cassette/CD player options in
the display.
Adjusting the time
Depressing the clock and
buttons to-
gether sets hours. Depressing the clock and
buttons together sets minutes.Clock priority mode
In this mode the clock is shown in the display.
If any radio, cassette or CD functions are
activated, the radio, cassette or CD display
illuminates for 10 seconds then returns to the
clock mode.
NOTE:
After clock adjustment, the radio is in the
clock priority mode.
FM-AM radio operation
FM-AM band select:
Pushing the FM/AM band select button will
change the band FM1, FM2 or AM.
When FM/AM band select button is pushed
while the ignition switch is in the ACC or ON,
the radio will come on at the station last
played.
The last station played will also come on when
the power knob is turned to ON.
If a compact disc or tape is playing when the
FM/AM band select button is turned to ON, the
compact disc or tape will automatically be
turned off and the last radio station played will
come on.
The FM stereo indicator ST will glow during
FM stereo reception. When the stereo broad-
SAA0305
4-20
Heater, air conditioner and audio systems
Z
00.1.17/R50-D/V5
X
Page 132 of 265
FF (Fast Forward), REW
(Rewind):
Push the(fast forward) button to fast
forward the tape. To rewind the tape, push the
(rewind) button. Either the FF or REW
symbol illuminates on the right side of the
display window. To stop the FF or REW func-
tion, press the
(fast forward) or
(re-
wind) again, or the TAPE button.
APS (Automatic Program
Search) FF, APS REW:
When the(APS FF) button is pushed
while the tape is being played, the next pro-
gram will start to play from the beginning. Push
the
(APS FF) button several times to skip
through programs. The tape will advance the
number of times the button is pushed (up to
nine programs).
When the
(APS REW) button is pushed
once, the program being played starts over
from the beginning. Push the
(APS
REW) button several times to skip back sev-
eral selections. The tape will go back the
number of times the button is pushed. Either
the FF or REW symbol flashes on the right
side of the display window while searching for
the selection.
This system searches for the blank intervalsbetween selections. If there is a blank interval
within one program or there is no interval
between programs, the system may not stop in
the desired or expected location.
PROG (Program):
Push the PROG button to change the tape
side while the tape is being played.
The cassette tape will automatically change
directions to play the other side when the first
side is completed.Dolby NR (Noise Reduction):
Push the Dolby NR
button for Dolby NR
encoded tapes to reduce high frequency tape
noise. The indicator will come on.
Dolby noise reduction manufactured under li-
cense from Dolby Laboratories Licensing Cor-
poration. Dolby NR and the double-D symbol
are trademarks of Dolby Laboratories
Licensing Corporation.
Metal or chrome tape usage:
The cassette player will be automatically set to
high performance play when playing a metal or
chrome cassette tape.TAPE EJECT:
When this button is pushed with the tape
loaded, the tape will be ejected.When the tape is ejected while it is being
played, the system will be turned off.
Compact Disc (CD) player operation
CAUTION
IDuring cold weather or rainy days,
the player may malfunction due to the
humidity. If this occurs, remove the
CD and dehumidify or ventilate the
player completely.
IThe player may skip while driving on
rough roads.
IThe CD player sometimes cannot
function when the compartment tem-
perature is extremely high. Decrease
the temperature before use.
IDo not expose the CD to direct sun-
light.
ICDs that are of poor quality, dirty,
scratched, or covered with finger-
prints may not work properly.
IDo not use an 8 cm CD adapter as this
will cause malfunction.
Heater, air conditioner and audio systems
4-23
Z
00.1.17/R50-D/V5
X
Page 133 of 265
IRecordable compact discs (CD-R)
may not function properly in the CD
player.
Turn the ignition key to the ACC or ON position
and insert the compact disc into the slot with
the label side facing up. The compact disc will
be guided automatically into the slot and start
playing.
After loading the disc, the number of tracks on
the disc and the play time will appear on the
display.
If the radio or tape is already operating, it will
automatically turn off and the compact disc will
play.
CAUTION
Do not force the compact disc into the
slot. This could damage the player.
If the system has been turned off while the
compact disc was playing, pushing the
ON×OFF/VOL control knob will start the com-
pact disc.
8 cm diameter compact discs can also be used
without an adapter.
PLAY:
When the CD/CHG button is pushed with the
system off and the compact disc loaded, the
system will turn on and the compact disc will
start to play.
When the CD/CHG button is pushed with the
compact disc loaded but the tape or the radio
playing, the tape or radio will automatically be
turned off and the compact disc will start to
play.
FF (Fast Forward), REW
(Rewind):
When the(fast forward) or
(rewind)
button is pushed while the compact disc is
being played, the compact disc will play while
fast forwarding or rewinding. When the button
is released, the compact disc will return to
normal play speed.
APS (Automatic Program
Search) FF, APS REW:
When the(APS FF) button is pushed
while the compact disc is being played, the
program next to the present one will start to
play from its beginning. Push several times to
skip through programs. The compact disc will
advance the number of times the button is
pushed. (When the last program on the com-
pact disc is skipped through, the first programwill be played.) When the
(APS REW)
button is pushed, the program being played
returns to its beginning. Push several times to
skip back through programs. The compact disc
will go back the number of times the button is
pushed.
PROG (Program):
When the PROG button is pushed while the
compact disc is being played, the play pattern
will change as follows:
no mark: All the programs will be played
repeatedly in sequence.
1: Only one program (the one being played
when the PROG button is pushed) will be
repeated.
RANDOM: Programs will be played at random,
not following the sequence on the compact
disc. The same program may be repeated
twice.
When the compact disc is ejected, the
play pattern will automatically change to
no mark.
CD EJECT:
When the CD EJECT button is pushed with the
compact disc loaded, the compact disc will be
ejected.
4-24
Heater, air conditioner and audio systems
Z
00.1.17/R50-D/V5
X
Page 134 of 265
When this button is pushed while the compact
disc is being played, the compact disc will
come out and the system will turn off.
If the compact disc comes out and is not
removed, it will be pulled back into the slot
to protect it. (without 8 cm diameter com-
pact discs)
CD IN indicator:
CD IN indicator appears on the display when
the CD is loaded with the system on.
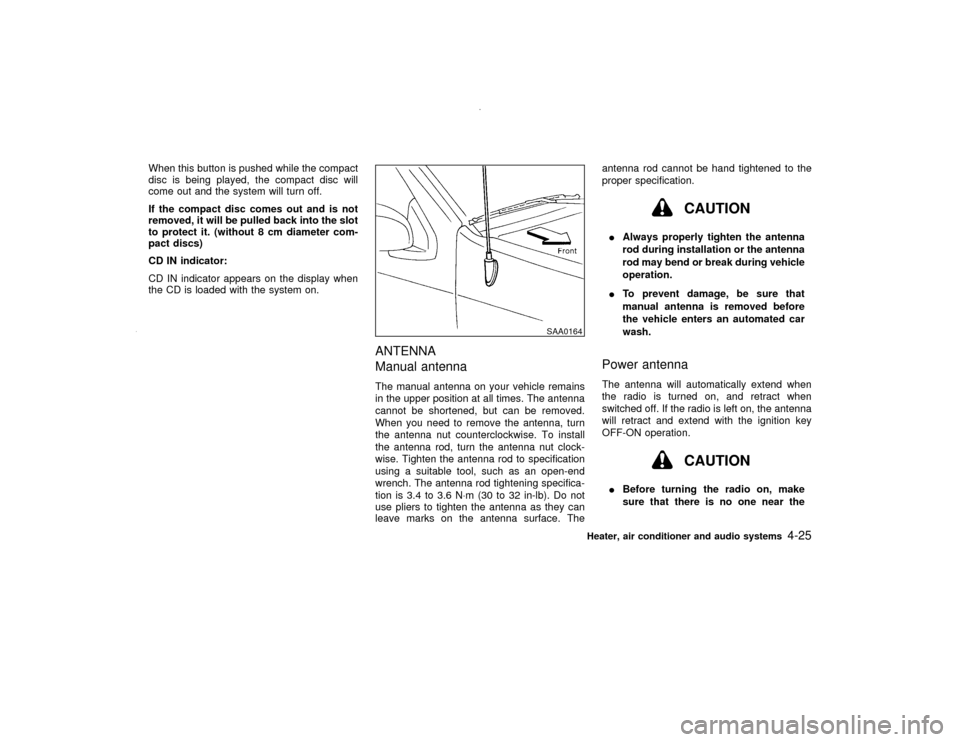
ANTENNA
Manual antennaThe manual antenna on your vehicle remains
in the upper position at all times. The antenna
cannot be shortened, but can be removed.
When you need to remove the antenna, turn
the antenna nut counterclockwise. To install
the antenna rod, turn the antenna nut clock-
wise. Tighten the antenna rod to specification
using a suitable tool, such as an open-end
wrench. The antenna rod tightening specifica-
tion is 3.4 to 3.6 N×m (30 to 32 in-lb). Do not
use pliers to tighten the antenna as they can
leave marks on the antenna surface. Theantenna rod cannot be hand tightened to the
proper specification.
CAUTION
IAlways properly tighten the antenna
rod during installation or the antenna
rod may bend or break during vehicle
operation.
ITo prevent damage, be sure that
manual antenna is removed before
the vehicle enters an automated car
wash.Power antennaThe antenna will automatically extend when
the radio is turned on, and retract when
switched off. If the radio is left on, the antenna
will retract and extend with the ignition key
OFF-ON operation.
CAUTION
IBefore turning the radio on, make
sure that there is no one near the
SAA0164
Heater, air conditioner and audio systems
4-25
Z
00.1.17/R50-D/V5
X
Page 257 of 265

Child restraints ................................................ 1-31
Installation on front passenger seat .......... 1-42
Installation on rear seat outboard
positions .................................................... 1-35
Installation on rear seat center position .... 1-33
Precautions on child restraints .................. 1-31
Top tether strap anchor point locations .... 1-41
With top tether strap.................................. 1-40
Child safety ..................................................... 1-24
Child safety rear door lock................................ 3-4
Chimes ............................................................ 2-13
Cigarette lighter (accessory) and ashtray....... 2-23
Circuit breaker, Fusible link ............................ 8-21
Cleaning exterior and interior .................... 7-2, 7-3
Clutch
Clutch pedal .............................................. 8-21
Fluid ........................................................... 8-12
Clutch housing drain (
only) .................. 8-34
Cold weather driving ....................................... 5-28
Compact Disc (CD) player (See audio
system) ........................................................... 4-23
Compact disc (CD) player operation .............. 4-12
Compass display .............................................. 2-7
Console box .................................................... 2-27
Controls
Audio controls............................................ 4-12
Audio controls (rear).................................. 4-12
Audio controls (steering wheel)................. 4-12
Heater and air conditioner controls ............. 4-3
Heater and air conditioner controls
(automatic)................................................... 4-9
Coolant
Capacities and recommended fuel/
lubricants ................................................... 10-2Changing engine coolant ............................ 8-6
Checking engine coolant level .................... 8-5
Corrosion protection ......................................... 7-4
Cruise control.................................................. 5-17
Cup holders .................................................... 2-25
D
Daytime running light system ......................... 2-19
Defogger switch, Glass hatch and outside mirror
defogger switch............................................... 2-17
Dimensions and weights ............................... 10-10
Door open warning light ................................. 2-11
Drive belts ....................................................... 8-15
Driving
Cold weather driving ................................. 5-28
Driving with automatic transmission.......... 5-10
Driving with manual transmission ............. 5-14
On-pavement and offroad driving ............... 5-3
Precautions when starting and driving ........ 5-2
Safety precautions....................................... 5-4
E
Economy, Fuel ................................................ 5-20
Emission control information label ................ 10-12
Emission control system warranty ................ 10-18
Engine
Before starting the engine ........................... 5-9
Block heater .............................................. 5-29
Capacities and recommended fuel/
lubricants ................................................... 10-2Changing engine coolant ............................ 8-6
Changing engine oil .................................... 8-8
Changing engine oil filter ............................ 8-9
Checking engine coolant level .................... 8-5
Checking engine oil level ............................ 8-7
Coolant temperature gauge ........................ 2-4
Engine compartment check locations ......... 8-4
Engine cooling system ................................ 8-5
Engine oil..................................................... 8-7
Engine oil and oil filter recommendation... 10-6
Engine oil viscosity .................................... 10-6
Engine serial number .............................. 10-12
Engine specifications................................. 10-9
If your engine overheats ........................... 6-11
Starting the engine ...................................... 5-9
Exhaust gas (Carbon monoxide) ...................... 5-2
F
F.M.V.S.S. certification label......................... 10-12
Filter, Air cleaner housing filter ....................... 8-17
Flashers (See hazard warning flasher
switch) ............................................................. 2-21
Flat tire .............................................................. 6-2
Floor mat cleaning ............................................ 7-4
Fluid
Automatic transmission fluid (ATF) ........... 8-10
Brake and clutch fluid................................ 8-12
Brake fluid ................................................. 8-12
Capacities and recommended fuel/
lubricants ................................................... 10-2
Engine coolant............................................. 8-5
Engine oil..................................................... 8-7
Z
00.1.17/R50-D/V5
X
11-2
Page 259 of 265

Engine serial number .............................. 10-12
Vehicle identification number (VIN)......... 10-11
Light
Air bag warning light ................................. 1-21
Bulb replacement ...................................... 8-24
Fog light switch ......................................... 2-20
Headlamps (Bulb replacement)................. 8-25
Headlight switch ........................................ 2-17
Headlights (Bulb replacement) .................. 8-25
Interior lights .............................................. 2-34
Map lights .................................................. 2-34
Personal lights ........................................... 2-35
Replacement ............................................. 8-24
Spot lights.................................................. 2-34
Vanity mirror light ...................................... 2-36
Warning/indicator lights and
chimes ................................................ 2-9, 2-12
Loading information (See vehicle loading
information) ................................................... 10-13
Lock
Door locks ................................................... 3-2
Glass hatch lock ........................................ 3-11
Glove box lock........................................... 2-26
Power door lock .......................................... 3-2
Rear door lock ............................................. 3-9
Rear door opener ........................................ 3-9
Luggage hooks ............................................... 2-28
Luggage rack .................................................. 2-31
M
Maintenance
Battery ....................................................... 8-14Explanation of maintenance items ............ 9-10
General maintenance .................................. 9-2
Inside the vehicle ........................................ 9-2
Maintenance precautions ............................ 8-2
Outside the vehicle...................................... 9-2
Periodic maintenance schedules ................ 9-5
Seat belt maintenance .............................. 1-31
Under the hood and vehicle ........................ 9-4
Manual front seat adjustment ........................... 1-2
Map lights ....................................................... 2-34
Meters and gauges ........................................... 2-3
Mirror
Inside mirror .............................................. 3-14
Outside mirror............................................ 3-15
Outside mirror control................................ 3-15
Outside mirrors .......................................... 3-15
Multi-remote control system.............................. 3-5
N
Net, Cargo net ................................................ 2-30
New vehicle break-in ...................................... 5-19
Nissan vehicle Immobilizer System ................ 2-14
Nissan vehicle immobilizer system engine
start ................................................................... 5-8
O
Odometer .......................................................... 2-3
Oil
Capacities and recommended fuel/
lubricants ................................................... 10-2Changing engine oil .................................... 8-8
Changing engine oil filter ............................ 8-9
Checking engine oil level ............................ 8-7
Engine oil..................................................... 8-7
Engine oil viscosity .................................... 10-6
Outside mirror ................................................. 3-15
Outside mirror control ..................................... 3-15
Outside mirrors ............................................... 3-15
Outside temperature display ............................. 2-6
Overdrive switch ............................................. 5-13
Overheat, If your vehicle overheats................ 6-11
P
Parking
Brake check............................................... 8-19
Parking brake check.................................. 5-16
Parking brake operation ............................ 5-16
Parking on hills .......................................... 5-16
Parking/parking on hills .................................. 5-24
Periodic maintenance schedules ...................... 9-5
Personal lights ................................................ 2-35
Power
Power door lock .......................................... 3-2
Power outlet .............................................. 2-23
Power steering fluid................................... 8-12
Power steering system .............................. 5-25
Power windows ......................................... 2-32
Pre-tensioner seat belt system ....................... 1-19
Precautions
Braking precautions................................... 5-26
Cruise control operations .......................... 5-19
Cruise control precautions ........................ 5-17
Z
00.1.17/R50-D/V5
X
11-4
Page 261 of 265

Switch
Fog light switch ......................................... 2-20
Glass hatch and outside mirror defogger
switch......................................................... 2-17
Hazard warning flasher switch .................. 2-21
Headlight switch ........................................ 2-17
Ignition switch .............................................. 5-6
Ignition switch automatic transmission
models ......................................................... 5-6
Ignition switch manual transmission
models ......................................................... 5-7
Overdrive switch ........................................ 5-13
Power door lock switch ............................... 3-4
Turn signal switch ..................................... 2-20
T
Tachometer ....................................................... 2-4
Temperature display ......................................... 2-6
Temperature gauge, Engine coolant temperature
gauge ................................................................ 2-4
Theft (Nissan Vehicle Immobilizer System),
Engine start..................................................... 2-15
Theft warning .................................................. 2-14
Three way catalyst ............................................ 5-3
Tilting steering wheel ...................................... 3-13
Tire, Flat tire ..................................................... 6-2
Tires
Tire chains ................................................. 8-30
Tire placard ............................................. 10-13
Tire pressure ............................................. 8-28
Tire rotation ............................................... 8-30
Type of tires .............................................. 8-29wheel/tire size.......................................... 10-10
Wheels and tires ....................................... 8-28
Tonneau cover ................................................ 2-30
Top tether strap child restraints ...................... 1-40
Towing
Tow truck towing ....................................... 6-12
Towing a trailer........................................ 10-15
Towing load/specification chart ............... 10-15
Towing safety .......................................... 10-17
Trailer towing ................................................ 10-15
Transceiver, Integrated HomeLink
Universal
Transceiver ..................................................... 2-36
Transfer case shifting procedures .................. 5-22
Transmission
Automatic transmission fluid (ATF) ........... 8-10
Driving with automatic transmission.......... 5-10
Driving with manual transmission ............. 5-14
Transmission selector lever lock release .. 5-13
Transmitter (See multi-remote control
system) ............................................................. 3-5
Traveling or registering your vehicle in another
country .......................................................... 10-11
Turn signal switch ........................................... 2-20
U
Underbody cleaning .......................................... 7-3
V
Vanity mirror light ............................................ 2-36Vehicle
Dimensions and weights ......................... 10-10
Identification number (VIN) ..................... 10-11
Loading information ................................. 10-13
Vehicle recovery, (freeing a stuck vehicle)..... 6-15
Ventilators ......................................................... 4-2
W
Warning
Hazard warning flasher switch .................. 2-21
Theft warning............................................. 2-14
Warning labels, Air bag warning labels .......... 1-20
Warning light
Air bag warning light ........................ 1-21, 2-11
Automatic transmission park warning
light .............................................................. 2-1
Brake warning light.................................... 2-10
Door open.................................................. 2-11
Seat belt warning light and chime............. 2-11
Warning/indicator lights and chimes ................. 2-9
Warranty, Emission control system
warranty ........................................................ 10-18
Washer switch, Rear window wiper and washer
switch .............................................................. 2-16
Washing ............................................................ 7-2
Waxing .............................................................. 7-2
Weights (See dimensions and weights) ....... 10-10
Wheel/tire size .............................................. 10-10
Wheels and tires ............................................. 8-28
Cleaning aluminum alloy wheels................. 7-3
Window washer fluid ....................................... 8-13
Z
00.1.17/R50-D/V5
X
11-6