coolant temperature NISSAN PATHFINDER 2001 R50 / 2.G Owners Manual
[x] Cancel search | Manufacturer: NISSAN, Model Year: 2001, Model line: PATHFINDER, Model: NISSAN PATHFINDER 2001 R50 / 2.GPages: 289, PDF Size: 2.45 MB
Page 53 of 289
2 Instruments and controlsInstrument panel ....................................................... 2-2
Meters and gauges ................................................... 2-3
Speedometer and odometer ................................ 2-3
Tachometer .......................................................... 2-4
Engine coolant temperature gauge ...................... 2-4
Fuel gauge ........................................................... 2-5
Compass and outside temperature display (if so
equipped) .................................................................. 2-6
Outside temperature display ................................ 2-6
Compass display .................................................. 2-7
Warning/indicator lights and audible reminders ........ 2-9
Checking bulbs ..................................................... 2-9
Warning lights....................................................... 2-9
Indicator lights .................................................... 2-13
Audible reminders .............................................. 2-15
Security systems ..................................................... 2-15
Vehicle security system ...................................... 2-15
Nissan vehicle immobilizer system .................... 2-16
Windshield wiper and washer switch ...................... 2-18
Rear window wiper and washer switch................... 2-18
Glass hatch and outside mirror (if so equipped)
defogger switch ...................................................... 2-19
Headlight and turn signal switch ............................. 2-19
Headlight switch ................................................. 2-20Turn signal switch .............................................. 2-22
Fog light switch (if so equipped) ............................. 2-23
Front fog light switch .......................................... 2-23
Hazard warning flasher switch ................................ 2-23
Horn......................................................................... 2-24
Heated seats (if so equipped) ................................. 2-24
Clock ....................................................................... 2-25
Adjusting the time............................................... 2-25
Power outlet (if so equipped) .................................. 2-25
Cigarette lighter and ashtray (if so equipped) ........ 2-26
Storage .................................................................... 2-27
Tray .................................................................... 2-27
Glasses case ...................................................... 2-27
Cup holders ........................................................ 2-28
Glove box ........................................................... 2-29
Console box ....................................................... 2-29
Luggage hooks ................................................... 2-31
Cargo net............................................................ 2-33
Tonneau cover (if so equipped) ......................... 2-33
Luggage rack (if so equipped) ........................... 2-34
Windows .................................................................. 2-35
Power windows .................................................. 2-35
Sunroof (if so equipped) ......................................... 2-36
Electric sunroof................................................... 2-36
Z
00.1.10/R50-D/V5
X
Page 57 of 289
Changing the display:
Push the reset knob to change the display as
follows:
TRIP A,TRIP B,TRIP A
Resetting the trip odometer:
Push the reset knob for more than 1 second to
reset the trip odometer to zero.
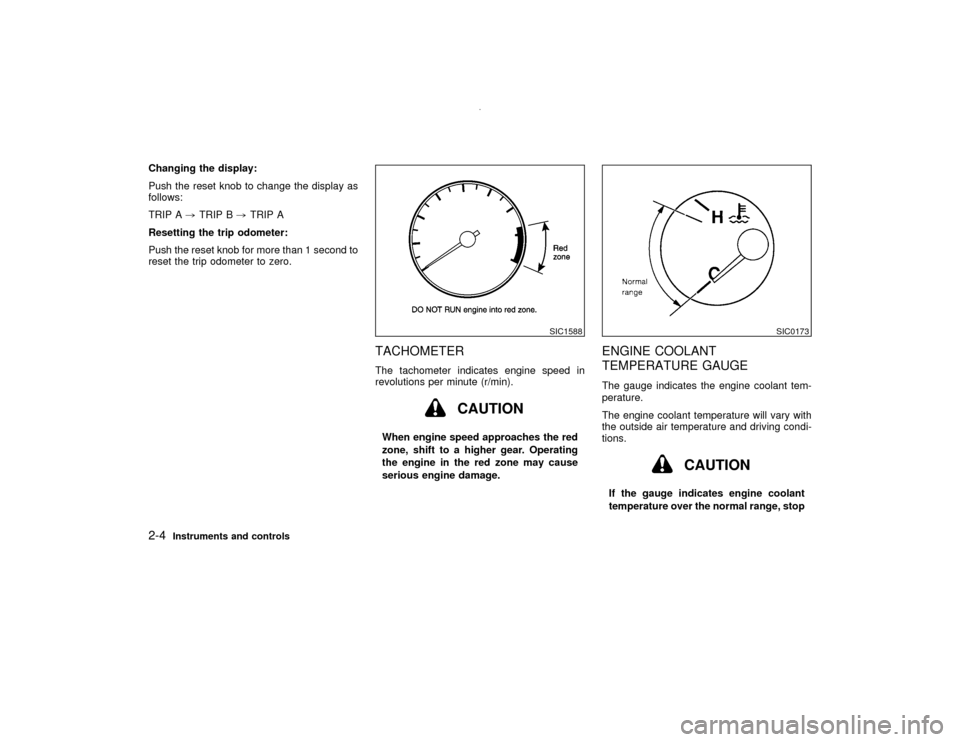
TACHOMETERThe tachometer indicates engine speed in
revolutions per minute (r/min).
CAUTION
When engine speed approaches the red
zone, shift to a higher gear. Operating
the engine in the red zone may cause
serious engine damage.
ENGINE COOLANT
TEMPERATURE GAUGEThe gauge indicates the engine coolant tem-
perature.
The engine coolant temperature will vary with
the outside air temperature and driving condi-
tions.
CAUTION
If the gauge indicates engine coolant
temperature over the normal range, stop
SIC1588
SIC0173
2-4
Instruments and controls
Z
00.1.10/R50-D/V5
X
Page 122 of 289
AIR CONDITIONER OPERATIONStart the engine, move the fan control dial to
the desired (1 to 4) position and push in the air
conditioner button to activate the air condi-
tioner. When the air conditioner is on, cooling
and dehumidifying functions will be added to
the heater operation.
The air conditioner cooling function oper-
ates only when the engine is running.CoolingThis mode is used to cool and dehumidify.
1. Push the air recirculation button to the off
position.
2. Turn the air control dial to the
position.
3. Turn on the fan control dial.
4. Push on the air conditioner button. The
indicator light will come on.
5. Turn the temperature control dial to the
desired position.
IFor quick cooling when the outside tem-
perature is high, push the air recirculation
button to the on position. Be sure to return
the air recirculation button to the off position
for normal cooling.
Dehumidified heatingThis mode is used to heat and dehumidify.
1. Push the air recirculation button to the off
position.
2. Turn the air control dial to the
posi-
tion.
3. Turn on the fan control dial.
4. Push on the air conditioner button. The
indicator light will come on.
5. Turn the temperature control dial to the
desired position.
Dehumidified defoggingThis mode is used to defog the windows and
dehumidify.
1. Push the air recirculation button to the off
position.
2. Turn the air control dial to the
posi-
tion.
3. Turn on the fan control dial.
4. Push on the air conditioner button. The
indicator light will come on.
5. Turn the temperature control dial to the
desired position.
Operating tipsIKeep windows and sun roof closed while
the air conditioner is in operation.
IAfter parking in the sun, drive for two or
three minutes with the windows open to
vent hot air from the passenger compart-
ment. Then, close the windows. This will
allow the air conditioner to cool the interior
more quickly.
IThe air conditioning system should be
operated for about ten minutes at least
once a month. This helps prevent dam-
age to the system due to lack of lubrica-
tion.
IIf the coolant temperature gauge exceeds
the hot position, turn the air conditioner off.
For additional information, see ªIf your ve-
hicle overheatsº in the ª6. In case of emer-
gencyº section.AIR FLOW CHARTSThe following charts show the button and dial
positions formaximum and quickheating,
cooling or defrosting.The air recirculation
switch should always be in the off position
for heating and defrosting.Heater, air conditioner and audio systems
4-5
Z
00.1.10/R50-D/V5
X
Page 127 of 289
: Air flow mainly from foot outlets.: Air flow from defroster and foot outlets.
To turn the system offPush the OFF button.OPERATING TIPSIWhen the engine coolant temperature and
outside air temperature are low, the air flow
from the foot outlets may not operate for 0
to 126 seconds. This is not a malfunction.
After the coolant temperature warms up, air
flow from the foot outlets will operate nor-
mally.
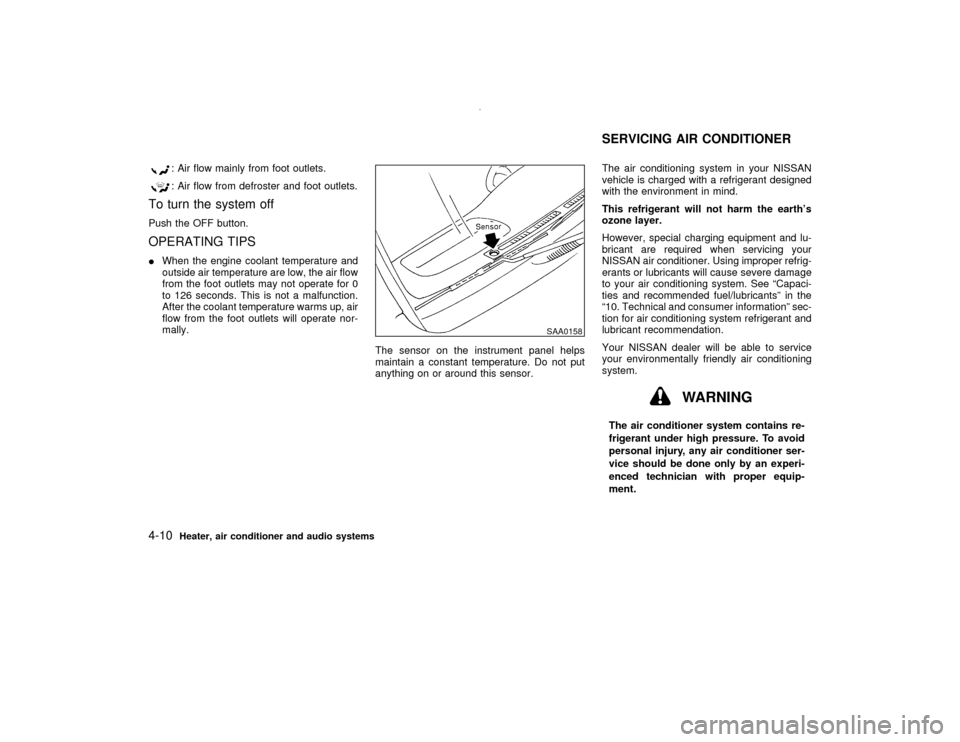
The sensor on the instrument panel helps
maintain a constant temperature. Do not put
anything on or around this sensor.The air conditioning system in your NISSAN
vehicle is charged with a refrigerant designed
with the environment in mind.
This refrigerant will not harm the earth's
ozone layer.
However, special charging equipment and lu-
bricant are required when servicing your
NISSAN air conditioner. Using improper refrig-
erants or lubricants will cause severe damage
to your air conditioning system. See ªCapaci-
ties and recommended fuel/lubricantsº in the
ª10. Technical and consumer informationº sec-
tion for air conditioning system refrigerant and
lubricant recommendation.
Your NISSAN dealer will be able to service
your environmentally friendly air conditioning
system.
WARNING
The air conditioner system contains re-
frigerant under high pressure. To avoid
personal injury, any air conditioner ser-
vice should be done only by an experi-
enced technician with proper equip-
ment.
SAA0158
SERVICING AIR CONDITIONER
4-10
Heater, air conditioner and audio systems
Z
00.1.10/R50-D/V5
X
Page 179 of 289
FREEING A FROZEN DOOR LOCKTo prevent a door lock from freezing, apply
de-icer or glycerin to it through the key hole. If
the lock becomes frozen, heat the key before
inserting it into the key hole.ANTI-FREEZEIn the winter when it is anticipated that the
temperature will drop below 32ÉF (0ÉC), check
anti-freeze (ethylene glycol base) to assure
proper winter protection. For details, see ªEn-
gine cooling systemº in the ª8. Do-it-yourselfº
section.BATTERYIf the battery is not fully charged during ex-
tremely cold weather conditions, the battery
fluid may freeze and damage the battery. To
maintain maximum efficiency, the battery
should be checked regularly. For details, see
ªBatteryº in the ª8. Do-it-yourselfº section.DRAINING OF COOLANT WATERIf the vehicle is to be left outside without
anti-freeze, drain the cooling system by open-
ing the drain valves located under the radiator
and on the engine block. Refill before operat-
ing the vehicle. See ªEngine cooling systemº in
the ª8. Do-it-yourselfº section for Changing
Engine Coolant.
TIRE EQUIPMENT1. SUMMER tires are of a tread design to
provide superior performance on dry pave-
ment. However, the performance of these
tires will be substantially reduced in snowy
and icy conditions. If you operate your
vehicle on snowy or icy roads, NISSAN
recommends the use of MUD & SNOW or
ALL SEASON tires on all four wheels.
Please consult your NISSAN dealer for the
tire type, size, speed rating and availability
information.
2. For additional traction on icy roads, studded
tires may be used. However, some Prov-
inces and States prohibit their use, so,
before installing studded tires, check local,
state and provincial laws.
Skid and traction capabilities of studded
snow tires, on wet or dry surfaces, may be
poorer than that of non-studded snow tires.
3. TIRE CHAINS may be used if desired.
Make sure they are of proper size for the
tires on your vehicle and are installed ac-
cording to the chain manufacturer's sug-
gestions. Use of tire chains may be prohib-
ited according to location. Check the local
laws before installing tire chains. When
installing tire chains, make sure they are of
proper size for the tires on your vehicle andare installed according to the chain manu-
facturer's suggestions.Use only SAE
Class S chains.Other types may damage
your vehicle. Use chain tensioners when
recommended by the tire chain manufac-
turer to ensure a tight fit. Loose end links of
the tire chain must be secured or removed
to prevent the possibility of whipping action
damage to the fenders or underbody. If
possible, avoid fully loading your vehicle
when using tire chains. In addition, drive at
a reduced speed. Otherwise, your vehicle
may be damaged and/or vehicle handling
and performance may be adversely af-
fected.
Do not use the chains on dry roads.
Tire chains must be installed only on the
rear wheels and not on the front wheels.
Do not drive with tire chains on paved roads
which are clear of snow. Driving with chains
in such conditions can cause damage to the
various mechanisms of the vehicle due to
some overstress. When driving on clear
paved roads, be sure to change to 2WD.
4. For four wheel drive:
If you install snow tires, they must also be
the same size, brand, construction and
tread pattern on all four wheels.
COLD WEATHER DRIVING5-34
Starting and driving
Z
00.1.10/R50-D/V5
X
Page 192 of 289
If your vehicle is overheating indicated by an
extremely high temperature gauge reading, or
if you feel a lack of engine power, detect
abnormal noise, etc., take the following steps:
WARNING
IDo not continue to drive if your ve-
hicle overheats. Doing so could
cause a vehicle fire.
ITo avoid the danger of being scalded,
never remove the radiator cap while
the engine is still hot. When the radia-
tor cap is removed, pressurized hot
water will spurt out, possibly causing
serious injury.
IDo not open the hood if steam is
coming out.
1. Move the vehicle safely off the road, apply
the parking brake and move the gearshift
lever to the neutral position (automatic
transmission to P (Park)).
Do not stop the engine.
2. Turn off the air conditioner switch. Open all
the windows, move the heater or air condi-tioner temperature control to maximum hot
and fan control to high speed.
3. If engine overheating is caused by climbing
a long hill on a hot day, run the engine at a
fast idle (approximately 1,500 rpm) until the
temperature gauge indication returns to
normal.
4. Get out of the vehicle. Look and listen for
steam or coolant escaping from the radiator
before opening the hood. Wait until no
steam or coolant can be seen before pro-
ceeding.
5. Open the engine hood.
WARNING
If steam or water is coming from the
engine, stand clear to prevent getting
burned.
6. Visually check drive belts for damage or
looseness. Also check if the cooling fan is
running. The radiator hoses and radiator
should not leak water. If coolant is leaking,
the cooling fan belt is missing or loose or
the cooling fan does not run, stop the
engine.
WARNING
IBe careful not to allow your hands,
hair, jewelry or clothing to come into
contact with, or to get caught in, the
cooling fan, or drive belt.
IThe engine cooling fan can start at
any time when the coolant tempera-
ture is high.
7. After the engine cools down, check the
coolant level in the reservoir tank with the
engine running. Add coolant to the reservoir
tank if necessary. Have your vehicle re-
paired at the nearest NISSAN dealer.
IF YOUR VEHICLE OVERHEATS
In case of emergency
6-11
Z
00.1.10/R50-D/V5
X
Page 206 of 289
8 Do-it-yourselfMaintenance precautions .......................................... 8-2
Engine compartment check locations ....................... 8-4
Engine cooling system .............................................. 8-6
Checking engine coolant level ............................. 8-6
Changing engine coolant ..................................... 8-7
Engine oil ................................................................ 8-10
Checking engine oil level ................................... 8-10
Changing engine oil ........................................... 8-11
Changing engine oil filter ................................... 8-12
Automatic transmission fluid ................................... 8-13
Temperature conditions for checking ................. 8-14
Power steering fluid ................................................ 8-15
Brake and clutch fluid ............................................. 8-15
Brake fluid .......................................................... 8-15
Clutch fluid.......................................................... 8-16
Window washer fluid ............................................... 8-17
Window washer fluid reservoir ........................... 8-17
Battery ..................................................................... 8-18
Jump starting ...................................................... 8-18
Drive belts ............................................................... 8-19
Spark plugs ............................................................. 8-19
Replacing spark plugs ........................................ 8-19Air cleaner ............................................................... 8-20
Windshield wiper blades ......................................... 8-21
Cleaning ............................................................. 8-21
Replacing............................................................ 8-21
Parking brake and brake pedal ............................... 8-22
Checking parking brake ..................................... 8-22
Checking brake pedal ........................................ 8-22
Brake booster ..................................................... 8-23
Clutch pedal ............................................................ 8-24
Checking clutch pedal ........................................ 8-24
Fuses....................................................................... 8-24
Engine compartment .......................................... 8-24
Passenger compartment .................................... 8-25
Multi-remote controller battery replacement....... 8-25
Lights ....................................................................... 8-27
Headlights........................................................... 8-28
Wheels and tires ..................................................... 8-31
Tire pressure ...................................................... 8-31
Types of tires...................................................... 8-32
Tire chains .......................................................... 8-33
Changing wheels and tires ................................. 8-33
Clutch housing drain............................... 8-37Z
00.1.10/R50-D/V5
X
Page 214 of 289
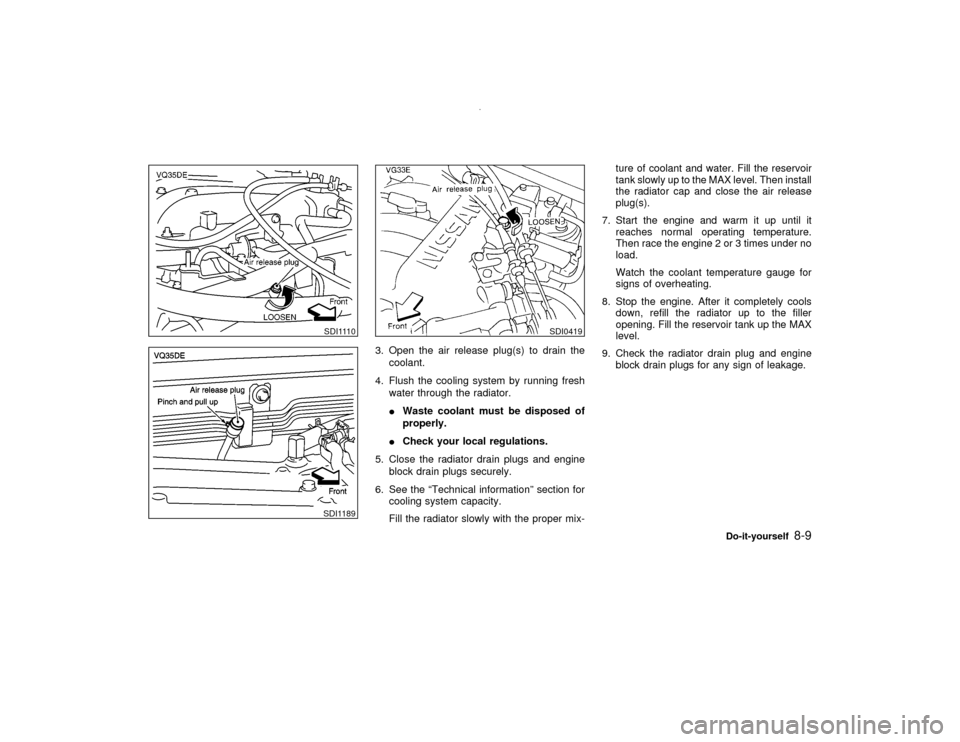
3. Open the air release plug(s) to drain the
coolant.
4. Flush the cooling system by running fresh
water through the radiator.
IWaste coolant must be disposed of
properly.
ICheck your local regulations.
5. Close the radiator drain plugs and engine
block drain plugs securely.
6. See the ªTechnical informationº section for
cooling system capacity.
Fill the radiator slowly with the proper mix-ture of coolant and water. Fill the reservoir
tank slowly up to the MAX level. Then install
the radiator cap and close the air release
plug(s).
7. Start the engine and warm it up until it
reaches normal operating temperature.
Then race the engine 2 or 3 times under no
load.
Watch the coolant temperature gauge for
signs of overheating.
8. Stop the engine. After it completely cools
down, refill the radiator up to the filler
opening. Fill the reservoir tank up the MAX
level.
9. Check the radiator drain plug and engine
block drain plugs for any sign of leakage.
SDI1110SDI1189
SDI0419
Do-it-yourself
8-9
Z
00.1.10/R50-D/V5
X
Page 275 of 289

However, for long steep grades, do not stay in
1st or 2nd gear when driving above 35 MPH
(56 km/h).
IIf the engine coolant rises to an extremely
high temperature when the air conditioning
system is on, turn off the air conditioner.
Coolant heat can be additionally vented by
opening the windows, switching the fan
control to high and setting the temperature
control to the HOT position.
ITrailer towing requires more fuel than nor-
mal circumstances.
IAvoid towing a trailer for the first 500 miles
(800 km).
IHave your vehicle serviced more often than
at intervals specified in the recommended
Maintenance Schedule.
When towing a trailer, change oil in the
transmission more frequently. See the
Maintenance Schedule.UNIFORM TIRE QUALITY
GRADINGDOT (Department of Transportation) Quality
Grades: All passenger car tire must conform to
Federal Safety Requirements in addition to
these grades.Quality grades can be found where applicable
on the tire sidewall between tread shoulder
and maximum section width. For example:
Treadwear 200 Traction AA Temperature A
TreadwearTreadwear grade is a comparative rating
based on tire wear rate when tested under
controlled conditions on specified government
test courses. For example, a tire graded 150
would wear one and a half (1-1/2) times as well
on the government course as a tire graded
100. However, relative tire performance de-
pends on actual driving conditions, and may
vary significantly due to variations in driving
habits, service practices and differences in
road characteristics and climate.Traction AA, A, B and CThe traction grades from highest to lowest are
AA, A, B, and C. Those grades represent the
tire's ability to stop on wet pavement as mea-
sured under controlled conditions on specified
government test surfaces of asphalt and con-
crete. A tire marked C may have poor traction
performance.
WARNING
The traction grade assigned to your ve-
hicle tires is based on straight-ahead
braking traction tests, and does not in-
clude acceleration, cornering, hydro-
planing, or peak traction characteristics.Temperature A, B and CTemperature grades are A (the highest), B,
and C. They represent a tire's resistance to
heat build-up, and its ability to dissipate heat
when tested under controlled conditions on a
specified indoor laboratory test wheel. Sus-
tained high temperature can cause tire mate-
rial to degenerate, reducing tire life. Excessive
temperatures can lead to sudden tire failure.
Grade C corresponds to a performance level
which all passenger car tires must meet under
the Federal Motor Vehicle Safety Standard No.
109. Grades A and B represent higher levels of
performance on laboratory test wheels than
the minimum required by law.
10-20
Technical and consumer information
Z
00.1.10/R50-D/V5
X
Page 277 of 289
You may notify NISSAN by contact-
ing our Consumer Affairs Depart-
ment, toll-free, at 1-800-NISSAN-1.
In Hawaii call (808) 836-0888.
Due to legal requirements in some states/
areas, your vehicle may be required to be in
what is called the ready condition for an
Inspection/Maintenance (I/M) test of the emis-
sion control system.
The vehicle is set to the ready condition when
it is driven through certain driving patterns.
Usually, the ready condition can be obtained
by ordinary usage of the vehicle.
If a powertrain system component is repaired
or the battery is disconnected, the vehicle may
be reset to a not ready condition. Before taking
the I/M test, drive the vehicle through the
following pattern to set the vehicle to the ready
condition. If you cannot or do not want to
perform the driving pattern, an NISSAN dealer
can conduct it for you.
WARNING
Always drive the vehicle in a safe and
prudent manner according to traffic con-
ditions, and obey all traffic laws.
1. Start the engine when the engine coolant
temperature gauge needle points to C. Al-
low the engine to idle until the gauge needlepoints between the C and H (normal oper-
ating temperature).
2. Accelerate the vehicle to 55 MPH (88
km/h), then quickly release the accelerator
pedal completely and keep it released for at
least 6 seconds.
3. Quickly depress the accelerator pedal for a
moment, then drive the vehicle at a speed
of 53 to 60 MPH (86 to 96 km/h) for at least
5 minutes.
4. Stop the vehicle.
5. Accelerate the vehicle to 35 MPH (55 km/h)
and maintain the speed for 20 seconds.
6. Repeat steps 4 and 5 at least 3 times.
7. Accelerate the vehicle to 55 MPH (88 km/h)
and maintain the speed for at least 3 min-
utes.
8. Stop the vehicle (shift lever in the ªPº or ªNº
position).
9. Rev the engine up between 2,500 and
3,500 rpm and hold it for 3 consecutive
minutes, then release the accelerator pedal
completely.
10.Wait 5 second at idle.
11.Rev the engine up between 2,000 andREADINESS FOR INSPECTION/
MAINTENANCE (I/M) TEST (US
only)
10-22
Technical and consumer information
Z
00.1.10/R50-D/V5
X