warning lights NISSAN PATHFINDER 2001 R50 / 2.G Owners Manual
[x] Cancel search | Manufacturer: NISSAN, Model Year: 2001, Model line: PATHFINDER, Model: NISSAN PATHFINDER 2001 R50 / 2.GPages: 289, PDF Size: 2.45 MB
Page 53 of 289

2 Instruments and controlsInstrument panel ....................................................... 2-2
Meters and gauges ................................................... 2-3
Speedometer and odometer ................................ 2-3
Tachometer .......................................................... 2-4
Engine coolant temperature gauge ...................... 2-4
Fuel gauge ........................................................... 2-5
Compass and outside temperature display (if so
equipped) .................................................................. 2-6
Outside temperature display ................................ 2-6
Compass display .................................................. 2-7
Warning/indicator lights and audible reminders ........ 2-9
Checking bulbs ..................................................... 2-9
Warning lights....................................................... 2-9
Indicator lights .................................................... 2-13
Audible reminders .............................................. 2-15
Security systems ..................................................... 2-15
Vehicle security system ...................................... 2-15
Nissan vehicle immobilizer system .................... 2-16
Windshield wiper and washer switch ...................... 2-18
Rear window wiper and washer switch................... 2-18
Glass hatch and outside mirror (if so equipped)
defogger switch ...................................................... 2-19
Headlight and turn signal switch ............................. 2-19
Headlight switch ................................................. 2-20Turn signal switch .............................................. 2-22
Fog light switch (if so equipped) ............................. 2-23
Front fog light switch .......................................... 2-23
Hazard warning flasher switch ................................ 2-23
Horn......................................................................... 2-24
Heated seats (if so equipped) ................................. 2-24
Clock ....................................................................... 2-25
Adjusting the time............................................... 2-25
Power outlet (if so equipped) .................................. 2-25
Cigarette lighter and ashtray (if so equipped) ........ 2-26
Storage .................................................................... 2-27
Tray .................................................................... 2-27
Glasses case ...................................................... 2-27
Cup holders ........................................................ 2-28
Glove box ........................................................... 2-29
Console box ....................................................... 2-29
Luggage hooks ................................................... 2-31
Cargo net............................................................ 2-33
Tonneau cover (if so equipped) ......................... 2-33
Luggage rack (if so equipped) ........................... 2-34
Windows .................................................................. 2-35
Power windows .................................................. 2-35
Sunroof (if so equipped) ......................................... 2-36
Electric sunroof................................................... 2-36
Z
00.1.10/R50-D/V5
X
Page 62 of 289

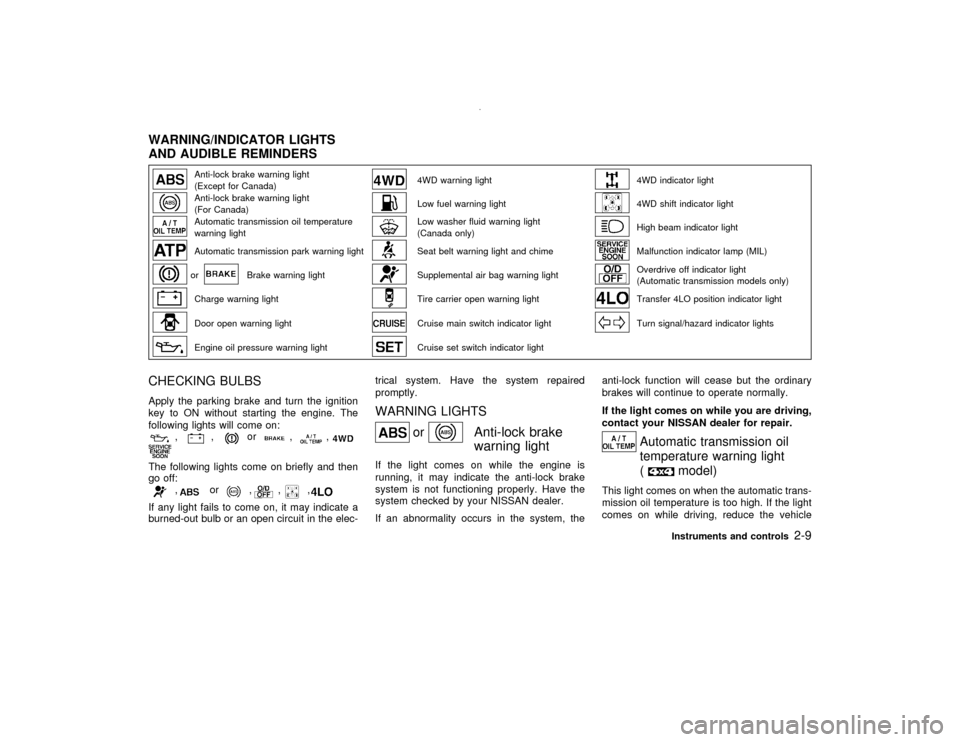
Anti-lock brake warning light
(Except for Canada)
4WD warning light
4WD indicator light
Anti-lock brake warning light
(For Canada)
Low fuel warning light
4WD shift indicator light
Automatic transmission oil temperature
warning light
Low washer fluid warning light
(Canada only)
High beam indicator light
Automatic transmission park warning light
Seat belt warning light and chime
Malfunction indicator lamp (MIL)
or
Brake warning light
Supplemental air bag warning light
Overdrive off indicator light
(Automatic transmission models only)
Charge warning light
Tire carrier open warning light
Transfer 4LO position indicator light
Door open warning light
Cruise main switch indicator light
Turn signal/hazard indicator lights
Engine oil pressure warning light
Cruise set switch indicator light
CHECKING BULBSApply the parking brake and turn the ignition
key to ON without starting the engine. The
following lights will come on:
,
,
or
,
,
The following lights come on briefly and then
go off:
,
or
,
,
,
If any light fails to come on, it may indicate a
burned-out bulb or an open circuit in the elec-trical system. Have the system repaired
promptly.
WARNING LIGHTS
or
Anti-lock brake
warning light
If the light comes on while the engine is
running, it may indicate the anti-lock brake
system is not functioning properly. Have the
system checked by your NISSAN dealer.
If an abnormality occurs in the system, theanti-lock function will cease but the ordinary
brakes will continue to operate normally.
If the light comes on while you are driving,
contact your NISSAN dealer for repair.
Automatic transmission oil
temperature warning light
(
model)
This light comes on when the automatic trans-
mission oil temperature is too high. If the light
comes on while driving, reduce the vehicle
WARNING/INDICATOR LIGHTS
AND AUDIBLE REMINDERS
Instruments and controls
2-9
Z
00.1.10/R50-D/V5
X
Page 66 of 289

IThe supplemental air bag light does not
come on at all.
Unless checked and repaired, the supplemen-
tal restraint system and/or the pre-tensioner
seat belt may not function properly. For addi-
tional information, see ªSupplemental restraint
systemº in the ª1. Seats, restraints and supple-
mental air bag systemsº section.
WARNING
If the supplemental air bag warning light
is on, it could mean that the supplemen-
tal front air bag system, supplemental
side air bag system (if so equipped)
and/or pre-tensioner seat belt may not
operate in an accident.
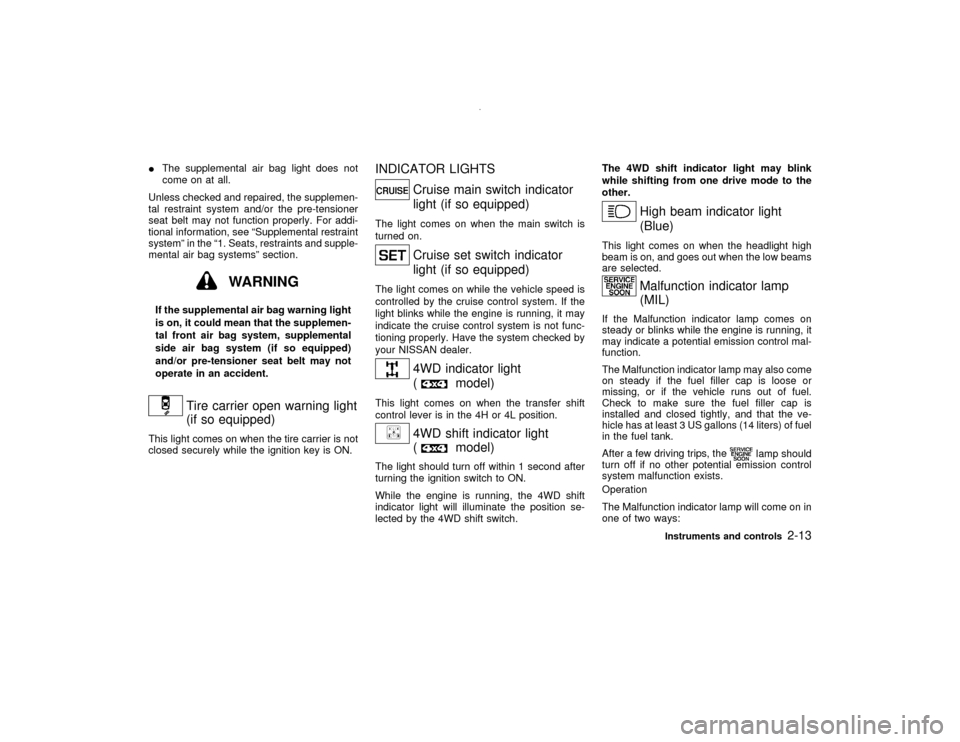
Tire carrier open warning light
(if so equipped)
This light comes on when the tire carrier is not
closed securely while the ignition key is ON.
INDICATOR LIGHTS
Cruise main switch indicator
light (if so equipped)
The light comes on when the main switch is
turned on.
Cruise set switch indicator
light (if so equipped)
The light comes on while the vehicle speed is
controlled by the cruise control system. If the
light blinks while the engine is running, it may
indicate the cruise control system is not func-
tioning properly. Have the system checked by
your NISSAN dealer.
4WD indicator light
(
model)
This light comes on when the transfer shift
control lever is in the 4H or 4L position.
4WD shift indicator light
(
model)
The light should turn off within 1 second after
turning the ignition switch to ON.
While the engine is running, the 4WD shift
indicator light will illuminate the position se-
lected by the 4WD shift switch.The 4WD shift indicator light may blink
while shifting from one drive mode to the
other.
High beam indicator light
(Blue)
This light comes on when the headlight high
beam is on, and goes out when the low beams
are selected.
Malfunction indicator lamp
(MIL)
If the Malfunction indicator lamp comes on
steady or blinks while the engine is running, it
may indicate a potential emission control mal-
function.
The Malfunction indicator lamp may also come
on steady if the fuel filler cap is loose or
missing, or if the vehicle runs out of fuel.
Check to make sure the fuel filler cap is
installed and closed tightly, and that the ve-
hicle has at least 3 US gallons (14 liters) of fuel
in the fuel tank.
After a few driving trips, the
lamp should
turn off if no other potential emission control
system malfunction exists.
Operation
The Malfunction indicator lamp will come on in
one of two ways:
Instruments and controls
2-13
Z
00.1.10/R50-D/V5
X
Page 68 of 289

the transfer 4LO position indicator light turns
on when you shift the 4WD shift switch to 4LO.
The indicator light may blink while shifting
from one drive mode to the other.
Turn signal/hazard indicator
lights
The light flashes when the turn signal switch
lever or hazard switch is turned on.AUDIBLE REMINDERS
Key reminder chimeThe chime will sound when the driver side door
is opened if the key is left in the ignition switch.
Take the ignition key when you leave the
vehicle.Light reminder chimeThe headlights will turn off when the front door
is opened with the light switch on unless the
ignition key is in the ON position.
When you turn the headlight switch ON again
after the lights automatically turn off and when
you open the driver's door, the lights will not
turn off automatically and a chime will sound
instead. See the battery saver system under
ªHeadlight switchº in this section for details.Make sure to turn the light switch off when you
leave the vehicle.
Brake pad wear warningThe disc brake pads have audible wear warn-
ings. When a brake pad requires replacement,
it will make a high pitched scraping sound.
Have the brakes checked as soon as possible
if the warning sound is heard when the vehicle
is moving, whether or not the brake pedal is
depressed.
Your vehicle may have two types of security
system, as follows:
IVehicle security system
INissan Vehicle Immobilizer System
The security condition will be shown by the
security indicator light.
VEHICLE SECURITY SYSTEMThe vehicle security system provides visual
and audio alarm signals if parts of the vehicle
are disturbed.
IC0005
SECURITY SYSTEMS
Instruments and controls
2-15
Z
00.1.10/R50-D/V5
X
Page 75 of 289

WARNING
When the daytime running light system
is active, tail lights on your vehicle are
not on. It is necessary at dusk to turn on
your headlights. Failure to do so could
cause an accident injuring yourself and
others.
TURN SIGNAL SWITCH
Turn signalMove the lever up or down to signal to the
turning direction. When the turn is completed,
the turn signals cancel automatically.Lane change signalTo indicate a lane change, move the lever up
or down to the point where lights begin flash-
ing.
SIC1446
2-22
Instruments and controls
Z
00.1.10/R50-D/V5
X
Page 76 of 289

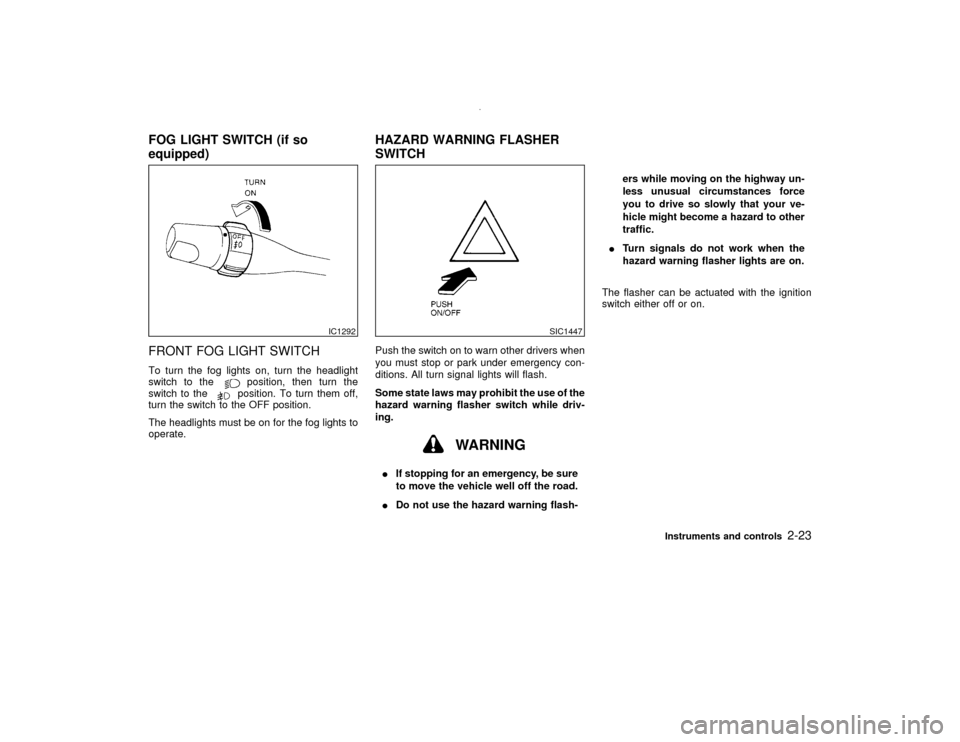
FRONT FOG LIGHT SWITCHTo turn the fog lights on, turn the headlight
switch to the
position, then turn the
switch to theposition. To turn them off,
turn the switch to the OFF position.
The headlights must be on for the fog lights to
operate.Push the switch on to warn other drivers when
you must stop or park under emergency con-
ditions. All turn signal lights will flash.
Some state laws may prohibit the use of the
hazard warning flasher switch while driv-
ing.
WARNING
IIf stopping for an emergency, be sure
to move the vehicle well off the road.
IDo not use the hazard warning flash-ers while moving on the highway un-
less unusual circumstances force
you to drive so slowly that your ve-
hicle might become a hazard to other
traffic.
ITurn signals do not work when the
hazard warning flasher lights are on.
The flasher can be actuated with the ignition
switch either off or on.
IC1292
SIC1447
FOG LIGHT SWITCH (if so
equipped)HAZARD WARNING FLASHER
SWITCH
Instruments and controls
2-23
Z
00.1.10/R50-D/V5
X
Page 91 of 289

Sun shadeOpen/close the sun shade by sliding it
backward/forward.
The shade will open automatically when the
sunroof is opened. However, it must be closed
manually.
WARNING
IIn an accident you could be thrown
from the vehicle through an open
sunroof. Always use seat belts and
child restraints.
IDo not allow anyone to stand up or
extend any portion of their body out
of the opening while the vehicle is in
motion or while the sunroof is clos-
ing.
CAUTION
IRemove water drops, snow, ice or
sand from the sunroof before
opening.IDo not place any heavy object on the
sunroof or surrounding area.
If the sunroof does not closeHave your NISSAN dealer check and repair
the sunroof.
The lights have a three-position switch.
When the switch is in the centerqposition, the
lights will illuminate when a door or the back
door is opened.
SIC0564A
INTERIOR LIGHTS (if so
equipped)
2-38
Instruments and controls
Z
00.1.10/R50-D/V5
X
Page 107 of 289

Using the panic alarmIf you are near your vehicle and feel threat-
ened, you may activate the alarm to call atten-
tion as follows:
1. Push the PANIC button on the remote
controller forlonger than 0.5 seconds.
2. The theft warning alarm and headlights will
stay on for 30 seconds.
3. The panic alarm stops when:
IIt has run for 30 seconds, or
IThe LOCK or the UNLOCK button is
pressed, or
IThe panic button is pushed on the multi-
remote controller for more than 0.5 sec-
onds.
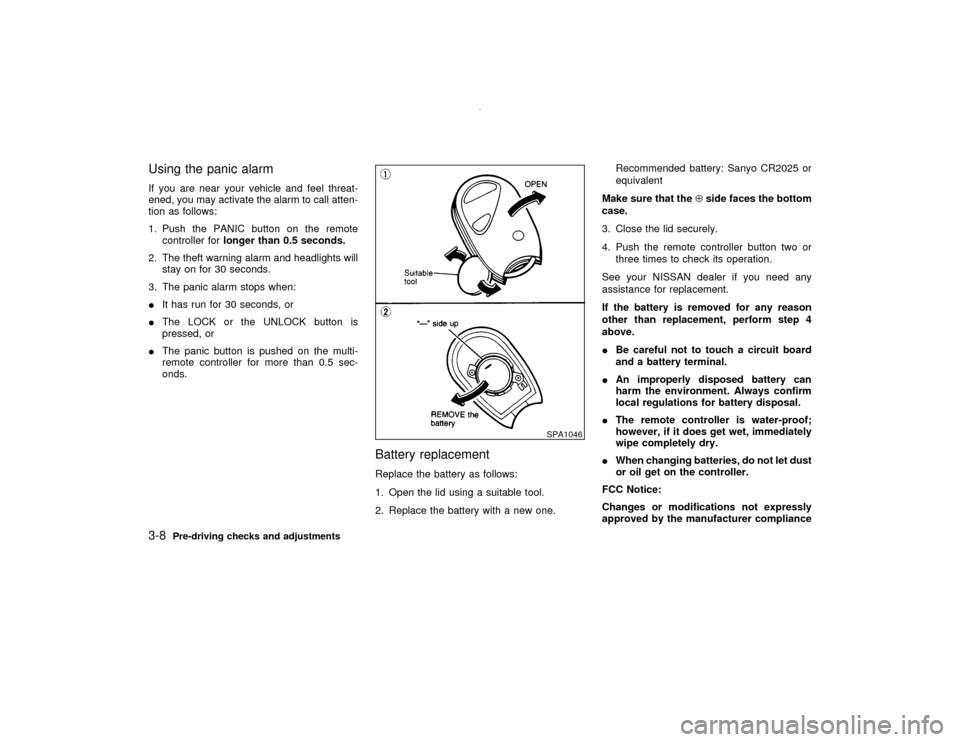
Battery replacementReplace the battery as follows:
1. Open the lid using a suitable tool.
2. Replace the battery with a new one.Recommended battery: Sanyo CR2025 or
equivalent
Make sure that theÅside faces the bottom
case.
3. Close the lid securely.
4. Push the remote controller button two or
three times to check its operation.
See your NISSAN dealer if you need any
assistance for replacement.
If the battery is removed for any reason
other than replacement, perform step 4
above.
IBe careful not to touch a circuit board
and a battery terminal.
IAn improperly disposed battery can
harm the environment. Always confirm
local regulations for battery disposal.
IThe remote controller is water-proof;
however, if it does get wet, immediately
wipe completely dry.
IWhen changing batteries, do not let dust
or oil get on the controller.
FCC Notice:
Changes or modifications not expressly
approved by the manufacturer compliance
SPA1046
3-8
Pre-driving checks and adjustments
Z
00.1.10/R50-D/V5
X
Page 114 of 289

INSIDE MIRRORThe night position will reduce glare from the
headlights of vehicles behind you at night.
WARNING
Use the night position only when neces-
sary, because it reduces rear view clar-
ity.
OUTSIDE MIRRORSThe outside mirror will operate only when the
ignition switch is in the ACC or ON position.
Turn the control knob to the right or left to
select the right or left outside mirror, then
adjust.The outside mirror can be moved in any direc-
tion for a better rear view.
WARNING
Objects viewed in the outside mirror on
the passenger side are closer than they
appear. Be careful when moving to the
right. Using only this mirror could cause
an accident. Use inside mirror or glance
over your shoulder to properly judge
distances to other objects.
PD1006M
SPA1211
PD1183MB
MIRRORS
Pre-driving checks and adjustments
3-15
Z
00.1.10/R50-D/V5
X
Page 154 of 289

IMake sure the area around the vehicle is
clear.
ICheck fluid levels such as engine oil, cool-
ant, brake and clutch fluid, window washer
fluid as frequently as possible, at least
whenever you refuel.
ICheck to be sure that all windows and light
lenses are clean.
IVisually inspect tires for their appearance
and condition. Also check tires for proper
inflation.
ILock all doors.
IPosition seat and adjust head restraints.
IAdjust inside and outside mirrors.
IFasten seat belts and ask all passengers to
do likewise.
ICheck the operation of warning lights when
key is turned to the ON (3) position.1. Apply the parking brake.
2.Automatic transmission:
Move the selector lever to P (Park position)
or N (Neutral position). (P preferred)
The selector lever cannot be moved out
of P and into any of the other gear
positions if the ignition key is turned to
LOCK or if the key is removed from the
switch.
The starter is designed not to operate if
the selector lever is in one of the driving
positions.
Manual transmission:
Move the gearshift lever to N (Neutral po-
sition), and depress the clutch pedal to the
floor while starting the engine.
The starter is designed not to operate
unless the clutch pedal is fully de-
pressed.
3. Crank the enginewith your foot off the
accelerator pedalby turning the ignition
key to START. Release the key when the
engine starts. If the engine starts, but fails
to run, repeat the above procedure.
Ð If the engine is very hard to start in
extremely cold or hot weather ÐUse the accelerator pedal to help start the
engine.
CAUTION
Do not operate the starter for more than
15 seconds at a time. If the engine does
not start, turn the key off and wait 10
seconds before cranking again, other-
wise the starter could be damaged.
4.Warm-up
Always allow the engine to idle for at least
30 seconds after starting. Drive at moder-
ate speed for a short distance first, espe-
cially in cold weather.
BEFORE STARTING THE ENGINE STARTING THE ENGINE
Starting and driving
5-9
Z
00.1.10/R50-D/V5
X