ECO mode NISSAN PATHFINDER 2002 R50 / 2.G Owner's Manual
[x] Cancel search | Manufacturer: NISSAN, Model Year: 2002, Model line: PATHFINDER, Model: NISSAN PATHFINDER 2002 R50 / 2.GPages: 288, PDF Size: 2.49 MB
Page 155 of 288
have their seat belts fastened.
IAlways drive with the floor mats in
place as the floor may become hot.
ILower your speed when encounter-
ing strong crosswinds. With a higher
center of gravity, your NISSAN is
more affected by strong side winds.
Slower speeds ensure better vehicle
control.
IDo not drive beyond the performance
of the tires, even with 4WD engaged.
Accelerating quickly, sharp steering
maneuvers or sudden braking may
cause loss of control.
IIf at all possible, avoid sharp turning
maneuvers, particularly at high
speeds. Your NISSAN four wheel
drive vehicle has a higher center of
gravity than a two wheel drive ve-
hicle. The vehicle is not designed for
cornering at the same speeds as con-
ventional two wheel drive vehicles.
Failure to operate this vehicle cor-
rectly could result in loss of controland/or a roll over accident.
IAlways use tires of the same type,
size, brand, construction (bias, bias-
belted or radial), and tread pattern on
all four wheels. Install tire chains on
the rear wheels when driving on slip-
pery roads and drive carefully.
IBe sure to check the brakes immedi-
ately after driving in mud or water.
See ªBrake systemº later in this sec-
tion for wet brakes.
IAvoid parking your vehicle on steep
hills. If you get out of the vehicle and
it rolls forward, backward or side-
ways, you could be injured.
IWhenever you drive off-road through
sand, mud or water as deep as the
wheel hub, more frequent mainte-
nance may be required. See ªPeriodic
maintenanceº in the ªService and
Maintenance Guideº.
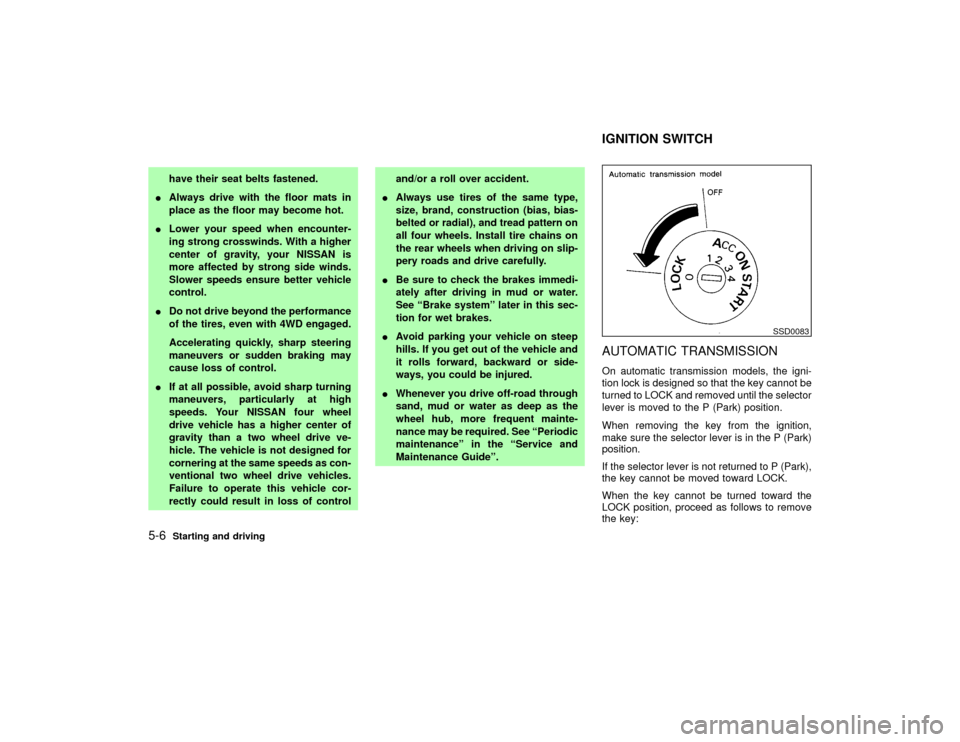
AUTOMATIC TRANSMISSIONOn automatic transmission models, the igni-
tion lock is designed so that the key cannot be
turned to LOCK and removed until the selector
lever is moved to the P (Park) position.
When removing the key from the ignition,
make sure the selector lever is in the P (Park)
position.
If the selector lever is not returned to P (Park),
the key cannot be moved toward LOCK.
When the key cannot be turned toward the
LOCK position, proceed as follows to remove
the key:
SSD0083
IGNITION SWITCH
5-6
Starting and driving
Z
01.9.21/R50-D/V5
X
Page 158 of 288
IMake sure the area around the vehicle is
clear.
ICheck fluid levels such as engine oil, cool-
ant, brake and clutch fluid, window washer
fluid as frequently as possible, at least
whenever you refuel.
ICheck to be sure that all windows and light
lenses are clean.
IVisually inspect tires for their appearance
and condition. Also check tires for proper
inflation.
ILock all doors.
IPosition seat and adjust head restraints.
IAdjust inside and outside mirrors.
IFasten seat belts and ask all passengers to
do likewise.
ICheck the operation of warning lights when
key is turned to the ON (3) position.1. Apply the parking brake.
2.Automatic transmission:
Move the selector lever to P (Park position)
or N (Neutral position). (P preferred)
The selector lever cannot be moved out
of P and into any of the other gear
positions if the ignition key is turned to
LOCK or if the key is removed from the
switch.
The starter is designed not to operate if
the selector lever is in one of the driving
positions.
Manual transmission:
Move the gearshift lever to N (Neutral po-
sition), and depress the clutch pedal to the
floor while starting the engine.
The starter is designed not to operate
unless the clutch pedal is fully de-
pressed.
3. Crank the enginewith your foot off the
accelerator pedalby turning the ignition
key to START. Release the key when the
engine starts. If the engine starts, but fails
to run, repeat the above procedure.
Ð If the engine is very hard to start in
extremely cold or hot weather ÐUse the accelerator pedal to help start the
engine.
CAUTION
Do not operate the starter for more than
15 seconds at a time. If the engine does
not start, turn the key off and wait 10
seconds before cranking again, other-
wise the starter could be damaged.
4.Warm-up
Always allow the engine to idle for at least
30 seconds after starting. Drive at moder-
ate speed for a short distance first, espe-
cially in cold weather.
BEFORE STARTING THE ENGINE STARTING THE ENGINE
Starting and driving
5-9
Z
01.9.21/R50-D/V5
X
Page 164 of 288
damage.
To change gears, or when up shifting or down
shifting, depress the clutch pedal fully, shift
into the appropriate gear, then release the
clutch slowly and smoothly.
Start the vehicle in 1st gear and shift to 2nd,
3rd and 4th up to 5th gear in sequence accord-
ing to the vehicle speed.
You cannot shift directly from 5th gear into
Reverse. First shift into the Neutral position,
then into Reverse.
If it is difficult to move the shift lever into
Reverse or 1st, shift into Neutral, then release
the clutch pedal and shift into Reverse or 1st
again. If your vehicle is equipped with four
wheel drive, see ªUsing four wheel driveº later
in this section.
Suggested up-shift speedsThe table below provides suggested speed
ranges for shifting into a higher gear. These
suggestions relate to fuel economy and ve-
hicle performance. Actual shift ranges should
be adjusted for specific road conditions,
weather conditions and individual driving hab-
its.
ITwo wheel drive models and four wheel
drive models (2H and 4H position)MPH (km/h)
1st to 2nd 15 (24)
2nd to 3rd 25 (40)
3rd to 4th 40 (64)
4th to 5th 45 (72)
IFour wheel drive model (4L position)
MPH (km/h)
1st to 2nd 8 (13)
2nd to 3rd 12 (20)
3rd to 4th 20 (32)
4th to 5th 22 (36)
Suggested maximum speed in each
gearDownshift to a lower gear if the engine is not
running smoothly, or if you need to accelerate.
Do not exceed the maximum suggested speed
(shown below) in any gear. For level road
driving, use the highest gear suggested for
that speed. Always observe posted speed
limits, and drive according to the road condi-
tions which will ensure safe operation. Do not
overrev the engine when shifting to a lower
gear as it may cause engine damage or loss of
vehicle control.Allowable maximum speed in each gear
Two wheel drive models and four wheel drive
models (2H position) MPH (km/h)
1st 22 (36)
2nd 37 (60)
3rd 56 (90)
4th & 5th Ð (Ð)
Four wheel drive models MPH (km/h)
4H position
1st 22 (36)
2nd 37 (60)
3rd 50 (80)
4th & 5th 50 (80)
4L position
1st 9 (15)
2nd 19 (30)
3rd 28 (45)
4th & 5th 31 (50)
CAUTION
IDo not rest your foot on the clutch
pedal while driving. This may cause
clutch damage.
IStop your vehicle completely before
shifting into R (Reverse).
Starting and driving
5-15
Z
01.9.21/R50-D/V5
X
Page 168 of 288

During the first 1,000 miles (1,600 km), follow
these recommendations for the future reliabil-
ity and economy of your new vehicle.
IAvoid driving for long periods at constant
speed, either fast or slow.
IDo not accelerate at full throttle in any gear.
IAvoid quick starts.
IAvoid hard braking as much as possible.
IDo not tow a trailer for the first 500 miles
(800 km).
IAccelerate slowly and smoothly. Maintain
cruising speeds with a constant accelerator
position.
IDrive at moderate speeds on the highway.
Driving at high speed will lower fuel
economy.
IAvoid unnecessary stopping and braking.
Maintain a safe distance behind other ve-
hicles.
IUse a proper gear range which suits road
conditions. On level roads, shift into high
gear as soon as possible.
IAvoid unnecessary engine idling.IKeep your engine tuned up.
IFollow the recommended periodic mainte-
nance schedule.
IKeep the tires inflated at the correct pres-
sure. Low pressure will increase tire wear
and waste fuel.
IKeep the front wheels in correct alignment.
Improper alignment will cause increased
tire wear and lower fuel economy.
IAir conditioner operation lowers fuel
economy. Use the air conditioner only when
necessary.
IWhen cruising at highway speeds, it is
more economical to use the air conditioner
and leave the windows closed to reduce
drag.
I
Use 4H or 4L position only when neces-
sary. Four wheel drive operation lowers fuel
economy.
SD0001
BREAK-IN SCHEDULE INCREASING FUEL ECONOMY
Starting and driving
5-19
Z
01.9.21/R50-D/V5
X
Page 171 of 288

TO SHIFT
TRANSFER CASE:AUTOMATIC TRANSMISSION MODELS SHIFT PROCEDURE
From 2H to 4HMove the transfer lever to 4H. This can be done at any speed up to 50 MPH (80 km/h), and it is not necessary to move the selector
lever to the N position. Perform this operation when driving straight.
From 4H to 2HMove the transfer lever to 2H. This can be done at any speed up to 50 MPH (80 km/h), and it is not necessary to move the selector
lever to the N position. Perform this operation when driving straight.
From 4H or 4L to 4L or
4H1. Stop the vehicle.
2. Move the selector lever to the N position.
3. Depress the transfer lever and move it to the desired 4L or 4H position.
When moving the transfer lever from 4H to 4L, you must always move it quickly through the N position. If you are slow to shift, the
engine idle speed will allow the transfer gears to speed up and gear clashing will occur.*
From 2H to 4L1. Stop the vehicle.
2. Move the selector lever to the N position.
3. Depress the transfer lever and move it to 4L. Change gears quickly and smoothly.
From 4L to 2H1. Stop the vehicle.
2. Move the selector lever to the N position.
3. Depress the transfer lever and move it to 2H.
* Do not leave the transfer lever in the N position. Stopping in the N position of the transfer case may cause gear grinding when selecting another gear.
Changing the transfer case gear quickly and smoothly will eliminate this. If the transfer is left in N for longer than a few seconds and you have difficulty in
selecting another gear, turn off the engine, make the gear selection and restart the engine.5-22
Starting and driving
Z
01.9.21/R50-D/V5
X
Page 174 of 288
*1:IThe transfer 4LO position indicator light
may blink. Stop the vehicle. Be sure to
shift the 4WD shift switch after the auto-
matic transmission lever has been
shifted to the N position. If the indicator
light keeps blinking after the 4WD shift
procedure in the previous page, drive
slowly without abrupt maneuvers for a
while. Then the light will turn on or off.
IAvoid making a turn or abrupt starts
while shifting to 4LO. Otherwise gears
may grind, damaging the drive system.
*2: Make sure the transfer 4LO position indica-
tor light turns on when you shift the 4WD
shift switch to 4LO.
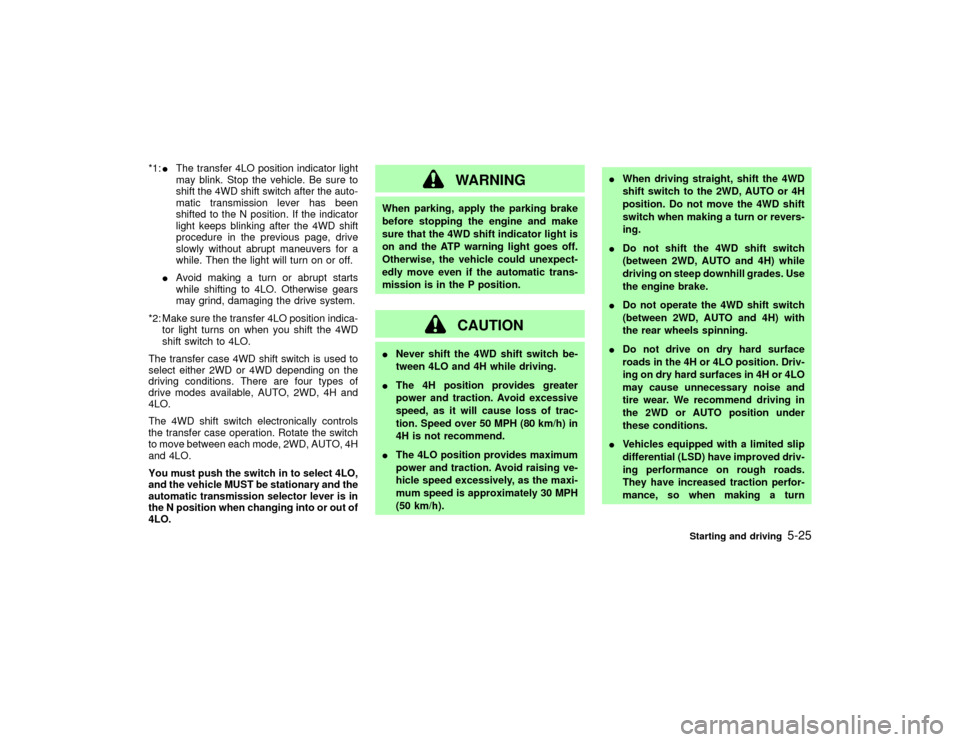
The transfer case 4WD shift switch is used to
select either 2WD or 4WD depending on the
driving conditions. There are four types of
drive modes available, AUTO, 2WD, 4H and
4LO.
The 4WD shift switch electronically controls
the transfer case operation. Rotate the switch
to move between each mode, 2WD, AUTO, 4H
and 4LO.
You must push the switch in to select 4LO,
and the vehicle MUST be stationary and the
automatic transmission selector lever is in
the N position when changing into or out of
4LO.
WARNING
When parking, apply the parking brake
before stopping the engine and make
sure that the 4WD shift indicator light is
on and the ATP warning light goes off.
Otherwise, the vehicle could unexpect-
edly move even if the automatic trans-
mission is in the P position.
CAUTION
INever shift the 4WD shift switch be-
tween 4LO and 4H while driving.
IThe 4H position provides greater
power and traction. Avoid excessive
speed, as it will cause loss of trac-
tion. Speed over 50 MPH (80 km/h) in
4H is not recommend.
IThe 4LO position provides maximum
power and traction. Avoid raising ve-
hicle speed excessively, as the maxi-
mum speed is approximately 30 MPH
(50 km/h).IWhen driving straight, shift the 4WD
shift switch to the 2WD, AUTO or 4H
position. Do not move the 4WD shift
switch when making a turn or revers-
ing.
IDo not shift the 4WD shift switch
(between 2WD, AUTO and 4H) while
driving on steep downhill grades. Use
the engine brake.
IDo not operate the 4WD shift switch
(between 2WD, AUTO and 4H) with
the rear wheels spinning.
IDo not drive on dry hard surface
roads in the 4H or 4LO position. Driv-
ing on dry hard surfaces in 4H or 4LO
may cause unnecessary noise and
tire wear. We recommend driving in
the 2WD or AUTO position under
these conditions.
IVehicles equipped with a limited slip
differential (LSD) have improved driv-
ing performance on rough roads.
They have increased traction perfor-
mance, so when making a turn
Starting and driving
5-25
Z
01.9.21/R50-D/V5
X
Page 176 of 288
This occurs because the transfer clutch
is released and not because of a mal-
function.
CAUTION
IWhen driving straight, shift the 4WD
shift switch to the 2WD, AUTO, or 4H
position. Do not move the 4WD shift
switch when making a turn or revers-
ing.
IDo not shift the 4WD shift switch
while driving on steep downhill
grades. Use the engine brake.
IDo not operate the 4WD shift switch
with the rear wheels spinning.
IBefore placing the 4WD shift switch
in the 4H position from 2WD or AUTO,
ensure the vehicle speed is less than
50 MPH (80 km/h). Failure to do so
can damage the 4WD system.
INever shift the 4WD shift switch be-
tween 4LO and 4H while driving.
IEngine idling speed is high while
warming up the engine. Be espe-cially careful when starting or driving
on slippery surfaces with the 4WD
shift switch set in AUTO.
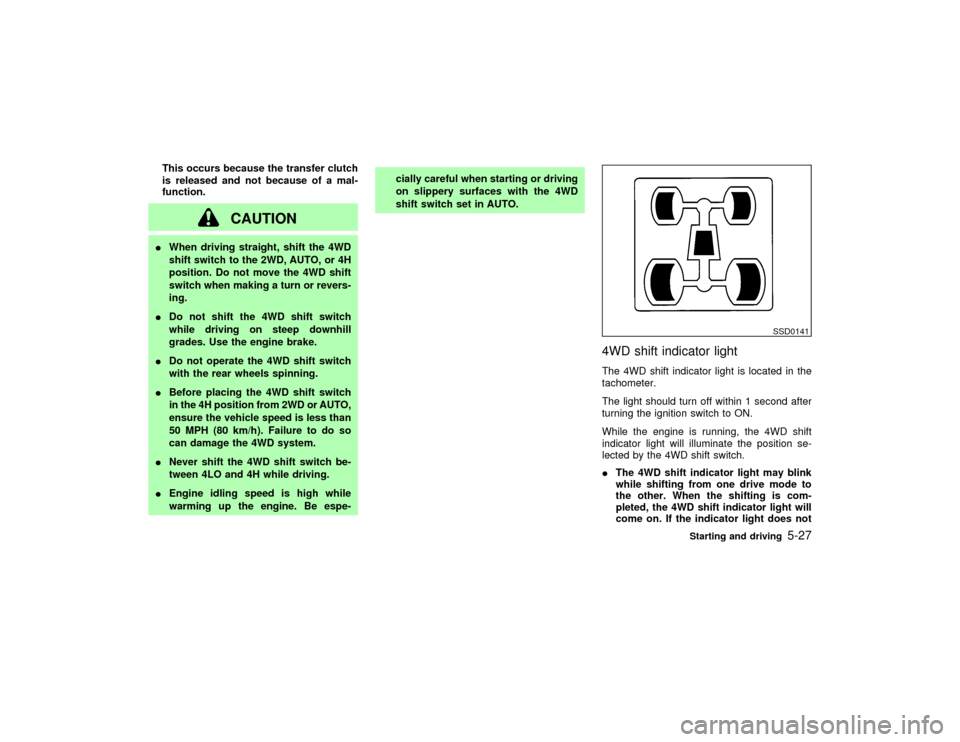
4WD shift indicator lightThe 4WD shift indicator light is located in the
tachometer.
The light should turn off within 1 second after
turning the ignition switch to ON.
While the engine is running, the 4WD shift
indicator light will illuminate the position se-
lected by the 4WD shift switch.
IThe 4WD shift indicator light may blink
while shifting from one drive mode to
the other. When the shifting is com-
pleted, the 4WD shift indicator light will
come on. If the indicator light does not
SSD0141
Starting and driving
5-27
Z
01.9.21/R50-D/V5
X
Page 177 of 288
come on immediately, make sure the
area around the vehicle is safe, and
drive the vehicle straight, accelerate or
decelerate or move the vehicle in re-
verse, then shift the 4WD shift switch.
IIf the 4WD warning light comes on, the
4WD shift indicator light goes out.
CAUTION
IWhen the 4WD shift switch is turned
to the AUTO position at low ambient
temperatures, the 4WD shift indicator
light may show 4H. If this happens, all
four wheels are driven as torque dis-
tribution is in the 4H position. Be
careful as the vehicle may become
difficult to turn. When the vehicle is
driven, the 4WD shift indicator light
should change to AUTO.
IIf the 4WD shift indicator light indica-
tion changes to 2WD when the 4WD
shift switch is shifted to the AUTO or
4H position at low ambient tempera-
tures, the 2WD mode may be being
engaged due to malfunctioning drivesystem. If the indicator does not re-
turn to normal and the 4WD warning
light comes on, have the system
checked by the nearest NISSAN
dealer.
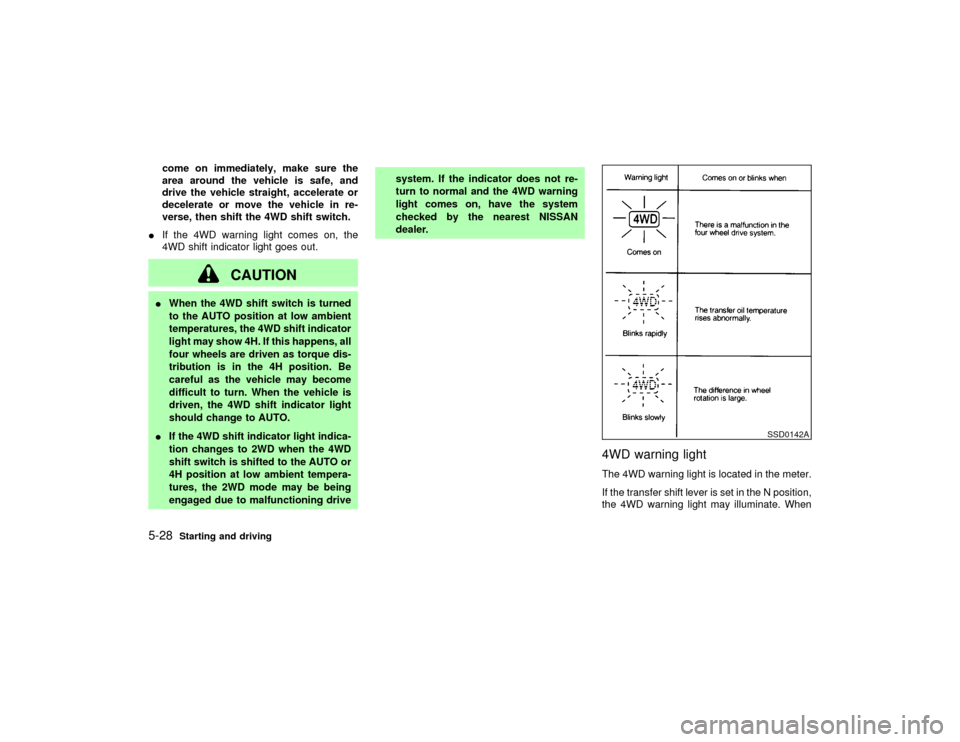
4WD warning lightThe 4WD warning light is located in the meter.
If the transfer shift lever is set in the N position,
the 4WD warning light may illuminate. When
SSD0142A
5-28
Starting and driving
Z
01.9.21/R50-D/V5
X
Page 178 of 288
this occurs, move the 4WD shift switch to the
4H or 4LO position.
The 4WD warning light comes on when the
key switch is turned to ON. It turns off soon
after the engine is started.
If any malfunction occurs in the 4WD system
when the key switch is ON, the warning light
will either remain illuminated or blink.
If the 4WD warning light comes on, the 4WD
indicator light goes out.
High-temperature transfer case oil makes the
warning light blink rapidly (about twice per
second). If the warning light blinks rapidly
during operation, stop the vehicle in a safe
place immediately. Then if the light goes off
after a while, you can continue driving.
A large difference between the diameters of
front and rear wheels will make the warning
light blink slowly (about once per two sec-
onds). Change the 4WD shift switch into 2WD
and do not drive fast.
CAUTION
IIf the warning light comes on or
blinks slowly during operation or rap-idly after stopping the vehicle for a
while, have your vehicle checked by
an authorized NISSAN dealer as soon
as possible.
IShifting between 4H and 4LO is not
recommended when the 4WD warn-
ing light turns on.
IWhen the warning light comes on, the
2WD mode may be engaged even if
the 4WD shift switch is in AUTO or
4H. Be especially careful when driv-
ing. If corresponding parts are mal-
functioning, the 4WD mode will not
be engaged even if the 4WD shift
switch is shifted.
IDo not drive on dry hard surface
roads in the 4H or 4LO position.
If the 4WD warning light turns on
when you are driving on dry hard
surface roads
Iin the AUTO or 4H position, shift
the 4WD shift switch to 2WD.
Iin the 4LO position, stop the ve-hicle, move the automatic transmis-
sion lever to the N position, and shift
the 4WD shift switch to 2WD.
IIf the warning light is still on after the
above operation, have your vehicle
checked by an authorized NISSAN
dealer as soon as possible.
IThe transfer case may be damaged if
you continue driving with the warning
light blinking rapidly.
Starting and driving
5-29
Z
01.9.21/R50-D/V5
X
Page 184 of 288
tread pattern on all four wheels.
CAUTION
ONLY use spare tires specified for each
four wheel drive model.SPECIAL WINTER EQUIPMENTIt is recommended that the following items be
carried in the vehicle during winter:
IA scraper and stiff-bristled brush to remove
ice and snow from the windows and wiper
blades.
IA sturdy, flat board to be placed under the
jack to give it firm support.
IA shovel to dig the vehicle out of snow-
drifts.
IExtra window washer fluid to refill the res-
ervoir tank.DRIVING ON SNOW OR ICE
WARNING
IWet ice (32ÉF, 0ÉC and freezing rain),very cold snow or ice can be slick and
very hard to drive on. The vehicle will
have a lot less traction or grip under
these conditions. Try to avoid driving
on wet ice until the road is salted or
sanded.
IWhatever the condition, drive with
caution. Accelerate and slow down
with care. If accelerating or down-
shifting too fast, the drive wheels will
lose even more traction.
IAllow more stopping distance under
these conditions. Braking should be
started sooner than on dry pavement.
IAllow greater following distances on
slippery roads.
IWatch for slippery spots (glare ice).
These may appear on an otherwise
clear road in shaded areas. If a patch
of ice is seen ahead, brake before
reaching it. Try not to brake while
actually on the ice, and avoid any
sudden steering maneuvers.IDo not use cruise control on slippery
roads.
ISnow can trap dangerous exhaust
gases under your vehicle. Keep snow
clear of the exhaust pipe and from
around your vehicle.
ENGINE BLOCK HEATER (if so
equipped)An engine block heater to assist extreme cold
temperature starting is available through your
NISSAN dealer.
WARNING
Do not use your heater with an un-
grounded electrical system or two-
pronged (cheater) adapters. You can be
injured by an electrical shock if you use
an ungrounded connection.
Starting and driving
5-35
Z
01.9.21/R50-D/V5
X