ECO mode NISSAN PATHFINDER 2005 R51 / 3.G User Guide
[x] Cancel search | Manufacturer: NISSAN, Model Year: 2005, Model line: PATHFINDER, Model: NISSAN PATHFINDER 2005 R51 / 3.GPages: 336, PDF Size: 5.49 MB
Page 127 of 336
The HomeLinkTUniversal Transceiver provides a
convenient way to consolidate the functions of up
to three individual hand-held transmitters into
one built-in device.
HomeLinkTUniversal Transceiver:
cWill operate most Radio Frequency (RF)
devices such as garage doors, gates, home
and office lighting, entry door locks and se-
curity systems.
cIs powered by your vehicle’s battery. No
separate batteries are required. If the vehi-
cle’s battery is discharged or is discon-
nected, HomeLinkTwill retain all program-
ming.
Once the HomeLinkTUniversal Transceiver
is programmed, retain the original trans-
mitter for future programming procedures
(Example: new vehicle purchases) . Upon
sale of the vehicle, the programmed
HomeLinkTUniversal Transceiver buttons
should be erased for security purposes. For
additional information refer to “Program-
ming HomeLinkT” later in this section.WARNING
cDo not use the HomeLinkTUniversal
Transceiver with any garage door
opener that lacks safety stop and re-
verse features as required by federal
safety standards. (These standards be-
came effective for opener models
manufactured after April 1, 1982) . A ga-
rage door opener which cannot detect
an object in the path of a closing garage
door and then automatically stop and
reverse, does not meet current federal
safety standards. Using a garage door
opener without these features in-
creases the risk of serious injury or
death.
cDuring the programming procedure
your garage door or security gate will
open and close (if the transmitter is
within range) . Make sure that people or
objects are clear of the garage door,
gate, etc. that you are programming.
cYour vehicle’s engine should be turned
off while programming the HomeLinkT
Universal Transceiver.
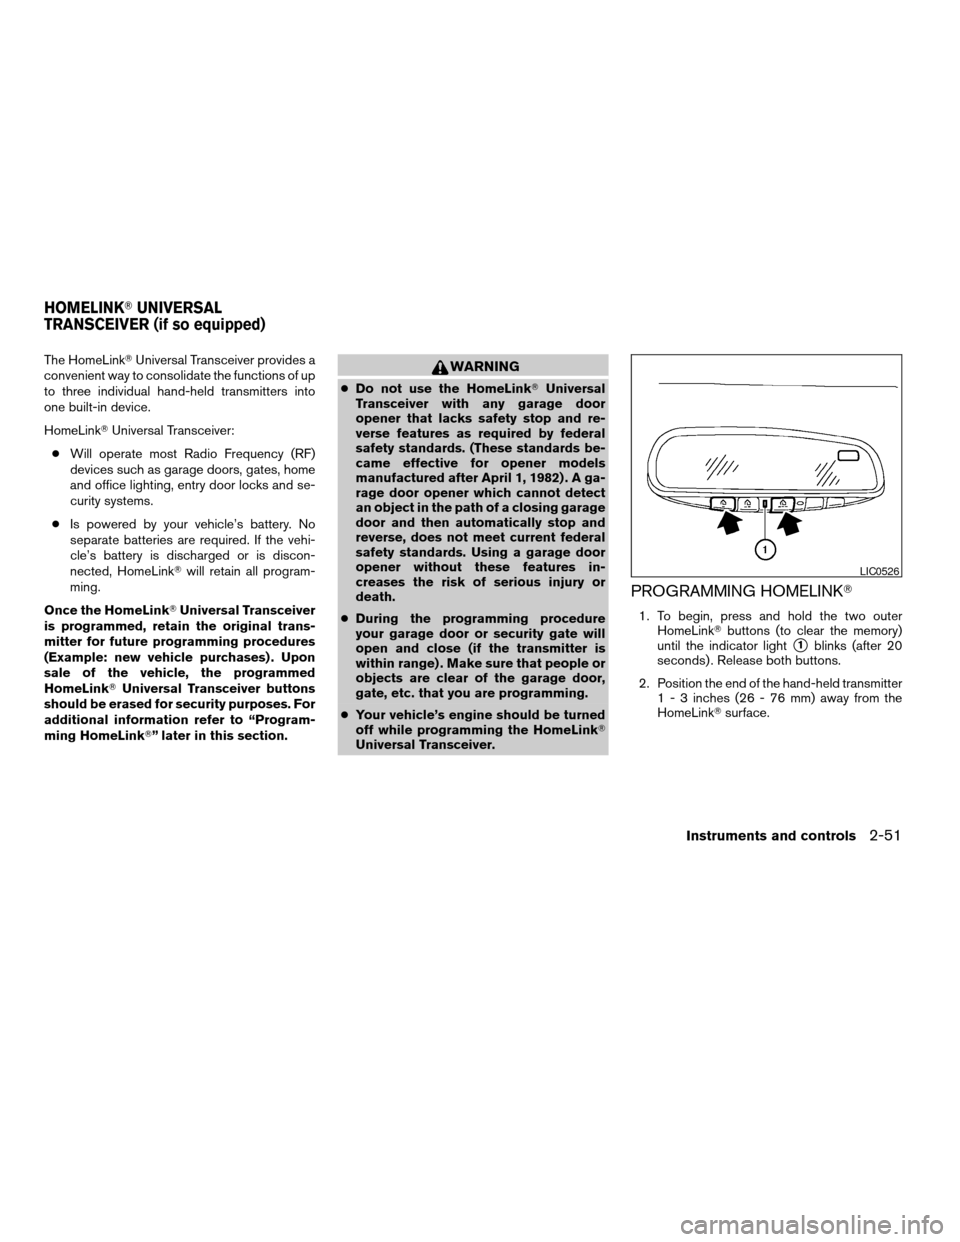
PROGRAMMING HOMELINKT
1. To begin, press and hold the two outer
HomeLinkTbuttons (to clear the memory)
until the indicator light
s1blinks (after 20
seconds) . Release both buttons.
2. Position the end of the hand-held transmitter
1 - 3 inches (26 - 76 mm) away from the
HomeLinkTsurface.
LIC0526
HOMELINKTUNIVERSAL
TRANSCEIVER (if so equipped)
Instruments and controls2-51
ZREVIEW COPYÐ2005 Pathfinder(pat)
Owners ManualÐUSA_English(nna)
07/22/04Ðdebbie0
X
Page 128 of 336

3. Using both hands, simultaneously press and
hold both the HomeLinkTbutton you want to
program and the hand-held transmitter but-
ton.
DO NOT release the buttons until step 4 has
been completed.4. Hold down both buttons until the indicator
light on the HomeLinkTflashes, changing
from a “slow blink” to a “rapidly flashing
blink”. This could take up to 90 seconds.
When the indicator light flashes rapidly, both
buttons may be released. The rapidly flash-
ing light indicates successful programming.
To activate the garage door or other pro-
grammed device, press and hold the pro-
grammed HomeLinkTbutton — releasing
when the device begins to activate.
5. If the indicator light on the HomeLinkTblinks
rapidly for 2 seconds and then turns solid,
HomeLinkThas picked up a “rolling code”
garage door opener signal. You will need to
proceed with the next steps to train the
HomeLinkTto complete the programming
which may require a ladder and another per-
son for convenience.
6. Press and release the “smart” or “learn” pro-
gram button located on the garage door
opener’s motor to activate the “training
mode”. This button is usually located near
the antenna wire that hangs down from the
motor. If the wire originates from under a
light lens, you will need to remove the lens to
access the program button.NOTE:
Once you have pressed and released the
program button on the garage door open-
er’s motor and the “training light” is lit, you
have 30 seconds in which to perform step 7.
Use the help of a second person for conve-
nience to assist when performing this step.
7. Within 30 seconds of pressing and releas-
ing the garage door opener program button,
quickly and firmly press and release the
HomeLinkTbutton you’ve just programmed.
Press and release the HomeLinkTbutton up
to 3 times to complete the training.
8. Your HomeLinkTbutton should now be pro-
grammed. (To program the remaining
HomeLinkTbuttons for additional door or
gate openers, follow steps 2-8 only.)
NOTE:
Do not repeat step 1 unless you want to
“clear” all previously programmed
HomeLinkTbuttons.
If you have any questions or are having difficulty
programming your HomeLinkTbuttons, please
refer to the HomeLinkTweb site at:
www.homelink.com or call 1-800-NISSAN-1 (1-
800-647-7261) .
LIC0527
2-52Instruments and controls
ZREVIEW COPYÐ2005 Pathfinder(pat)
Owners ManualÐUSA_English(nna)
07/22/04Ðdebbie0
X
Page 137 of 336

Using the panic alarm
If you are near your vehicle and feel threatened,
you may activate the panic alarm to call attention
by pushing and holding the
button on the
keyfob forlonger than 0.5 second.
The panic alarm and headlights will stay on for 25
seconds.
The panic alarm stops when:
cit has run for 25 seconds, or
cany button is pushed on the keyfob.
Silencing the horn beep feature
If desired, the horn beep feature can be deacti-
vated using the keyfob.
NOTE:
If you change the horn beep and lamp flash
feature with the keyfob, the display screen
(if so equipped) will not show the current
mode and cannot be used to change the
mode. Use the keyfob to return to the pre-
vious mode and re-enable the display
screen control.
To deactivate:Press and hold the
andbuttonsfor at least 2 seconds.The hazard warning lights will flash three times to
confirm that the horn beep feature has been
deactivated.
To activate:Press and hold the
andbuttonsfor at least 2 seconds
once more.
The hazard warning lights will flash once and the
horn will sound once to confirm that the horn
beep feature has been reactivated.
Deactivating the horn beep feature does not si-
lence the horn if the alarm is triggered.
Using the interior lights
Push thebutton on the keyfob once to turn
on the interior lights.
The interior lights can be turned off without wait-
ing 30 seconds by inserting the key into the
ignition, locking the doors with the keyfob or
pushing the interior light switch to the off posi-
tion.LPD0211LPD0262
Pre-driving checks and adjustments3-7
ZREVIEW COPYÐ2005 Pathfinder(pat)
Owners ManualÐUSA_English(nna)
07/22/04Ðdebbie0
X
Page 152 of 336

HOW TO USE THE “TRIP” BUTTON
When the“TRIP”button is pushed, the following
modes will display on the screen.
Warning message (if there are any)!TRIP 1
(Elapsed Time, Driving Distance, Average
Speed)!TRIP 2!FUEL ECONOMY (Average
Fuel Economy, Distance to Empty)!MAINTE-
NANCE (Engine Oil, Tire Rotation and Tire Pres-
sure — if so equipped)!OFF.
Trip 1, trip 2 and fuel economy items
To reset the TRIP 1, TRIP 2 and FUEL
ECONOMY, select the“RESET”key using the
joystick and push the“ENTER”button or push
the“TRIP”button for more than approximately
1.5 seconds.
Maintenance items
You can set the engine oil and the tire rotation
interval.
To display the setting of the maintenance interval,
select the“Engine Oil”or“Tire Rotation”key
using the joystick and push the“ENTER”button.
LHA0398LHA0399LHA0402
4-4Display screen, heater, air conditioner and audio systems
ZREVIEW COPYÐ2005 Pathfinder(pat)
Owners ManualÐUSA_English(nna)
07/22/04Ðdebbie0
X
Page 155 of 336

HOW TO USE THE “SETTING”
BUTTON
To adjust the various settings within the display
screen press the“SETTING”button.
After pressing the SETTING button a menu will
be shown on the display screen which will allow
you to program several functions such as the
display screen appearance, programmable fea-
tures for your vehicles electronics system and
other system settings such as your clock. To
make a selection from this mode use the joystick
and press the “ENTER” button.
SETTING THE DISPLAY (Audio or
HVAC display):
The audio or HVAC reading can be displayed at
the bottom of the screen. Choose the “Audio” or
“HVAC” (Heater and air conditioner) key to be
displayed at the bottom, by using the joystick and
pressing the ENTER button to select or deselect
the key. The setting condition will normally appear
on the screen. To return to the setting screen,
push the “SETTING” button or “PREV” button.
Display settings
The DISPLAY SETTINGS screen will appear af-
ter pushing the“SETTING”button, selecting
“Display”key and pushing the“ENTER”but-
ton.
Brightness/Contrast/Map Background:
To adjust the brightness and contrast of the
screen, select the“Brightness/contrast”key
and push the“ENTER”button. You can then use
the joystick to adjust the brightness to Darker or
Brighter and the contrast to Lower or Higher. For
information on Map Background, please refer to
the separate Navigation System Owner’s
Manual.
Display Off:
To turn off the screen, push the“SETTING”
button and select the“Display”key and“Dis-play Off”key. The indicator of the“Display
Off”will turn to amber. When any mode button is
pushed with the screen off, the screen turns on
for further operation. The screen will turn off
automatically 5 seconds after the operation is
finished on the map display in the Audio, HVAC
(Heater and air conditioner) , SETTING or VE-
HICLE INFO modes.
To turn on the screen, push the“SETTING”
button and select the“Display”key and“Dis-
play Off”key, then set the screen to on by
pushing the“ENTER”button.
Setting Audio or HVAC display:
Choose the“Audio”or“HVAC”(Heater and air
conditioner) key to be displayed at the bottom, by
using the joystick. The audio or HVAC setting
condition will normally appear on the screen. To
return to the setting screen, push the“SET-
TING”button or“PREV”button.LHA0268
Display screen, heater, air conditioner and audio systems4-7
ZREVIEW COPYÐ2005 Pathfinder(pat)
Owners ManualÐUSA_English(nna)
07/22/04Ðdebbie0
X
Page 161 of 336
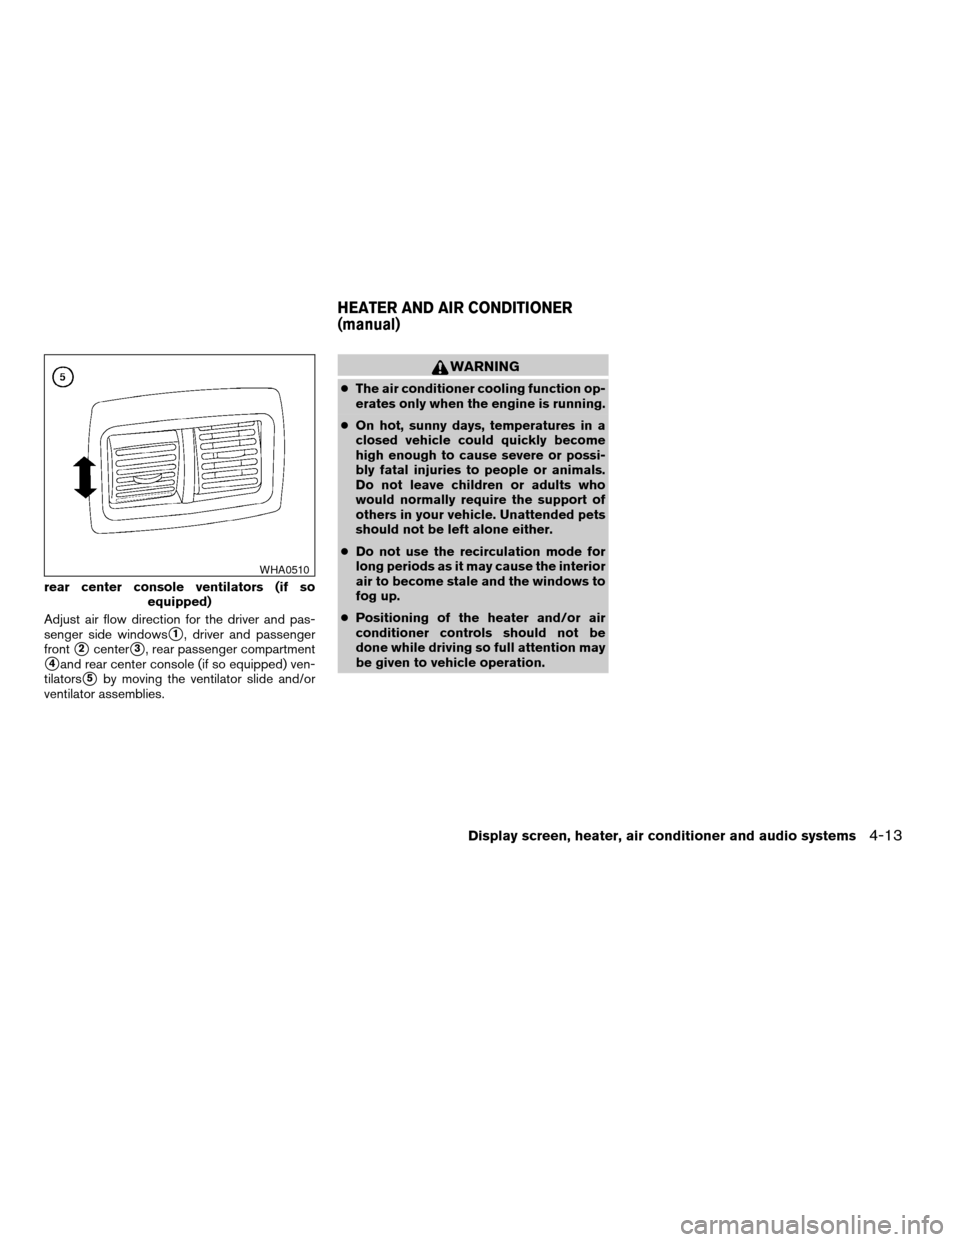
Adjust air flow direction for the driver and pas-
senger side windows
s1, driver and passenger
front
s2centers3, rear passenger compartment
s4and rear center console (if so equipped) ven-
tilators
s5by moving the ventilator slide and/or
ventilator assemblies.
WARNING
cThe air conditioner cooling function op-
erates only when the engine is running.
cOn hot, sunny days, temperatures in a
closed vehicle could quickly become
high enough to cause severe or possi-
bly fatal injuries to people or animals.
Do not leave children or adults who
would normally require the support of
others in your vehicle. Unattended pets
should not be left alone either.
cDo not use the recirculation mode for
long periods as it may cause the interior
air to become stale and the windows to
fog up.
cPositioning of the heater and/or air
conditioner controls should not be
done while driving so full attention may
be given to vehicle operation.
rear center console ventilators (if so
equipped)
WHA0510
HEATER AND AIR CONDITIONER
(manual)
Display screen, heater, air conditioner and audio systems4-13
ZREVIEW COPYÐ2005 Pathfinder(pat)
Owners ManualÐUSA_English(nna)
07/22/04Ðdebbie0
X
Page 169 of 336
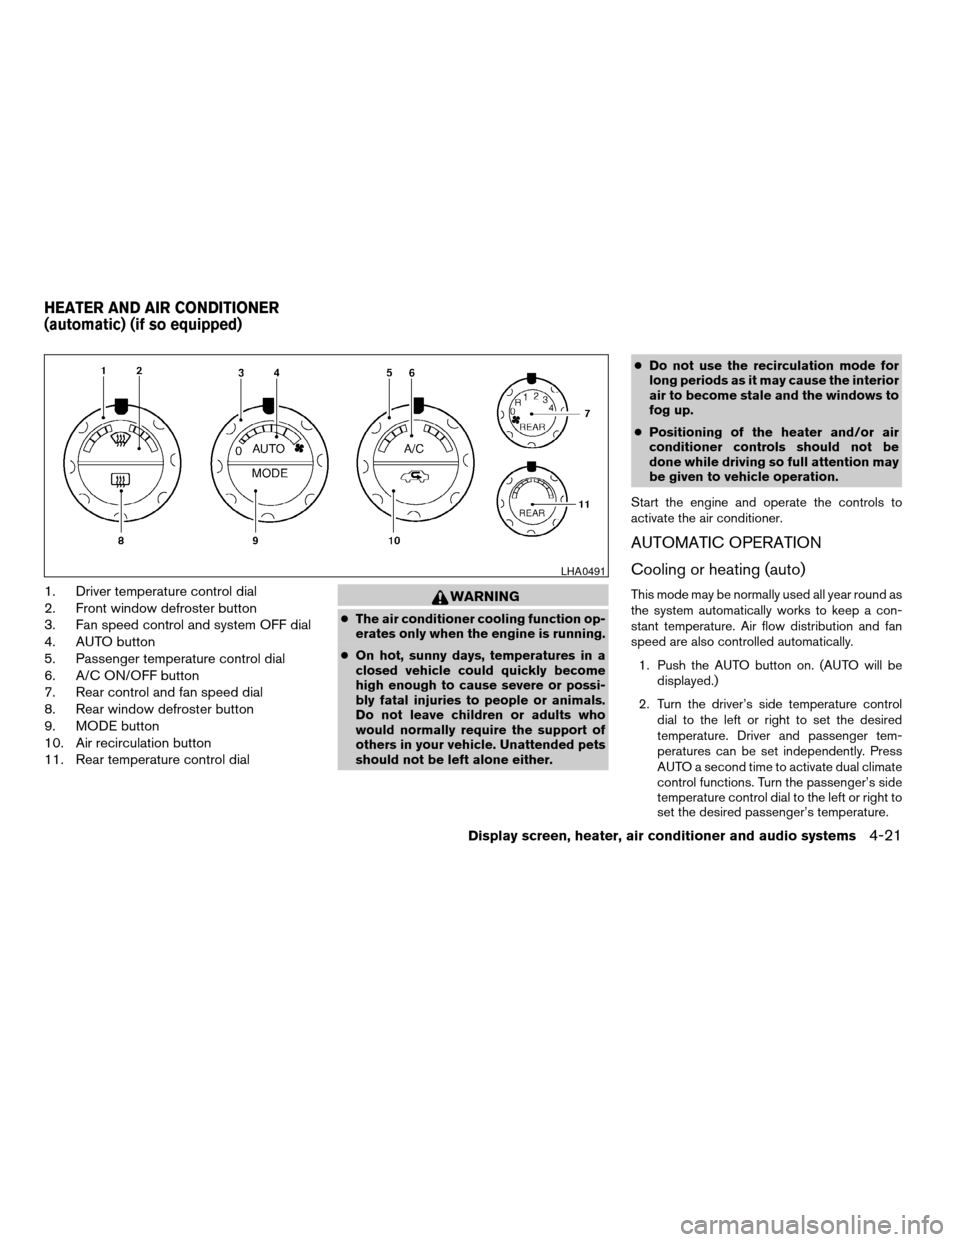
1. Driver temperature control dial
2. Front window defroster button
3. Fan speed control and system OFF dial
4. AUTO button
5. Passenger temperature control dial
6. A/C ON/OFF button
7. Rear control and fan speed dial
8. Rear window defroster button
9. MODE button
10. Air recirculation button
11. Rear temperature control dialWARNING
cThe air conditioner cooling function op-
erates only when the engine is running.
cOn hot, sunny days, temperatures in a
closed vehicle could quickly become
high enough to cause severe or possi-
bly fatal injuries to people or animals.
Do not leave children or adults who
would normally require the support of
others in your vehicle. Unattended pets
should not be left alone either.cDo not use the recirculation mode for
long periods as it may cause the interior
air to become stale and the windows to
fog up.
cPositioning of the heater and/or air
conditioner controls should not be
done while driving so full attention may
be given to vehicle operation.
Start the engine and operate the controls to
activate the air conditioner.
AUTOMATIC OPERATION
Cooling or heating (auto)
This mode may be normally used all year round as
the system automatically works to keep a con-
stant temperature. Air flow distribution and fan
speed are also controlled automatically.
1. Push the AUTO button on. (AUTO will be
displayed.)
2. Turn the driver’s side temperature control
dial to the left or right to set the desired
temperature. Driver and passenger tem-
peratures can be set independently. Press
AUTO a second time to activate dual climate
control functions. Turn the passenger’s side
temperature control dial to the left or right to
set the desired passenger’s temperature.
LHA0491
HEATER AND AIR CONDITIONER
(automatic) (if so equipped)
Display screen, heater, air conditioner and audio systems4-21
ZREVIEW COPYÐ2005 Pathfinder(pat)
Owners ManualÐUSA_English(nna)
07/22/04Ðdebbie0
X
Page 176 of 336
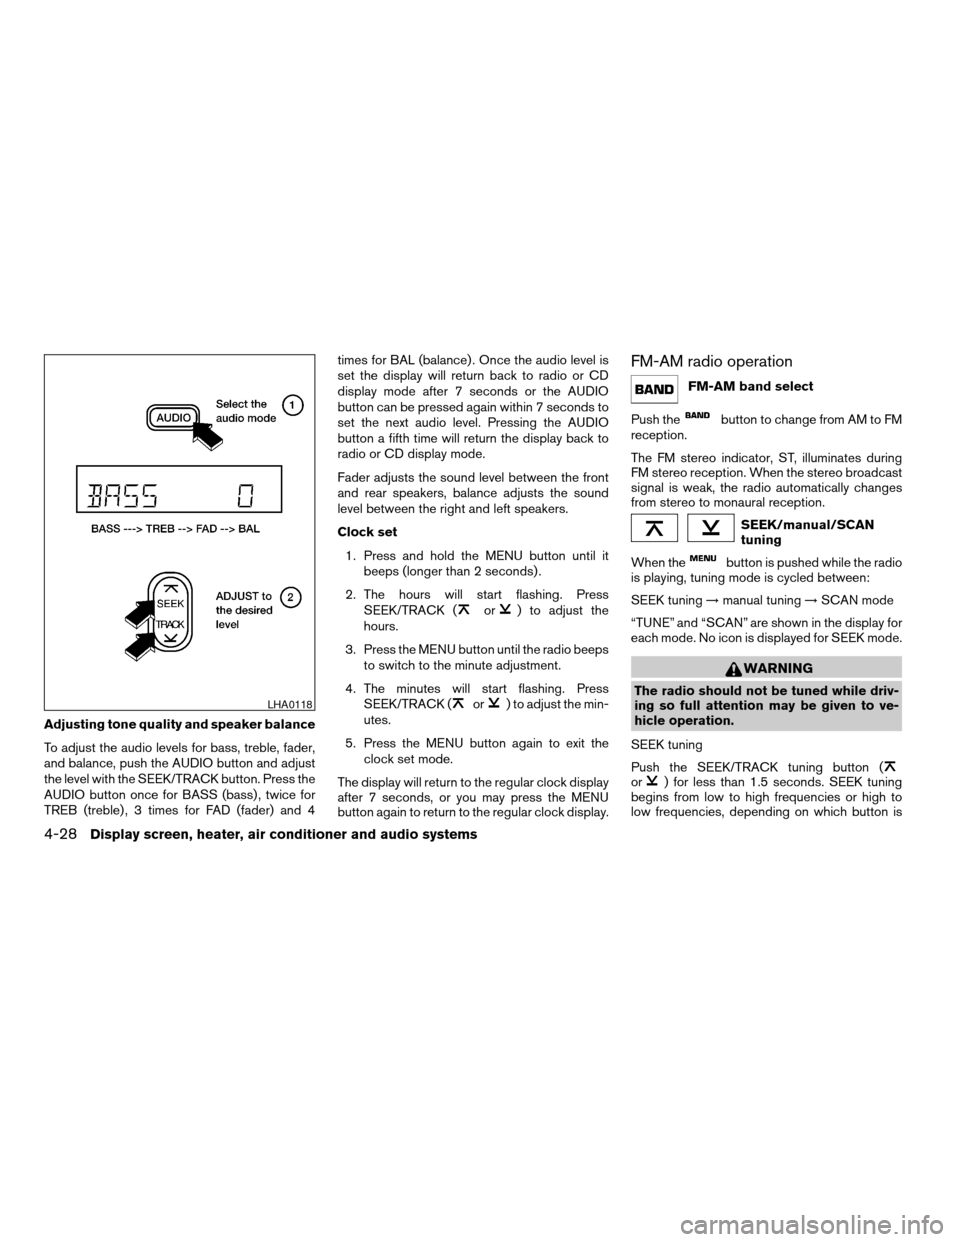
Adjusting tone quality and speaker balance
To adjust the audio levels for bass, treble, fader,
and balance, push the AUDIO button and adjust
the level with the SEEK/TRACK button. Press the
AUDIO button once for BASS (bass) , twice for
TREB (treble) , 3 times for FAD (fader) and 4times for BAL (balance) . Once the audio level is
set the display will return back to radio or CD
display mode after 7 seconds or the AUDIO
button can be pressed again within 7 seconds to
set the next audio level. Pressing the AUDIO
button a fifth time will return the display back to
radio or CD display mode.
Fader adjusts the sound level between the front
and rear speakers, balance adjusts the sound
level between the right and left speakers.
Clock set
1. Press and hold the MENU button until it
beeps (longer than 2 seconds) .
2. The hours will start flashing. Press
SEEK/TRACK (
or) to adjust the
hours.
3. Press the MENU button until the radio beeps
to switch to the minute adjustment.
4. The minutes will start flashing. Press
SEEK/TRACK (
or) to adjust the min-
utes.
5. Press the MENU button again to exit the
clock set mode.
The display will return to the regular clock display
after 7 seconds, or you may press the MENU
button again to return to the regular clock display.
FM-AM radio operation
FM-AM band select
Push the
button to change from AM to FM
reception.
The FM stereo indicator, ST, illuminates during
FM stereo reception. When the stereo broadcast
signal is weak, the radio automatically changes
from stereo to monaural reception.
SEEK/manual/SCAN
tuning
When the
button is pushed while the radio
is playing, tuning mode is cycled between:
SEEK tuning!manual tuning!SCAN mode
“TUNE” and “SCAN” are shown in the display for
each mode. No icon is displayed for SEEK mode.
WARNING
The radio should not be tuned while driv-
ing so full attention may be given to ve-
hicle operation.
SEEK tuning
Push the SEEK/TRACK tuning button (
or) for less than 1.5 seconds. SEEK tuning
begins from low to high frequencies or high to
low frequencies, depending on which button is
LHA0118
4-28Display screen, heater, air conditioner and audio systems
ZREVIEW COPYÐ2005 Pathfinder(pat)
Owners ManualÐUSA_English(nna)
07/22/04Ðdebbie0
X
Page 177 of 336

pressed, and stops at the next broadcasting sta-
tion. If using thebutton, once the highest
broadcasting station is reached, the radio contin-
ues in the SEEK mode at the lowest broadcasting
station. If using the
button, once the lowest
broadcasting station is reached, the radio contin-
ues in the SEEK mode at the highest broadcast-
ing station.
Manual tuning
Use the
andbuttons for manual
tuning. To move quickly through the channels,
hold either of the tuning buttons down.
SCAN tuning
Push and hold the SEEK/TRACK tuning button
(
or) for more than 1.5 seconds.
SCAN illuminates in the display window, and the
radio station blinks. SCAN tuning begins from
low to high frequencies or high to low frequen-
cies, depending on which button is pressed.
SCAN tuning stops at each broadcasting station
for 5 seconds. When scanning, SCAN is solid
and the radio station blinks. When temporarily
stopped on a station, SCAN blinks and the sta-
tion display is solid. Pushing the button again
during this 5 second period stops SCAN tuning
and the radio remains tuned to that station.Station memory operations
Each preset mode (A, B or C) has 6 presets,
capable of storing any combination of AM and FM
stations.Press the PRESET ABC button to change be-
tween the presets:
A!B!C
The radio displays icon A, B or C to indicate
which set of presets is active.
To store a radio station in a preset:
1. Select the desired preset by pressing PRE-
SET ABC.
2. Tune to the desired station.
3. Press the desired station select button for
more than 3 seconds. For example, in the
illustrations, ch2 is to be memorized. The
radio mutes when the select button is
pushed.
4. When the indicator illuminates in the display
and the sound resumes, memorizing is com-
plete.
5. Other station select buttons can be set in
the same manner.
If the battery cable is disconnected, or if the radio
fuse opens, the radio memory is canceled. In that
case, reset the desired stations.
LHA0119
Display screen, heater, air conditioner and audio systems4-29
ZREVIEW COPYÐ2005 Pathfinder(pat)
Owners ManualÐUSA_English(nna)
07/22/04Ðdebbie0
X
Page 180 of 336

This vehicle may be equipped with speed sensi-
tive control volume (SSV) for audio. The audio
volume changes as the driving speed changes.
AUDIO knob (BASS, MIDRANGE, TREBLE,
FADE, BALANCE and SSV if so equipped):
Press the AUDIO knob to change the mode as
follows:
BASS!MID!TREBLE!FADE!BALANCE
!SSV (if so equipped)
To adjust Bass, Mid (Midrange) , Treble, Fade and
Balance, press the AUDIO knob until the desired
mode appears in the display. Turn the Tuning
knob to adjust Bass and Treble to the desired
level. You can also use the Tuning knob to adjust
Fader and Balance modes. Fader adjusts the
sound level between the front and rear speakers
and Balance adjusts the sound between the right
and left speakers.
To change the SSV mode to OFF, LOW, MID or
HIGH, turn the Tuning knob to the right or left.
Once you have adjusted the sound quality to the
desired level, press the AUDIO knob repeatedly
until the radio or CD display reappears. Other-
wise, the radio or CD display will automatically
reappear after about 10 seconds.Clock set
1. Press the CLOCK button until it beeps
(>1.5 seconds) .
2. The hours will start flashing. Press CAT
FOLDER (
or) or SEEK TRACK
(or) to adjust the hours.
3. Press the CLOCK button again to switch to
the minute adjustment.
4. Press CAT FOLDER (
or)or
SEEK-TRACK (or) to adjust
the minutes.
5. Press the CLOCK button again to exit the
clock set mode.
The display will return to the regular clock display
after 7 seconds, or you may press the CLOCK
button again to return to the regular clock display.
DISP (display) button:
This DISP (display) button will show text about
MP3, SAT or CD information in the audio display.
CD display mode
To change the text displayed while playing a CD
with text, press the DISP button . The DISP
button will allow you to scroll through CD text as
follows: Disc titleÃ!Track title.To change the default display mode push the
tune knob to display mode and rotate the knob to
select the following display mode: Disc titleÃ!
Track titleÃ!Track number.
Once the display mode is selected press the tune
knob to store your selection. If the tuning knob is
not pressed after 8 seconds the display will re-
fresh with the last selected display mode setting.
cTrack title mode displays the title of the se-
lected CD track.
cDisk title mode displays the title of the CD
being played.
cTrack number mode displays the number
selected disc and the track that is currently
being played on the disk.
MP3 Display mode
To change the text displayed when listening to an
MP3 with MP3 text (when CD with text is being
used) , press the DISP button. The DISP button
will scroll through the CD text as follows: Disc
titleÃ!Track titleÃ!Folder title.
To change the default display mode push the
tune knob to display mode and rotate the knob to
select the following display mode: Folder number
Ã!Track titleÃ!Folder titleÃ!Disc title
Ã!Disc number.
4-32Display screen, heater, air conditioner and audio systems
ZREVIEW COPYÐ2005 Pathfinder(pat)
Owners ManualÐUSA_English(nna)
07/22/04Ðdebbie0
X