light NISSAN PATHFINDER 2008 R51 / 3.G 06IT Navigation Manual
[x] Cancel search | Manufacturer: NISSAN, Model Year: 2008, Model line: PATHFINDER, Model: NISSAN PATHFINDER 2008 R51 / 3.GPages: 217, PDF Size: 6.62 MB
Page 7 of 217
Black plate (10,1)
Model "NAV2-N" EDITED: 2007/ 3/ 9
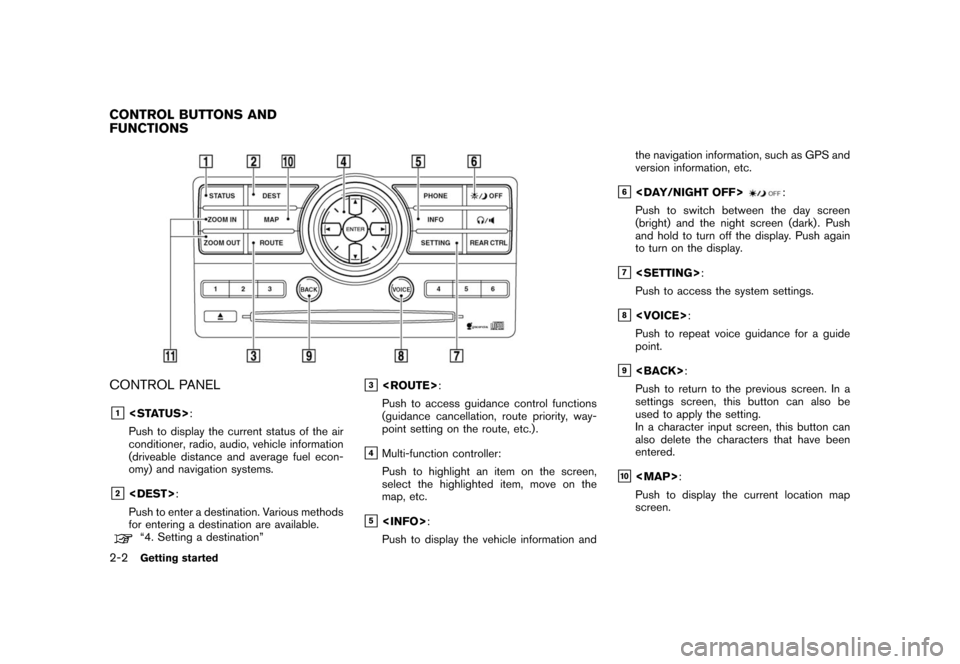
CONTROL PANEL
&1
Push to display the current status of the air
conditioner, radio, audio, vehicle information
(driveable distance and average fuel econ-
omy) and navigation systems.
&2
Push to enter a destination. Various methods
for entering a destination are available.
“4. Setting a destination”
&3
Push to access guidance control functions
(guidance cancellation, route priority, way-
point setting on the route, etc.) .
&4Multi-function controller:
Push to highlight an item on the screen,
select the highlighted item, move on the
map, etc.
&5
Push to display the vehicle information andthe navigation information, such as GPS and
version information, etc.
&6
Push to switch between the day screen
(bright) and the night screen (dark) . Push
and hold to turn off the display. Push again
to turn on the display.
&7
Push to access the system settings.
&8
Push to repeat voice guidance for a guide
point.
&9
Push to return to the previous screen. In a
settings screen, this button can also be
used to apply the setting.
In a character input screen, this button can
also delete the characters that have been
entered.
&10
Page 8 of 217
Black plate (11,1)
Model "NAV2-N" EDITED: 2007/ 3/ 9
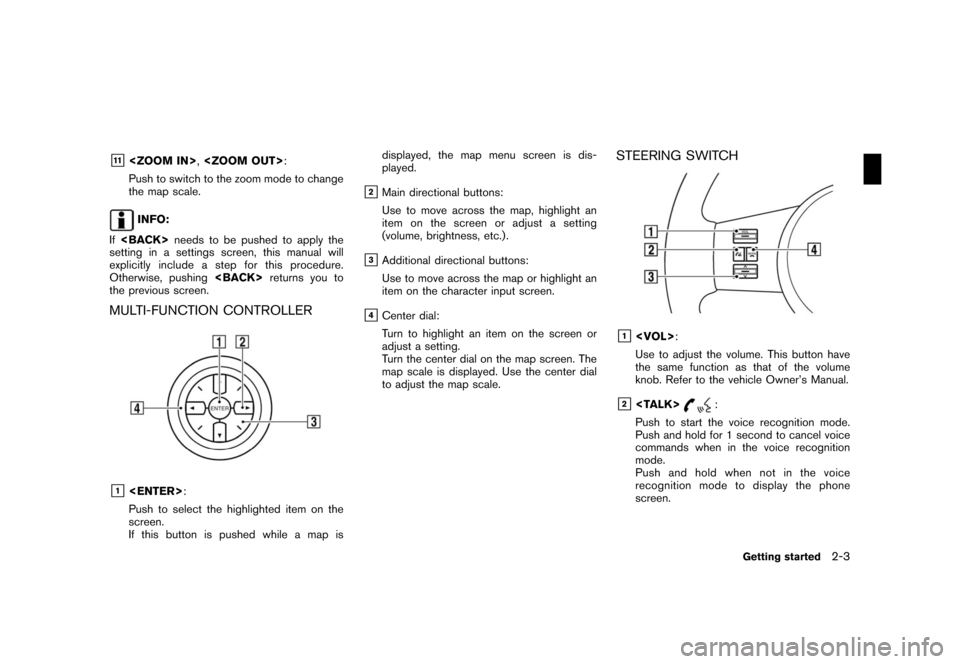
&11
Push to switch to the zoom mode to change
the map scale.
INFO:
If
setting in a settings screen, this manual will
explicitly include a step for this procedure.
Otherwise, pushing
the previous screen.
MULTI-FUNCTION CONTROLLER
&1
Push to select the highlighted item on the
screen.
If this button is pushed while a map isdisplayed, the map menu screen is dis-
played.
&2Main directional buttons:
Use to move across the map, highlight an
item on the screen or adjust a setting
(volume, brightness, etc.) .
&3Additional directional buttons:
Use to move across the map or highlight an
item on the character input screen.
&4Center dial:
Turn to highlight an item on the screen or
adjust a setting.
Turn the center dial on the map screen. The
map scale is displayed. Use the center dial
to adjust the map scale.
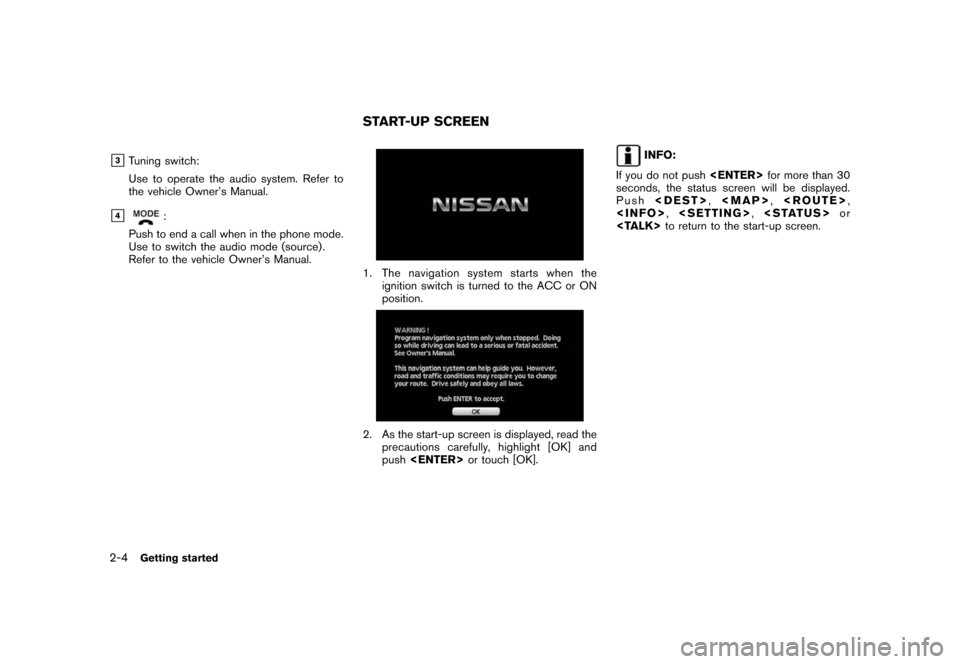
STEERING SWITCH
&1
Use to adjust the volume. This button have
the same function as that of the volume
knob. Refer to the vehicle Owner’s Manual.
&2
Push to start the voice recognition mode.
Push and hold for 1 second to cancel voice
commands when in the voice recognition
mode.
Push and hold when not in the voice
recognition mode to display the phone
screen.
Getting started2-3
Page 9 of 217
Black plate (12,1)
Model "NAV2-N" EDITED: 2007/ 3/ 9
&3Tuning switch:
Use to operate the audio system. Refer to
the vehicle Owner’s Manual.
&4:
Push to end a call when in the phone mode.
Use to switch the audio mode (source) .
Refer to the vehicle Owner’s Manual.
1. The navigation system starts when the
ignition switch is turned to the ACC or ON
position.
2. As the start-up screen is displayed, read the
precautions carefully, highlight [OK] and
push
INFO:
If you do not push
seconds, the status screen will be displayed.
Push
Page 12 of 217
Black plate (15,1)
Model "NAV2-N" EDITED: 2007/ 3/ 9
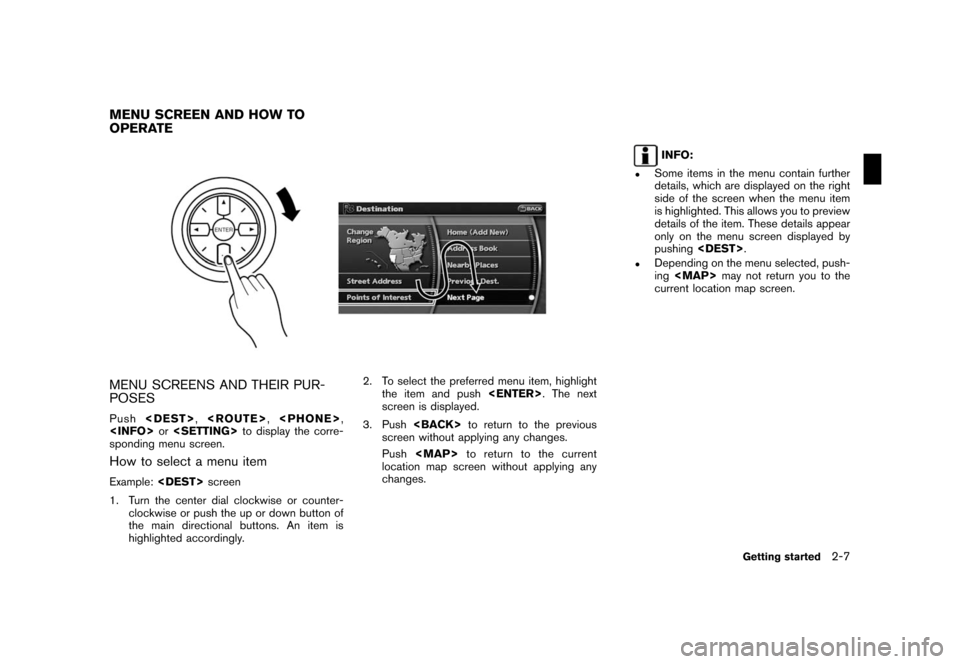
MENU SCREENS AND THEIR PUR-
POSES
Push
sponding menu screen.
How to select a menu item
Example:
1. Turn the center dial clockwise or counter-
clockwise or push the up or down button of
the main directional buttons. An item is
highlighted accordingly.2. To select the preferred menu item, highlight
the item and push
screen is displayed.
3. Push
screen without applying any changes.
Push
Page 13 of 217
Black plate (16,1)
Model "NAV2-N" EDITED: 2007/ 3/ 9
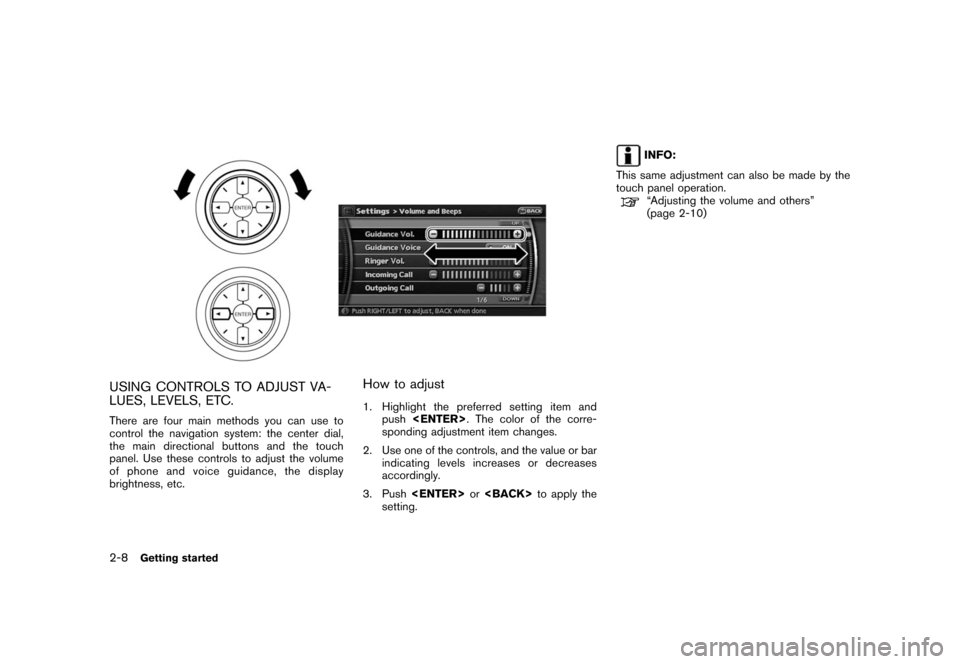
USING CONTROLS TO ADJUST VA-
LUES, LEVELS, ETC.
There are four main methods you can use to
control the navigation system: the center dial,
the main directional buttons and the touch
panel. Use these controls to adjust the volume
of phone and voice guidance, the display
brightness, etc.
How to adjust
1. Highlight the preferred setting item and
push
sponding adjustment item changes.
2. Use one of the controls, and the value or bar
indicating levels increases or decreases
accordingly.
3. Push
setting.
INFO:
This same adjustment can also be made by the
touch panel operation.
“Adjusting the volume and others”
(page 2-10)
2-8Getting started
Page 14 of 217
Black plate (17,1)
Model "NAV2-N" EDITED: 2007/ 3/ 9
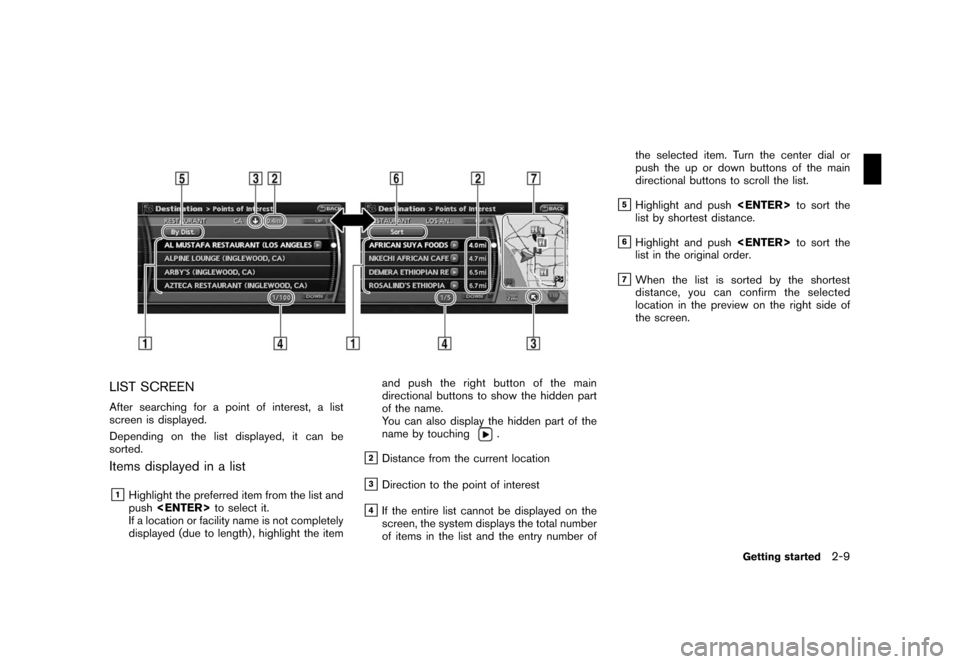
LIST SCREEN
After searching for a point of interest, a list
screen is displayed.
Depending on the list displayed, it can be
sorted.
Items displayed in a list
&1Highlight the preferred item from the list and
push
If a location or facility name is not completely
displayed (due to length) , highlight the itemand push the right button of the main
directional buttons to show the hidden part
of the name.
You can also display the hidden part of the
name by touching
.
&2Distance from the current location
&3Direction to the point of interest
&4If the entire list cannot be displayed on the
screen, the system displays the total number
of items in the list and the entry number ofthe selected item. Turn the center dial or
push the up or down buttons of the main
directional buttons to scroll the list.
&5Highlight and push
list by shortest distance.
&6Highlight and push
list in the original order.
&7When the list is sorted by the shortest
distance, you can confirm the selected
location in the preview on the right side of
the screen.
Getting started2-9
Page 18 of 217
![NISSAN PATHFINDER 2008 R51 / 3.G 06IT Navigation Manual Black plate (21,1)
Model "NAV2-N" EDITED: 2007/ 3/ 9
2. Highlight [Home Location (Add New)] and
push<ENTER>.
3. A confirmation message is displayed. Con-
firm the contents of the message, highlight
[Y NISSAN PATHFINDER 2008 R51 / 3.G 06IT Navigation Manual Black plate (21,1)
Model "NAV2-N" EDITED: 2007/ 3/ 9
2. Highlight [Home Location (Add New)] and
push<ENTER>.
3. A confirmation message is displayed. Con-
firm the contents of the message, highlight
[Y](/img/5/795/w960_795-17.png)
Black plate (21,1)
Model "NAV2-N" EDITED: 2007/ 3/ 9
2. Highlight [Home Location (Add New)] and
push
3. A confirmation message is displayed. Con-
firm the contents of the message, highlight
[Yes] and push
4. Highlight [Street Address] and push
displayed.
5. Enter the address of your home, highlight
[OK] and push
The map screen is displayed.
“SETTING A STREET ADDRESS”
(page 4-4)
6. Pushing the directional buttons, adjust your
home location if necessary.
7. After adjusting the location, push
8. A message is displayed and your home
location is stored.
9. Push
location map screen.
The home icon is displayed on the map.
Getting started2-13
Page 19 of 217
![NISSAN PATHFINDER 2008 R51 / 3.G 06IT Navigation Manual Black plate (22,1)
Model "NAV2-N" EDITED: 2007/ 3/ 9
INFO:
You can also perform the same setting by
pushing<SETTING>and selecting [Naviga-
tion].
“STORING A LOCATION BY SEARCH-
ING” (page 6-2)
SEA NISSAN PATHFINDER 2008 R51 / 3.G 06IT Navigation Manual Black plate (22,1)
Model "NAV2-N" EDITED: 2007/ 3/ 9
INFO:
You can also perform the same setting by
pushing<SETTING>and selecting [Naviga-
tion].
“STORING A LOCATION BY SEARCH-
ING” (page 6-2)
SEA](/img/5/795/w960_795-18.png)
Black plate (22,1)
Model "NAV2-N" EDITED: 2007/ 3/ 9
INFO:
You can also perform the same setting by
pushing
tion].
“STORING A LOCATION BY SEARCH-
ING” (page 6-2)
SEARCHING FOR A DESTINATION
As an example, the method for setting an airport
as the destination using [Points of Interest] is
described here.
1. Push
2. Highlight [Points of Interest] and push
3. Highlight [Travel] and push
4. From the category list, highlight [AIRPORT]
and push
SETTING A DESTINATION
2-14Getting started
Page 20 of 217
![NISSAN PATHFINDER 2008 R51 / 3.G 06IT Navigation Manual Black plate (23,1)
Model "NAV2-N" EDITED: 2007/ 3/ 9
5. Highlight [By Name] and push<ENTER>.
A character input screen is displayed.
6. Highlight [List] and push<ENTER>.
A list screen is displayed.
INF NISSAN PATHFINDER 2008 R51 / 3.G 06IT Navigation Manual Black plate (23,1)
Model "NAV2-N" EDITED: 2007/ 3/ 9
5. Highlight [By Name] and push<ENTER>.
A character input screen is displayed.
6. Highlight [List] and push<ENTER>.
A list screen is displayed.
INF](/img/5/795/w960_795-19.png)
Black plate (23,1)
Model "NAV2-N" EDITED: 2007/ 3/ 9
5. Highlight [By Name] and push
A character input screen is displayed.
6. Highlight [List] and push
A list screen is displayed.
INFO:
You can enter the city name and facility
name to narrow down your search.
The number of narrowed down points are
displayed in the “Matches” column.
7. Highlight the preferred airport from the list
and push
INFO:
.By selecting [By Dist.], you can sort the
list by the shortest distance.
.The position of the selected location is
displayed in the preview on the right
side of the screen.
8. The selected destination is displayed at the
center of the map. Highlight [Start] after
confirming the location of the displayed
destination, and push
INFO:
.The system sets the destination to the
selected location and starts calculating
a route.
.Even after setting a destination, you can
adjust the location of the destination,
store the route, etc. if necessary.
“OPERATIONS AFTER SETTING
A DESTINATION” (page 4-24)
Getting started2-15
Page 21 of 217
![NISSAN PATHFINDER 2008 R51 / 3.G 06IT Navigation Manual Black plate (24,1)
Model "NAV2-N" EDITED: 2007/ 3/ 9
STARTING ROUTE GUIDANCE
After setting the destination and performing
route calculation, the suggested route is dis-
played.
1. Highlight [Start] an NISSAN PATHFINDER 2008 R51 / 3.G 06IT Navigation Manual Black plate (24,1)
Model "NAV2-N" EDITED: 2007/ 3/ 9
STARTING ROUTE GUIDANCE
After setting the destination and performing
route calculation, the suggested route is dis-
played.
1. Highlight [Start] an](/img/5/795/w960_795-20.png)
Black plate (24,1)
Model "NAV2-N" EDITED: 2007/ 3/ 9
STARTING ROUTE GUIDANCE
After setting the destination and performing
route calculation, the suggested route is dis-
played.
1. Highlight [Start] and push
2. Once route guidance is started, the system
navigates you through the guide points
using visual and voice guidance.
3. When approaching a guide point, the
system automatically changes to the split
screen and shows an enlarged view of the
intersection in the left screen.
Push
screen.
4. When arriving at the destination, route
guidance automatically ends.
DELETING A ROUTE
To delete a route already set, use the following
procedure. If you delete a route, the destination
is also deleted.
1. Push
2. Highlight [Cancel Route] and push
2-16Getting started