NISSAN PATHFINDER 2008 R51 / 3.G Owners Manual
Manufacturer: NISSAN, Model Year: 2008, Model line: PATHFINDER, Model: NISSAN PATHFINDER 2008 R51 / 3.GPages: 448, PDF Size: 6.06 MB
Page 311 of 448
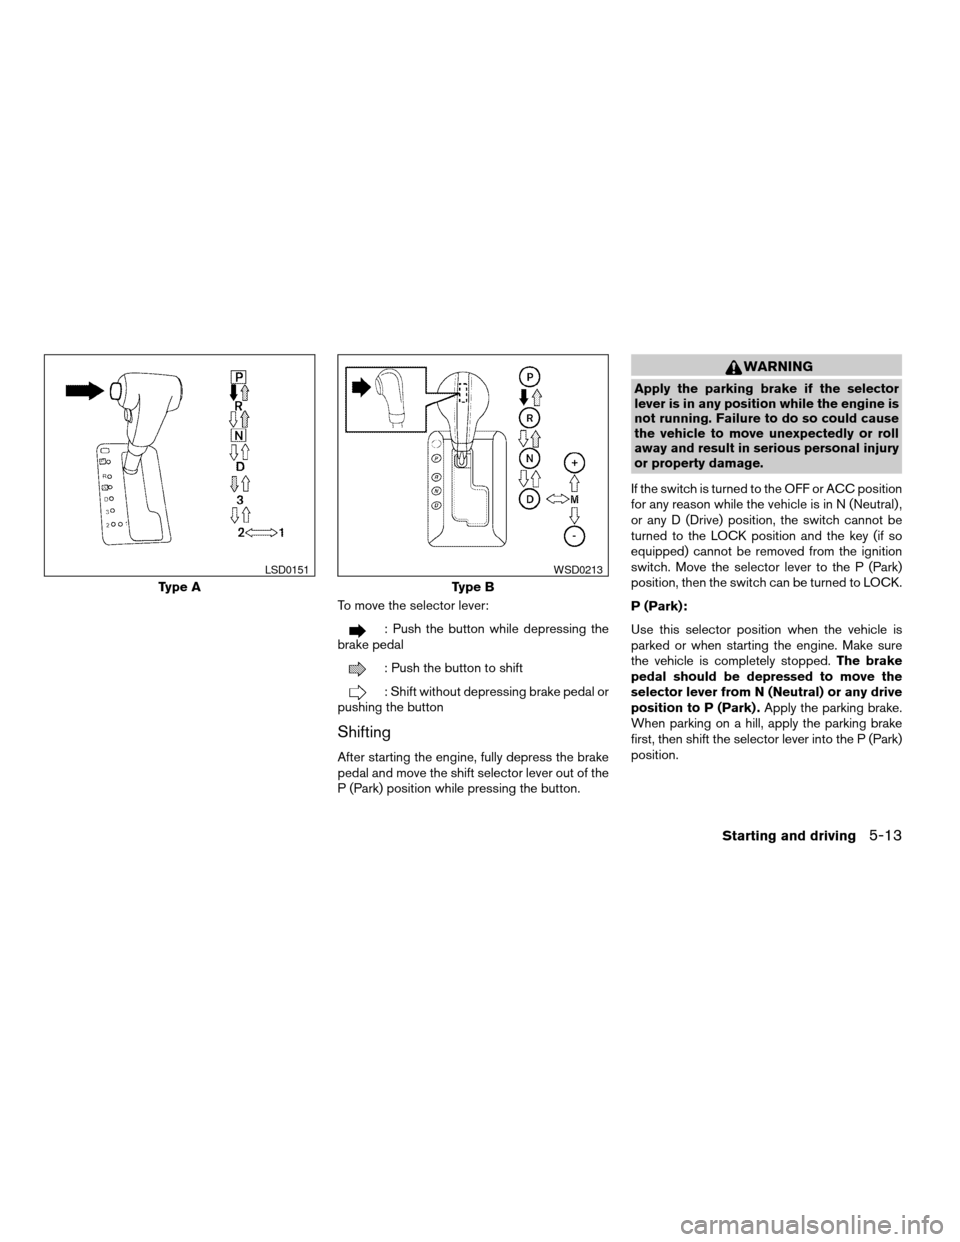
To move the selector lever:
: Push the button while depressing the
brake pedal
: Push the button to shift
: Shift without depressing brake pedal or
pushing the button
Shifting
After starting the engine, fully depress the brake
pedal and move the shift selector lever out of the
P (Park) position while pressing the button.
WARNING
Apply the parking brake if the selector
lever is in any position while the engine is
not running. Failure to do so could cause
the vehicle to move unexpectedly or roll
away and result in serious personal injury
or property damage.
If the switch is turned to the OFF or ACC position
for any reason while the vehicle is in N (Neutral) ,
or any D (Drive) position, the switch cannot be
turned to the LOCK position and the key (if so
equipped) cannot be removed from the ignition
switch. Move the selector lever to the P (Park)
position, then the switch can be turned to LOCK.
P (Park):
Use this selector position when the vehicle is
parked or when starting the engine. Make sure
the vehicle is completely stopped.The brake
pedal should be depressed to move the
selector lever from N (Neutral) or any drive
position to P (Park) .Apply the parking brake.
When parking on a hill, apply the parking brake
first, then shift the selector lever into the P (Park)
position.
Type A
LSD0151
Type B
WSD0213
Starting and driving5-13
ZREVIEW COPYÐ2008 Pathfinder(pat)
Owners ManualÐUSA_English(nna)
03/23/07Ðdebbie
X
Page 312 of 448

R (Reverse):
CAUTION
Use this position only when the vehicle is
completely stopped.
Use this position to back up. Make sure the
vehicle is completely stopped before selecting
the R (Reverse) position.The brake pedal
must be depressed to move the selector
lever from P (Park) , N (Neutral) or any drive
position to R (Reverse) .
N (Neutral):
Neither forward nor reverse gear is engaged. The
engine can be started in this position. You may
shift to N (Neutral) and restart a stalled engine
while the vehicle is moving.
D (Drive):
Use this position for all normal forward driving.
3 (Third gear) Type A only:
Use this position for driving up and down long
slopes where engine braking would be advanta-
geous.
Do not downshift into the 3 position at speeds
over the following and do not exceed the follow-
ing speeds in the 3 position.2WD and AUTO:
62 MPH (100 km/h)
4H:
62 MPH (100 km/h)
4LO:
31 MPH (50 km/h)
2 (Second gear) Type A only:
Use this position for hill climbing or engine brak-
ing on downhill grades.
Do not downshift into the 2 position at speeds
over the following and do not exceed the follow-
ing speeds in the 2 position.
2WD and AUTO:
71 MPH (115 km/h)
4H:
62 MPH (100 km/h)
4LO:
31 MPH (50 km/h)
1 (Low gear) Type A only:
Use this position when climbing steep hills slowly
or slow driving through deep snow, sand or mud,
or for maximum engine braking on steep downhill
grades.Do not downshift into the 1 position at speeds
over the following and do not exceed the follow-
ing speeds in the 1 position.
2WD and AUTO:
43 MPH (70 km/h)
4H:
43 MPH (70 km/h)
4LO:
31 MPH (50 km/h)
5-14Starting and driving
ZREVIEW COPYÐ2008 Pathfinder(pat)
Owners ManualÐUSA_English(nna)
03/23/07Ðdebbie
X
Page 313 of 448

Manual shift mode (if so equipped)
When the selector lever is shifted from D (Drive)
to the manual shift gate with the vehicle stopped
or while driving, the transmission enters the
manual shift mode. Shift ranges can be selected
manually.
In the manual shift mode, the shift range is dis-
played on the position indicator in the meter.
When shifting the shift lever to the manual shift
gate, the position indicator displays 1 (First) up to
5 (Fifth) depending on vehicle speed.
Shift ranges up or down one by one as follows:
1,2,3,4,5M5 (Fifth):
Use this position for all normal forward driving.
M4 (Fourth):
For driving up or down long slopes where engine
braking would be advantageous.
M3 (Third) and M2 (Second):
Use for hill climbing or engine braking on downhill
grades.
M1 (First):
Use this position when climbing steep hills slowly
or driving slowly through deep snow, sand or
mud, or for maximum engine braking on steep
downhill grades.
cRemember not to drive at high speeds for
extended periods of time in lower than M4
range. This reduces fuel economy.
When shifting up:
Move the selector lever to the + (up) side. (Shifts
to higher range.)
When shifting down:
Move the selector lever to the2(down) side.
(Shifts to lower range.)cThe transmission will automatically down-
shift the gears. (For example, if you select the
3rd range, the transmission will shift down
between the 3rd and 1st gears.)
cMoving the selector lever rapidly to the same
side twice will shift the ranges in succession.
When canceling the manual shift mode:
Return the selector lever to the D (Drive) position
to return the transmission to the normal driving
mode.
cIn the manual shift mode, the transmis-
sion may not shift to the selected gear.
This helps maintain driving perfor-
mance and reduces the chance of ve-
hicle damage or loss of control.
cIn the manual shift mode, the transmis-
sion may shift up automatically to a
higher range than selected if the en-
gine speed is too high. When the ve-
hicle speed decreases, the transmis-
sion automatically shifts down and
shifts to 1st gear before the vehicle
comes to a stop.
WSD0212
Starting and driving5-15
ZREVIEW COPYÐ2008 Pathfinder(pat)
Owners ManualÐUSA_English(nna)
03/23/07Ðdebbie
X
Page 314 of 448
Shift lock release
If the battery is discharged, the shift selector lever
may not be moved from the P (Park) position even
with the brake pedal depressed.
To move the shift selector lever, release the shift
lock. The shift selector lever can be moved to N
(Neutral) . However, the steering wheel will be
locked unless the ignition switch is turned to the
ON position. This allows the vehicle to be moved
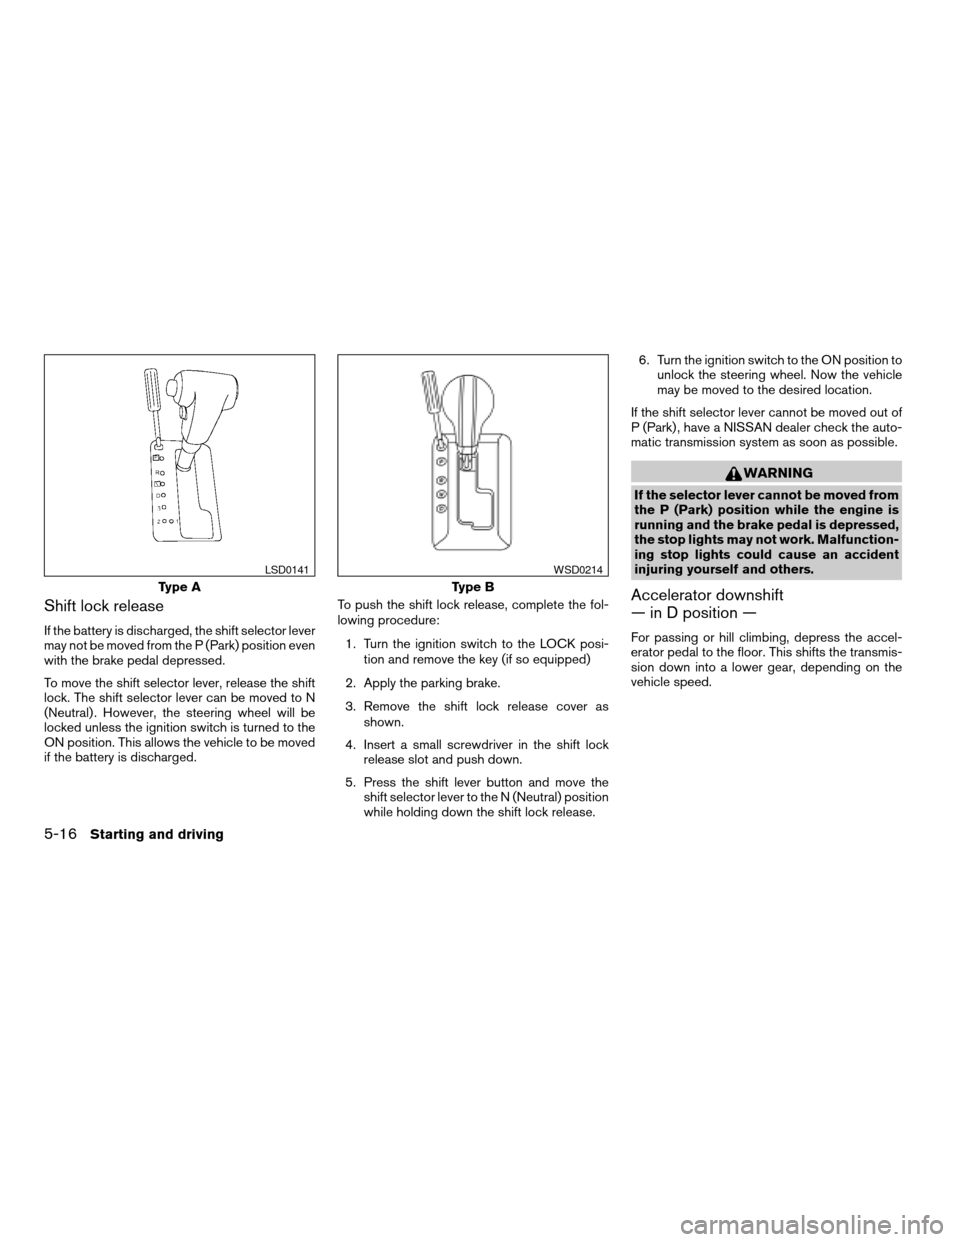
if the battery is discharged.To push the shift lock release, complete the fol-
lowing procedure:
1. Turn the ignition switch to the LOCK posi-
tion and remove the key (if so equipped)
2. Apply the parking brake.
3. Remove the shift lock release cover as
shown.
4. Insert a small screwdriver in the shift lock
release slot and push down.
5. Press the shift lever button and move the
shift selector lever to the N (Neutral) position
while holding down the shift lock release.6. Turn the ignition switch to the ON position to
unlock the steering wheel. Now the vehicle
may be moved to the desired location.
If the shift selector lever cannot be moved out of
P (Park) , have a NISSAN dealer check the auto-
matic transmission system as soon as possible.
WARNING
If the selector lever cannot be moved from
the P (Park) position while the engine is
running and the brake pedal is depressed,
the stop lights may not work. Malfunction-
ing stop lights could cause an accident
injuring yourself and others.
Accelerator downshift
— in D position —
For passing or hill climbing, depress the accel-
erator pedal to the floor. This shifts the transmis-
sion down into a lower gear, depending on the
vehicle speed.
Type A
LSD0141
Type B
WSD0214
5-16Starting and driving
ZREVIEW COPYÐ2008 Pathfinder(pat)
Owners ManualÐUSA_English(nna)
03/23/07Ðdebbie
X
Page 315 of 448
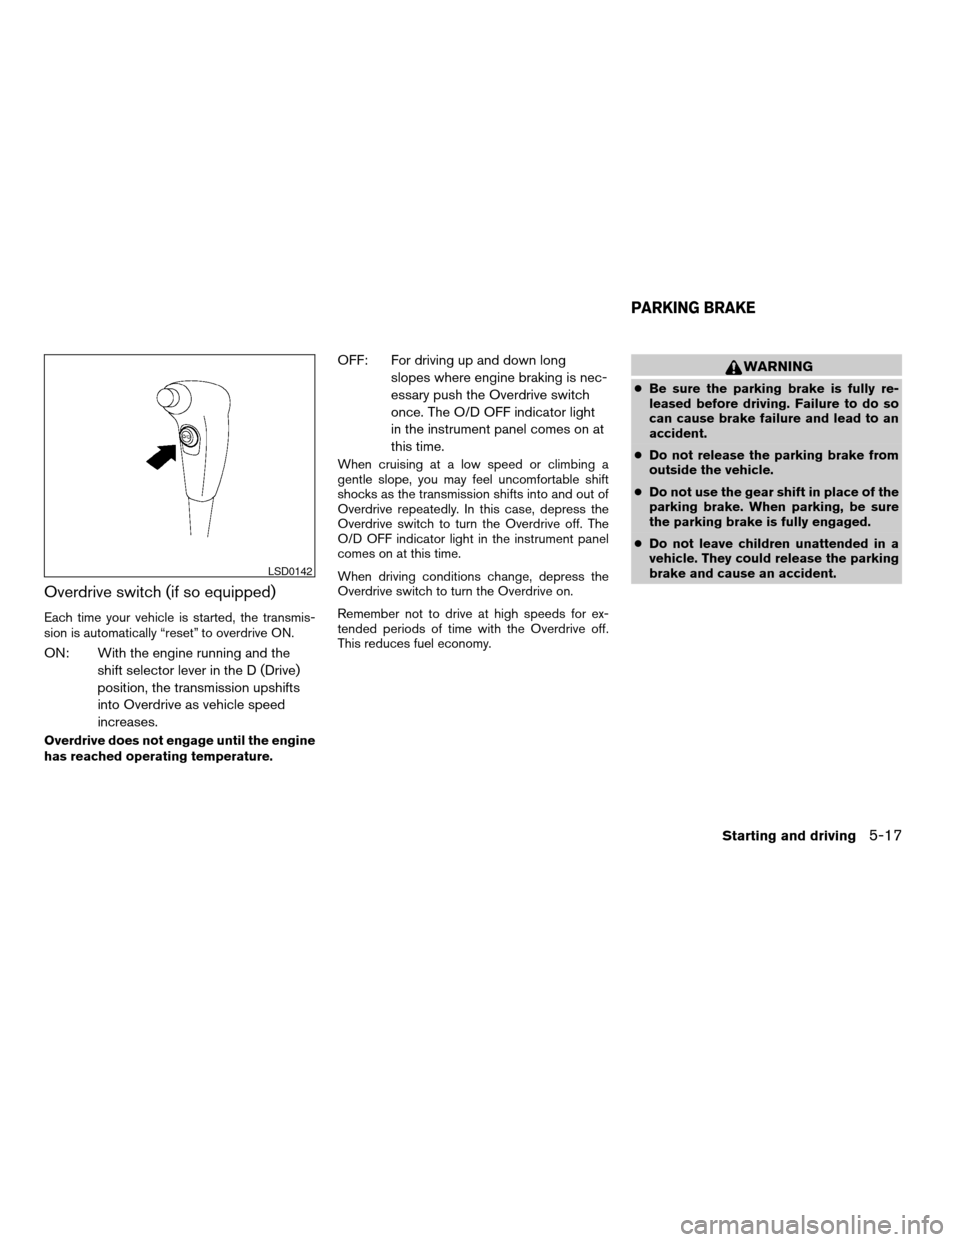
Overdrive switch (if so equipped)
Each time your vehicle is started, the transmis-
sion is automatically “reset” to overdrive ON.
ON: With the engine running and the
shift selector lever in the D (Drive)
position, the transmission upshifts
into Overdrive as vehicle speed
increases.
Overdrive does not engage until the engine
has reached operating temperature.
OFF: For driving up and down long
slopes where engine braking is nec-
essary push the Overdrive switch
once. The O/D OFF indicator light
in the instrument panel comes on at
this time.
When cruising at a low speed or climbing a
gentle slope, you may feel uncomfortable shift
shocks as the transmission shifts into and out of
Overdrive repeatedly. In this case, depress the
Overdrive switch to turn the Overdrive off. The
O/D OFF indicator light in the instrument panel
comes on at this time.
When driving conditions change, depress the
Overdrive switch to turn the Overdrive on.
Remember not to drive at high speeds for ex-
tended periods of time with the Overdrive off.
This reduces fuel economy.
WARNING
cBe sure the parking brake is fully re-
leased before driving. Failure to do so
can cause brake failure and lead to an
accident.
cDo not release the parking brake from
outside the vehicle.
cDo not use the gear shift in place of the
parking brake. When parking, be sure
the parking brake is fully engaged.
cDo not leave children unattended in a
vehicle. They could release the parking
brake and cause an accident.
LSD0142
PARKING BRAKE
Starting and driving5-17
ZREVIEW COPYÐ2008 Pathfinder(pat)
Owners ManualÐUSA_English(nna)
03/23/07Ðdebbie
X
Page 316 of 448
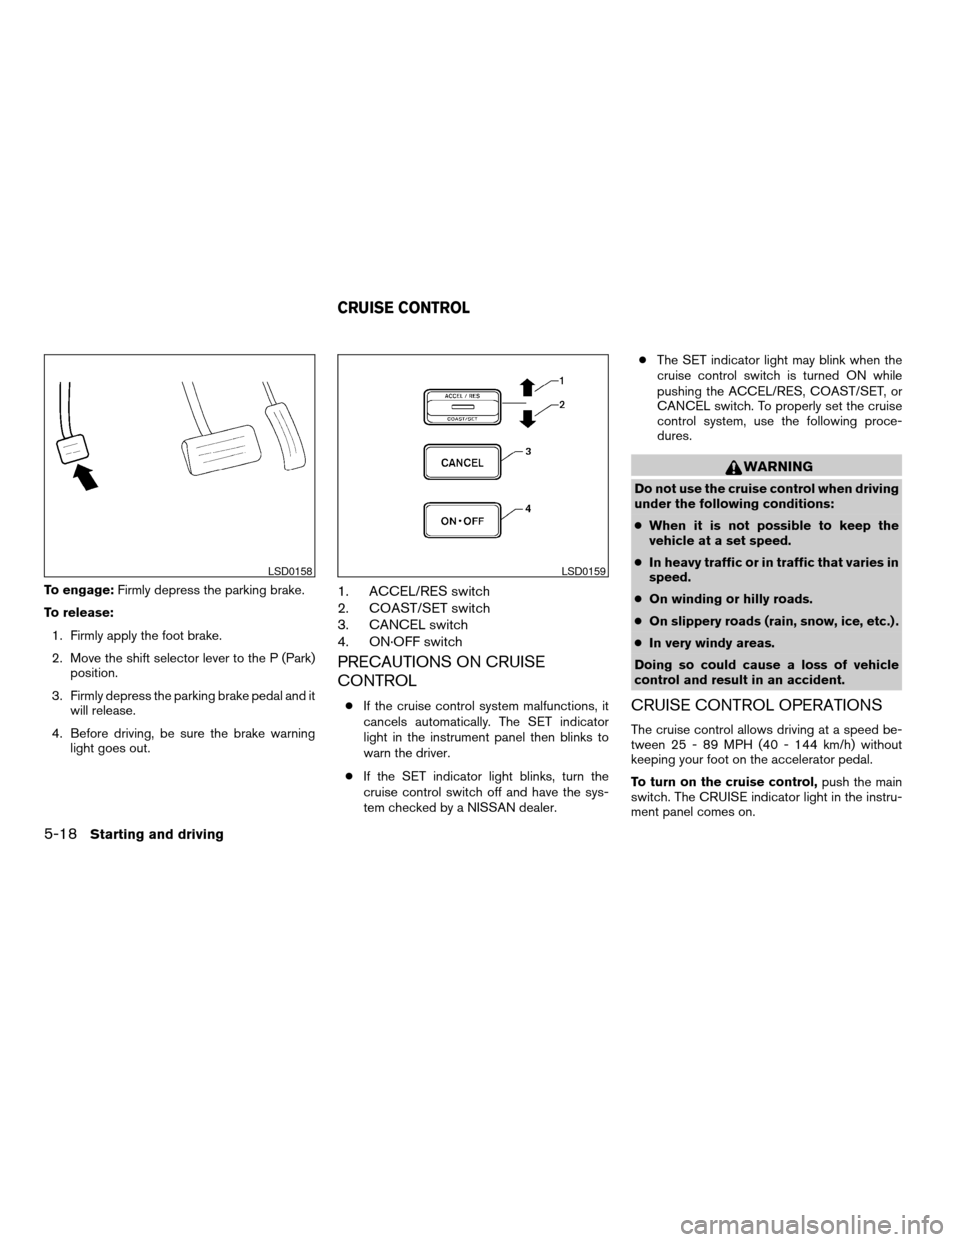
To engage:Firmly depress the parking brake.
To release:
1. Firmly apply the foot brake.
2. Move the shift selector lever to the P (Park)
position.
3. Firmly depress the parking brake pedal and it
will release.
4. Before driving, be sure the brake warning
light goes out.1. ACCEL/RES switch
2. COAST/SET switch
3. CANCEL switch
4. ON·OFF switch
PRECAUTIONS ON CRUISE
CONTROL
cIf the cruise control system malfunctions, it
cancels automatically. The SET indicator
light in the instrument panel then blinks to
warn the driver.
cIf the SET indicator light blinks, turn the
cruise control switch off and have the sys-
tem checked by a NISSAN dealer.cThe SET indicator light may blink when the
cruise control switch is turned ON while
pushing the ACCEL/RES, COAST/SET, or
CANCEL switch. To properly set the cruise
control system, use the following proce-
dures.
WARNING
Do not use the cruise control when driving
under the following conditions:
cWhen it is not possible to keep the
vehicle at a set speed.
cIn heavy traffic or in traffic that varies in
speed.
cOn winding or hilly roads.
cOn slippery roads (rain, snow, ice, etc.) .
cIn very windy areas.
Doing so could cause a loss of vehicle
control and result in an accident.
CRUISE CONTROL OPERATIONS
The cruise control allows driving at a speed be-
tween 25 - 89 MPH (40 - 144 km/h) without
keeping your foot on the accelerator pedal.
To turn on the cruise control,push the main
switch. The CRUISE indicator light in the instru-
ment panel comes on.
LSD0158LSD0159
CRUISE CONTROL
5-18Starting and driving
ZREVIEW COPYÐ2008 Pathfinder(pat)
Owners ManualÐUSA_English(nna)
03/23/07Ðdebbie
X
Page 317 of 448

To set cruising speed,accelerate the vehicle to
the desired speed, push the COAST/SET switch
and release it. The SET indicator light in the
instrument panel comes on. Take your foot off the
accelerator pedal. Your vehicle maintains the set
speed.
cTo pass another vehicle,depress the ac-
celerator pedal. When you release the
pedal, the vehicle returns to the previously
set speed.
cThe vehicle may not maintain the set speed
when going up or down steep hills. If this
happens, drive without the cruise control.
To cancel the preset speed,use one of the
following three methods.
cPush the CANCEL button; the SET indicator
light in the instrument panel goes out.
cTap the brake pedal; the SET indicator light
goes out.
cTurn the main switch off. Both the CRUISE
indicator light and SET indicator light in the
instrument panel go out.
The cruise control is automatically canceled and
the SET light in the instrument panel goes out if:
cyou depress the brake pedal while pushing
the ACCEL/RES or SET/COAST switch.
The preset speed is deleted from memory.cthe vehicle slows down more than 8 MPH
(13 km/h) below the set speed.
cyou move the shift selector lever to N (Neu-
tral) .
To reset at a faster cruising speed,use one
of the following three methods.
cDepress the accelerator pedal. When the
vehicle attains the desired speed, push and
release the COAST/SET switch.
cPush and hold the ACCEL/RES switch.
When the vehicle attains the speed you de-
sire, release the switch.
cPush and release the ACCEL/RES switch.
Each time you do this, the set speed in-
creases by about 1 MPH (1.6 km/h) .
To reset at a slower cruising speed,use one
of the following three methods.
cLightly tap the brake pedal. When the ve-
hicle attains the desired speed, push the
COAST/SET switch and release it.
cPush and hold the COAST/SET switch. Re-
lease the switch when the vehicle slows to
the desired speed.
cPush and release the COAST/SET switch.
Each time you do this, the set speed de-
creases by about 1 MPH (1.6 km/h) .To resume the preset speed,push and re-
lease the ACCEL/RES switch. The vehicle re-
turns to the last set cruising speed when the
vehicle speed is over 25 MPH (40 km/h) .
Starting and driving5-19
ZREVIEW COPYÐ2008 Pathfinder(pat)
Owners ManualÐUSA_English(nna)
03/23/07Ðdebbie
X
Page 318 of 448
CAUTION
During the first 1,200 miles (2,000 km) ,
follow these recommendations to obtain
maximum engine performance and en-
sure the future reliability and economy of
your new vehicle. Failure to follow these
recommendations may result in short-
ened engine life and reduced engine
performance.
cAvoid driving for long periods at constant
speed, either fast or slow, and do not run the
engine over 4,000 rpm.
cDo not accelerate at full throttle in any gear.
cAvoid quick starts.
cAvoid hard braking as much as possible.
cDo not tow a trailer for the first 500 miles
(800 km) . Your engine, axle or other parts
could be damaged.cAccelerate slowly and smoothly. Maintain
cruising speeds with a constant accelerator
position.
cDrive at moderate speeds on the highway.
Driving at high speed lowers fuel economy.
cAvoid unnecessary stopping and braking.
Maintain a safe distance behind other ve-
hicles.
cUse a proper gear range which suits road
conditions. On level roads, shift into high
gear as soon as possible.
cAvoid unnecessary engine idling.
cKeep your engine tuned up.
cFollow the recommended periodic mainte-
nance schedule.
cKeep the tires inflated to the correct pres-
sure. Low tire pressure increases tire wear
and lowers fuel economy.
cKeep the front wheels in correct alignment.
Improper alignment increases tire wear and
lowers fuel economy.
cAir conditioner operation lowers fuel
economy. Use the air conditioner only when
necessary.cWhen cruising at highway speeds, it is more
economical to use the air conditioner and
leave the windows closed to reduce drag.
c
Use 4H or 4L position only when
necessary. Four-wheel drive operation low-
ers fuel economy.
BREAK-IN SCHEDULE INCREASING FUEL ECONOMY
5-20Starting and driving
ZREVIEW COPYÐ2008 Pathfinder(pat)
Owners ManualÐUSA_English(nna)
03/23/07Ðdebbie
X
Page 319 of 448
WARNING
cFor 4WD equipped vehicles, do not at-
tempt to raise two wheels off the
ground and shift the transmission to
any drive or reverse position with the
engine running. Doing so may result in
drivetrain damage or unexpected ve-
hicle movement which could result in
serious vehicle damage or personal
injury.
cDo not attempt to test a 4WD equipped
vehicle on a 2-wheel dynamometer
(such as the dynamometers used by
some states for emissions testing) , or
similar equipment even if the other two
wheels are raised off the ground. Make
sure you inform test facility personnel
that your vehicle is equipped with 4WD
before it is placed on a dynamometer.
Using the wrong test equipment may
result in drivetrain damage or unex-
pected vehicle movement which could
result in serious vehicle damage or per-
sonal injury.
CAUTION
cDo not drive the vehicle in the 4H or 4LO
position on dry hard surface roads. Driv-
ing on dry, hard surfaces in 4H or 4LO
may cause unnecessary noise, tire wear
and increased fuel consumption.
If the 4WD warning light turns on when
you are driving on dry hard surface
roads:
– in the 4H position, shift the 4WD shift
switch to 2WD.
– in the 4LO position for all mode 4WD
vehicles, stop the vehicle and shift
the transmission selector to the N
position with the brake pedal de-
pressed and shift the 4WD shift
switch to 2WD.
– in the 4LO position for part time 4WD
vehicles, stop the vehicle and shift
the transmission selector to the N
position with the brake pedal de-
pressed and shift the 4WD shift
switch to 2WD.
cIf the warning light is still on after the
above operation, have your vehicle
checked by a NISSAN dealer as soon as
possible.cThe transfer case may be damaged if
you continue driving with the warning
light blinking rapidly.
All mode 4WD system (if so
equipped)
The all mode 4WD system provides 4 positions
(AUTO, 2WD, 4H and 4LO) , so you can select
the desired drive mode according to the driving
conditions.
USING FOUR WHEEL DRIVE
(4WD)
Starting and driving5-21
ZREVIEW COPYÐ2008 Pathfinder(pat)
Owners ManualÐUSA_English(nna)
03/23/07Ðdebbie
X
Page 320 of 448

2WD or 4WD shift procedure:
4WD Shift
Switch PositionWheels
DrivenIndicator Light
Use Conditions 4WD Shift Procedure
4WD shift Transfer 4LO position
AUTORear
wheels or 4
wheels
For driving on paved or slippery
roadsMove the 4WD switch.
2WD <—> AUTO <—> 4H
4WD shift indicator light will indicate transfer shift position en-
gaged.
IT IS NOT NECESSARY TO MOVE THE TRANSMISSION SE-
LECTOR TO THE (N) POSITION IN THIS OPERATION. PER-
FORM THIS OPERATION WHEN DRIVING STRAIGHT.
2WDRear
wheels
For driving on dry, paved roads
(Economy drive) or state dyna-
mometer I/M testing
4H4 wheels
For driving on rocky, sandy or
snow-covered roads
Neutral
*1
May blinkNeutral disengages the automatic
transmission mechanical parking
lock, which will allow the vehicle
to roll. Do not leave the transfer
shift position in Neutral.*21. Stop the vehicle.
2. Shift the transmission selector to the (N) position.
3. Depress and turn the 4WD shift switch to 4LO or 4H with
the brake pedal depressed.
YOU CANNOT MOVE THE TRANSFER 4WD SHIFT SWITCH
BETWEEN 4H AND 4LO (OR 4LO TO 4H) UNLESS YOU
FIRST STOP THE VEHICLE DEPRESS THE BRAKE AND
SHIFT THE TRANSMISSION SELECTOR LEVER TO THE
NEUTRAL (N) POSITION, THEN DEPRESS AND TURN THE
4WD SHIFT SWITCH TO 4LO OR 4H. *3
4LO4 wheels
IlluminatedFor use when maximum power
and traction is required (for ex-
ample: on steep grades or rocky,
sandy, muddy roads)
*1: The transfer 4LO position indicator light may blink. Stop the vehicle. Be sure to shift the 4WD shift switch after the transmission selector has been shifted
to the N position. If the indicator light keeps blinking after the 4WD shift procedure in the previous page, drive slowly without abrupt maneuvers for awhile.
Then the light will turn on or off.
• Avoid making a turn or abrupt starts while shifting to 4LO. Otherwise gears may grind, damaging the drive system.
*2: While changing in and out of 4LO, the ignition key must be ON and the vehicle’s engine must be running for a shift to take place and for the indicator
lights (4WD shift and 4LO position indicator) to be operable. Otherwise, the shift will not take place and no indicator lights will be on or flashing.
*3: Make sure the transfer 4LO position indicator light turns on when you shift the 4WD shift switch to 4LO. The
indicator light (if so equipped) will
also turn on when 4LO is selected. See “Vehicle dynamic control system” later in this section.
5-22Starting and driving
ZREVIEW COPYÐ2008 Pathfinder(pat)
Owners ManualÐUSA_English(nna)
03/23/07Ðdebbie
X