ESP NISSAN PATHFINDER 2008 R51 / 3.G Quick Reference Guide
[x] Cancel search | Manufacturer: NISSAN, Model Year: 2008, Model line: PATHFINDER, Model: NISSAN PATHFINDER 2008 R51 / 3.GPages: 36, PDF Size: 3.11 MB
Page 4 of 36
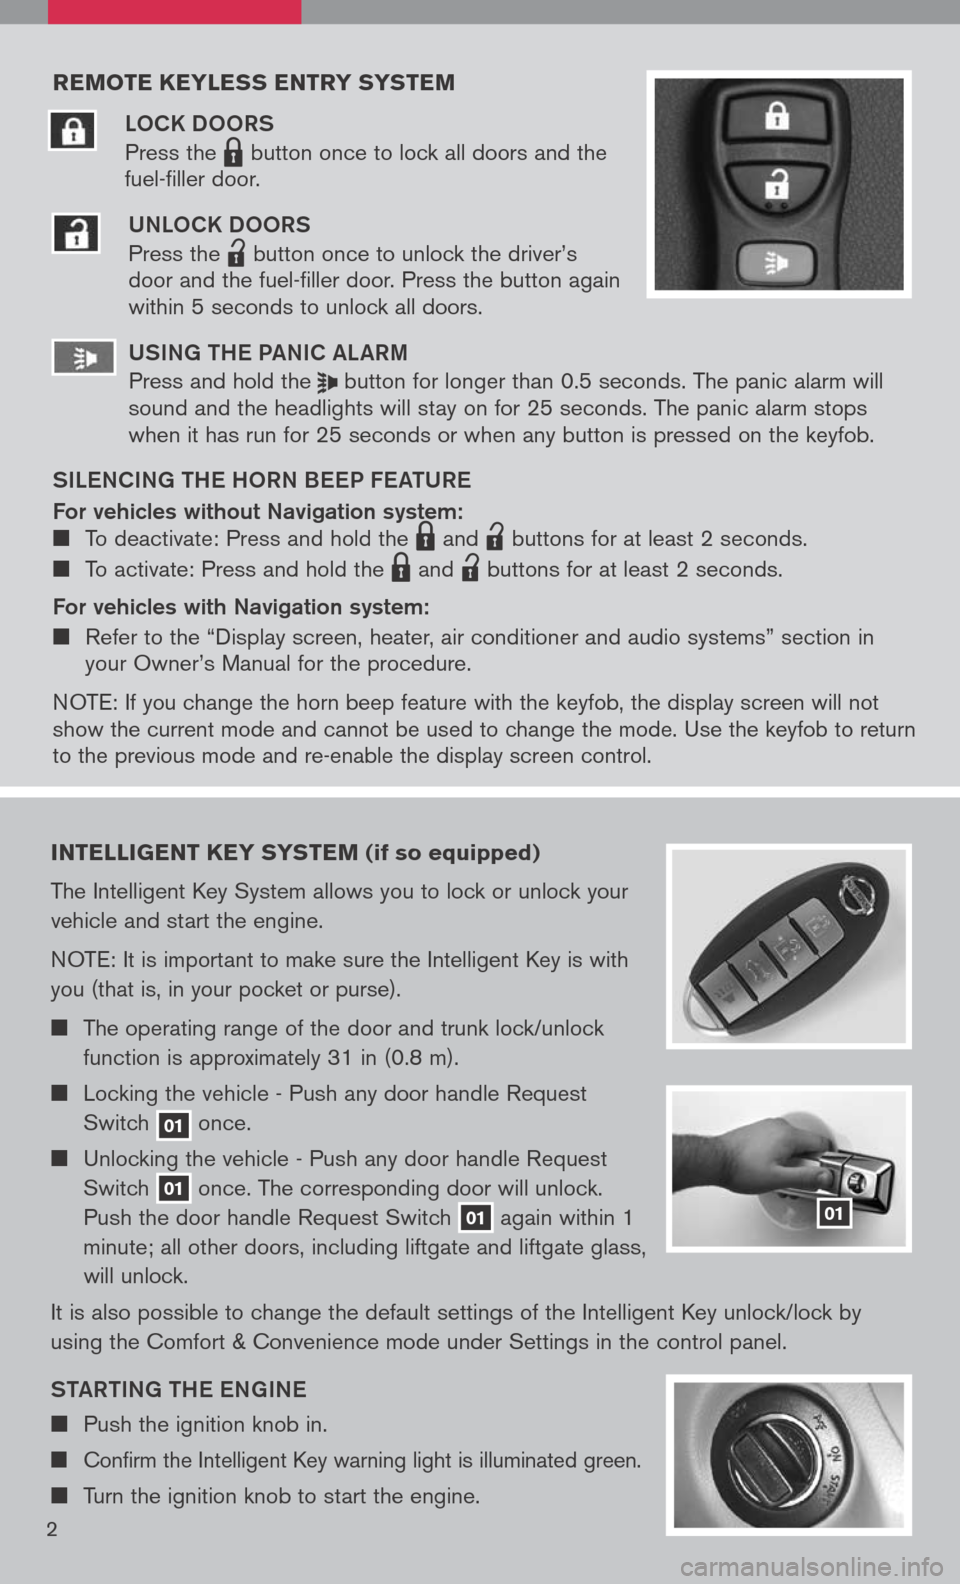
reMote keyless entry systeM
LOCK DOORS
Press the LPD0150 button once to lock all doors and the
fuel-filler door.
UNLOCK DOORS
Press the
lpd0151
button once to unlock the driver’s door and the fuel-filler door. Press the button again within 5 seconds to unlock all doors.
U SiN g the Pa NiC aL aR m
Press and hold the button for longer than 0.5 seconds. The panic alarm will sound and the headlights will stay on for 25 seconds. The panic alarm stops when it has run for 25 seconds or when any button is pressed on the keyfob.
S iL e NC iN g the h ORN B eeP F eat URe
For vehicles without Navigation system: To deactivate: Press and hold the LPD0150 and
lpd0151
buttons for at least 2 seconds.
To activate: Press and hold the LPD0150 and
lpd0151
buttons for at least 2 seconds.
For vehicles with Navigation system:
Refer to the “Display screen, heater, air conditioner and audio systems” section in your Owner’s Manual for the procedure.
N OTE: If you change the horn beep feature with the keyfob, the display screen will not show the current mode and cannot be used to change the mode. Use the keyfob to return to the previous mode and re-enable the display screen control.
intelligent key syste M (if so equipped)
The Intelligent Key System allows you to lock or unlock your
vehicle and start the engine.
NOTE: It is important to make sure the Intelligent Key is with
you (that is, in your pocket or purse).
The operating range of the door and trunk lock/unlock
function is approximately 31 in (0.8 m).
Locking the vehicle - Push any door handle Request
Switch 01 once.
Unlocking the vehicle - Push any door handle Request
Switch 01 once. The corresponding door will unlock.
Push the door handle Request Switch 01 again within 1
minute; all other doors, including liftgate and liftgate glass,
will unlock.
It is also possible to change the default settings of the Intelligent Key unlock/lock by
using the Comfort & Convenience mode under Settings in the control panel.
Sta Rti Ng the eN gi Ne
Push the ignition knob in.
Confirm the Intelligent Key warning light is illuminated green.
Turn the ignition knob to start the engine.
01
2
Page 9 of 36
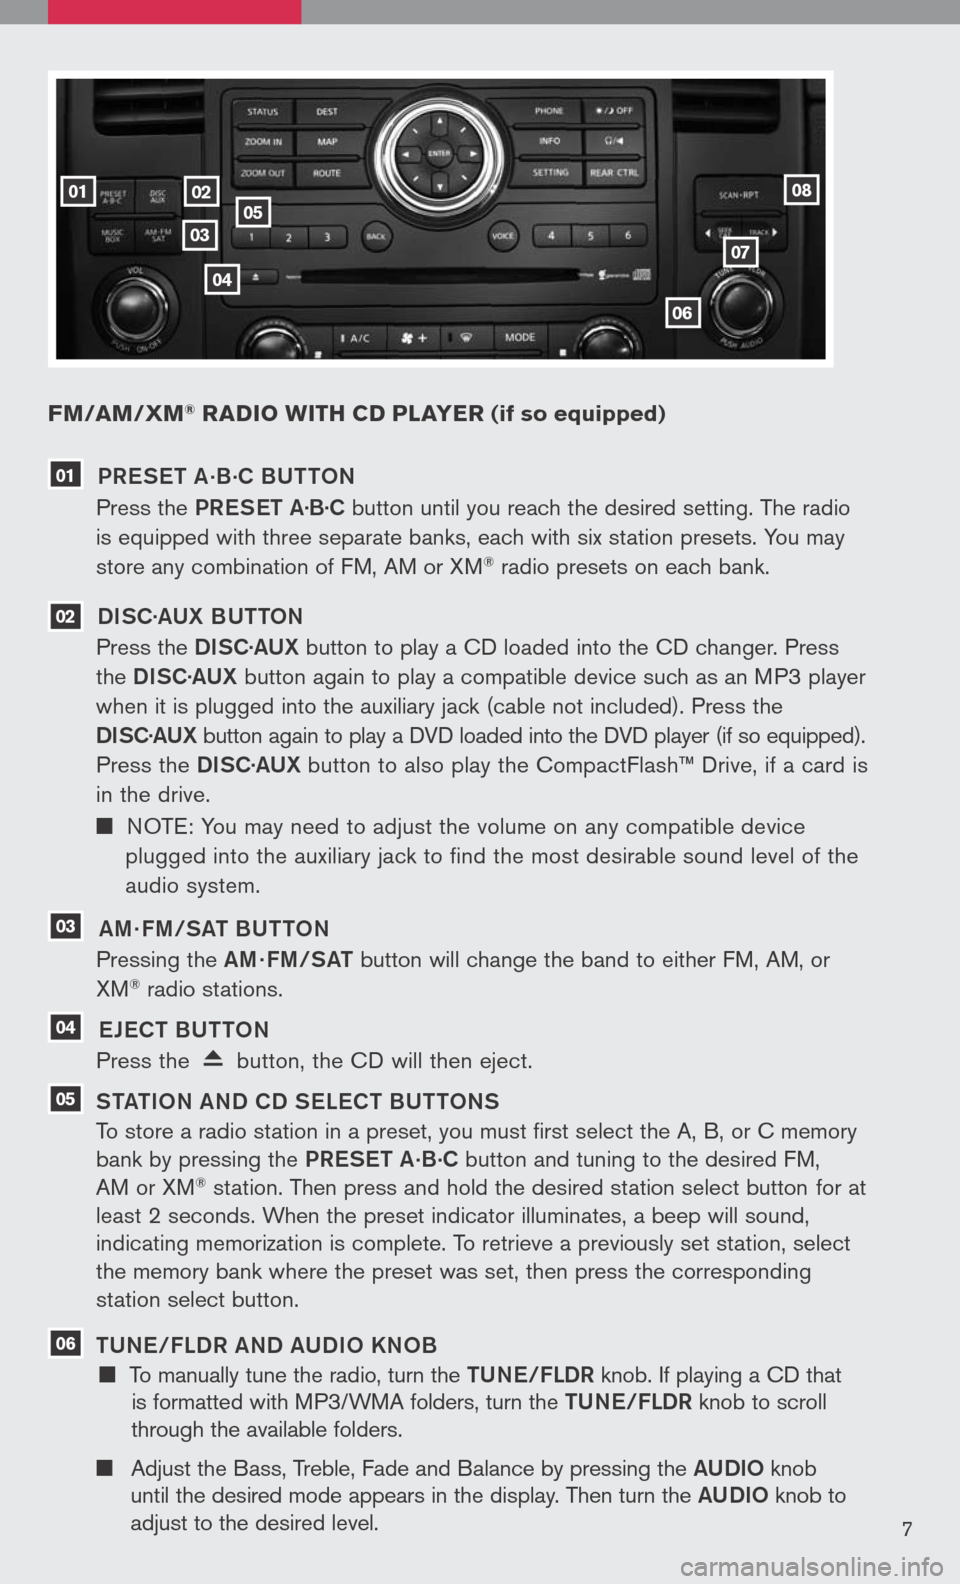
FM/aM/ xM® radio W ith cd player (if so equipped)
02
0307
06
05
04
0108
7
01 PR eS et a.B.
C BU ttON
Press the PReS et a·B·C button until you reach the desired setting. The radio
is equipped with three separate banks, each with six station presets. You may
store any combination of FM, AM or XM® radio presets on each bank.
02 DiSC· aUX B U ttON
Press the DiSC·a UX button to play a CD loaded into the CD changer. Press
the DiSC·a UX button again to play a compatible device such as an MP3 player
when it is plugged into the auxiliary jack (cable not included). Press the
D iSC· aUX
button again to play a DVD loaded into the DVD player (if so equipped).
Press the DiSC·a UX button to also play the CompactFlash™ Drive, if a card is
in the drive.
NOTE: You may need to adjust the volume on any compatible device
plugged into the auxiliary jack to find the most desirable sound level of the
audio system.
03 am · Fm/S at BU ttON
Pressing the am· Fm/S at button will change the band to either FM, AM, or
XM® radio stations.
04 eJe C t BU ttON
Press the button, the CD will then eject.
05 S tati ON aND CD S eLe C t BU ttONS
To store a radio station in a preset, you must first select the A, B, or C memory
bank by pressing the PReS et a.B.C button and tuning to the desired FM,
AM or XM® station. Then press and hold the desired station select button for at
least 2 seconds. When the preset indicator illuminates, a beep will sound,
indicating memorization is complete. To retrieve a previously set station, select
the memory bank where the preset was set, then press the corresponding
station select button.
06 tUN e/FLDR aND a UD iO KNOB
To manually tune the radio, turn the tUN e/FLDR knob. If playing a CD that
is formatted with MP3/WMA folders, turn the tUN e/FLDR knob to scroll
through the available folders.
Adjust the Bass, Treble, Fade and Balance by pressing the aUD iO knob
until the desired mode appears in the display. Then turn the aUD iO knob to
adjust to the desired level.
Page 16 of 36
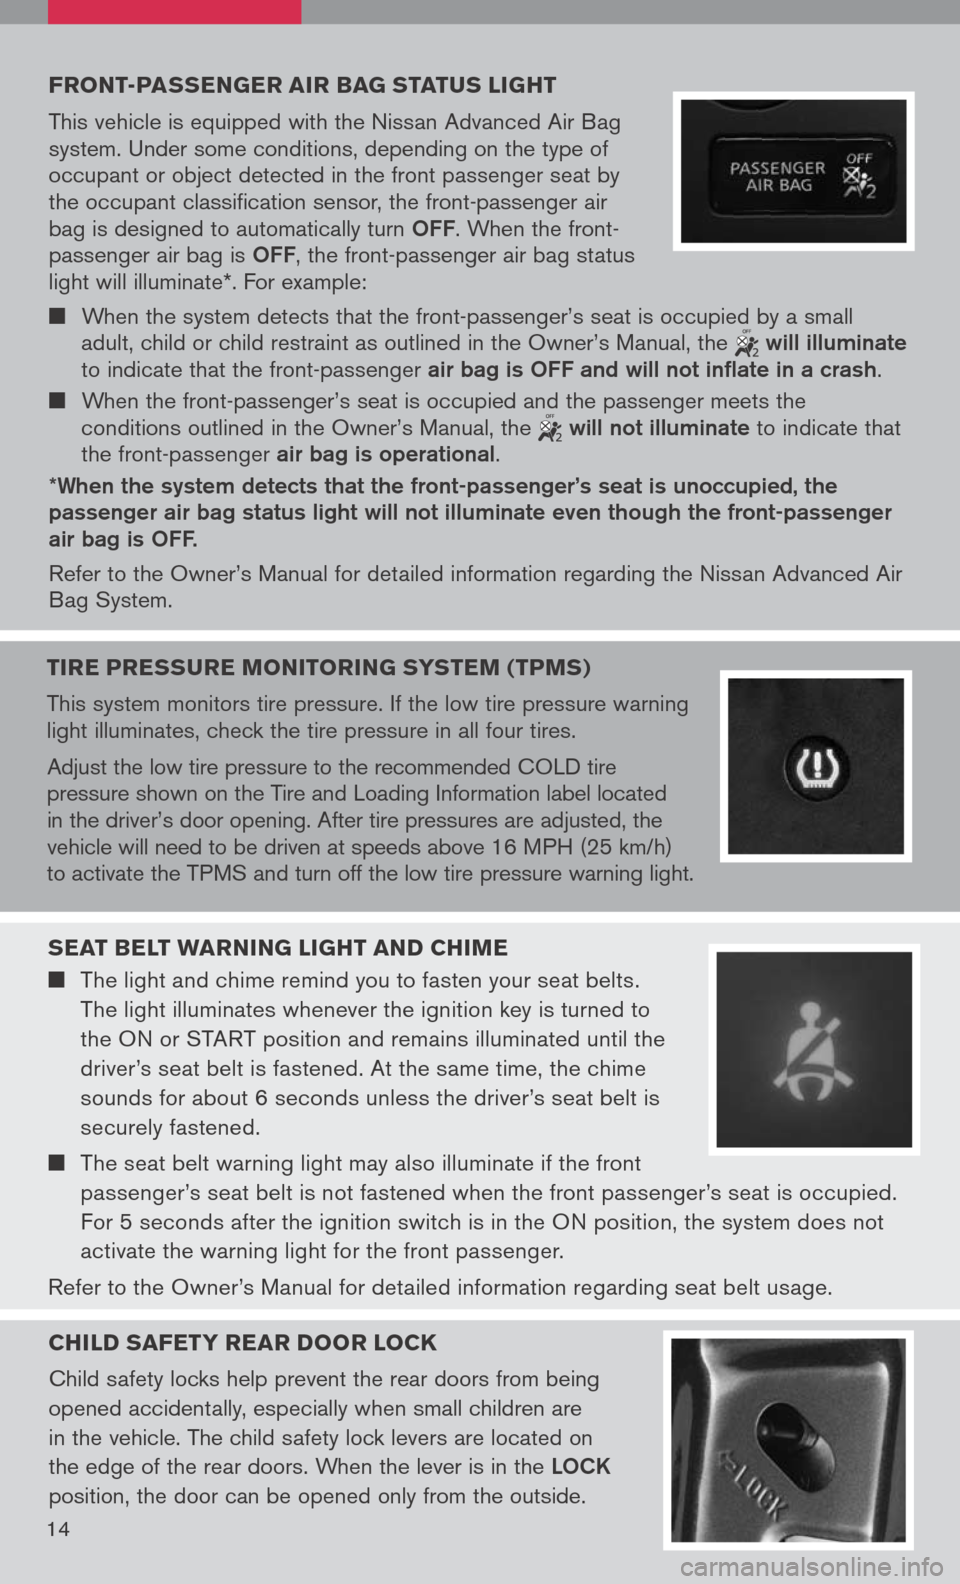
Front -passenger air bag status light
This vehicle is equipped with the Nissan Advanced Air Bag system. Under some conditions, depending on the type of occupant or object detected in the front passenger seat by the occupant classification sensor, the front-passenger air bag is designed to automatically turn OFF. When the front-passenger air bag is OFF, the front-passenger air bag status light will illuminate*. For example:
When the system detects that the front-passenger’s seat is occupied by a small adult, child or child restraint as outlined in the Owner’s Manual, the will illuminate to indicate that the front-passenger air bag is OFF and will not inflate in a crash.
When the front-passenger’s seat is occupied and the passenger meets the conditions outlined in the Owner’s Manual, the will not illuminate to indicate that the front-passenger air bag is operational.
*When the system detects that the front-passenger’s seat is unoccupied, the passenger air bag status light will not illuminate even though the front-passenger air bag is OFF.
Refer to the Owner’s Manual for detailed information regarding the Nissan Advanced Air Bag System.
seat belt W arning light and chiMe
The light and chime remind you to fasten your seat belts.
The light illuminates whenever the ignition key is turned to
the ON or START position and remains illuminated until the
driver’s seat belt is fastened. At the same time, the chime
sounds for about 6 seconds unless the driver’s seat belt is
securely fastened.
The seat belt warning light may also illuminate if the front
passenger’s seat belt is not fastened when the front passenger’s seat is occupied.
For 5 seconds after the ignition switch is in the ON position, the system does not
activate the warning light for the front passenger.
Refer to the Owner’s Manual for detailed information regarding seat belt usage.
child saFety rear door lock
Child safety locks help prevent the rear doors from being
opened accidentally, especially when small children are
in the vehicle. The child safety lock levers are located on
the edge of the rear doors. When the lever is in the LOCK
position, the door can be opened only from the outside.
14
tire pressure M onitoring systeM (tpMs)
This system monitors tire pressure. If the low tire pressure warning light illuminates, check the tire pressure in all four tires.
Adjust the low tire pressure to the recommended COLD tire pressure shown on the Tire and Loading Information label located in the driver’s door opening. After tire pressures are adjusted, the vehicle will need to be driven at speeds above 16 MPH (25 km/h) to activate the TPMS and turn off the low tire pressure warning light.
Page 20 of 36
16
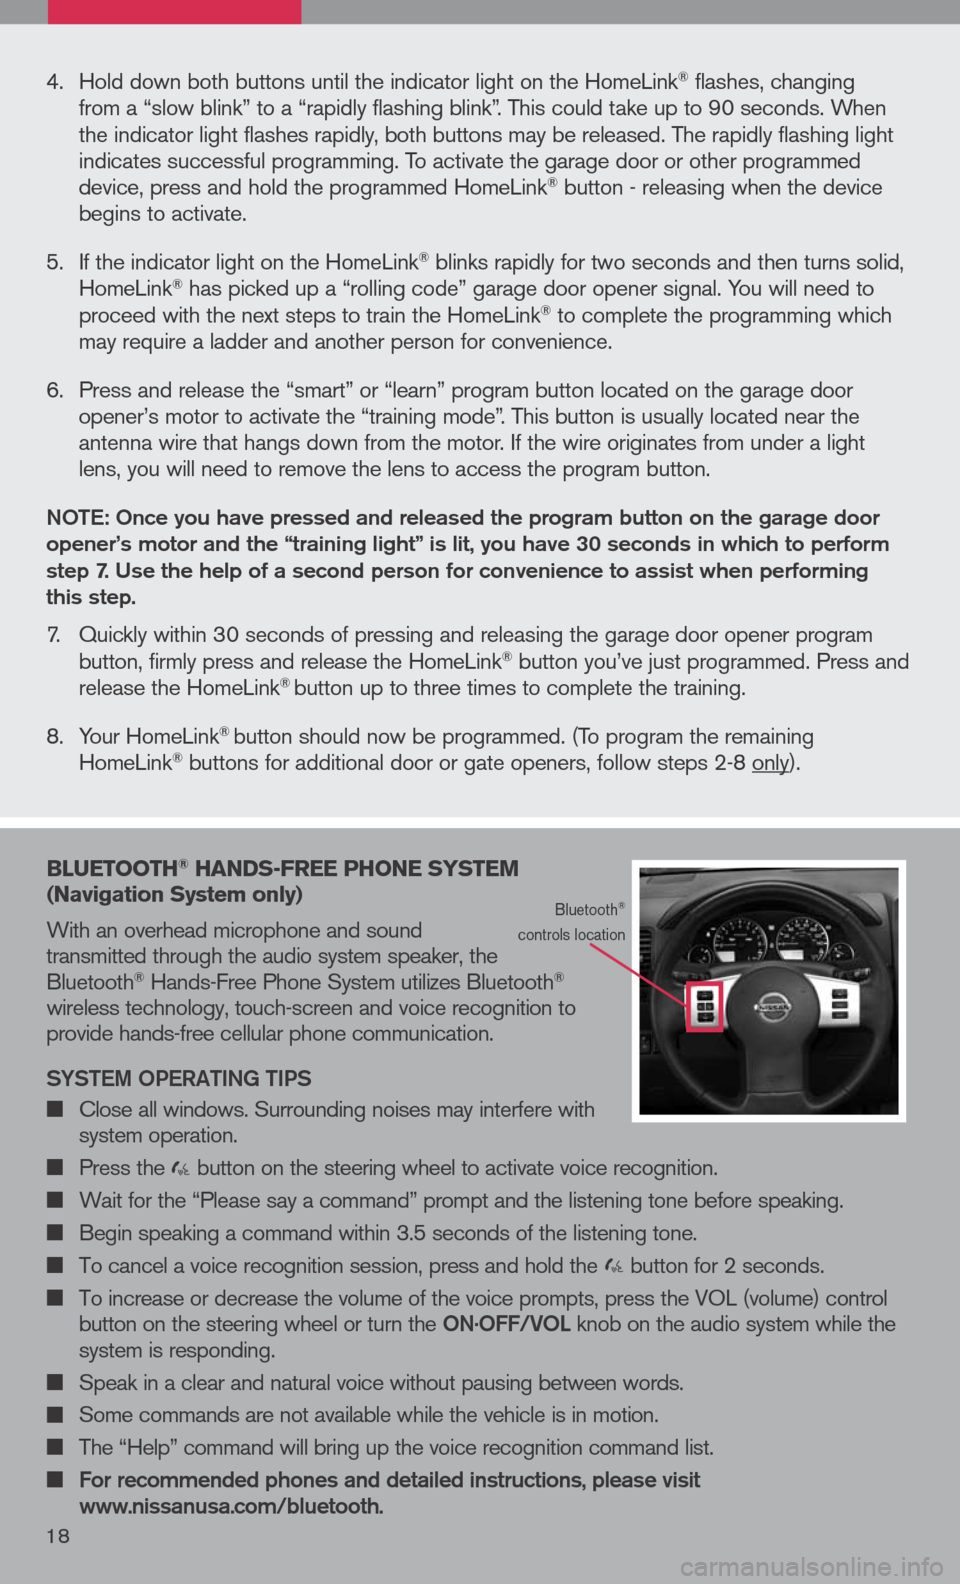
bluetooth® hands -Free phone syste M
( n avigation system only)
With an overhead microphone and sound transmitted through the audio system speaker, the Bluetooth® Hands-Free Phone System utilizes Bluetooth® wireless technology, touch-screen and voice recognition to provide hands-free cellular phone communication.
SYS tem OPeR ati Ng ti PS
Close all windows. Surrounding noises may interfere with system operation.
Press the button on the steering wheel to activate voice recognition.
Wait for the “Please say a command” prompt and the listening tone before speaking.
Begin speaking a command within 3.5 seconds of the listening tone.
To cancel a voice recognition session, press and hold the button for 2 seconds.
To increase or decrease the volume of the voice prompts, press the VOL (volume) control button on the steering wheel or turn the ON.OFF/VOL knob on the audio system while the system is responding.
Speak in a clear and natural voice without pausing between words.
Some commands are not available while the vehicle is in motion.
The “Help” command will bring up the voice recognition command list.
For recommended phones and detailed instructions, please visit www.nissanusa.com/bluetooth.
Bluetooth® controls location
4. Hold down both buttons until the indicator light on the HomeLink® flashes, changing from a “slow blink” to a “rapidly flashing blink”. This could take up to 90 seconds. When the indicator light flashes rapidly, both buttons may be released. The rapidly flashing light indicates successful programming. To activate the garage door or other programmed device, press and hold the programmed HomeLink® button - releasing when the device begins to activate.
5. If the indicator light on the HomeLink
® blinks rapidly for two seconds and then turns solid, HomeLink® has picked up a “rolling code” garage door opener signal. You will need to proceed with the next steps to train the HomeLink® to complete the programming which may require a ladder and another person for convenience.
6. Press and release the “smart” or “learn” program button located on the garage door
opener’s motor to activate the “training mode”. This button is usually located near the antenna wire that hangs down from the motor. If the wire originates from under a light lens, you will need to remove the lens to access the program button.
NO te: Once you have pressed and released the program button on the garage door opener’s motor and the “training light” is lit, you have 30 seconds in which to perform step 7. Use the help of a second person for convenience to assist when performing this step.
7. Quickly within 30 seconds of pressing and releasing the garage door opener program button, firmly press and release the HomeLink® button you’ve just programmed. Press and release the HomeLink® button up to three times to complete the training.
8. Your HomeLink
® button should now be programmed. (To program the remaining HomeLink® buttons for additional door or gate openers, follow steps 2-8 only).
18
Page 31 of 36
29
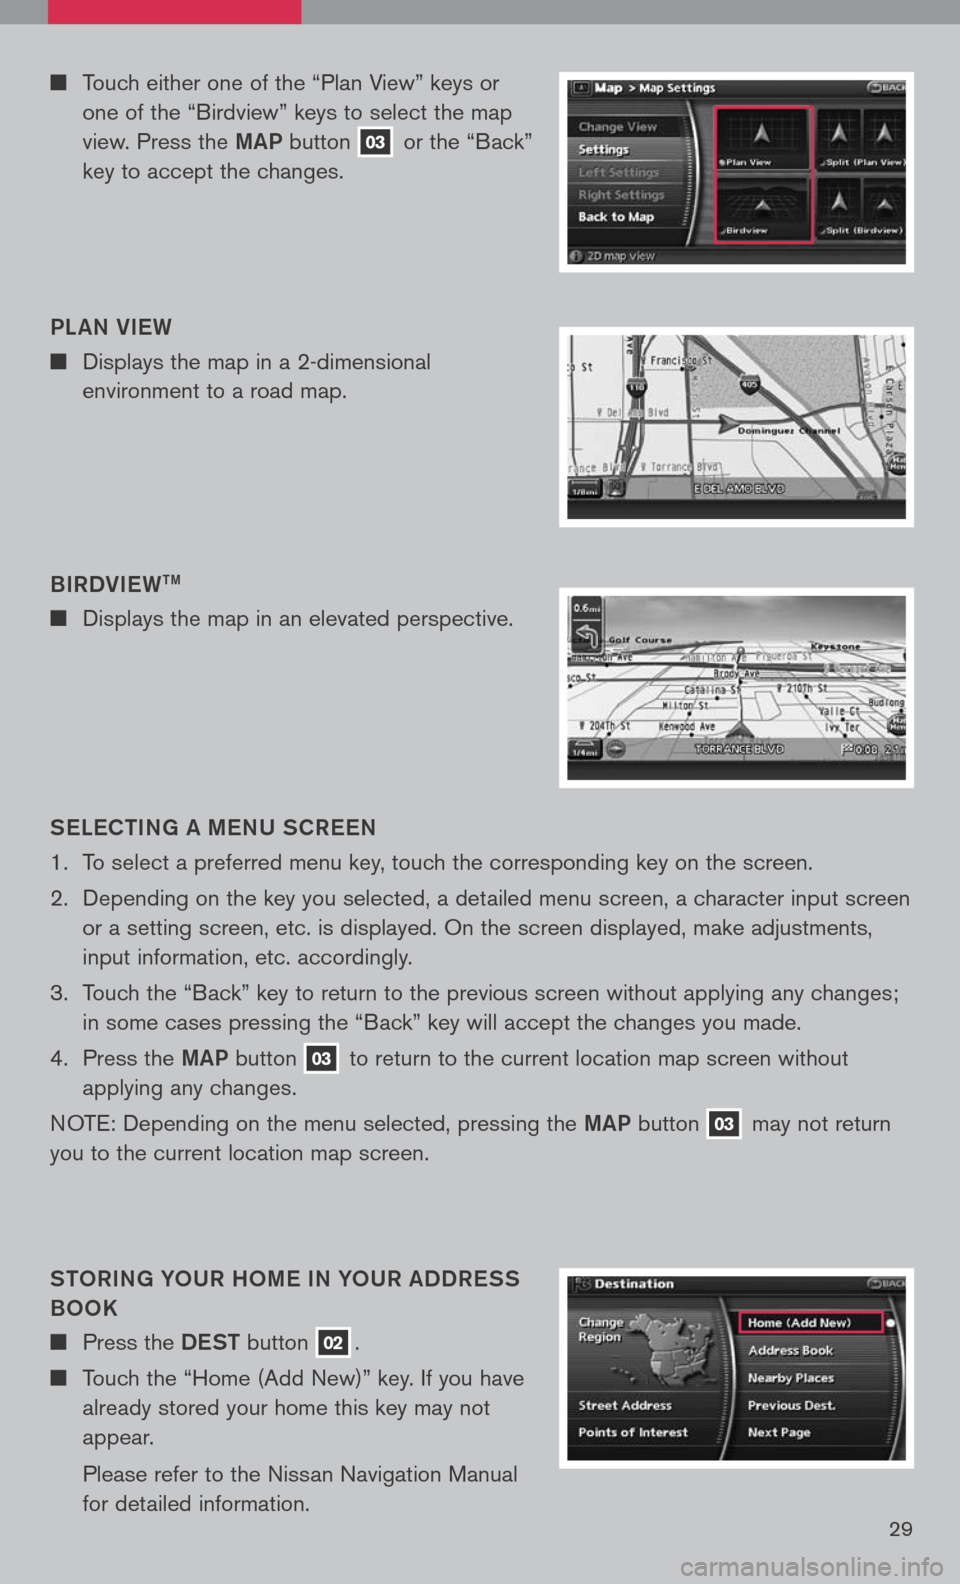
Touch either one of the “Plan View” keys or
one of the “Birdview” keys to select the map
view. Press the maP button 03 or the “Back”
key to accept the changes.
S eLe C ti Ng a me NU SCR eeN
1. To select a preferred menu key, touch the corresponding key on the screen.
2. Depending on the key you selected, a detailed menu screen, a character input screen
or a setting screen, etc. is displayed. On the screen displayed, make adjustments,
input information, etc. accordingly.
3. Touch the “Back” key to return to the previous screen without applying any changes;
in some cases pressing the “Back” key will accept the changes you made.
4. Press the maP
button 03 to return to the current location map screen without
applying any changes.
NOTE: Depending on the menu selected, pressing the maP button 03 may not return
you to the current location map screen.
StOR iN g YOUR hO me i N YOUR aDDR eSS
BOOK
Press the DeSt button 02.
Touch the “Home (Add New)” key. If you have
already stored your home this key may not
appear.
Please refer to the Nissan Navigation Manual
for detailed information.
B
iRDV ieW
tm
Displays the map in an elevated perspective.
PL
aN V ieW
Displays the map in a 2-dimensional
environment to a road map.