steering wheel NISSAN PATHFINDER 2008 R51 / 3.G Quick Reference Guide
[x] Cancel search | Manufacturer: NISSAN, Model Year: 2008, Model line: PATHFINDER, Model: NISSAN PATHFINDER 2008 R51 / 3.GPages: 36, PDF Size: 3.11 MB
Page 2 of 36
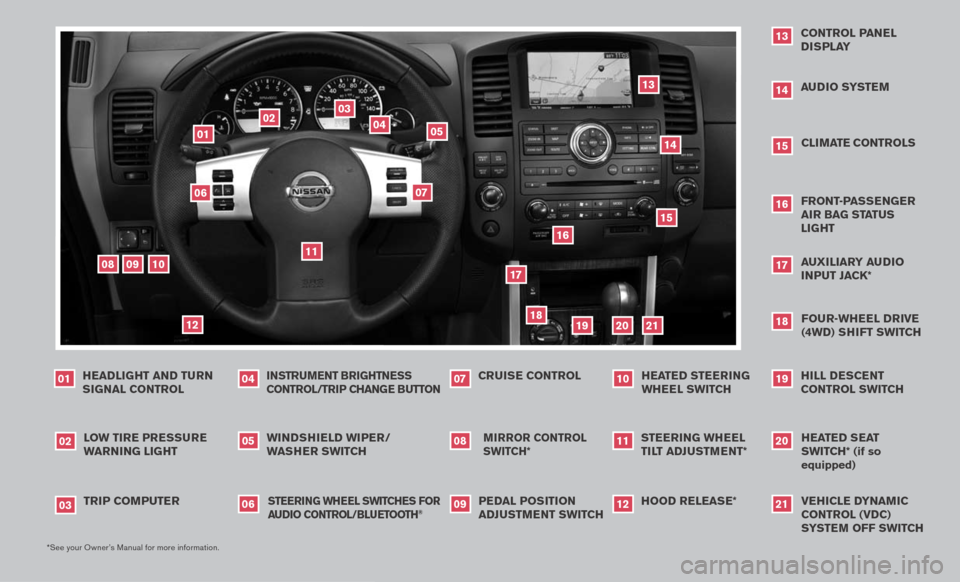
10
*See your Owner’s Manual for more information.
Windshield Wiper/
W asher sWitch
05
Mirror control
sWitch*
08
l o W tire pressure
Warning light
02
cruise control
07
audio syste M
1418
Four-Wheel drive
(4Wd) shi Ft sWitch
headlight and turn
signal control
01
13
control panel display
a uxiliary audio
i nput Jack*
17
01
02
03
04
05
09
08
06
07
11
12
13
trip coMputer
03
instru Ment brightness control/trip change button
04
hood release*
12
Front-p assenger air bag status light
1620
heated seat
sWitch*
(if so
equipped
)
pedal position
ad JustM ent sWitch
09
steering Wheel
tilt ad JustM ent*
11
15
cliMate controls
h ill descent
control sWitch
19
1415
16
17
18
19
20
h eated steering
Wheel sWitch
10
s teering Wheel s Witches For
audio control/ bluetooth
®
06
10
21
21
vehicle dynaM ic
control (vdc)
s yste M oFF sWitch
Page 3 of 36

TAB LE O F C O NTE NTS
Remote Keyless Entry System . . . . . . . . . . . . . . . . . . 2
Intelligent Key System. . . . . . . . . . . . . . . . . . . . . . . 2
Windshield Wiper/Washer Switch . . . . . . . . . . . . . . . . 3
Headlight and Turn Signal Control . . . . . . . . . . . . . . . . 3
Steering Wheel Switches for Audio Control . . . . . . . . . . . 4
Cruise Control . . . . . . . . . . . . . . . . . . . . . . . . . . . 5
Automatic Climate Control . . . . . . . . . . . . . . . . . . . . 5
Rear Climate Control Dials . . . . . . . . . . . . . . . . . . . . 6
FM/AM/XM® Radio with CD Changer . . . . . . . . . . . . . . 7
Music Box Hard-Disk Drive Audio System . . . . . . . . . . . . 8
CompactFlash™ (CF) Player Operation . . . . . . . . . . . . . 9
Control Panel Display with Navigation System . . . . . . . . . . 9
Rearview Monitor (Navigation System Only) . . . . . . . . . . . 10
Clock/Set Adjustment . . . . . . . . . . . . . . . . . . . . . . . 10
Trip Computer . . . . . . . . . . . . . . . . . . . . . . . . . . . 11
Instrument Brightness Control/Trip Change Button . . . . . . . 11
Automatic Driver Positioner . . . . . . . . . . . . . . . . . . . . 11
Pedal Position Adjustment . . . . . . . . . . . . . . . . . . . . 12
Manual Shift Mode . . . . . . . . . . . . . . . . . . . . . . . . 12
Four-Wheel Drive (4WD) Shift Switch . . . . . . . . . . . . . . 13
Hill Descent Control Switch . . . . . . . . . . . . . . . . . . . 13
Front-Passenger Air Bag Status Light . . . . . . . . . . . . . . 14
Tire Pressure Monitoring System (TPMS) . . . . . . . . . . . . 14
Seat Belt Warning Light and Chime . . . . . . . . . . . . . . . 14
Child Safety Rear Door Lock . . . . . . . . . . . . . . . . . . . 14
Vehicle Dynamic Control (VDC) System Off Switch . . . . . . . 15
Heated Steering Wheel Switch . . . . . . . . . . . . . . . . . . 15
Sunroof Controls . . . . . . . . . . . . . . . . . . . . . . . . . 15
Liftgate . . . . . . . . . . . . . . . . . . . . . . . . . . . . . . . 16
Front Seat Adjustments . . . . . . . . . . . . . . . . . . . . . . 16
Folding the 2nd Row Bench Seat . . . . . . . . . . . . . . . . 16
Tip Up for Easy Entry or Exit From the 3rd Row . . . . . . . . . 17
Folding the 3rd Row Seats . . . . . . . . . . . . . . . . . . . . 17
Homelink® Universal Transceiver . . . . . . . . . . . . . . . . . 17
Bluetooth® Hands-Free Phone System . . . . . . . . . . . . . . 18
N ISSAN
Mobile Entertainment System . . . . . . . . . . . . . 21
Remote Audio System Controls . . . . . . . . . . . . . . . . . 22
NISSAN Voice Recognition System . . . . . . . . . . . . . . . 24
Navigation System . . . . . . . . . . . . . . . . . . . . . . . . . 26
Page 10 of 36
07 S ee K /C at a ND tR aCK BU ttONS
To scan quickly through each broadcasting station, press the S ee K/C at button or the tR aCK button.
To skip from one track to another on a CD, press the S ee K/C at button or the
tR aCK button.
08 S C aN ·R P t BU ttON
Press the SCaN ·R P t button while listening to the radio. The radio will stop at each station that has significant signal strength for 5 seconds. If listening to a CD, it will select the previous/next selections.
To change the play pattern of a CD, Press the SCaN ·R P t button.
XM® presets are only available on XM® Satellite Radio equipped vehicles.
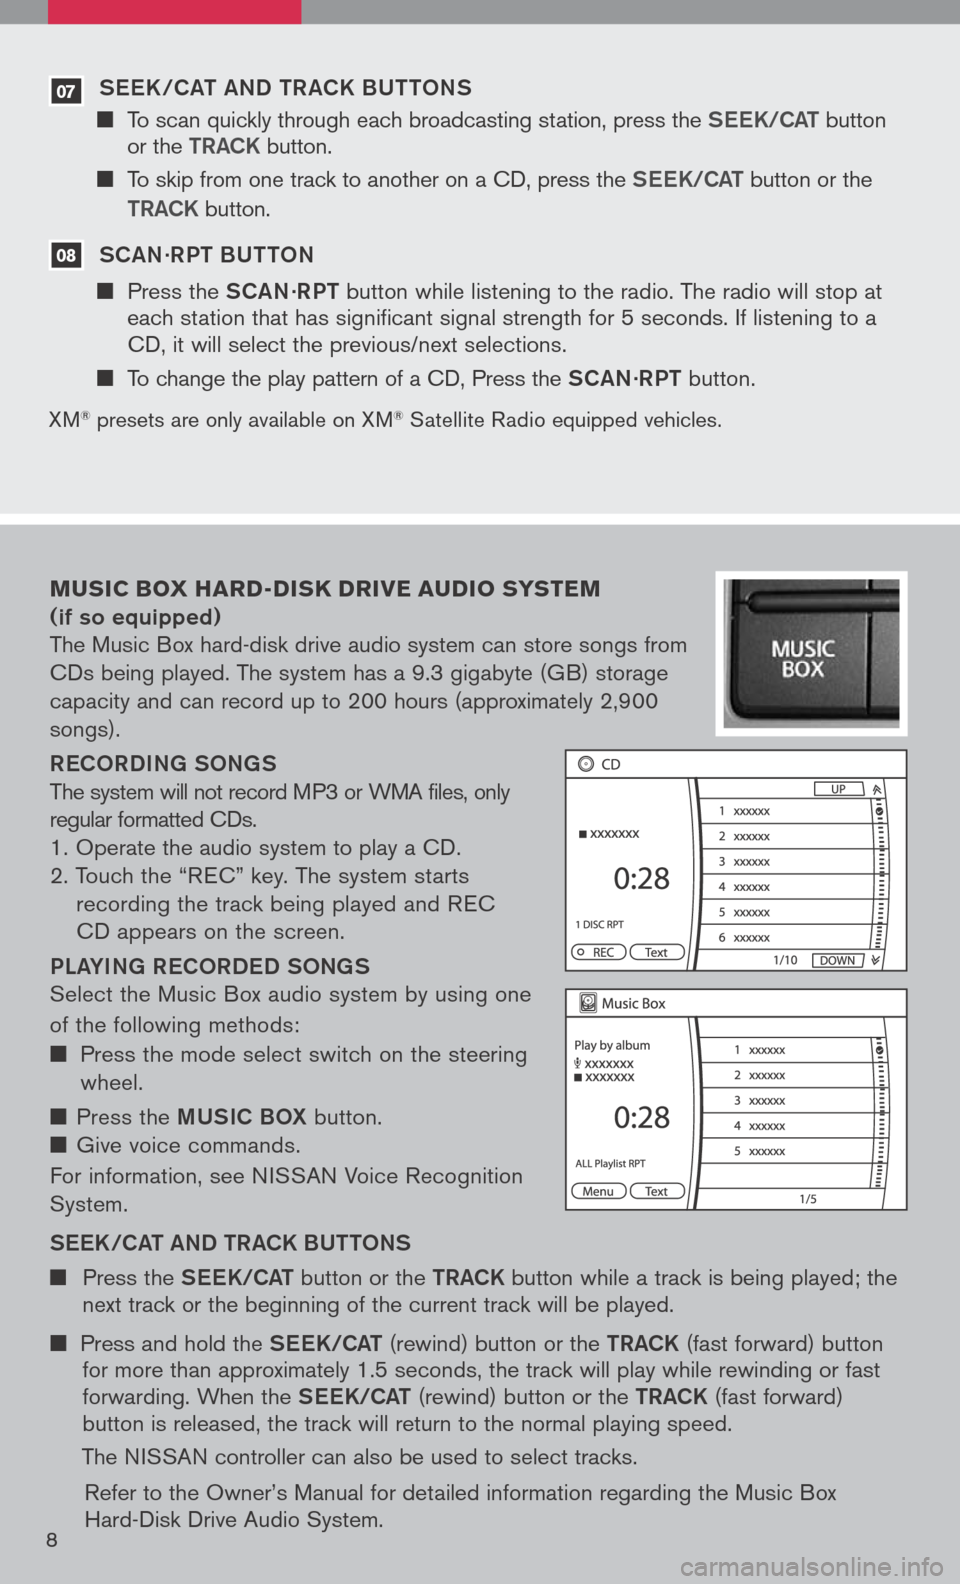
Music box hard -disk drive audio syste M
(if so equipped)
The Music Box hard-disk drive audio system can store songs from
CDs being played. The system has a 9.3 gigabyte (GB) storage
capacity and can record up to 200 hours (approximately 2,900
songs).
ReCOR D iN g SON gS
The system will not record MP3 or WMA files, only
regular formatted CDs.
1. Operate the audio system to play a CD.
2. Touch the “R EC” key. The system starts
recording the track being played and R EC
CD appears on the screen.
PL aY iN g R eCOR D eD SON gS
Select the Music Box audio system by using one
of the following methods:
Press the mode select switch on the steering
wheel.
Press the mUS iC BOX button.
Give voice commands.
For information, see N ISSAN Voice Recognition
System.
S ee K/C at a ND tR aCK BU ttONS
Press the See K/C at button or the tRaCK button while a track is being played; the next track or the beginning of the current track will be played.
Press and hold the See K/C at (rewind) button or the tRaCK (fast forward) button for more than approximately 1.5 seconds, the track will play while rewinding or fast forwarding. When the See K/C at (rewind) button or the tRaCK (fast forward) button is released, the track will return to the normal playing speed.
The NISSAN controller can also be used to select tracks.
Refer to the Owner’s Manual for detailed information regarding the Music Box Hard-Disk Drive Audio System.8
Page 15 of 36
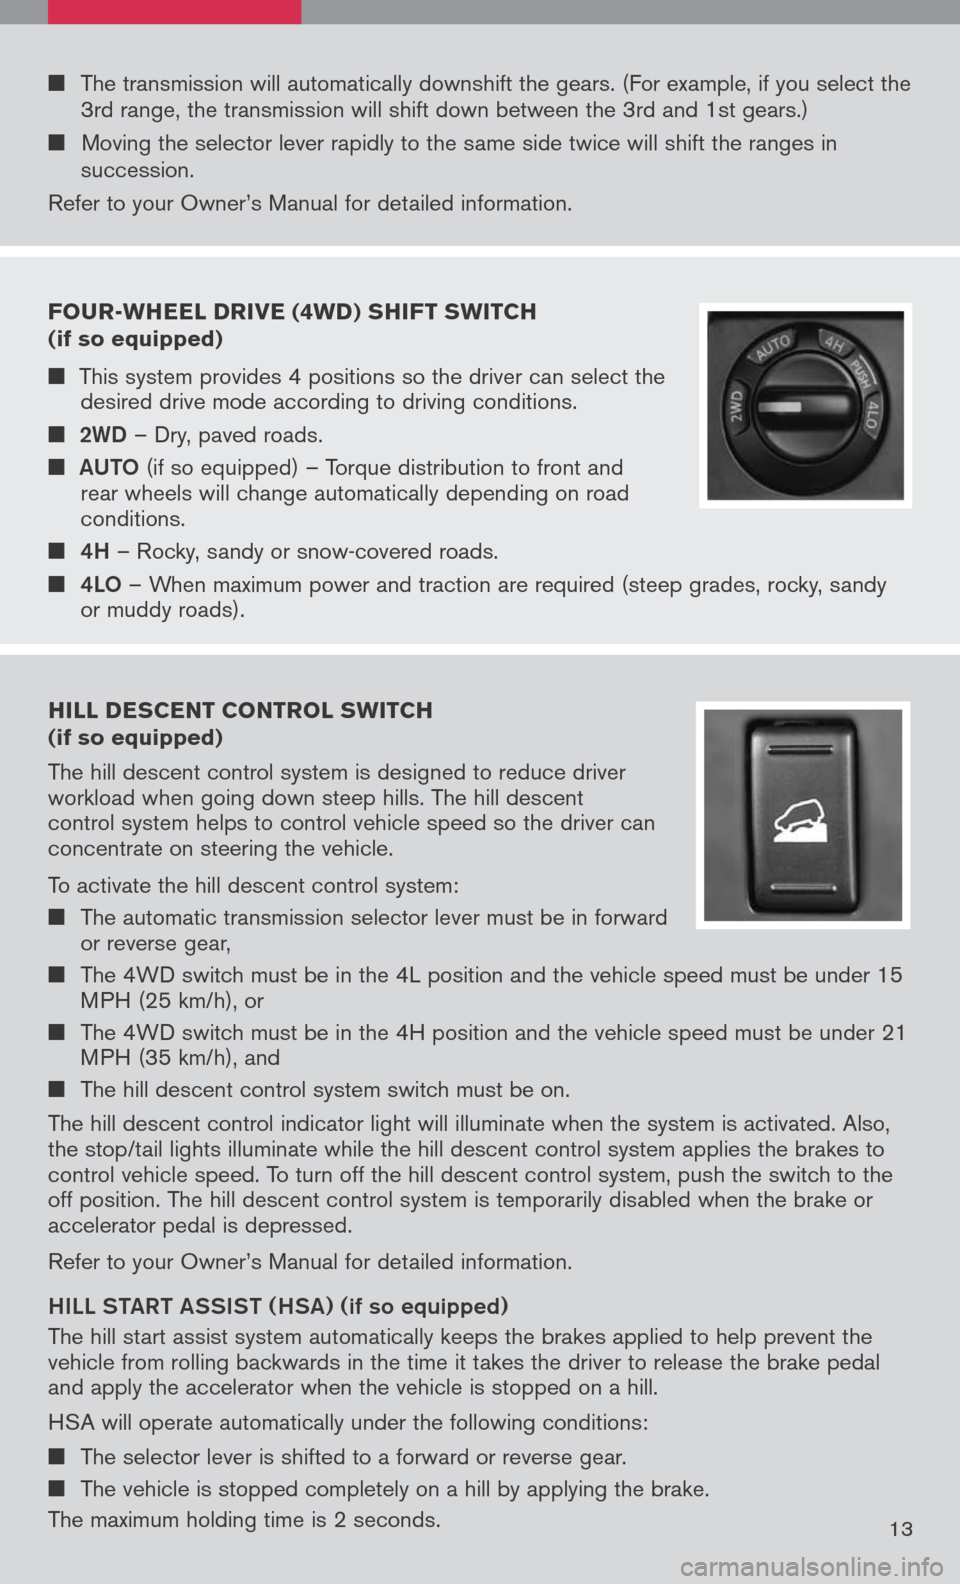
Four -Wheel drive (4W d) shi Ft sW itch
(if so equipped)
This system provides 4 positions so the driver can select the desired drive mode according to driving conditions.
2WD – Dry, paved roads.
aUt O
(if so equipped) – Torque distribution to front and rear wheels will change automatically depending on road conditions.
4h – Rocky, sandy or snow-covered roads.
4LO – When maximum power and traction are required (steep grades, rocky, sandy or muddy roads).
hill descent control s W itch (if so equipped)
The hill descent control system is designed to reduce driver workload when going down steep hills. The hill descent control system helps to control vehicle speed so the driver can concentrate on steering the vehicle.
To activate the hill descent control system:
The automatic transmission selector lever must be in forward or reverse gear,
The 4WD switch must be in the 4L position and the vehicle speed must be under 15 MPH (25 km/h), or
The 4WD switch must be in the 4H position and the vehicle speed must be under 21 MPH (35 km/h), and
The hill descent control system switch must be on.
The hill descent control indicator light will illuminate when the system is activated. Also, the stop/tail lights illuminate while the hill descent control system applies the brakes to control vehicle speed. To turn off the hill descent control system, push the switch to the off position. The hill descent control system is temporarily disabled when the brake or accelerator pedal is depressed.
Refer to your Owner’s Manual for detailed information.
hiLL Sta Rt aSS iS t ( hSa) (
if so equipped)
The hill start assist system automatically keeps the brakes applied to help prevent the vehicle from rolling backwards in the time it takes the driver to release the brake pedal and apply the accelerator when the vehicle is stopped on a hill.
HSA will operate automatically under the following conditions:
The selector lever is shifted to a forward or reverse gear.
The vehicle is stopped completely on a hill by applying the brake.
The maximum holding time is 2 seconds.13
The transmission will automatically downshift the gears. (For example, if you select the 3rd range, the transmission will shift down between the 3rd and 1st gears.)
Moving the selector lever rapidly to the same side twice will shift the ranges in succession.
Refer to your Owner’s Manual for detailed information.
Page 17 of 36
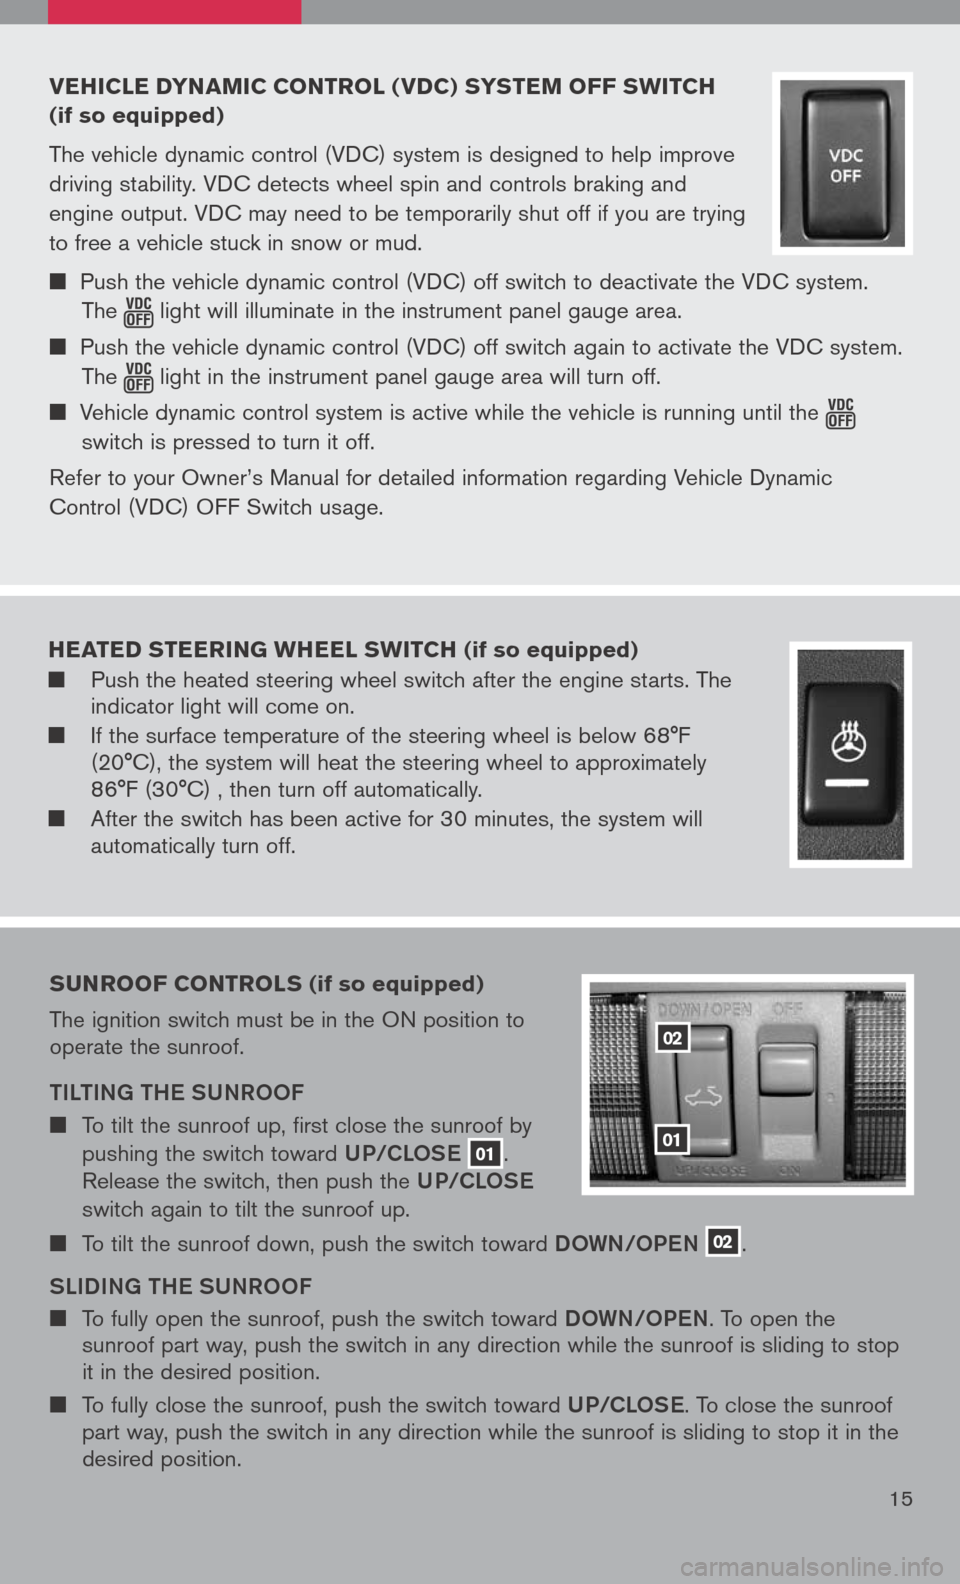
vehicle dyna Mic control ( vdc) s yste M oFF sWitch
(if so equipped)
The vehicle dynamic control (VDC) system is designed to help improve
driving stability. VDC detects wheel spin and controls braking and
engine output. VDC may need to be temporarily shut off if you are trying
to free a vehicle stuck in snow or mud.
Push the vehicle dynamic control (VDC) off switch to deactivate the VDC system.
The light will illuminate in the instrument panel gauge area.
Push the vehicle dynamic control (VDC) off switch again to activate the VDC system.
The light in the instrument panel gauge area will turn off.
Vehicle dynamic control system is active while the vehicle is running until the
switch is pressed to turn it off.
Refer to your Owner’s Manual for detailed information regarding Vehicle Dynamic
Control (VDC) OFF Switch usage.
15
02
01
sunroo F controls (if so equipped)
The ignition switch must be in the ON position to operate the sunroof.
tiLti Ng the SUNROOF
To tilt the sunroof up, first close the sunroof by
pushing the switch toward UP/CLOSe 01.
Release the switch, then push the UP/CLOSe
switch again to tilt the sunroof up.
To tilt the sunroof down, push the switch toward DOWN/OPeN 02.
SL iD iN g the SUNROOF
To fully open the sunroof, push the switch toward DOWN/OPeN. To open the sunroof part way, push the switch in any direction while the sunroof is sliding to stop it in the desired position.
To fully close the sunroof, push the switch toward UP/CLOSe. To close the sunroof part way, push the switch in any direction while the sunroof is sliding to stop it in the desired position.
heated steering Wheel sWitch (if so equipped)
Push the heated steering wheel switch after the engine starts. The indicator light will come on.
If the surface temperature of the steering wheel is below 68°F (20°C), the system will heat the steering wheel to approximately 86°F (30°C) , then turn off automatically.
After the switch has been active for 30 minutes, the system will automatically turn off.
Page 20 of 36
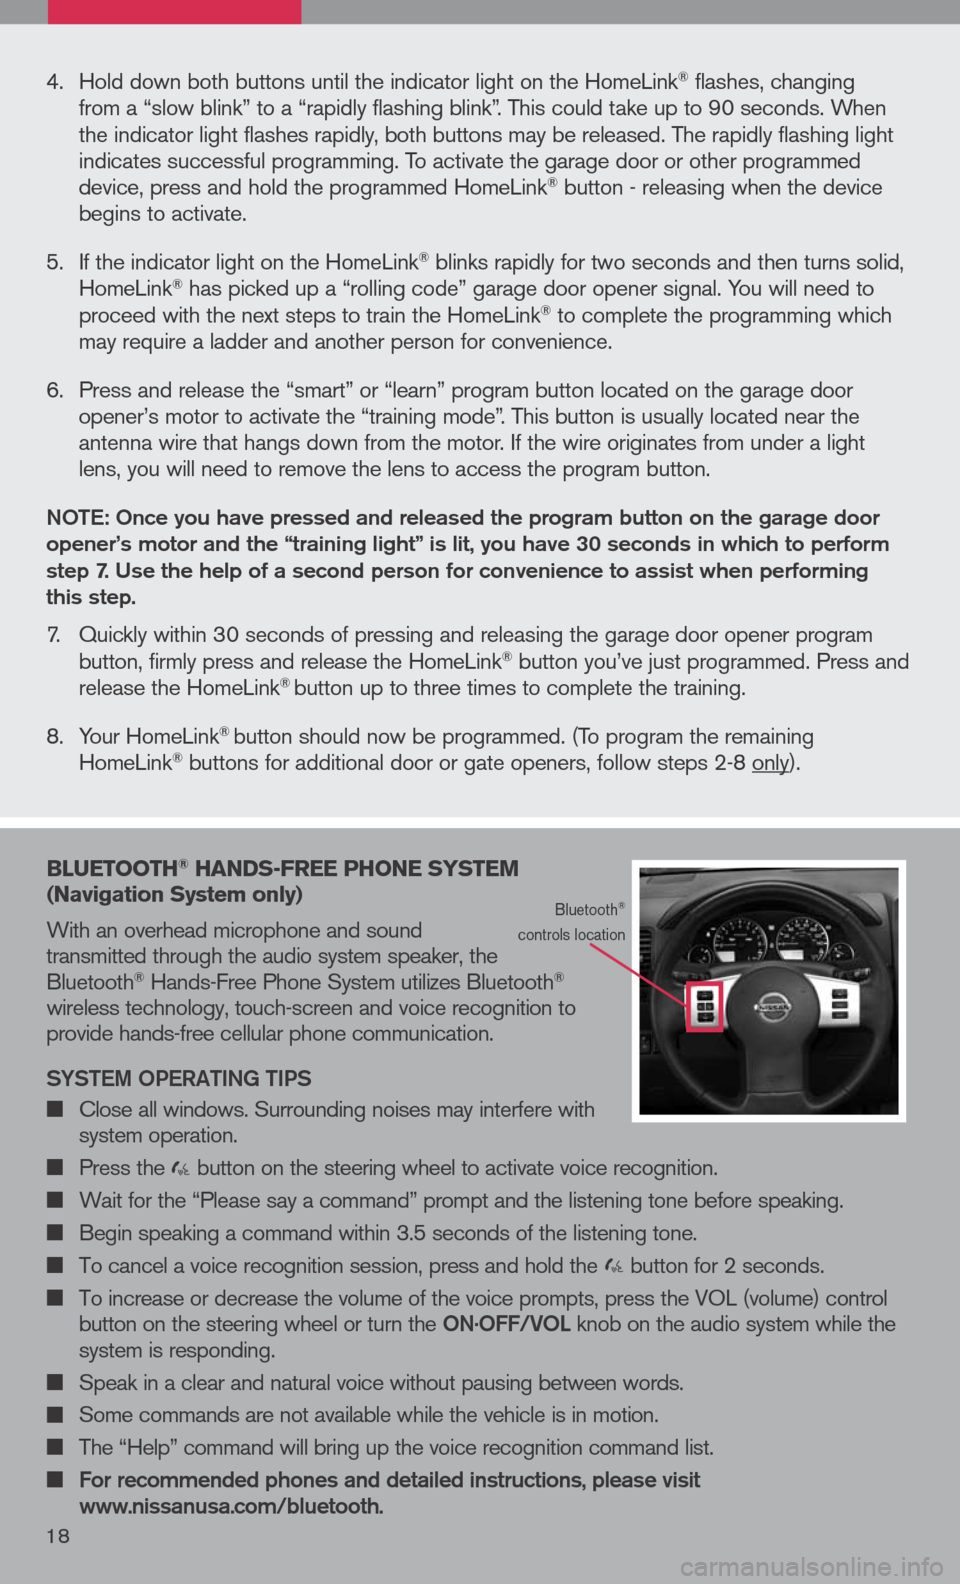
16
bluetooth® hands -Free phone syste M
( n avigation system only)
With an overhead microphone and sound transmitted through the audio system speaker, the Bluetooth® Hands-Free Phone System utilizes Bluetooth® wireless technology, touch-screen and voice recognition to provide hands-free cellular phone communication.
SYS tem OPeR ati Ng ti PS
Close all windows. Surrounding noises may interfere with system operation.
Press the button on the steering wheel to activate voice recognition.
Wait for the “Please say a command” prompt and the listening tone before speaking.
Begin speaking a command within 3.5 seconds of the listening tone.
To cancel a voice recognition session, press and hold the button for 2 seconds.
To increase or decrease the volume of the voice prompts, press the VOL (volume) control button on the steering wheel or turn the ON.OFF/VOL knob on the audio system while the system is responding.
Speak in a clear and natural voice without pausing between words.
Some commands are not available while the vehicle is in motion.
The “Help” command will bring up the voice recognition command list.
For recommended phones and detailed instructions, please visit www.nissanusa.com/bluetooth.
Bluetooth® controls location
4. Hold down both buttons until the indicator light on the HomeLink® flashes, changing from a “slow blink” to a “rapidly flashing blink”. This could take up to 90 seconds. When the indicator light flashes rapidly, both buttons may be released. The rapidly flashing light indicates successful programming. To activate the garage door or other programmed device, press and hold the programmed HomeLink® button - releasing when the device begins to activate.
5. If the indicator light on the HomeLink
® blinks rapidly for two seconds and then turns solid, HomeLink® has picked up a “rolling code” garage door opener signal. You will need to proceed with the next steps to train the HomeLink® to complete the programming which may require a ladder and another person for convenience.
6. Press and release the “smart” or “learn” program button located on the garage door
opener’s motor to activate the “training mode”. This button is usually located near the antenna wire that hangs down from the motor. If the wire originates from under a light lens, you will need to remove the lens to access the program button.
NO te: Once you have pressed and released the program button on the garage door opener’s motor and the “training light” is lit, you have 30 seconds in which to perform step 7. Use the help of a second person for convenience to assist when performing this step.
7. Quickly within 30 seconds of pressing and releasing the garage door opener program button, firmly press and release the HomeLink® button you’ve just programmed. Press and release the HomeLink® button up to three times to complete the training.
8. Your HomeLink
® button should now be programmed. (To program the remaining HomeLink® buttons for additional door or gate openers, follow steps 2-8 only).
18
Page 22 of 36
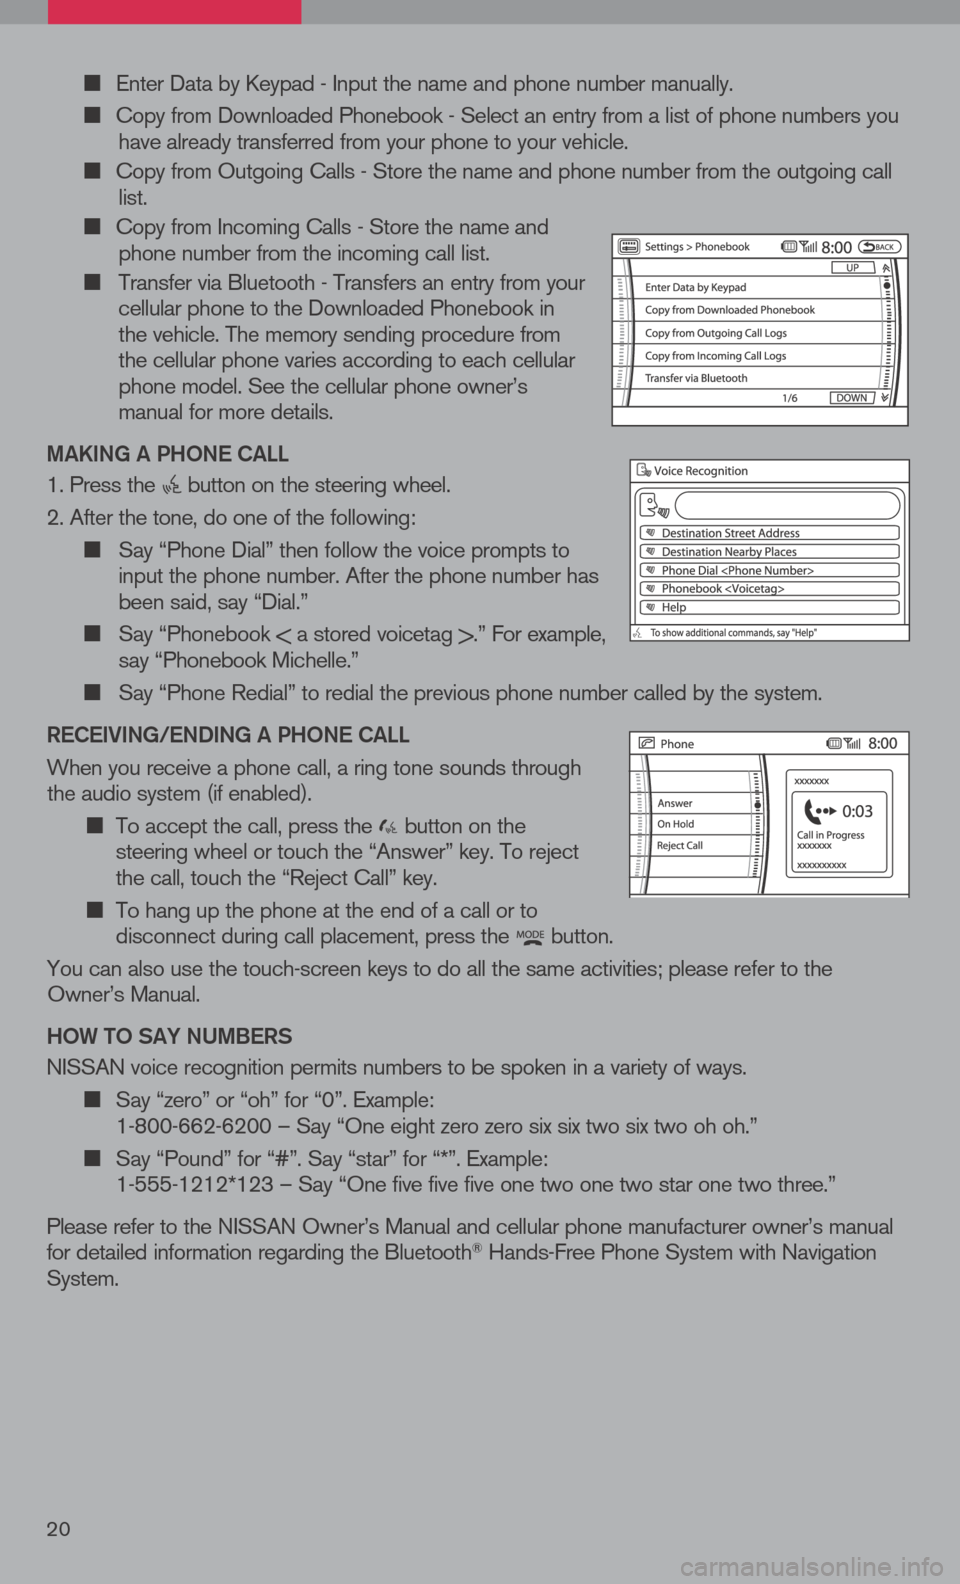
Enter Data by Keypad - Input the name and phone number manually.
Copy from Downloaded Phonebook - Select an entry from a list of phone numbers you have already transferred from your phone to your vehicle.
Copy from Outgoing Calls - Store the name and phone number from the outgoing call list.
Copy from Incoming Calls - Store the name and phone number from the incoming call list.
Transfer via Bluetooth - Transfers an entry from your cellular phone to the Downloaded Phonebook in the vehicle. The memory sending procedure from the cellular phone varies according to each cellular phone model. See the cellular phone owner’s manual for more details.
ma KiN g a P hON e C aLL
1. Press the button on the steering wheel.
2. After the tone, do one of the following:
Say “Phone Dial” then follow the voice prompts to input the phone number. After the phone number has been said, say “Dial.”
Say “Phonebook < a stored voicetag >.” For example, say “Phonebook Michelle.”
Say “Phone Redial” to redial the previous phone number called by the system.
R eC ei ViN g /e ND iN g a P hON e C aLL
When you receive a phone call, a ring tone sounds through the audio system (if enabled).
To accept the call, press the button on the steering wheel or touch the “Answer” key. To reject the call, touch the “Reject Call” key.
To hang up the phone at the end of a call or to disconnect during call placement, press the button.
You can also use the touch-screen keys to do all the same activities; please refer to the Owner’s Manual.
h OW tO S aY NU mBeRS
NISSAN voice recognition permits numbers to be spoken in a variety of ways.
Say “zero” or “oh” for “0”. Example: 1-800-662-6200 – Say “One eight zero zero six six two six two oh oh.”
Say “Pound” for “#”. Say “star” for “*”. Example: 1-555-1212*123 – Say “One five five five one two one two star one two three.”
Please refer to the NISSAN Owner’s Manual and cellular phone manufacturer owner’s manual for detailed information regarding the Bluetooth® Hands-Free Phone System with Navigation System.
20
Page 26 of 36
nissan voice recognition
syste M
(Navigation System only)
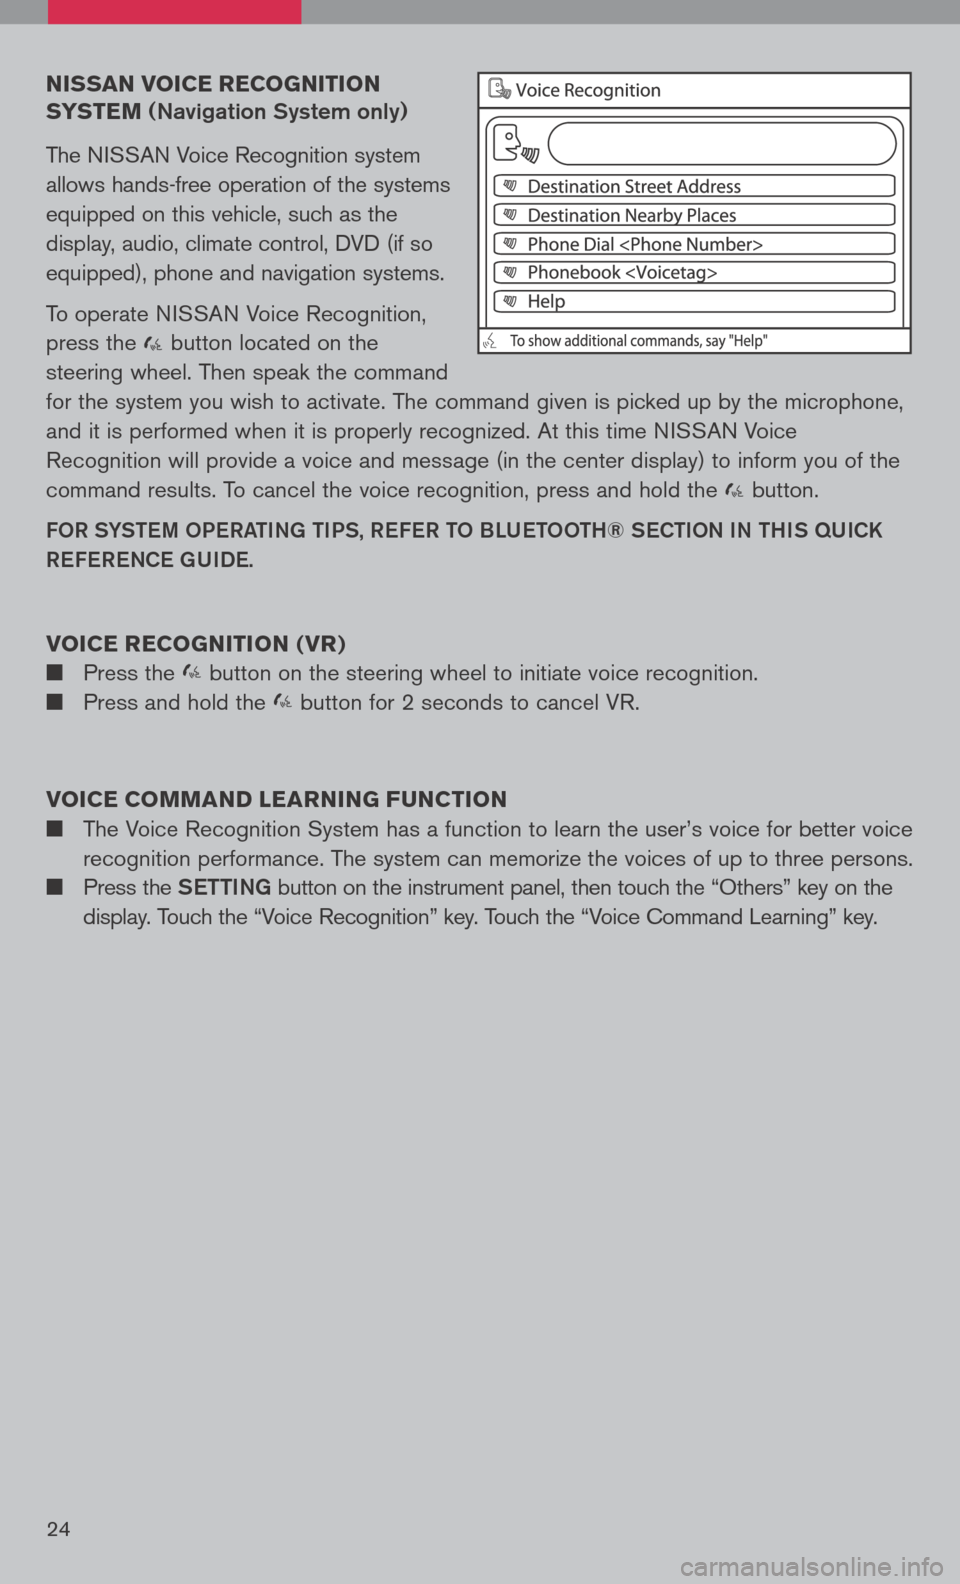
The NISSAN Voice Recognition system
allows hands-free operation of the systems
equipped on this vehicle, such as the
display, audio, climate control, DVD (if so
equipped), phone and navigation systems.
To operate NISSAN Voice Recognition,
press the button located on the
steering wheel. Then speak the command
for the system you wish to activate. The command given is picked up by the microphone,
and it is performed when it is properly recognized. At this time NISSAN Voice
Recognition will provide a voice and message (in the center display) to inform you of the
command results. To cancel the voice recognition, press and hold the button.
FOR SYStem OPeRati Ng ti PS, ReFe R t O BLU etOO th® SeC tiON i N thiS qUiCK
Re Fe R eNCe gUiDe.
voice recognition ( vr)
Press the button on the steering wheel to initiate voice recognition.
Press and hold the button for 2 seconds to cancel VR.
voice coMM and learning F unction
The Voice Recognition System has a function to learn the user’s voice for better voice
recognition performance. The system can memorize the voices of up to three persons.
Press the Setti Ng button on the instrument panel, then touch the “Others” key on the
display. Touch the “Voice Recognition” key. Touch the “Voice Command Learning” key.
24