warning NISSAN PATHFINDER 2008 R51 / 3.G Quick Reference Guide
[x] Cancel search | Manufacturer: NISSAN, Model Year: 2008, Model line: PATHFINDER, Model: NISSAN PATHFINDER 2008 R51 / 3.GPages: 36, PDF Size: 3.11 MB
Page 2 of 36
10
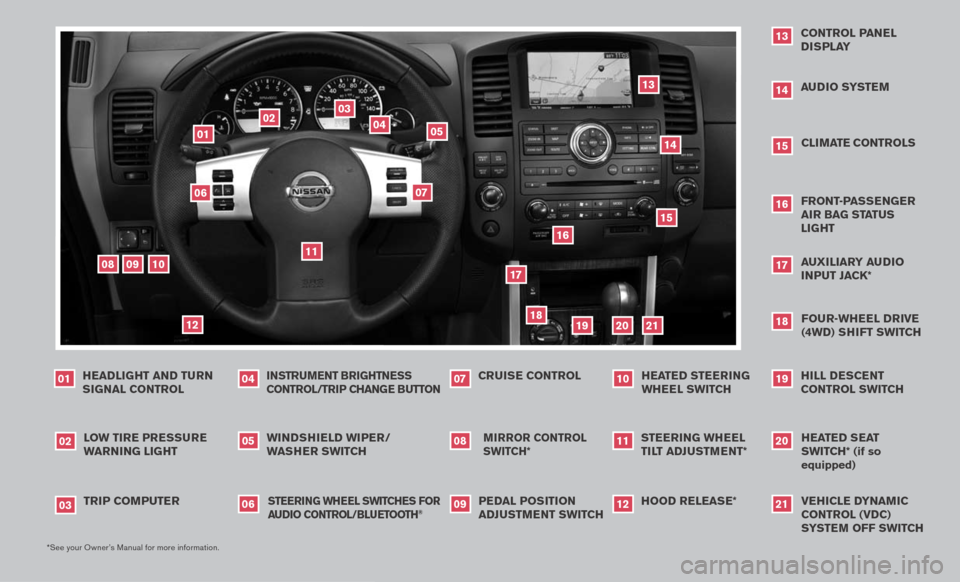
*See your Owner’s Manual for more information.
Windshield Wiper/
W asher sWitch
05
Mirror control
sWitch*
08
l o W tire pressure
Warning light
02
cruise control
07
audio syste M
1418
Four-Wheel drive
(4Wd) shi Ft sWitch
headlight and turn
signal control
01
13
control panel display
a uxiliary audio
i nput Jack*
17
01
02
03
04
05
09
08
06
07
11
12
13
trip coMputer
03
instru Ment brightness control/trip change button
04
hood release*
12
Front-p assenger air bag status light
1620
heated seat
sWitch*
(if so
equipped
)
pedal position
ad JustM ent sWitch
09
steering Wheel
tilt ad JustM ent*
11
15
cliMate controls
h ill descent
control sWitch
19
1415
16
17
18
19
20
h eated steering
Wheel sWitch
10
s teering Wheel s Witches For
audio control/ bluetooth
®
06
10
21
21
vehicle dynaM ic
control (vdc)
s yste M oFF sWitch
Page 3 of 36
TAB LE O F C O NTE NTS
Remote Keyless Entry System . . . . . . . . . . . . . . . . . . 2
Intelligent Key System. . . . . . . . . . . . . . . . . . . . . . . 2
Windshield Wiper/Washer Switch . . . . . . . . . . . . . . . . 3
Headlight and Turn Signal Control . . . . . . . . . . . . . . . . 3
Steering Wheel Switches for Audio Control . . . . . . . . . . . 4
Cruise Control . . . . . . . . . . . . . . . . . . . . . . . . . . . 5
Automatic Climate Control . . . . . . . . . . . . . . . . . . . . 5
Rear Climate Control Dials . . . . . . . . . . . . . . . . . . . . 6
FM/AM/XM® Radio with CD Changer . . . . . . . . . . . . . . 7
Music Box Hard-Disk Drive Audio System . . . . . . . . . . . . 8
CompactFlash™ (CF) Player Operation . . . . . . . . . . . . . 9
Control Panel Display with Navigation System . . . . . . . . . . 9
Rearview Monitor (Navigation System Only) . . . . . . . . . . . 10
Clock/Set Adjustment . . . . . . . . . . . . . . . . . . . . . . . 10
Trip Computer . . . . . . . . . . . . . . . . . . . . . . . . . . . 11
Instrument Brightness Control/Trip Change Button . . . . . . . 11
Automatic Driver Positioner . . . . . . . . . . . . . . . . . . . . 11
Pedal Position Adjustment . . . . . . . . . . . . . . . . . . . . 12
Manual Shift Mode . . . . . . . . . . . . . . . . . . . . . . . . 12
Four-Wheel Drive (4WD) Shift Switch . . . . . . . . . . . . . . 13
Hill Descent Control Switch . . . . . . . . . . . . . . . . . . . 13
Front-Passenger Air Bag Status Light . . . . . . . . . . . . . . 14
Tire Pressure Monitoring System (TPMS) . . . . . . . . . . . . 14
Seat Belt Warning Light and Chime . . . . . . . . . . . . . . . 14
Child Safety Rear Door Lock . . . . . . . . . . . . . . . . . . . 14
Vehicle Dynamic Control (VDC) System Off Switch . . . . . . . 15
Heated Steering Wheel Switch . . . . . . . . . . . . . . . . . . 15
Sunroof Controls . . . . . . . . . . . . . . . . . . . . . . . . . 15
Liftgate . . . . . . . . . . . . . . . . . . . . . . . . . . . . . . . 16
Front Seat Adjustments . . . . . . . . . . . . . . . . . . . . . . 16
Folding the 2nd Row Bench Seat . . . . . . . . . . . . . . . . 16
Tip Up for Easy Entry or Exit From the 3rd Row . . . . . . . . . 17
Folding the 3rd Row Seats . . . . . . . . . . . . . . . . . . . . 17
Homelink® Universal Transceiver . . . . . . . . . . . . . . . . . 17
Bluetooth® Hands-Free Phone System . . . . . . . . . . . . . . 18
N ISSAN
Mobile Entertainment System . . . . . . . . . . . . . 21
Remote Audio System Controls . . . . . . . . . . . . . . . . . 22
NISSAN Voice Recognition System . . . . . . . . . . . . . . . 24
Navigation System . . . . . . . . . . . . . . . . . . . . . . . . . 26
Page 4 of 36
reMote keyless entry systeM
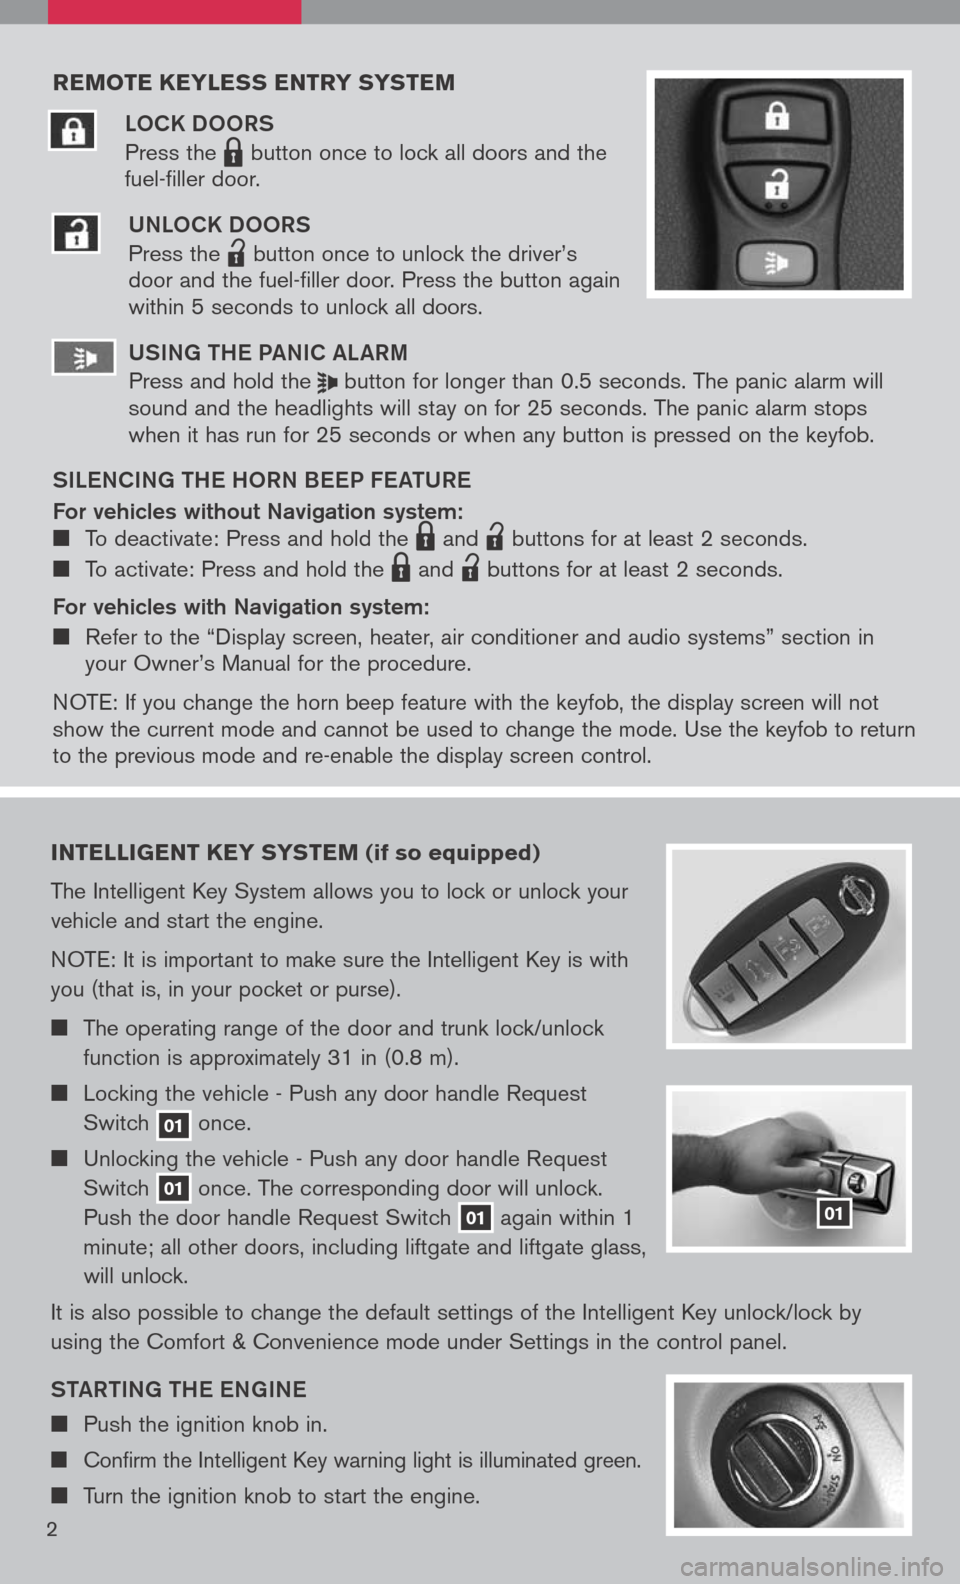
LOCK DOORS
Press the LPD0150 button once to lock all doors and the
fuel-filler door.
UNLOCK DOORS
Press the
lpd0151
button once to unlock the driver’s door and the fuel-filler door. Press the button again within 5 seconds to unlock all doors.
U SiN g the Pa NiC aL aR m
Press and hold the button for longer than 0.5 seconds. The panic alarm will sound and the headlights will stay on for 25 seconds. The panic alarm stops when it has run for 25 seconds or when any button is pressed on the keyfob.
S iL e NC iN g the h ORN B eeP F eat URe
For vehicles without Navigation system: To deactivate: Press and hold the LPD0150 and
lpd0151
buttons for at least 2 seconds.
To activate: Press and hold the LPD0150 and
lpd0151
buttons for at least 2 seconds.
For vehicles with Navigation system:
Refer to the “Display screen, heater, air conditioner and audio systems” section in your Owner’s Manual for the procedure.
N OTE: If you change the horn beep feature with the keyfob, the display screen will not show the current mode and cannot be used to change the mode. Use the keyfob to return to the previous mode and re-enable the display screen control.
intelligent key syste M (if so equipped)
The Intelligent Key System allows you to lock or unlock your
vehicle and start the engine.
NOTE: It is important to make sure the Intelligent Key is with
you (that is, in your pocket or purse).
The operating range of the door and trunk lock/unlock
function is approximately 31 in (0.8 m).
Locking the vehicle - Push any door handle Request
Switch 01 once.
Unlocking the vehicle - Push any door handle Request
Switch 01 once. The corresponding door will unlock.
Push the door handle Request Switch 01 again within 1
minute; all other doors, including liftgate and liftgate glass,
will unlock.
It is also possible to change the default settings of the Intelligent Key unlock/lock by
using the Comfort & Convenience mode under Settings in the control panel.
Sta Rti Ng the eN gi Ne
Push the ignition knob in.
Confirm the Intelligent Key warning light is illuminated green.
Turn the ignition knob to start the engine.
01
2
Page 5 of 36
tURN iN g the eN gi Ne OFF
Shift the transmission into P (Park).
Turn the ignition knob to the LOCK position.
An audible warning chime will sound when exiting the vehicle if the ignition knob is
not completely turned to the OFF position.
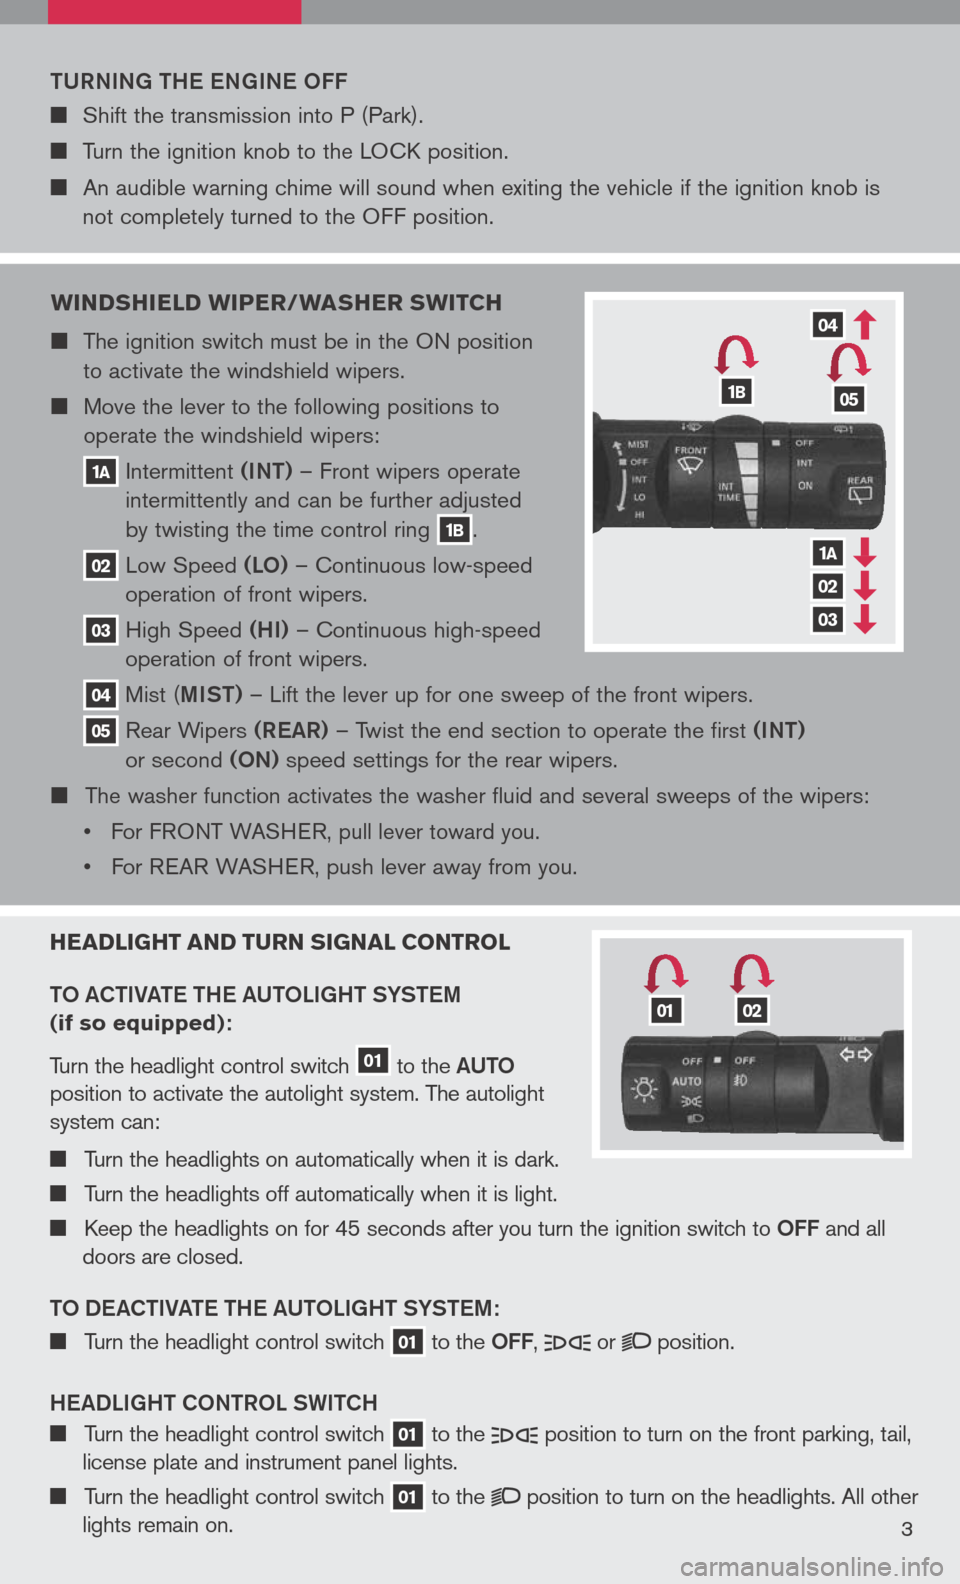
W indshield W iper/Washer sW itch
The ignition switch must be in the ON position
to activate the windshield wipers.
Move the lever to the following positions to
operate the windshield wipers:
1a Intermittent (iNt) – Front wipers operate
intermittently and can be further adjusted
by twisting the time control ring 1b.
02 Low Speed (LO) – Continuous low-speed
operation of front wipers.
03 High Speed (hi) – Continuous high-speed
operation of front wipers.
04 Mist ( miSt) – Lift the lever up for one sweep of the front wipers.
05 Rear Wipers (ReaR) – Twist the end section to operate the first (iNt)
or second (ON) speed settings for the rear wipers.
The washer function activates the washer fluid and several sweeps of the wipers:
• For F
RONT WASHER, pull lever toward you.
• For REAR WASHER, push lever away from you.
headlight and turn signal control
t O aC ti Vate the a U tOL ight SYStem
(if so equipped):
Turn the headlight control switch 01 to the aU tO
position to activate the autolight system. The autolight
system can:
Turn the headlights on automatically when it is dark.
Turn the headlights off automatically when it is light.
Keep the headlights on for 45 seconds after you turn the ignition switch to OFF and all
doors are closed.
t O D eaCti Vate the a U tOL ight SYStem:
Turn the headlight control switch 01 to the OFF, or position.
hea DLight CON tROL SW itCh
Turn the headlight control switch 01 to the position to turn on the front parking, tail,
license plate and instrument panel lights.
Turn the headlight control switch 01 to the position to turn on the headlights. All other
lights remain on.3
1b05
04
03
02
1a
0102
Page 11 of 36
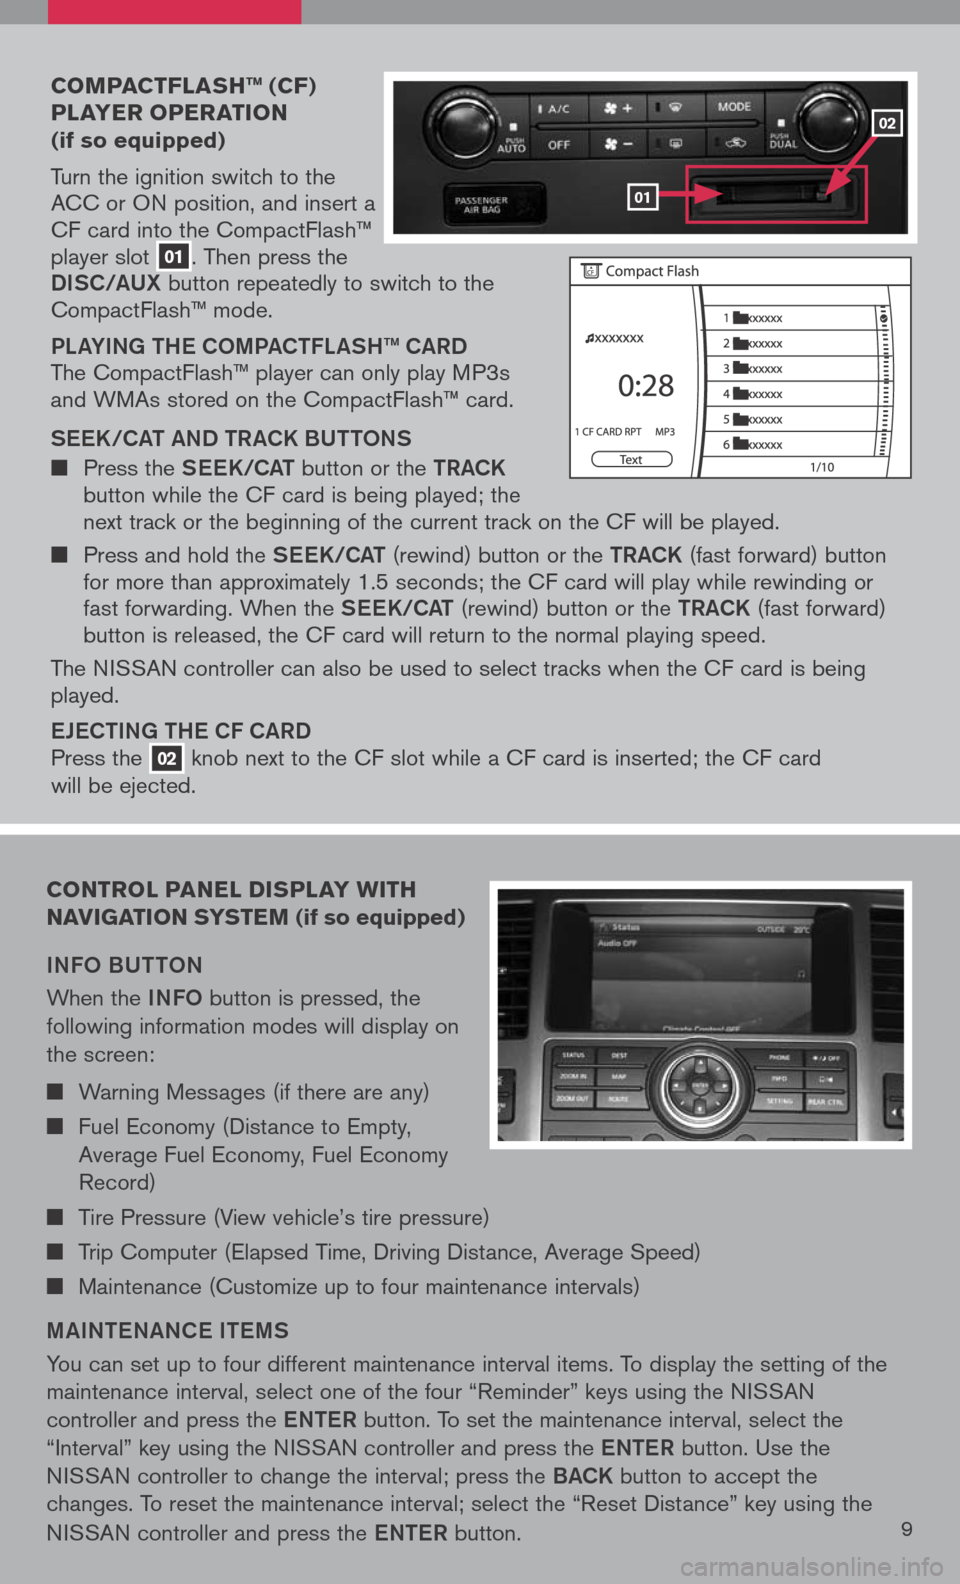
coMpact Flash ™ (cF)
player operation
(if so equipped)
Turn the ignition switch to the ACC or ON position, and insert a CF card into the CompactFlash™ player slot 01. Then press the
Di SC/a UX button repeatedly to switch to the CompactFlash™ mode.
PLaY iN g the COmPa C tFL aS h ™ C aRD
The CompactFlash™ player can only play MP3s and WMAs stored on the CompactFlash™ card.
S ee K/C at a ND tR aCK BU ttONS
Press the See K/C at button or the tRaCK button while the CF card is being played; the next track or the beginning of the current track on the CF will be played.
Press and hold the See K/C at (rewind) button or the tRaCK (fast forward) button for more than approximately 1.5 seconds; the CF card will play while rewinding or fast forwarding. When the See K/C at (rewind) button or the tRaCK (fast forward) button is released, the CF card will return to the normal playing speed.
The NISSAN controller can also be used to select tracks when the CF card is being played.
eJe C ti Ng the CF C aRD
Press the 02 knob next to the CF slot while a CF card is inserted; the CF card
will be ejected.
control panel display W ith
navigation syste M (if so equipped)
iNFO BU ttON
When the iNFO button is pressed, the
following information modes will display on
the screen:
Warning Messages (if there are any)
Fuel Economy (Distance to Empty,
Average Fuel Economy, Fuel Economy
Record)
Tire Pressure (View vehicle’s tire pressure)
Trip Computer (Elapsed Time, Driving Distance, Average Speed)
Maintenance (Customize up to four maintenance intervals)
mai Nte NaNC e item S
You can set up to four different maintenance interval items. To display the setting of the
maintenance interval, select one of the four “Reminder” keys using the NISSAN
controller and press the eNte R button. To set the maintenance interval, select the
“Interval” key using the NISSAN controller and press the eNte R button. Use the
NISSAN controller to change the interval; press the BaCK button to accept the
changes. To reset the maintenance interval; select the “Reset Distance” key using the
NISSAN controller and press the eNte R button.9
01
02
Page 16 of 36
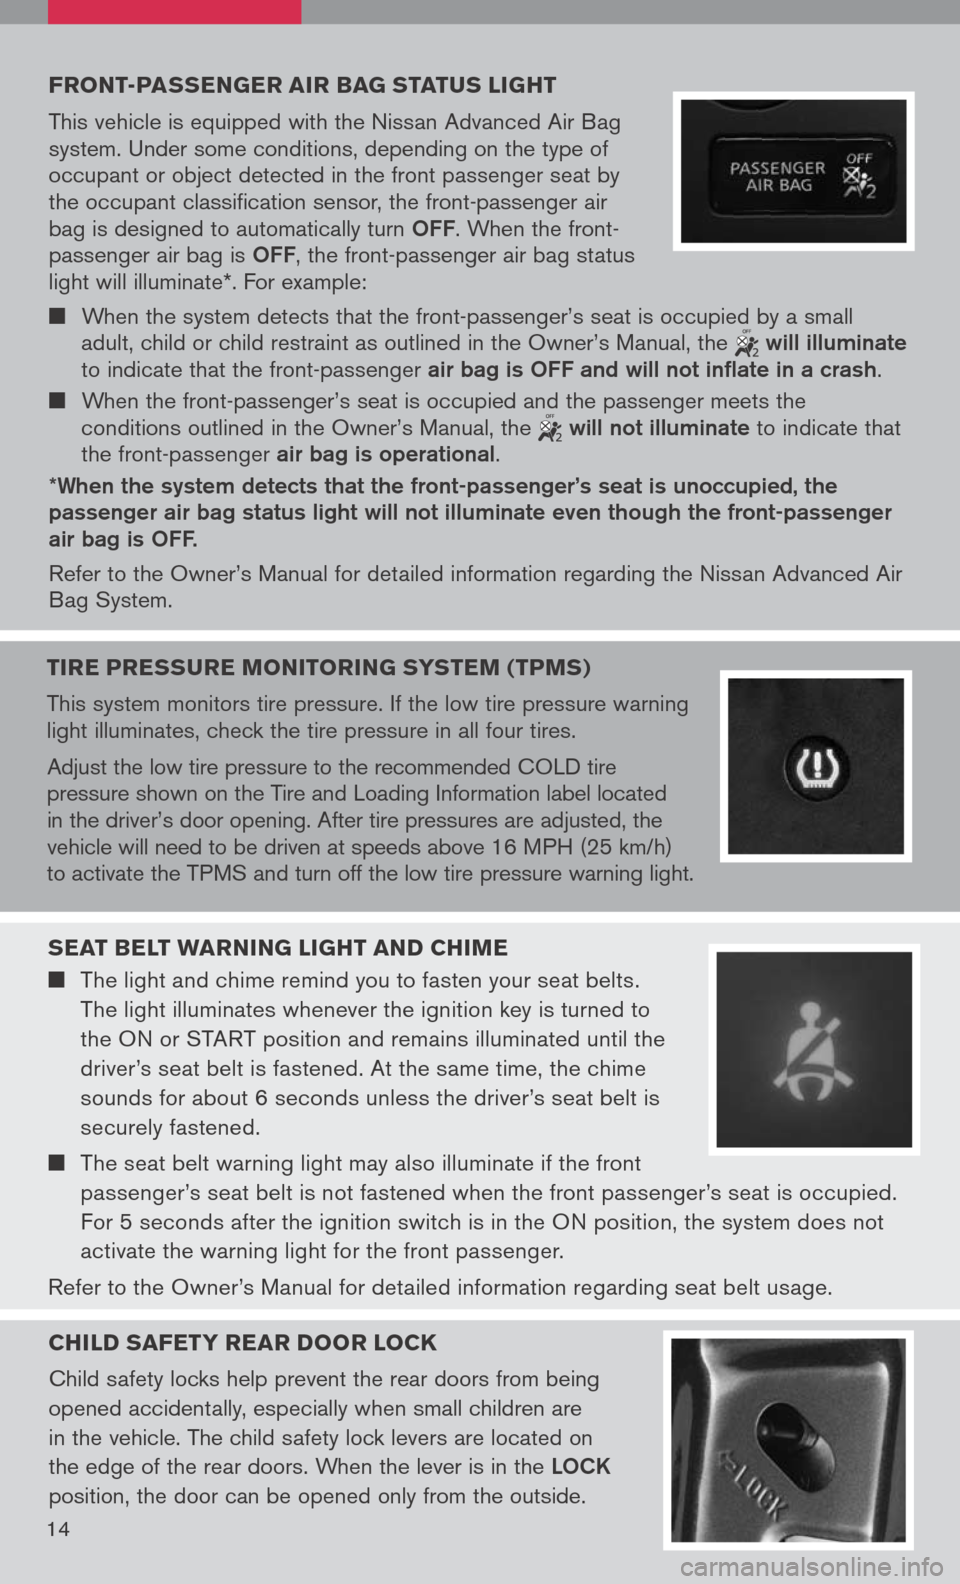
Front -passenger air bag status light
This vehicle is equipped with the Nissan Advanced Air Bag system. Under some conditions, depending on the type of occupant or object detected in the front passenger seat by the occupant classification sensor, the front-passenger air bag is designed to automatically turn OFF. When the front-passenger air bag is OFF, the front-passenger air bag status light will illuminate*. For example:
When the system detects that the front-passenger’s seat is occupied by a small adult, child or child restraint as outlined in the Owner’s Manual, the will illuminate to indicate that the front-passenger air bag is OFF and will not inflate in a crash.
When the front-passenger’s seat is occupied and the passenger meets the conditions outlined in the Owner’s Manual, the will not illuminate to indicate that the front-passenger air bag is operational.
*When the system detects that the front-passenger’s seat is unoccupied, the passenger air bag status light will not illuminate even though the front-passenger air bag is OFF.
Refer to the Owner’s Manual for detailed information regarding the Nissan Advanced Air Bag System.
seat belt W arning light and chiMe
The light and chime remind you to fasten your seat belts.
The light illuminates whenever the ignition key is turned to
the ON or START position and remains illuminated until the
driver’s seat belt is fastened. At the same time, the chime
sounds for about 6 seconds unless the driver’s seat belt is
securely fastened.
The seat belt warning light may also illuminate if the front
passenger’s seat belt is not fastened when the front passenger’s seat is occupied.
For 5 seconds after the ignition switch is in the ON position, the system does not
activate the warning light for the front passenger.
Refer to the Owner’s Manual for detailed information regarding seat belt usage.
child saFety rear door lock
Child safety locks help prevent the rear doors from being
opened accidentally, especially when small children are
in the vehicle. The child safety lock levers are located on
the edge of the rear doors. When the lever is in the LOCK
position, the door can be opened only from the outside.
14
tire pressure M onitoring systeM (tpMs)
This system monitors tire pressure. If the low tire pressure warning light illuminates, check the tire pressure in all four tires.
Adjust the low tire pressure to the recommended COLD tire pressure shown on the Tire and Loading Information label located in the driver’s door opening. After tire pressures are adjusted, the vehicle will need to be driven at speeds above 16 MPH (25 km/h) to activate the TPMS and turn off the low tire pressure warning light.
Page 25 of 36
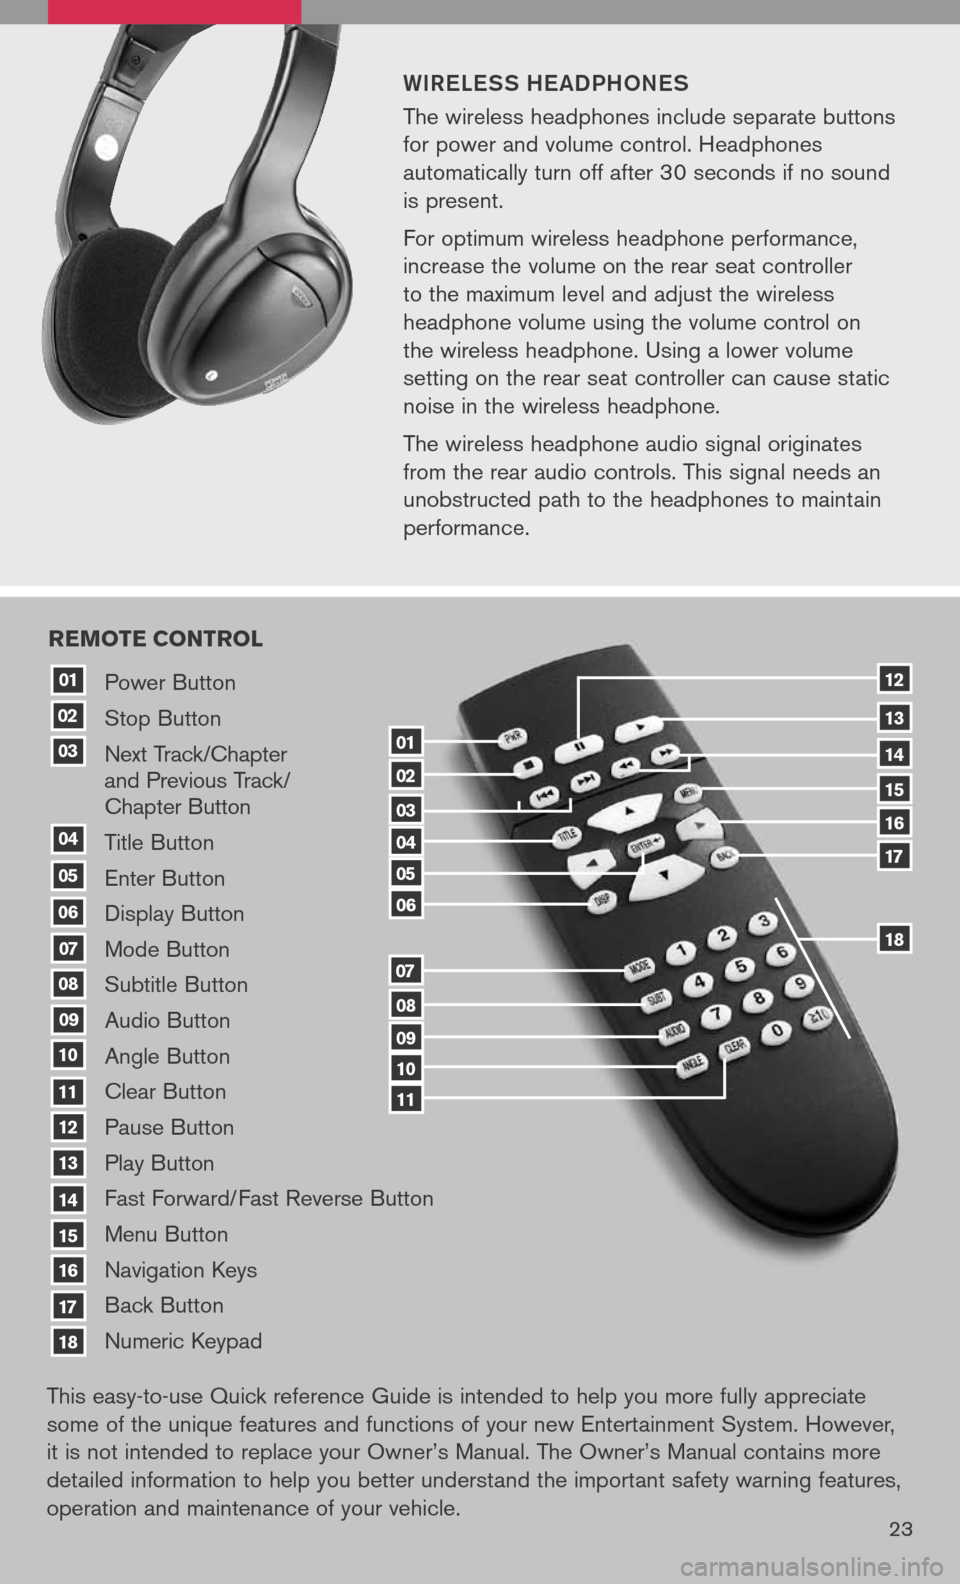
WiR eLe SS he a DPhON eS
The wireless headphones include separate buttons
for power and volume control. Headphones
automatically turn off after 30 seconds if no sound
is present.
For optimum wireless headphone performance,
increase the volume on the rear seat controller
to the maximum level and adjust the wireless
headphone volume using the volume control on
the wireless headphone. Using a lower volume
setting on the rear seat controller can cause static
noise in the wireless headphone.
The wireless headphone audio signal originates
from the rear audio controls. This signal needs an
unobstructed path to the headphones to maintain
performance.
23
Power Button
Stop Button
Next Track/Chapter and Previous Track/ Chapter Button
Title Button
Enter Button
Display Button
Mode Button
Subtitle Button
Audio Button
Angle Button
Clear Button
Pause Button
Play Button
Fast Forward/Fast Reverse Button
Menu Button
Navigation Keys
Back Button
Numeric Keypad
10
09
01
08
18
17
07
16
03
02
04
05
06
07
15
14
08
13
12
09
1110
11
06
05
04
03
02
18
17
16
15
14
13
12
re Mote control
01
This easy-to-use Quick reference Guide is intended to help you more fully appreciate
some of the unique features and functions of your new Entertainment System. However,
it is not intended to replace your Owner’s Manual. The Owner’s Manual contains more
detailed information to help you better understand the important safety warning features,
operation and maintenance of your vehicle.
Page 36 of 36
This easy-to-use Quick Reference Guide is intended to help you more fully appreciate some of the unique features and functions of your new vehicle. However, it is not intended to replace your Owner’s Manual. The Owner’s Manual contains more detailed information to help you better understand the important safety warnings, features, operation, and maintenance of your vehicle.
QR8E-0R51U0 Printing: April 2007 (10)
Nissan, the Nissan Brand Symbol, “SHIF T_” tagline, Z and Nissan model names are Nissan trademarks. ©2007 Nissan Nor th America, Inc.
Sh ift_