AUX jack NISSAN PATHFINDER 2009 Owner´s Manual
[x] Cancel search | Manufacturer: NISSAN, Model Year: 2009, Model line: PATHFINDER, Model: NISSAN PATHFINDER 2009Pages: 471, PDF Size: 5.9 MB
Page 232 of 471
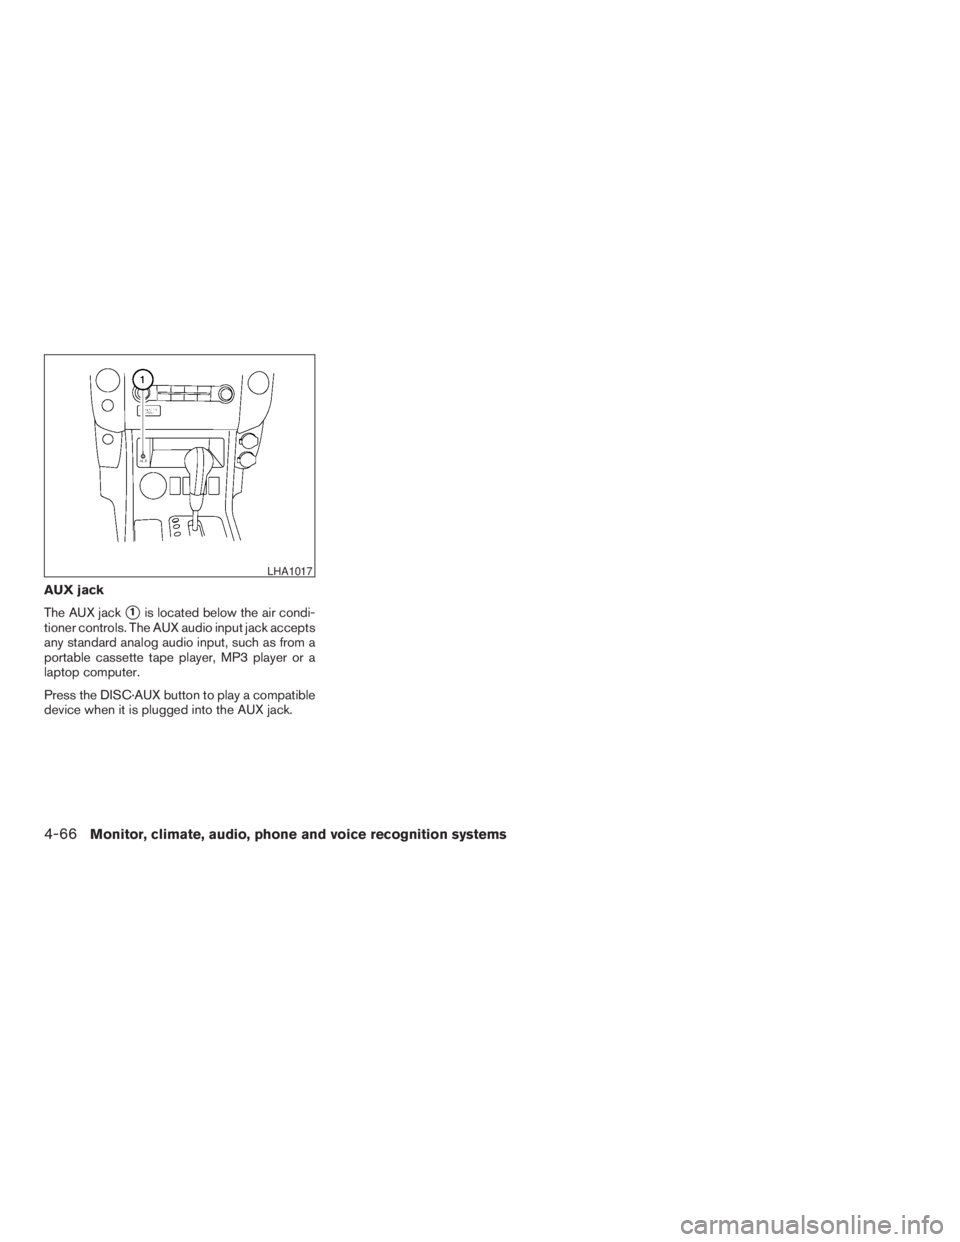
AUX jack
The AUX jack
s1is located below the air condi-
tioner controls. The AUX audio input jack accepts
any standard analog audio input, such as from a
portable cassette tape player, MP3 player or a
laptop computer.
Press the DISC·AUX button to play a compatible
device when it is plugged into the AUX jack.
LHA1017
4-66Monitor, climate, audio, phone and voice recognition systems
ZREVIEW COPYÐ2009 Pathfinder(pat)
Owners ManualÐUSA_English(nna)
05/29/08Ðdebbie
X
Page 239 of 471
(SPEAKER CONTROL) button:
Press the
button to turn the rear speakers
off and the headphones on. Press this button
again to turn rear seat speakers back on and the
headphones off.
CD EJECT button:
When the
button is pressed with the com-
pact disc loaded, the compact disc will be
ejected.
When
button is pressed while the com-
pact disc is being played, the compact disc will
eject and the system will turn off.
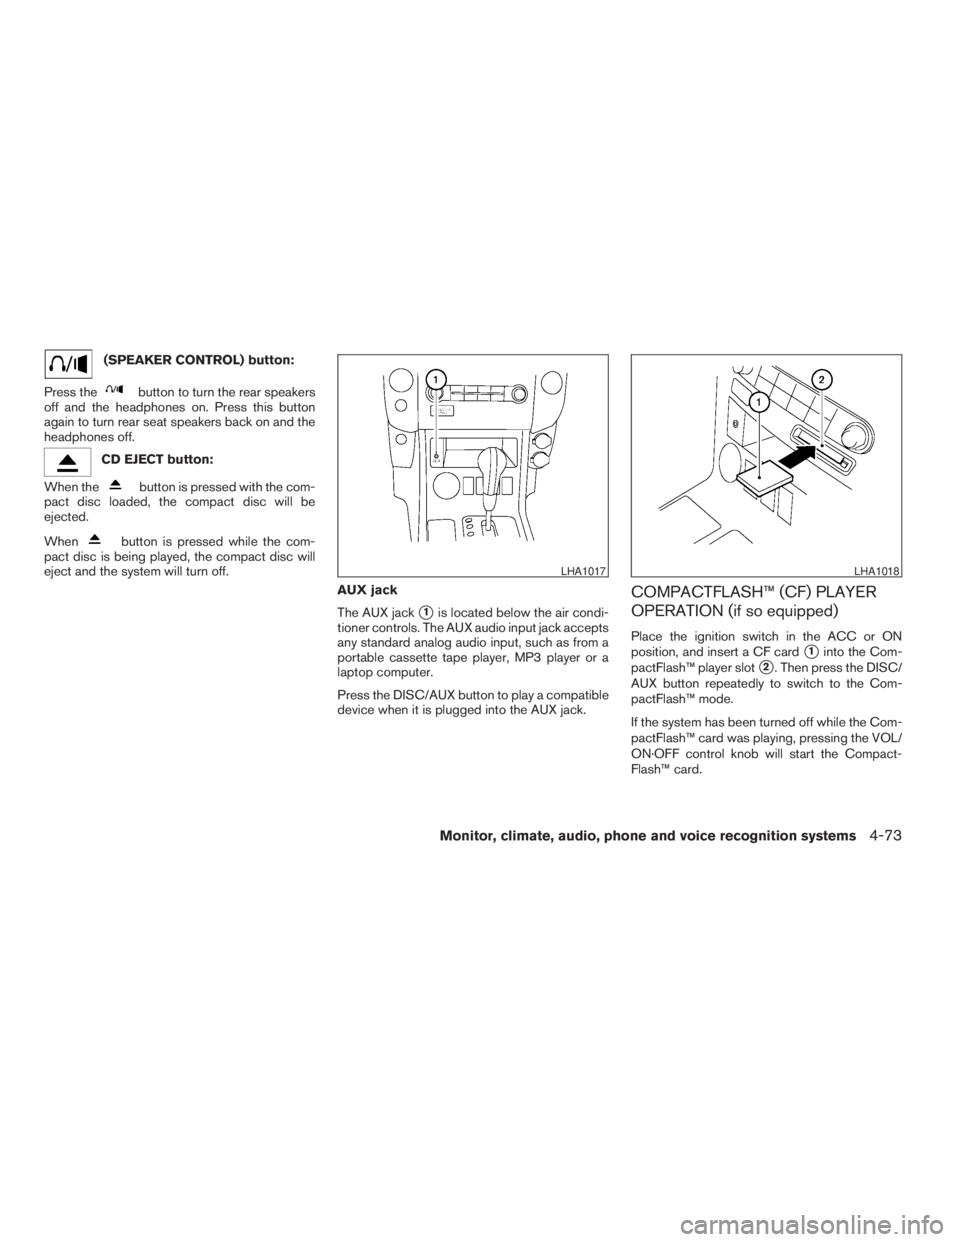
AUX jack
The AUX jack
s1is located below the air condi-
tioner controls. The AUX audio input jack accepts
any standard analog audio input, such as from a
portable cassette tape player, MP3 player or a
laptop computer.
Press the DISC/AUX button to play a compatible
device when it is plugged into the AUX jack.
COMPACTFLASH™ (CF) PLAYER
OPERATION (if so equipped)
Place the ignition switch in the ACC or ON
position, and insert a CF card
s1into the Com-
pactFlash™ player slot
s2. Then press the DISC/
AUX button repeatedly to switch to the Com-
pactFlash™ mode.
If the system has been turned off while the Com-
pactFlash™ card was playing, pressing the VOL/
ON·OFF control knob will start the Compact-
Flash™ card.
LHA1017LHA1018
Monitor, climate, audio, phone and voice recognition systems4-73
ZREVIEW COPYÐ2009 Pathfinder(pat)
Owners ManualÐUSA_English(nna)
05/29/08Ðdebbie
X
Page 252 of 471
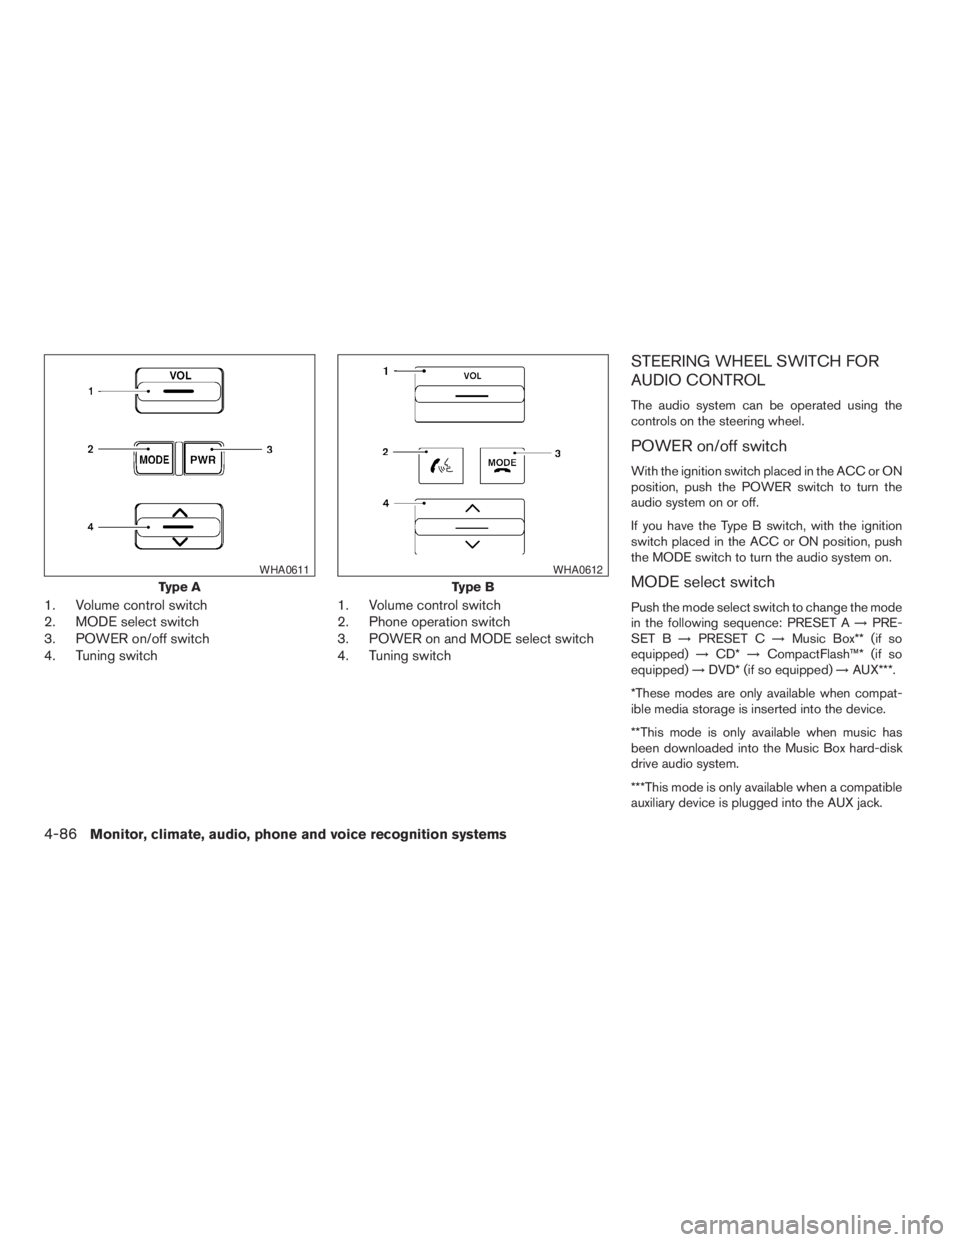
1. Volume control switch
2. MODE select switch
3. POWER on/off switch
4. Tuning switch1. Volume control switch
2. Phone operation switch
3. POWER on and MODE select switch
4. Tuning switch
STEERING WHEEL SWITCH FOR
AUDIO CONTROL
The audio system can be operated using the
controls on the steering wheel.
POWER on/off switch
With the ignition switch placed in the ACC or ON
position, push the POWER switch to turn the
audio system on or off.
If you have the Type B switch, with the ignition
switch placed in the ACC or ON position, push
the MODE switch to turn the audio system on.
MODE select switch
Push the mode select switch to change the mode
in the following sequence: PRESET A!PRE-
SET B!PRESET C!Music Box** (if so
equipped)!CD*!CompactFlash™* (if so
equipped)!DVD* (if so equipped)!AUX***.
*These modes are only available when compat-
ible media storage is inserted into the device.
**This mode is only available when music has
been downloaded into the Music Box hard-disk
drive audio system.
***This mode is only available when a compatible
auxiliary device is plugged into the AUX jack.
Type A
WHA0611
Type B
WHA0612
4-86Monitor, climate, audio, phone and voice recognition systems
ZREVIEW COPYÐ2009 Pathfinder(pat)
Owners ManualÐUSA_English(nna)
05/29/08Ðdebbie
X
Page 256 of 471
Movies will not be shown on the front display
while the vehicle is in any drive position to reduce
driver distraction. Audio is available when a movie
is played. To view movies in the front display, stop
the vehicle in a safe location, move the shift
selector lever to the P (Park) position and apply
the parking brake.
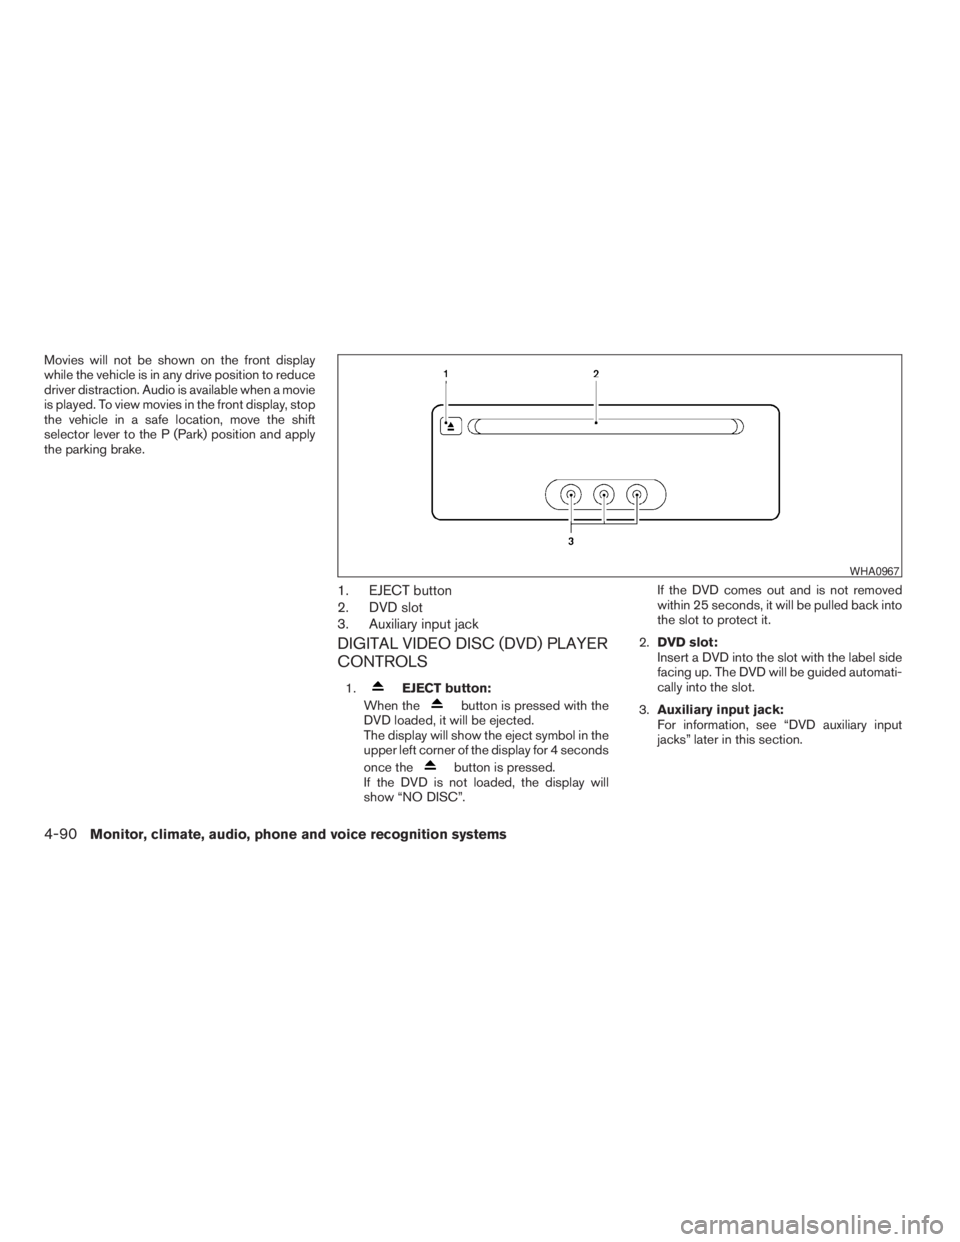
1. EJECT button
2. DVD slot
3. Auxiliary input jack
DIGITAL VIDEO DISC (DVD) PLAYER
CONTROLS
1.EJECT button:
When the
button is pressed with the
DVD loaded, it will be ejected.
The display will show the eject symbol in the
upper left corner of the display for 4 seconds
once the
button is pressed.
If the DVD is not loaded, the display will
show “NO DISC”.If the DVD comes out and is not removed
within 25 seconds, it will be pulled back into
the slot to protect it.
2.DVD slot:
Insert a DVD into the slot with the label side
facing up. The DVD will be guided automati-
cally into the slot.
3.Auxiliary input jack:
For information, see “DVD auxiliary input
jacks” later in this section.
WHA0967
4-90Monitor, climate, audio, phone and voice recognition systems
ZREVIEW COPYÐ2009 Pathfinder(pat)
Owners ManualÐUSA_English(nna)
05/29/08Ðdebbie
X
Page 263 of 471
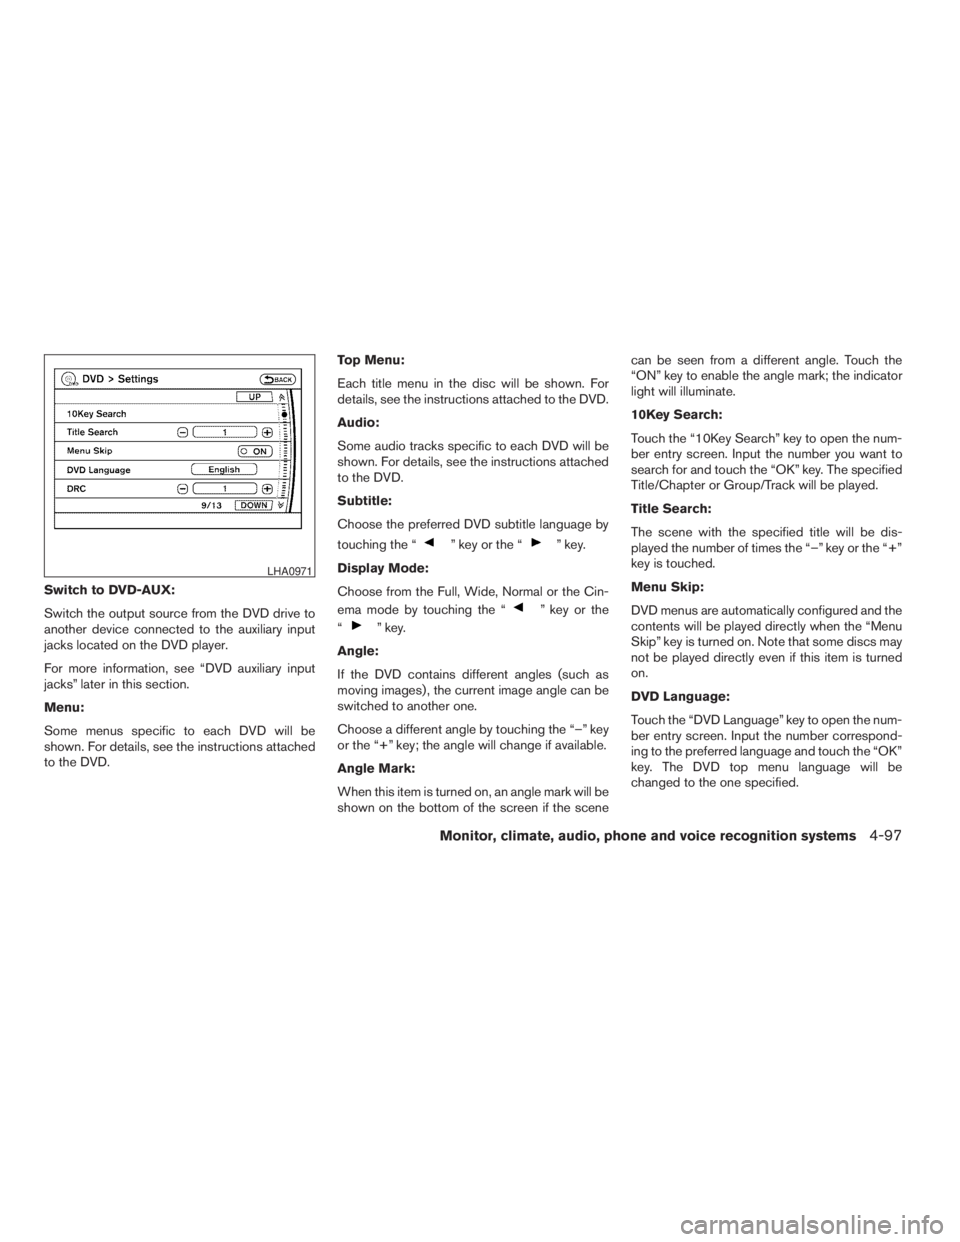
Switch to DVD-AUX:
Switch the output source from the DVD drive to
another device connected to the auxiliary input
jacks located on the DVD player.
For more information, see “DVD auxiliary input
jacks” later in this section.
Menu:
Some menus specific to each DVD will be
shown. For details, see the instructions attached
to the DVD.Top Menu:
Each title menu in the disc will be shown. For
details, see the instructions attached to the DVD.
Audio:
Some audio tracks specific to each DVD will be
shown. For details, see the instructions attached
to the DVD.
Subtitle:
Choose the preferred DVD subtitle language by
touching the “
” key or the “” key.
Display Mode:
Choose from the Full, Wide, Normal or the Cin-
ema mode by touching the “
” key or the
“
” key.
Angle:
If the DVD contains different angles (such as
moving images) , the current image angle can be
switched to another one.
Choose a different angle by touching the “–” key
or the “+” key; the angle will change if available.
Angle Mark:
When this item is turned on, an angle mark will be
shown on the bottom of the screen if the scenecan be seen from a different angle. Touch the
“ON” key to enable the angle mark; the indicator
light will illuminate.
10Key Search:
Touch the “10Key Search” key to open the num-
ber entry screen. Input the number you want to
search for and touch the “OK” key. The specified
Title/Chapter or Group/Track will be played.
Title Search:
The scene with the specified title will be dis-
played the number of times the “–” key or the “+”
key is touched.
Menu Skip:
DVD menus are automatically configured and the
contents will be played directly when the “Menu
Skip” key is turned on. Note that some discs may
not be played directly even if this item is turned
on.
DVD Language:
Touch the “DVD Language” key to open the num-
ber entry screen. Input the number correspond-
ing to the preferred language and touch the “OK”
key. The DVD top menu language will be
changed to the one specified.
LHA0971
Monitor, climate, audio, phone and voice recognition systems4-97
ZREVIEW COPYÐ2009 Pathfinder(pat)
Owners ManualÐUSA_English(nna)
05/29/08Ðdebbie
X
Page 264 of 471
DRC:
DRC (Dynamic Range Compression) allows you
to tune the dynamic range of the sound recorded
in the DolbyTDigital format. Touch the “–” key or
the “+” key to tune the DRC.
DVD auxiliary input jacks
The auxiliary input jacks are located on the front of
the DVD player which is located inside the center
console. NTSC and PAL compatible devices
such as video games, camcorders and portable
video players can be connected to the auxiliary
jacks.
The auxiliary jacks are color coded for identifica-
tion purposes.
cYellow - video input
cWhite - left channel audio input
cRed - right channel audio input
Before connecting a device to a jack, power off
the portable device and turn off the DVD player.
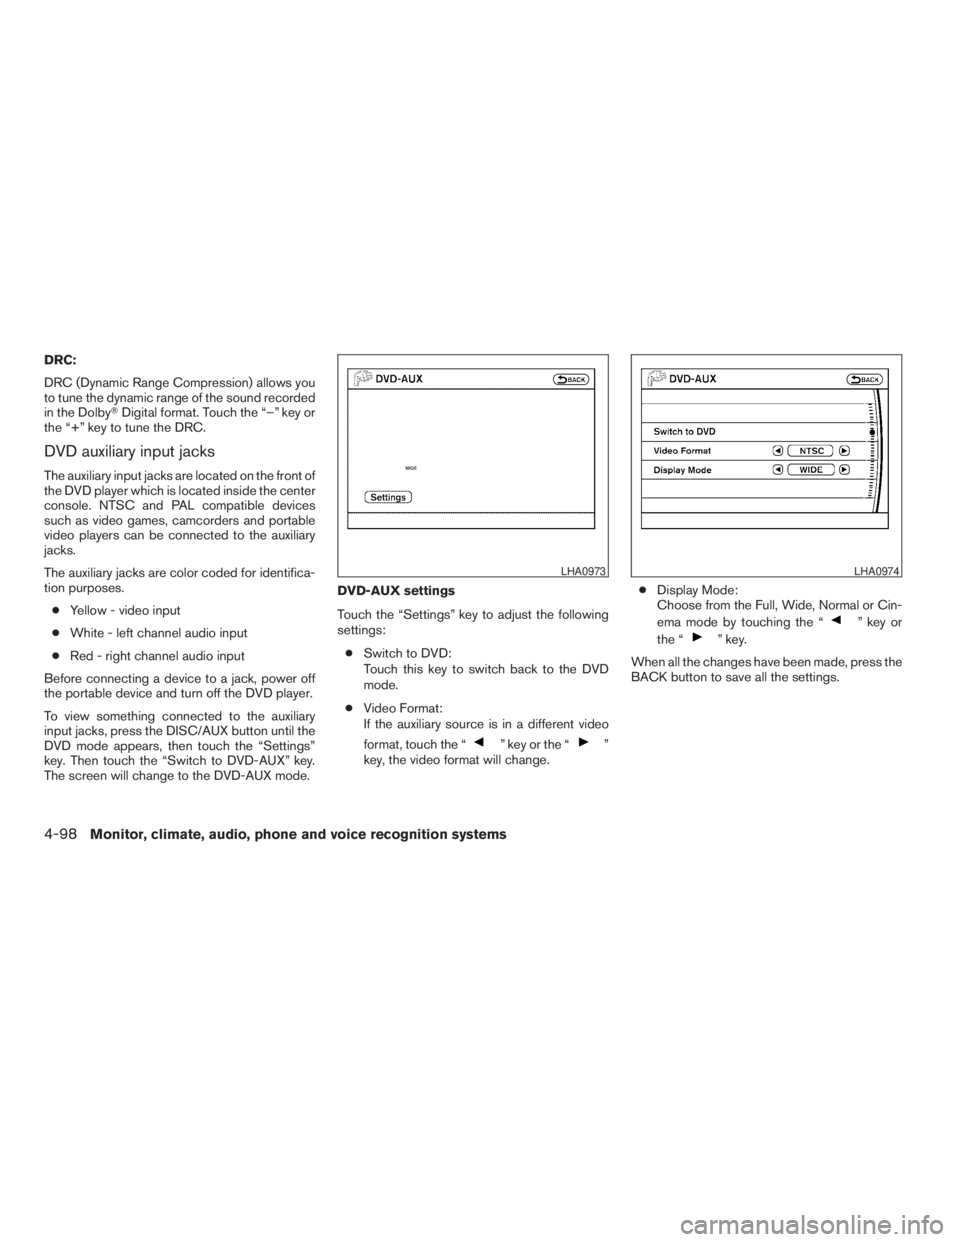
To view something connected to the auxiliary
input jacks, press the DISC/AUX button until the
DVD mode appears, then touch the “Settings”
key. Then touch the “Switch to DVD-AUX” key.
The screen will change to the DVD-AUX mode.DVD-AUX settings
Touch the “Settings” key to adjust the following
settings:
cSwitch to DVD:
Touch this key to switch back to the DVD
mode.
cVideo Format:
If the auxiliary source is in a different video
format, touch the “
” key or the “”
key, the video format will change.cDisplay Mode:
Choose from the Full, Wide, Normal or Cin-
ema mode by touching the “
” key or
the “
” key.
When all the changes have been made, press the
BACK button to save all the settings.
LHA0973LHA0974
4-98Monitor, climate, audio, phone and voice recognition systems
ZREVIEW COPYÐ2009 Pathfinder(pat)
Owners ManualÐUSA_English(nna)
05/30/08Ðbarbara
X
Page 265 of 471
REMOTE CONTROL OPERATION
For all operation precautions, see “Before oper-
ating the DVD Mobile Entertainment System”
earlier in this section.
The DVD system can also be controlled by using
the remote controller in the rear seats. See the
following items.
PWR on/off button:
With the ignition switch turned to the ACC or ON
position, press the PWR button to turn the DVD
rear display on or off.
NOTE:
The PWR button on the remote control only
turns the rear display on or off.
Insert the DVD into the slot with the label side
facing up. The DVD will be guided automatically
into the slot.
If the DVD player is off and a DVD is inserted, the
DVD player will automatically turn on.
CAUTION
Do not force the compact disc into the
slot. This could damage the player.MODE select button:
Press the MODE button to select Audio/Video
source between DVD and AUX input (input jacks
on the faceplate, Red = right channel audio input,
White = left channel audio input, and Yellow =
Video input) .
The display will show the “AUX” in the upper left
corner of the display for 4 seconds once the
Mode is changed to AUX.
To use the input jacks, refer to “Auxiliary input
jacks” in this section.
PLAY:
When the
PLAY button on the remote
control is pressed, the player will play.
In play mode, the display will briefly show
on the upper left corner of the display.
FF (Fast Forward) , REW
(Rewind):
Press
(fast forward) /(Rewind) but-
tons to carry out the fast forward or rewind pre-
sentation at 5 times normal play speed.
Press
(fast forward) /(Rewind) but-
tons again or PLAY button to resume the normal
play speed.
NEXT CHAPTER/
PREVIOUS CHAPTER:
When the
(NEXT CHAPTER) button is
pressed while the DVD is being played, the pro-
gram next to the present one will start to play from
its beginning. Press several times to skip through
programs. The DVD will advance the number of
times the button is pressed. When the
(PREVIOUS CHAPTER) button is pressed, the
program being played returns to its beginning.
Press several times to skip back through pro-
grams. The DVD will go back the number of times
the button is pressed.
PAUSE:
When the
PAUSE button on the remote
control is pressed, the player will pause playing of
the media. In pause mode, the player will
show
on the upper left corner of the dis-
play until the player is changed to another mode.
STOP:
Press the STOP button once to stop playing the
media. The display will show
in the upper
left corner of the display for 4 seconds, and the
last disc position will be stored. When the PLAY
button is pressed again, it will resume at the
stored disc track and time position.
Monitor, climate, audio, phone and voice recognition systems4-99
ZREVIEW COPYÐ2009 Pathfinder(pat)
Owners ManualÐUSA_English(nna)
05/30/08Ðbarbara
X
Page 463 of 471
10 Index
4WD warning light...............2-16
A
Active brake limited slip (ABLS) system
(if so equipped).................5-35
Active Head Restraint..............1-7
Adjusting pedal position............3-25
Air bag (See supplemental restraint
system).....................1-41
Air bag system
Front (See supplemental front impact
air bag system)...............1-49
Air bag warning labels.............1-56
Air bag warning light...........1-56, 2-19
Air cleaner housing filter............8-19
Air conditioner
Air conditioner operation..........4-40
Air conditioner service...........4-48
Air conditioner specification label.....9-11
Air conditioner system refrigerant and
oil recommendations.............9-6
Heater and air conditioner
controls................4-38, 4-45
Rear seat air conditioner..........4-47
Servicing air conditioner..........4-48
Air flow charts..................4-42
Alarm system
(See vehicle security system).........2-23
Anchor point locations.............1-24
Antenna.....................4-88Anti-lock brake warning light..........2-14
Anti-lock Braking System (ABS)........5-34
Audible reminders................2-22
Audio system..................4-48
Compact Disc (CD) changer.......4-63
Compact disc (CD) player.....4-57, 4-71
Audio System
CompactFlash (CF) player.........4-73
Audio system
FM/AM radio with compact disc (CD)
player....................4-55
FM/AM/SAT radio with compact disc (CD)
changer...................4-60
FM/AM/SAT radio with compact disc (CD)
player....................4-68
Audio System
Music Box hard-disk drive audio
system....................4-75
Audio system
Radio....................4-48
Rear audio controls.............4-87
Audio System
Settings................4-60, 4-68
Audio system
Steering wheel audio control switch. . . .4-86
Autolight switch.................2-29
Automatic
Automatic drive positioner.........3-30
Automatic power window switch.....2-50
Automatic transmission position indicator
light.....................2-19Driving with automatic transmission. . . .5-14
Transmission selector lever lock
release....................5-17
Automatic anti-glare inside mirror.......3-27
AUX jack.................4-66, 4-73
B
Battery......................8-15
Charge warning light............2-15
Before starting the engine...........5-13
Belt (See drive belt)..............8-18
Block heater
Engine....................5-41
BluetoothThands-free phone
system.................4-105, 4-120
Booster seats..................1-36
Brake
Anti-lock Braking System (ABS)......5-34
Brake fluid..................8-14
Brake light (See stop light).........8-32
Brake system................5-33
Brake warning light.............2-15
Brake wear indicators........2-22, 8-24
Parking brake operation..........5-19
Self-adjusting brakes............8-24
Brakes......................8-24
Break-in schedule................5-21
Brightness control
Instrument panel..............2-31
Brightness/contrast button.......4-18, 4-34
ZREVIEW COPYÐ2009 Pathfinder(pat)
Owners ManualÐUSA_English(nna)
06/13/08Ðdebbie
X