oil dipstick NISSAN PATHFINDER 2010 Owner´s Manual
[x] Cancel search | Manufacturer: NISSAN, Model Year: 2010, Model line: PATHFINDER, Model: NISSAN PATHFINDER 2010Pages: 463, PDF Size: 5.69 MB
Page 14 of 463
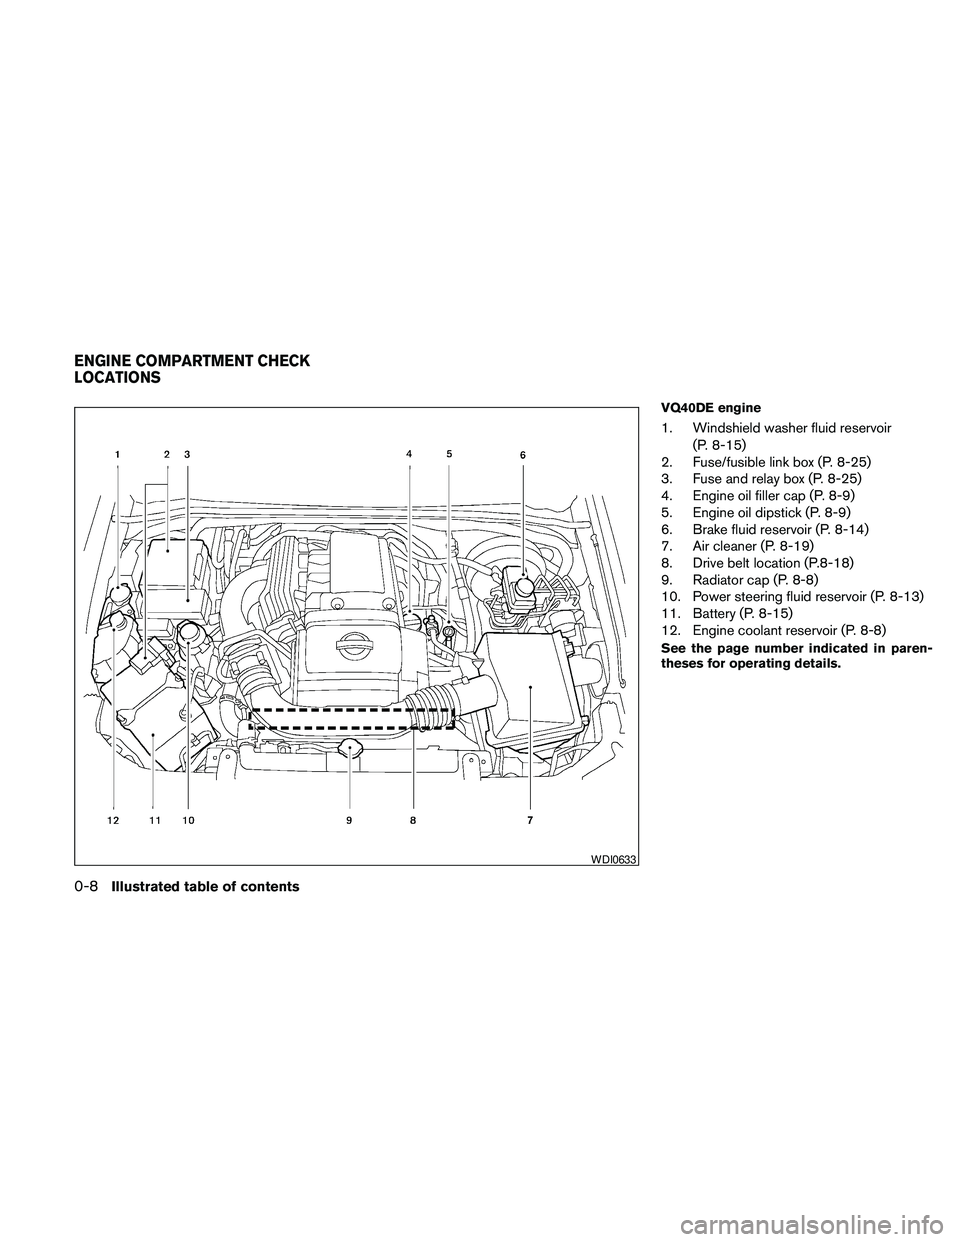
VQ40DE engine
1. Windshield washer fluid reservoir
(P. 8-15)
2. Fuse/fusible link box (P. 8-25)
3. Fuse and relay box (P. 8-25)
4. Engine oil filler cap (P. 8-9)
5. Engine oil dipstick (P. 8-9)
6. Brake fluid reservoir (P. 8-14)
7. Air cleaner (P. 8-19)
8. Drive belt location (P.8-18)
9. Radiator cap (P. 8-8)
10. Power steering fluid reservoir (P. 8-13)
11. Battery (P. 8-15)
12. Engine coolant reservoir (P. 8-8)
See the page number indicated in paren-
theses for operating details.
WDI0633
ENGINE COMPARTMENT CHECK
LOCATIONS
0-8Illustrated table of contents
Page 15 of 463
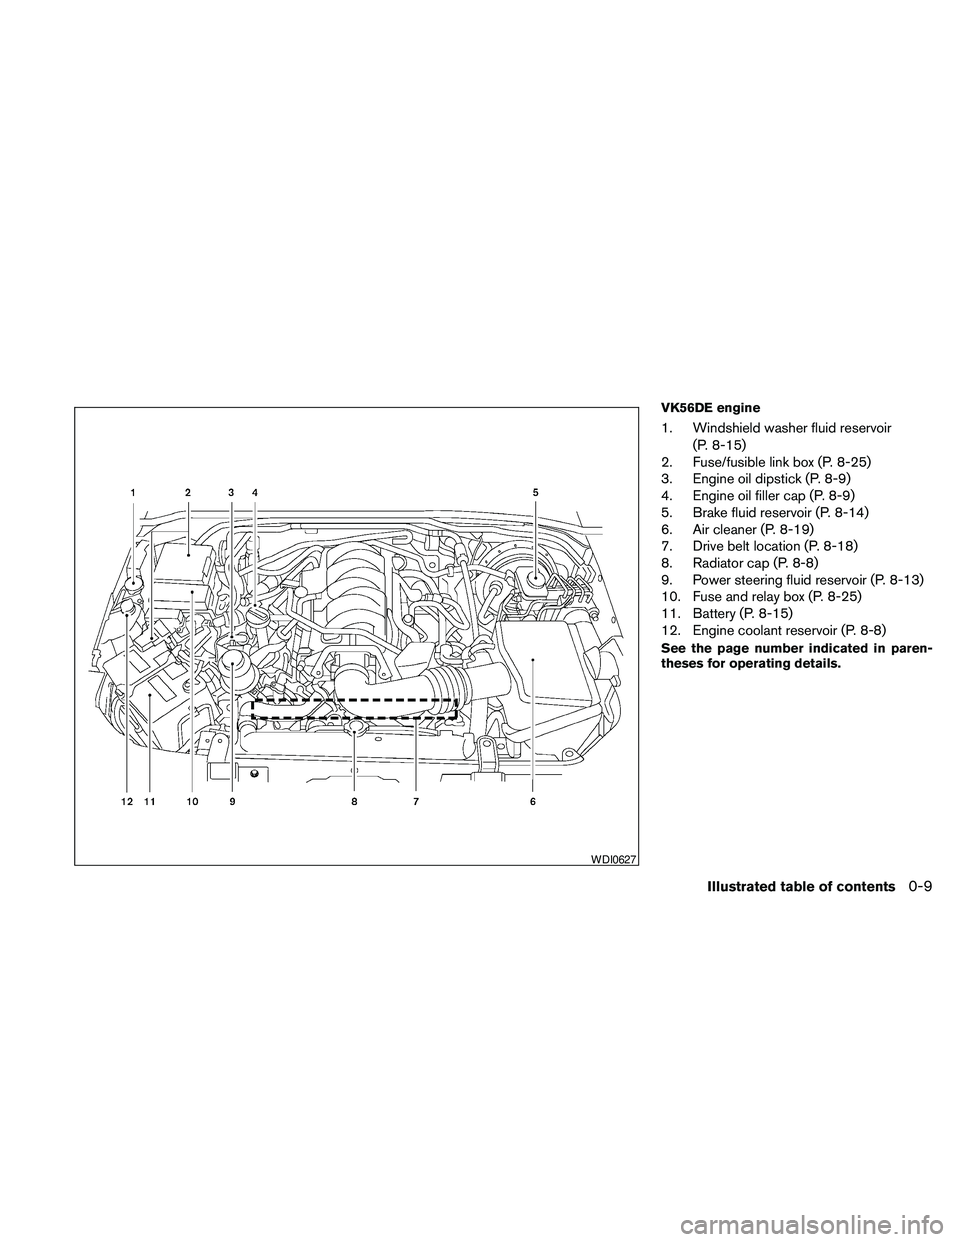
VK56DE engine
1. Windshield washer fluid reservoir
(P. 8-15)
2. Fuse/fusible link box (P. 8-25)
3. Engine oil dipstick (P. 8-9)
4. Engine oil filler cap (P. 8-9)
5. Brake fluid reservoir (P. 8-14)
6. Air cleaner (P. 8-19)
7. Drive belt location (P. 8-18)
8. Radiator cap (P. 8-8)
9. Power steering fluid reservoir (P. 8-13)
10. Fuse and relay box (P. 8-25)
11. Battery (P. 8-15)
12. Engine coolant reservoir (P. 8-8)
See the page number indicated in paren-
theses for operating details.
WDI0627
Illustrated table of contents0-9
Page 88 of 463
CAUTION
cThis gauge is not designed to indicate
low engine oil level. Use the dipstick to
check the oil level. (See “Engine oil” in
the “Maintenance and do-it-yourself”
section.)
cIf the gauge needle does not move with
the proper amount of engine oil, have
the vehicle checked by a NISSAN
dealer. Continued vehicle operation in
such a condition could cause serious
damage to the engine.
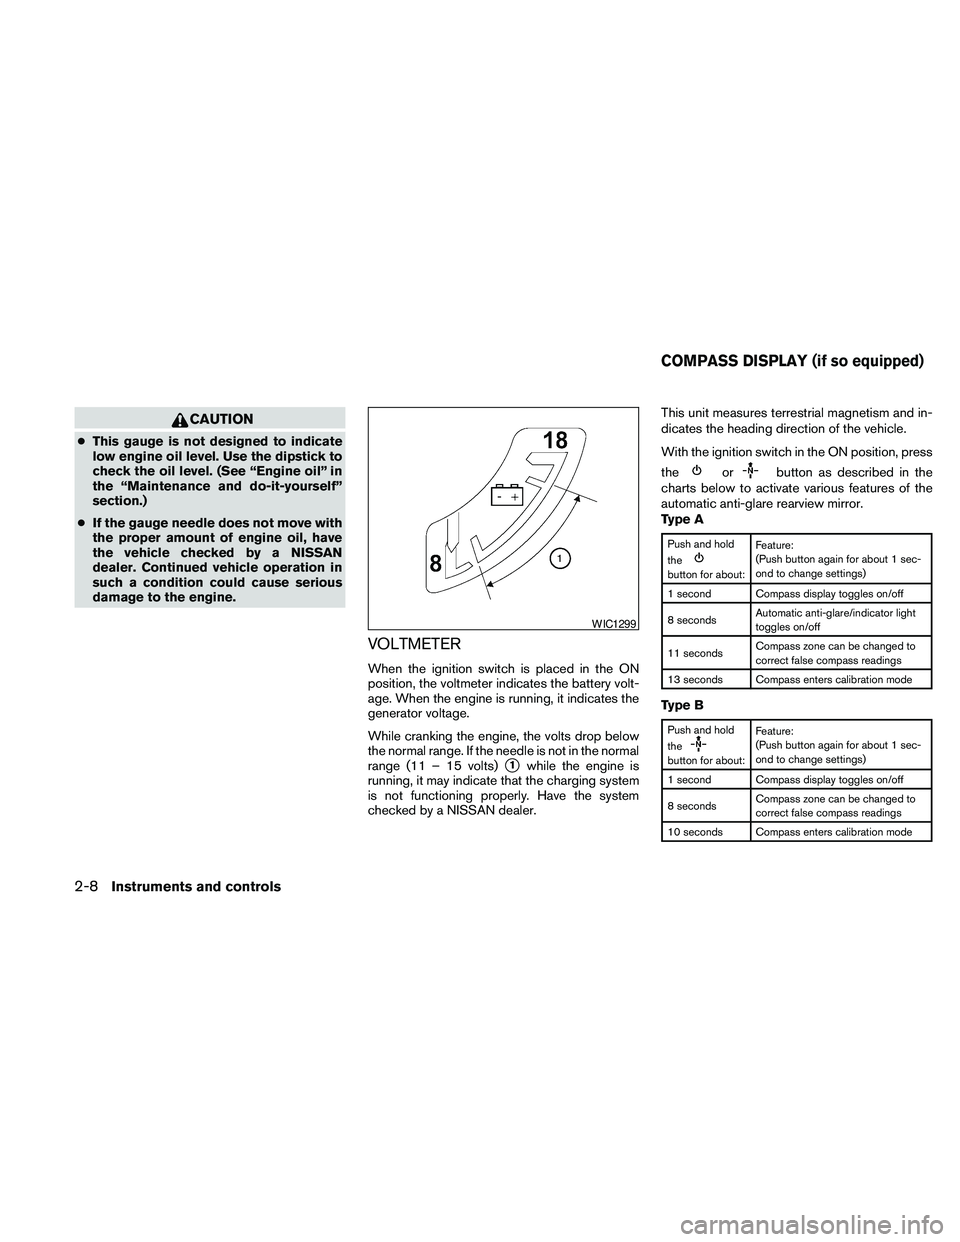
VOLTMETER
When the ignition switch is placed in the ON
position, the voltmeter indicates the battery volt-
age. When the engine is running, it indicates the
generator voltage.
While cranking the engine, the volts drop below
the normal range. If the needle is not in the normal
range (11 – 15 volts)
s1while the engine is
running, it may indicate that the charging system
is not functioning properly. Have the system
checked by a NISSAN dealer.This unit measures terrestrial magnetism and in-
dicates the heading direction of the vehicle.
With the ignition switch in the ON position, press
the
orbutton as described in the
charts below to activate various features of the
automatic anti-glare rearview mirror.
Type A
Push and hold
the
button for about:Feature:
(Push button again for about 1 sec-
ond to change settings)
1 second Compass display toggles on/off
8 secondsAutomatic anti-glare/indicator light
toggles on/off
11 secondsCompass zone can be changed to
correct false compass readings
13 seconds Compass enters calibration mode
Type B
Push and hold
the
button for about:Feature:
(Push button again for about 1 sec-
ond to change settings)
1 second Compass display toggles on/off
8 secondsCompass zone can be changed to
correct false compass readings
10 seconds Compass enters calibration mode
WIC1299
COMPASS DISPLAY (if so equipped)
2-8Instruments and controls
Page 95 of 463
CAUTION
cDo not ground electrical accessories
directly to the battery terminal. Doing
so will bypass the variable control sys-
tem and the vehicle battery may not
charge completely. Refer to “Variable
voltage control system” in the “Mainte-
nance and do-it-yourself” section later
in this manual.
cDo not continue driving if the generator
belt is loose, broken or missing.
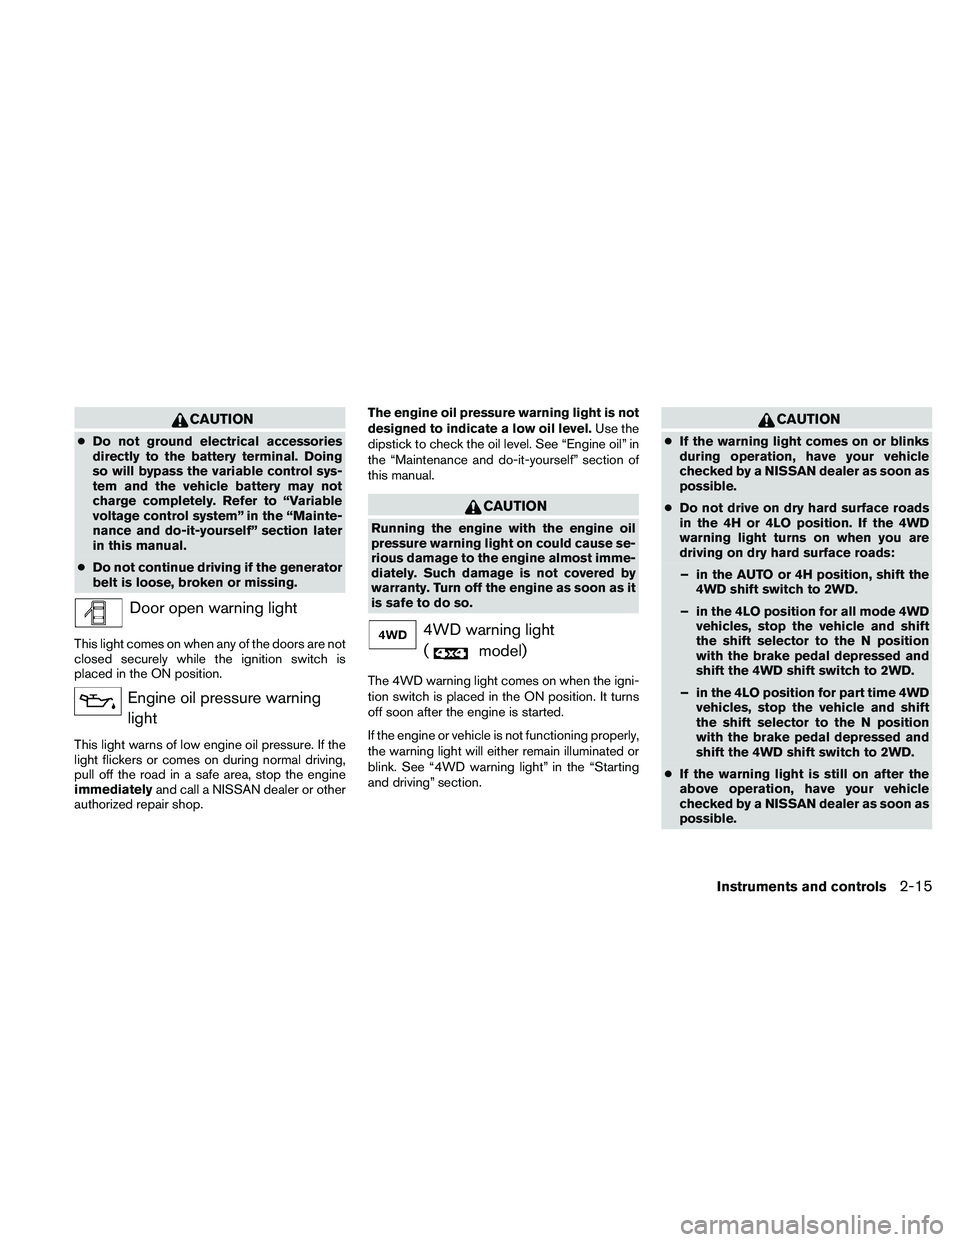
Door open warning light
This light comes on when any of the doors are not
closed securely while the ignition switch is
placed in the ON position.
Engine oil pressure warning
light
This light warns of low engine oil pressure. If the
light flickers or comes on during normal driving,
pull off the road in a safe area, stop the engine
immediatelyand call a NISSAN dealer or other
authorized repair shop.The engine oil pressure warning light is not
designed to indicate a low oil level.Use the
dipstick to check the oil level. See “Engine oil” in
the “Maintenance and do-it-yourself” section of
this manual.
CAUTION
Running the engine with the engine oil
pressure warning light on could cause se-
rious damage to the engine almost imme-
diately. Such damage is not covered by
warranty. Turn off the engine as soon as it
is safe to do so.
4WD warning light
(
model)
The 4WD warning light comes on when the igni-
tion switch is placed in the ON position. It turns
off soon after the engine is started.
If the engine or vehicle is not functioning properly,
the warning light will either remain illuminated or
blink. See “4WD warning light” in the “Starting
and driving” section.
CAUTION
cIf the warning light comes on or blinks
during operation, have your vehicle
checked by a NISSAN dealer as soon as
possible.
cDo not drive on dry hard surface roads
in the 4H or 4LO position. If the 4WD
warning light turns on when you are
driving on dry hard surface roads:
– in the AUTO or 4H position, shift the
4WD shift switch to 2WD.
– in the 4LO position for all mode 4WD
vehicles, stop the vehicle and shift
the shift selector to the N position
with the brake pedal depressed and
shift the 4WD shift switch to 2WD.
– in the 4LO position for part time 4WD
vehicles, stop the vehicle and shift
the shift selector to the N position
with the brake pedal depressed and
shift the 4WD shift switch to 2WD.
cIf the warning light is still on after the
above operation, have your vehicle
checked by a NISSAN dealer as soon as
possible.
Instruments and controls2-15
Page 382 of 463
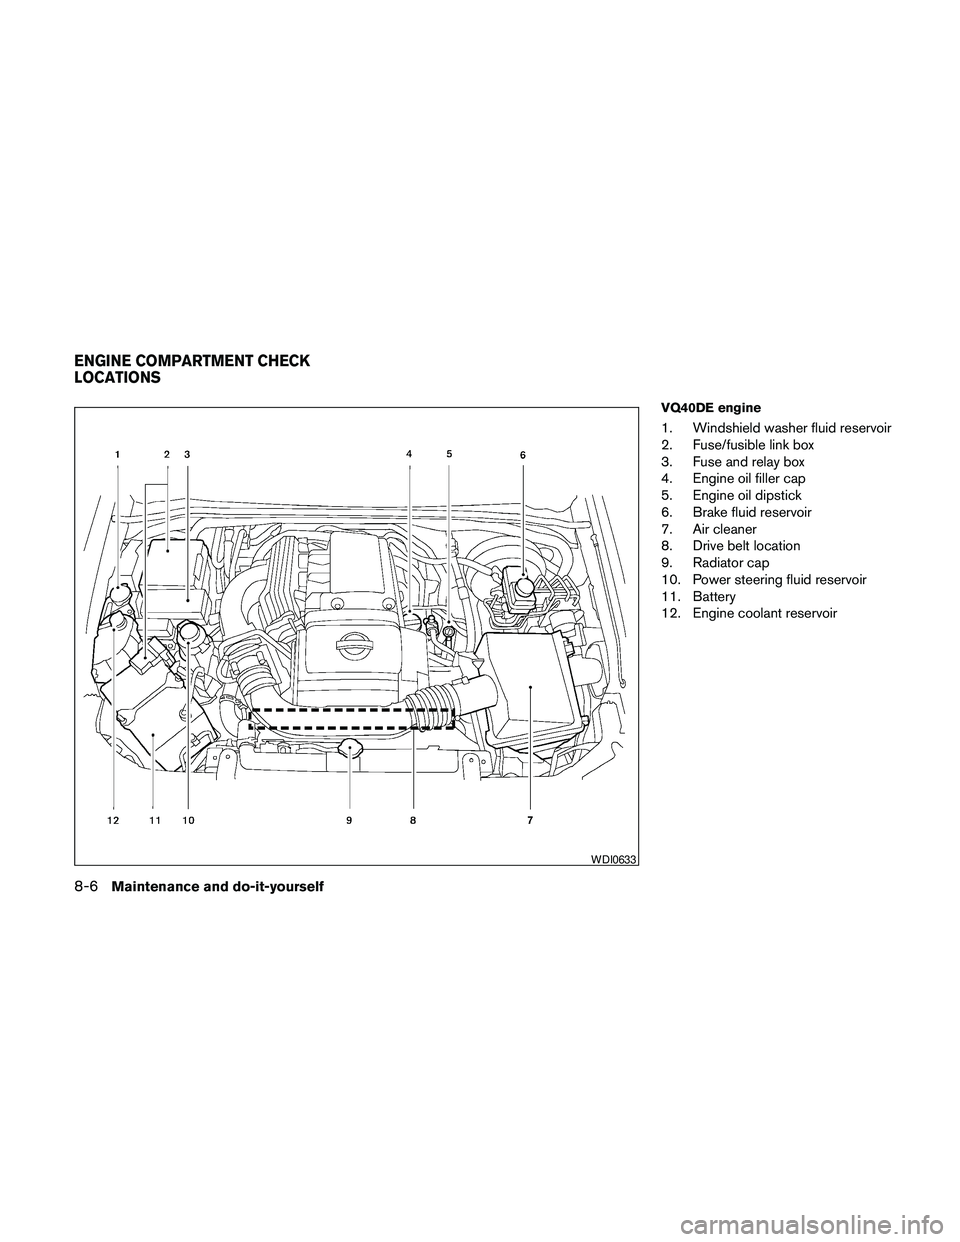
VQ40DE engine
1. Windshield washer fluid reservoir
2. Fuse/fusible link box
3. Fuse and relay box
4. Engine oil filler cap
5. Engine oil dipstick
6. Brake fluid reservoir
7. Air cleaner
8. Drive belt location
9. Radiator cap
10. Power steering fluid reservoir
11. Battery
12. Engine coolant reservoir
WDI0633
ENGINE COMPARTMENT CHECK
LOCATIONS
8-6Maintenance and do-it-yourself
Page 383 of 463
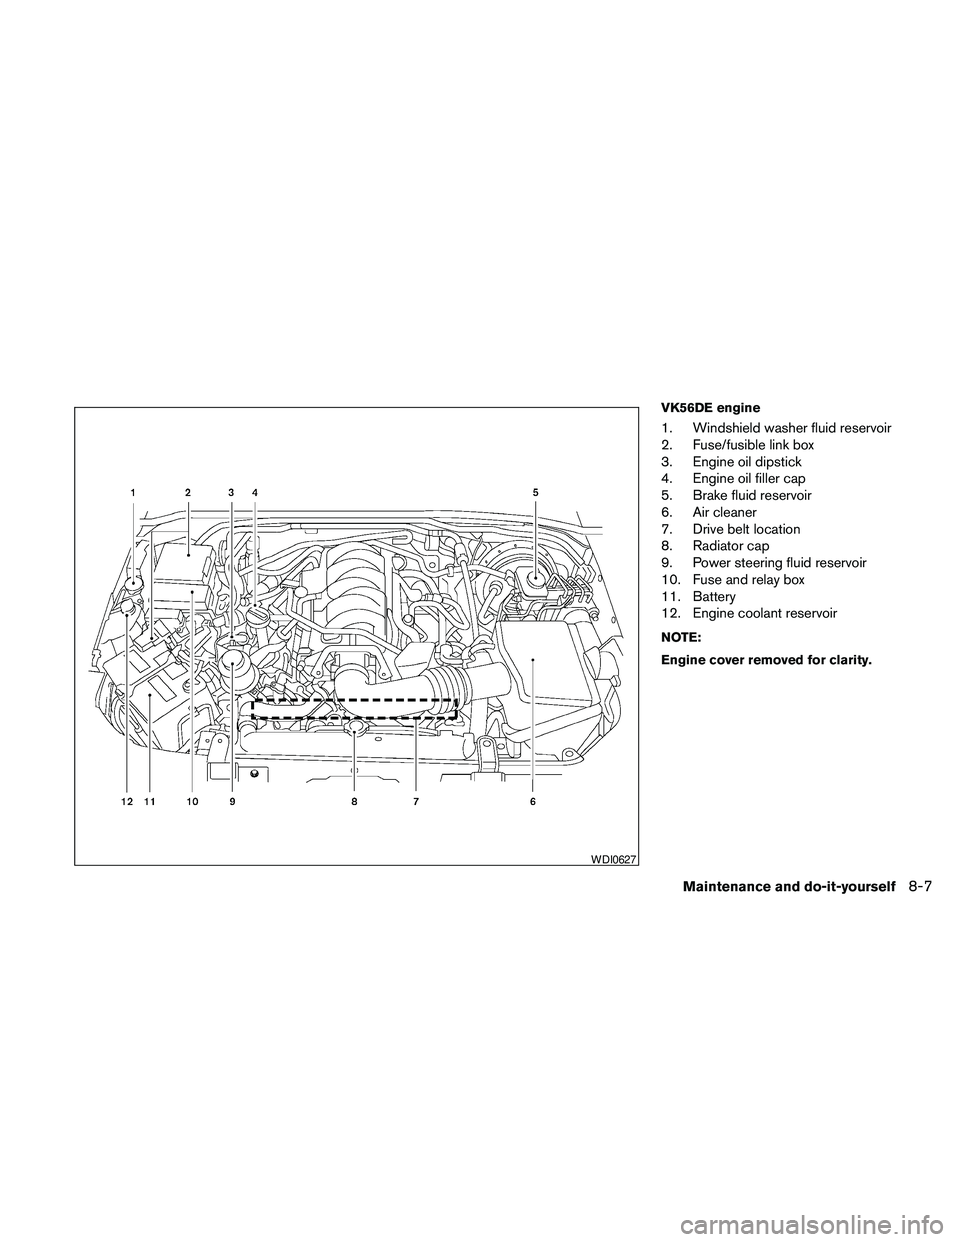
VK56DE engine
1. Windshield washer fluid reservoir
2. Fuse/fusible link box
3. Engine oil dipstick
4. Engine oil filler cap
5. Brake fluid reservoir
6. Air cleaner
7. Drive belt location
8. Radiator cap
9. Power steering fluid reservoir
10. Fuse and relay box
11. Battery
12. Engine coolant reservoir
NOTE:
Engine cover removed for clarity.
WDI0627
Maintenance and do-it-yourself8-7
Page 385 of 463
If the cooling system frequently requires
coolant, have it checked by a NISSAN
dealer.
CHANGING ENGINE COOLANT
A NISSAN dealer can change the engine coolant.
The service procedure can be found in the
NISSAN Service Manual.
Improper servicing can result in reduced
heater performance and engine overheat-
ing.
WARNING
cTo avoid the danger of being scalded,
never change the coolant when the en-
gine is hot.
cNever remove the radiator cap when the
engine is hot. Serious burns could be
caused by high pressure fluid escaping
from the radiator.
cAvoid direct skin contact with used
coolant. If skin contact is made, wash
thoroughly with soap or hand cleaner
as soon as possible.
cKeep coolant out of the reach of chil-
dren and pets.
Engine coolant must be disposed of properly.
Check your local regulations.
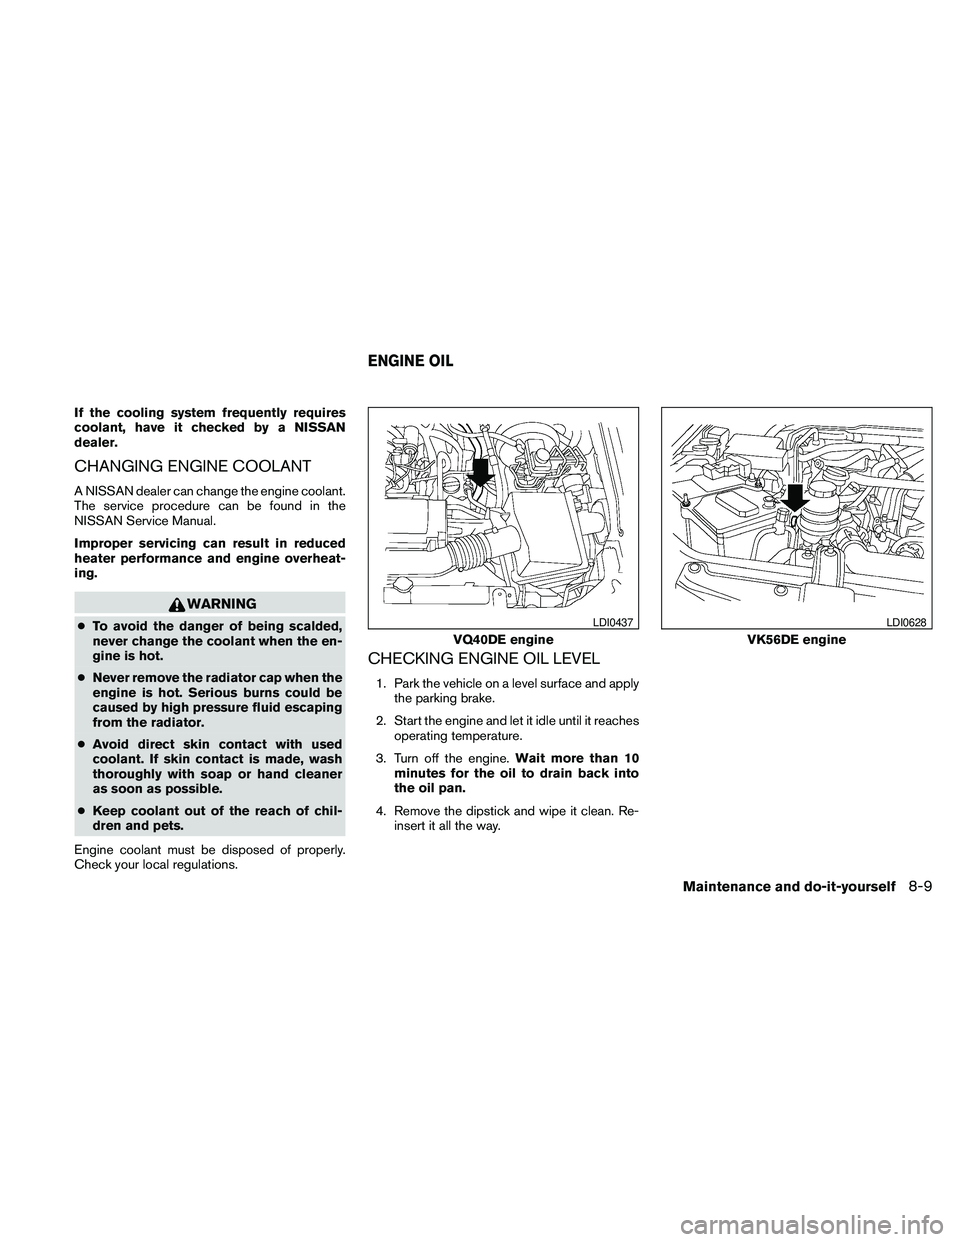
CHECKING ENGINE OIL LEVEL
1. Park the vehicle on a level surface and apply
the parking brake.
2. Start the engine and let it idle until it reaches
operating temperature.
3. Turn off the engine.Wait more than 10
minutes for the oil to drain back into
the oil pan.
4. Remove the dipstick and wipe it clean. Re-
insert it all the way.
VQ40DE engine
LDI0437
VK56DE engine
LDI0628
ENGINE OIL
Maintenance and do-it-yourself8-9
Page 386 of 463
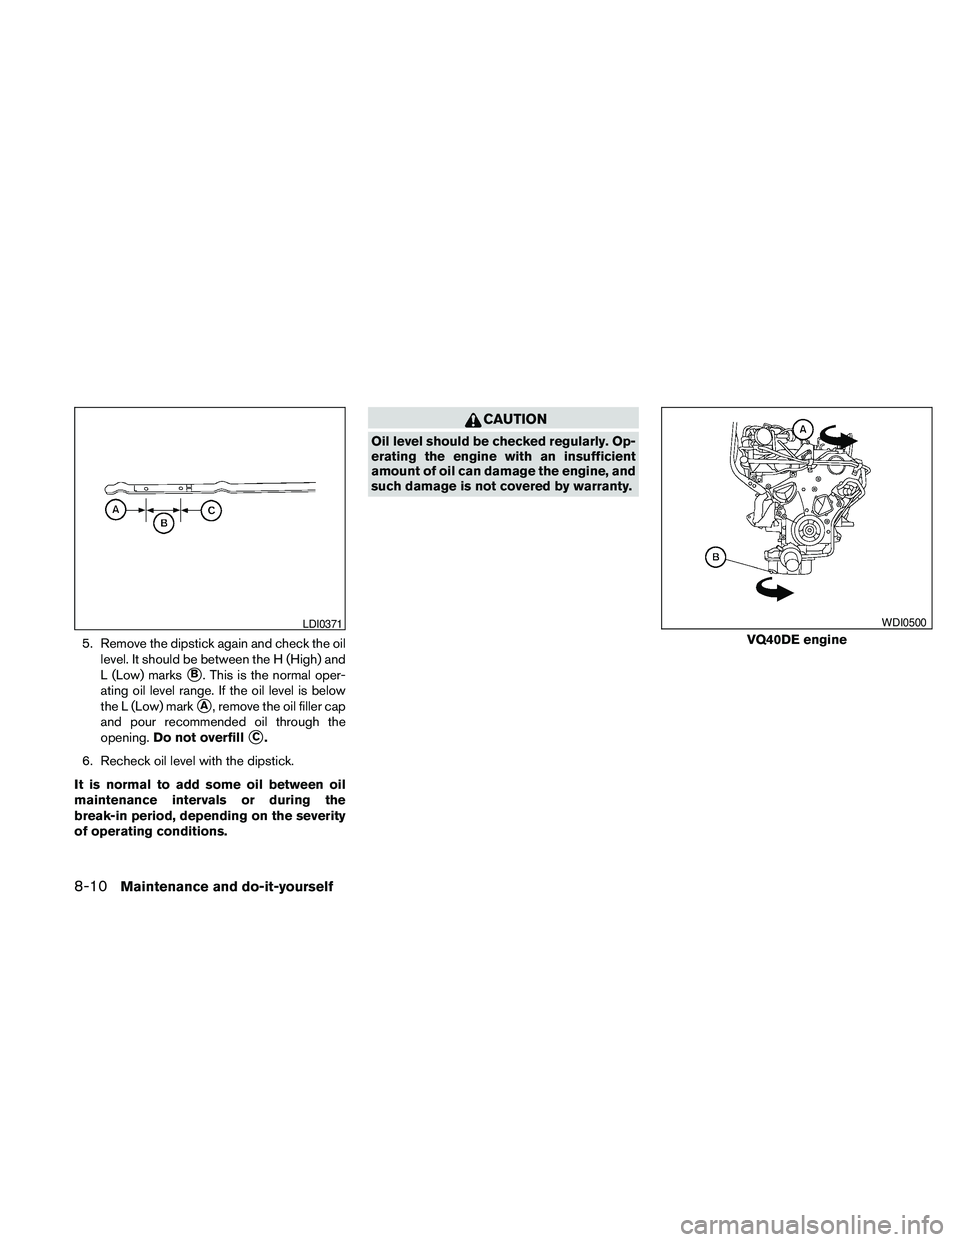
5. Remove the dipstick again and check the oil
level. It should be between the H (High) and
L (Low) marks
sB. This is the normal oper-
ating oil level range. If the oil level is below
the L (Low) mark
sA, remove the oil filler cap
and pour recommended oil through the
opening.Do not overfill
sC.
6. Recheck oil level with the dipstick.
It is normal to add some oil between oil
maintenance intervals or during the
break-in period, depending on the severity
of operating conditions.
CAUTION
Oil level should be checked regularly. Op-
erating the engine with an insufficient
amount of oil can damage the engine, and
such damage is not covered by warranty.
LDI0371
VQ40DE engine
WDI0500
8-10Maintenance and do-it-yourself
Page 387 of 463
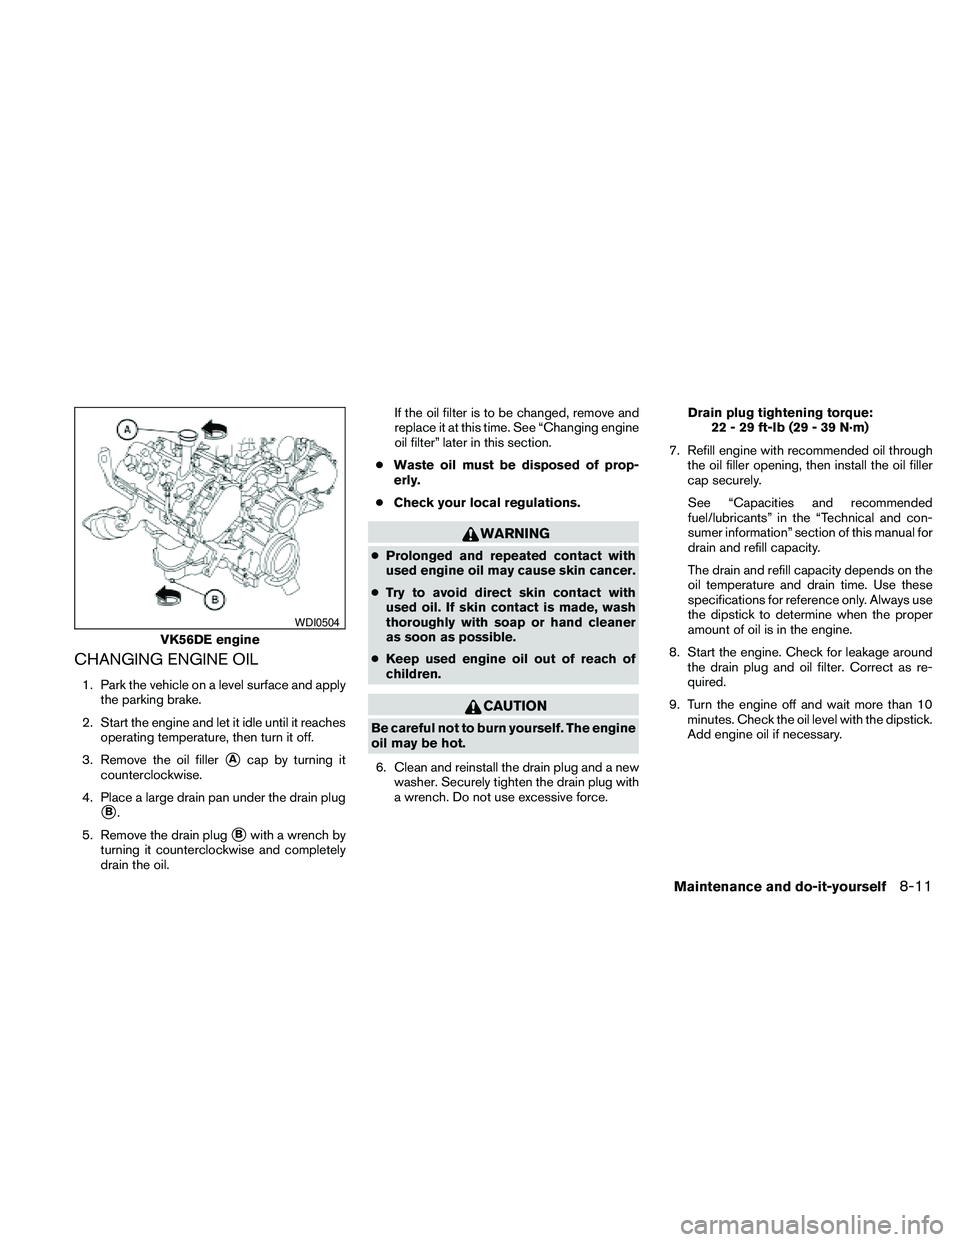
CHANGING ENGINE OIL
1. Park the vehicle on a level surface and apply
the parking brake.
2. Start the engine and let it idle until it reaches
operating temperature, then turn it off.
3. Remove the oil filler
sAcap by turning it
counterclockwise.
4. Place a large drain pan under the drain plug
sB.
5. Remove the drain plug
sBwith a wrench by
turning it counterclockwise and completely
drain the oil.If the oil filter is to be changed, remove and
replace it at this time. See “Changing engine
oil filter” later in this section.
cWaste oil must be disposed of prop-
erly.
cCheck your local regulations.
WARNING
cProlonged and repeated contact with
used engine oil may cause skin cancer.
cTry to avoid direct skin contact with
used oil. If skin contact is made, wash
thoroughly with soap or hand cleaner
as soon as possible.
cKeep used engine oil out of reach of
children.
CAUTION
Be careful not to burn yourself. The engine
oil may be hot.
6. Clean and reinstall the drain plug and a new
washer. Securely tighten the drain plug with
a wrench. Do not use excessive force.Drain plug tightening torque:
22 - 29 ft-lb (29 - 39 N·m)
7. Refill engine with recommended oil through
the oil filler opening, then install the oil filler
cap securely.
See “Capacities and recommended
fuel/lubricants” in the “Technical and con-
sumer information” section of this manual for
drain and refill capacity.
The drain and refill capacity depends on the
oil temperature and drain time. Use these
specifications for reference only. Always use
the dipstick to determine when the proper
amount of oil is in the engine.
8. Start the engine. Check for leakage around
the drain plug and oil filter. Correct as re-
quired.
9. Turn the engine off and wait more than 10
minutes. Check the oil level with the dipstick.
Add engine oil if necessary.
VK56DE engine
WDI0504
Maintenance and do-it-yourself8-11