alarm NISSAN PATHFINDER 2019 Owner´s Manual
[x] Cancel search | Manufacturer: NISSAN, Model Year: 2019, Model line: PATHFINDER, Model: NISSAN PATHFINDER 2019Pages: 476, PDF Size: 5.61 MB
Page 117 of 476
To control what items display in the vehicle
information display, refer to “Main menu se-
lection” in this section.
RESETTING THE TRIP COMPUTER
1. Press thebutton until you reach
the trip computer mode.
2. Press the
button again for more
than 1.5 seconds to reset average fuel
consumption, average speed, distance
to empty, and journey time.
SETTINGS
The setting mode allows you to change the
information displayed in the vehicle infor-
mation display:
∙ Driver Assistance (if so equipped)
∙ Vehicle Settings
∙ Main Menu Selection
∙ Body Color
∙ Maintenance ∙ Alarms
∙ Language
∙ Unit
∙ Welcome Effect
∙ Factory Reset
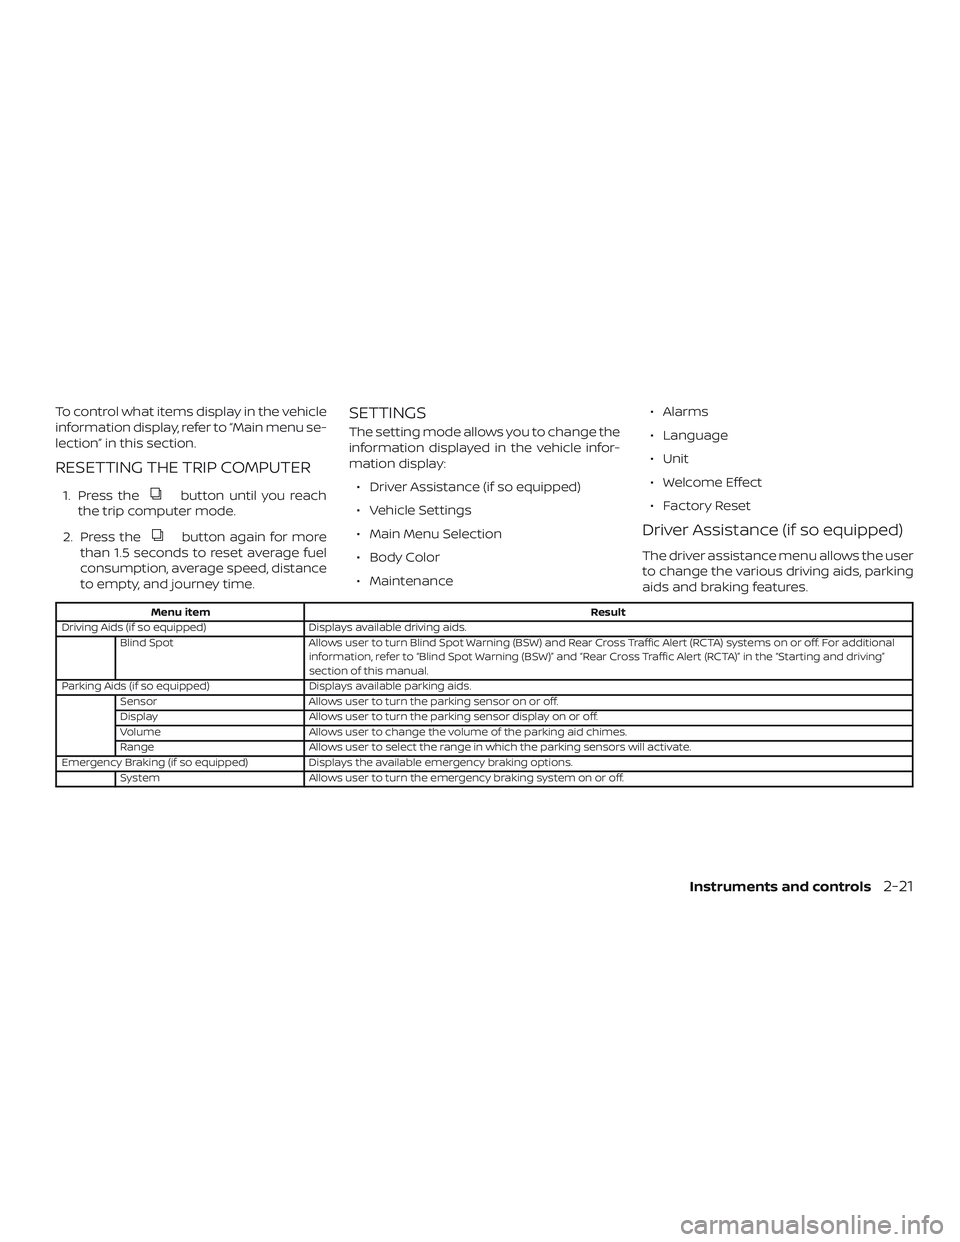
Driver Assistance (if so equipped)
The driver assistance menu allows the user
to change the various driving aids, parking
aids and braking features.
Menu item
Result
Driving Aids (if so equipped) Displays available driving aids.
Blind Spot Allows user to turn Blind Spot Warning (BSW) and Rear Cross Traffic Alert (RCTA) systems on or off. For additional
information, refer to “Blind Spot Warning (BSW)” and “Rear Cross Traffic Alert (RCTA)” in the “Starting and driving”
section of this manual.
Parking Aids (if so equipped) Displays available parking aids.
Sensor Allows user to turn the parking sensor on or off.
Display Allows user to turn the parking sensor display on or off.
Volume Allows user to change the volume of the parking aid chimes.
Range Allows user to select the range in which the parking sensors will activate.
Emergency Braking (if so equipped) Displays the available emergency braking options.
System Allows user to turn the emergency braking system on or off.
Instruments and controls2-21
Page 121 of 476
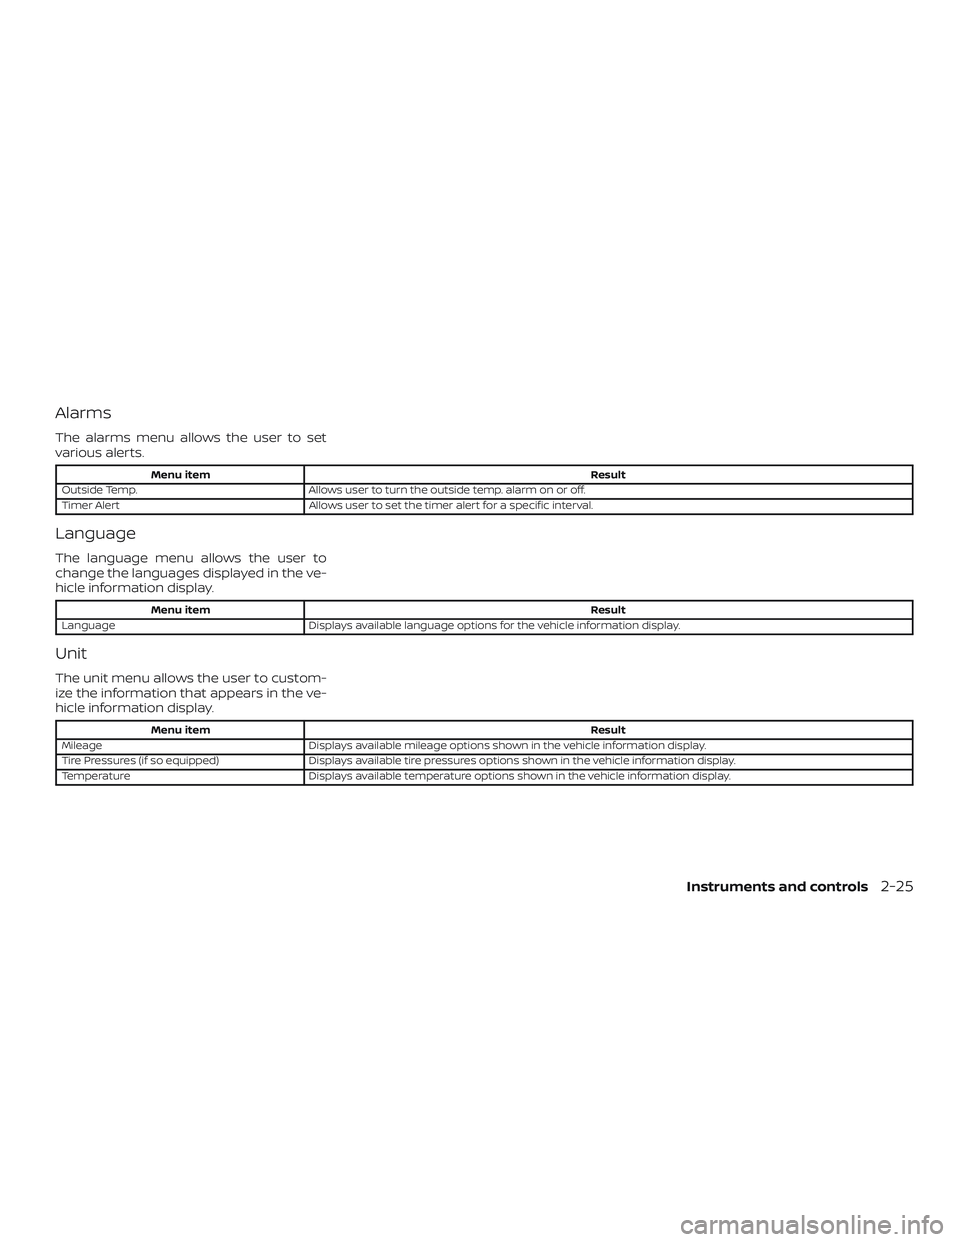
Alarms
The alarms menu allows the user to set
various alerts.
Menu itemResult
Outside Temp. Allows user to turn the outside temp. alarm on or off.
Timer Alert Allows user to set the timer alert for a specific interval.
Language
The language menu allows the user to
change the languages displayed in the ve-
hicle information display.
Menu item Result
Language Displays available language options for the vehicle information display.
Unit
The unit menu allows the user to custom-
ize the information that appears in the ve-
hicle information display.
Menu item Result
Mileage Displays available mileage options shown in the vehicle information display.
Tire Pressures (if so equipped) Displays available tire pressures options shown in the vehicle information display.
Temperature Displays available temperature options shown in the vehicle information display.
Instruments and controls2-25
Page 129 of 476
NOTE:
This system is disabled until a driver en-
ables it using the vehicle information
display. For additional information, refer
to “How to use the vehicle information
display ” in this section.
For additional information, refer to “Rear
Door Alert” in this section.
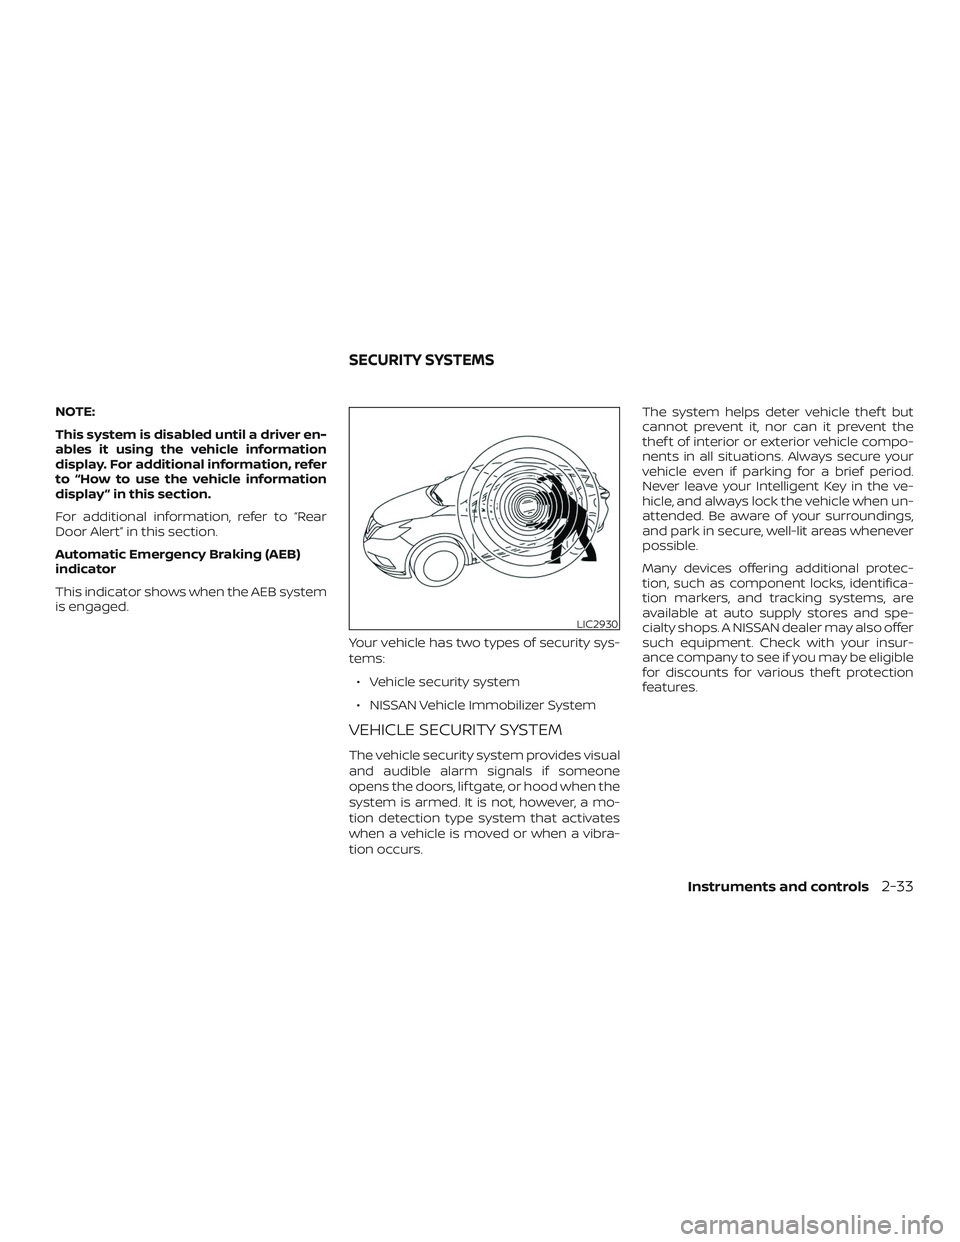
Automatic Emergency Braking (AEB)
indicator
This indicator shows when the AEB system
is engaged.Your vehicle has two types of security sys-
tems:∙ Vehicle security system
∙ NISSAN Vehicle Immobilizer System
VEHICLE SECURITY SYSTEM
The vehicle security system provides visual
and audible alarm signals if someone
opens the doors, lif tgate, or hood when the
system is armed. It is not, however, a mo-
tion detection type system that activates
when a vehicle is moved or when a vibra-
tion occurs. The system helps deter vehicle thef t but
cannot prevent it, nor can it prevent the
thef t of interior or exterior vehicle compo-
nents in all situations. Always secure your
vehicle even if parking for a brief period.
Never leave your Intelligent Key in the ve-
hicle, and always lock the vehicle when un-
attended. Be aware of your surroundings,
and park in secure, well-lit areas whenever
possible.
Many devices offering additional protec-
tion, such as component locks, identifica-
tion markers, and tracking systems, are
available at auto supply stores and spe-
cialty shops. A NISSAN dealer may also offer
such equipment. Check with your insur-
ance company to see if you may be eligible
for discounts for various thef t protection
features.
LIC2930
SECURITY SYSTEMS
Instruments and controls2-33
Page 130 of 476
How to arm the vehicle security
system
1. Close all windows.(The system can be
armed even if the windows are open.)
2. Remove the Intelligent Key from the ve- hicle.
3. Close all doors, hood and lif tgate. Lock all doors. The doors can be locked with
the Intelligent Key, door handle request
switch, or mechanical key (if so
equipped).
4. Confirm that the
security indica-
tor light stays on for about 30 seconds.
The vehicle security system is now pre-
armed. The vehicle security system will
automatically shif t into the armed
phase. The
security light begins
to flash once every three seconds. If
during the pre-armed phase one of the
following occurs, the system will not
arm:
∙ Any door is unlocked with the mechani- cal key (if so equipped), the Intelligent
Key or door request switch.
∙ Ignition switch is placed in ACC or ON position. ∙
Even when the driver and/or passen-
gers are in the vehicle, the system will
activate with all the doors, hood and
lif tgate locked with the ignition
switch placed in the LOCK position.
When placing the ignition switch in
the ACC or ON position, the system
will be released.
Vehicle security system activation
The vehicle security system will give the
following alarm:
∙ The hazard lights blink (for non I-key vehicle) or the headlights (for I-key ve-
hicle) blink and the horn sounds inter-
mittently.
∙ The alarm automatically turns off af ter a period of time. However, the alarm
reactivates if the vehicle is tampered
with again. The alarm can be shut off by
unlocking the driver’s door by pressing
the
button on the key fob or plac-
ing the ignition switch in the ON or ACC
position. The alarm is activated by:
∙ opening a door without using the key fob (even if the door is unlocked by us-
ing the inside lock knob or the power
door lock switch).
How to stop an activated alarm
The alarm stops only by unlocking a door
or the lif tgate with the mechanical key (if so
equipped), pressing the
button on
the Intelligent Key, or pushing the request
switch on the driver’s or passenger’s door
with the Intelligent Key in range of the door
handle.
NISSAN VEHICLE IMMOBILIZER
SYSTEM
The NISSAN Vehicle Immobilizer System
will not allow the engine to start without
the use of a registered key.
If the engine fails to start using a registered
key (for example, when interference is
caused by another registered key, an auto-
mated toll road device or automatic pay-
ment device on the key ring), restart the
engine using the following procedures:
1. Leave the ignition switch in the ON po- sition for approximately 5 seconds.
2-34Instruments and controls
Page 191 of 476
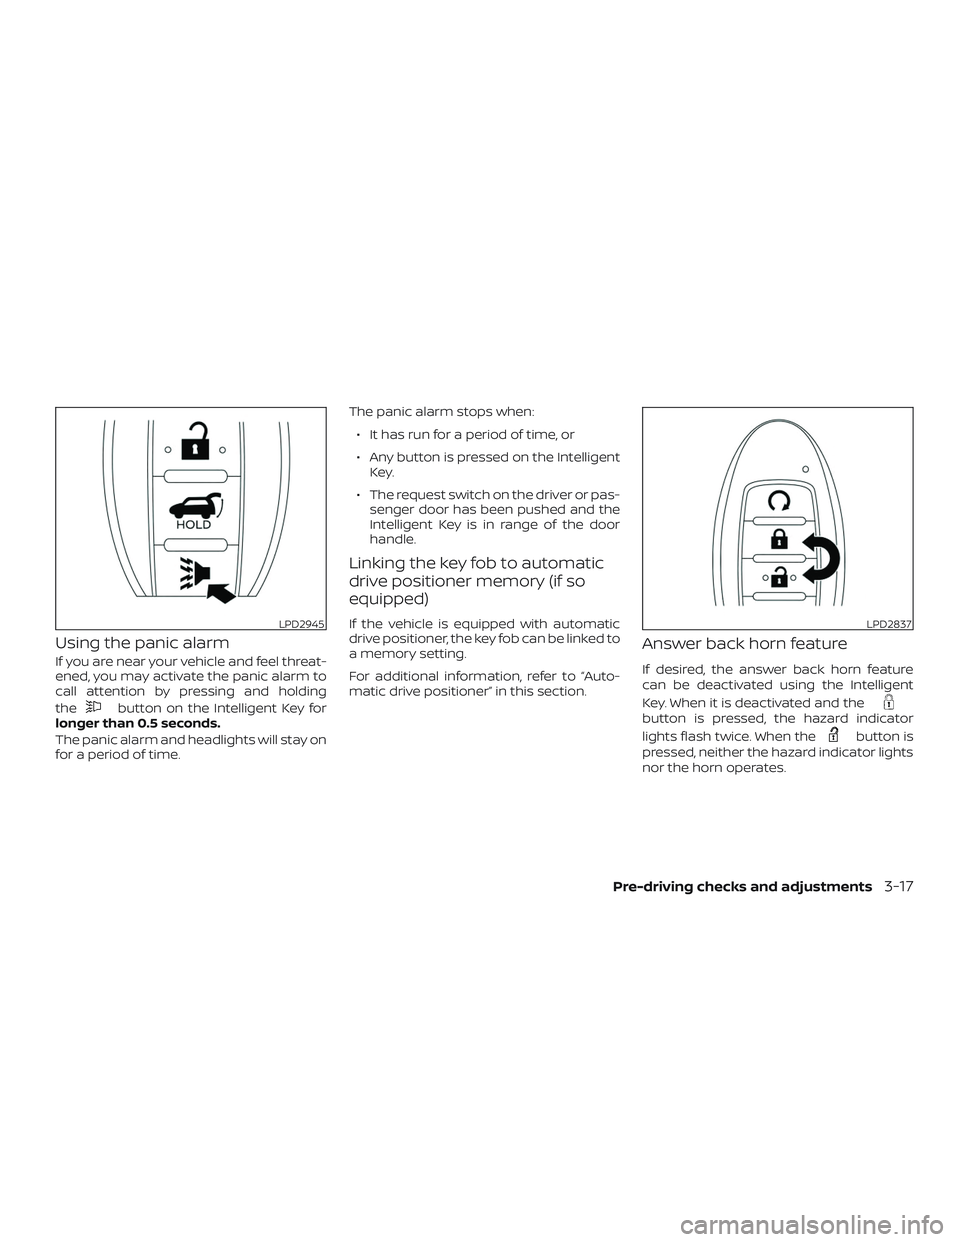
Using the panic alarm
If you are near your vehicle and feel threat-
ened, you may activate the panic alarm to
call attention by pressing and holding
the
button on the Intelligent Key for
longer than 0.5 seconds.
The panic alarm and headlights will stay on
for a period of time. The panic alarm stops when:
∙ It has run for a period of time, or
∙ Any button is pressed on the Intelligent Key.
∙ The request switch on the driver or pas- senger door has been pushed and the
Intelligent Key is in range of the door
handle.
Linking the key fob to automatic
drive positioner memory (if so
equipped)
If the vehicle is equipped with automatic
drive positioner, the key fob can be linked to
a memory setting.
For additional information, refer to “Auto-
matic drive positioner” in this section.
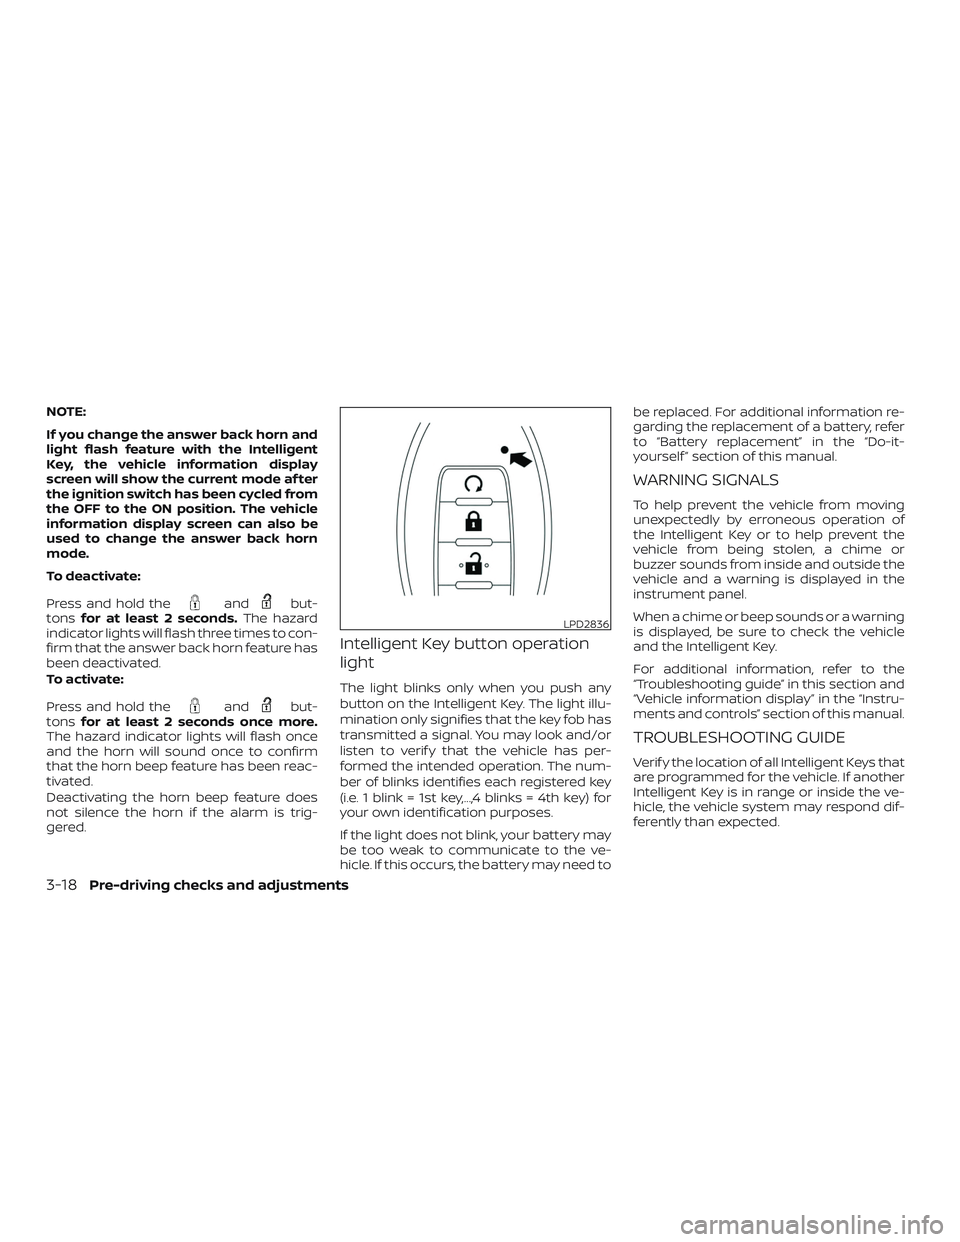
Answer back horn feature
If desired, the answer back horn feature
can be deactivated using the Intelligent
Key. When it is deactivated and the
button is pressed, the hazard indicator
lights flash twice. When the
button is
pressed, neither the hazard indicator lights
nor the horn operates.
LPD2945LPD2837
Pre-driving checks and adjustments3-17
Page 192 of 476
NOTE:
If you change the answer back horn and
light flash feature with the Intelligent
Key, the vehicle information display
screen will show the current mode af ter
the ignition switch has been cycled from
the OFF to the ON position. The vehicle
information display screen can also be
used to change the answer back horn
mode.
To deactivate:
Press and hold the
andbut-
tons for at least 2 seconds. The hazard
indicator lights will flash three times to con-
firm that the answer back horn feature has
been deactivated.
To activate:
Press and hold the
andbut-
tons for at least 2 seconds once more.
The hazard indicator lights will flash once
and the horn will sound once to confirm
that the horn beep feature has been reac-
tivated.
Deactivating the horn beep feature does
not silence the horn if the alarm is trig-
gered.
Intelligent Key button operation
light
The light blinks only when you push any
button on the Intelligent Key. The light illu-
mination only signifies that the key fob has
transmitted a signal. You may look and/or
listen to verif y that the vehicle has per-
formed the intended operation. The num-
ber of blinks identifies each registered key
(i.e. 1 blink = 1st key,...,4 blinks = 4th key) for
your own identification purposes.
If the light does not blink, your battery may
be too weak to communicate to the ve-
hicle. If this occurs, the battery may need to be replaced. For additional information re-
garding the replacement of a battery, refer
to “Battery replacement” in the “Do-it-
yourself ” section of this manual.
WARNING SIGNALS
To help prevent the vehicle from moving
unexpectedly by erroneous operation of
the Intelligent Key or to help prevent the
vehicle from being stolen, a chime or
buzzer sounds from inside and outside the
vehicle and a warning is displayed in the
instrument panel.
When a chime or beep sounds or a warning
is displayed, be sure to check the vehicle
and the Intelligent Key.
For additional information, refer to the
“Troubleshooting guide” in this section and
“Vehicle information display” in the “Instru-
ments and controls” section of this manual.
TROUBLESHOOTING GUIDE
Verif y the location of all Intelligent Keys that
are programmed for the vehicle. If another
Intelligent Key is in range or inside the ve-
hicle, the vehicle system may respond dif-
ferently than expected.
LPD2836
3-18Pre-driving checks and adjustments
Page 199 of 476
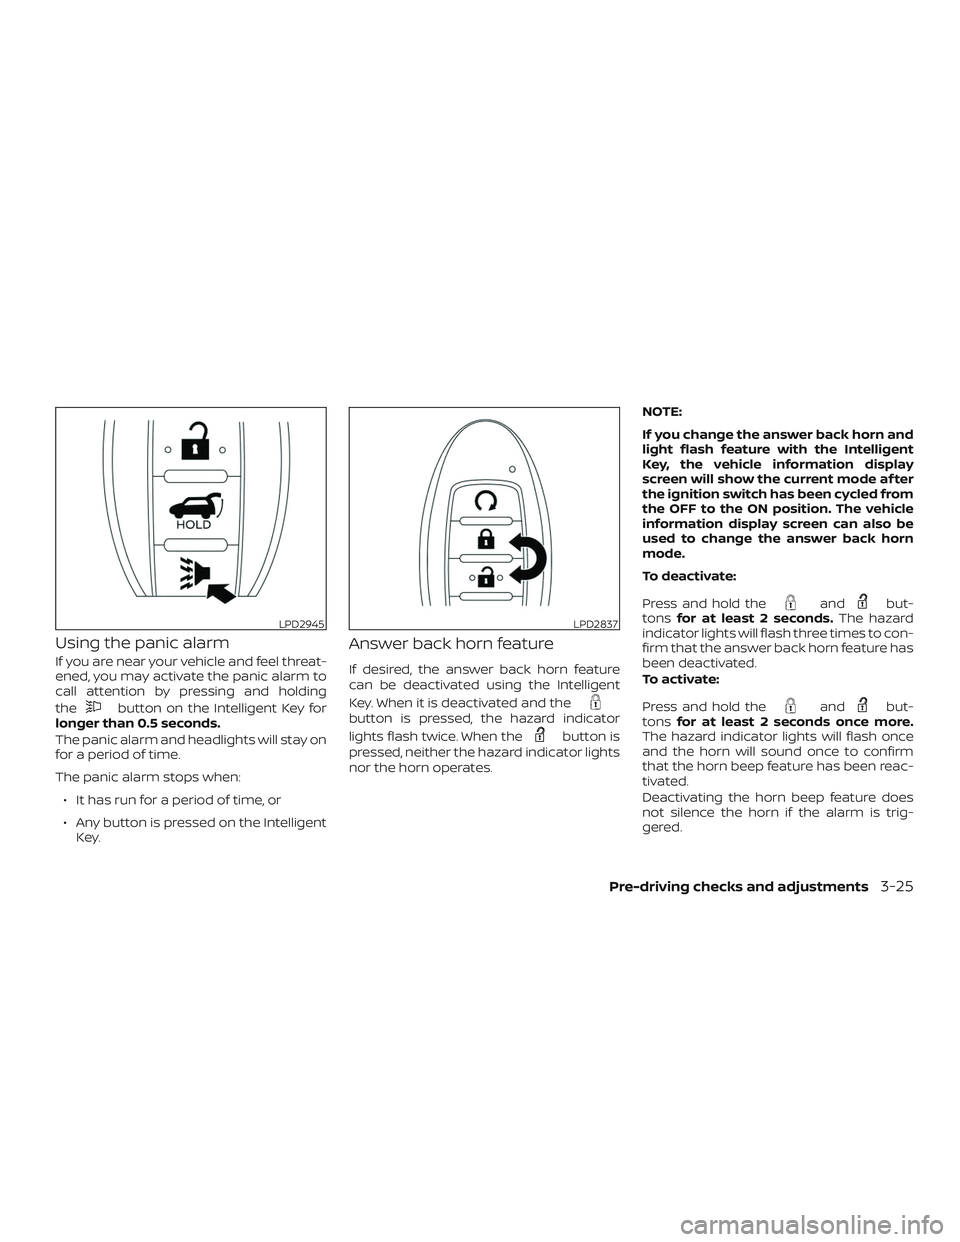
Using the panic alarm
If you are near your vehicle and feel threat-
ened, you may activate the panic alarm to
call attention by pressing and holding
the
button on the Intelligent Key for
longer than 0.5 seconds.
The panic alarm and headlights will stay on
for a period of time.
The panic alarm stops when:
∙ It has run for a period of time, or
∙ Any button is pressed on the Intelligent Key.
Answer back horn feature
If desired, the answer back horn feature
can be deactivated using the Intelligent
Key. When it is deactivated and the
button is pressed, the hazard indicator
lights flash twice. When the
button is
pressed, neither the hazard indicator lights
nor the horn operates. NOTE:
If you change the answer back horn and
light flash feature with the Intelligent
Key, the vehicle information display
screen will show the current mode af ter
the ignition switch has been cycled from
the OFF to the ON position. The vehicle
information display screen can also be
used to change the answer back horn
mode.
To deactivate:
Press and hold the
andbut-
tons for at least 2 seconds. The hazard
indicator lights will flash three times to con-
firm that the answer back horn feature has
been deactivated.
To activate:
Press and hold the
andbut-
tons for at least 2 seconds once more.
The hazard indicator lights will flash once
and the horn will sound once to confirm
that the horn beep feature has been reac-
tivated.
Deactivating the horn beep feature does
not silence the horn if the alarm is trig-
gered.
LPD2945LPD2837
Pre-driving checks and adjustments3-25
Page 204 of 476
The Remote Engine Start operating range
is approximately 197 f t (60 m) from the ve-
hicle.
REMOTE STARTING THE VEHICLE
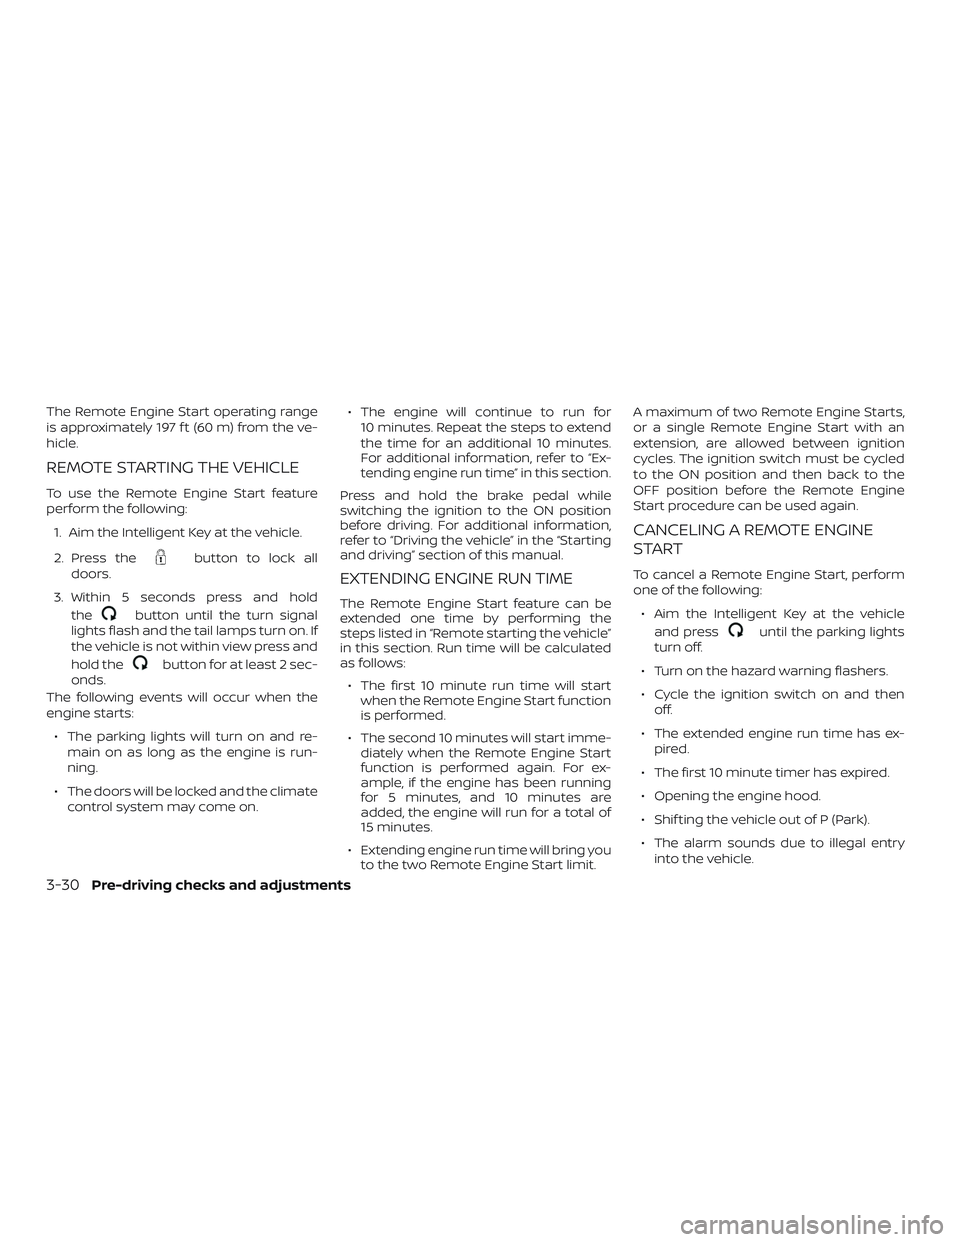
To use the Remote Engine Start feature
perform the following:1. Aim the Intelligent Key at the vehicle.
2. Press the
button to lock all
doors.
3. Within 5 seconds press and hold the
button until the turn signal
lights flash and the tail lamps turn on. If
the vehicle is not within view press and
hold the
button for at least 2 sec-
onds.
The following events will occur when the
engine starts:
∙ The parking lights will turn on and re- main on as long as the engine is run-
ning.
∙ The doors will be locked and the climate control system may come on. ∙ The engine will continue to run for
10 minutes. Repeat the steps to extend
the time for an additional 10 minutes.
For additional information, refer to “Ex-
tending engine run time” in this section.
Press and hold the brake pedal while
switching the ignition to the ON position
before driving. For additional information,
refer to “Driving the vehicle” in the “Starting
and driving” section of this manual.
EXTENDING ENGINE RUN TIME
The Remote Engine Start feature can be
extended one time by performing the
steps listed in “Remote starting the vehicle”
in this section. Run time will be calculated
as follows: ∙ The first 10 minute run time will start when the Remote Engine Start function
is performed.
∙ The second 10 minutes will start imme- diately when the Remote Engine Start
function is performed again. For ex-
ample, if the engine has been running
for 5 minutes, and 10 minutes are
added, the engine will run for a total of
15 minutes.
∙ Extending engine run time will bring you to the two Remote Engine Start limit. A maximum of two Remote Engine Starts,
or a single Remote Engine Start with an
extension, are allowed between ignition
cycles. The ignition switch must be cycled
to the ON position and then back to the
OFF position before the Remote Engine
Start procedure can be used again.
CANCELING A REMOTE ENGINE
START
To cancel a Remote Engine Start, perform
one of the following:
∙ Aim the Intelligent Key at the vehicle and press
until the parking lights
turn off.
∙ Turn on the hazard warning flashers.
∙ Cycle the ignition switch on and then off.
∙ The extended engine run time has ex- pired.
∙ The first 10 minute timer has expired.
∙ Opening the engine hood.
∙ Shif ting the vehicle out of P (Park).
∙ The alarm sounds due to illegal entry into the vehicle.
3-30Pre-driving checks and adjustments
Page 205 of 476
∙ Pushing the ignition switch without theIntelligent Key in the vehicle.
∙ Not pressing the brake pedal while pressing the ignition switch with the In-
telligent Key in the vehicle.
CONDITIONS THE REMOTE ENGINE
START WILL NOT WORK
The Remote Engine Start will not operate if
any of the following conditions are present:
∙ The ignition switch is placed in the ON position.
∙ The hood is not securely closed.
∙ The hazard indicator lights are on.
∙ The engine is still running. The engine must be completely stopped. Wait at
least 6 seconds if the engine goes from
running to off. This is not applicable
when extending engine run time.
∙ The
button is not pressed and
held for at least 2 seconds. ∙ The
button is not pressed and
held within 5 seconds of pressing the
lock button.
∙ The brake is pressed.
∙ The doors are not closed and locked.
∙ The lif tgate is open.
∙ The I–Key Indicator Light remains solid is in the vehicle information display.
∙ The alarm sounds due to illegal entry into the vehicle.
∙ Two Remote Engine Starts, or a single Remote Engine Start with an extension,
have already been used.
∙ The vehicle is not in P (Park).
∙ There is a detected registered key al- ready inside of the vehicle.
∙ The Remote Engine Start function has been switched to the OFF position in
Vehicle Settings of the vehicle informa-
tion display. For additional information,
refer to “Vehicle information display” in
the “Instruments and controls” section
of this manual. The Remote Engine Start may display a
warning or indicator in the vehicle informa-
tion display. For additional information, re-
fer to “Vehicle information display” in the
“Instruments and controls” section of this
manual.
Pre-driving checks and adjustments3-31
Page 252 of 476
Towing mode (if so equipped):When this
item is turned on, only the rear sonar is off.
The amber markers are displayed at the
rear corners of the vehicle icon.
Show Camera when Sonar Activate (if so
equipped): When this item is turned on, the
camera view is automatically shown on the
display in the case that the distance to the
objects measured by the sonar is becom-
ing short.
SONAR SYSTEM LIMITATIONS
WARNING
Listed below are the system limitations
for the sonar function. Failure to oper-
ate the vehicle in accordance with these
system limitations could result in seri-
ous injury or death.
∙ Inclement weather or ultrasonic sources such as an automatic car
wash, a truck’s compressed-air
brakes or a pneumatic drill may affect
the function of the system, including
reduced performance or a false
activation.
∙ The system is not designed to prevent contact with small or moving objects. ∙ The system will not detect small ob-
jects below the bumper, and may not
detect objects close to the bumper or
on the ground.
∙ The system may not detect the fol- lowing objects:
– Fluff y objects such as snow, cloth, cotton, grass or wool.
– Thin objects such as rope, wire or chain.
– Wedge-shaped objects.
∙ If your vehicle sustains damage to the bumper fascia, leaving it misaligned
or bent, the sensing zone may be al-
tered causing inaccurate measure-
ment of objects or false alarms.
CAUTION
Excessive noise (such as audio system
volume or an open vehicle window) will
interfere with the tone and it may not
be heard.
System temporarily unavailable
When the amber markers are displayed at
the corners of the vehicle icon and the
function cannot be activated from the
Camera setting menu (the setting items
are grayed out), the sonar system may be
malfunctioning.
SYSTEM MAINTENANCE
CAUTION
Keep the surface of the sonar sensors
(located on the front and rear bumper
fascia) free from accumulations of
snow, ice and dirt. Do not scratch the
surface of the sonar sensors when
cleaning. If the sensors are covered, the
accuracy of the sonar function will be
diminished.
4-26Monitor, climate, audio, phone and voice recognition systems