sensor NISSAN PATHFINDER 2022 Owner´s Manual
[x] Cancel search | Manufacturer: NISSAN, Model Year: 2022, Model line: PATHFINDER, Model: NISSAN PATHFINDER 2022Pages: 647, PDF Size: 8.48 MB
Page 242 of 647

Lockout protection
To prevent the Intelligent Key from being
accidentally locked in the vehicle, lockout
protection is equipped with the Intelligent
Key system.
When any door is open, the doors are
locked, and then the Intelligent Key is put
inside the vehicle and all the doors are
closed; a chime will sound and the lock will
automatically unlock.
NOTE:
The doors may not lock when the Intelli-
gent Key is in the same hand that is op-
erating the lock sensor to lock the door.
Put the Intelligent Key in a purse, pocket
or your other hand.
CAUTION
The lockout protection may not func-
tion under the following conditions:
• When the Intelligent Key is placed on
top of the instrument panel.
• When the Intelligent Key is placed in-
side the glove box or a storage bin.
• When the Intelligent Key is placed in-
side the door pockets.
• When the Intelligent Key is placed in-
side or near metallic materials.
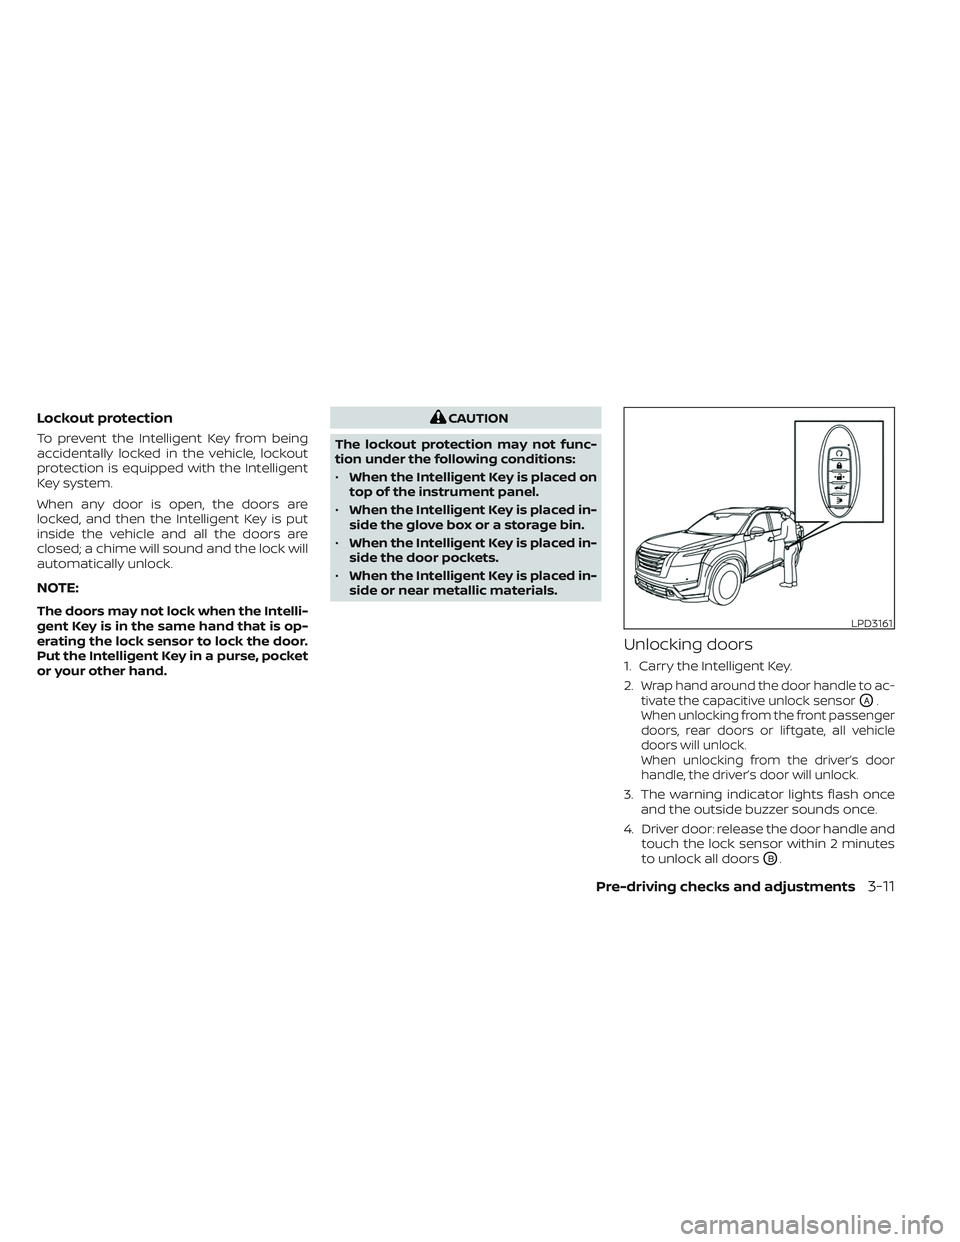
Unlocking doors
1. Carry the Intelligent Key.
2.
Wrap hand around the door handle to ac-
tivate the capacitive unlock sensor
OA.
When unlocking from the front passenger
doors, rear doors or lif tgate, all vehicle
doors will unlock.
When unlocking from the driver’s door
handle, the driver’s door will unlock.
3. The warning indicator lights flash once and the outside buzzer sounds once.
4. Driver door: release the door handle and touch the lock sensor within 2 minutes
to unlock all doors
OB.
LPD3161
Pre-driving checks and adjustments3-11
Page 243 of 647

NOTE:
Lock sensors for all doors can be deacti-
vated when the Ext. Door Switch feature is
switched to OFF using the “Vehicle Set-
tings” menu on the vehicle information
display. For additional information, see
“Vehicle information display 7 inch (18 cm)
Type A” (P. 2-22) or “Vehicle information
display 12.3 inch (31 cm) Type B” (P. 2-45).
If a door handle is pulled while unlocking
the doors, that door may not be unlocked.
Returning the door handle to its original
position will unlock the door. If the door
does not unlock af ter returning the door
handle, touch the door handle lock sensor
to unlock the door.
All doors will be locked automatically un-
less one of the following operations is per-
formed within 1 minute af ter touching the
lock sensor.
• Opening any door.
• Pushing the ignition switch.
Using the interior lights
The interior lights illuminate for a period of
time when a door is unlocked.
The lights can be turned off without waiting
by performing one of the following
operations:
• Placing the ignition switch in the ONposition.
• Locking the doors with the Intelligent Key.
• Switching the interior light switch to the OFF position.
• Switching the Auto Room Lamp feature to the OFF position in the “Vehicle Set-
tings” menu on the vehicle information
display. For additional information, see
“Vehicle information display 7 inch (18 cm)
Type A” (P. 2-22) or “Vehicle information
display 12.3 inch (31 cm) Type B” (P. 2-45).
For additional information, see “Interior
lights” (P. 2-116).
LPD3185LPD3270
3-12Pre-driving checks and adjustments
Page 246 of 647

• Switching the Auto Room Lamp featureto the OFF position in the “Vehicle Set-
tings” menu on the vehicle information
display. For additional information, see
“Vehicle information display 7 inch (18 cm)
Type A” (P. 2-22) or “Vehicle information
display 12.3 inch (31 cm) Type B” (P. 2-45).
For additional information, see “Interior
lights” (P. 2-116).
Opening windows
The Intelligent Key allows you to simultane-
ously open windows equipped with auto-
matic operation.
All doors must be closed and the key must
be outside the vehicle.
To open the windows, press and hold the
button on the Intelligent Key for lon-
ger than 3 seconds af ter all doors are
unlocked.
The door windows will open while pressing
the
button on the Intelligent Key.
To interrupt opening of the windows, re-
lease the
button.
Releasing the rear lif tgate (if so
equipped)
The rear lif tgate can be opened and closed
by performing the following:
• Press the
button for longer than 1
second to open the rear lif tgate.
• Press the
button again for longer
than 1 second to close the rear lif tgate.
When the
button is pressed during
the open or close process the lif tgate will
stop. When pressed again, the lif tgate will
reverse and go in the opposite direction.
Using the panic alarm
If you are near your vehicle and feel threat-
ened, you may activate the panic alarm to
call attention by pressing and holding the
button on the Intelligent Key for lon-
ger than 0.5 seconds.
The panic alarm and headlights will stay on
for a period of time.
The panic alarm stops when:
• It has run for a period of time.
• Any button is pressed on the Intelligent Key. • The lock sensor on the driver or passen-
ger door is pushed and the Intelligent Key
is in range of the door handle.
Answer back horn feature
If desired, the answer back horn feature
can be deactivated using the Intelligent
Key. When it is deactivated and the
button is pressed, the hazard indicator
lights flash twice. When thebutton is
pressed, neither the hazard indicator lights
nor the horn operates.
NOTE:
If you can change the Answer Back Horn
feature with the Intelligent Key, the ve-
hicle information display screen will
show the current mode af ter the ignition
switch has been cycled from the OFF to
the ON position. The vehicle information
display screen can also be used to
change the answer back horn mode.
For additional information, see “Vehicle
information display 7 inch (18 cm) Type A”
(P. 2-22) or “Vehicle information display
12.3 inch (31 cm) Type B” (P. 2-45).
Pre-driving checks and adjustments3-15
Page 248 of 647

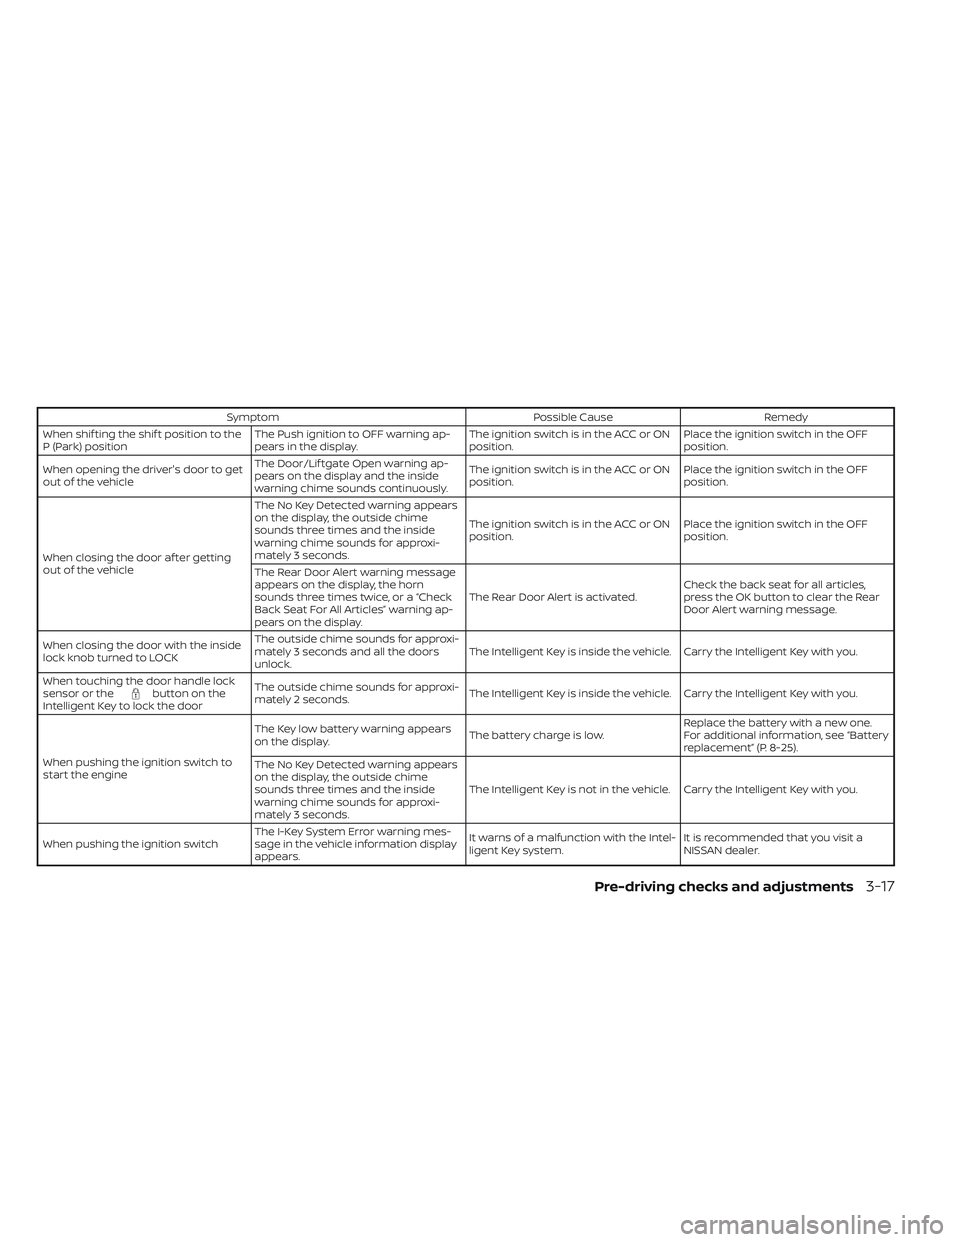
SymptomPossible CauseRemedy
When shif ting the shif t position to the
P (Park) position The Push ignition to OFF warning ap-
pears in the display. The ignition switch is in the ACC or ON
position.Place the ignition switch in the OFF
position.
When opening the driver's door to get
out of the vehicle The Door/Lif tgate Open warning ap-
pears on the display and the inside
warning chime sounds continuously. The ignition switch is in the ACC or ON
position.
Place the ignition switch in the OFF
position.
When closing the door af ter getting
out of the vehicle The No Key Detected warning appears
on the display, the outside chime
sounds three times and the inside
warning chime sounds for approxi-
mately 3 seconds.
The ignition switch is in the ACC or ON
position.
Place the ignition switch in the OFF
position.
The Rear Door Alert warning message
appears on the display, the horn
sounds three times twice, or a “Check
Back Seat For All Articles” warning ap-
pears on the display. The Rear Door Alert is activated.
Check the back seat for all articles,
press the OK button to clear the Rear
Door Alert warning message.
When closing the door with the inside
lock knob turned to LOCK The outside chime sounds for approxi-
mately 3 seconds and all the doors
unlock.
The Intelligent Key is inside the vehicle. Carry the Intelligent Key with you.
When touching the door handle lock
sensor or the
button on the
Intelligent Key to lock the door The outside chime sounds for approxi-
mately 2 seconds.
The Intelligent Key is inside the vehicle. Carry the Intelligent Key with you.
When pushing the ignition switch to
start the engine The Key low battery warning appears
on the display.
The battery charge is low.Replace the battery with a new one.
For additional information, see “Battery
replacement” (P. 8-25).
The No Key Detected warning appears
on the display, the outside chime
sounds three times and the inside
warning chime sounds for approxi-
mately 3 seconds. The Intelligent Key is not in the vehicle. Carry the Intelligent Key with you.
When pushing the ignition switch The I-Key System Error warning mes-
sage in the vehicle information display
appears. It warns of a malfunction with the Intel-
ligent Key system.
It is recommended that you visit a
NISSAN dealer.
Pre-driving checks and adjustments3-17
Page 265 of 647

NOTE:
Do not hang any objects over the sen-
sors
O1or apply glass cleaner to the sen-
sors. Doing so will reduce the sensitivity
of the sensors, resulting in improper
operation.
The indicator light
O2will illuminate when
the automatic anti-glare feature is
operating.
To turn off the automatic anti-glare feature,
press the O button. The indicator light
will turn off.
To turn on the automatic anti-glare feature
again, press the | button again. The in-
dicator light will turn on.
For additional information on HomeLink®
Universal Transceiver operation, see
“HomeLink® Universal Transceiver” (P. 2-118).
OUTSIDE MIRRORS
The outside mirror remote control will op-
erate only when the ignition switch is in the
ACC or ON position.
Push the switch
O1orO2to select the lef t
or right mirror. Adjust each mirror to the
desired position using the large switch
O3.
Push the switch
O1orO2and make sure
that the corresponding light is off, to pre-
vent accidentally moving the mirror.
WARNING
• Objects viewed in the outside mirror
on the passenger side are closer than
they appear. Be careful when moving
to the right. Using only this mirror
could cause an accident. Use the in-
side mirror or glance over your
shoulder to properly judge distances
to other objects.
• Do not adjust the mirrors while driv-
ing. You could lose control of your ve-
hicle and cause an accident.
LPD3166
3-34Pre-driving checks and adjustments
Page 270 of 647

4 Monitor, climate, audio, phone and
voice recognition systems
NissanConnect® Owner’s Manual...............4-2
RearView Monitor (if so equipped) ...............4-3
RearView Monitor system operation ..........4-4
How to read the displayed lines ..............4-4
Difference between predicted and
actual distances .............................4-5
How to park with predicted course
lines ..........................................4-6
Adjusting the screen .........................4-8
How to turn on and off predicted
course lines ..................................4-8
RearView Monitor system limitations .........4-8
System maintenance ........................4-9
Intelligent Around View Monitor
(if so equipped) ................................. 4-10
Intelligent Around View Monitor system
operation .................................... 4-11
Difference between predicted and
actual distances ............................ 4-16
How to park with predicted course
lines ......................................... 4-17
How to switch the display ...................4-18
Adjusting the screen ........................ 4-19
Intelligent Around View Monitor system
limitations .................................. 4-20System maintenance
.......................4-22
Camera aiding sonar (parking sensor)
(if so equipped) ................................. 4-22
Sonar system operation .....................4-23
Turning on and off the sonar function .......4-24
Sonar system limitations ....................4-24
System maintenance .......................4-25
Moving Object Detection (MOD)
(if so equipped) ................................. 4-26
MOD system operation ......................4-27
Turning MOD on and off .....................4-29
MOD system limitations .....................4-29
System maintenance .......................4-30
Vents .......................................... 4-31
Heater and air conditioner (automatic) .........4-32
Automatic operation ........................ 4-33
Manual operation ........................... 4-34
Operating tips ............................... 4-36
Rear automatic air conditioning system .....4-37
Servicing air conditioner ........................4-39
Antenna ........................................ 4-39
Car phone or CB radio .......................... 4-40
iP
od®/iPhone® ................................. 4-40
Page 291 of 647

SYSTEM MAINTENANCE
CAUTION
• Do not use alcohol, benzine or thin-
ner to clean the camera. This will
cause discoloration.
• Do not damage the cameras as the
monitor screen may be adversely
affected. If dirt, rain or snow accumulates on any of
the cameras
O1, the Intelligent Around
View Monitor may not display objects
clearly. Clean the camera by wiping with a
cloth dampened with a diluted mild clean-
ing agent and then wiping with a dry cloth.WARNING
Failure to follow the warnings and in-
structions for proper use of the sonar
function as outlined in this section
could result in serious injury or death.
• The sonar is a convenience feature. It
is not a substitute for proper parking.
• This function is designed as an aid to
the driver in detecting large station-
ary objects to help avoid damaging
the vehicle.
• The driver is always responsible for
safety during parking and other
maneuvers.
• Always look around and check that it
is safe to move before parking.
• Read and understand the limitations
of the sonar as contained in this
section.
The sonar function helps to inform the
driver of large stationary objects around
the vehicle when parking by issuing an au-
dible and visual alert.
LHA5436
CAMERA AIDING SONAR (parking
sensor) (if so equipped)
4-22Monitor, climate, audio, phone and voice recognition systems
Page 294 of 647

•The system may not detect the fol-
lowing objects:
– Fluff y objects such as snow, cloth,
cotton, grass or wool.
– Thin objects such as rope, wire or
chain.
– Wedge-shaped objects.
• If your vehicle sustains damage to
the bumper fascia, leaving it mis-
aligned or bent, the sensing zone
may be altered causing inaccurate
measurement of objects or false
alarms.
CAUTION
Excessive noise (such as audio system
volume or an open vehicle window) will
interfere with the tone and it may not
be heard.
System temporarily unavailable
When the amber markers are displayed at
the corners of the vehicle icon and the
function cannot be activated from the
Camera setting menu (the setting items
are grayed out), the sonar system may be
malfunctioning.
SYSTEM MAINTENANCE
CAUTION
Keep the surface of the sonar sensors
(located on the front and rear bumper
fascia) free from accumulations of
snow, ice and dirt. Do not scratch the
surface of the sonar sensors when
cleaning. If the sensors are covered, the
accuracy of the sonar function will be
diminished.
Monitor, climate, audio, phone and voice recognition systems4-25
Page 305 of 647

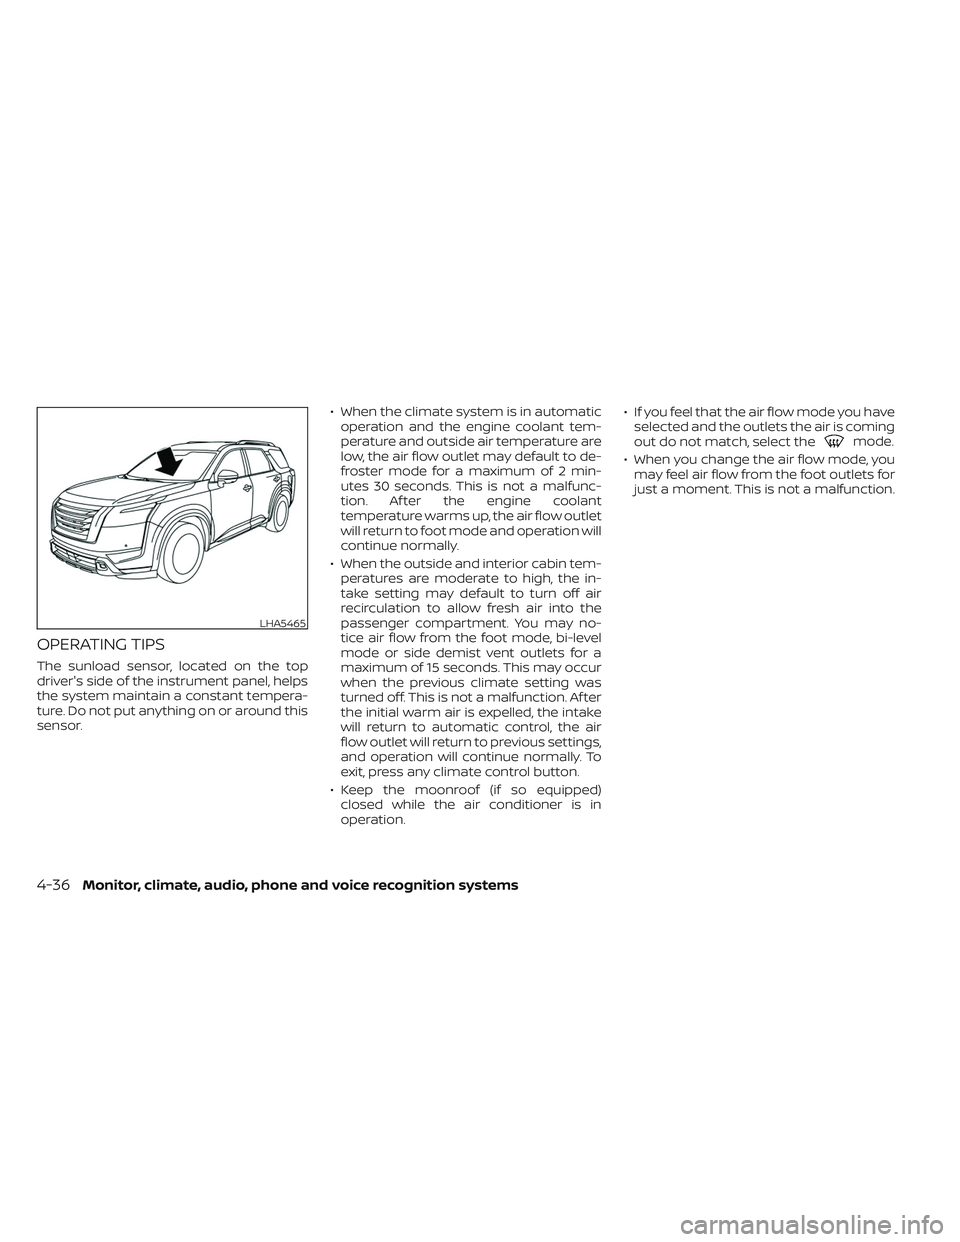
OPERATING TIPS
The sunload sensor, located on the top
driver's side of the instrument panel, helps
the system maintain a constant tempera-
ture. Do not put anything on or around this
sensor.• When the climate system is in automatic
operation and the engine coolant tem-
perature and outside air temperature are
low, the air flow outlet may default to de-
froster mode for a maximum of 2 min-
utes 30 seconds. This is not a malfunc-
tion. Af ter the engine coolant
temperature warms up, the air flow outlet
will return to foot mode and operation will
continue normally.
• When the outside and interior cabin tem- peratures are moderate to high, the in-
take setting may default to turn off air
recirculation to allow fresh air into the
passenger compartment. You may no-
tice air flow from the foot mode, bi-level
mode or side demist vent outlets for a
maximum of 15 seconds. This may occur
when the previous climate setting was
turned off. This is not a malfunction. Af ter
the initial warm air is expelled, the intake
will return to automatic control, the air
flow outlet will return to previous settings,
and operation will continue normally. To
exit, press any climate control button.
• Keep the moonroof (if so equipped) closed while the air conditioner is in
operation. • If you feel that the air flow mode you have
selected and the outlets the air is coming
out do not match, select the
mode.
• When you change the air flow mode, you may feel air flow from the foot outlets for
just a moment. This is not a malfunction.
LHA5465
4-36Monitor, climate, audio, phone and voice recognition systems
Page 318 of 647

•When using a wheel without the
TPMS such as the spare tire, when a
spare tire is mounted or a wheel is
replaced, tire pressure will not be in-
dicated, the TPMS will not function
and the low tire pressure warning
light will flash for approximately 1
minute. The light will remain on af ter
1 minute. Have your tires replaced
and/or TPMS system reset as soon as
possible. It is recommended that you
visit a NISSAN dealer for this service.
• Replacing tires with those not origi-
nally specified by NISSAN could af-
fect the proper operation of the
TPMS.
• Do not inject any tire liquid or aerosol
tire sealant into the tires, as this may
cause a malfunction of the tire pres-
sure sensors.
CAUTION
• The TPMS may not function properly
when the wheels are equipped with
tire chains or the wheels are buried in
snow. •
Do not place metalized film or any
metal parts (antenna, etc.) on the
windows. This may cause poor re-
ception of the signals from the tire
pressure sensors, and the TPMS will
not function properly.
Some devices and transmitters may tem-
porarily interfere with the operation of the
TPMS and cause the low tire pressure
warning light to illuminate.
Some examples are:
• Facilities or electric devices using similar radio frequencies are near the vehicle.
• If a transmitter set to similar frequencies is being used in or near the vehicle.
• If a computer (or similar equipment) or a DC/AC converter is being used in or near
the vehicle.
The low tire pressure warning light may
illuminate in the following cases.
• If the vehicle is equipped with a wheel and tire without TPMS.
• If the TPMS has been replaced and the ID has not been registered.
• If the wheel is not originally specified by NISSAN. FCC Notice:
For USA:
This device complies with Part 15 of the
FCC Rules. Operation is subject to the fol-
lowing two conditions: (1) This device
may not cause harmful interference, and
(2) this device must accept any interfer-
ence received, including interference
that may cause undesired operation.
NOTE:Changes or modifications not expressly
approved by the party responsible for
compliance could void the user's au-
thority to operate the equipment.
For Canada:
This device contains licence-exempt
transmitter(s)/receiver(s) that comply
with Innovation, Science and Economic
Development Canada’s licence-exempt
RSS(s). Operation is subject to the fol-
lowing two conditions: (1) This device
may not cause interference. (2) This de-
vice must accept any interference, in-
cluding interference that may cause un-
desired operation of the device.
Starting and driving5-7