manual transmission NISSAN PATHFINDER 2022 Owner´s Manual
[x] Cancel search | Manufacturer: NISSAN, Model Year: 2022, Model line: PATHFINDER, Model: NISSAN PATHFINDER 2022Pages: 647, PDF Size: 8.48 MB
Page 133 of 647
5. Eco Pedal Guide
When the ECO mode is selected, you can
view ECO Pedal Guide function for improv-
ing fuel economy.
The ECO Pedal Guide mode has three
modes of operation. You can switch be-
tween Manual Reset1, Manual Reset2 or
Auto Refuel by pushing the scroll dial.
Manual Reset1 can be reset manually by
using the scroll dial.
Manual Reset2 can be reset manually by
using the scroll dial or will be reset auto-
matically each time the ignition switch is
placed in the OFF position (if so equipped).
Auto Refuel will be reset automatically each
time when refueling.
For additional information, see “ECO Mode”
(P. 5-31).
6. Tire Pressures
The tire pressure mode shows the pres-
sure of all four tires while the vehicle is
driven.
With the “Tire Pres ECO advice” function ON,
when the tire pressure is getting low, “Check
Tire Pressures for Best Fuel Economy” or
“Add air for Best Fuel Economy” appears. Foradditional information, see “ECO Mode Set-
ting” (P. 5-31) or “Tire Pres ECO advice” (P. 5-31).
When the “Tire Pressure Low — Add Air”
warning appears, the display can be
switched to the tire pressure mode by
pushing the scroll dial to reveal additional
details on the displayed warning.
7. Intelligent 4x4 torque
distribution display (if so
equipped)
When the Intelligent 4x4 torque distribution
display is selected, you can view the distri-
bution ratio of the transmission torque to
the front and rear wheels during driving.
8. Compass (if so equipped)
This display indicates the direction the ve-
hicle is heading.
9. Navigation (if so equipped)
When the route guidance is set in the navi-
gation system, this item shows the naviga-
tion route information.
9. Audio
The audio mode shows the status of audio
information.
11. Driver Assistance
The Driver Assistance mode shows the op-
erating condition for the following systems:
•Forward
–– Automatic Emergency Braking (AEB)with Pedestrian Detection system
– – Intelligent Forward Collision Warning
(I-FCW)
• Lane: –– Lane Departure Warning (LDW)
–– Intelligent Lane Intervention (I-LI)
• Blind Spot: –– Blind Spot Warning (BSW)
––
Intelligent Blind Spot Intervention (I-BSI)
(if so equipped)
For additional information, see “Intelligent
Blind Spot Intervention (I-BSI)” (P. 5-62),
“Blind Spot Warning (BSW)” (P. 5-49), “Lane
Departure Warning (LDW)” (P. 5-35), “Auto-
matic Emergency Braking (AEB) with Pe-
destrian Detection” (P. 5-136), “Intelligent
Forward Collision Warning (I-FCW)” (P. 5-149)
or “Intelligent Lane Intervention (I-LI)”
(P. 5-42).
2-26Instruments and controls
Page 148 of 647
Timer Alert — Have a
break?
This indicator appears when the set time is
reached. The time can be set up to six
hours. For additional information, see
“Driver Assistance” (P. 2-28).
Tire Pressure Low - Add Air
This warning appears when the low tire
pressure warning light in the meter illumi-
nates and low tire pressure is detected. The
warning appears each time the ignition
switch is placed in the ON position as long
as the low tire pressure warning light re-
mains illuminated. If this warning appears,
stop the vehicle and adjust the tire pres-
sures of all four tires to the recommended
COLD tire pressure shown on the Tire and
Loading Information label. For additional
information, see “Low tire pressure warning
light” (P. 2-18) and “Tire Pressure Monitoring
System (TPMS)” (P. 5-5).
TPMS Error: See Owner’s Manual
This warning appears when there is an er-
ror with your TPMS. If this warning appears,
have the system checked. It is recom-
mended that you visit a NISSAN dealer for
this service.
Transmission Shif t Position
indicator
This indicator shows the transmission shif t
position.
When parked apply parking
brake
This message appears when a malfunc-
tion occurs in the electric shif t control sys-
tem below 6 mph (10 km/h).
Have the system checked. It is recom-
mended that you visit a NISSAN dealer for
this service.
AWD Error: See Owner’s Manual
This warning appears when the 4-Wheel
Drive (4WD) system is not functioning prop-
erly while the engine is running. Reduce
vehicle speed and have your vehicle
checked by a NISSAN dealer as soon as
possible. For additional information, see
“Intelligent 4x4 (I-4x4)” (P. 5-171).
AWD High Temp. Stop Vehicle
This warning appears when the oil tem-
perature of the powertrain parts will in-
crease due to the difference in rotation be-
tween the front and rear wheels is large
(wheel slip), such as when driving the ve-
hicle on rough roads, through sand or mud,
or freeing a stuck vehicle. If this warning isdisplayed, stop the vehicle with the engine
idling, as soon as it is safe to do so. In these
cases, the 4WD changes to 2WD to protect
the powertrain parts. Then if the warning
turns off, you can continue 4WD driving.
Tire Size Incorrect See Owner’s
Manual
This warning may appear if there is a large
difference between the diameters of the
front and rear wheels. Pull off the road in a
safe area, with the engine idling. Check that
all the tire sizes, brand, construction and
tread patterns are the same, that the tire
pressure is correct and that the tires are
not excessively worn. If you have any prob-
lems, please change tires or adjust to the
correct tire pressure. Do not select the
SNOW or SAND or MUD/RUT (if so equipped)
mode with the Drive Mode Selector and do
not drive fast. For additional information,
see “Intelligent 4x4 (I-4x4)” (P. 5-171).
Automatic Emergency
Braking (AEB) with
Pedestrian Detection
emergency warning
indicator
This indicator appears along, with an au-
dible warning, when the system detects
the possibility of a forward collision.
Instruments and controls2-41
Page 156 of 647
Manual Reset2 can be reset manually by
using the scroll dial or will be reset auto-
matically each time the ignition switch is
placed in the OFF position (if so equipped).
Auto Refuel will be reset automatically each
time when refueling.
For additional information, see “ECO Mode”
(P. 5-31).
6. Tire Pressures
The tire pressure mode shows the pres-
sure of all four tires while the vehicle is
driven.
With the “Tire Pres ECO advice” function ON,
when the tire pressure is getting low,
“Check Tire Pressures for Best Fuel
Economy” or “Add air for Best Fuel
Economy” appears. For additional informa-
tion, see “ECO Mode Setting” (P. 5-31) or “Tire
Pres ECO advice” (P. 5-31).
When the “Tire Pressure Low — Add Air”
warning appears, the display can be
switched to the tire pressure mode by
pushing the scroll dial to reveal additional
details on the displayed warning.
7. Intelligent 4x4 torque
distribution display (if so
equipped)
When the Intelligent 4x4 torque distribution
display is selected, you can view the distri-
bution ratio of the transmission torque to
the front and rear wheels during driving.
8. Compass (if so equipped)
This display indicates the direction the ve-
hicle is heading.
9. Navigation (if so equipped)
When the route guidance is set in the navi-
gation system, this item shows the naviga-
tion route information.
9. Audio
The audio mode shows the status of audio
information.
11. Driver Assistance
The Driver Assistance mode shows the op-
erating condition for the following systems:
•Forward–– Automatic Emergency Braking (AEB)with Pedestrian Detection system –
– Intelligent Forward Collision Warning
(I-FCW)
• Lane: –– Lane Departure Warning (LDW)
–– Intelligent Lane Intervention (I-LI)
• Blind Spot: –– Blind Spot Warning (BSW)
–– Intelligent Blind Spot Intervention (I-
BSI) (if so equipped)
For additional information, see “Intelligent
Blind Spot Intervention (I-BSI)” (P. 5-62),
“Blind Spot Warning (BSW)” (P. 5-49), “Lane
Departure Warning (LDW)” (P. 5-35), “Auto-
matic Emergency Braking (AEB) with Pe-
destrian Detection” (P. 5-136), “Intelligent
Forward Collision Warning (I-FCW)” (P. 5-149)
or “Intelligent Lane Intervention (I-LI)”
(P. 5-42).
12. ProPILOT Assist (if so equipped)
The ProPILOT Assist mode shows operat-
ing conditions for the following systems:
• Intelligent Cruise Control (ICC)
• Steering Assist
The display will also be shown when the
ProPILOT Assist is turned on. For additional
information, see “ProPILOT Assist” (P. 5-86).
Instruments and controls2-49
Page 173 of 647
Seat belt indicator and
chime
The light and chime remind you to fasten
the driver and front passenger seat belts.
The 2nd and 3rd row seats may also be
equipped with a seat belt indicator.
For additional information, see “Seat belts”
(P. 1-20).
Shipping Mode On Push Storage Fuse
This warning may appear if the extended
storage switch is not pushed in. When this
warning appears, push in the extended
storage switch to turn off the warning. For
additional information, see “Extended stor-
age switch” (P. 2-100).
Side light and headlight
indicator (green)
The side indicator and headlight indicator
appears when the side light or headlights
are on (not including the Daytime Running
Lights (DRL) system or signature lights). If
the headlight switch is in the AUTO posi-
tion, the side indicator and headlight indi-
cator will appear when the headlights turn
on. For additional information, see “Head-
light and turn signal switch” (P. 2-78).
Steep Slope Apply foot
brake
This warning appears, and sounds buzzer if
the “Caution Steep slope” warning has ap-
peared over about 3 minutes. Then the
parking brake will automatically be applied
and the brake force of the automatic brake
hold will be released, and the vehicle may
move or roll away unexpectedly. Apply the
foot brake to stop the vehicle from moving.
For additional information, see “Automatic
brake hold” (P. 5-25).
Timer Alert — Have a
break?
This indicator appears when the set time is
reached. The time can be set up to six
hours. For additional information, see
“Driver Assistance” (P. 2-28).
Tire Pressure Low - Add Air
This warning appears when the low tire
pressure warning light in the meter illumi-
nates and low tire pressure is detected. The
warning appears each time the ignition
switch is placed in the ON position as long
as the low tire pressure warning light re-
mains illuminated. If this warning appears,
stop the vehicle and adjust the tire pres-sures of all four tires to the recommended
COLD tire pressure shown on the Tire and
Loading Information label. For additional
information, see “Low tire pressure warning
light” (P. 2-18) and “Tire Pressure Monitoring
System (TPMS)” (P. 5-5).
TPMS Error: See Owner’s Manual
This warning appears when there is an
error with your TPMS. If this warning ap-
pears, have the system checked. It is rec-
ommended that you visit a NISSAN dealer
for this service.
Transmission Shif t Position
indicator
This indicator shows the transmission shif t
position.
Turn signal/hazard
indicators (green)
The appropriate indicator flashes when the
turn signal switch is activated.
Both indicators flash when the hazard
switch is turned on.
When parked apply parking
brake
This message appears when a malfunc-
tion occurs in the electric shif t control sys-
tem below 6 mph (10 km/h).
2-66Instruments and controls
Page 332 of 647
• You unfasten the driver’s seat belt andopen the driver side door when the ve-
hicle is stationary or driving at very low
speed and the transmission is in the D
(Drive) position, the N (Neutral) position.
CAUTION
To avoid A/T malfunction, it is recom-
mended that you manually place the
shif t position in the P (Park) position
under the above conditions.
R (Reverse)
CAUTION
To prevent transmission damage, use
the R (Reverse) position only when the
vehicle is completely stopped.
Use the R (Reverse) position to back up.
Make sure the vehicle is completely
stopped before selecting the R (Reverse)
position. The brake pedal must be de-
pressed and the shif t lever button
pressed to move the shif t lever from the
home position to R (Reverse). If the ve-
hicle is placed in R (Reverse) position
while the vehicle is moving forward, the
chime will sound and the vehicle will
switch into the N (Neutral) position.
N (Neutral)
Neither forward nor reverse gear is en-
gaged. The engine can be started in this
position. You may shif t to the N (Neutral)
position and restart a stalled engine while
the vehicle is moving.
You can select this position by holding the
shif t lever at this position for 0.5 seconds.
D (Drive)
Use this position for all normal forward
driving. The A/T changes gears automati-
cally. All forward gears are available. If the
vehicle is placed in the D (Drive) position
while the vehicle is reversing, the chime
will sound and the vehicle will switch into
the N (Neutral) position.
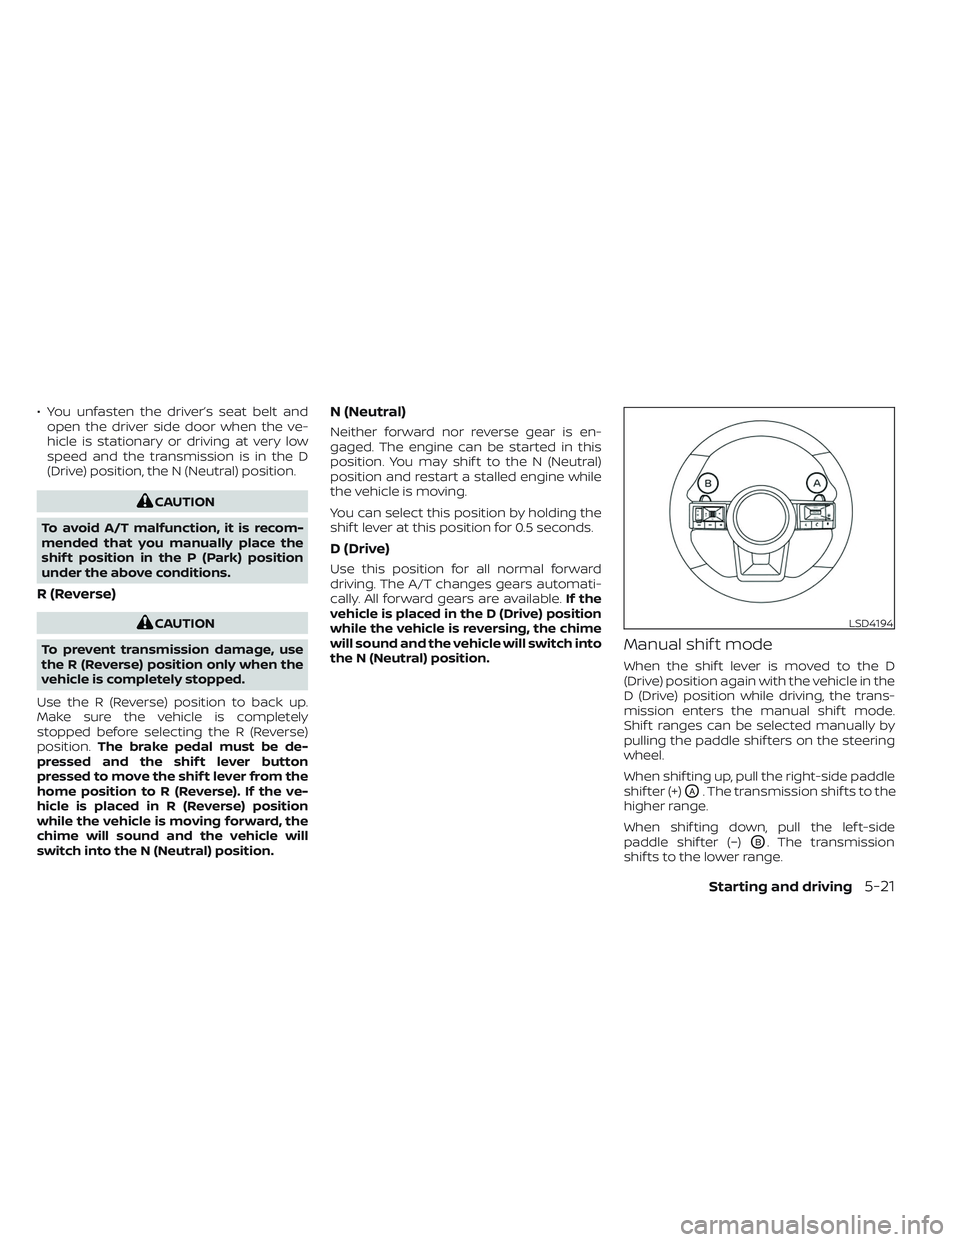
Manual shif t mode
When the shif t lever is moved to the D
(Drive) position again with the vehicle in the
D (Drive) position while driving, the trans-
mission enters the manual shif t mode.
Shif t ranges can be selected manually by
pulling the paddle shif ters on the steering
wheel.
When shif ting up, pull the right-side paddle
shif ter (+)
OA. The transmission shif ts to the
higher range.
When shif ting down, pull the lef t-side
paddle shif ter (−)
OB. The transmission
shif ts to the lower range.
LSD4194
Starting and driving5-21
Page 333 of 647
When canceling the manual shif t mode,
move the shif t lever to the D (Drive) position
again. The transmission returns to the nor-
mal driving mode.
When you pull the paddle shif ter while in
the D (Drive) position, the transmission will
shif t to the upper or lower range temporar-
ily. The transmission will automatically re-
turn to the D (Drive) position af ter a short
period of time. If you want to return to the D
(Drive) position manually, pull and hold the
paddle shif ter for about 1.5 seconds.
In the manual shif t mode, the shif t range is
displayed in the vehicle information
display.
Shif t ranges up or down one by one as
follows:
1M⇔2M⇔3M ⇔4M ⇔5M ⇔6M ⇔7M ⇔8M
⇔ 9M
9M (9th) and 8M (8th)
Use this position for all normal forward
driving at highway speeds.
7M (7th), 6M (6th) and 5M (5th)
Use these positions when driving up long
slopes, or for engine braking when driving
down long slopes.
4M (4th), 3M (3rd) and 2M (2nd)
Use these positions for hill climbing or en-
gine braking on downhill grades.
1M (1st)
Use this position when climbing steep hills
slowly or driving slowly through deep snow,
or for maximum engine braking on steep
downhill grades.
• Remember not to drive at high speeds for
extended periods of time in lower than
the 8th range. This reduces fuel economy.
• Pulling the same paddle shif ter twice will shif t the ranges in succession. However, if
this motion is rapidly done, the second
shif ting may not be completed properly.
• In the manual shif t mode, the trans-
mission may not shif t to the selected
gear. This helps maintain driving per-
formance and reduces the chance of
vehicle damage or loss of control.
• In the manual shif t mode, the trans-
mission may shif t up automatically to a
higher range than selected if the en-
gine speed is too high. When the ve-
hicle speed decreases, the transmis-
sion automatically shif ts down and
shif ts to 1st gear before the vehicle
comes to a stop.
Accelerator downshif t
— in D (Drive) position —
For passing or hill climbing, depress the
accelerator pedal to the floor. This shif ts
the transmission down into a lower gear,
depending on the vehicle speed.
High fluid temperature protection
mode
This transmission has a high fluid tem-
perature protection mode. If the fluid tem-
perature becomes too high (for example,
when climbing steep grades in high tem-
peratures with heavy loads, such as when
towing a trailer), engine power and, under
some conditions, vehicle speed will be de-
creased automatically to reduce the
chance of transmission damage. Vehicle
speed can be controlled with the accelera-
tor pedal, but the engine and vehicle speed
may be limited.
5-22Starting and driving
Page 520 of 647
CAUTION
• Always connect positive (+) to posi-
tive (+) and negative (−) to body
ground (for example, strut mounting
bolt, engine lif t bracket, etc.) — not to
the battery.
• Make sure the jumper cables do not
touch moving parts in the engine
compartment and that the cable
clamps do not contact any other
metal.
5. Start the engine of the booster vehicle and let it run for a few minutes.
6. Keep the engine speed of the booster vehicle at about 2,000 rpm and start the
engine of the vehicle being jump
started.
CAUTION
Do not keep the starter motor engaged
for more than 10 seconds. If the engine
does not start right away, place the ig-
nition switch in the OFF position and
wait 3 to 4 seconds before trying again.
7. Af ter starting the engine, carefully dis- connect the negative cable and then the
positive cable.
CAUTION
Automatic transmission models can-
not be push-started. Attempting to do
so may cause transmission damage.WARNING
• Do not continue to drive if your ve-
hicle overheats. Doing so could cause
engine damage or a vehicle fire.
• To avoid the danger of being scalded,
never remove the radiator or coolant
reservoir cap while the engine is still
hot. When the radiator or coolant res-
ervoir cap is removed, pressurized
hot water will spurt out, possibly
causing serious injury.
• Do not open the hood if steam is
coming out.
If your vehicle is overheating (indicated by
an extremely high temperature gauge
reading and the Low Oil Pressure: See
Owner’s Manual warning message ap-
pears in the vehicle information display), or
if you feel a lack of engine power, detect
abnormal noise, etc. take the following
steps:
1. Move the vehicle safely off the road, ap- ply the parking brake.
2. Push the park button to shif t to the P (Park) position.
Do not stop the engine.
PUSH STARTING IF YOUR VEHICLE OVERHEATS
In case of emergency6-13
Page 523 of 647
NOTE:
If the battery is completely drained the
transmission will not manually shif t to
other positions.
Two-Wheel Drive models with
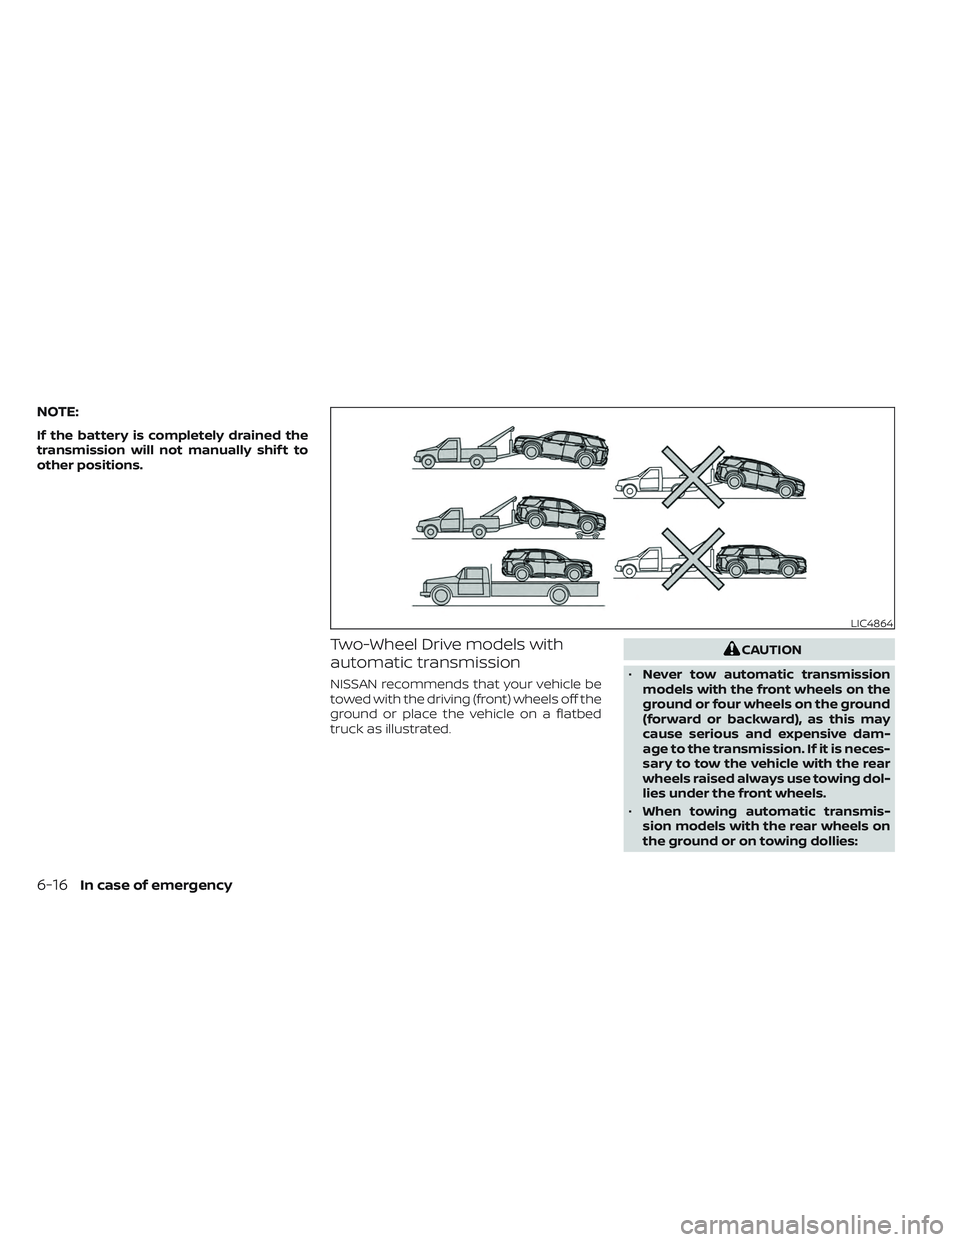
automatic transmission
NISSAN recommends that your vehicle be
towed with the driving (front) wheels off the
ground or place the vehicle on a flatbed
truck as illustrated.
CAUTION
• Never tow automatic transmission
models with the front wheels on the
ground or four wheels on the ground
(forward or backward), as this may
cause serious and expensive dam-
age to the transmission. If it is neces-
sary to tow the vehicle with the rear
wheels raised always use towing dol-
lies under the front wheels.
• When towing automatic transmis-
sion models with the rear wheels on
the ground or on towing dollies:
LIC4864
6-16In case of emergency
Page 524 of 647
–Place the ignition switch in the
OFF position, and secure the
steering wheel in a straight-ahead
position with a rope or similar de-
vice. Never secure the steering
wheel by placing the ignition
switch in the LOCK position. This
may damage the steering lock
mechanism (for models with a
steering lock mechanism).
NOTE:
If the battery is completely drained the
transmission will not manually shif t to
other positions.
VEHICLE RECOVERY (freeing a
stuck vehicle)
WARNING
To avoid vehicle damage, serious per-
sonal injury or death when recovering a
stuck vehicle:
• Contact a professional towing ser-
vice to recover the vehicle if you have
any questions regarding the recov-
ery procedure. •
Tow chains or cables must be at-
tached only to main structural mem-
bers of the vehicle.
• Do not use the vehicle tie-downs to
tow or free a stuck vehicle.
• Only use devices specifically de-
signed for vehicle recovery and fol-
low the manufacturer's instructions.
• Always pull the recovery device
straight out from the front of the ve-
hicle. Never pull at an angle.
• Route recovery devices so they do
not touch any part of the vehicle ex-
cept the attachment point.
If your vehicle is stuck in sand, snow, mud,
etc., use a tow strap or other device de-
signed specifically for vehicle recovery. Al-
ways follow the manufacturer's instruc-
tions for the recovery device.
Rocking a stuck vehicle
WARNING
• Stand clear of a stuck vehicle.
• Do not spin your tires at high speed.
This could cause them to explode
and result in serious injury. Parts of
your vehicle could also overheat and
be damaged.
If your vehicle is stuck in sand, snow, mud,
etc., use the following procedure:
1. Turn off the Vehicle Dynamic Control (VDC) system or place the Drive Mode
Selector in MUD/RUT (4WD models) or
SAND (4WD models) mode.
2. Make sure the area in front and behind the vehicle is clear of obstructions.
3. Turn the steering wheel right and lef t to clear an area around the front tires.
4. Slowly rock the vehicle forward and backward.
• Shif t back and forth between R (Re- verse) and D (Drive).
• Apply the accelerator as little as pos- sible to maintain the rocking motion.
In case of emergency6-17
Page 535 of 647
When performing any inspection or main-
tenance work on your vehicle, always take
care to prevent serious accidental injury to
yourself or damage to the vehicle. The fol-
lowing are general precautions which
should be closely observed.
WARNING
• Park the vehicle on a level surface,
apply the parking brake securely and
block the wheels to prevent the ve-
hicle from moving. Push the park
button to shif t to the P (Park)
position.
• Be sure the ignition switch is in the
OFF or LOCK position when perform-
ing any parts replacement or repairs.
• If you must work with the engine run-
ning, keep your hands, clothing, hair
and tools away from moving fans,
belts and any other moving parts.
• It is advisable to secure or remove
any loose clothing and remove any
jewelry, such as rings, watches, etc.
before working on your vehicle.
• Always wear eye protection when-
ever you work on your vehicle. •
Your vehicle is equipped with an au-
tomatic engine cooling fan. It may
come on at any time without warn-
ing, even if the ignition switch is in
the OFF position and the engine is
not running. To avoid injury, always
disconnect the negative battery
cable before working near the fan.
• If you must run the engine in an en-
closed space such as a garage, be
sure there is proper ventilation for
exhaust gases to escape.
• Never get under the vehicle while it is
supported only by a jack. If it is nec-
essary to work under the vehicle,
support it with safety stands.
• Keep smoking materials, flame and
sparks away from the fuel tank and
battery.
• Because the fuel lines on gasoline
engine models are under high pres-
sure even when the engine is off, it is
recommended that you visit a
NISSAN dealer for service of the fuel
filter or fuel lines.
CAUTION
• Do not work under the hood while
the engine is hot. Turn the engine off
and wait until it cools down.
• Avoid contact with used engine oil
and coolant. Improperly disposed
engine oil, engine coolant and/or
other vehicle fluids can damage the
environment. Always conform to lo-
cal regulations for disposal of vehicle
fluid.
• Never leave the engine or automatic
transmission related component
harnesses disconnected while the
ignition switch is in the ON position.
• Never connect or disconnect the bat-
tery or any transistorized compo-
nent while the ignition switch is in
the ON position.
NOTE:
If the battery is completely drained the
transmission will not manually shif t to
other positions.
This “Do-it-yourself ” section gives instruc-
tions regarding only those items which are
relatively easy for an owner to perform.
MAINTENANCE PRECAUTIONS
8-2Do-it-yourself