NISSAN QASHQAI 2010 Owners Manual
Manufacturer: NISSAN, Model Year: 2010, Model line: QASHQAI, Model: NISSAN QASHQAI 2010Pages: 297, PDF Size: 4.09 MB
Page 191 of 297
Downloaded from www.Manualslib.com manuals search engine Unsecured cargo can be thrown around when
driving over rough terrain. Properly secure it so
that it will not be thrown forwards and cause
injury to you or your passengers.
To avoid raising the centre of gravity excessively,
do not exceed the rated capacity of the roof rack/
gear bin (where fitted) and evenly distribute the
load. Secure heavy loads in the luggage area as
far forwards and as low as possible. Do not equip
the vehicle with tyres larger than specified. This
could cause your vehicle to rollover.
Accelerating quickly, sharp steering manoeuvres
or sudden braking may cause loss of control.
Do not drive beyond the performance of the
tyres, even with 4WD. Sudden acceleration,
steering or braking may result in loss of control
and could cause the vehicle to become stuck.
If at all possible, avoid sharp turning manoeuvres,
particularly at high speeds. Your 4WD vehicle
has a higher centre of gravity than a 2WD ve-
hicle and can tip over more easily. The vehicle is
not designed for cornering at the same speeds
as conventional 2WD models any more than low
sports cars are designed to perform satisfacto-
rily under off-road conditions. Failure to operate
this vehicle correctly could result in loss of con-
trol and/or a rollover accident.
Do not grip the inside or spokes of the steering
wheel when driving off-road. The steering wheel
could jerk and injure your hands. Instead, drive
with your fingers and thumbs on the outside of
the rim.
Before operating the vehicle, ensure that the
driver and all passengers have their seat belts
fastened.
Avoid raising the centre of gravity by loading
things on the roof or equipping the vehicle with
tyres larger than specified in this manual.
Always drive with the floor mats in place as the
floor may become very hot. Particular care
should be taken if you are barefoot.
Lower your speed when encountering strong
crosswinds. With its higher centre of gravity your
NISSAN is more affected by gusty side winds.
Slower speeds ensure better vehicle control.
Be sure to check the brakes immediately after
driving in mud or water as specified in “Wet
brakes” later in this section.
Whenever you drive off-road through sand, mud
or water as deep as the wheel hub, more fre-
quent maintenance may be required. For details,
refer to the separately provided Warranty Infor-
mation and Maintenance Booklet.
Rinse the underside of the vehicle with fresh
water after driving through mud or sand. Re-
move any brush or sticks that are trapped.
Install the same size of winter tyres on all four (4)
wheels (such as studless tyres) or install snow
chains to the front wheels when driving on slip-
pery roads (e.g. after a snowfall) and drive care-
fully using 4WD.
Avoid parking your vehicle on steep hills. If you
get out of the vehicle and it rolls forwards, back-
wards or sideways, you could be injured.
5-28Starting and driving
Page 192 of 297
Downloaded from www.Manualslib.com manuals search engine The cruise control system allows driving at constant
speeds without keeping your foot on the accelerator
pedal.
WARNING
The cruise control system ONLY maintains a
constant vehicle speed, it does not replace
the driver.
Always observe the posted speed limits and
do not set the speed above them.
Do not use the cruise control system when
driving under the following conditions. Doing
so could cause a loss of vehicle control and
result in an accident.
– When it is not possible to keep the vehicleat a constant speed
– When driving in heavy traffic
– When driving in traffic that varies speed
– When driving in windy areas
– When driving on winding or hilly roads
– When driving on slippery (rain, snow, ice, etc.) roads
CAUTION
On manual transmission models, do not shift into
N (Neutral) without depressing the clutch pedal
when the cruise control is set. Should this occur,
depress the clutch pedal and turn the cruise con-
trol main switch off immediately. Failure to do so
may cause engine damage. When the cruise control system is on the speed lim-
iter cannot be operated.
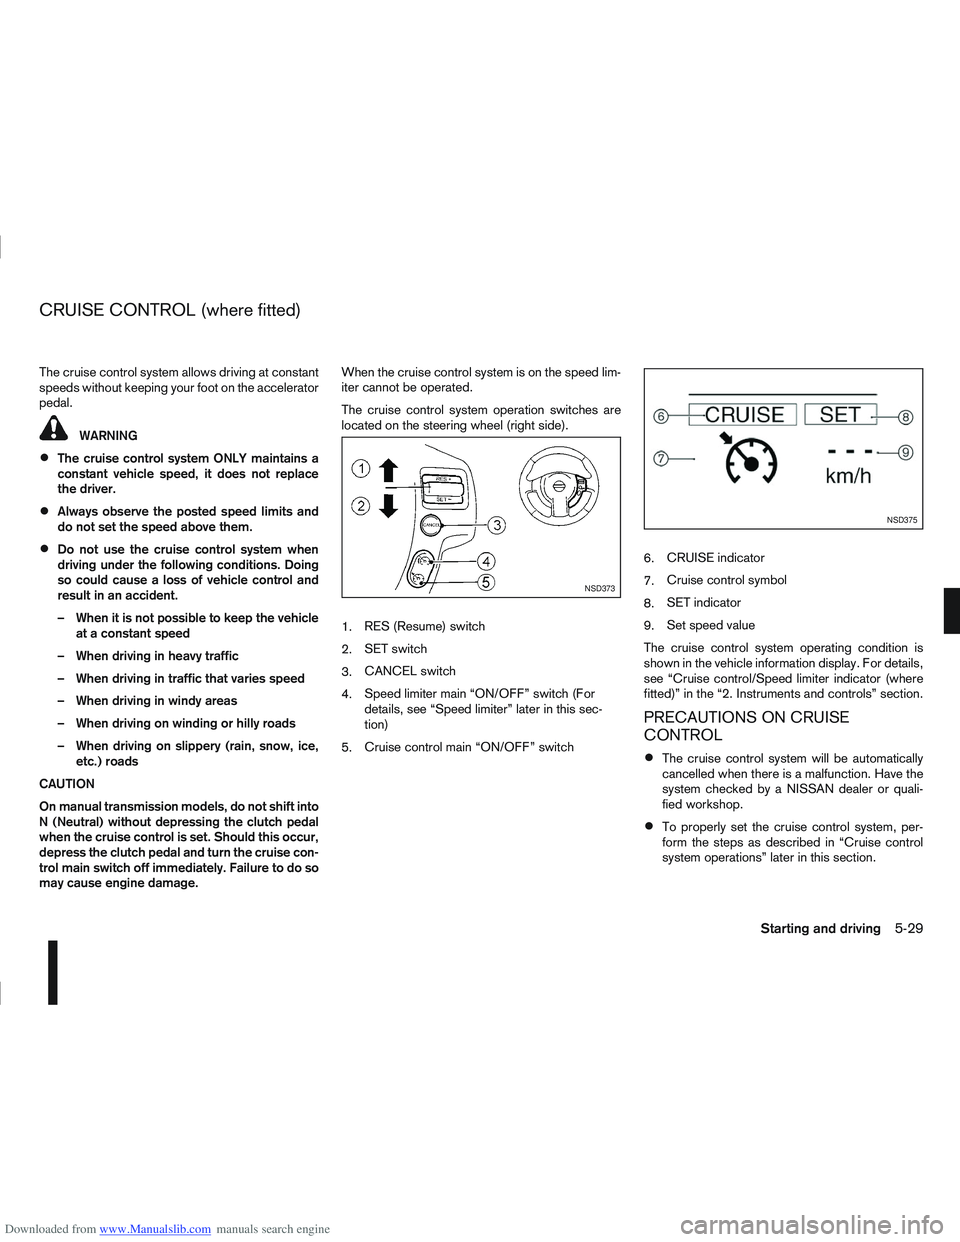
The cruise control system operation switches are
located on the steering wheel (right side).
1.
RES (Resume) switch
2. SET switch
3. CANCEL switch
4. Speed limiter main “ON/OFF” switch (For
details, see “Speed limiter” later in this sec-
tion)
5. Cruise control main “ON/OFF” switch 6.
CRUISE indicator
7. Cruise control symbol
8. SET indicator
9. Set speed value
The cruise control system operating condition is
shown in the vehicle information display. For details,
see “Cruise control/Speed limiter indicator (where
fitted)” in the “2. Instruments and controls” section.
PRECAUTIONS ON CRUISE
CONTROL
The cruise control system will be automatically
cancelled when there is a malfunction. Have the
system checked by a NISSAN dealer or quali-
fied workshop.
To properly set the cruise control system, per-
form the steps as described in “Cruise control
system operations” later in this section.
NSD373
NSD375
CRUISE CONTROL (where fitted)
Starting and driving5-29
Page 193 of 297
Downloaded from www.Manualslib.com manuals search engine CRUISE CONTROL SYSTEM
OPERATIONS
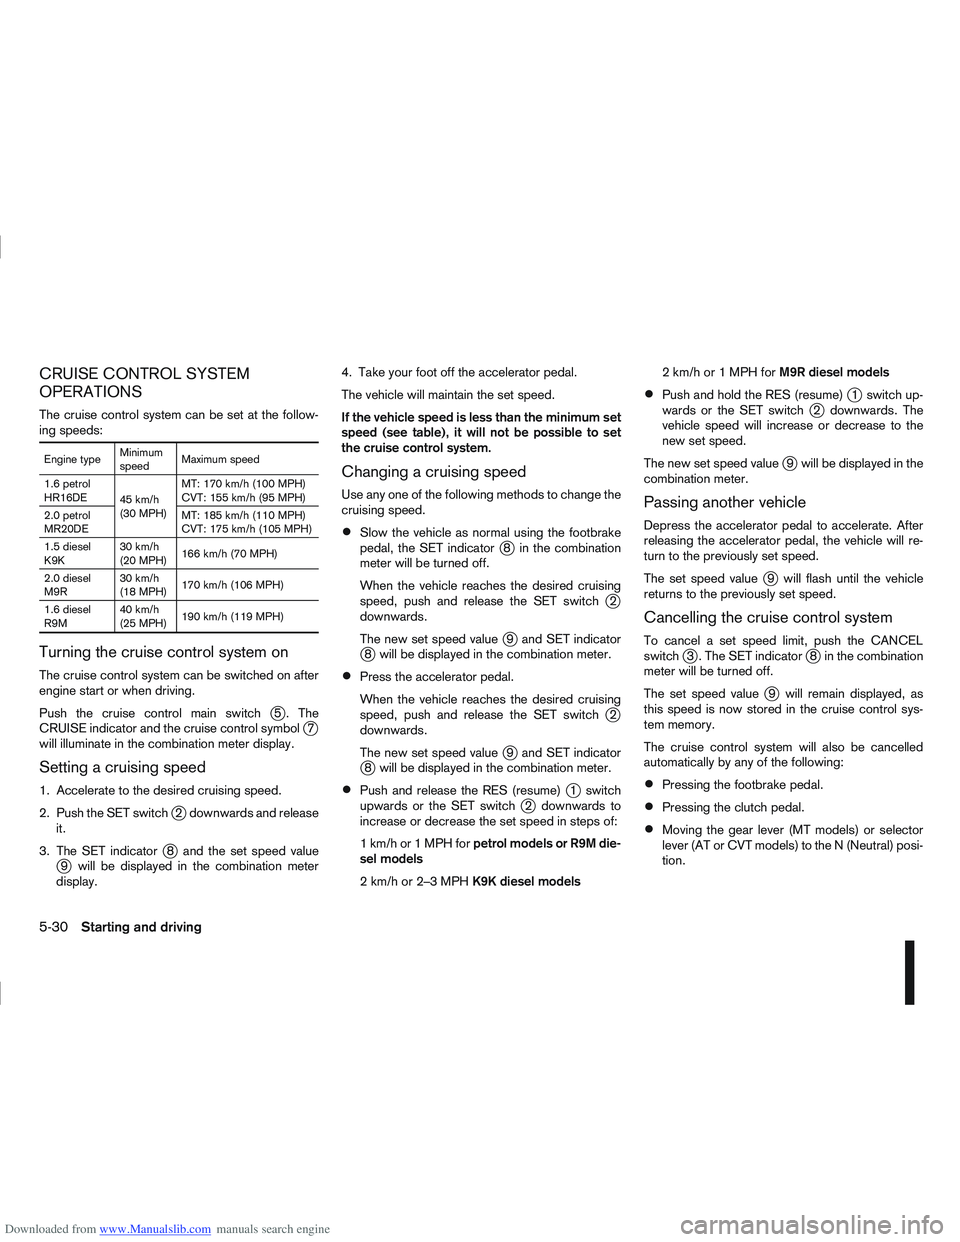
The cruise control system can be set at the follow-
ing speeds:
Engine typeMinimum
speedMaximum speed
1.6 petrol
HR16DE 45 km/h
(30 MPH)MT: 170 km/h (100 MPH)
CVT: 155 km/h (95 MPH)
2.0 petrol
MR20DE MT: 185 km/h (110 MPH)
CVT: 175 km/h (105 MPH)
1.5 diesel
K9K 30 km/h
(20 MPH)
166 km/h (70 MPH)
2.0 diesel
M9R 30 km/h
(18 MPH)
170 km/h (106 MPH)
1.6 diesel
R9M 40 km/h
(25 MPH)
190 km/h (119 MPH)
Turning the cruise control system on
The cruise control system can be switched on after
engine start or when driving.
Push the cruise control main switch
j5 . The
CRUISE indicator and the cruise control symbolj7
will illuminate in the combination meter display.
Setting a cruising speed
1. Accelerate to the desired cruising speed.
2. Push the SET switch
j2 downwards and release
it.
3. The SET indicator
j8 and the set speed valuej9 will be displayed in the combination meter
display. 4. Take your foot off the accelerator pedal.
The vehicle will maintain the set speed.
If the vehicle speed is less than the minimum set
speed (see table), it will not be possible to set
the cruise control system.
Changing a cruising speed
Use any one of the following methods to change the
cruising speed.
Slow the vehicle as normal using the footbrake
pedal, the SET indicatorj8 in the combination
meter will be turned off.
When the vehicle reaches the desired cruising
speed, push and release the SET switch
j2
downwards.
The new set speed value
j9 and SET indicatorj8 will be displayed in the combination meter.
Press the accelerator pedal.
When the vehicle reaches the desired cruising
speed, push and release the SET switch
j2
downwards.
The new set speed value
j9 and SET indicatorj8 will be displayed in the combination meter.
Push and release the RES (resume)j1 switch
upwards or the SET switchj2 downwards to
increase or decrease the set speed in steps of:
1km/hor1MPHforpetrol models or R9M die-
sel models
2km/hor2–3MPHK9K diesel models 2km/hor1MPHforM9R diesel models
Push and hold the RES (resume)j1 switch up-
wards or the SET switchj2 downwards. The
vehicle speed will increase or decrease to the
new set speed.
The new set speed value
j9 will be displayed in the
combination meter.
Passing another vehicle
Depress the accelerator pedal to accelerate. After
releasing the accelerator pedal, the vehicle will re-
turn to the previously set speed.
The set speed value
j9 will flash until the vehicle
returns to the previously set speed.
Cancelling the cruise control system
To cancel a set speed limit, push the CANCEL
switchj3 . The SET indicatorj8 in the combination
meter will be turned off.
The set speed value
j9 will remain displayed, as
this speed is now stored in the cruise control sys-
tem memory.
The cruise control system will also be cancelled
automatically by any of the following:
Pressing the footbrake pedal.
Pressing the clutch pedal.
Moving the gear lever (MT models) or selector
lever (AT or CVT models) to the N (Neutral) posi-
tion.
5-30Starting and driving
Page 194 of 297
Downloaded from www.Manualslib.com manuals search engine If the vehicle slows down more than approxi-
mately 12 km/h (8 MPH) below the set speed.
Resuming a previous cruising speed
If the cruising speed has been cancelled, the set
speed valuej9 will remain displayed in the combi-
nation meter and the speed will be stored in the
cruise control system memory. This cruising speed
can be reactivated by pressing the RES (Resume)
switch
j1 upwards.
If the vehicle speed is less than the minimum set
speed (see table), it will not be possible to re-
sume to the cruising speed.
Turn the cruise control system off
The cruise control system will be turned off when
one of the following operations is performed:
Push the cruise control main “ON/OFF” switchj5 . The cruise control symbolj7 , the CRUISE
indicatorj6 , the SET indicatorj8 , and the set
speed valuej9 will turn off in the combination
meter display
Push the speed limiter main “ON/OFF” switchj5 . The cruise control system information in the
combination meter will be replaced with the
speed limiter information. For details see “Speed
limiter” later in this section.
When the vehicle is stopped and the ignition is
turned to the off position.
Turning off the cruise control system will erase
the cruise control system memory. The speed limiter allows you to set the desired ve-
hicle speed limit. While the speed limiter is acti-
vated, you can perform normal braking and accel-
eration, but the vehicle will not exceed the set speed.
When the vehicle reaches the set speed limit or if
the set speed limit is lower than the actual vehicle
speed, the accelerator pedal will not work until the
vehicle speed drops below the set speed limit.
WARNING
The speed limiter will not automatically brake
the vehicle to the set speed limit.
Always observe posted speed limits. Do not
set the speed above them.
Always confirm the setting status of the speed
limiter in the combination meter display.
When the speed limiter is set, avoid hard ac-
celeration to reach the set limit to ensure that
the system can limit the speed of the vehicle
correctly.
When additional floor mats are used, be sure
that they are correctly secured and that they
cannot interfere with the accelerator pedal.
Mats not adapted to the vehicle may prevent
proper operation of the speed limiter.
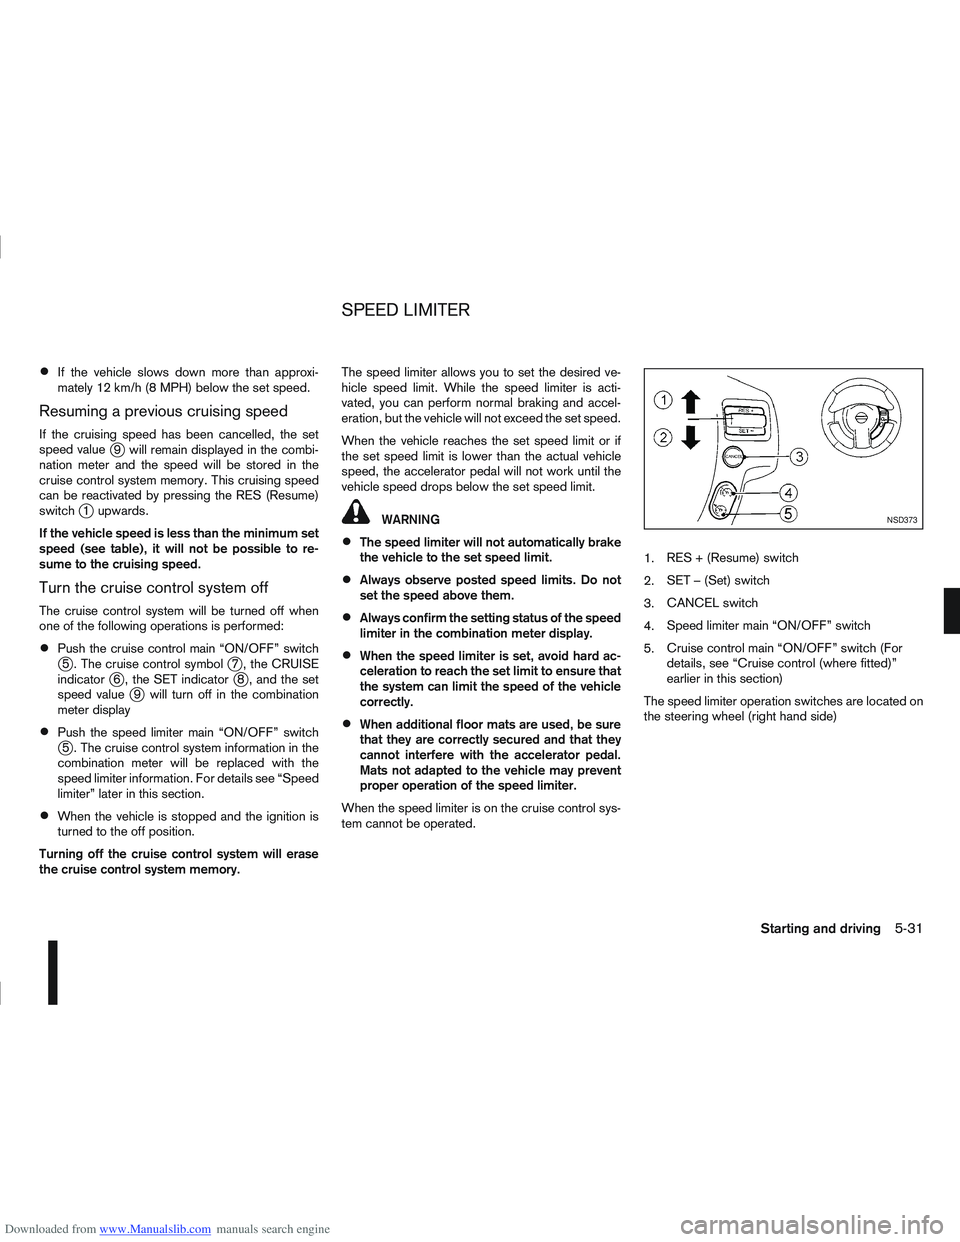
When the speed limiter is on the cruise control sys-
tem cannot be operated. 1.
RES + (Resume) switch
2. SET – (Set) switch
3. CANCEL switch
4. Speed limiter main “ON/OFF” switch
5. Cruise control main “ON/OFF” switch (For
details, see “Cruise control (where fitted)”
earlier in this section)
The speed limiter operation switches are located on
the steering wheel (right hand side)
NSD373
SPEED LIMITER
Starting and driving5-31
Page 195 of 297
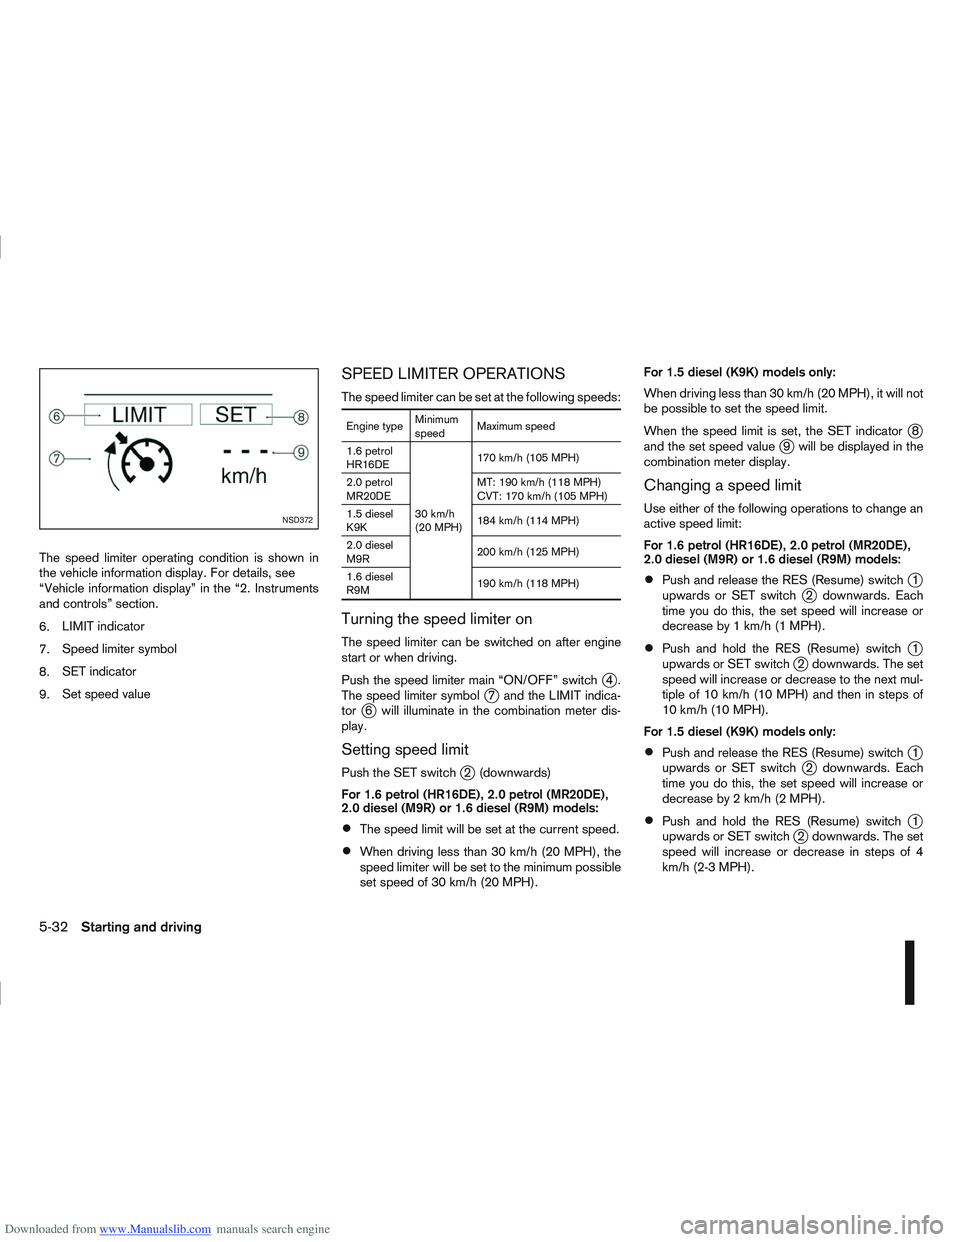
Downloaded from www.Manualslib.com manuals search engine The speed limiter operating condition is shown in
the vehicle information display. For details, see
“Vehicle information display” in the “2. Instruments
and controls” section.
6.LIMIT indicator
7. Speed limiter symbol
8. SET indicator
9. Set speed value
SPEED LIMITER OPERATIONS
The speed limiter can be set at the following speeds:
Engine type Minimum
speedMaximum speed
1.6 petrol
HR16DE
30 km/h
(20 MPH)170 km/h (105 MPH)
2.0 petrol
MR20DE MT: 190 km/h (118 MPH)
CVT: 170 km/h (105 MPH)
1.5 diesel
K9K 184 km/h (114 MPH)
2.0 diesel
M9R 200 km/h (125 MPH)
1.6 diesel
R9M 190 km/h (118 MPH)
Turning the speed limiter on
The speed limiter can be switched on after engine
start or when driving.
Push the speed limiter main “ON/OFF” switch
j4.
The speed limiter symbolj7 and the LIMIT indica-
torj6 will illuminate in the combination meter dis-
play.
Setting speed limit
Push the SET switchj2 (downwards)
For 1.6 petrol (HR16DE), 2.0 petrol (MR20DE),
2.0 diesel (M9R) or 1.6 diesel (R9M) models:
The speed limit will be set at the current speed.
When driving less than 30 km/h (20 MPH), the
speed limiter will be set to the minimum possible
set speed of 30 km/h (20 MPH). For 1.5 diesel (K9K) models only:
When driving less than 30 km/h (20 MPH), it will not
be possible to set the speed limit.
When the speed limit is set, the SET indicator
j8
and the set speed valuej9 will be displayed in the
combination meter display.
Changing a speed limit
Use either of the following operations to change an
active speed limit:
For 1.6 petrol (HR16DE), 2.0 petrol (MR20DE),
2.0 diesel (M9R) or 1.6 diesel (R9M) models:
Push and release the RES (Resume) switchj1
upwards or SET switchj2 downwards. Each
time you do this, the set speed will increase or
decrease by 1 km/h (1 MPH).
Push and hold the RES (Resume) switchj1
upwards or SET switchj2 downwards. The set
speed will increase or decrease to the next mul-
tiple of 10 km/h (10 MPH) and then in steps of
10 km/h (10 MPH).
For 1.5 diesel (K9K) models only:
Push and release the RES (Resume) switchj1
upwards or SET switchj2 downwards. Each
time you do this, the set speed will increase or
decrease by 2 km/h (2 MPH).
Push and hold the RES (Resume) switchj1
upwards or SET switchj2 downwards. The set
speed will increase or decrease in steps of 4
km/h (2-3 MPH).
NSD372
5-32Starting and driving
Page 196 of 297
Downloaded from www.Manualslib.com manuals search engine The new set speed limit valuej9 will be displayed
in the combination meter display.
Cancelling a speed limit
To cancel a set speed limit, push the CANCEL
switchj3 . The SET indicatorj8 in the combination
meter will be turned off. The set speed valuej9 will
remain displayed.
It is also possible to override the speed limiter by
fully depressing the accelerator pedal beyond the
resistance point.
WARNING
The vehicle may accelerate when the speed
limiter cancels.
When additional floor mats are used, be sure
that they are correctly secured and that they
cannot interfere with the accelerator pedal.
Mats not adapted to the vehicle may prevent
proper operation of the speed limiter.
Fully depress the accelerator pedal beyond the re-
sistance point. The speed limiter will be suspended
to allow driving above the set speed. The set speed
value
j9 will flash. The speed limiter will automati-
cally resume when the vehicle speed drops below
the set speed limit.
Resuming a previous set speed
If a set speed limit has been cancelled, the set speed
valuej9 will remain displayed in the combination
meter and the speed will be stored in the speed lim-
iter memory. This speed limit can be reactivated by pressing the
RES (Resume) switch
j1 upwards.
If the current vehicle speed is higher than the previ-
ous set speed, the accelerator pedal will not work
and the set speed value
j9 will flash until the vehicle
speed drops below the set speed limit.
Turning the speed limiter off
The speed limiter system will be turned off when
one of the following operations is performed:
Push the speed limiter main “ON/OFF” switchj4 . The speed limiter symbolj7 , the LIMIT indi-
catorj6 , the SET indicatorj8 , and the set
speed valuej9 will turn off in the combination
meter display.
Push the cruise control main “ON/OFF” switchj5 . The speed limiter information in the combi-
nation meter will be replaced with the cruise con-
trol information. For details see “Cruise control
(where fitted)” earlier in this section.
When the vehicle is stopped and the ignition is
turned to the off position.
Turning off the speed limiter will erase the set
speed limit memory.
Speed limiter malfunction
If the speed limiter malfunctions, the set indicatorj8 in the combination meter display will flash.
Turn the speed limiter off by pushing the speed lim-
iter main “ON/OFF” switch
j4 and have the system
checked by a NISSAN dealer or qualified workshop.
WARNING
Do not park the vehicle over flammable mate-
rials, such as dry grass, waste paper, or rags.
They may ignite and cause a fire.
Safe parking procedures require that:
– The handbrake is applied.
– The gear lever is placed in an appropriate gear for manual transmission models.
– The selector lever is placed in the P (Park) position for automatic transmission or con-
tinuously variable transmission models.
Failure to follow the above recommenda-
tions could cause the vehicle to move un-
expectedly or roll away and result in an
accident.
Never leave the engine running while the ve-
hicle is unattended.
Do not leave children or adults who would
normally require the support of others alone
in your vehicle. Pets should also not be left
alone either. On hot, sunny days, tempera-
tures in a closed vehicle could quickly be-
come high enough to cause severe or possi-
bly fatal injuries to people or animals.
Manual transmission models:
Depress the clutch pedal and place the gear
lever in the R (Reverse) position. When parking
on an uphill gradient, place the gear lever in the
1st (Low gear) position.
PARKING
Starting and driving5-33
Page 197 of 297
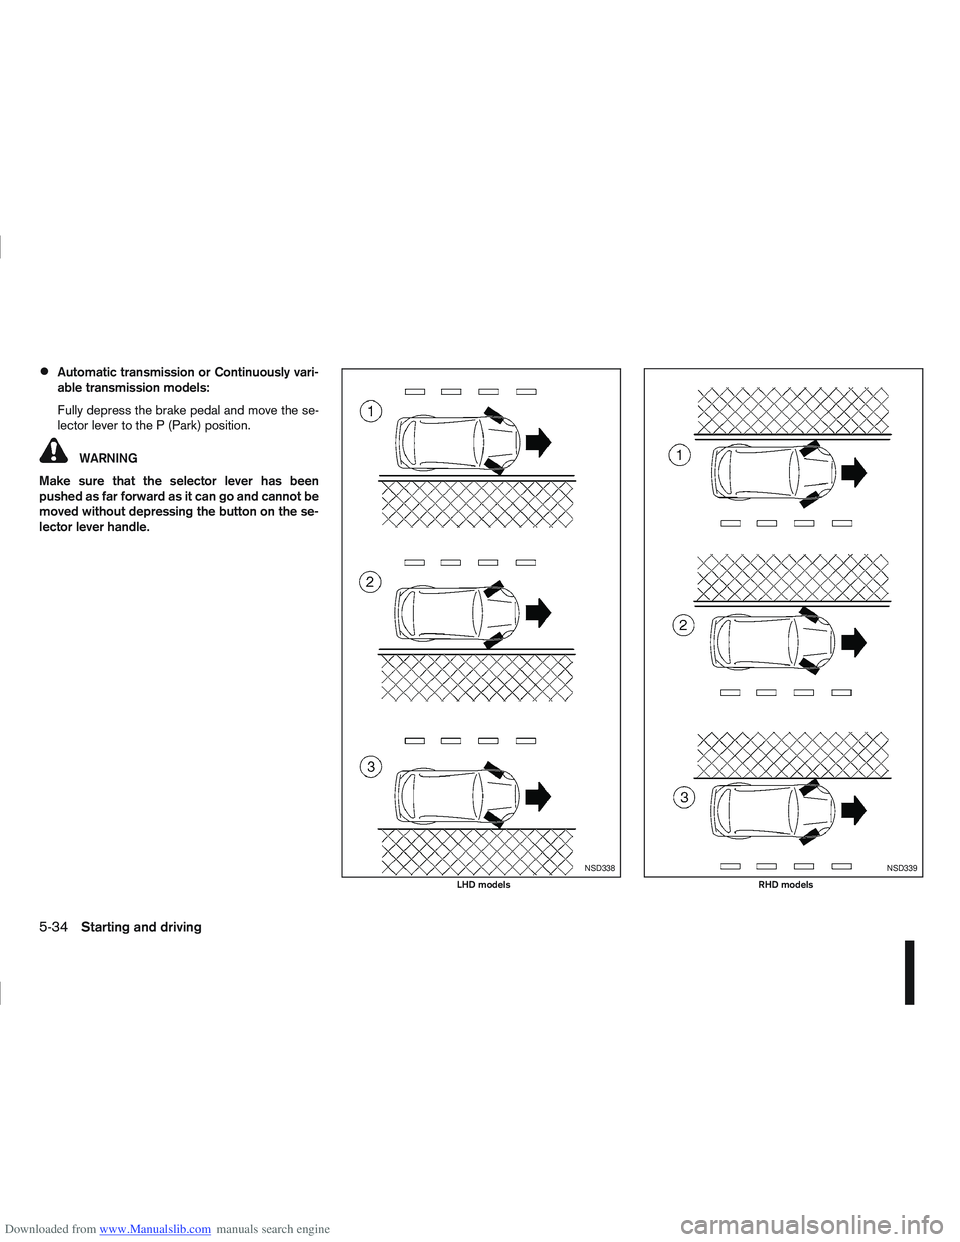
Downloaded from www.Manualslib.com manuals search engine Automatic transmission or Continuously vari-
able transmission models:
Fully depress the brake pedal and move the se-
lector lever to the P (Park) position.
WARNING
Make sure that the selector lever has been
pushed as far forward as it can go and cannot be
moved without depressing the button on the se-
lector lever handle.
NSD338
LHD models
NSD339
RHD models
5-34Starting and driving
Page 198 of 297
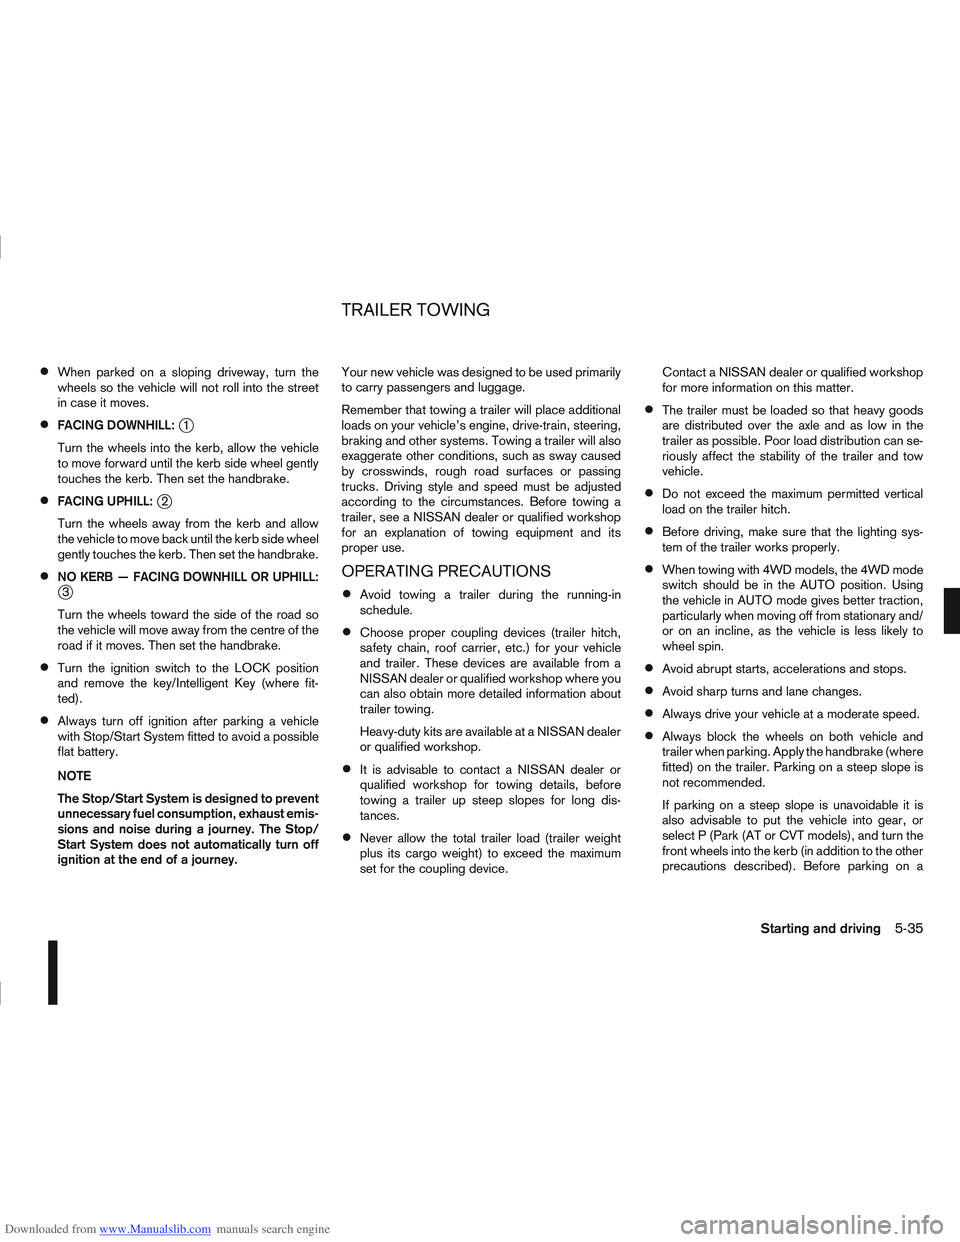
Downloaded from www.Manualslib.com manuals search engine When parked on a sloping driveway, turn the
wheels so the vehicle will not roll into the street
in case it moves.
FACING DOWNHILL:j1
Turn the wheels into the kerb, allow the vehicle
to move forward until the kerb side wheel gently
touches the kerb. Then set the handbrake.
FACING UPHILL:j2
Turn the wheels away from the kerb and allow
the vehicle to move back until the kerb side wheel
gently touches the kerb. Then set the handbrake.
NO KERB — FACING DOWNHILL OR UPHILL:j3
Turn the wheels toward the side of the road so
the vehicle will move away from the centre of the
road if it moves. Then set the handbrake.
Turn the ignition switch to the LOCK position
and remove the key/Intelligent Key (where fit-
ted).
Always turn off ignition after parking a vehicle
with Stop/Start System fitted to avoid a possible
flat battery.
NOTE
The Stop/Start System is designed to prevent
unnecessary fuel consumption, exhaust emis-
sions and noise during a journey. The Stop/
Start System does not automatically turn off
ignition at the end of a journey. Your new vehicle was designed to be used primarily
to carry passengers and luggage.
Remember that towing a trailer will place additional
loads on your vehicle’s engine, drive-train, steering,
braking and other systems. Towing a trailer will also
exaggerate other conditions, such as sway caused
by crosswinds, rough road surfaces or passing
trucks. Driving style and speed must be adjusted
according to the circumstances. Before towing a
trailer, see a NISSAN dealer or qualified workshop
for an explanation of towing equipment and its
proper use.
OPERATING PRECAUTIONS
Avoid towing a trailer during the running-in
schedule.
Choose proper coupling devices (trailer hitch,
safety chain, roof carrier, etc.) for your vehicle
and trailer. These devices are available from a
NISSAN dealer or qualified workshop where you
can also obtain more detailed information about
trailer towing.
Heavy-duty kits are available at a NISSAN dealer
or qualified workshop.
It is advisable to contact a NISSAN dealer or
qualified workshop for towing details, before
towing a trailer up steep slopes for long dis-
tances.
Never allow the total trailer load (trailer weight
plus its cargo weight) to exceed the maximum
set for the coupling device. Contact a NISSAN dealer or qualified workshop
for more information on this matter.
The trailer must be loaded so that heavy goods
are distributed over the axle and as low in the
trailer as possible. Poor load distribution can se-
riously affect the stability of the trailer and tow
vehicle.
Do not exceed the maximum permitted vertical
load on the trailer hitch.
Before driving, make sure that the lighting sys-
tem of the trailer works properly.
When towing with 4WD models, the 4WD mode
switch should be in the AUTO position. Using
the vehicle in AUTO mode gives better traction,
particularly when moving off from stationary and/
or on an incline, as the vehicle is less likely to
wheel spin.
Avoid abrupt starts, accelerations and stops.
Avoid sharp turns and lane changes.
Always drive your vehicle at a moderate speed.
Always block the wheels on both vehicle and
trailer when parking. Apply the handbrake (where
fitted) on the trailer. Parking on a steep slope is
not recommended.
If parking on a steep slope is unavoidable it is
also advisable to put the vehicle into gear, or
select P (Park (AT or CVT models), and turn the
front wheels into the kerb (in addition to the other
precautions described). Before parking on a
TRAILER TOWING
Starting and driving5-35
Page 199 of 297
Downloaded from www.Manualslib.com manuals search engine steep slope consider the incline (the towing
weights quoted are for a 12% slope).
Follow the trailer manufacturer’s instructions.
Have your vehicle serviced more often than at
the intervals specified in the separately provided
Warranty Information and Maintenance booklet.
Trailer towing requires more fuel than under nor-
mal circumstances because of a considerable
increase in traction power required and resis-
tance.
When towing a trailer, observe the following re-
stricted towing speed:
Speed: below 100 km/h (62 MPH)
CAUTION
While towing a trailer, check the engine coolant
temperature gauge regularly to prevent engine
overheating.
TYRE PRESSURE
When towing a trailer, inflate the vehicle tyres to the
maximum recommended COLD tyre pressure, as
indicated on the tyre placard (for full loading). Make
sure the trailer tyre pressures are correct.
CAUTION
Do not tow a trailer when the vehicle is installed
with a temporary-use spare tyre.
SAFETY CHAINS
Always use a suitable chain between the vehicle
and trailer. The chain should be attached to the hitch
and not to the vehicle bumper or axle. Be sure to
leave enough slack in the chain to permit turning
corners. The chain should not drag on the ground:
passing the chain across the trailer hitch may be the
best practice depending on your trailer.
TRAILER BRAKES
Ensure that trailer brakes are installed as required
by local regulations. Also check that all other trailer
equipment conforms to local regulations.
TRAILER DETECTION (where fitted)
When towing a trailer and the turn signal switch is
used, the electrical system of the vehicle will detect
an additional electrical load of the trailer lighting. As
a result, the trailer direction indicator light comes
on.
INSTALLATION OF COUPLING
DEVICE
NISSAN recommends that the coupling device for
trailer towing be installed under the following condi-
tions:
Maximum permissible vertical load on the cou-
pling device: 736 N (75 kg, 165 lb)
The coupling device, mounting points and instal-
lation parts on your vehicle: as shown as an ex-
ample in the illustration. Follow all of the coupling device manufacturer’s in-
structions for installation and use.
5-36Starting and driving
Page 200 of 297
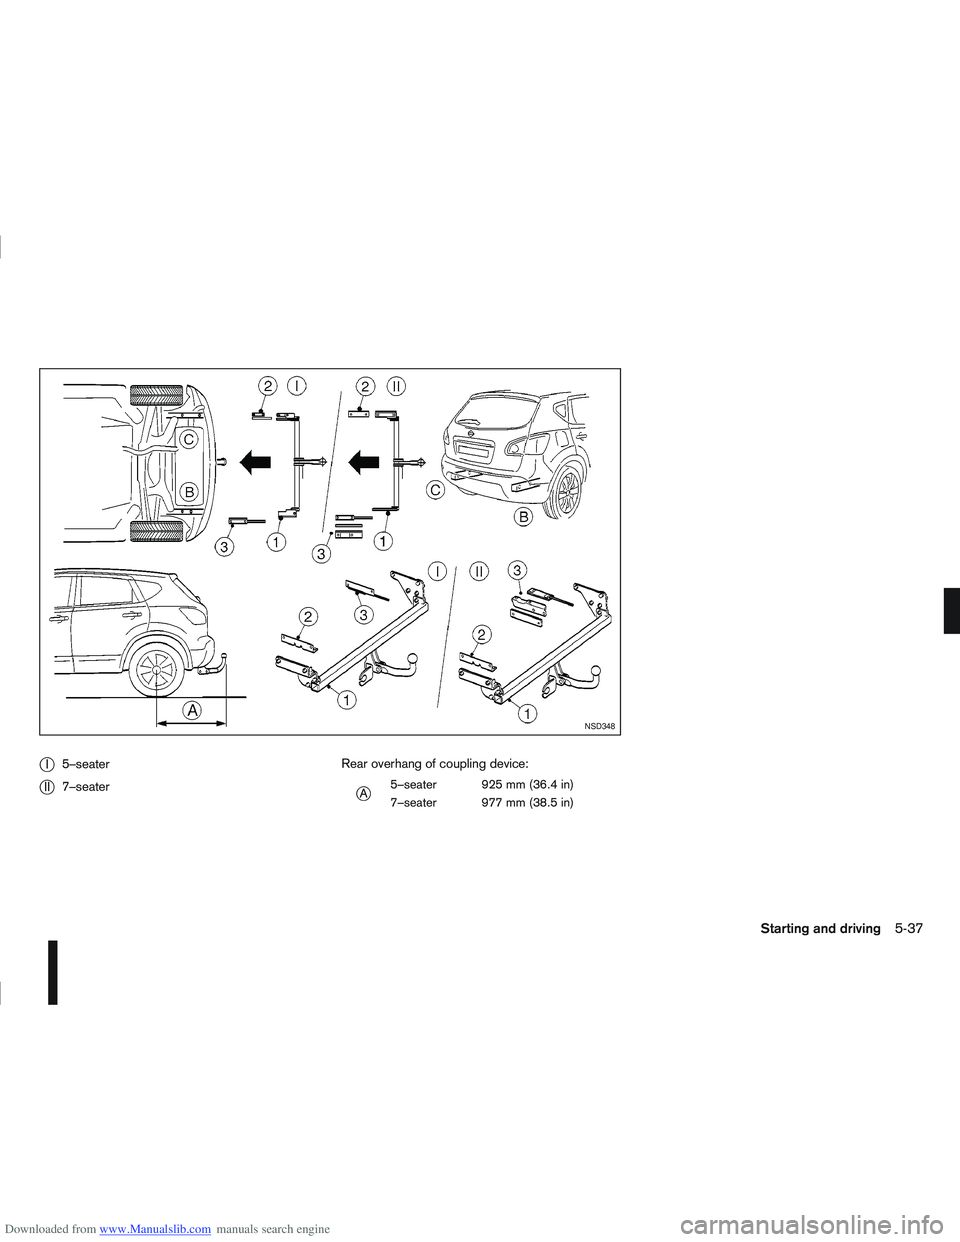
Downloaded from www.Manualslib.com manuals search engine jI5–seater
jII 7–seater Rear overhang of coupling device:jA
5–seater 925 mm (36.4 in)
7–seater 977 mm (38.5 in)
NSD348
Starting and driving5-37