K9K NISSAN QASHQAI 2010 Owners Manual
[x] Cancel search | Manufacturer: NISSAN, Model Year: 2010, Model line: QASHQAI, Model: NISSAN QASHQAI 2010Pages: 297, PDF Size: 4.09 MB
Page 6 of 297

Downloaded from www.Manualslib.com manuals search engine 0Illustrated table of contents
Illustrated table of contents
Air bag system ......................................................... 0-2
Exterior front and rear .............................................. 0-3
Instrument and control layout ................................... 0-4
Left (LHD) and Right-hand drive (RHD)
models ............................................................... 0-5
Meters and gauges .................................................. 0-6
Engine compartment ................................................ 0-7 HR16DE engine (Type A) ................................... 0-8
HR16DE engine (Type B) ................................... 0-8
MR20DE engine ................................................. 0-9
Euro 4 K9K engine ............................................. 0-11
Euro 5 K9K engine ............................................. 0-11
M9R engine ........................................................ 0-12
R9M engine ........................................................ 0-13
Page 15 of 297

Downloaded from www.Manualslib.com manuals search engine Euro 4 K9K engine
j
1Engine coolant reservoir (P. 8-6)
j2Brake and clutch fluid reservoir (RHD models)
(P. 8-15)
j3Engine oil filler cap (P. 8-8)
j4Brake/clutch fluid reservoir (LHD models)
(P. 8-15)
j5Air cleaner filter (P. 8-21)
j6Fuses/fusible link box (P. 8-23)
j7Battery (P. 8-17)
j8Engine oil dipstick (P. 8-8)
j9Window washer/headlight cleaner (where fit-
ted) fluid reservoir (P. 8-16)
j10Fuel filter priming bulb (P. 8-13)
NDI908
0-10Illustrated table of contents
Page 16 of 297

Downloaded from www.Manualslib.com manuals search engine Euro 5 K9K engine
j
1Engine coolant reservoir (P. 8-6)
j2Brake and clutch fluid reservoir (RHD models)
(P. 8-15)
j3Brake/clutch fluid reservoir (LHD models)
(P. 8-15)
j4Air cleaner filter (P. 8-21)
j5Fuses/fusible link box (P. 8-23)
j6Battery (P. 8-17)
j7Engine oil filler cap (P. 8-8)
Engine oil dipstick (P. 8-8)
j8Window washer/headlight cleaner (where fit-
ted) fluid reservoir (P. 8-16)
j9Fuel filter priming bulb (P. 8-13)
NDI1065
Illustrated table of contents0-11
Page 165 of 297
Downloaded from www.Manualslib.com manuals search engine During the first 1,600 km (1,000 miles), follow these
recommendations for the future reliability and
economy of your new vehicle. Failure to follow the
recommendations may result in shortened engine
life and reduced engine performance.
Avoid driving for long periods at a constant
speed, either fast or slow.
Do not accelerate at full throttle in any gear.
Avoid quick starts.
Avoid hard braking as much as possible.
Do not tow a trailer during the first 800 km (500
miles).
NOTE
Models with K9K diesel engine will achieve top
performance only after approximately 5,000 km
(3,000 miles).
WARNING
The driving characteristics of your vehicle can be
changed remarkably by any additional load and
its distribution as well as by adding optional
equipment (trailer couplings, roof racks, etc.).
Your driving style and speed have to be adjusted
accordingly. Especially when carrying heavy
loads, your speed must be reduced adequately.
Make sure the area around the vehicle is free of
obstacles.
Check fluid levels such as engine oil, coolant,
brake and clutch fluid, and window washer fluid
as frequently as possible, at least whenever you
refuel.
Visually inspect tyres for their appearance and
condition. Also check the tyre pressure for
proper inflation.
Maintenance items in the “8. Maintenance and
do-it-yourself” section should be checked peri-
odically.
Check that all windows and light lenses are
clean.
Check that all doors are closed.
Position the seat and adjust the head restraints.
Adjust the inside and outside mirrors.
Fasten your seat belt and ask all passengers to
do likewise.
Check the operation of the warning/indicator
lights when the ignition switch is turned to the
ON position.
Do not place hard or heavy objects on the dash-
board or rear parcel shelf in order to prevent
injury in the event of a sudden stop.
RUNNING-IN SCHEDULE BEFORE STARTING THE ENGINE
5-2Starting and driving
Page 193 of 297
Downloaded from www.Manualslib.com manuals search engine CRUISE CONTROL SYSTEM
OPERATIONS
The cruise control system can be set at the follow-
ing speeds:
Engine typeMinimum
speedMaximum speed
1.6 petrol
HR16DE 45 km/h
(30 MPH)MT: 170 km/h (100 MPH)
CVT: 155 km/h (95 MPH)
2.0 petrol
MR20DE MT: 185 km/h (110 MPH)
CVT: 175 km/h (105 MPH)
1.5 diesel
K9K 30 km/h
(20 MPH)
166 km/h (70 MPH)
2.0 diesel
M9R 30 km/h
(18 MPH)
170 km/h (106 MPH)
1.6 diesel
R9M 40 km/h
(25 MPH)
190 km/h (119 MPH)
Turning the cruise control system on
The cruise control system can be switched on after
engine start or when driving.
Push the cruise control main switch
j5 . The
CRUISE indicator and the cruise control symbolj7
will illuminate in the combination meter display.
Setting a cruising speed
1. Accelerate to the desired cruising speed.
2. Push the SET switch
j2 downwards and release
it.
3. The SET indicator
j8 and the set speed valuej9 will be displayed in the combination meter
display. 4. Take your foot off the accelerator pedal.
The vehicle will maintain the set speed.
If the vehicle speed is less than the minimum set
speed (see table), it will not be possible to set
the cruise control system.
Changing a cruising speed
Use any one of the following methods to change the
cruising speed.
Slow the vehicle as normal using the footbrake
pedal, the SET indicatorj8 in the combination
meter will be turned off.
When the vehicle reaches the desired cruising
speed, push and release the SET switch
j2
downwards.
The new set speed value
j9 and SET indicatorj8 will be displayed in the combination meter.
Press the accelerator pedal.
When the vehicle reaches the desired cruising
speed, push and release the SET switch
j2
downwards.
The new set speed value
j9 and SET indicatorj8 will be displayed in the combination meter.
Push and release the RES (resume)j1 switch
upwards or the SET switchj2 downwards to
increase or decrease the set speed in steps of:
1km/hor1MPHforpetrol models or R9M die-
sel models
2km/hor2–3MPHK9K diesel models 2km/hor1MPHforM9R diesel models
Push and hold the RES (resume)j1 switch up-
wards or the SET switchj2 downwards. The
vehicle speed will increase or decrease to the
new set speed.
The new set speed value
j9 will be displayed in the
combination meter.
Passing another vehicle
Depress the accelerator pedal to accelerate. After
releasing the accelerator pedal, the vehicle will re-
turn to the previously set speed.
The set speed value
j9 will flash until the vehicle
returns to the previously set speed.
Cancelling the cruise control system
To cancel a set speed limit, push the CANCEL
switchj3 . The SET indicatorj8 in the combination
meter will be turned off.
The set speed value
j9 will remain displayed, as
this speed is now stored in the cruise control sys-
tem memory.
The cruise control system will also be cancelled
automatically by any of the following:
Pressing the footbrake pedal.
Pressing the clutch pedal.
Moving the gear lever (MT models) or selector
lever (AT or CVT models) to the N (Neutral) posi-
tion.
5-30Starting and driving
Page 195 of 297
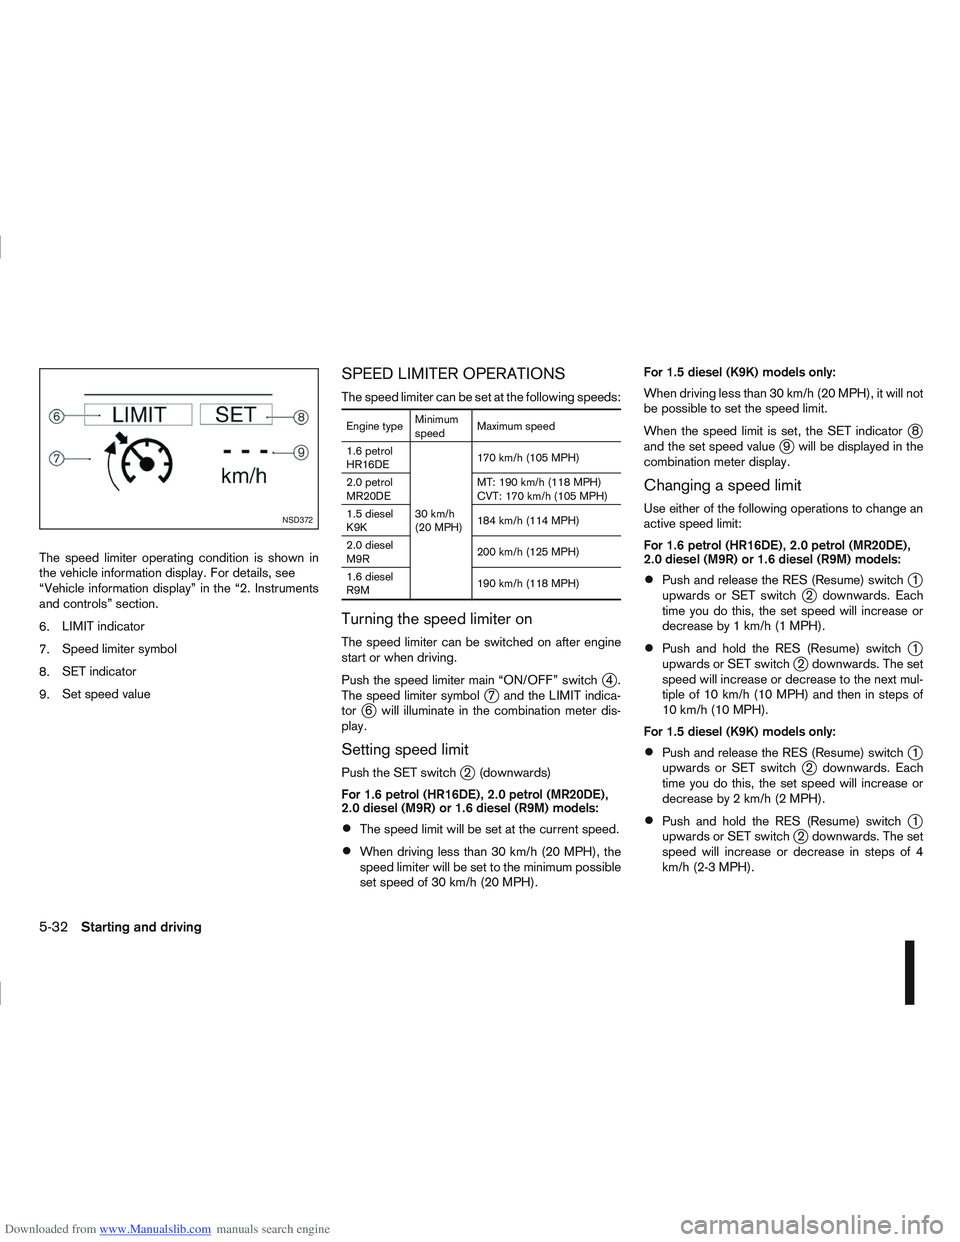
Downloaded from www.Manualslib.com manuals search engine The speed limiter operating condition is shown in
the vehicle information display. For details, see
“Vehicle information display” in the “2. Instruments
and controls” section.
6.LIMIT indicator
7. Speed limiter symbol
8. SET indicator
9. Set speed value
SPEED LIMITER OPERATIONS
The speed limiter can be set at the following speeds:
Engine type Minimum
speedMaximum speed
1.6 petrol
HR16DE
30 km/h
(20 MPH)170 km/h (105 MPH)
2.0 petrol
MR20DE MT: 190 km/h (118 MPH)
CVT: 170 km/h (105 MPH)
1.5 diesel
K9K 184 km/h (114 MPH)
2.0 diesel
M9R 200 km/h (125 MPH)
1.6 diesel
R9M 190 km/h (118 MPH)
Turning the speed limiter on
The speed limiter can be switched on after engine
start or when driving.
Push the speed limiter main “ON/OFF” switch
j4.
The speed limiter symbolj7 and the LIMIT indica-
torj6 will illuminate in the combination meter dis-
play.
Setting speed limit
Push the SET switchj2 (downwards)
For 1.6 petrol (HR16DE), 2.0 petrol (MR20DE),
2.0 diesel (M9R) or 1.6 diesel (R9M) models:
The speed limit will be set at the current speed.
When driving less than 30 km/h (20 MPH), the
speed limiter will be set to the minimum possible
set speed of 30 km/h (20 MPH). For 1.5 diesel (K9K) models only:
When driving less than 30 km/h (20 MPH), it will not
be possible to set the speed limit.
When the speed limit is set, the SET indicator
j8
and the set speed valuej9 will be displayed in the
combination meter display.
Changing a speed limit
Use either of the following operations to change an
active speed limit:
For 1.6 petrol (HR16DE), 2.0 petrol (MR20DE),
2.0 diesel (M9R) or 1.6 diesel (R9M) models:
Push and release the RES (Resume) switchj1
upwards or SET switchj2 downwards. Each
time you do this, the set speed will increase or
decrease by 1 km/h (1 MPH).
Push and hold the RES (Resume) switchj1
upwards or SET switchj2 downwards. The set
speed will increase or decrease to the next mul-
tiple of 10 km/h (10 MPH) and then in steps of
10 km/h (10 MPH).
For 1.5 diesel (K9K) models only:
Push and release the RES (Resume) switchj1
upwards or SET switchj2 downwards. Each
time you do this, the set speed will increase or
decrease by 2 km/h (2 MPH).
Push and hold the RES (Resume) switchj1
upwards or SET switchj2 downwards. The set
speed will increase or decrease in steps of 4
km/h (2-3 MPH).
NSD372
5-32Starting and driving
Page 238 of 297

Downloaded from www.Manualslib.com manuals search engine HR16DE, MR20DE, M9R or R9M
engine
1. Set the heater or air conditioner temperaturecontrol to the maximum “HOT” position.
2. Open the bonnet. For details, see “Bonnet release” in the “3. Pre-driving checks and
adjustments” section.
3. Open the engine coolant reservoir cap
j1to
help to drain the coolant.
4. Disconnect the end of the hose
j2 to drain the
coolant.
5. Flush the cooling system by running clean water through the engine coolant reservoir.
6. Install the hose
j2.
7. Fill the coolant reservoir up to the MAX level. See “Capacities and recommended
fuel/lubricants” in the “9. Technical information”
section for cooling system capacity.
8. Install the engine coolant reservoir cap.
9. Start the engine, and rev the engine two or three times under no load.
10. Touch the radiator hose and feel if the water flows.
11. Keep racing the engine at a speed of 3,000 rpm for about 10 minutes.
12. Observe the coolant temperature gauge for signs of overheating. 13. Stop the engine and check coolant level, allow
to cool and refill up to the MAX level.
14. Check radiator lower hose for any signs of leak- age.
15. Close the bonnet.
K9K engine
1. Set the heater or air conditioner temperature control to the maximum “HOT” position.
2. Open the bonnet. For details, see “Bonnet release” in the “3. Pre-driving checks and
adjustments” section.
3. Disconnect the radiator lower hose
j1 and open
the drain plugj2 on the engine block.
4. Open the engine coolant reservoir cap to help to drain the coolant.
5. Flush the cooling system by running fresh water through the engine coolant reservoir. 6. Install the hose and securely tighten the engine
block drain plug.
7. Fill the reservoir up to the MAX level with cool- ant. See “Capacities and recommended
fuel/lubricants” in the “9. Technical information”
section for cooling system capacity.
8. Install the engine coolant reservoir cap.
9. Start the engine, and rev the engine two or three times under no load.
10. Touch the radiator hose and feel if the water flows.
11. Keep racing the engine at a speed of 2,000 – 2,500 rpm for about 10 minutes.
12. Observe the coolant temperature gauge for signs of overheating.
13. Stop the engine and check coolant level, allow to cool and refill up to the MAX level.
14. Check the radiator lower hose for any signs of leakage.
15. Close the bonnet.
NDI941Z
Maintenance and do-it-yourself8-7
Page 239 of 297
Downloaded from www.Manualslib.com manuals search engine CHECKING ENGINE OIL LEVEL
CAUTION
The oil level should be checked regularly. Oper-
ating with an insufficient amount of oil can dam-
age the engine, and such damage is not covered
by warranty.
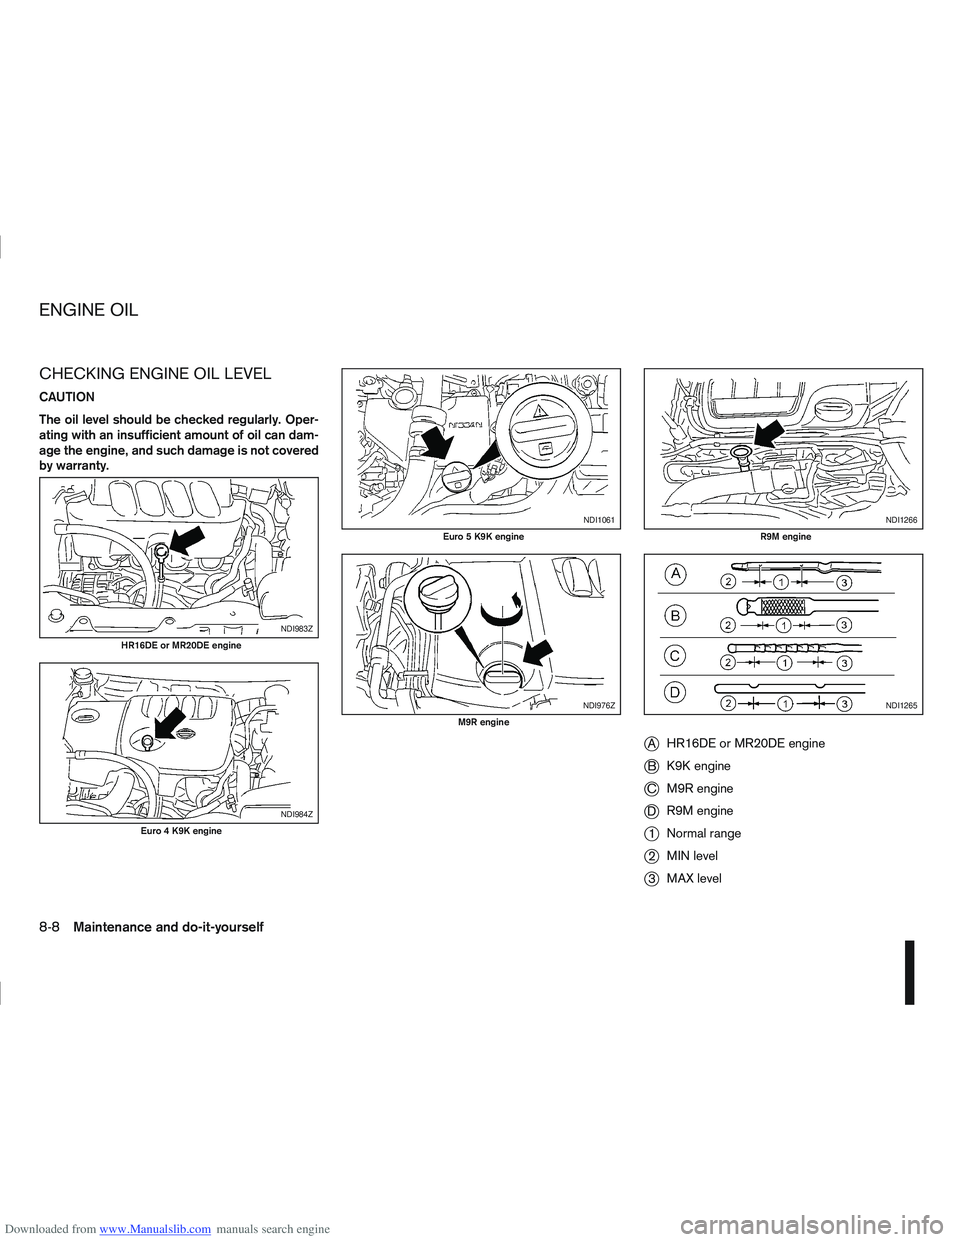
jAHR16DE or MR20DE engine
jB K9K engine
jC M9R engine
jDR9M engine
j1Normal range
j2MIN level
j3MAX level
NDI983Z
HR16DE or MR20DE engine
NDI984Z
Euro 4 K9K engine
NDI1061
Euro 5 K9K engine
NDI976Z
M9R engine
NDI1266
R9M engine
NDI1265
ENGINE OIL
8-8Maintenance and do-it-yourself
Page 240 of 297

Downloaded from www.Manualslib.com manuals search engine 1. Park the vehicle on a level surface and apply thehandbrake.
2. Start the engine. If the engine is cold, start and let the engine idle until it reaches the operational
temperature.
3. Turn the engine off.
4. Wait at least 10 minutes for the engine oil to drain back into the oil pan.
5. Open the bonnet. For details, see “Bonnet release” in the “3. Pre-driving checks and
adjustments” section.
6. Remove the dipstick and wipe it clean. Models with M9R engine: the engine oil dipstick
is attached to the engine oil filler cap. Remove
the engine oil filler cap and wipe the dipstick
clean.
7. Reinsert it all the way. Models with M9R engine: install the engine oil
filler cap.
8. Remove the dipstick again and check the oil level. It should be in the normal range
j1.
9. If the oil level is below MIN
j2 , remove the en-
gine oil filler cap and pour the recommended oil
through the opening. Do not overfill
j3.
10. Recheck the oil level with the dipstick.
11. Install the engine oil filler cap securely.
12. Close the bonnet. It is normal to add some engine oil between oil
maintenance intervals depending on the severity
of operating conditions or depending on the prop-
erty of the engine oil used. More engine oil is
consumed by frequent acceleration/deceleration
especially when the engine rpm is high. Con-
sumption is likely to be higher when the engine
is new. If the rate of oil consumption, after hav-
ing driven for 5,000 km (3,000 miles), is more
than 0.5 litre per 1,000 km (621 miles), consult a
NISSAN dealer or qualified workshop.
CHANGING ENGINE OIL
WARNING
NISSAN recommends contacting a NISSAN
dealer or qualified workshop for engine oil
servicing.
NISSAN GREEN PROGRAM
Used oil must not be poured into the ground,
canals, rivers, etc. It should be disposed of at
a rubbish tip having proper facilities. Check
your local regulations.
Be careful not to burn yourself, as the engine
oil is hot.
Prolonged and repeated contact with used
engine oil may cause skin cancer.
Avoid direct skin contact with used oil. If skin
contact is made, wash thoroughly with soap
or hand cleaner and plenty of water as soon
as possible.
Store used engine oil in marked containers
out of the reach of children.
NDI653Z
HR16DE or MR20DE engine
NDI509Z
Euro 4 K9K engine
Maintenance and do-it-yourself8-9
Page 241 of 297

Downloaded from www.Manualslib.com manuals search engine 1. Park the vehicle on a level surface and apply thehandbrake.
2. Start the engine. If the engine is cold, start and let the engine idle until the engine temperature
reaches the operational temperature.
3. Turn the engine off and wait at least 10 minutes to let the engine oil drain back into the oil pan. 4. Open the bonnet. For details, see “Bonnet
release” in the “3. Pre-driving checks and
adjustments” section.
5. Remove the engine oil filler cap.
6. Raise and support the vehicle using a suitable floor jack and safety jack stands.
Place the safety jack stands under the vehicle
jack-up points.
For details, see “Flat tyre” in the “6. In case of
emergency” section.
7. Remove the engine compartment under cover.
8. Place a large drain pan under the drain plug.
9. Remove the drain plug with a wrench and com- pletely drain the oil.
If the engine oil filter needs to be changed, re-
move and replace it at this time. See “Changing
engine oil filter” later in this section.
10. Clean and re-install the drain plug along with a new washer. Securely tighten the drain plug
with a wrench. Do not use excessive force. Drain plug tightening torques:
HR16DE, MR20DE engine:
34.3 (3.5 kg-m, 25 ft-lb)
K9K engine:
20 (2.1 kg-m, 15 ft-lb)
M9R engine:
44 (4.5 kg-m, 32 ft-lb)
R9M engine:
50 (5.1 kg-m, 36.9 ft-lb)
11. Refill the engine with recommended engine oil and quantity.
See “Capacities and recommended
fuel/lubricants” in the “9. Technical information”
section.
12. Check the oil level with the dipstick. For details, see “Checking engine oil level” earlier in this
section. If necessary, add engine oil.
13. Install the engine oil filler cap securely.
14. Start the engine.
15. Check for any leakage around the drain plug. Correct as required.
16. Turn the engine off and wait several minutes.
17. Check the oil level again with the dipstick. If necessary, add engine oil.
18. Install the engine compartment under cover.
19. Lower the vehicle carefully to the ground.
20. Close the bonnet.
NDI1064
Euro 5 K9K engine
NDI978Z
M9R or R9M engine
8-10Maintenance and do-it-yourself