sensor NISSAN QASHQAI 2010 Owners Manual
[x] Cancel search | Manufacturer: NISSAN, Model Year: 2010, Model line: QASHQAI, Model: NISSAN QASHQAI 2010Pages: 297, PDF Size: 4.09 MB
Page 2 of 297

Downloaded from www.Manualslib.com manuals search engine The NISSAN GREEN PROGRAM symbol indicates environmentally friendly
information and best practices.
This symbol means“Do not do this”or“Do not let this happen” .
Arrows in an illustration that are similar to these point to the front of the vehicle.
Arrows in an illustration that are similar to these indicate movement or action.
Arrows in an illustration that are similar to these call attention to an item in the
illustration.
ON-PAVEMENT AND OFF-ROAD DRIVING (4WD models)
This vehicle will handle and manoeuvre differently from an ordinary passenger
vehicle, because it has a higher centre of gravity for off-road use. As with other
vehicles with features of this type, failure to operate this vehicle correctly may
result in loss of control or an accident.
Be sure to read “On-pavement and off-road driving precautions” and “Four-
wheel drive (4WD)” in the “5. Starting and driving” section of this manual.
BATTERY DISPOSAL
CAUTION
An improperly disposed battery can harm the environment. Always confirm
local regulations for battery disposal.
Examples of the batteries that the vehicle contains:
Vehicle battery
Remote controller battery (for Intelligent Key and/or Remote keyless entry
system)
Tyre Pressure Monitoring System (TPMS) sensor battery
Remote controller battery (for Mobile Entertainment system)
If in doubt, contact your local authority, or a NISSAN dealer, or a qualified work-
shop for advice on disposal.
Page 7 of 297

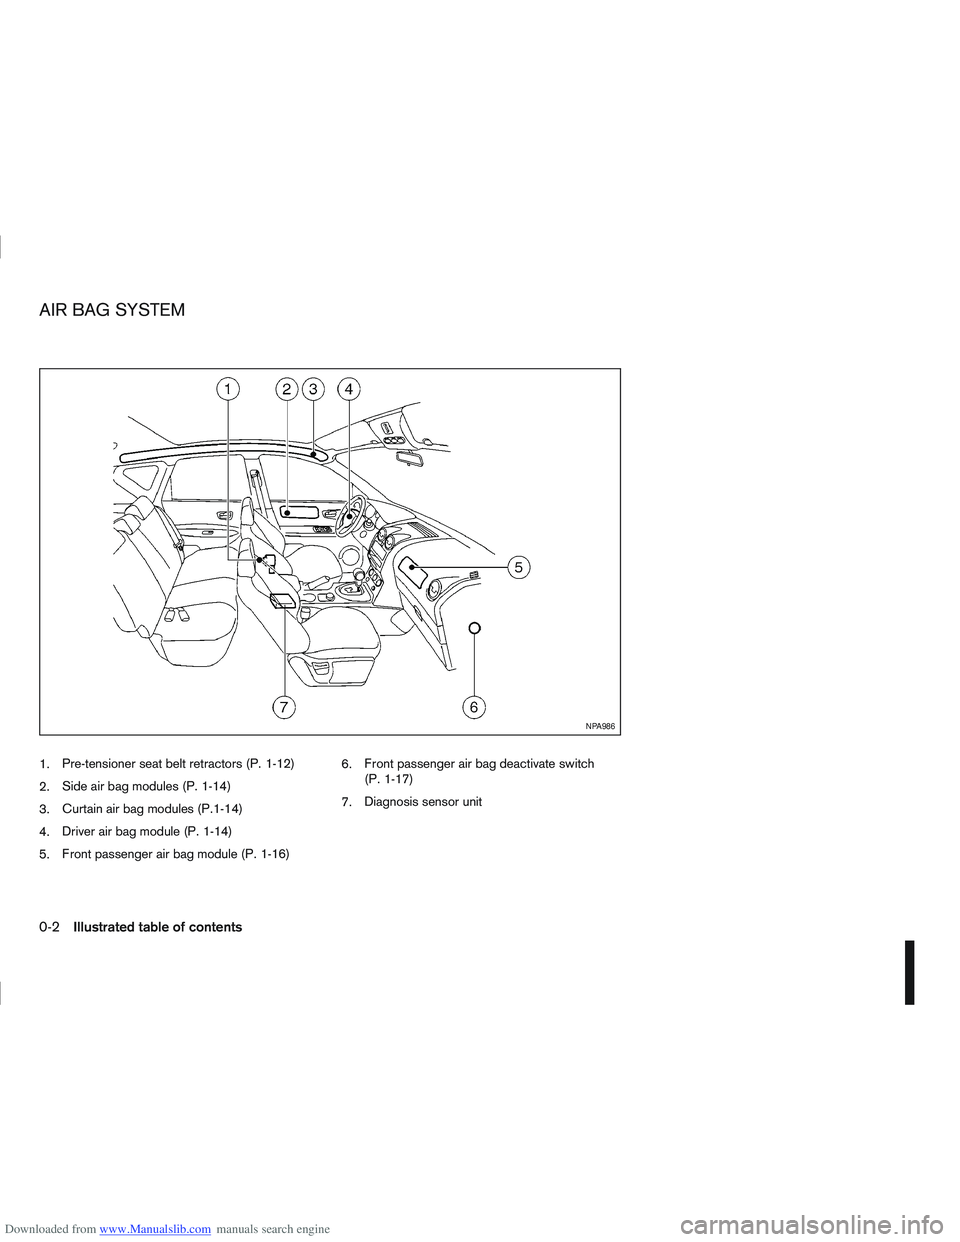
Downloaded from www.Manualslib.com manuals search engine 1.Pre-tensioner seat belt retractors (P. 1-12)
2. Side air bag modules (P. 1-14)
3. Curtain air bag modules (P.1-14)
4. Driver air bag module (P. 1-14)
5. Front passenger air bag module (P. 1-16) 6.
Front passenger air bag deactivate switch
(P. 1-17)
7. Diagnosis sensor unit
NPA986
AIR BAG SYSTEM
0-2Illustrated table of contents
Page 63 of 297

Downloaded from www.Manualslib.com manuals search engine For more information, see “Integrated keyfob/re-
mote control system” in the “3. Pre-driving checks
and adjustments” section.
j11Intelligent Key convenience mode alert
The Intelligent Key convenience mode alert shows
to confirm that convenience mode has been acti-
vated. See “Switching from Convenience mode to
Anti-hijack mode” in the “3. Pre-driving checks and
adjustments” section.
j12Intelligent Key anti–hijack alert
The Intelligent Key anti–hijack alert shows to con-
firm that anti-hijack mode has been activated. See
“Switching from Convenience mode to Anti-hijack
mode” in the “3. Pre-driving checks and
adjustments” section.
j13Engine oil level information
When turning the ignition to the ON position, the oil
message indicates the oil level.
The [Oil level OK] message indicates the oil level is
sufficient for driving. Push the
switch or the
steering wheel switchji (where fitted) when the
[Oil level OK] message shows to see a more de-
tailed oil level. (See Oil level
j14 )
NOTE
The [Oil level OK] message indication is dis-
played after the ignition switch has been turned
to the ON position and other warnings have been
shown. CAUTION
The engine oil level check is not designed to indi-
cate a low oil level. Use the dipstick to check the
oil level.
See “Engine oil” in the “8. Maintenance and
do-it-yourself” section.
j14Engine oil level
This display provides a visual representation of the
engine oil level.
j15Engine oil level low
If the oil level is not sufficient for driving, the [Oil
level low] message appears. Oil needs to be added
before driving.
CAUTION
The engine oil level should be checked regularly.
Operating with an insufficient amount of oil can
damage the engine and such damage is not cov-
ered by the warranty.
Park the vehicle at a safe location as soon as pos-
sible and fill the engine with the recommended en-
gine oil.
For checking the engine oil level and adding oil, see
“Engine oil” in the “8. Maintenance and
do-it-yourself” section.
j16Engine oil sensor warning
Please visit your local NISSAN dealer or qualified
workshop if this warning appears.
j17Diesel Particulate Filter warning
(where fitted)
See “Diesel Particulate Filter (DPF) (where fitted)”
in the “5. Starting and driving” section for further
details.
j18Setting menu operation alert
The alert shows when you try to operate the setting
menu while driving. The setting menu can only be
entered if the vehicle is stationary.
j19Maintenance due alert (where fitted)
This alert shows that maintenance is due. The mes-
sage is shown until the steering wheel switchji
(where fitted) is pressed. When the maintenance
due alert reaches 0 km (miles), the
symbol
flashes next to the odometer value.
CAUTION
The engine oil must be changed before the main-
tenance due alert is shown.
– Failure to do so risks causing damage to the engine.
– Continued driving after maintenance due alert reaches 0 km (miles) may result in reduced
engine performance. The engine malfunction
indicator light (orange) will illuminate.
– The DPF (where fitted) may also become satu- rated because regeneration is restricted once
the distance equals 0 km (miles)
Always visit a NISSAN dealer or qualified work-
shop to perform the maintenance and the reset.
2-14Instruments and controls
Page 64 of 297
![NISSAN QASHQAI 2010 Owners Manual Downloaded from www.Manualslib.com manuals search engine However reset is possible (only after the oil was
changed) using the [Service] menu item in the
[Settings] menu. See “[Maintenance]” later NISSAN QASHQAI 2010 Owners Manual Downloaded from www.Manualslib.com manuals search engine However reset is possible (only after the oil was
changed) using the [Service] menu item in the
[Settings] menu. See “[Maintenance]” later](/img/5/56766/w960_56766-63.png)
Downloaded from www.Manualslib.com manuals search engine However reset is possible (only after the oil was
changed) using the [Service] menu item in the
[Settings] menu. See “[Maintenance]” later in this
section
Have the vehicle inspected by a NISSAN dealer
or qualified workshop if these conditions occur.
j20Distance to maintenance alert
(where fitted)
This alert reminds when maintenance is due in the
shown distance. The alert is shown for 10 seconds
at ignition ON, when the distance to the next main-
tenance interval is below 5000 km (3100 Miles).
The message is shown until the steering wheel
switch
ji (where fitted) is pressed.
NOTE
Visit a NISSAN dealer or qualified workshop
before the maintenance due alertj19reaches
0 km (miles) to perform maintenance (oil
change).
The maintenance interval will reduce faster
with certain types of driving, especially at low
speeds in urban conditions.
j21Tyre change alert
You can set a distance for changing tyres. See
“[Maintenance]” later in this section
j22Maintenance alert
You can set a distance for a non specific mainte-
nance item. See “[Maintenance]” later in this sec-
tion
j23Low temperature warning
If, during driving, the temperature falls below 4ºC
this alert will appear to indicate low outside air tem-
perature. You can switch the low temperature warn-
ing [On] or [Off]. See “[Units]” later in this section
CAUTION
Even if the alert is not on, there is no guarantee
that the road is free of hazards caused by in-
clement weather.
NOTE
The outside air temperature sensor is located at
the front of the vehicle. At low speeds the sensor
can be affected by engine heat, heat reflected
from the road surface and exhaust from other
vehicles, these influences can cause the display
to be inaccurate. To compensate, the outside air
temperature display is designed to react slowly
to increasing temperatures, but quickly to falling
temperatures.
j24Low fuel warning
This warning appears when the fuel level in the tank
is getting low. Refuel as soon as it is convenient,
preferably before the fuel gauge reaches the empty
position. For more information, see “Fuel gauge”
earlier in this section.
j25Driver alert
This warning appears when the previously set time
for a break is reached. You can set the time for up
to 6 hours in the setting menu. (See “Settings menu”
later in this section.)
Stop/Start System (where fitted)
For more information, see “Stop/Start System
(where fitted)” in the “5. Starting and driving” sec-
tion
j26Engine stop:
If the engine stops when the Stop/Start System is
activated, the message is shown.
j27Auto start deactivation:
If the engine stops when the Stop/Start System is
activated, and will not start automatically, the mes-
sage is shown.
j28System fault:
If the Stop/Start System is activated, but does not
operate correctly, the message is shown. Visit a
NISSAN dealer or qualified workshop.
Activating or deactivating using the Stop/Start
System OFF switch:
Using the Stop/Start System OFF switch activates
or deactivates the Stop/Start System. This is shown
in the vehicle information display:
j29 :The Stop/Start System OFF switch is
pushed to the “ON” position.
j30 :The Stop/Start System OFF switch is pushed to
the “OFF” position.
Instruments and controls2-15
Page 71 of 297

Downloaded from www.Manualslib.com manuals search engine WINDSCREEN
The windscreen wiper and washer can be operated
when the ignition switch is in the ON position.
Wiper operation
Move the lever up or down to operate the wiper at
the following speeds:
Lever positionUp
j4 — for a single sweep opera-
tion of the wiper. Lever position
j1:
Intermittent ()or AUTO.
AUTO (where fitted) operates the rain-sensing auto
wiper system. (See “Rain sensor (where fitted)” later
in this section.).
— The intermittent operation speed can be adjusted
by rotating the ring forward
jA (slower) or back-
wardjB (faster).
— The wiper operation speed will vary (where fit-
ted) in accordance with the vehicle speed. For ex-
ample, when the vehicle speed is high, the intermit-
tent operation speed will be faster.
Lever position Low (
)j2 – for continuous low
speed operation
Lever position High (
)j3 – for continuous high
speed operation
Washer operation
Pull the lever toward youj5 to operate the washer.
For every fifth operation of the wiper and washer,
the headlight washing system (where fitted) will be
activated to clean the headlights. The headlight
washing system is only activated while the headlight
switchisinthe
position. See “Headlight
cleaner (where fitted)” later in this section.
Wiper drip wipe system (where fitted):
The wiper will also operate once about 3 seconds
after the washer and wiper are operated. This op-
eration is to wipe washer fluid that has dripped on
the windscreen.
Rain sensor (where fitted)
The rain sensor is activated when the AUTO posi-
tionj1 of the wiper switch is selected.
The wiper will start to operate automatically at a suit-
able speed when rain is detected on the windscreen.
The sensitivity of the rain sensing system can be
adjusted by rotating the ring of the wiper switch for-
ward
jA – less sensitive, or backwardjB – more
sensitive.
NOTE
The rain sensor is only intended for use during
rain or precipitation. During other weather condi-
tions no harm will come to the rain sensor sys-
tem if left active (wiper switch set to AUTO), al-
though occasional unexpected activation of the
wipers may occur.
NIC1471
Intermittent (without rain sensor)
NIC1469
AUTO (with rain sensor)
2-22Instruments and controls
Page 100 of 297

Downloaded from www.Manualslib.com manuals search engine ALARM SYSTEM (where fitted)
The alarm system provides visual and audible alarm
signals if parts of the vehicle are disturbed.
How to arm the alarm system
1. Close all doors, windows, back door and bon-net.
2. Lock the vehicle using the keyfob (lock button), for additional information, see “Integrated key-
fob/remote control system” in the “3. Pre-driving
checks and adjustments” section.
NOTE
If the vehicle is not fully locked, a door/bonnet/
back door is open, or the ignition switch is in the
ON position (after arming the system), the buzzer
will sound. After correctly closing, the buzzer will
stop.
Alarm system operation
The system will give the following alarm:
The siren sounds intermittently and all direction
indicators will flash.
The alarm automatically turns off after 28 sec-
onds.
The alarm is activated when:
The volumetric sensing system (ultrasonic sen-
sors) is triggered.
Any door/the back door is opened.
The bonnet is opened.
The ignition circuit is turned on without the own-
er’s key being used.
The alarm system will stop when:
The vehicle is unlocked using the keyfob unlock
button.
The ignition switch or ignition knob is turned to
the ON position with a registered NATS key.
If the system does not operate as described
above, have it checked by your NISSAN dealer or
qualified workshop.
Ultrasonic sensors (where fitted)
The ultrasonic sensors (volumetric sensing) detect
movements in the passenger’s compartment. When
the alarm system is set to the armed position, it will
automatically switch on the ultrasonic sensors.
It is possible to exclude the ultrasonic sensors (e.g.
when leaving pets inside the car).
To exclude the ultrasonic sensors:
1. Turn the ignition switch 3 times within 7 seconds from the “OFF” to the ON position.
2. Close the door(s)/bonnet/back door and press the lock button
on the keyfob to lock all doors/
back door.
The ultrasonic sensors are now excluded from the
alarm system. All other functions of the system re-
main activated until the alarm system is disarmed
again.
NISSAN ANTI-THEFT SYSTEM (NATS)
The NISSAN Anti-Theft System (NATS)* will not
allow the engine to start without the use of the reg-
istered NATS key.
* Immobilizer
If the engine fails to start using the registered NATS
key, it may be due to interference from another
NATS key, an automated toll road device or an auto-
mated payment device on the key ring. Restart the
engine using the following procedure:
1. Leave the ignition switch in the ON position for approximately 5 seconds.
2. Turn the ignition switch to the “OFF” or LOCK position and wait approximately 5 seconds.
3. Repeat steps 1 and 2.
4. Restart the engine while holding the device (which may have caused the interference) sepa-
rated from the registered NATS key or NATS
Intelligent Key (where fitted).
If this procedure allows the engine to start,
NISSAN recommends placing the registered
NATS key or NATS Intelligent Key (where fitted)
on a separate key-ring to avoid interference from
other devices.
SECURITY SYSTEM
Pre-driving checks and adjustments3-13
Page 104 of 297

Downloaded from www.Manualslib.com manuals search engine CAUTION
Do not store the sun visor before returning it to
its original position.
1. To block out glare from the front, move the mainsun visor downwards.
2. To block glare from the side, remove the main sun visor from the centre mount and move it to
the side.
INSIDE REAR-VIEW MIRROR
j
1 Night position
j2Day position
jA Front of the vehicle
The night position
j1 will reduce glare from the
headlights of vehicles behind you at night.
WARNING
Only use the night position
j1 when necessary,
as it reduces rear-view clarity.
AUTOMATIC ANTI-DAZZLING INSIDE
MIRROR (where fitted)
The inside mirror is designed so that it automatically
adjusts the reflection according to the intensity of
the following vehicle’s headlights.
CAUTION
Do not hang any object on the mirror or spray
glass cleaner directly on the mirror. Doing so will
reduce the sensitivity of the sensor, resulting in
improper operation.
OUTSIDE REAR-VIEW MIRRORS
WARNING
Check the position of all mirrors before driv-
ing. Altering their position while driving could
distract your attention from the driving opera-
tion.
Objects viewed in the outside mirrors are
closer than they appear.
NPA839Z
NPA862Z
NPA829Z
SUN VISORS MIRRORS
Pre-driving checks and adjustments3-17
Page 127 of 297

Downloaded from www.Manualslib.com manuals search engine 2. To switch off, press either thebutton to
return to the previous mode or the AUTO button
for the auto climate control mode.
To quickly defrost/defog the windscreen, set the
fan speed to the maximum position.
As soon as possible after the windscreen has
been cleared of ice or fog, press either the
windscreen defogger button or AUTO button.
When the windscreen defogging mode is acti-
vated, the air conditioner will automatically switch
on at outside temperatures [above -2°C (28°F)]
and the air recirculation mode will be switched
off.
Outside air is drawn into the passenger com-
partment to improve the defogging performance.
Heating and defogging (Manual mode):
This mode heats the interior and defogs the wind-
screen.
The outside air is drawn inside the passenger com-
partment when the
button is pressed. Switch
on the air-conditioning to improve the defogging and
adjust the preferred fan speed and temperature.
Fan speed control
m(Manual mode):
Turn the fan speed control dial anticlockwise or
clockwise to adjust the fan speed.
Press the AUTO button to change the fan speed to
automatic mode. Air recirculation:
Use this mode to recirculate interior air inside the
passenger compartment in situations such as driv-
ing on a dust raised road, avoiding traffic fumes or
having maximum cooling from the air conditioner.
Press the
<
>button to recirculate interior air.
The indicator light illuminates and the air conditioner
will automatically come on.
When the air recirculation mode is switched off, out-
side air is drawn into the passenger compartment.
Outside air circulation:
Use this mode to draw outside air into the passen-
ger compartment for normal heating, ventilation or
air conditioner operation.
Press the <
>button to change the air intake
from the air recirculation to the outside air mode.
The indicator light (
) turns off. To turn the system on/off:
Press the “ON/OFF” (
) button to turn the system
on or off.
The sensor
jA (next to the tweeter speaker) helps
the air conditioning system to maintain a constant
cabin temperature. Do not put anything on or around
this sensor and ensure that items nearby on the
windscreen do not shade it.
Operating tips
In order to improve the heater operation, clear
the snow and ice from the wiper blade and air
inlet in front of the windscreen.
When the engine coolant temperature and out-
side air temperature are low, the airflow from the
floor outlets may not operate for a maximum of
150 seconds. However, this is not a malfunction.
After the coolant temperature has warmed up,
the airflow from the floor outlets will operate nor-
mally.
NAA967Z
4-20Display screen, heater and air conditioner, and audio system
Page 163 of 297

Downloaded from www.Manualslib.com manuals search engine 5Starting and driving
Starting and driving
Running-in schedule ................................................ 5-2
Before starting the engine ........................................ 5-2
Precautions when starting and driving ...................... 5-3
Exhaust gas (Carbon Monoxide) ......................... 5-3
On-pavement and off-road driving precautions ......... 5-4
Three-way catalyst (Petrol engine models)................ 5-4 To help prevent damage ..................................... 5-4
Turbocharger system (Diesel engine models) ........... 5-5
Diesel Particulate Filter (DPF) (where fitted) ............. 5-5 Regeneration restrictions .................................... 5-5
If regeneration fails ............................................. 5-5
Care when driving ................................................... 5-6 Engine cold start period ...................................... 5-6
Loading luggage ................................................. 5-6
Driving on wet roads ........................................... 5-6
Driving under winter conditions ........................... 5-6
Ignition switch.......................................................... 5-6 Manual transmission ........................................... 5-6
Automatic transmission or Continuously
variable transmission........................................... 5-7
Steering lock ...................................................... 5-7
Key positions ...................................................... 5-7
NISSAN Anti-Theft System (NATS)..................... 5-7
Ignition knob (where fitted)....................................... 5-8 Manual transmission ........................................... 5-8
Automatic transmission or Continuously
variable transmission........................................... 5-9
Steering lock ...................................................... 5-9
Ignition knob position .......................................... 5-9 Emergency key – Intelligent Key dead battery
situation .............................................................. 5-10
NISSAN Anti-Theft System (NATS)..................... 5-10
Starting the engine................................................... 5-11
Driving the vehicle.................................................... 5-12 Driving with manual transmission......................... 5-12
Driving with automatic transmission or with
continuously variable transmission (Models
with manual shift) ................................................ 5-14
Driving with Continuously Variable Transmis-
sion (CVT) (Models without manual shift) ............ 5-17
Stop/Start System (where fitted) .............................. 5-21 Normal operation ................................................ 5-21
Precautions ........................................................ 5-22
Stop/Start System OFF switch ........................... 5-23
Environmental savings ........................................ 5-23
Ultrasonic Parking Sensor (where fitted) .................. 5-24
Four-wheel Drive (4WD) (where fitted)..................... 5-24 4WD mode operations........................................ 5-25
4WD shift tips .................................................... 5-25
4WD Warning light ............................................. 5-26
4WD Mode indicator lights ................................. 5-27
Driving four-wheel drive (4WD) safely ................. 5-27
Cruise control (where fitted) .................................... 5-29 Precautions on cruise control .............................. 5-29
Cruise control system operations ........................ 5-30
Speed limiter ........................................................... 5-31 Speed limiter operations ..................................... 5-32
Parking .................................................................... 5-33
Trailer towing ........................................................... 5-35
Page 177 of 297

Downloaded from www.Manualslib.com manuals search engine or the ultra sonic parking sensor (where fitted) will
be activated. For details, see “Rear-view monitor
(where fitted)” in the “4. Display screen, heater and
air conditioner, and audio system” section, “Around
view monitor (where fitted)” in the “4. Display
screen, heater and air conditioner, and audio
system” section or “Ultrasonic Parking Sensor
(where fitted)” later in this section.
If it is difficult to move the gear lever into R (Re-
verse) or 1st. Shift into N (Neutral), then release the
clutch pedal. Fully depress the clutch pedal again
and shift into R (Reverse) or 1st.
DRIVING WITH AUTOMATIC
TRANSMISSION OR WITH
CONTINUOUSLY VARIABLE
TRANSMISSION (Models with manual
shift)
CAUTION
The cold engine idle speed is high, so use
caution when shifting into a forward or re-
verse gear before the engine has warmed up.
Avoid revving up the engine while the vehicle
is stopped. This could cause unexpected ve-
hicle movement.
Driving precautions
Never shift to P (Park) or R (Reverse) while
the vehicle is moving, this could result in dam-
age to the transmission.
Start the engine in the P (Park) or N (Neutral)
position. The engine will not start in any otherselector position. If it does, have your vehicle
checked by a NISSAN dealer or qualified
workshop.
Do not depress the accelerator pedal while
shifting from P (Park) or N (Neutral) to R (Re-
verse), D (Drive) or Manual shift modes posi-
tion. Always depress the brake pedal until
shifting is completed.
On an uphill grade, do not hold the vehicle by
depressing the accelerator pedal. The foot-
brake should be used for this purpose, in or-
der to hold the vehicle in place and to prevent
overheating of the transmission.
Shift into the N (Neutral) position and apply
the handbrake when at a standstill for longer
than a short waiting period.
Keep the engine at idling speed while shifting
from the N (Neutral) position to any driving
position.
CAUTION (when starting the vehicle):
DEPRESS THE FOOTBRAKE PEDAL
When the engine is running, shifting the se-
lector lever into the R (Reverse), D (Drive) or
Manual shift mode position without depress-
ing the brake pedal causes the vehicle to
move slowly. Be sure the brake pedal is fully
depressed and the vehicle is stopped, before
shifting the selector lever.
BE AWARE OF THE SELECTOR LEVER POSI-
TION Make sure that the selector lever is in the
desired position. Use the D (Drive), or Manual
shift mode to move forwards and the R (Re-
verse) to move backwards. Release the hand-
brake lever and the footbrake pedal, then de-
press the accelerator pedal to start the vehicle
in motion and merge with traffic (avoid abrupt
starting and spinning the wheels).
Avoid revving up the engine while the vehicle
is stopped, this could cause unexpected ve-
hicle movement [if the selector lever is in the
R (Reverse), D (Drive), or Manual shift mode
position] or damage the engine [if the selec-
tor lever is in the N (Neutral) or P (Park) posi-
tion].
WARM THE ENGINE UP
Due to the higher idle speeds when the en-
gine is cold, extra caution must be taken when
shifting the selector lever into the driving po-
sition immediately after starting the engine.
PARKING THE VEHICLE
Depress the footbrake pedal and, once the
vehicle stops, move the selector lever into the
P (Park) position, pull the handbrake lever and
release the footbrake pedal.
Starting the vehicle
1. After starting the engine, fully depress the foot-
brake pedal before shifting the selector lever from
P (Park) to R (Reverse), D (Drive) or Manual shift
mode.
5-14Starting and driving