Wheels NISSAN QASHQAI 2011 Owners Manual
[x] Cancel search | Manufacturer: NISSAN, Model Year: 2011, Model line: QASHQAI, Model: NISSAN QASHQAI 2011Pages: 297, PDF Size: 4.09 MB
Page 8 of 297
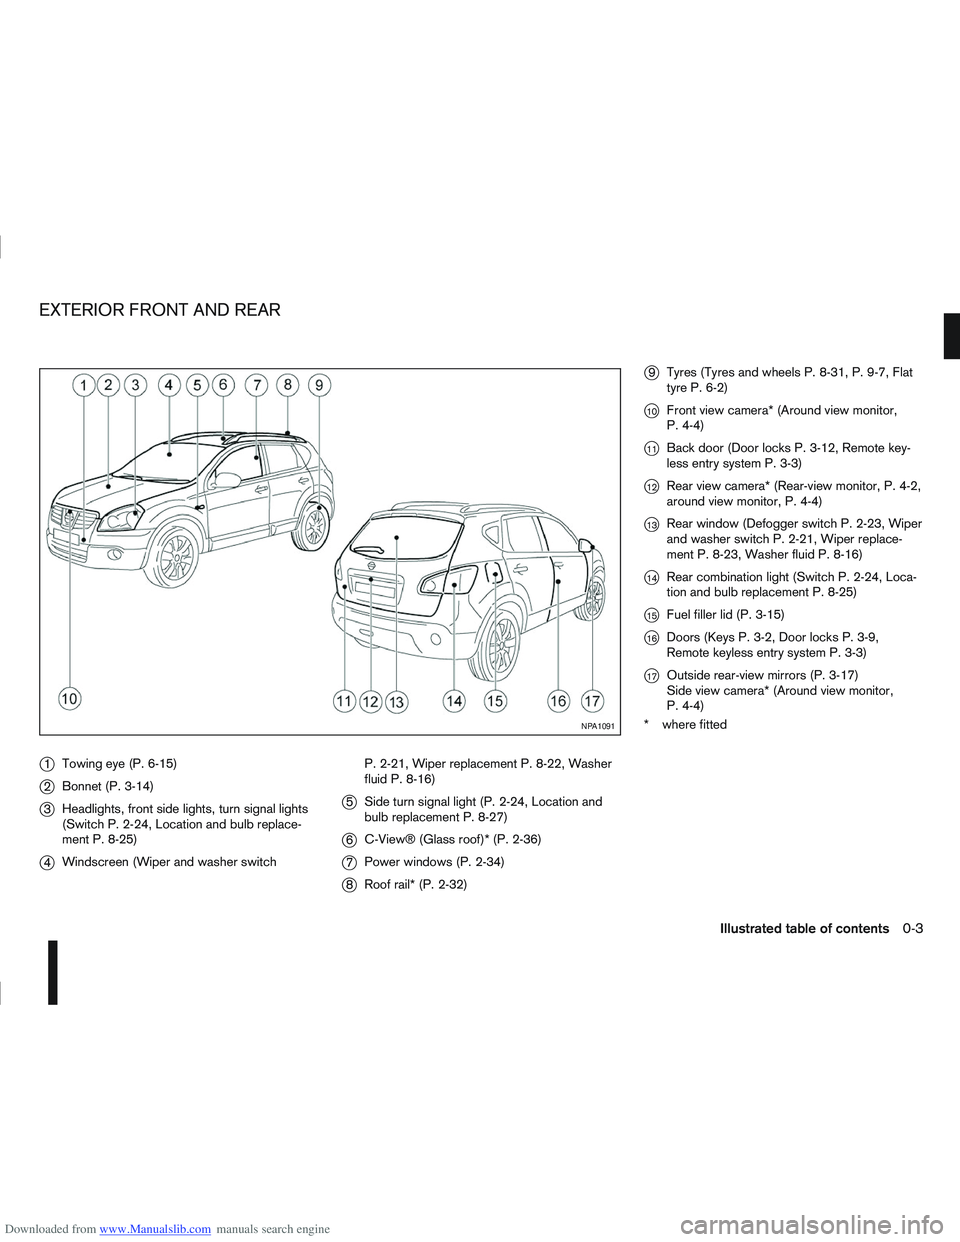
Downloaded from www.Manualslib.com manuals search engine j1Towing eye (P. 6-15)
j2Bonnet (P. 3-14)
j3Headlights, front side lights, turn signal lights
(Switch P. 2-24, Location and bulb replace-
ment P. 8-25)
j4Windscreen (Wiper and washer switch P. 2-21, Wiper replacement P. 8-22, Washer
fluid P. 8-16)
j5
Side turn signal light (P. 2-24, Location and
bulb replacement P. 8-27)
j6C-View® (Glass roof)* (P. 2-36)
j7Power windows (P. 2-34)
j8Roof rail* (P. 2-32)
j9Tyres (Tyres and wheels P. 8-31, P. 9-7, Flat
tyre P. 6-2)
j10Front view camera* (Around view monitor,
P. 4-4)
j11Back door (Door locks P. 3-12, Remote key-
less entry system P. 3-3)
j12Rear view camera* (Rear-view monitor, P. 4-2,
around view monitor, P. 4-4)
j13Rear window (Defogger switch P. 2-23, Wiper
and washer switch P. 2-21, Wiper replace-
ment P. 8-23, Washer fluid P. 8-16)
j14Rear combination light (Switch P. 2-24, Loca-
tion and bulb replacement P. 8-25)
j15Fuel filler lid (P. 3-15)
j16Doors (Keys P. 3-2, Door locks P. 3-9,
Remote keyless entry system P. 3-3)
j17Outside rear-view mirrors (P. 3-17)
Side view camera* (Around view monitor,
P. 4-4)
* where fitted
NPA1091
EXTERIOR FRONT AND REAR
Illustrated table of contents0-3
Page 55 of 297
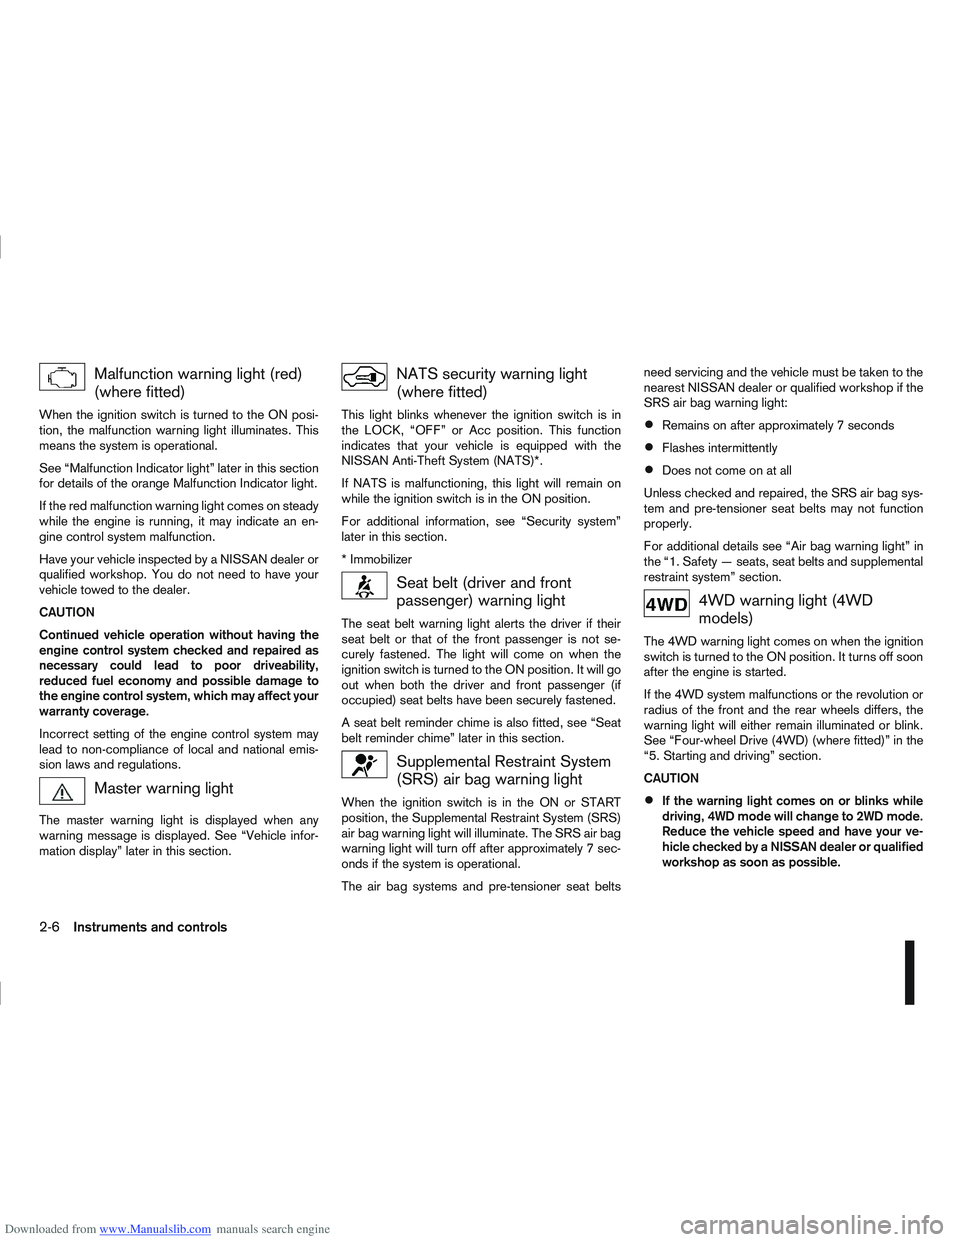
Downloaded from www.Manualslib.com manuals search engine Malfunction warning light (red)
(where fitted)
When the ignition switch is turned to the ON posi-
tion, the malfunction warning light illuminates. This
means the system is operational.
See “Malfunction Indicator light” later in this section
for details of the orange Malfunction Indicator light.
If the red malfunction warning light comes on steady
while the engine is running, it may indicate an en-
gine control system malfunction.
Have your vehicle inspected by a NISSAN dealer or
qualified workshop. You do not need to have your
vehicle towed to the dealer.
CAUTION
Continued vehicle operation without having the
engine control system checked and repaired as
necessary could lead to poor driveability,
reduced fuel economy and possible damage to
the engine control system, which may affect your
warranty coverage.
Incorrect setting of the engine control system may
lead to non-compliance of local and national emis-
sion laws and regulations.
Master warning light
The master warning light is displayed when any
warning message is displayed. See “Vehicle infor-
mation display” later in this section.
NATS security warning light
(where fitted)
This light blinks whenever the ignition switch is in
the LOCK, “OFF” or Acc position. This function
indicates that your vehicle is equipped with the
NISSAN Anti-Theft System (NATS)*.
If NATS is malfunctioning, this light will remain on
while the ignition switch is in the ON position.
For additional information, see “Security system”
later in this section.
* Immobilizer
Seat belt (driver and front
passenger) warning light
The seat belt warning light alerts the driver if their
seat belt or that of the front passenger is not se-
curely fastened. The light will come on when the
ignition switch is turned to the ON position. It will go
out when both the driver and front passenger (if
occupied) seat belts have been securely fastened.
A seat belt reminder chime is also fitted, see “Seat
belt reminder chime” later in this section.
Supplemental Restraint System
(SRS) air bag warning light
When the ignition switch is in the ON or START
position, the Supplemental Restraint System (SRS)
air bag warning light will illuminate. The SRS air bag
warning light will turn off after approximately 7 sec-
onds if the system is operational.
The air bag systems and pre-tensioner seat beltsneed servicing and the vehicle must be taken to the
nearest NISSAN dealer or qualified workshop if the
SRS air bag warning light:
Remains on after approximately 7 seconds
Flashes intermittently
Does not come on at all
Unless checked and repaired, the SRS air bag sys-
tem and pre-tensioner seat belts may not function
properly.
For additional details see “Air bag warning light” in
the “1. Safety — seats, seat belts and supplemental
restraint system” section.
4WD warning light (4WD
models)
The 4WD warning light comes on when the ignition
switch is turned to the ON position. It turns off soon
after the engine is started.
If the 4WD system malfunctions or the revolution or
radius of the front and the rear wheels differs, the
warning light will either remain illuminated or blink.
See “Four-wheel Drive (4WD) (where fitted)” in the
“5. Starting and driving” section.
CAUTION
If the warning light comes on or blinks while
driving, 4WD mode will change to 2WD mode.
Reduce the vehicle speed and have your ve-
hicle checked by a NISSAN dealer or qualified
workshop as soon as possible.
2-6Instruments and controls
Page 175 of 297
Downloaded from www.Manualslib.com manuals search engine mately 1/3 to the floor) and hold it then crank
the engine. Release the ignition switch and
the accelerator pedal when the engine starts.
CAUTION
Do not operate the starter for more than 15
seconds at a time. If the engine does not start,
turn the ignition switch to the “OFF” position
and wait 10 seconds (Petrol engine models)
or 20 seconds (Diesel engine models) before
cranking again, otherwise the starter could be
damaged.
If it becomes necessary to start the engine
with a booster battery and jumper leads, the
instructions and cautions contained in the
“Jump-starting” in the “6. In case of
emergency” section should be carefully fol-
lowed.
7. Warm-up
Allow the engine to idle for at least 30 seconds
after starting. Drive at moderate speed for a short
distance first, especially in cold weather.
WARNING
Do not leave the vehicle unattended while the
engine is warming up.
DRIVING WITH MANUAL
TRANSMISSION
CAUTION
Do not rest your foot on the clutch pedal while
driving. This may cause clutch damage.
Stop your vehicle completely before shifting
into the R (Reverse) position.
When you are shifting from one gear to an-
other, be certain to depress the clutch pedal
all the way to the floor to avoid clashing or
chipping the gears.
Avoid abrupt starts and acceleration for your
safety.
When quick acceleration is required for some
reason, shift to a lower gear and accelerate
until the vehicle reaches the maximum speed
in each gear. Do not exceed the speed limit of
any gear. Pay special attention when acceler-
ating or when shifting into a lower gear on
slippery surfaces. Sudden acceleration or
down shifting could cause the wheels to skid
and result in loss of control.
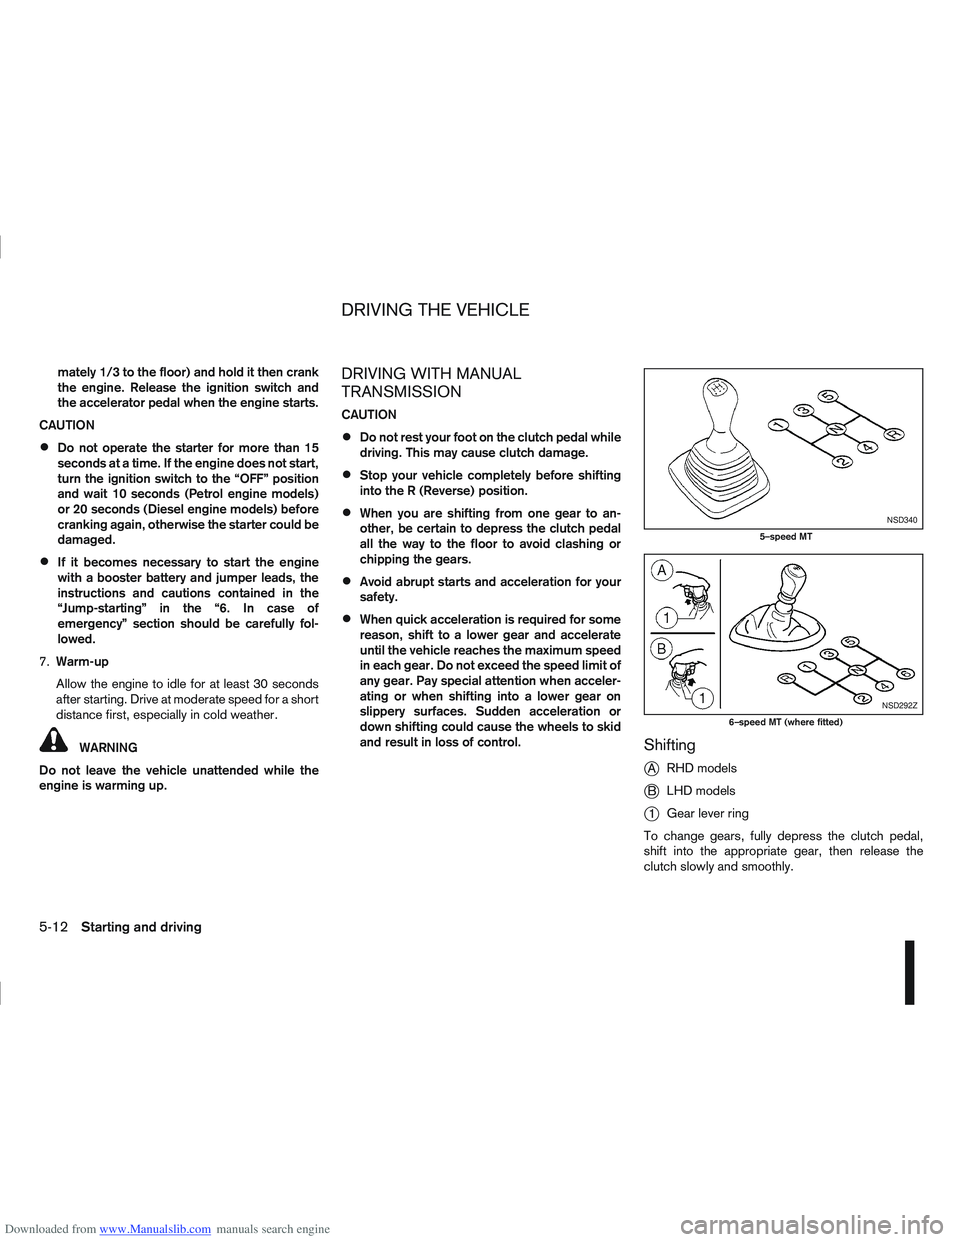
Shifting
j
A RHD models
jB LHD models
j1Gear lever ring
To change gears, fully depress the clutch pedal,
shift into the appropriate gear, then release the
clutch slowly and smoothly.
NSD340
5–speed MT
NSD292Z
6–speed MT (where fitted)
DRIVING THE VEHICLE
5-12Starting and driving
Page 177 of 297
Downloaded from www.Manualslib.com manuals search engine or the ultra sonic parking sensor (where fitted) will
be activated. For details, see “Rear-view monitor
(where fitted)” in the “4. Display screen, heater and
air conditioner, and audio system” section, “Around
view monitor (where fitted)” in the “4. Display
screen, heater and air conditioner, and audio
system” section or “Ultrasonic Parking Sensor
(where fitted)” later in this section.
If it is difficult to move the gear lever into R (Re-
verse) or 1st. Shift into N (Neutral), then release the
clutch pedal. Fully depress the clutch pedal again
and shift into R (Reverse) or 1st.
DRIVING WITH AUTOMATIC
TRANSMISSION OR WITH
CONTINUOUSLY VARIABLE
TRANSMISSION (Models with manual
shift)
CAUTION
The cold engine idle speed is high, so use
caution when shifting into a forward or re-
verse gear before the engine has warmed up.
Avoid revving up the engine while the vehicle
is stopped. This could cause unexpected ve-
hicle movement.
Driving precautions
Never shift to P (Park) or R (Reverse) while
the vehicle is moving, this could result in dam-
age to the transmission.
Start the engine in the P (Park) or N (Neutral)
position. The engine will not start in any otherselector position. If it does, have your vehicle
checked by a NISSAN dealer or qualified
workshop.
Do not depress the accelerator pedal while
shifting from P (Park) or N (Neutral) to R (Re-
verse), D (Drive) or Manual shift modes posi-
tion. Always depress the brake pedal until
shifting is completed.
On an uphill grade, do not hold the vehicle by
depressing the accelerator pedal. The foot-
brake should be used for this purpose, in or-
der to hold the vehicle in place and to prevent
overheating of the transmission.
Shift into the N (Neutral) position and apply
the handbrake when at a standstill for longer
than a short waiting period.
Keep the engine at idling speed while shifting
from the N (Neutral) position to any driving
position.
CAUTION (when starting the vehicle):
DEPRESS THE FOOTBRAKE PEDAL
When the engine is running, shifting the se-
lector lever into the R (Reverse), D (Drive) or
Manual shift mode position without depress-
ing the brake pedal causes the vehicle to
move slowly. Be sure the brake pedal is fully
depressed and the vehicle is stopped, before
shifting the selector lever.
BE AWARE OF THE SELECTOR LEVER POSI-
TION Make sure that the selector lever is in the
desired position. Use the D (Drive), or Manual
shift mode to move forwards and the R (Re-
verse) to move backwards. Release the hand-
brake lever and the footbrake pedal, then de-
press the accelerator pedal to start the vehicle
in motion and merge with traffic (avoid abrupt
starting and spinning the wheels).
Avoid revving up the engine while the vehicle
is stopped, this could cause unexpected ve-
hicle movement [if the selector lever is in the
R (Reverse), D (Drive), or Manual shift mode
position] or damage the engine [if the selec-
tor lever is in the N (Neutral) or P (Park) posi-
tion].
WARM THE ENGINE UP
Due to the higher idle speeds when the en-
gine is cold, extra caution must be taken when
shifting the selector lever into the driving po-
sition immediately after starting the engine.
PARKING THE VEHICLE
Depress the footbrake pedal and, once the
vehicle stops, move the selector lever into the
P (Park) position, pull the handbrake lever and
release the footbrake pedal.
Starting the vehicle
1. After starting the engine, fully depress the foot-
brake pedal before shifting the selector lever from
P (Park) to R (Reverse), D (Drive) or Manual shift
mode.
5-14Starting and driving
Page 188 of 297
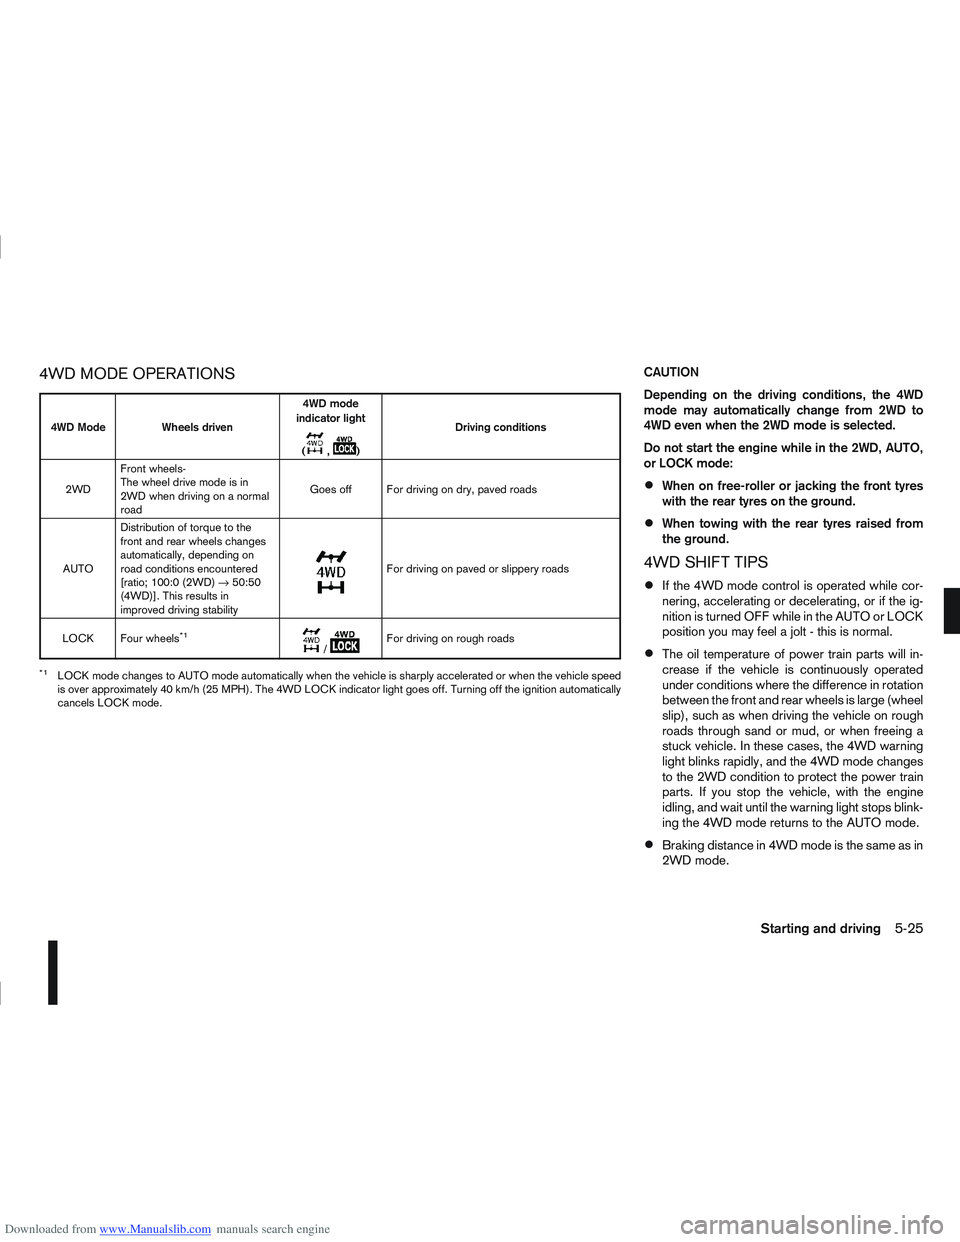
Downloaded from www.Manualslib.com manuals search engine 4WD MODE OPERATIONSCAUTION
Depending on the driving conditions, the 4WD
mode may automatically change from 2WD to
4WD even when the 2WD mode is selected.
Do not start the engine while in the 2WD, AUTO,
or LOCK mode:
When on free-roller or jacking the front tyres
with the rear tyres on the ground.
When towing with the rear tyres raised from
the ground.
4WD SHIFT TIPS
If the 4WD mode control is operated while cor-
nering, accelerating or decelerating, or if the ig-
nition is turned OFF while in the AUTO or LOCK
position you may feel a jolt - this is normal.
The oil temperature of power train parts will in-
crease if the vehicle is continuously operated
under conditions where the difference in rotation
between the front and rear wheels is large (wheel
slip), such as when driving the vehicle on rough
roads through sand or mud, or when freeing a
stuck vehicle. In these cases, the 4WD warning
light blinks rapidly, and the 4WD mode changes
to the 2WD condition to protect the power train
parts. If you stop the vehicle, with the engine
idling, and wait until the warning light stops blink-
ing the 4WD mode returns to the AUTO mode.
Braking distance in 4WD mode is the same as in
2WD mode.
4WD Mode Wheels driven4WD mode
indicator light
(
m,m) Driving conditions
2WD Front wheels-
The wheel drive mode is in
2WD when driving on a normal
road Goes off For driving on dry, paved roads
AUTO Distribution of torque to the
front and rear wheels changes
automatically, depending on
road conditions encountered
[ratio; 100:0 (2WD)
→50:50
(4WD)]. This results in
improved driving stability
m
For driving on paved or slippery roads
LOCK Four wheels
*1m/mFor driving on rough roads
*1LOCK mode changes to AUTO mode automatically when the vehicle is sharply accelerated or when the vehicle speed
is over approximately 40 km/h (25 MPH). The 4WD LOCK indicator light goes off. Turning off the ignition automatically
cancels LOCK mode.
Starting and driving5-25
Page 189 of 297
Downloaded from www.Manualslib.com manuals search engine Even if the mode automatically changes to AUTO
mode, when driving in the LOCK mode, the indi-
cator light stays in the LOCK mode.
CAUTION
Only use the 4WD mode control when driving
in a straight direction (to select 2WD, AUTO or
LOCK).
Do not use the 4WD mode control when turn-
ing or reversing.
Do not use the 4WD mode control with the
front wheels spinning (to select 2WD, AUTO,
or LOCK).
Be especially careful when starting or driving
on slippery surfaces with the 4WD mode set
to AUTO.
Do not drive on dry, hard surfaced roads in
the LOCK position.
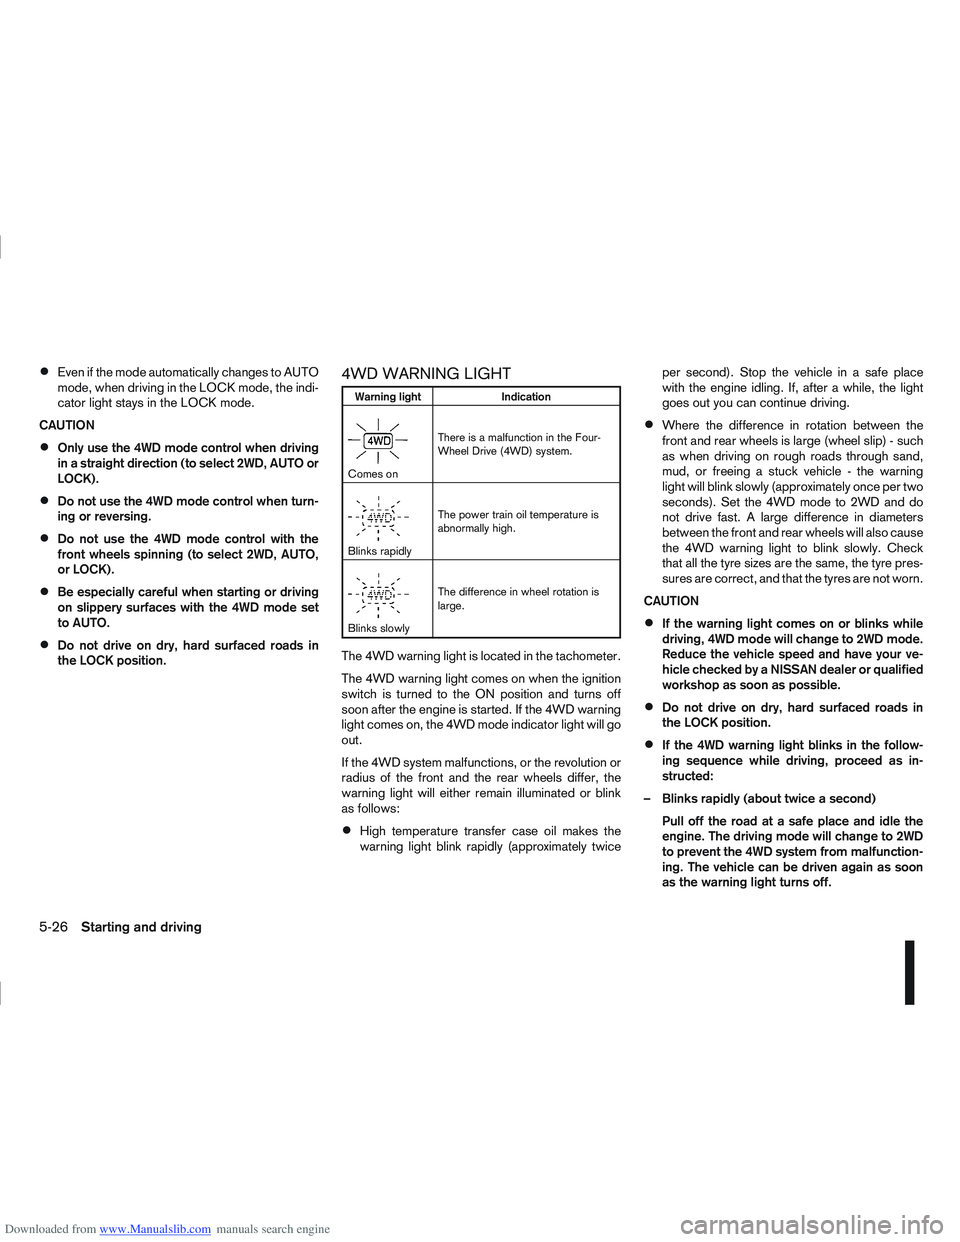
4WD WARNING LIGHT
Warning light Indication
mComes onThere is a malfunction in the Four-
Wheel Drive (4WD) system.
mBlinks rapidlyThe power train oil temperature is
abnormally high.
mBlinks slowlyThe difference in wheel rotation is
large.
The 4WD warning light is located in the tachometer.
The 4WD warning light comes on when the ignition
switch is turned to the ON position and turns off
soon after the engine is started. If the 4WD warning
light comes on, the 4WD mode indicator light will go
out.
If the 4WD system malfunctions, or the revolution or
radius of the front and the rear wheels differ, the
warning light will either remain illuminated or blink
as follows:
High temperature transfer case oil makes the
warning light blink rapidly (approximately twice per second). Stop the vehicle in a safe place
with the engine idling. If, after a while, the light
goes out you can continue driving.
Where the difference in rotation between the
front and rear wheels is large (wheel slip) - such
as when driving on rough roads through sand,
mud, or freeing a stuck vehicle - the warning
light will blink slowly (approximately once per two
seconds). Set the 4WD mode to 2WD and do
not drive fast. A large difference in diameters
between the front and rear wheels will also cause
the 4WD warning light to blink slowly. Check
that all the tyre sizes are the same, the tyre pres-
sures are correct, and that the tyres are not worn.
CAUTION
If the warning light comes on or blinks while
driving, 4WD mode will change to 2WD mode.
Reduce the vehicle speed and have your ve-
hicle checked by a NISSAN dealer or qualified
workshop as soon as possible.
Do not drive on dry, hard surfaced roads in
the LOCK position.
If the 4WD warning light blinks in the follow-
ing sequence while driving, proceed as in-
structed:
– Blinks rapidly (about twice a second) Pull off the road at a safe place and idle the
engine. The driving mode will change to 2WD
to prevent the 4WD system from malfunction-
ing. The vehicle can be driven again as soon
as the warning light turns off.
5-26Starting and driving
Page 191 of 297
Downloaded from www.Manualslib.com manuals search engine Unsecured cargo can be thrown around when
driving over rough terrain. Properly secure it so
that it will not be thrown forwards and cause
injury to you or your passengers.
To avoid raising the centre of gravity excessively,
do not exceed the rated capacity of the roof rack/
gear bin (where fitted) and evenly distribute the
load. Secure heavy loads in the luggage area as
far forwards and as low as possible. Do not equip
the vehicle with tyres larger than specified. This
could cause your vehicle to rollover.
Accelerating quickly, sharp steering manoeuvres
or sudden braking may cause loss of control.
Do not drive beyond the performance of the
tyres, even with 4WD. Sudden acceleration,
steering or braking may result in loss of control
and could cause the vehicle to become stuck.
If at all possible, avoid sharp turning manoeuvres,
particularly at high speeds. Your 4WD vehicle
has a higher centre of gravity than a 2WD ve-
hicle and can tip over more easily. The vehicle is
not designed for cornering at the same speeds
as conventional 2WD models any more than low
sports cars are designed to perform satisfacto-
rily under off-road conditions. Failure to operate
this vehicle correctly could result in loss of con-
trol and/or a rollover accident.
Do not grip the inside or spokes of the steering
wheel when driving off-road. The steering wheel
could jerk and injure your hands. Instead, drive
with your fingers and thumbs on the outside of
the rim.
Before operating the vehicle, ensure that the
driver and all passengers have their seat belts
fastened.
Avoid raising the centre of gravity by loading
things on the roof or equipping the vehicle with
tyres larger than specified in this manual.
Always drive with the floor mats in place as the
floor may become very hot. Particular care
should be taken if you are barefoot.
Lower your speed when encountering strong
crosswinds. With its higher centre of gravity your
NISSAN is more affected by gusty side winds.
Slower speeds ensure better vehicle control.
Be sure to check the brakes immediately after
driving in mud or water as specified in “Wet
brakes” later in this section.
Whenever you drive off-road through sand, mud
or water as deep as the wheel hub, more fre-
quent maintenance may be required. For details,
refer to the separately provided Warranty Infor-
mation and Maintenance Booklet.
Rinse the underside of the vehicle with fresh
water after driving through mud or sand. Re-
move any brush or sticks that are trapped.
Install the same size of winter tyres on all four (4)
wheels (such as studless tyres) or install snow
chains to the front wheels when driving on slip-
pery roads (e.g. after a snowfall) and drive care-
fully using 4WD.
Avoid parking your vehicle on steep hills. If you
get out of the vehicle and it rolls forwards, back-
wards or sideways, you could be injured.
5-28Starting and driving
Page 198 of 297
Downloaded from www.Manualslib.com manuals search engine When parked on a sloping driveway, turn the
wheels so the vehicle will not roll into the street
in case it moves.
FACING DOWNHILL:j1
Turn the wheels into the kerb, allow the vehicle
to move forward until the kerb side wheel gently
touches the kerb. Then set the handbrake.
FACING UPHILL:j2
Turn the wheels away from the kerb and allow
the vehicle to move back until the kerb side wheel
gently touches the kerb. Then set the handbrake.
NO KERB — FACING DOWNHILL OR UPHILL:j3
Turn the wheels toward the side of the road so
the vehicle will move away from the centre of the
road if it moves. Then set the handbrake.
Turn the ignition switch to the LOCK position
and remove the key/Intelligent Key (where fit-
ted).
Always turn off ignition after parking a vehicle
with Stop/Start System fitted to avoid a possible
flat battery.
NOTE
The Stop/Start System is designed to prevent
unnecessary fuel consumption, exhaust emis-
sions and noise during a journey. The Stop/
Start System does not automatically turn off
ignition at the end of a journey. Your new vehicle was designed to be used primarily
to carry passengers and luggage.
Remember that towing a trailer will place additional
loads on your vehicle’s engine, drive-train, steering,
braking and other systems. Towing a trailer will also
exaggerate other conditions, such as sway caused
by crosswinds, rough road surfaces or passing
trucks. Driving style and speed must be adjusted
according to the circumstances. Before towing a
trailer, see a NISSAN dealer or qualified workshop
for an explanation of towing equipment and its
proper use.
OPERATING PRECAUTIONS
Avoid towing a trailer during the running-in
schedule.
Choose proper coupling devices (trailer hitch,
safety chain, roof carrier, etc.) for your vehicle
and trailer. These devices are available from a
NISSAN dealer or qualified workshop where you
can also obtain more detailed information about
trailer towing.
Heavy-duty kits are available at a NISSAN dealer
or qualified workshop.
It is advisable to contact a NISSAN dealer or
qualified workshop for towing details, before
towing a trailer up steep slopes for long dis-
tances.
Never allow the total trailer load (trailer weight
plus its cargo weight) to exceed the maximum
set for the coupling device. Contact a NISSAN dealer or qualified workshop
for more information on this matter.
The trailer must be loaded so that heavy goods
are distributed over the axle and as low in the
trailer as possible. Poor load distribution can se-
riously affect the stability of the trailer and tow
vehicle.
Do not exceed the maximum permitted vertical
load on the trailer hitch.
Before driving, make sure that the lighting sys-
tem of the trailer works properly.
When towing with 4WD models, the 4WD mode
switch should be in the AUTO position. Using
the vehicle in AUTO mode gives better traction,
particularly when moving off from stationary and/
or on an incline, as the vehicle is less likely to
wheel spin.
Avoid abrupt starts, accelerations and stops.
Avoid sharp turns and lane changes.
Always drive your vehicle at a moderate speed.
Always block the wheels on both vehicle and
trailer when parking. Apply the handbrake (where
fitted) on the trailer. Parking on a steep slope is
not recommended.
If parking on a steep slope is unavoidable it is
also advisable to put the vehicle into gear, or
select P (Park (AT or CVT models), and turn the
front wheels into the kerb (in addition to the other
precautions described). Before parking on a
TRAILER TOWING
Starting and driving5-35
Page 202 of 297
Downloaded from www.Manualslib.com manuals search engine The brake system has two separate hydraulic cir-
cuits. If one circuit malfunctions, you will still have
braking ability with two wheels.
BRAKE PRECAUTIONS
Vacuum assisted brake
The brake booster aids braking by using engine
vacuum. If the engine stops or the drive belt is bro-
ken, you can stop the vehicle by depressing the
brake pedal. However, greater foot pressure on the
brake pedal will be required to stop the vehicle and
the stopping distance will be longer.
Wet brakes
When the vehicle is washed or driven through wa-
ter, the brakes may get wet. As a result, your brak-
ing distance will be longer and the vehicle may pull
to one side during braking.
To dry brakes, drive the vehicle at a safe speed
while lightly pressing the brake pedal to heat up the
brakes. Do this until the brakes return to normal.
Avoid driving the vehicle at high speeds until the
brakes function correctly.
Using the brakes
Avoid resting your foot on the brake pedal while
driving. This will overheat the brakes, wear out the
brake linings and pads faster and reduce fuel
economy performance.
To help reduce brake wear and to prevent the brakes
from overheating, reduce speed and downshift to a
lower gear before going down a slope or long down-hill gradient. Overheated brakes may reduce brak-
ing performance and could result in loss of vehicle
control.
CAUTION
While driving on a slippery surface, be careful
when braking, accelerating or downshifting.
Abrupt braking actions or sudden acceleration
could cause the wheels to skid and result in an
accident.
Be aware that brakes will fade if repeated heavy
brake applications are made.
Driving uphill
When starting on a steep gradient, it is sometimes
difficult to operate the brake (AT or CVT models) or
both the brake and clutch (MT models). Use the
handbrake to hold the vehicle. Do not slip the clutch
(MT models). When ready to start, slowly release
the handbrake while depressing the accelerator
pedal and releasing the clutch (MT models) or de-
pressing the accelerator pedal (AT or CVT models).
Driving downhill
The engine braking action is effective for controlling
the vehicle while descending hills.
The gear lever (MT models) should be placed in a
gear position low enough to obtain sufficient engine
braking.
For the AT or CVT models, a low gear position in
the manual shift mode, low enough to obtain suffi-
cient engine braking, should be selected.
ANTI-LOCK BRAKING SYSTEM (ABS)
WARNING
The Anti-lock Braking System (ABS) is a so-
phisticated device, but it cannot prevent acci-
dents resulting from careless or dangerous
driving techniques. It can help maintain ve-
hicle control during braking on slippery sur-
faces. Remember that stopping distances
may also be longer on rough, gravel or snow
covered roads, or if you are using snow
chains. Always maintain a safe distance from
the vehicle in front of you. Ultimately, the
driver is responsible for safety.
Tyre type and condition may also affect brak-
ing effectiveness.
– When replacing tyres, install the specified
size of tyres on all four wheels.
– When installing a spare tyre, make sure it is the proper size and type as specified on
the tyre placard. See “Vehicle
identification” in the “9. Technical
information” section for the tyre placard
location.
– For detailed information, see “Wheels and tyres” in the “8. Maintenance and
do-it-yourself” section.
The Anti-lock Braking System (ABS) controls the
brakes so that the wheels do not lock during hard
braking or when braking on slippery surfaces. The
system detects the rotation speed at each wheel
BRAKE SYSTEM
Starting and driving5-39
Page 203 of 297
Downloaded from www.Manualslib.com manuals search engine and varies the brake fluid pressure to prevent each
wheel from locking and sliding. By preventing each
wheel from locking, the system helps the driver to
maintain steering control and helps to minimise
swerving and spinning on slippery surfaces.
Using the system
Depress the brake pedal and hold it down. Depress
the brake pedal with firm steady pressure, but do
not pump the brakes. The ABS will operate to pre-
vent the wheels from locking up. Steer the vehicle to
avoid obstacles.
WARNING
Do not pump the brake pedal. Doing so may in-
crease the stopping distance.
Self-test feature
The ABS includes electronic sensors, electric
pumps, hydraulic solenoids and a computer. The
computer has a built-in diagnostic feature that tests
the system each time you start the engine and move
thevehicleatalowspeedinforwardorreverse.
When the self-test occurs, you may hear a “clunk”
noise and/or feel a pulsation in the brake pedal. This
is normal and does not indicate a malfunction. If the
computer senses a malfunction, it switches the ABS
off and illuminates the ABS warning light on the
instrument panel. The brake system then operates
normally, but without anti-lock assistance.
If the ABS warning light illuminates during the self-
test or while driving, have the vehicle checked by a
NISSAN dealer or qualified workshop.
Normal operation
The ABS will not initiate at speeds below 5 to 10
km/h (3 to 6 MPH). The speeds will vary according
to road conditions.
When the ABS senses that one or more wheels are
close to locking up, the actuator rapidly applies and
releases hydraulic pressure. This action is similar to
pumping the brakes very quickly. You may feel a
pulsation in the brake pedal and hear a noise from
the actuator under the bonnet when it is operating.
This is normal and indicates that the ABS is working
properly. However, the pulsation may indicate that
road conditions are hazardous and extra care is re-
quired while driving. When accelerating, driving on slippery surfaces or
suddenly avoiding obstacles on roads, the vehicle
might swerve or slip. The Electronic Stability Pro-
gramme (ESP) system continuously monitors and
compares the driver’s intended speed and the travel
direction. The system adjusts wheel brake pressure
and engine torque to assist in improving vehicle sta-
bility.
When the ESP system is operating, the “SLIP”
indicator light () in the combination meter
blinks.
When only the traction control (TCS) system in
the ESP system is operating, the “SLIP” indica-
tor light (
) in the combination meter will also
blink.
If the “SLIP” indicator light () blinks, the
road conditions are slippery. Be sure to drive
carefully. See “Warning/indicator lights and au-
dible reminders” in the “2. Instruments and
controls” section.
Indicator light
If a malfunction occurs in the system, the “SLIP”
indicator light (
) and the ESP indicator light
() come on in the combination meter.
As long as these indicator lights are on, the trac-
tion control function is cancelled.
The ESP system uses Active Brake Limited Slip
(ABLS) system to improve vehicle traction. The Ac-
tive Brake Limited Slip (ABLS) system works when
one of the driving wheels is spinning on a slippery
ELECTRONIC STABILITY
PROGRAMME (ESP) SYSTEM
(where fitted)
5-40Starting and driving