recommended oil NISSAN QASHQAI 2011 Owners Manual
[x] Cancel search | Manufacturer: NISSAN, Model Year: 2011, Model line: QASHQAI, Model: NISSAN QASHQAI 2011Pages: 297, PDF Size: 4.09 MB
Page 53 of 297
Downloaded from www.Manualslib.com manuals search engine If the light comes on while the engine is running, it
may indicate that the anti-lock portion of the braking
system is not functioning properly. Have the system
checked by a NISSAN dealer or qualified workshop.
Brake warning light
This light functions for both the handbrake and the
footbrake systems.
Handbrake indicator:
The light comes on when the handbrake is applied.
Low brake fluid warning:
The light warns of a low brake fluid level. If the light
comes on while the engine is running with the hand-
brake not applied, stop the vehicle and perform the
following procedure:
1. Check the brake fluid level. Add brake fluid asnecessary. See “Brake and clutch fluid” in the
“8. Maintenance and do-it-yourself” section.
WARNING
If the level is below the MIN (minimum) mark
on the brake fluid reservoir, do not drive until
the brake system has been checked at a
NISSAN dealer or qualified workshop.
2. If the brake fluid level is correct: Have the warning system checked by a NISSAN
dealer or qualified workshop.
WARNING
Driving your vehicle could be dangerous. Have
it towed to the nearest NISSAN dealer or quali-
fied workshop.
Depressing the brake pedal with the engine
stopped could increase your stopping dis-
tance and require greater pedal travel dis-
tance and effort.
Charge warning light
If the light comes on while the engine is running, it
may indicate that the charging system is not func-
tioning properly. Turn the engine off and check the
alternator belt. If the belt is loose, broken, missing
or if the light remains on, see a NISSAN dealer or
qualified workshop immediately.
CAUTION
Do not continue driving if the alternator belt is
loose, broken or missing.
Diesel Particulate Filter (DPF)
warning light (where fitted)
WARNING
Be careful not to burn yourself with exhaust
gases.
Do not park the vehicle over flammable mate-
rials such as dry grass, waste paper or rags,
as they may burn easily.
If the vehicle continues to be driven at a low
speed with the DPF warning light illuminated,
the fail-safe will limit engine revolutions and/
or torque. In this case, the engine oil must be
replaced and the process of burning accumu-
lated particulate matter must be carried out
by a NISSAN dealer or qualified workshop.
Service regeneration is a maintenance item
and is not covered by the NISSAN warranty.
Use engine oil for DPF equipped models. For
details, see “Capacities and recommended
fuel/lubricants” in the “9. Technical
information” section.
CAUTION
The DPF becomes extremely hot after burning
particulate matter.
M9R engine only:
When the ignition switch is turned to the ON posi-
tion, the Diesel Particulate Filter (DPF) warning light
illuminates for a few seconds and then goes out.
This indicates that the system is operational.
All diesel engines:
NISSAN GREEN PROGRAM
Some diesel engine models are fitted with a Diesel
Particulate Filter (DPF), which is a device that re-
moves carbon (soot) from the exhaust gas. To oper-
ate effectively, the DPF system must routinely con-
duct a cleaning operation, called regeneration, that
2-4Instruments and controls
Page 63 of 297
Downloaded from www.Manualslib.com manuals search engine For more information, see “Integrated keyfob/re-
mote control system” in the “3. Pre-driving checks
and adjustments” section.
j11Intelligent Key convenience mode alert
The Intelligent Key convenience mode alert shows
to confirm that convenience mode has been acti-
vated. See “Switching from Convenience mode to
Anti-hijack mode” in the “3. Pre-driving checks and
adjustments” section.
j12Intelligent Key anti–hijack alert
The Intelligent Key anti–hijack alert shows to con-
firm that anti-hijack mode has been activated. See
“Switching from Convenience mode to Anti-hijack
mode” in the “3. Pre-driving checks and
adjustments” section.
j13Engine oil level information
When turning the ignition to the ON position, the oil
message indicates the oil level.
The [Oil level OK] message indicates the oil level is
sufficient for driving. Push the
switch or the
steering wheel switchji (where fitted) when the
[Oil level OK] message shows to see a more de-
tailed oil level. (See Oil level
j14 )
NOTE
The [Oil level OK] message indication is dis-
played after the ignition switch has been turned
to the ON position and other warnings have been
shown. CAUTION
The engine oil level check is not designed to indi-
cate a low oil level. Use the dipstick to check the
oil level.
See “Engine oil” in the “8. Maintenance and
do-it-yourself” section.
j14Engine oil level
This display provides a visual representation of the
engine oil level.
j15Engine oil level low
If the oil level is not sufficient for driving, the [Oil
level low] message appears. Oil needs to be added
before driving.
CAUTION
The engine oil level should be checked regularly.
Operating with an insufficient amount of oil can
damage the engine and such damage is not cov-
ered by the warranty.
Park the vehicle at a safe location as soon as pos-
sible and fill the engine with the recommended en-
gine oil.
For checking the engine oil level and adding oil, see
“Engine oil” in the “8. Maintenance and
do-it-yourself” section.
j16Engine oil sensor warning
Please visit your local NISSAN dealer or qualified
workshop if this warning appears.
j17Diesel Particulate Filter warning
(where fitted)
See “Diesel Particulate Filter (DPF) (where fitted)”
in the “5. Starting and driving” section for further
details.
j18Setting menu operation alert
The alert shows when you try to operate the setting
menu while driving. The setting menu can only be
entered if the vehicle is stationary.
j19Maintenance due alert (where fitted)
This alert shows that maintenance is due. The mes-
sage is shown until the steering wheel switchji
(where fitted) is pressed. When the maintenance
due alert reaches 0 km (miles), the
symbol
flashes next to the odometer value.
CAUTION
The engine oil must be changed before the main-
tenance due alert is shown.
– Failure to do so risks causing damage to the engine.
– Continued driving after maintenance due alert reaches 0 km (miles) may result in reduced
engine performance. The engine malfunction
indicator light (orange) will illuminate.
– The DPF (where fitted) may also become satu- rated because regeneration is restricted once
the distance equals 0 km (miles)
Always visit a NISSAN dealer or qualified work-
shop to perform the maintenance and the reset.
2-14Instruments and controls
Page 168 of 297
Downloaded from www.Manualslib.com manuals search engine The turbocharger system uses engine oil for lubrica-
tion and cooling of its rotating components. The tur-
bocharger turbine turns at extremely high speeds
and it can reach an extremely high temperature. It is
essential to maintain a flow of clean oil through the
turbocharger system. A sudden interruption to the
oil supply may cause a malfunction in the turbo-
charger.
To ensure prolonged life and performance of the
turbocharger, it is essential to comply with the fol-
lowing maintenance procedure:
CAUTION
Change the engine oil of the turbo-charged
diesel engine as prescribed. See the sepa-
rately provided Warranty Information & Main-
tenance Booklet for additional information.
Use only the recommended engine oil. See
“Capacities and recommended
fuel/lubricants” in the “9. Technical
information” section.
If the engine has been operating at high rpm
for an extended period of time, let it idle for a
few minutes prior to shutdown.
Do not accelerate the engine to high rpm im-
mediately after starting it.
WARNING
Be careful not to burn yourself with exhaust
gases.
Do not park the vehicle over flammable mate-
rials such as dry grass, waste paper or rags,
as they may burn easily.
If the vehicle continues to be driven at a low
speed with the DPF warning light illuminated,
the fail-safe will limit engine revolutions and/
or torque. In this case, the engine oil must be
replaced and the process of burning accumu-
lated particulate matter must be carried out
by a NISSAN dealer or qualified workshop.
Service regeneration is a maintenance item
and is not covered by the NISSAN warranty.
Use engine oil for DPF equipped models. For
details, see “Capacities and recommended
fuel/lubricants” in the “9. Technical
information” section.
CAUTION
The DPF becomes extremely hot after burning
particulate matter.
NISSAN GREEN PROGRAM
Some diesel engine models are fitted with a Diesel
Particulate Filter (DPF), which is a device that re-
moves carbon (soot) from the exhaust gas. To oper-
ate effectively, the DPF system must routinely con-
duct a cleaning operation, called regeneration, that burns-off the accumulated carbon. This regenera-
tion process is normally automatic and not visible to
the driver.
REGENERATION RESTRICTIONS
Driving conditions such as frequent short journeys
or stop/start driving can result in excessive build up
of carbon in the filter. When this happens the DPF
warning light
will illuminate (and a message
will appear in the vehicle information display, see
“Vehicle information display” later in this section) to
inform you that the vehicle must be driven in a par-
ticular manner to begin regeneration.
When the DPF warning light is illuminated, provided
that legal and safety conditions allow, the vehicle
should be driven at a speed of over 60 km/h (37.5
MPH) until the DPF warning light turns off. This pro-
cess can take up to 30 minutes to complete.
IF REGENERATION FAILS
Failure to react to the DPF warning lightmay
lead to saturation of the DPF system. If this hap-
pens, the Malfunction Indicator (MI)
will also
illuminate to indicate that a Service Regeneration by
a NISSAN dealer or qualified workshop is required.
The engine speed may also be limited to 3,000 rpm
to protect the DPF system.
NOTE
Contact a NISSAN dealer or qualified workshop
to perform a forced regeneration.
TURBOCHARGER SYSTEM
(Diesel engine models) DIESEL PARTICULATE FILTER
(DPF) (where fitted)
Starting and driving5-5
Page 213 of 297
Downloaded from www.Manualslib.com manuals search engine CAUTION
The wheel is heavy. Be sure that your feet are
clear of the wheel and use gloves as necessary
to avoid injury.
Installing the wheel
WARNING
The temporary use spare tyre is designed for
emergency use. See “Spare tyre” earlier in
this section.
Never use wheel nuts other than those pro-
vided with your vehicle. Incorrect wheel nuts
or improperly tightened wheel nuts may cause
the wheel to become loose or come off. This
could cause an accident.
Never use oil or grease on the wheel studs or
nuts. This may cause the wheel nuts to be-
come loose.
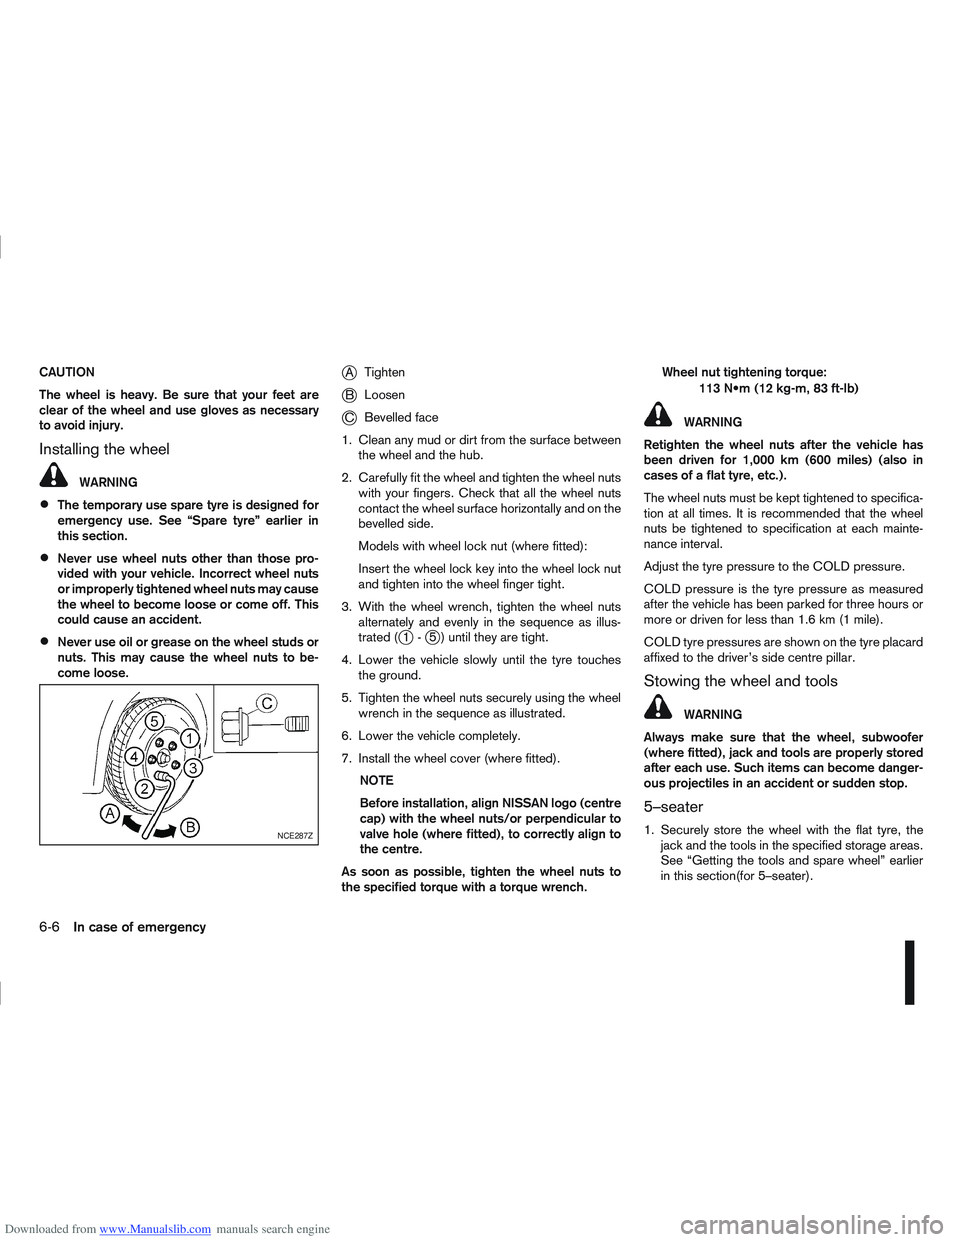
jATighten
jB Loosen
jC Bevelled face
1. Clean any mud or dirt from the surface between the wheel and the hub.
2. Carefully fit the wheel and tighten the wheel nuts with your fingers. Check that all the wheel nuts
contact the wheel surface horizontally and on the
bevelled side.
Models with wheel lock nut (where fitted):
Insert the wheel lock key into the wheel lock nut
and tighten into the wheel finger tight.
3. With the wheel wrench, tighten the wheel nuts alternately and evenly in the sequence as illus-
trated (
j1-j5 ) until they are tight.
4. Lower the vehicle slowly until the tyre touches the ground.
5. Tighten the wheel nuts securely using the wheel wrench in the sequence as illustrated.
6. Lower the vehicle completely.
7. Install the wheel cover (where fitted). NOTE
Before installation, align NISSAN logo (centre
cap) with the wheel nuts/or perpendicular to
valve hole (where fitted), to correctly align to
the centre.
As soon as possible, tighten the wheel nuts to
the specified torque with a torque wrench. Wheel nut tightening torque:
113 (12 kg-m, 83 ft-lb)
WARNING
Retighten the wheel nuts after the vehicle has
been driven for 1,000 km (600 miles) (also in
cases of a flat tyre, etc.).
The wheel nuts must be kept tightened to specifica-
tion at all times. It is recommended that the wheel
nuts be tightened to specification at each mainte-
nance interval.
Adjust the tyre pressure to the COLD pressure.
COLD pressure is the tyre pressure as measured
after the vehicle has been parked for three hours or
more or driven for less than 1.6 km (1 mile).
COLD tyre pressures are shown on the tyre placard
affixed to the driver’s side centre pillar.
Stowing the wheel and tools
WARNING
Always make sure that the wheel, subwoofer
(where fitted), jack and tools are properly stored
after each use. Such items can become danger-
ous projectiles in an accident or sudden stop.
5–seater
1. Securely store the wheel with the flat tyre, the jack and the tools in the specified storage areas.
See “Getting the tools and spare wheel” earlier
in this section(for 5–seater).NCE287Z
6-6In case of emergency
Page 225 of 297
Downloaded from www.Manualslib.com manuals search engine In order to maintain the appearance of your vehicle,
it is important to take proper care of it.
Whenever possible, park your vehicle inside a ga-
rage or in a covered area to minimise the chances
of damaging the paint surface of your vehicle.
When it is necessary to park outside, park in a shady
area or protect the vehicle with a body cover.Be
careful not to scratch the paint surface when put-
ting on or removing the body cover.
WASHING
In the following instances, wash your vehicle as soon
as possible to protect the paint surface:
After a rainfall, to prevent possible damage from
acid rain.
After driving on coastal roads.
When contaminants such as soot, bird drop-
pings, tree sap, metal particles or insects get on
the paint surface.
When dust or mud builds up on the paint sur-
face.
1. Wash the vehicle surface with a wet sponge and plenty of water.
2. Clean the vehicle surface gently and thoroughly using a mild soap or a special vehicle wash sham-
poo mixed with clean, lukewarm (never hot) wa-
ter. CAUTION
Do not wash the vehicle with strong house-
hold soap, strong chemical detergents, petrol
or solvents.
Do not wash the vehicle in direct sunlight or
while the vehicle body is hot, as the paint sur-
face may become water-spotted.
Avoid using tight-napped or rough cloths,
such as washing mitts. Care must be taken
when removing caked-on dirt or other foreign
substances so the paint surface is not
scratched or damaged.
3. Rinse the vehicle thoroughly with plenty of clean water.
4. Use a damp chamois to dry the paint surface to avoid leaving water spots.
When washing the vehicle, take care of the follow-
ing:
Inside flanges, joints and folds on the doors, back
door and bonnet are particularly vulnerable to
the effects of road salt. Therefore, these areas
must be cleaned regularly.
Be sure that the drain holes in the lower edge of
the doors are not clogged.
Spray water to the underbody and in the wheel
wells to loosen the dirt and/or wash away road
salt.
If using a high pressure washer always follow
the recommendations on the equipment (pres-
sure and spraying distance).
CAUTION
Do not spray directly into the engine compart-
ment with a high-pressure washer/hose this
could damage the engine.
If there are damaged areas on the vehicle (e.g.
painted bumpers or headlamp assembly), it is
not recommended to direct the high pressure jet
on to them. Carefully wash these areas by hand.
Avoid the entry of water into the locks.
REMOVING SPOTS
Remove tar and oil spots, industrial dust, insects,
and tree sap as quickly as possible from the paint
surface to avoid lasting damage or staining. Special
cleaning products are available at a NISSAN dealer
or any automotive accessory store.
WAXING
Regular waxing protects the paint surface and helps
to retain a new vehicle appearance.
After waxing, polishing is recommended to remove
built-up residue.
A NISSAN dealer or qualified workshop can assist
you in choosing the appropriate waxing products.
CAUTION
Wash your vehicle thoroughly and completely
before applying wax to the paint surface.
CLEANING EXTERIOR
7-2Appearance and care
Page 240 of 297
Downloaded from www.Manualslib.com manuals search engine 1. Park the vehicle on a level surface and apply thehandbrake.
2. Start the engine. If the engine is cold, start and let the engine idle until it reaches the operational
temperature.
3. Turn the engine off.
4. Wait at least 10 minutes for the engine oil to drain back into the oil pan.
5. Open the bonnet. For details, see “Bonnet release” in the “3. Pre-driving checks and
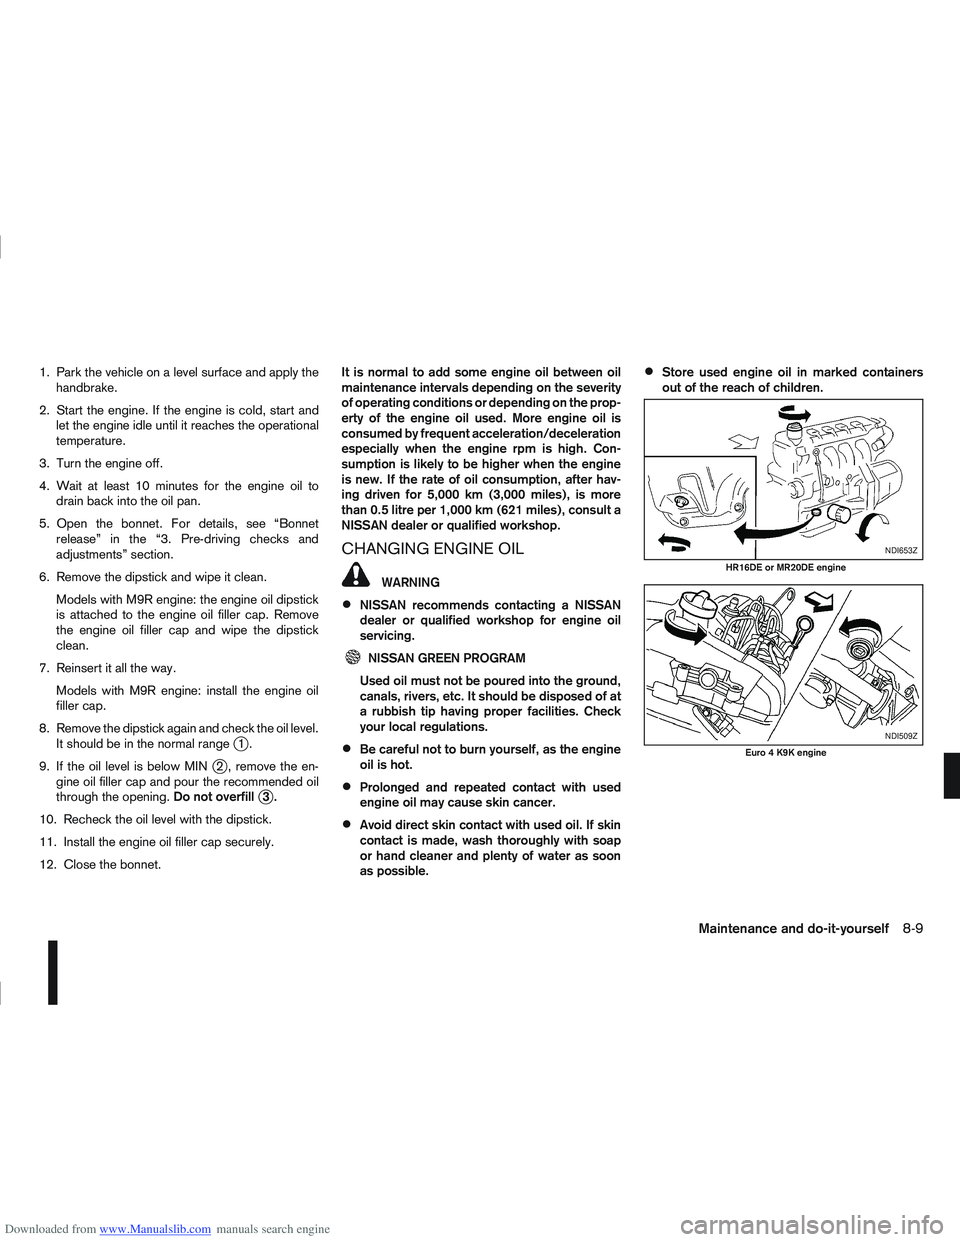
adjustments” section.
6. Remove the dipstick and wipe it clean. Models with M9R engine: the engine oil dipstick
is attached to the engine oil filler cap. Remove
the engine oil filler cap and wipe the dipstick
clean.
7. Reinsert it all the way. Models with M9R engine: install the engine oil
filler cap.
8. Remove the dipstick again and check the oil level. It should be in the normal range
j1.
9. If the oil level is below MIN
j2 , remove the en-
gine oil filler cap and pour the recommended oil
through the opening. Do not overfill
j3.
10. Recheck the oil level with the dipstick.
11. Install the engine oil filler cap securely.
12. Close the bonnet. It is normal to add some engine oil between oil
maintenance intervals depending on the severity
of operating conditions or depending on the prop-
erty of the engine oil used. More engine oil is
consumed by frequent acceleration/deceleration
especially when the engine rpm is high. Con-
sumption is likely to be higher when the engine
is new. If the rate of oil consumption, after hav-
ing driven for 5,000 km (3,000 miles), is more
than 0.5 litre per 1,000 km (621 miles), consult a
NISSAN dealer or qualified workshop.
CHANGING ENGINE OIL
WARNING
NISSAN recommends contacting a NISSAN
dealer or qualified workshop for engine oil
servicing.
NISSAN GREEN PROGRAM
Used oil must not be poured into the ground,
canals, rivers, etc. It should be disposed of at
a rubbish tip having proper facilities. Check
your local regulations.
Be careful not to burn yourself, as the engine
oil is hot.
Prolonged and repeated contact with used
engine oil may cause skin cancer.
Avoid direct skin contact with used oil. If skin
contact is made, wash thoroughly with soap
or hand cleaner and plenty of water as soon
as possible.
Store used engine oil in marked containers
out of the reach of children.
NDI653Z
HR16DE or MR20DE engine
NDI509Z
Euro 4 K9K engine
Maintenance and do-it-yourself8-9
Page 241 of 297
Downloaded from www.Manualslib.com manuals search engine 1. Park the vehicle on a level surface and apply thehandbrake.
2. Start the engine. If the engine is cold, start and let the engine idle until the engine temperature
reaches the operational temperature.
3. Turn the engine off and wait at least 10 minutes to let the engine oil drain back into the oil pan. 4. Open the bonnet. For details, see “Bonnet
release” in the “3. Pre-driving checks and
adjustments” section.
5. Remove the engine oil filler cap.
6. Raise and support the vehicle using a suitable floor jack and safety jack stands.
Place the safety jack stands under the vehicle
jack-up points.
For details, see “Flat tyre” in the “6. In case of
emergency” section.
7. Remove the engine compartment under cover.
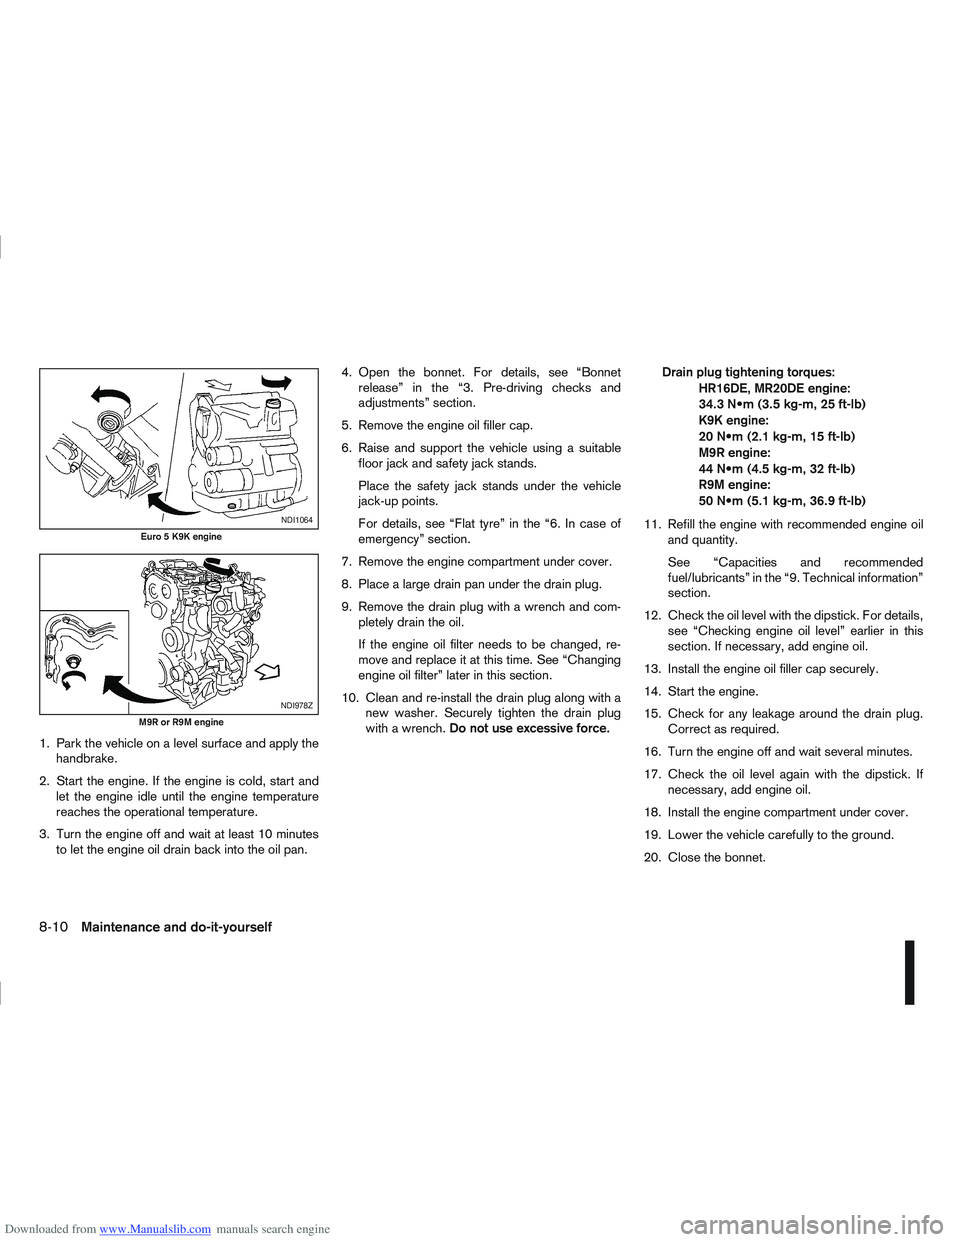
8. Place a large drain pan under the drain plug.
9. Remove the drain plug with a wrench and com- pletely drain the oil.
If the engine oil filter needs to be changed, re-
move and replace it at this time. See “Changing
engine oil filter” later in this section.
10. Clean and re-install the drain plug along with a new washer. Securely tighten the drain plug
with a wrench. Do not use excessive force. Drain plug tightening torques:
HR16DE, MR20DE engine:
34.3 (3.5 kg-m, 25 ft-lb)
K9K engine:
20 (2.1 kg-m, 15 ft-lb)
M9R engine:
44 (4.5 kg-m, 32 ft-lb)
R9M engine:
50 (5.1 kg-m, 36.9 ft-lb)
11. Refill the engine with recommended engine oil and quantity.
See “Capacities and recommended
fuel/lubricants” in the “9. Technical information”
section.
12. Check the oil level with the dipstick. For details, see “Checking engine oil level” earlier in this
section. If necessary, add engine oil.
13. Install the engine oil filler cap securely.
14. Start the engine.
15. Check for any leakage around the drain plug. Correct as required.
16. Turn the engine off and wait several minutes.
17. Check the oil level again with the dipstick. If necessary, add engine oil.
18. Install the engine compartment under cover.
19. Lower the vehicle carefully to the ground.
20. Close the bonnet.
NDI1064
Euro 5 K9K engine
NDI978Z
M9R or R9M engine
8-10Maintenance and do-it-yourself
Page 242 of 297
Downloaded from www.Manualslib.com manuals search engine CHANGING ENGINE OIL FILTER
WARNING
NISSAN recommends contacting a NISSAN
dealer or qualified workshop for engine oil fil-
ter servicing.
NISSAN GREEN PROGRAM
A used oil filter should be disposed of at a
rubbish tip having proper facilities.
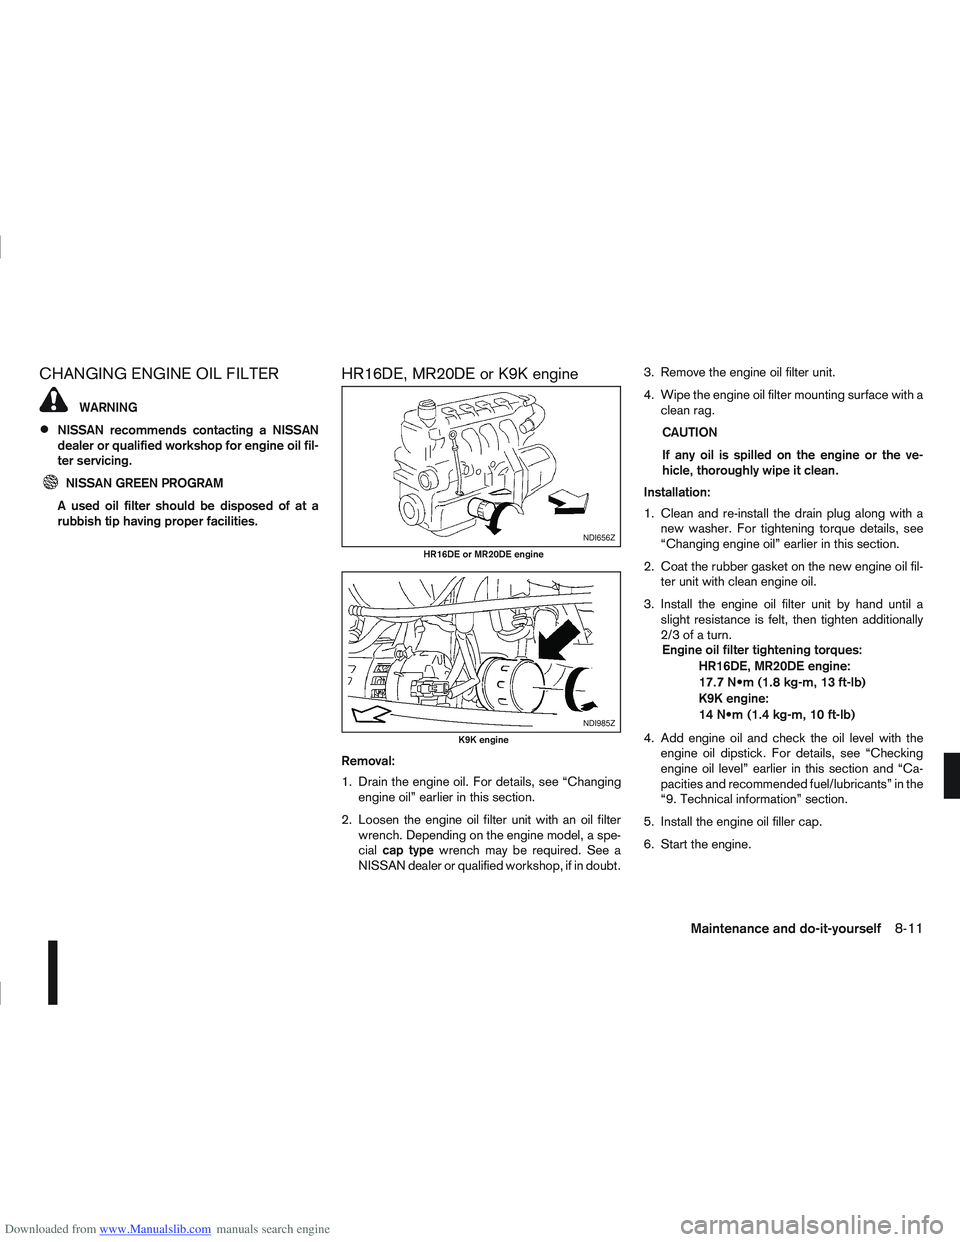
HR16DE, MR20DE or K9K engine
Removal:
1. Drain the engine oil. For details, see “Changing engine oil” earlier in this section.
2. Loosen the engine oil filter unit with an oil filter wrench. Depending on the engine model, a spe-
cial cap type wrench may be required. See a
NISSAN dealer or qualified workshop, if in doubt. 3. Remove the engine oil filter unit.
4. Wipe the engine oil filter mounting surface with a
clean rag.
CAUTION
If any oil is spilled on the engine or the ve-
hicle, thoroughly wipe it clean.
Installation:
1. Clean and re-install the drain plug along with a new washer. For tightening torque details, see
“Changing engine oil” earlier in this section.
2. Coat the rubber gasket on the new engine oil fil- ter unit with clean engine oil.
3. Install the engine oil filter unit by hand until a slight resistance is felt, then tighten additionally
2/3ofaturn.Engine oil filter tightening torques:
HR16DE, MR20DE engine:
17.7 (1.8 kg-m, 13 ft-lb)
K9K engine:
14 (1.4 kg-m, 10 ft-lb)
4. Add engine oil and check the oil level with the engine oil dipstick. For details, see “Checking
engine oil level” earlier in this section and “Ca-
pacities and recommended fuel/lubricants” in the
“9. Technical information” section.
5. Install the engine oil filler cap.
6. Start the engine.
NDI656Z
HR16DE or MR20DE engine
NDI985Z
K9K engine
Maintenance and do-it-yourself8-11
Page 243 of 297
Downloaded from www.Manualslib.com manuals search engine 7. After the engine has been warmed up, make surethere are no leaks around the engine oil filter unit
and the drain plug. Correct as required.
8. Turn the engine off and wait several minutes. Check the oil level and add engine oil, if neces-
sary.
9. Install the engine compartment under cover.
10. Lower the vehicle carefully to the ground.
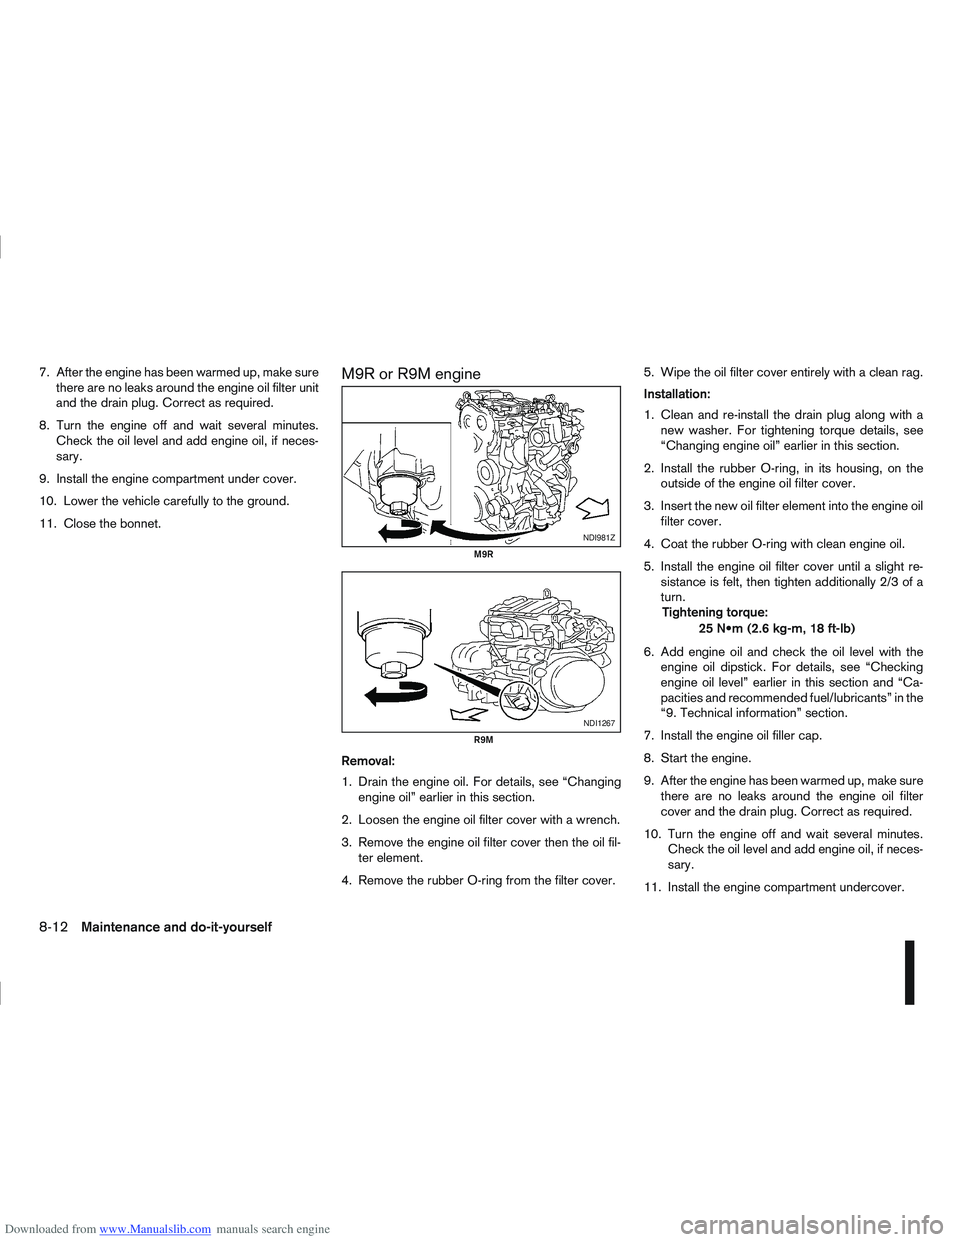
11. Close the bonnet.M9R or R9M engine
Removal:
1. Drain the engine oil. For details, see “Changing engine oil” earlier in this section.
2. Loosen the engine oil filter cover with a wrench.
3. Remove the engine oil filter cover then the oil fil- ter element.
4. Remove the rubber O-ring from the filter cover. 5. Wipe the oil filter cover entirely with a clean rag.
Installation:
1. Clean and re-install the drain plug along with a
new washer. For tightening torque details, see
“Changing engine oil” earlier in this section.
2. Install the rubber O-ring, in its housing, on the outside of the engine oil filter cover.
3. Insert the new oil filter element into the engine oil filter cover.
4. Coat the rubber O-ring with clean engine oil.
5. Install the engine oil filter cover until a slight re- sistance is felt, then tighten additionally 2/3 of a
turn.Tightening torque:
25 (2.6 kg-m, 18 ft-lb)
6. Add engine oil and check the oil level with the engine oil dipstick. For details, see “Checking
engine oil level” earlier in this section and “Ca-
pacities and recommended fuel/lubricants” in the
“9. Technical information” section.
7. Install the engine oil filler cap.
8. Start the engine.
9. After the engine has been warmed up, make sure there are no leaks around the engine oil filter
cover and the drain plug. Correct as required.
10. Turn the engine off and wait several minutes. Check the oil level and add engine oil, if neces-
sary.
11. Install the engine compartment undercover.
NDI981Z
M9R
NDI1267
R9M
8-12Maintenance and do-it-yourself
Page 267 of 297
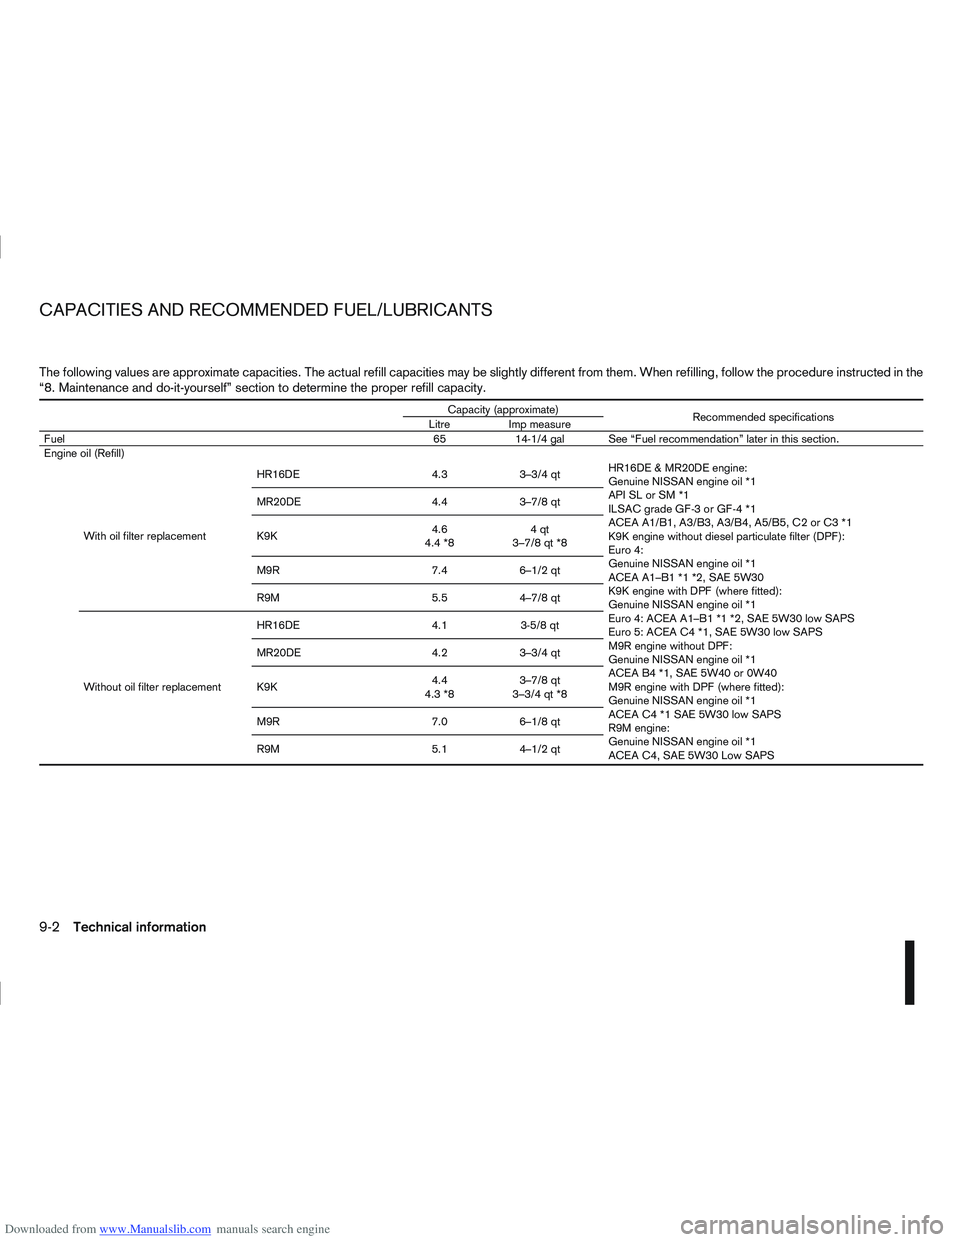
Downloaded from www.Manualslib.com manuals search engine The following values are approximate capacities. The actual refill capacities may be slightly different from them. When refilling, follow the procedure instructed in the
“8. Maintenance and do-it-yourself” section to determine the proper refill capacity.
Capacity (approximate)Recommended specifications
Litre Imp measure
Fuel 6514-1/4 gal See “Fuel recommendation” later in this section
.Engine oil (Refill)
With oil filter replacement HR16DE 4.3 3–3/4 qt
HR16DE & MR20DE engine:
Genuine NISSAN engine oil *1
API SL or SM *1
ILSAC grade GF-3 or GF-4 *1
ACEA A1/B1, A3/B3, A3/B4, A5/B5, C2 or C3 *1
K9K engine without diesel particulate filter (DPF):
Euro 4:
Genuine NISSAN engine oil *1
ACEA A1–B1 *1 *2, SAE 5W30
K9K engine with DPF (where fitted):
Genuine NISSAN engine oil *1
Euro 4: ACEA A1–B1 *1 *2, SAE 5W30 low SAPS
Euro 5: ACEA C4 *1, SAE 5W30 low SAPS
M9R engine without DPF:
Genuine NISSAN engine oil *1
ACEA B4 *1, SAE 5W40 or 0W40
M9R engine with DPF (where fitted):
Genuine NISSAN engine oil *1
ACEA C4 *1 SAE 5W30 low SAPS
R9M engine:
Genuine NISSAN engine oil *1
ACEA C4, SAE 5W30 Low SAPS
MR20DE 4.4 3–7/8 qt
K9K
4.6
4.4 *8 4qt
3–7/8 qt *8
M9R 7.4 6–1/2 qt
R9M 5.5 4–7/8 qt
Without oil filter replacement HR16DE 4.1 3-5/8 qt
MR20DE 4.2 3–3/4 qt
K9K
4.4
4.3 *8 3–7/8 qt
3–3/4 qt *8
M9R 7.0 6–1/8 qt
R9M 5.1 4–1/2 qt
CAPACITIES AND RECOMMENDED FUEL/LUBRICANTS
9-2Technical information