oil filter NISSAN QASHQAI 2016 Owner´s Manual
[x] Cancel search | Manufacturer: NISSAN, Model Year: 2016, Model line: QASHQAI, Model: NISSAN QASHQAI 2016Pages: 338, PDF Size: 4.87 MB
Page 17 of 338
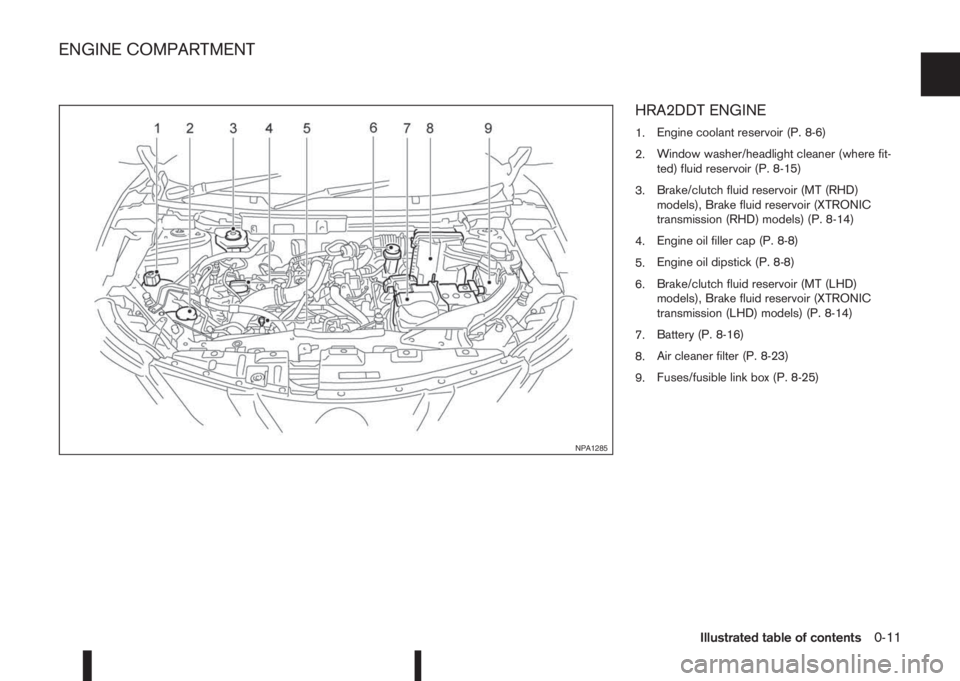
HRA2DDT ENGINE
1.Engine coolant reservoir (P. 8-6)
2.Window washer/headlight cleaner (where fit-
ted) fluid reservoir (P. 8-15)
3.Brake/clutch fluid reservoir (MT (RHD)
models), Brake fluid reservoir (XTRONIC
transmission (RHD) models) (P. 8-14)
4.Engine oil filler cap (P. 8-8)
5.Engine oil dipstick (P. 8-8)
6.Brake/clutch fluid reservoir (MT (LHD)
models), Brake fluid reservoir (XTRONIC
transmission (LHD) models) (P. 8-14)
7.Battery (P. 8-16)
8.Air cleaner filter (P. 8-23)
9.Fuses/fusible link box (P. 8-25)
NPA1285
ENGINE COMPARTMENT
Illustrated table of contents0-11
Page 18 of 338
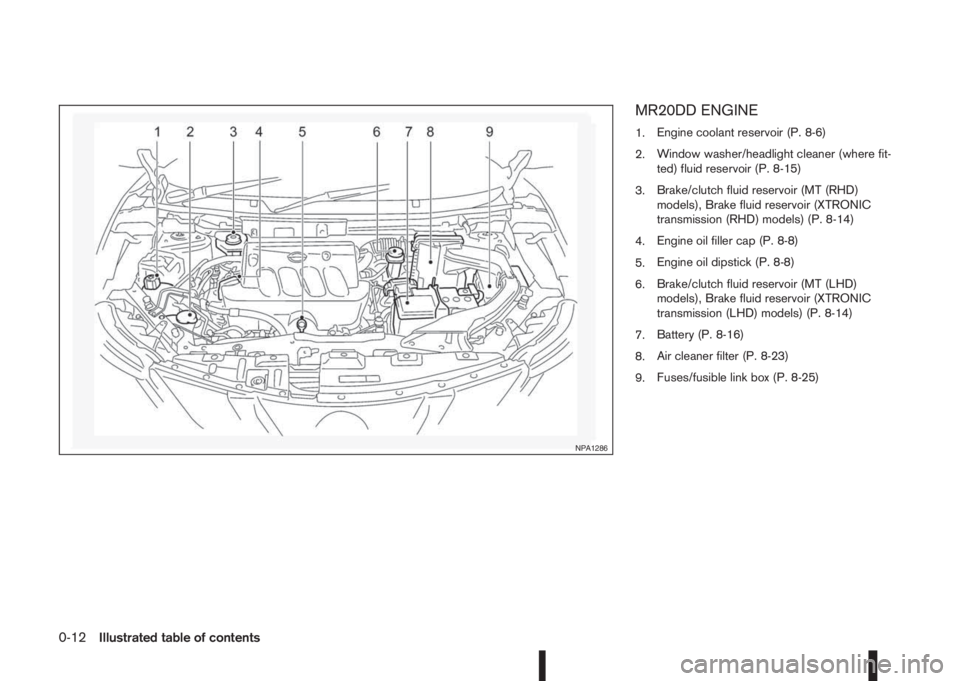
MR20DD ENGINE
1.Engine coolant reservoir (P. 8-6)
2.Window washer/headlight cleaner (where fit-
ted) fluid reservoir (P. 8-15)
3.Brake/clutch fluid reservoir (MT (RHD)
models), Brake fluid reservoir (XTRONIC
transmission (RHD) models) (P. 8-14)
4.Engine oil filler cap (P. 8-8)
5.Engine oil dipstick (P. 8-8)
6.Brake/clutch fluid reservoir (MT (LHD)
models), Brake fluid reservoir (XTRONIC
transmission (LHD) models) (P. 8-14)
7.Battery (P. 8-16)
8.Air cleaner filter (P. 8-23)
9.Fuses/fusible link box (P. 8-25)
NPA1286
0-12Illustrated table of contents
Page 19 of 338
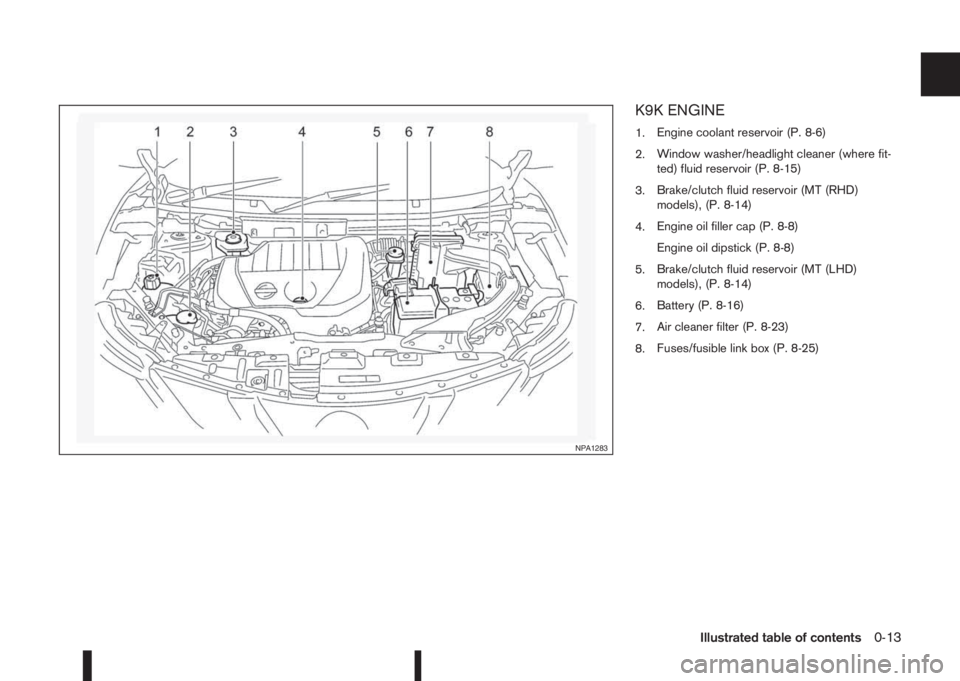
K9K ENGINE
1.Engine coolant reservoir (P. 8-6)
2.Window washer/headlight cleaner (where fit-
ted) fluid reservoir (P. 8-15)
3.Brake/clutch fluid reservoir (MT (RHD)
models), (P. 8-14)
4.Engine oil filler cap (P. 8-8)
Engine oil dipstick (P. 8-8)
5.Brake/clutch fluid reservoir (MT (LHD)
models), (P. 8-14)
6.Battery (P. 8-16)
7.Air cleaner filter (P. 8-23)
8.Fuses/fusible link box (P. 8-25)
NPA1283
Illustrated table of contents0-13
Page 20 of 338
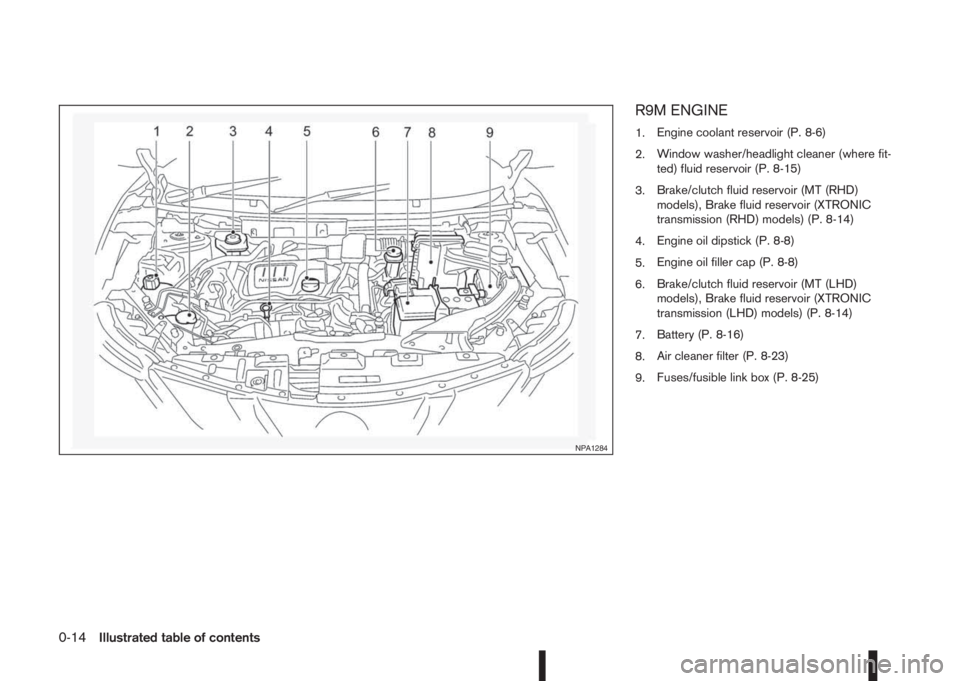
R9M ENGINE
1.Engine coolant reservoir (P. 8-6)
2.Window washer/headlight cleaner (where fit-
ted) fluid reservoir (P. 8-15)
3.Brake/clutch fluid reservoir (MT (RHD)
models), Brake fluid reservoir (XTRONIC
transmission (RHD) models) (P. 8-14)
4.Engine oil dipstick (P. 8-8)
5.Engine oil filler cap (P. 8-8)
6.Brake/clutch fluid reservoir (MT (LHD)
models), Brake fluid reservoir (XTRONIC
transmission (LHD) models) (P. 8-14)
7.Battery (P. 8-16)
8.Air cleaner filter (P. 8-23)
9.Fuses/fusible link box (P. 8-25)
NPA1284
0-14Illustrated table of contents
Page 75 of 338
![NISSAN QASHQAI 2016 Owner´s Manual •[Auto lights]:
The sensitivity of the automatic lighting can be
adjusted. From the [Lighting] menu, select [Auto
Lights]. Use the
orand ENTER switches to
select the required sensitivity. The follow NISSAN QASHQAI 2016 Owner´s Manual •[Auto lights]:
The sensitivity of the automatic lighting can be
adjusted. From the [Lighting] menu, select [Auto
Lights]. Use the
orand ENTER switches to
select the required sensitivity. The follow](/img/5/40324/w960_40324-74.png)
•[Auto lights]:
The sensitivity of the automatic lighting can be
adjusted. From the [Lighting] menu, select [Auto
Lights]. Use the
orand ENTER switches to
select the required sensitivity. The following op-
tions are available:
– On earliest
– On earlier
– Standard
– On later
[Turn indicator]:
The [3 flash on] overtaking feature can be set to be
ON or OFF. From the Vehicle Settings menu, select
“[3 Flash on]”. Use the ENTER button to turn this
feature ON or OFF.
[Unlocking]:
There are two options (where fitted) in the [Unlock-
ing] menu:
•[I–Key Door Lock] (where fitted)
When this item is turned on, the request switch
on the door is activated. From the [Unlocking]
menu, select [I-Key Door Unlock]. Use the
ENTER button to activate or deactivate this func-
tion.
•[Selective unlock]
When this item is turned on, and the door handle
request switch on the driver’s or front passen-
ger’s side door is pushed, only the correspond-
ing door is unlocked. All the doors can be un-
locked if the door handle request switch ispushed again within 1 minute. When this item is
turned to off, all the doors will be unlocked when
the door handle request switch is pushed once.
From the [Unlocking] menu, select [Selective
Unlock]. Use the ENTER button to activate or
deactivate this function.
[Wipers]:
•[Speed dependent] (where fitted)
The Speed dependent wiper feature can be set
to be ON or OFF. From the [Wipers] menu,
select [Speed Dependent]. Use the ENTER but-
ton to turn this feature ON or OFF.
•[Rain Sensor] (where fitted)
The [Rain sensor] feature can be activated or
deactivated. From the [Wipers] menu, select
[Rain Sensor]. Use the ENTER button to turn
this feature ON or OFF.
•[Reverse link]
The [Reverse link] wiper feature can be set to be
ON or OFF. From the [Wipers] menu, select
[Reverse Link]. Use the ENTER button to turn
this feature ON or OFF.
•[Drip wipe]
The [Drip wipe] feature can be set to be ON or
OFF. From the [Wipers] menu, select [Drip
Wipe]. Use the ENTER button to turn this fea-
ture ON or OFF.
Maintenance
1. Engine oil and filter replacement indicator:
This indicator appears when the customer set time
comes for changing the engine oil and filter. You
can set or reset the distance for changing the en-
gine oil and filter.
NIC2206
Instruments and controls2-17
Page 76 of 338
![NISSAN QASHQAI 2016 Owner´s Manual NOTE
Diesel models with diesel engines make use of
an Oil Condition Supervisor (OCS) function.
Petrol engines have a basic service reminder.
1. Use the
orbuttons to select [Settings], and
press ENTER. NISSAN QASHQAI 2016 Owner´s Manual NOTE
Diesel models with diesel engines make use of
an Oil Condition Supervisor (OCS) function.
Petrol engines have a basic service reminder.
1. Use the
orbuttons to select [Settings], and
press ENTER.](/img/5/40324/w960_40324-75.png)
NOTE
Diesel models with diesel engines make use of
an Oil Condition Supervisor (OCS) function.
Petrol engines have a basic service reminder.
1. Use the
orbuttons to select [Settings], and
press ENTER.
2. Select [Maintenance], followed by [Service] us-
ing the
orand ENTER switches. In the
[Service] menu, use theorbuttons to navi-
gate between the menu options and press
ENTER to set or reset the distance for changing
the engine oil.
3. (Diesel models only) Select [Maintenance], fol-
lowed by [Filter] using the
orand ENTER
switches. In the [Filter] menu, use theorbuttons to navigate between the menu options
and press ENTER to set or reset the distance for
draining the diesel fuel filter.
For scheduled maintenance items and intervals, see
your NISSAN Service and Maintenance Guide.
2. Tyre replacement indicator:
This indicator appears when the customer set dis-
tance comes for replacing tyres. You can set or
reset the distance for replacing tyres.
1. Use the
orbuttons to select [Settings], and
press ENTER.
2. Select [Maintenance], followed by [Tyre] using
the
orand ENTER switches. In the [Tyre]menu, use the
orbuttons to navigate be-
tween the menu options and press ENTER to set
or reset the distance for replacing tyres.
WARNING
The tyre replacement indicator is not a substitute
for regular tyre checks, including tyre pressure
checks. See “Wheels and tyres” in the “8. Main-
tenance and do-it-yourself” section. Many factors
including tyre inflation, alignment, driving habits
and road conditions affect tyre wear and when
tyres should be replaced. Setting the tyre re-
placement indicator for a certain driving distance
does not mean your tyres will last that long. Use
the tyre replacement indicator as a guide only
and always perform regular tyre checks. Failure
to perform regular tyre checks, including tyre
pressure checks could result in tyre failure. Seri-
ous vehicle damage could occur and may lead to
a collision, which could result in serious personal
injury or death.
3. Other indicator:
This indicator appears when the customer set time
comes for replacing items other than the engine oil,
fuel filter and tyres. You can set or reset the dis-
tance for replacing the items.
[Alert]
You can specify that an alert occurs to notify the
driver that a certain event has occurred. You can set
alerts for the following items:
•[Timer]
•[Navigation] (where fitted)
•[Phone]
•[Mail] (where fitted)
To set an alert:
1. Use the
orbuttons to select the item re-
quired, and press ENTER.
2. For [Phone], [Navigation] or [Mail] use the
ENTER button to toggle between YES and NO.
For the [Timer], to change the timer value, use
the
orbuttons and the ENTER button to
save the selected length of time.
[Tyre pressures]
The settings in the Tyre pressures] menu are all
related to the Tyre pressure monitoring system
TPMS (see “Tyre Pressure Monitoring System
(TPMS)” in the “5. Starting and driving” section).
•[Target front]
•[Target rear]
•[Tyre pressure unit]
•[Calibrate]
[Target front]:
The [target front] tyre pressure is the pressure speci-
fied for the front tyres on the tyre placard (see “Tyre
placard” in the “9. Technical information” section
and “Tyre Pressure Monitoring System (TPMS)” in
the “5. Starting and driving” section).
2-18Instruments and controls
Page 268 of 338
8Maintenance and do-it-yourselfMaintenance and do-it-yourself
Maintenance requirements ....................................... 8-2
Scheduled maintenance...................................... 8-2
General maintenance .......................................... 8-2
Where to go for service ...................................... 8-2
General maintenance ............................................... 8-2
Explanation of general maintenance items ........... 8-2
Maintenance precautions ......................................... 8-4
Engine compartment ................................................ 8-5
Engine cooling system ............................................. 8-6
Checking engine coolant level............................. 8-6
Changing engine coolant .................................... 8-6
Engine oil................................................................. 8-8
Checking engine oil level .................................... 8-8
Changing engine oil ............................................ 8-9
Changing engine oil filter .................................... 8-10
Protect the environment ...................................... 8-12
Fuel filter (Diesel engine models) ............................. 8-13
Draining water .................................................... 8-13
Bleeding the fuel system ..................................... 8-13
XTRONIC Continuously variable transmission
(CVT) fluid ............................................................... 8-13
Brakes ..................................................................... 8-13
Checking parking brake ...................................... 8-13
Checking brake pedal......................................... 8-13
Brake booster ..................................................... 8-14
Brake and clutch fluid .............................................. 8-14
Window washer fluid/headlight cleaner fluid
(where fitted) ........................................................... 8-15
Battery..................................................................... 8-16
Vehicle battery .................................................... 8-16Jump-starting ...................................................... 8-18
Integrated keyfob/Intelligent Key battery
replacement........................................................ 8-18
Drive belts ............................................................... 8-20
Spark plugs (Petrol engine models).......................... 8-21
Air duct removal....................................................... 8-21
Air cleaner filter........................................................ 8-23
Viscous paper type ............................................. 8-23
Dry paper type (where fitted) .............................. 8-23
Wiper blades ........................................................... 8-24
Cleaning ............................................................. 8-24
Front window wiper replacement ........................ 8-24
Back door window wiper replacement ................ 8-24
Windscreen washer nozzle ................................. 8-25
Fuses ...................................................................... 8-25
Passenger compartment ..................................... 8-25
Engine compartment ........................................... 8-26
Lights ...................................................................... 8-27
Headlights .......................................................... 8-28
Exterior lights ...................................................... 8-29
Interior lights....................................................... 8-29
Light locations .................................................... 8-30
Wheels and tyres ..................................................... 8-33
Tyre inflation pressure......................................... 8-33
Types of tyres ..................................................... 8-33
Snow chains....................................................... 8-34
Tyre rotation ....................................................... 8-34
Tyre wear and damage ....................................... 8-35
Tyre age ............................................................. 8-35
Changing tyres and wheels................................. 8-35
Page 273 of 338
•If you must run the engine in an enclosed
space such as a garage, be sure there is
proper ventilation for exhaust gases.
•DO NOT GET UNDER A VEHICLE THAT IS
SUPPORTED BY A JACK.
•Keep smoking materials, flame and sparks
away from fuel and battery.
•Never connect or disconnect either the bat-
tery or any transistorised component connec-
tor while the ignition switch is in the ON posi-
tion.
•Never leave the engine or transmission re-
lated component harness connector discon-
nected while the ignition switch is in the ON
position.
•On petrol engine models with the multiport
fuel injection (MFI) system, the fuel filter or
fuel lines should be serviced by a NISSAN
dealer or qualified workshop because the fuel
lines are under high pressure even when the
engine is off.
•Always wear eye protection whenever you
work on your vehicle.
•Failure to follow these or other common sense
guidelines may lead to serious injury or ve-
hicle damage.
NISSAN Blue Citizenship
Improperly disposed engine oil and/or other
vehicle fluids can pollute the environment. Al-
ways conform to local regulations for disposal
of vehicle fluid.
This section gives instructions regarding only those
items which are relatively easy for an owner to per-
form.
You should be aware that incomplete or improper
servicing may result in operating difficulties or ex-
cessive emissions, and could affect your warranty
coverage.If in doubt about any servicing, have it
done by your NISSAN dealer or qualified work-
shop.For an overview of the engine compartment, see
“Engine compartment” in the “0. Illustrated table
of contents” section.
ENGINE COMPARTMENT
Maintenance and do-it-yourself8-5
Page 278 of 338
1. Park the vehicle on a level surface and apply the
parking brake.
2. Start the engine. If the engine is cold, start and
let the engine idle until the engine temperature
reaches the operational temperature.
3. Turn the engine off and wait at least 10 minutes
to let the engine oil drain back into the oil pan.4. Open the bonnet. For details, see “Bonnet
release” in the “3. Pre-driving checks and
adjustments” section.
5. Remove the engine oil filler cap.
6. Raise and support the vehicle using a suitable
floor jack and safety jack stands.
Place the safety jack stands under the vehicle
jack-up points.
For details, see “Flat tyre” in the “6. In case of
emergency” section.
7. Remove the engine compartment under cover.
8. Place a large drain pan under the drain plug.
9. Remove the drain plug with a wrench and com-
pletely drain the oil.
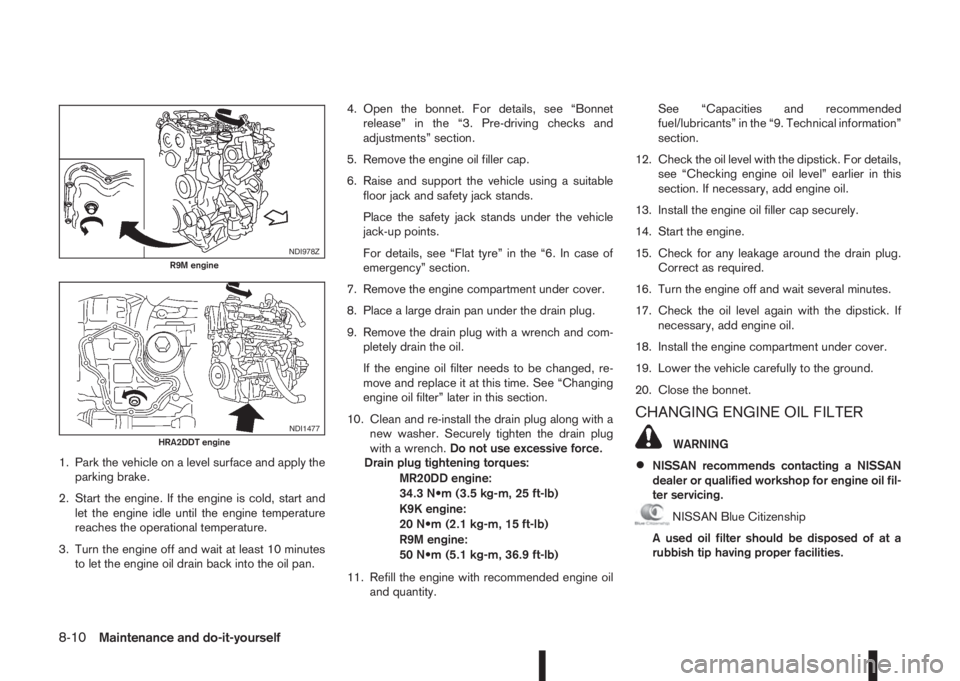
If the engine oil filter needs to be changed, re-
move and replace it at this time. See “Changing
engine oil filter” later in this section.
10. Clean and re-install the drain plug along with a
new washer. Securely tighten the drain plug
with a wrench.Do not use excessive force.
Drain plug tightening torques:
MR20DD engine:
34.3 N•m (3.5 kg-m, 25 ft-lb)
K9K engine:
20 N•m (2.1 kg-m, 15 ft-lb)
R9M engine:
50 N•m (5.1 kg-m, 36.9 ft-lb)
11. Refill the engine with recommended engine oil
and quantity.See “Capacities and recommended
fuel/lubricants” in the “9. Technical information”
section.
12. Check the oil level with the dipstick. For details,
see “Checking engine oil level” earlier in this
section. If necessary, add engine oil.
13. Install the engine oil filler cap securely.
14. Start the engine.
15. Check for any leakage around the drain plug.
Correct as required.
16. Turn the engine off and wait several minutes.
17. Check the oil level again with the dipstick. If
necessary, add engine oil.
18. Install the engine compartment under cover.
19. Lower the vehicle carefully to the ground.
20. Close the bonnet.
CHANGING ENGINE OIL FILTER
WARNING
•NISSAN recommends contacting a NISSAN
dealer or qualified workshop for engine oil fil-
ter servicing.
NISSAN Blue Citizenship
A used oil filter should be disposed of at a
rubbish tip having proper facilities.
NDI978ZR9M engine
NDI1477HRA2DDT engine
8-10Maintenance and do-it-yourself
Page 279 of 338
MR20DD and K9K engines
Removal:
1. Drain the engine oil. For details, see “Changing
engine oil” earlier in this section.
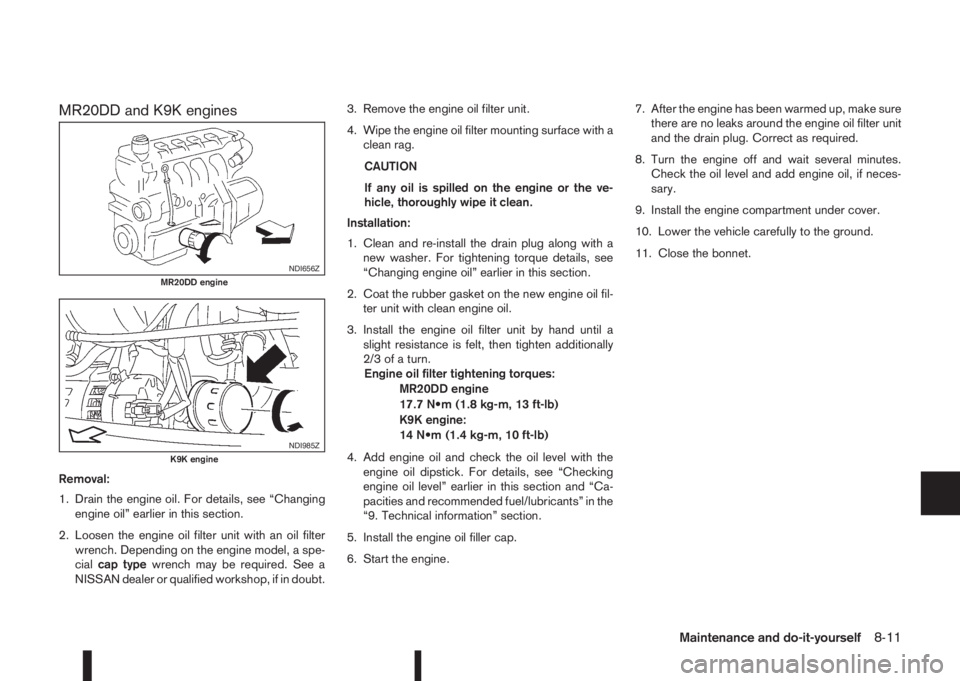
2. Loosen the engine oil filter unit with an oil filter
wrench. Depending on the engine model, a spe-
cialcap typewrench may be required. See a
NISSAN dealer or qualified workshop, if in doubt.3. Remove the engine oil filter unit.
4. Wipe the engine oil filter mounting surface with a
clean rag.
CAUTION
If any oil is spilled on the engine or the ve-
hicle, thoroughly wipe it clean.
Installation:
1. Clean and re-install the drain plug along with a
new washer. For tightening torque details, see
“Changing engine oil” earlier in this section.
2. Coat the rubber gasket on the new engine oil fil-
ter unit with clean engine oil.
3. Install the engine oil filter unit by hand until a
slight resistance is felt, then tighten additionally
2/3 of a turn.
Engine oil filter tightening torques:
MR20DD engine
17.7 N•m (1.8 kg-m, 13 ft-lb)
K9K engine:
14 N•m (1.4 kg-m, 10 ft-lb)
4. Add engine oil and check the oil level with the
engine oil dipstick. For details, see “Checking
engine oil level” earlier in this section and “Ca-
pacities and recommended fuel/lubricants” in the
“9. Technical information” section.
5. Install the engine oil filler cap.
6. Start the engine.7. After the engine has been warmed up, make sure
there are no leaks around the engine oil filter unit
and the drain plug. Correct as required.
8. Turn the engine off and wait several minutes.
Check the oil level and add engine oil, if neces-
sary.
9. Install the engine compartment under cover.
10. Lower the vehicle carefully to the ground.
11. Close the bonnet.
NDI656ZMR20DD engine
NDI985ZK9K engine
Maintenance and do-it-yourself8-11