tyre repair NISSAN QASHQAI 2016 Owner´s Manual
[x] Cancel search | Manufacturer: NISSAN, Model Year: 2016, Model line: QASHQAI, Model: NISSAN QASHQAI 2016Pages: 338, PDF Size: 4.87 MB
Page 62 of 338
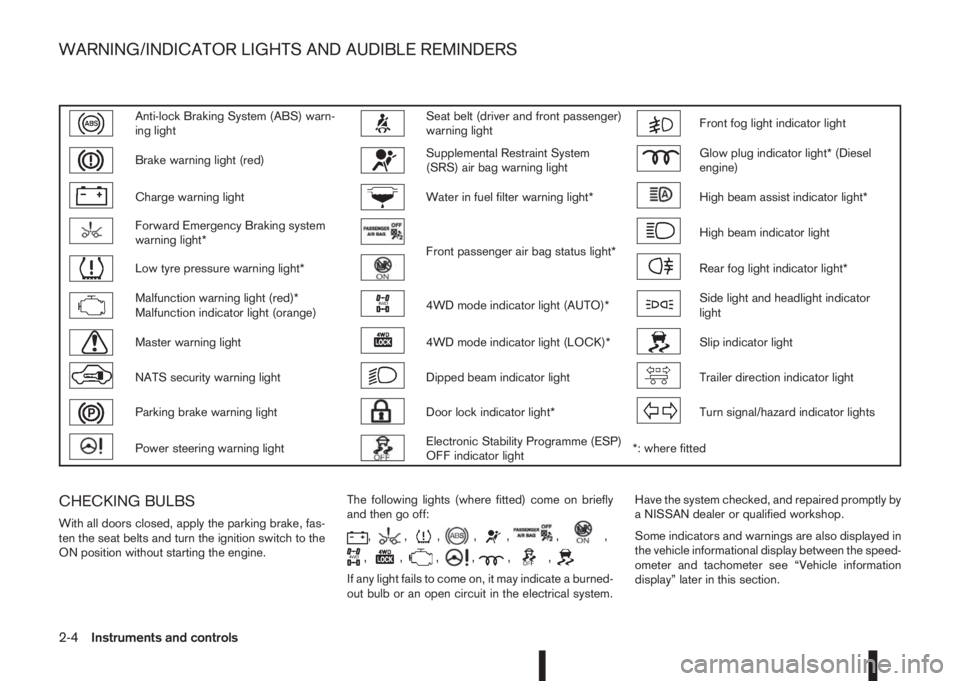
Anti-lock Braking System (ABS) warn-
ing lightSeat belt (driver and front passenger)
warning lightFront fog light indicator light
Brake warning light (red)Supplemental Restraint System
(SRS) air bag warning lightGlow plug indicator light* (Diesel
engine)
Charge warning lightWater in fuel filter warning light*High beam assist indicator light*
Forward Emergency Braking system
warning light*
Front passenger air bag status light*
High beam indicator light
Low tyre pressure warning light*Rear fog light indicator light*
Malfunction warning light (red)*
Malfunction indicator light (orange)4WD mode indicator light (AUTO)*Side light and headlight indicator
light
Master warning light4WD mode indicator light (LOCK)*Slip indicator light
NATS security warning lightDipped beam indicator lightTrailer direction indicator light
Parking brake warning lightDoor lock indicator light*Turn signal/hazard indicator lights
Power steering warning lightElectronic Stability Programme (ESP)
OFF indicator light*: where fitted
CHECKING BULBS
With all doors closed, apply the parking brake, fas-
ten the seat belts and turn the ignition switch to the
ON position without starting the engine.The following lights (where fitted) come on briefly
and then go off:,,,,,,,
,,,,,,
If any light fails to come on, it may indicate a burned-
out bulb or an open circuit in the electrical system.Have the system checked, and repaired promptly by
a NISSAN dealer or qualified workshop.
Some indicators and warnings are also displayed in
the vehicle informational display between the speed-
ometer and tachometer see “Vehicle information
display” later in this section.
WARNING/INDICATOR LIGHTS AND AUDIBLE REMINDERS
2-4Instruments and controls
Page 65 of 338
on the driver side centre pillar, to turn the low
tyre pressure warning light off. If the light still
illuminates while driving after adjusting the
tyre pressure, a tyre may be flat. If you have a
flat tyre, repair it with the emergency tyre
puncture repair kit (where fitted) or replace it
with a spare tyre (where fitted) as soon as
possible.
•After adjusting the tyre pressure, be sure to
reset the TPMS. Unless the resetting is per-
formed, the TPMS will not warn of the low tyre
pressure correctly.
•When a spare tyre is mounted or a wheel is
replaced, the TPMS will not function and the
low tyre pressure warning light will flash for
approximately 1 minute. The light will remain
on after 1 minute. Contact a NISSAN dealer or
qualified workshop as soon as possible for
tyre replacement and/or system resetting.
•Replacing tyres with those not originally speci-
fied by NISSAN could affect the proper opera-
tion of the TPMS.
CAUTION
•The TPMS is not a substitute for the regular
tyre pressure check. Be sure to check the tyre
pressure regularly.
•If the vehicle is being driven at speeds of less
than 25 km/h (16 MPH), the TPMS may not
operate correctly.
•Be sure to install the specified size of tyres to
all four wheels correctly.
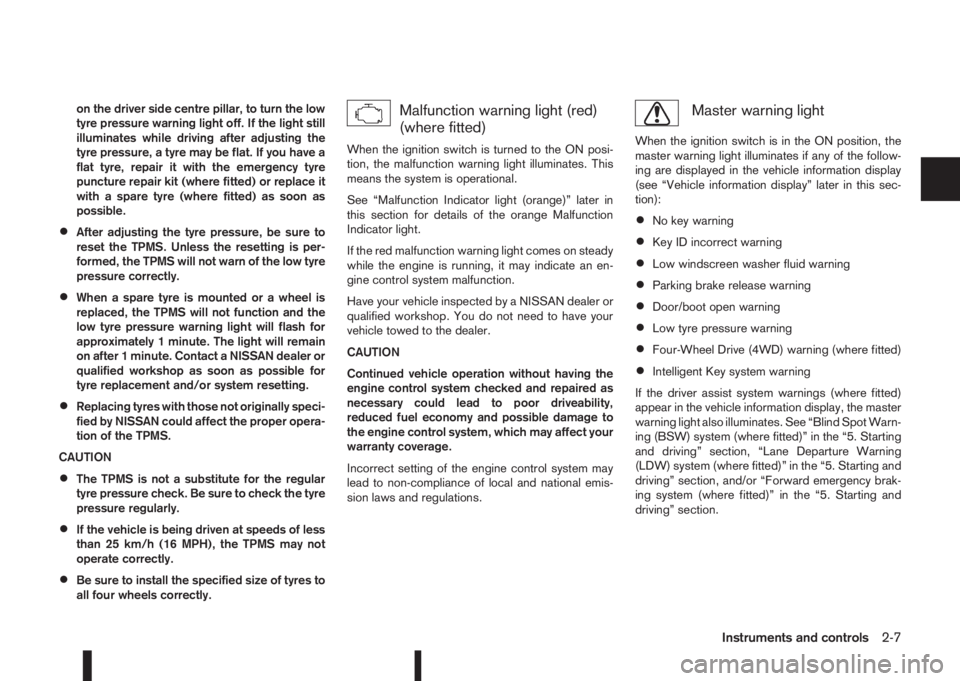
Malfunction warning light (red)
(where fitted)
When the ignition switch is turned to the ON posi-
tion, the malfunction warning light illuminates. This
means the system is operational.
See “Malfunction Indicator light (orange)” later in
this section for details of the orange Malfunction
Indicator light.
If the red malfunction warning light comes on steady
while the engine is running, it may indicate an en-
gine control system malfunction.
Have your vehicle inspected by a NISSAN dealer or
qualified workshop. You do not need to have your
vehicle towed to the dealer.
CAUTION
Continued vehicle operation without having the
engine control system checked and repaired as
necessary could lead to poor driveability,
reduced fuel economy and possible damage to
the engine control system, which may affect your
warranty coverage.
Incorrect setting of the engine control system may
lead to non-compliance of local and national emis-
sion laws and regulations.
Master warning light
When the ignition switch is in the ON position, the
master warning light illuminates if any of the follow-
ing are displayed in the vehicle information display
(see “Vehicle information display” later in this sec-
tion):
•No key warning
•Key ID incorrect warning
•Low windscreen washer fluid warning
•Parking brake release warning
•Door/boot open warning
•Low tyre pressure warning
•Four-Wheel Drive (4WD) warning (where fitted)
•Intelligent Key system warning
If the driver assist system warnings (where fitted)
appear in the vehicle information display, the master
warning light also illuminates. See “Blind Spot Warn-
ing (BSW) system (where fitted)” in the “5. Starting
and driving” section, “Lane Departure Warning
(LDW) system (where fitted)” in the “5. Starting and
driving” section, and/or “Forward emergency brak-
ing system (where fitted)” in the “5. Starting and
driving” section.
Instruments and controls2-7
Page 181 of 338
be able to detect or signal low tyre pressure as
intended. TPMS malfunctions may occur for a vari-
ety of reasons including the installation of replace-
ment or alternate tyres or wheels on the vehicle that
prevent the TPMS from functioning properly. Always
check the TPMS indicator light after replacing one
or more tyres or wheels on your vehicle to ensure
that the replacement or alternate tyres and wheels
allow the TPMS to continue to function properly.
•The TPMS does not monitor the tyre pressure of
the spare tyre.
•The TPMS will activate only when the vehicle is
driven at speeds above 25 km/h (16 MPH). Also,
this system may not detect a sudden drop in tyre
pressure (for example a flat tyre while driving).
•The TPMS indicator light may not automatically
turn off when the tyre pressure is adjusted.After
the tyre is inflated to the recommended COLD
tyre pressure, drive the vehicle at speeds above
25 km/h (16 MPH) to activate the TPMS. See
“TPMS sensor ID and position recognition” later
in this section
•Following a change in the outside temperature,
the TPMS indicator light may illuminate even if
the tyre pressure has been adjusted properly.
Adjust the tyre pressure to the recommended
COLD tyre pressure again when the tyres are
cold, and reset the TPMS.
For additional information, see “[Check cold tyre]
message” later in this section.
WARNING
•If the TPMS indicator light illuminates while
driving:
– avoid sudden steering manoeuvres
– avoid abrupt braking
– reduce vehicle speed
– pull off the road to a safe location
– stop the vehicle as soon as possible
•Driving with under-inflated tyres may perma-
nently damage the tyres and increase the like-
lihood of tyre failure. Serious vehicle damage
could occur which may lead to an accident
and could result in serious personal injury.
•Check the tyre pressure for all four tyres. Ad-
just the tyre pressure to the recommended
COLD tyre pressure shown on the tyre plac-
ard to turn the TPMS indicator light “OFF”. In
case of a flat tyre, replace it with a spare tyre
as soon as possible. (See “Flat tyre” in the
“6. In case of emergency” section for chang-
ing a flat tyre.)
•When a spare tyre is mounted or a wheel is
replaced, the TPMS will not function and the
TPMS indicator light will flash for approxi-
mately 1 minute. The light will remain on after
1 minute. Be sure to follow all instructions for
wheel replacement and mount the TPMS sys-
tem correctly.
•Replacing tyres with those not originally speci-
fied by NISSAN could affect the proper opera-
tion of the TPMS.
•The Genuine NISSAN Emergency Tyre Repair
Sealant or equivalent can be used for tempo-
rarily repairing a tyre. Do not inject any other
tyre liquid or aerosol tyre sealant into the
tyres, as this may cause a malfunction of the
tyre pressure sensors.
•NISSAN recommends using only Genuine
NISSAN Emergency Tyre Sealant provided
with your vehicle. Other tyre sealants may
damage the valve stem seal which can cause
the tyre to lose air pressure. Visit a NISSAN
dealer or qualified workshop as soon as pos-
sible after using tyre repair sealant (for mod-
els equipped with the emergency tyre punc-
ture repair kit).
CAUTION
•The TPMS may not function properly when the
wheels are equipped with tyre chains or the
wheels are buried in snow.
•Do not place metalised film or any metal parts
(antenna, etc.) on the windows. This may
cause poor reception of the signals from the
tyre pressure sensors, and the TPMS will not
function properly.
Starting and driving5-5
Page 245 of 338
6In case of emergencyIn case of emergency
Hazard warning flasher switch ................................. 6-2
Spare tyre................................................................ 6-2
Temporary-use spare tyre (where fitted) .............. 6-2
Conventional spare tyre (where fitted) ................. 6-2
Flat tyre ................................................................... 6-3
Stopping the vehicle ........................................... 6-3
Changing flat tyre (Models with spare wheel,
where fitted) ....................................................... 6-3
Tyre Pressure Monitoring System (TPMS)
(where fitted) ...................................................... 6-7
Repairing flat tyre (Models with emergency
tyre puncture repair kit) ....................................... 6-8Jump-starting ........................................................... 6-11
Push-starting ........................................................... 6-13
Engine overheat ....................................................... 6-13
Tow truck towing ..................................................... 6-14
Towing precautions ............................................ 6-14
Recommended towing for two-wheel drive
(2WD) models .................................................... 6-15
Recommended towing for four-wheel drive
(4WD) models .................................................... 6-15
Towing eye ......................................................... 6-16
Freeing the vehicle from sand, snow or mud ....... 6-16
Page 251 of 338
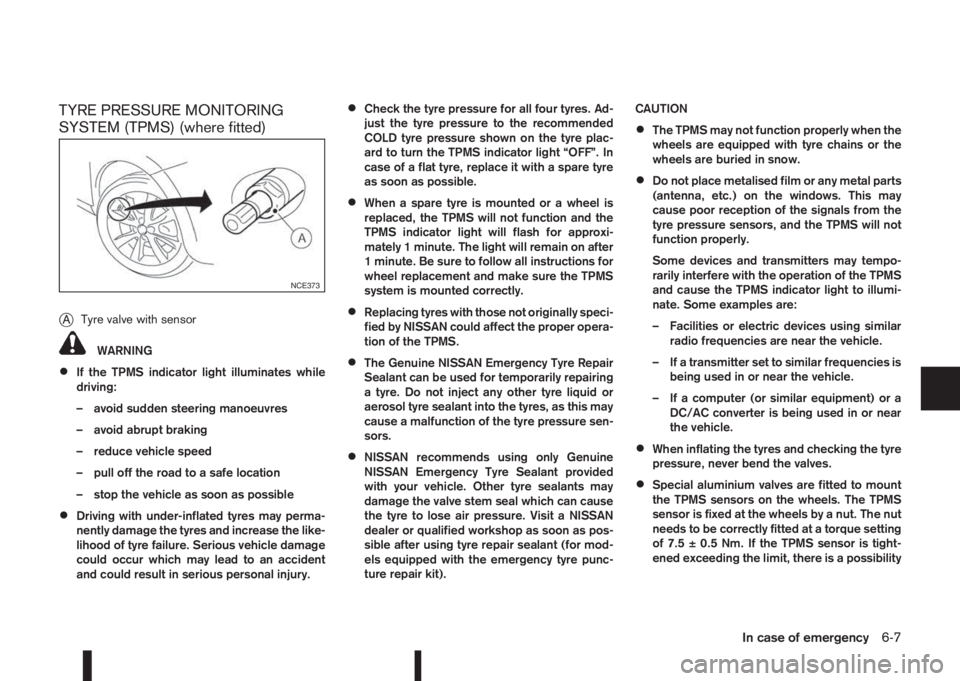
TYRE PRESSURE MONITORING
SYSTEM (TPMS) (where fitted)
j
ATyre valve with sensor
WARNING
•If the TPMS indicator light illuminates while
driving:
– avoid sudden steering manoeuvres
– avoid abrupt braking
– reduce vehicle speed
– pull off the road to a safe location
– stop the vehicle as soon as possible
•Driving with under-inflated tyres may perma-
nently damage the tyres and increase the like-
lihood of tyre failure. Serious vehicle damage
could occur which may lead to an accident
and could result in serious personal injury.
•Check the tyre pressure for all four tyres. Ad-
just the tyre pressure to the recommended
COLD tyre pressure shown on the tyre plac-
ard to turn the TPMS indicator light “OFF”. In
case of a flat tyre, replace it with a spare tyre
as soon as possible.
•When a spare tyre is mounted or a wheel is
replaced, the TPMS will not function and the
TPMS indicator light will flash for approxi-
mately 1 minute. The light will remain on after
1 minute. Be sure to follow all instructions for
wheel replacement and make sure the TPMS
system is mounted correctly.
•Replacing tyres with those not originally speci-
fied by NISSAN could affect the proper opera-
tion of the TPMS.
•The Genuine NISSAN Emergency Tyre Repair
Sealant can be used for temporarily repairing
a tyre. Do not inject any other tyre liquid or
aerosol tyre sealant into the tyres, as this may
cause a malfunction of the tyre pressure sen-
sors.
•NISSAN recommends using only Genuine
NISSAN Emergency Tyre Sealant provided
with your vehicle. Other tyre sealants may
damage the valve stem seal which can cause
the tyre to lose air pressure. Visit a NISSAN
dealer or qualified workshop as soon as pos-
sible after using tyre repair sealant (for mod-
els equipped with the emergency tyre punc-
ture repair kit).CAUTION
•The TPMS may not function properly when the
wheels are equipped with tyre chains or the
wheels are buried in snow.
•Do not place metalised film or any metal parts
(antenna, etc.) on the windows. This may
cause poor reception of the signals from the
tyre pressure sensors, and the TPMS will not
function properly.
Some devices and transmitters may tempo-
rarily interfere with the operation of the TPMS
and cause the TPMS indicator light to illumi-
nate. Some examples are:
– Facilities or electric devices using similar
radio frequencies are near the vehicle.
– If a transmitter set to similar frequencies is
being used in or near the vehicle.
– If a computer (or similar equipment) or a
DC/AC converter is being used in or near
the vehicle.
•When inflating the tyres and checking the tyre
pressure, never bend the valves.
•Special aluminium valves are fitted to mount
the TPMS sensors on the wheels. The TPMS
sensor is fixed at the wheels by a nut. The nut
needs to be correctly fitted at a torque setting
of 7.5 ± 0.5 Nm. If the TPMS sensor is tight-
ened exceeding the limit, there is a possibility
NCE373
In case of emergency6-7
Page 252 of 338
the sensor grommet will be damaged. If the
sensor is tightened under the limit, there is a
possibility to cause an air leak.
•Use Genuine NISSAN valve caps that comply
with the factory-fitted valve cap specifications.
•Do not use metal valve caps.
•Fit the valve caps properly. Without the valve
caps the valve and tyre pressure monitor sen-
sors could be damaged.
•Do not damage the valves and sensors when
storing the wheels or fitting different tyres.
•Replace the sensor grommet and washer dur-
ing a tyre change. Once they have been re-
moved, the sensor grommet and washer can-
not be reused and must be replaced. The
TPMS sensors can be used again.
The Tyre Pressure Monitoring System (TPMS) moni-
tors the tyre pressure of the four wheels except the
spare wheel. When the TPMS indicator light comes
on together with the TPMS tyre location indicator
light (in the meter panel), one or more of the tyres is
significantly under-inflated. If the vehicle is being
driven with low tyre pressure, the TPMS will activate
and TPMS indicator light together with the TPMS
tyre location indicator light remains on. This system
will deactivate only when tyre pressure is corrected
and the vehicle is driven at speeds above 25 km/h
(16 MPH).
For more details about the TPMS, see “Tyre Pres-
sure Monitoring System (TPMS)” in the “5. Starting
and driving” section.
REPAIRING FLAT TYRE (Models with
emergency tyre puncture repair kit)
The emergency tyre puncture repair kit is supplied
with the vehicle instead of a spare tyre. This repair
kit must be used for temporarily fixing a minor tyre
puncture. After using the repair kit, see a NISSAN
dealer or qualified workshop as soon as possible for
tyre inspection and repair/replacement.
CAUTION
Do not use the emergency tyre puncture repair
kit under the following conditions. Contact a
NISSAN dealer or qualified workshop or profes-
sional road assistance.
•when the sealant has passed its expiration
date (shown on the label attached to the
bottle)
•when the cut or the puncture is approximately
4 mm (0.16 in) or longer
•when the side of the tyre is damaged
•when the vehicle has been driven with a con-
siderable loss of air from the tyre
•when the tyre is completely displaced inside
or outside the rim
•when the tyre rim is damaged
•when two or more tyres are flat
Getting emergency tyre puncture repair
kit
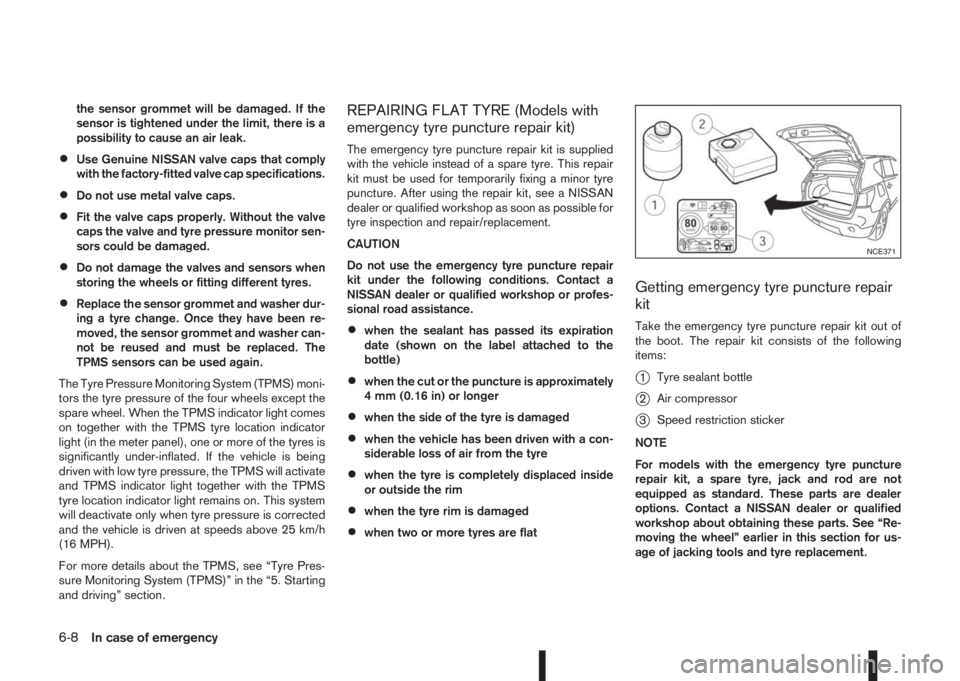
Take the emergency tyre puncture repair kit out of
the boot. The repair kit consists of the following
items:
j1Tyre sealant bottle
j2Air compressor
j3Speed restriction sticker
NOTE
For models with the emergency tyre puncture
repair kit, a spare tyre, jack and rod are not
equipped as standard. These parts are dealer
options. Contact a NISSAN dealer or qualified
workshop about obtaining these parts. See “Re-
moving the wheel” earlier in this section for us-
age of jacking tools and tyre replacement.
NCE371
6-8In case of emergency
Page 253 of 338
Before using emergency tyre puncture
repair kit
•If any foreign object (for example, a screw or
nail) is embedded in the tyre,do not remove it.
•Check the expiration date of the sealant (shown
on the label attached to the bottle). Never use a
sealant which has passed its expiration date.
Repairing tyre
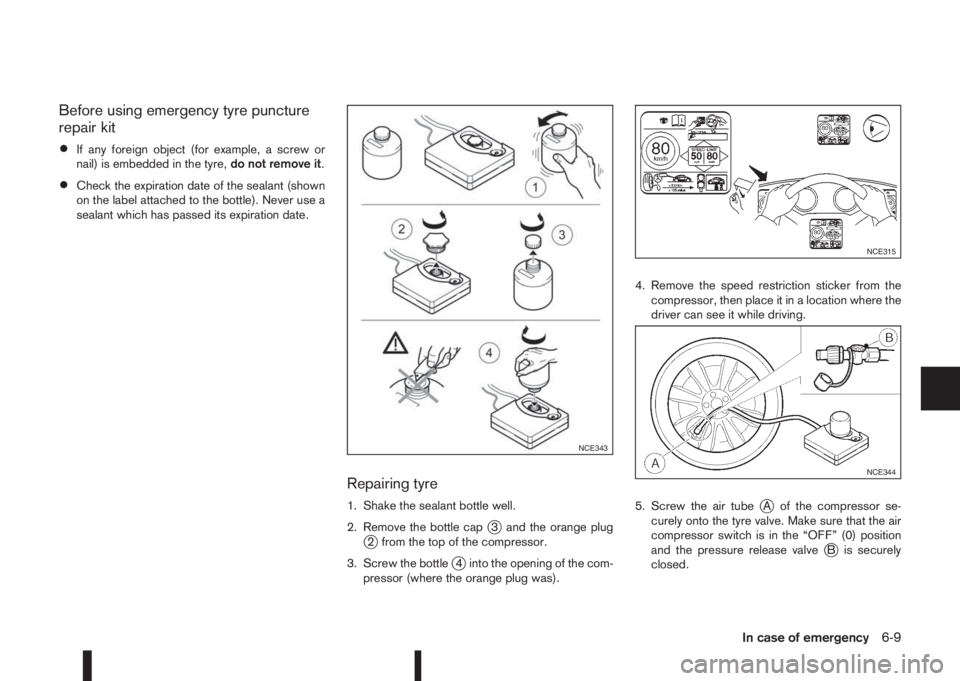
1. Shake the sealant bottle well.
2. Remove the bottle cap
j3 and the orange plugj2 from the top of the compressor.
3. Screw the bottle
j4 into the opening of the com-
pressor (where the orange plug was).4. Remove the speed restriction sticker from the
compressor, then place it in a location where the
driver can see it while driving.
5. Screw the air tube
jA of the compressor se-
curely onto the tyre valve. Make sure that the air
compressor switch is in the “OFF” (0) position
and the pressure release valve
jB is securely
closed.
NCE343
NCE315
NCE344
In case of emergency6-9
Page 254 of 338
6. Insert its power plug into the power outlet in the
vehicle. Make sure no other accessories are fit-
ted to the power outlet. For details, see “Power
outlet” in the “2. Instruments and controls” sec-
tion.
7. Turn the ignition switch to the Acc position.
8. Switch on the compressor, and inflate the tyre to
the pressure that is specified on the tyre placard
affixed to the driver’s side centre pillar.
CAUTION
Do not operate the compressor for more than 10
minutes.
If the tyre pressure does not increase to the speci-
fied pressurewithin 10 minutes, the tyre may be
seriously damaged andthe tyre cannot be repaired
with this tyre repair kit. Contact a NISSAN dealer
or qualified workshop.
9. Remove the air compressor from the tyre valve.
Immediately drive the vehicle at a speed of 80
km/h (50 MPH) or less.
10. After 10 minute or 10 km (6 miles) drive, check
the tyre pressure. The temporary repair is com-
pleted if the tyre pressure does not drop.
If the tyre pressure is lower than specified, re-
peat the steps from step5.
If the pressure drops again or under 130 kPa
(1,3 bar, 19 psi),the tyre cannot be repaired
with this tyre repair kit. Contact a NISSAN
dealer or qualified workshop.After repairing tyre
See a NISSAN dealer or qualified workshop for tyre
repair/replacement, inspection/replacement of the
TPMS sensor and for a new tyre sealant bottle and
hose, as soon as possible.
6-10In case of emergency
Page 271 of 338
Lights*:
Clean the headlights on a regular basis. Make sure
that the headlights, stop lights, tail lights, turn signal
lights, and other lights are all operating properly and
installed securely. Also check headlight aim.
Tyres*:
Check the pressure with a gauge periodically when
at a service station (including the spare) and adjust
to the specified pressure if necessary. Check care-
fully for damage, cuts or excessive wear.
Tyre rotation*:
Tyres should be rotated every 10,000 km (6,000
miles) for Two-Wheel Drive (2WD) models and
5,000 km (3,000 miles) for Four-Wheel Drive (4WD)
models. However, the timing for tyre rotation may
vary according to your driving habits and road sur-
face conditions.
Tyre Pressure Monitoring System (TPMS)
transmitter components (where fitted):
Replace the TPMS transmitter grommet seal, valve
core and cap when the tyres are replaced due to
wear or age.
Wheel alignment and balance:
If the vehicle pull to either side while driving on a
straight and level road, or if you detect uneven or
abnormal tyre wear, there may be a need for wheel
alignment. If the steering wheel or seat vibrates at
normal highway speeds, wheel balancing may be
needed.Wheel nuts:
When checking the tyres, make sure no wheel nuts
are missing, and check for any loose wheel nuts.
Tighten if necessary.
Windscreen:
Clean the windscreen on a regular basis. Check the
windscreen at least every six months for cracks or
other damage. Have a damaged windscreen re-
paired by a qualified repair facility.
Wiper blades*:
Check for cracks or wear if they do not wipe prop-
erly.
Under the bonnet and vehicle
The maintenance items listed here should be
checked periodically, e.g. each time you check the
engine oil or refuel.
Battery*:
Check if the green indicator on the top of the main-
tenance free battery is visible. If it is not visible,
replace the battery as soon as possible.
Vehicles operated in high temperatures or under
severe conditions, check the fluid level frequently.
Brake and clutch fluid level*:
Make sure that the brake and clutch fluid level is
between the MAX and MIN lines on the reservoir.
Engine coolant level*:
Check the coolant level when the engine is cold.Engine drive belts*:
Make sure that the drive belts are not frayed, worn,
cracked or oily.
Engine oil level*:
Check the level after parking the vehicle on a level
surface and turning off the engine.
Fluid leaks:
Check under the vehicle for fuel, oil, water or other
fluid leaks after the vehicle has been parked for a
while. Water dripping from the air conditioner after
use is normal. If you should notice any leaks or if
petrol fumes are evident, check for the cause and
have it corrected immediately.
Window washer fluid*:
Check that there is adequate fluid in the tank.
Inside the vehicle
The maintenance items listed here should be
checked on a regular basis, such as when perform-
ing periodic maintenance, cleaning the vehicle, etc.
Accelerator pedal:
Check the pedal for smooth operation and make
sure that the pedal does not catch or require uneven
effort. Keep the floor mats away from the pedal.
Brake pedal*:
Check the pedal for smooth operation. If the brake
pedal suddenly goes down further than normal, the
pedal feels spongy or the vehicle seems to take
Maintenance and do-it-yourself8-3
Page 303 of 338
WARNING
•After rotating the tyres, adjust the tyre pres-
sure and perform a TPMS temperature cali-
bration.
•Retighten the wheel nuts when the vehicle
has been driven for the first 1,000 km (600
miles) (also in cases of a flat tyre, etc.).
•Do not include the temporary-use spare tyre
in the tyre rotation.
•Incorrect tyre selection, fitting, care or main-
tenance can affect vehicle safety with risk of
accident and injury. If in doubt, consult a
NISSAN dealer or the tyre manufacturer.
TYRE WEAR AND DAMAGE
Tyres should be periodically inspected for wear,
cracking, bulging or objects caught in the tread. If
excessive wear, cracks, bulging or deep cuts are
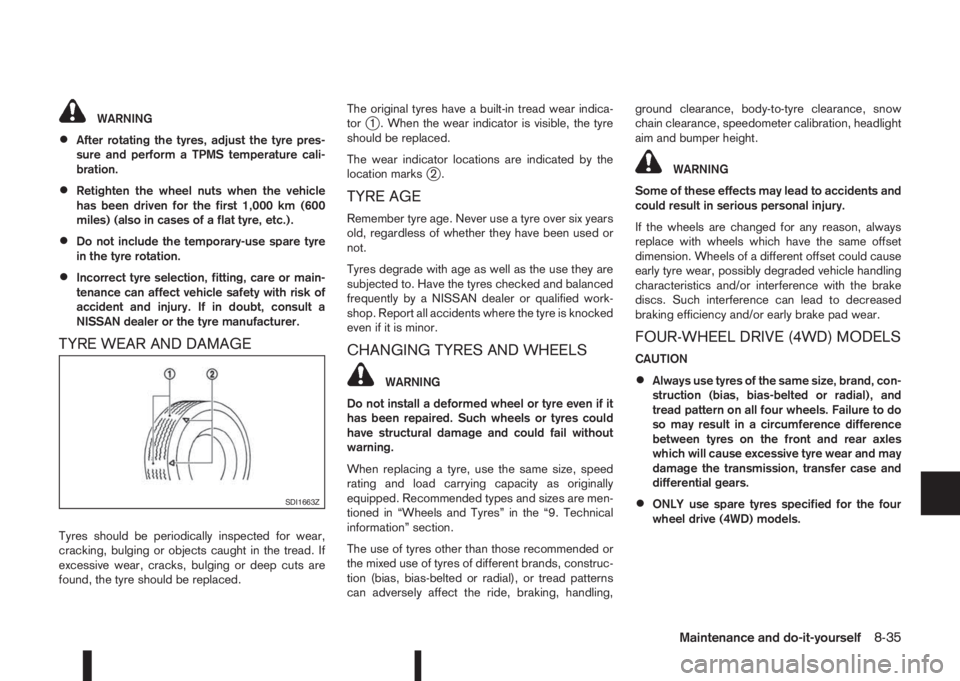
found, the tyre should be replaced.The original tyres have a built-in tread wear indica-
tor
j1 . When the wear indicator is visible, the tyre
should be replaced.
The wear indicator locations are indicated by the
location marks
j2.
TYRE AGE
Remember tyre age. Never use a tyre over six years
old, regardless of whether they have been used or
not.
Tyres degrade with age as well as the use they are
subjected to. Have the tyres checked and balanced
frequently by a NISSAN dealer or qualified work-
shop. Report all accidents where the tyre is knocked
even if it is minor.
CHANGING TYRES AND WHEELS
WARNING
Do not install a deformed wheel or tyre even if it
has been repaired. Such wheels or tyres could
have structural damage and could fail without
warning.
When replacing a tyre, use the same size, speed
rating and load carrying capacity as originally
equipped. Recommended types and sizes are men-
tioned in “Wheels and Tyres” in the “9. Technical
information” section.
The use of tyres other than those recommended or
the mixed use of tyres of different brands, construc-
tion (bias, bias-belted or radial), or tread patterns
can adversely affect the ride, braking, handling,ground clearance, body-to-tyre clearance, snow
chain clearance, speedometer calibration, headlight
aim and bumper height.
WARNING
Some of these effects may lead to accidents and
could result in serious personal injury.
If the wheels are changed for any reason, always
replace with wheels which have the same offset
dimension. Wheels of a different offset could cause
early tyre wear, possibly degraded vehicle handling
characteristics and/or interference with the brake
discs. Such interference can lead to decreased
braking efficiency and/or early brake pad wear.
FOUR-WHEEL DRIVE (4WD) MODELS
CAUTION
•Always use tyres of the same size, brand, con-
struction (bias, bias-belted or radial), and
tread pattern on all four wheels. Failure to do
so may result in a circumference difference
between tyres on the front and rear axles
which will cause excessive tyre wear and may
damage the transmission, transfer case and
differential gears.
•ONLY use spare tyres specified for the four
wheel drive (4WD) models.SDI1663Z
Maintenance and do-it-yourself8-35