light NISSAN QASHQAI 2017 Owner´s Manual
[x] Cancel search | Manufacturer: NISSAN, Model Year: 2017, Model line: QASHQAI, Model: NISSAN QASHQAI 2017Pages: 508, PDF Size: 2.68 MB
Page 444 of 508
JVM0415X
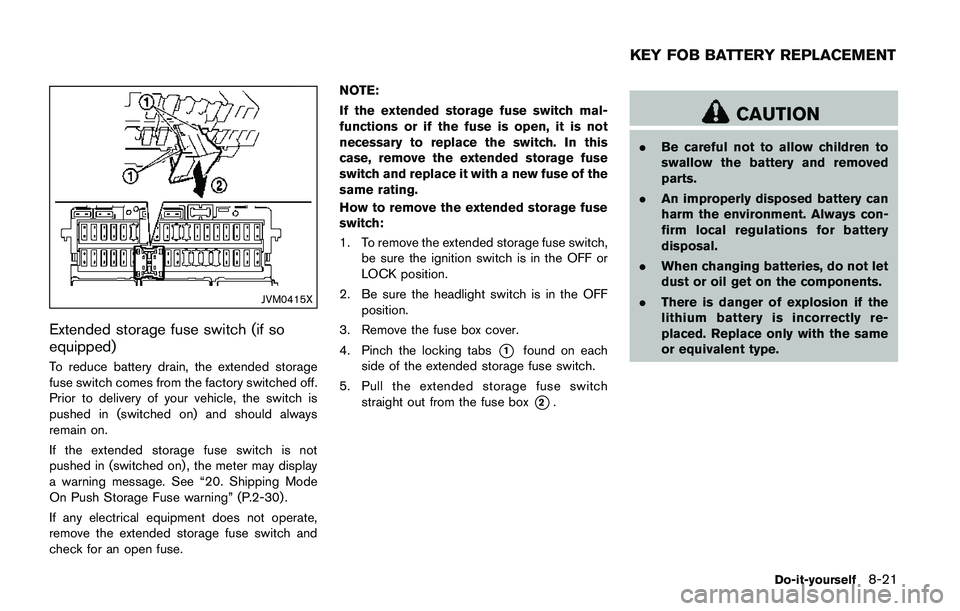
Extended storage fuse switch (if so
equipped)
To reduce battery drain, the extended storage
fuse switch comes from the factory switched off.
Prior to delivery of your vehicle, the switch is
pushed in (switched on) and should always
remain on.
If the extended storage fuse switch is not
pushed in (switched on) , the meter may display
a warning message. See “20. Shipping Mode
On Push Storage Fuse warning” (P.2-30) .
If any electrical equipment does not operate,
remove the extended storage fuse switch and
check for an open fuse.NOTE:
If the extended storage fuse switch mal-
functions or if the fuse is open, it is not
necessary to replace the switch. In this
case, remove the extended storage fuse
switch and replace it with a new fuse of the
same rating.
How to remove the extended storage fuse
switch:
1. To remove the extended storage fuse switch,
be sure the ignition switch is in the OFF or
LOCK position.
2. Be sure the headlight switch is in the OFF
position.
3. Remove the fuse box cover.
4. Pinch the locking tabs*1found on each
side of the extended storage fuse switch.
5. Pull the extended storage fuse switch
straight out from the fuse box
*2.
CAUTION
.Be careful not to allow children to
swallow the battery and removed
parts.
.An improperly disposed battery can
harm the environment. Always con-
firm local regulations for battery
disposal.
.When changing batteries, do not let
dust or oil get on the components.
.There is danger of explosion if the
lithium battery is incorrectly re-
placed. Replace only with the same
or equivalent type.
Do-it-yourself8-21
KEY FOB BATTERY REPLACEMENT
Page 448 of 508
JVM0787X
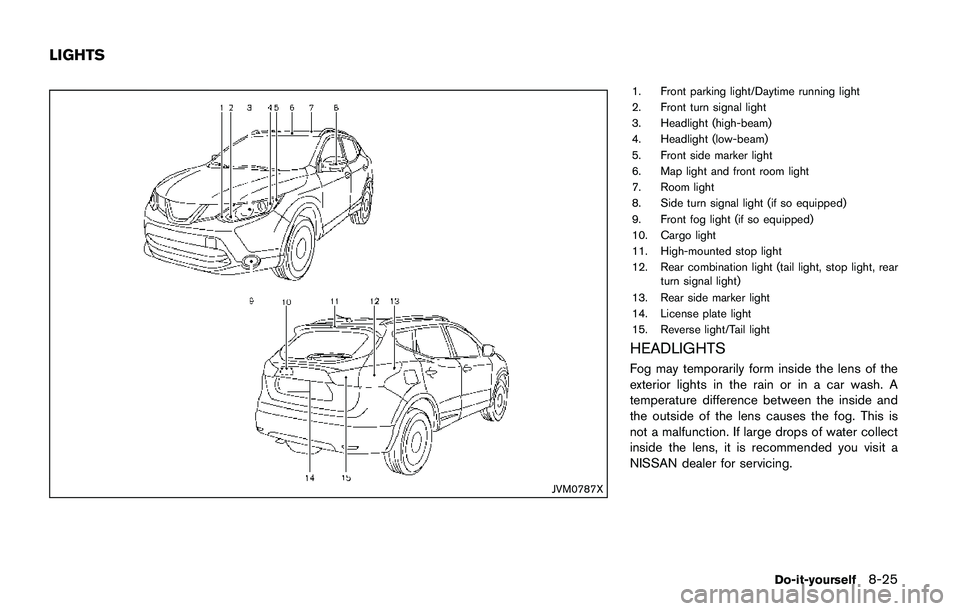
1. Front parking light/Daytime running light
2. Front turn signal light
3. Headlight (high-beam)
4. Headlight (low-beam)
5. Front side marker light
6. Map light and front room light
7. Room light
8. Side turn signal light (if so equipped)
9. Front fog light (if so equipped)
10. Cargo light
11. High-mounted stop light
12. Rear combination light (tail light, stop light, rear
turn signal light)
13. Rear side marker light
14. License plate light
15. Reverse light/Tail light
HEADLIGHTS
Fog may temporarily form inside the lens of the
exterior lights in the rain or in a car wash. A
temperature difference between the inside and
the outside of the lens causes the fog. This is
not a malfunction. If large drops of water collect
inside the lens, it is recommended you visit a
NISSAN dealer for servicing.
Do-it-yourself8-25
LIGHTS
Page 449 of 508
8-26Do-it-yourself
Replacing
LED headlight model:
If LED headlight replacement is required, it is
recommended that you visit a NISSAN dealer for
this service.
Halogen headlight model:
The headlight is a semi-sealed beam type which
uses a replaceable headlight (halogen) bulb.
CAUTION
.Do not leave the bulb out of the
headlight reflector for a long period
of time. Dust, moisture, smoke, etc.
entering the headlight body may
affect bulb performance.
.High pressure halogen gas is sealed
inside the halogen bulb. The bulb
may break if the glass envelope is
scratched or the bulb is dropped.
.Only touch the base when handling
the bulb. Never touch the glass
envelope. Touching the glass envel-
ope could significantly affect bulb
life and/or headlight performance.
.Aiming is not necessary after repla-
cing the bulb. When aiming adjust-ment is necessary, it is
recommended you visit a NISSAN
dealer for this service.
Use the same number and wattage as originally
installed as shown in the chart.
JVM0395X
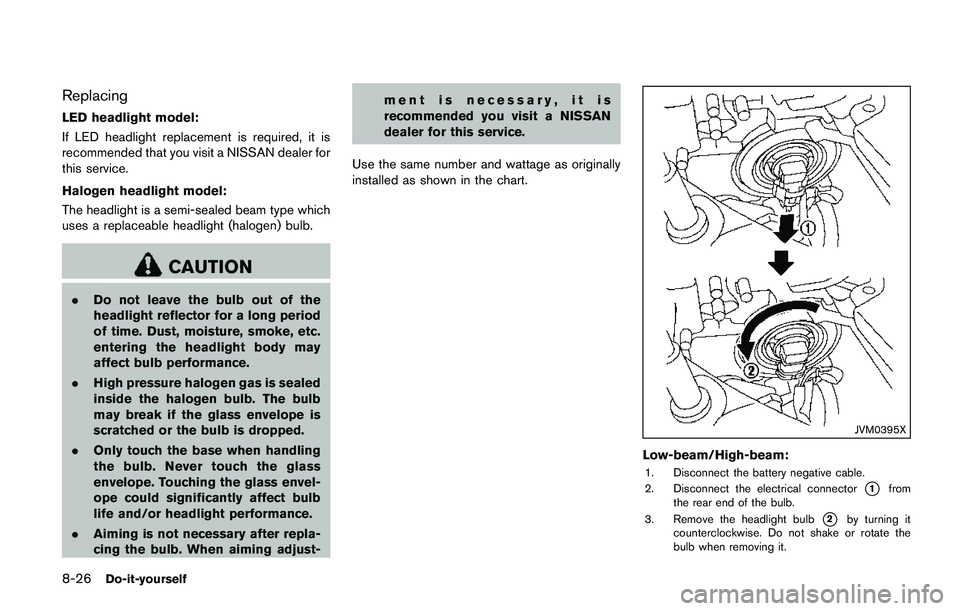
Low-beam/High-beam:
1. Disconnect the battery negative cable.
2. Disconnect the electrical connector
*1from
the rear end of the bulb.
3. Remove the headlight bulb
*2by turning it
counterclockwise. Do not shake or rotate the
bulb when removing it.
Page 450 of 508
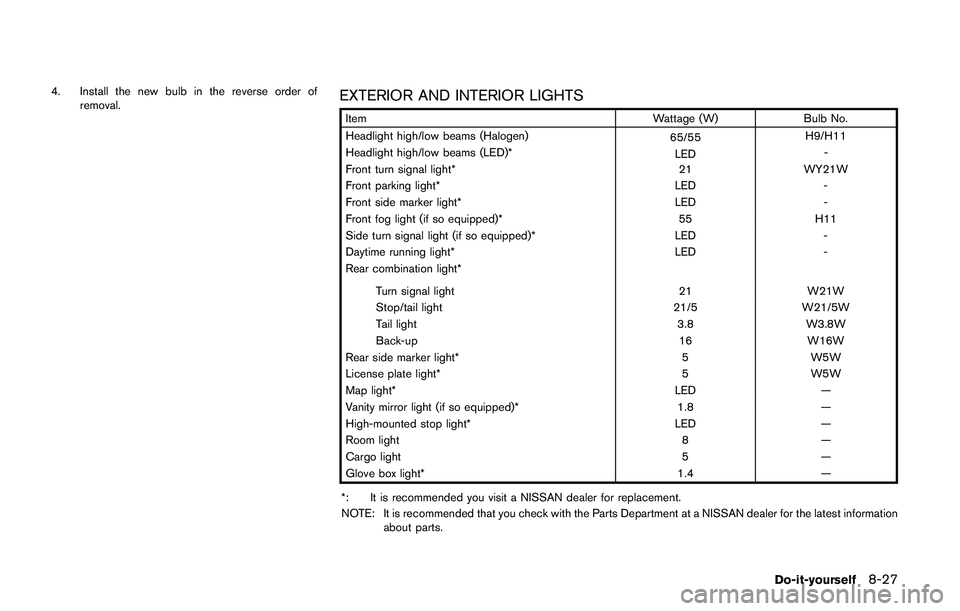
4. Install the new bulb in the reverse order of
removal.EXTERIOR AND INTERIOR LIGHTS
Item Wattage (W) Bulb No.
Headlight high/low beams (Halogen)
65/55H9/H11
Headlight high/low beams (LED)*
LED-
Front turn signal light* 21 WY21W
Front parking light* LED -
Front side marker light* LED -
Front fog light (if so equipped)* 55 H11
Side turn signal light (if so equipped)* LED -
Daytime running light* LED -
Rear combination light*
Turn signal light 21 W21W
Stop/tail light 21/5 W21/5W
Tail light 3.8 W3.8W
Back-up 16 W16W
Rear side marker light* 5 W5W
License plate light* 5 W5W
Map light* LED —
Vanity mirror light (if so equipped)* 1.8 —
High-mounted stop light* LED —
Room light 8 —
Cargo light 5 —
Glove box light* 1.4 —
*: It is recommended you visit a NISSAN dealer for replacement.
NOTE: It is recommended that you check with the Parts Department at a NISSAN dealer for the latest information
about parts.
Do-it-yourself8-27
Page 451 of 508
8-28Do-it-yourself
SDI2306
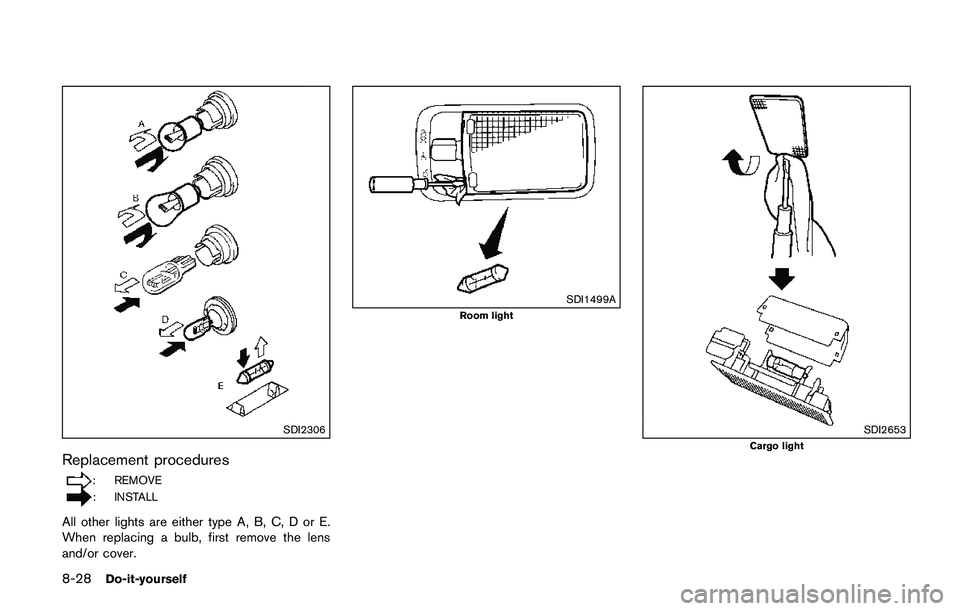
Replacement procedures
: REMOVE
: INSTALL
All other lights are either type A, B, C, D or E.
When replacing a bulb, first remove the lens
and/or cover.
SDI1499A
Room light
SDI2653Cargo light
Page 452 of 508
If you have a flat tire, see “Flat tire” (P.6-3) .
TIRE PRESSURE
Tire Pressure Monitoring System (TPMS)
This vehicle is equipped with the Tire Pressure
Monitoring System (TPMS) . It monitors tire
pressure of all tires except the spare. When
the low tire pressure warning light is lit, and the
“Tire Pressure Low - Add Air” warning message
is displayed in the vehicle information display,
one or more of your tires is significantly under-
inflated.
The TPMS will activate only when the vehicle is
driven at speeds above 16 MPH (25 km/h) .
Also, this system may not detect a sudden drop
in tire pressure (for example a flat tire while
driving) .
For more details, see “Low tire pressure warning
light” (P.2-13) , “Tire Pressure Monitoring Sys-
tem (TPMS)” (P.5-5) and “Tire Pressure Mon-
itoring System (TPMS)” (P.6-3) .
Tire inflation pressure
Check the pressure of the tires (including
the spare) often and always prior to long
distance trips. The recommended tire
pressure specifications are shown on the
Tire and Loading Information label underthe “Cold Tire Pressure” heading. The
Tire and Loading Information label is
affixed to the driver side center pillar.
Tire pressures should be checked reg-
ularly because:
.Most tires naturally lose air over time.
.Tires can lose air suddenly when
driven over potholes or other objects
or if the vehicle strikes a curb while
parking.
The tire pressures should be checked
when the tires are cold. The tires are
considered COLD after the vehicle has
been parked for 3 or more hours, or
driven less than 1 mile (1.6 km) at
moderate speeds.
TPMS with Easy Fill Tire Alert provides
visual and audible signals outside the
vehicle for inflating the tires to the
recommended COLD tire pressure.
(See “TPMS with Easy Fill Tire Alert”
(P.5-7) .)
Incorrect tire pressure, including
under inflation, may adversely affect
tire life and vehicle handling.
WARNING
.Improperly inflated tires can
fail suddenly and cause an
accident.
.The Gross Vehicle Weight rat-
ing (GVWR) is located on the F.
M.V.S.S./C.M.V.S.S. certifica-
tion label. The vehicle weight
capacity is indicated on the
Tire and Loading Information
label. Do not load your vehicle
beyond this capacity. Over-
loading your vehicle may re-
sult in reduced tire life, unsafe
operating conditions due to
premature tire failure, or un-
favorable handling character-
istics and could also lead to a
serious accident. Loading be-
yond the specified capacity
may also result in failure of
other vehicle components.
.Before taking a long trip, or
whenever you heavily load
Do-it-yourself8-29
WHEELS AND TIRES
Page 461 of 508
8-38Do-it-yourself
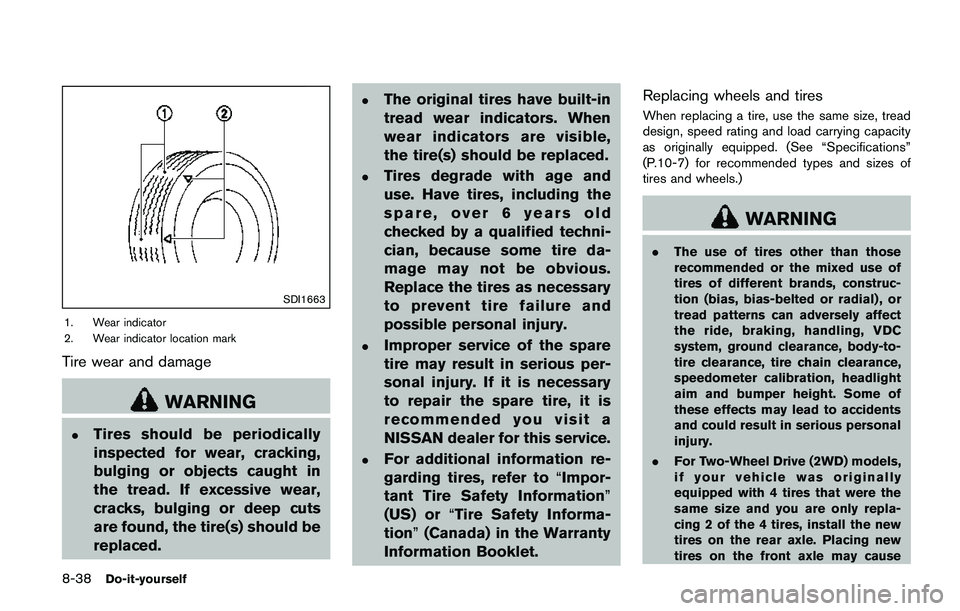
SDI1663
1. Wear indicator
2. Wear indicator location mark
Tire wear and damage
WARNING
.Tires should be periodically
inspected for wear, cracking,
bulging or objects caught in
the tread. If excessive wear,
cracks, bulging or deep cuts
are found, the tire(s) should be
replaced.
.The original tires have built-in
tread wear indicators. When
wear indicators are visible,
the tire(s) should be replaced.
.Tires degrade with age and
use. Have tires, including the
spare, over 6 years old
checked by a qualified techni-
cian, because some tire da-
mage may not be obvious.
Replace the tires as necessary
to prevent tire failure and
possible personal injury.
.Improper service of the spare
tire may result in serious per-
sonal injury. If it is necessary
to repair the spare tire, it is
recommended you visit a
NISSAN dealer for this service.
.For additional information re-
garding tires, refer to“Impor-
tant Tire Safety Information”
(US) or“Tire Safety Informa-
tion”(Canada) in the Warranty
Information Booklet.Replacing wheels and tires
When replacing a tire, use the same size, tread
design, speed rating and load carrying capacity
as originally equipped. (See “Specifications”
(P.10-7) for recommended types and sizes of
tires and wheels.)
WARNING
.The use of tires other than those
recommended or the mixed use of
tires of different brands, construc-
tion (bias, bias-belted or radial) , or
tread patterns can adversely affect
the ride, braking, handling, VDC
system, ground clearance, body-to-
tire clearance, tire chain clearance,
speedometer calibration, headlight
aim and bumper height. Some of
these effects may lead to accidents
and could result in serious personal
injury.
.For Two-Wheel Drive (2WD) models,
if your vehicle was originally
equipped with 4 tires that were the
same size and you are only repla-
cing 2 of the 4 tires, install the new
tires on the rear axle. Placing new
tires on the front axle may cause
Page 462 of 508
loss of vehicle control in some
driving conditions and cause an
accident and personal injury.
.If the wheels are changed for any
reason, always replace with wheels
which have the same off-set dimen-
sion. Wheels of a different off-set
could cause premature tire wear,
degrade vehicle handling character-
istics and/or interference with the
brake discs/drums. Such interfer-
ence can lead to decreased braking
efficiency and/or early brake pad/
shoe wear. See“Wheels and tires”
(P.10-7) of this manual for wheel off-
set dimensions.
.Since the spare tire is not equipped
with the TPMS, when a spare tire is
mounted or a wheel is replaced, the
TPMS will not function and the low
tire pressure warning light will flash
for approximately 1 minute. The
light will remain on after 1 minute.
Have your tires replaced and/or
TPMS system reset as soon as
possible. It is recommended you
visit a NISSAN dealer for these
services..Replacing tires with those not ori-
ginally specified by NISSAN could
affect the proper operation of the
TPMS.
.The TPMS sensor may be damaged
if it is not handled correctly. Be
careful when handling the TPMS
sensor.
.When replacing the TPMS sensor,
the ID registration may be required.
It is recommended you visit a
NISSAN dealer for ID registration.
.Do not use a valve stem cap that is
not specified by NISSAN. The valve
stem cap may become stuck.
.Be sure that the valve stem caps are
correctly fitted. Otherwise the valve
may be clogged up with dirt and
cause a malfunction or loss of
pressure.
.Do not install a damaged or de-
formed wheel or tire even if it has
been repaired. Such wheels or tires
could have structural damage and
could fail without warning.
.The use of retread tire is not re-
commended..For additional information regard-
ing tires, refer to“Important Tire
Safety Information”(US) or“Tire
Safety Information”(Canada) in the
Warranty Information Booklet.
All-Wheel Drive (AWD) models
CAUTION
.Always use tires of the same size,
brand, construction (bias, bias-
belted or radial) , and tread pattern
on all four wheels. Failure to do so
may result in a circumference differ-
ence between tires on the front and
rear axles which will cause exces-
sive tire wear and may damage the
transmission, transfer case and rear
differential gears.
.Only use spare tires specified for
each AWD model.
If excessive tire wear is found, it is recom-
mended that all four tires be replaced with tires
of the same size, brand, construction and tread
pattern. The tire pressure and wheel alignment
should also be checked and corrected as
Do-it-yourself8-39
Page 466 of 508
Lights*:Clean the headlights on a regular basis.
Make sure that the headlights, stop lights, tail
lights, turn signal lights, and other lights are all
operating properly and installed securely. Also
check headlight aim.
Road wheel nuts (lug nuts)*:When checking
the tires, make sure no wheel nuts are missing,
and check for any loose wheel nuts. Tighten if
necessary.
Tire rotation*:Tires should be rotated every
5,000 miles (8,000 km) .
Tires*:Check the pressure with a gauge often
and always prior to long distance trips. If
necessary, adjust the pressure in all tires,
including the spare, to the pressure specified.
Check carefully for damage, cuts or excessive
wear.
Tire Pressure Monitoring System (TPMS)
transmitter components:Replace the TPMS
transmitter grommet seal, valve core and cap
when the tires are replaced due to wear or age.
Wheel alignment and balance:If the vehicle
should pull to either side while driving on a
straight and level road, or if you detect uneven or
abnormal tire wear, there may be a need for
wheel alignment.
If the steering wheel or seat vibrates at normal
highway speeds, wheel balancing may be
needed.For additional information regarding tires, refer
to “Important Tire Safety Information” (US) or
“Tire Safety Information” (Canada) in the
NISSAN Warranty Information Booklet.
Windshield:Clean the windshield on a regular
basis. Check the windshield at least every six
months for cracks or other damage. Have a
damaged windshield repaired by a qualified
repair facility.
Windshield wiper blades*:Check for cracks
or wear if they do not wipe properly.
Inside the vehicle
The maintenance items listed here should be
checked on a regular basis, such as when
performing scheduled maintenance, cleaning
the vehicle, etc.
Accelerator pedal:Check the pedal for
smooth operation and make sure the pedal
does not catch or require uneven effort. Keep
the floor mat away from the pedal.
Brake pedal:Check the pedal for smooth
operation. If the brake pedal suddenly goes
down further than normal, the pedal feels
spongy or the vehicle seems to take longer to
stop, have your vehicle checked immediately. It
is recommended you visit a NISSAN dealer for
this service. Keep the floor mat away from the
pedal.Brakes:Check that the brakes do not pull the
vehicle to one side when applied.
Continuously Variable Transmission (CVT)
P (Park) mechanism:On a fairly steep hill,
check that the vehicle is held securely with the
shift lever in the P (Park) position without
applying any brakes.
Parking brake:Check the parking brake
operation regularly. The vehicle should be
securely held on a fairly steep hill with only the
parking brake applied. If the parking brake needs
adjusted, it is recommended you visit a NISSAN
dealer for this service.
Seat belts:Check that all parts of the seat belt
system (for example, buckles, anchors, adjusters
and retractors) operate properly and smoothly,
and are installed securely. Check the belt
webbing for cuts, fraying, wear or damage.
Seats:Check seat position controls such as
seat adjusters, seatback recliners, etc. to ensure
they operate smoothly and that all latches lock
securely in every position. Check that the head
restraints move up and down smoothly and that
the locks (if so equipped) hold securely in all
latched positions.
Steering wheel:Check for changes in the
steering conditions, such as excessive free play,
hard steering or strange noises.
Maintenance and schedules9-3
Page 467 of 508
9-4Maintenance and schedules
Warning lights and chimes:Make sure that
all warning lights and chimes are operating
properly.
Windshield defroster:Check that the air
comes out of the defroster outlets properly and
in sufficient quantity when operating the heater
or air conditioner.
Windshield wiper and washer*:Check that
the wipers and washers operate properly and
that the wipers do not streak.
Under the hood and vehicle
The maintenance items listed here should be
checked periodically (for example, each time you
check the engine oil or refuel) .
Battery*:Check the fluid level in each cell.
It should be between the MAX and MIN lines.
Vehicles operated in high temperatures or under
severe condition require frequent checks of the
battery fluid level.
NOTE:
Care should be taken to avoid situations
that can lead to potential battery discharge
and potential no-start conditions such as:
1.Installation or extended use of electro-
nic accessories that consume battery
power when the engine is not running
(Phone chargers, GPS, DVD players,
etc.)2.Vehicle is not driven regularly and/or
only driven short distances.
In these cases, the battery may need to be
charged to maintain battery health.
Brake and clutch fluid level*:Make sure that
the brake and clutch fluid level is between the
MAX and MIN lines on the reservoir.
Engine coolant level*:Check the coolant level
when the engine is cold.
Engine drive belt*:Make sure that the drive
belt is not frayed, worn, cracked or oily.
Engine oil level*:Check the level after parking
the vehicle on a level surface and turning off the
engine. Wait more than 10 minutes for the oil to
drain back into the oil pan.
Exhaust system:Make sure there are no loose
supports, cracks or holes. If the sound of the
exhaust seems unusual or there is a smell of
exhaust fumes, immediately have the exhaust
system inspected. It is recommended you visit a
NISSAN dealer for this service. (See “Precau-
tions when starting and driving” (P.5-4) for
exhaust gas (carbon monoxide) .)
Fluid leaks:Check under the vehicle for fuel,
oil, water or other fluid leaks after the vehicle has
been parked for a while. Water dripping from the
air conditioner after use is normal. If you should
notice any leaks or if gasoline fumes are evident,check for the cause and have it corrected
immediately.
Radiator and hoses:Check the front of the
radiator and clean off any dirt, insects, leaves,
etc., that may have accumulated. Make sure the
hoses have no cracks, deformation, rot or loose
connections.
Underbody:The underbody is frequently ex-
posed to corrosive substances such as those
used on icy roads or to control dust. It is very
important to remove these substances, other-
wise rust will form on the floor pan, frame, fuel
lines and around the exhaust system. At the end
of winter, the underbody should be thoroughly
flushed with plain water, being careful to clean
those areas where mud and dirt may accumu-
late. For additional information, see “Cleaning
exterior” (P.7-2) .
Windshield washer fluid*:Check that there is
adequate fluid in the reservoir.