tires NISSAN QASHQAI 2017 Owner´s Manual
[x] Cancel search | Manufacturer: NISSAN, Model Year: 2017, Model line: QASHQAI, Model: NISSAN QASHQAI 2017Pages: 508, PDF Size: 2.68 MB
Page 12 of 508
JVC1065X
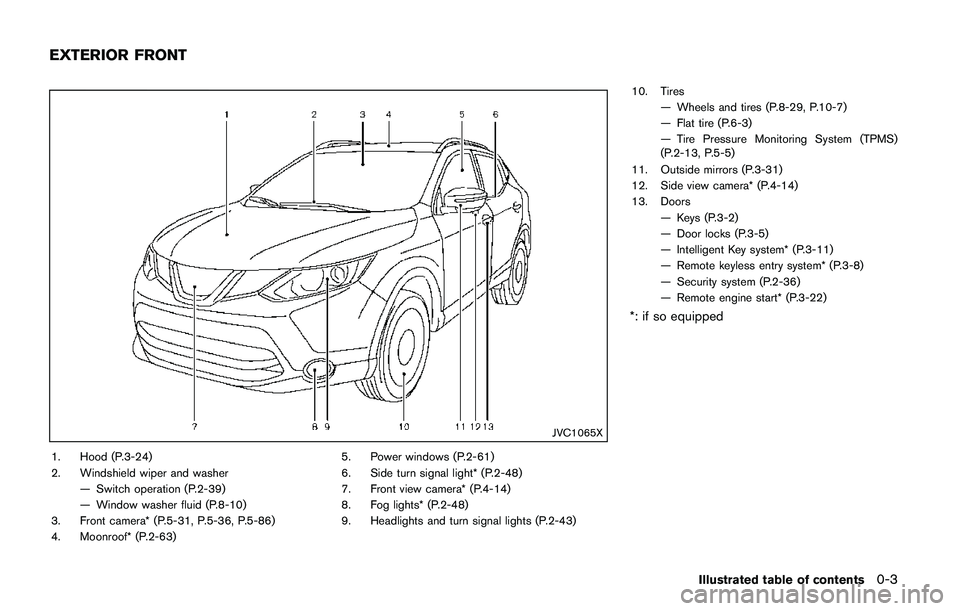
1. Hood (P.3-24)
2. Windshield wiper and washer
— Switch operation (P.2-39)
— Window washer fluid (P.8-10)
3. Front camera* (P.5-31, P.5-36, P.5-86)
4. Moonroof* (P.2-63)5. Power windows (P.2-61)
6. Side turn signal light* (P.2-48)
7. Front view camera* (P.4-14)
8. Fog lights* (P.2-48)
9. Headlights and turn signal lights (P.2-43)10. Tires
— Wheels and tires (P.8-29, P.10-7)
— Flat tire (P.6-3)
— Tire Pressure Monitoring System (TPMS)
(P.2-13, P.5-5)
11. Outside mirrors (P.3-31)
12. Side view camera* (P.4-14)
13. Doors
— Keys (P.3-2)
— Door locks (P.3-5)
— Intelligent Key system* (P.3-11)
— Remote keyless entry system* (P.3-8)
— Security system (P.2-36)
— Remote engine start* (P.3-22)
*: if so equipped
Illustrated table of contents0-3
EXTERIOR FRONT
Page 92 of 508
Low tire pressure warning light
Your vehicle is equipped with a Tire Pressure
Monitoring System (TPMS) that monitors the tire
pressure of all tires except the spare tire.
The low tire pressure warning light warns of low
tire pressure or indicates that the TPMS is not
functioning properly.
After the ignition switch is placed in the ON
position, this light illuminates for about 1 second
and turns off.
Low tire pressure warning:
If the vehicle is being driven with low tire
pressure, the warning light will illuminate. The
“Tire Pressure Low - Add Air” warning also
appears in the vehicle information display.
When the low tire pressure warning light
illuminates, you should stop and adjust the tire
pressure to the recommended COLD tire
pressure shown on the Tire and Loading
Information label. The low tire pressure warning
light does not automatically turn off when the tire
pressure is adjusted. After the tire is inflated to
the recommended pressure, the vehicle must be
driven at speeds above 16 MPH (25 km/h) to
activate the TPMS and turn off the low tire
pressure warning light. Use a tire pressure
gauge to check the tire pressure.
The “Tire Pressure Low - Add Air” warning isactive as long as the low tire pressure warning
light remains illuminated.
For additional information, see “Vehicle informa-
tion display” (P.2-18) , “Tire Pressure Monitoring
System (TPMS)” (P.5-5) and “Tire Pressure
Monitoring System (TPMS)” (P.6-3) .
TPMS malfunction:
If the TPMS is not functioning properly, the low
tire pressure warning light will flash for approxi-
mately 1 minute when the ignition switch is
placed in the ON position. The light will remain
on after the 1 minute. Have the system checked.
It is recommended you visit a NISSAN dealer for
this service. The “Tire Pressure Low - Add Air”
warning does not appear if the low tire pressure
warning light illuminates to indicate a TPMS
malfunction.
For additional information, see “Tire Pressure
Monitoring System (TPMS)” (P.5-5) .
WARNING
.If the light does not illuminate with
the ignition switch placed in the ON
position, have the vehicle checked.
It is recommended you visit a
NISSAN dealer for this service as
soon as possible..If the light illuminates while driving,
avoid sudden steering maneuvers or
abrupt braking, reduce vehicle
speed, pull off the road to a safe
location and stop the vehicle as
soon as possible. Driving with un-
der-inflated tires may permanently
damage the tires and increase the
likelihood of tire failure. Serious
vehicle damage could occur and
may lead to an accident and could
result in serious personal injury.
Check the tire pressure for all four
tires. Adjust the tire pressure to the
recommended COLD tire pressure
shown on the Tire and Loading
Information label to turn the low
tire pressure warning light OFF. If
the light still illuminates while driv-
ing after adjusting the tire pressure,
a tire may be flat or the TPMS may
be malfunctioning. If you have a flat
tire, replace it with a spare tire as
soon as possible. If no tire is flat
and all tires are properly inflated, it
is recommended you consult a
NISSAN dealer.
.Since the spare tire is not equipped
with the TPMS, when a spare tire is
mounted or a wheel is replaced, the
Instruments and controls2-13
Page 93 of 508
2-14Instruments and controls
TPMS will not function and the low
tire pressure warning light will flash
for approximately 1 minute. The
light will remain on after 1 minute.
Have your tires replaced and/or
TPMS system reset as soon as
possible. It is recommended you
visit a NISSAN dealer for these
services.
.Replacing tires with those not ori-
ginally specified by NISSAN could
affect the proper operation of the
TPMS.
CAUTION
.The TPMS is not a substitute for the
regular tire pressure check. Be sure
to check the tire pressure regularly.
.If the vehicle is being driven at
speeds of less than 16 MPH (25
km/h) , the TPMS may not operate
correctly.
.Be sure to install the specified size
of tires to the four wheels correctly.
Master warning light
When the ignition switch is in the ON position,
the master warning light illuminates if any of the
following are displayed on the vehicle informa-
tion display.
.No Key detected warning (if so equipped)
.Shift to Park warning (Continuously Variable
Transmission (CVT) models) (if so
equipped)
.Key battery low warning (if so equipped)
.Engine start operation for Intelligent Key
system indicator (if so equipped)
.Key ID incorrect warning (if so equipped)
.Release Parking Brake warning
.Low fuel level warning
.Low Washer Fluid (if so equipped)
.Door/liftgate open warning
.Key System Error: See Owner’s Manual
warning (if so equipped)
.Loose Fuel Cap
.Tire Pressure Low - Add Air warning
.Low oil pressure Stop vehicle warning
.AWD Error: See Owner’s Manual warning (if
so equipped)
.AWD High Temp. Stop vehicle warning (if so
equipped).Tire Size Incorrect: See Owner’s Manual
warning (if so equipped)
.Battery Voltage Low Charge Battery warn-
ing
.Shipping Mode On Push Storage Fuse
warning
.Power will turn off to save the battery
warning
.Power turned off to save the battery warning
.Reminder: Turn OFF Headlights warning
.Headlight System Error: See Owner’s Man-
ual warning (if so equipped)
.Timer Alert - Time for a driver break?
indicator (if so equipped)
.Chassis Control System Error: See Owner’s
Manual warning
.CVT Error: See Owner’s Manual warning
(for Continuously Variable Transmission
(CVT) models)
.Malfunction warning (if so equipped)
.Unavailable: High Cabin Temperature warn-
ing (if so equipped)
.Not Available: Poor Road Conditions warn-
ing (if so equipped)
.Currently unavailable warning (if so
equipped)
.Unavailable: Front Radar Obstruction warn-
ing (if so equipped)
Page 103 of 508
2-24Instruments and controls
checking or replacing these items. For sched-
uled maintenance items and intervals, refer to
the “9. Maintenance and schedules” section.
Tire:
This indicator appears when the customer set
distance comes for replacing tires. You can set
or reset the distance for replacing tires.
WARNING
The tire replacement indicator is not a
substitute for regular tire checks, in-
cluding tire pressure checks. See
“Changing wheels and tires”(P.8-37) .
Many factors including tire inflation,
alignment, driving habits and road con-
ditions affect tire wear and when tires
should be replaced. Setting the tire
replacement indicator for a certain
driving distance does not mean your
tires will last that long. Use the tire
replacement indicator as a guide only
and always perform regular tire checks.
Failure to perform regular tire checks,
including tire pressure checks could
result in tire failure. Serious vehicle
damage could occur and may lead to a
collision, which could result in serious
personal injury or death.Other:
This indicator appears when the customer set
distance comes for checking or replacing
maintenance items other than the engine oil, oil
filter and tires. Other maintenance items can
include such things as air filter or tire rotation.
You can set or reset the distance for checking or
replacing the items.
Alarm (if so equipped)
This setting allows the customer to set alarms.
Select “Alarm” using the
button*2and
press OK button
*1.
Timer Alert (if so equipped):
This setting allows the customer to set an alert
to notify the driver that the set time has been
reached.
1. Use the
button*2to select “Timer
Alert”.
2. Press the OK button
*1.
3. To change the timer amount, use the
button*2and the OK button*1to save
the selected time amount.
Navigation (if so equipped):
This setting allows the customer to enable/
disable the alert for navigation in the vehicle
information display.1. Use the
button*2to select “Naviga-
tion”.
2. Press the OK button
*1to turn ON/OFF
the alert.
Phone (if so equipped):
This setting allows the customer to enable/
disable the alert for an incoming call in the
vehicle information display.
1. Use the
button*2to select “Phone”.
2. Press the OK button
*1to turn ON/OFF
the alert.
Mail (if so equipped):
This setting allows the customer to enable/
disable the alert for navigation in the vehicle
information display.
1. Use the
button*2to select “Mail”.
2. Press the OK button
*1to turn ON/OFF
the alert.
Page 109 of 508
2-30Instruments and controls
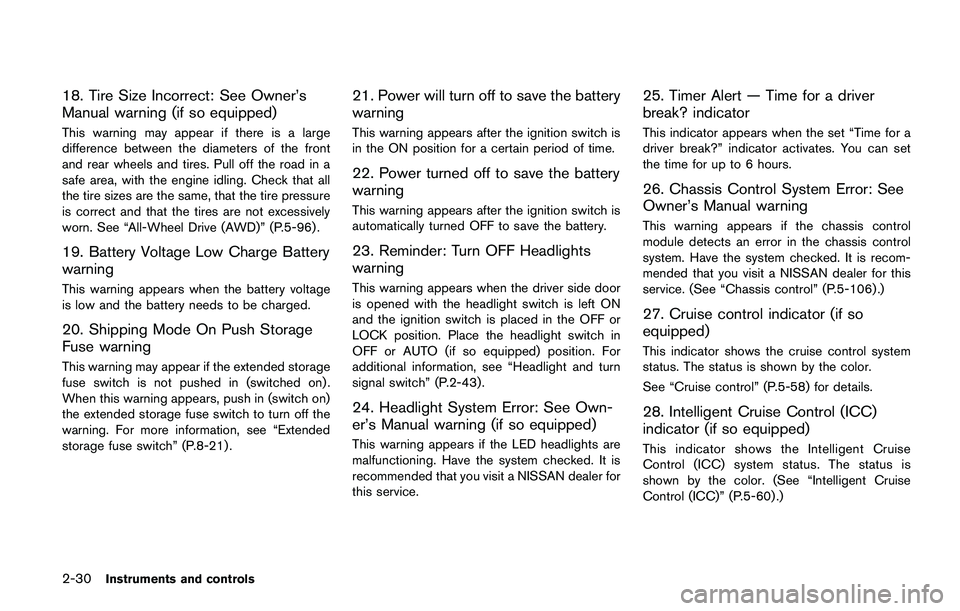
18. Tire Size Incorrect: See Owner’s
Manual warning (if so equipped)
This warning may appear if there is a large
difference between the diameters of the front
and rear wheels and tires. Pull off the road in a
safe area, with the engine idling. Check that all
the tire sizes are the same, that the tire pressure
is correct and that the tires are not excessively
worn. See “All-Wheel Drive (AWD)” (P.5-96) .
19. Battery Voltage Low Charge Battery
warning
This warning appears when the battery voltage
is low and the battery needs to be charged.
20. Shipping Mode On Push Storage
Fuse warning
This warning may appear if the extended storage
fuse switch is not pushed in (switched on) .
When this warning appears, push in (switch on)
the extended storage fuse switch to turn off the
warning. For more information, see “Extended
storage fuse switch” (P.8-21) .
21. Power will turn off to save the battery
warning
This warning appears after the ignition switch is
in the ON position for a certain period of time.
22. Power turned off to save the battery
warning
This warning appears after the ignition switch is
automatically turned OFF to save the battery.
23. Reminder: Turn OFF Headlights
warning
This warning appears when the driver side door
is opened with the headlight switch is left ON
and the ignition switch is placed in the OFF or
LOCK position. Place the headlight switch in
OFF or AUTO (if so equipped) position. For
additional information, see “Headlight and turn
signal switch” (P.2-43) .
24. Headlight System Error: See Own-
er’s Manual warning (if so equipped)
This warning appears if the LED headlights are
malfunctioning. Have the system checked. It is
recommended that you visit a NISSAN dealer for
this service.
25. Timer Alert — Time for a driver
break? indicator
This indicator appears when the set “Time for a
driver break?” indicator activates. You can set
the time for up to 6 hours.
26. Chassis Control System Error: See
Owner’s Manual warning
This warning appears if the chassis control
module detects an error in the chassis control
system. Have the system checked. It is recom-
mended that you visit a NISSAN dealer for this
service. (See “Chassis control” (P.5-106) .)
27. Cruise control indicator (if so
equipped)
This indicator shows the cruise control system
status. The status is shown by the color.
See “Cruise control” (P.5-58) for details.
28. Intelligent Cruise Control (ICC)
indicator (if so equipped)
This indicator shows the Intelligent Cruise
Control (ICC) system status. The status is
shown by the color. (See “Intelligent Cruise
Control (ICC)” (P.5-60) .)
Page 114 of 508
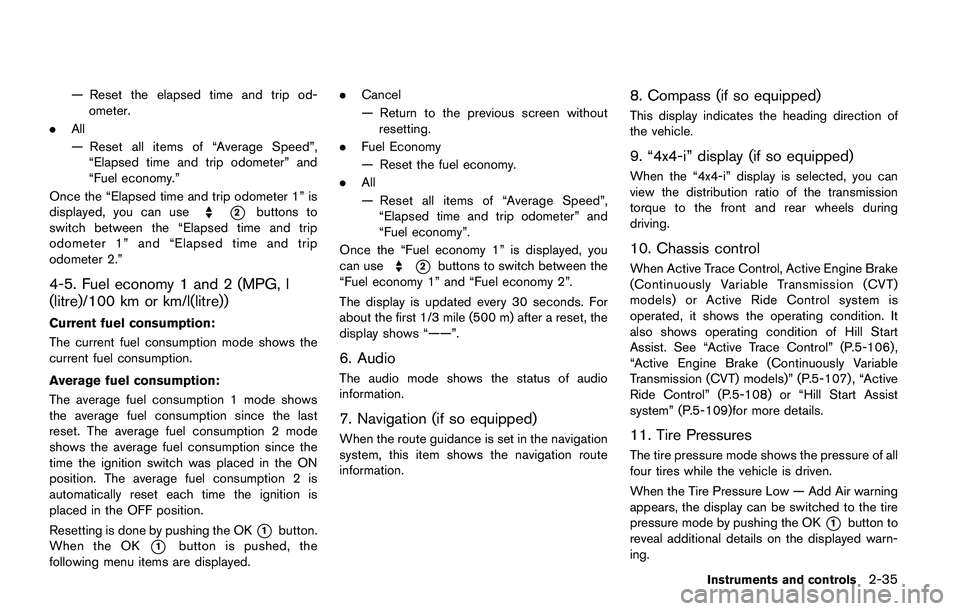
— Reset the elapsed time and trip od-
ometer.
.All
— Reset all items of “Average Speed”,
“Elapsed time and trip odometer” and
“Fuel economy.”
Once the “Elapsed time and trip odometer 1” is
displayed, you can use
*2buttons to
switch between the “Elapsed time and trip
odometer 1” and “Elapsed time and trip
odometer 2.”
4-5. Fuel economy 1 and 2 (MPG, l
(litre)/100 km or km/l(litre))
Current fuel consumption:
The current fuel consumption mode shows the
current fuel consumption.
Average fuel consumption:
The average fuel consumption 1 mode shows
the average fuel consumption since the last
reset. The average fuel consumption 2 mode
shows the average fuel consumption since the
time the ignition switch was placed in the ON
position. The average fuel consumption 2 is
automatically reset each time the ignition is
placed in the OFF position.
Resetting is done by pushing the OK
*1button.
When the OK
*1button is pushed, the
following menu items are displayed..Cancel
— Return to the previous screen without
resetting.
.Fuel Economy
— Reset the fuel economy.
.All
— Reset all items of “Average Speed”,
“Elapsed time and trip odometer” and
“Fuel economy”.
Once the “Fuel economy 1” is displayed, you
can use
*2buttons to switch between the
“Fuel economy 1” and “Fuel economy 2”.
The display is updated every 30 seconds. For
about the first 1/3 mile (500 m) after a reset, the
display shows “——”.
6. Audio
The audio mode shows the status of audio
information.
7. Navigation (if so equipped)
When the route guidance is set in the navigation
system, this item shows the navigation route
information.
8. Compass (if so equipped)
This display indicates the heading direction of
the vehicle.
9. “4x4-i” display (if so equipped)
When the “4x4-i” display is selected, you can
view the distribution ratio of the transmission
torque to the front and rear wheels during
driving.
10. Chassis control
When Active Trace Control, Active Engine Brake
(Continuously Variable Transmission (CVT)
models) or Active Ride Control system is
operated, it shows the operating condition. It
also shows operating condition of Hill Start
Assist. See “Active Trace Control” (P.5-106) ,
“Active Engine Brake (Continuously Variable
Transmission (CVT) models)” (P.5-107) , “Active
Ride Control” (P.5-108) or “Hill Start Assist
system” (P.5-109)for more details.
11. Tire Pressures
The tire pressure mode shows the pressure of all
four tires while the vehicle is driven.
When the Tire Pressure Low — Add Air warning
appears, the display can be switched to the tire
pressure mode by pushing the OK
*1button to
reveal additional details on the displayed warn-
ing.
Instruments and controls2-35
Page 196 of 508
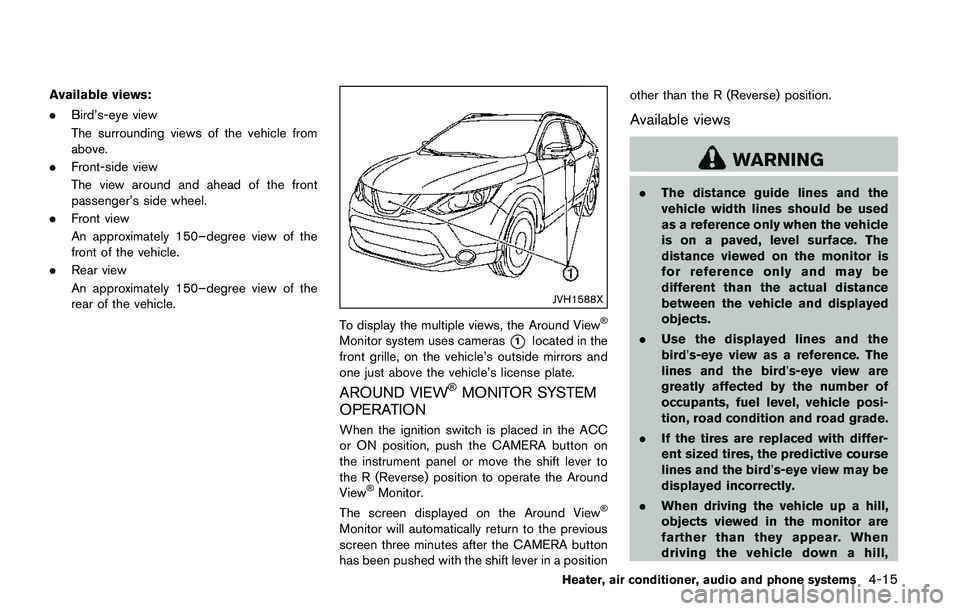
Available views:
.Bird’s-eye view
The surrounding views of the vehicle from
above.
.Front-side view
The view around and ahead of the front
passenger’s side wheel.
.Front view
An approximately 150–degree view of the
front of the vehicle.
.Rear view
An approximately 150–degree view of the
rear of the vehicle.
JVH1588X
To display the multiple views, the Around View�Š
Monitor system uses cameras*1located in the
front grille, on the vehicle’s outside mirrors and
one just above the vehicle’s license plate.
AROUND VIEW�ŠMONITOR SYSTEM
OPERATION
When the ignition switch is placed in the ACC
or ON position, push the CAMERA button on
the instrument panel or move the shift lever to
the R (Reverse) position to operate the Around
View
�ŠMonitor.
The screen displayed on the Around View�Š
Monitor will automatically return to the previous
screen three minutes after the CAMERA button
has been pushed with the shift lever in a positionother than the R (Reverse) position.
Available views
WARNING
.The distance guide lines and the
vehicle width lines should be used
as a reference only when the vehicle
is on a paved, level surface. The
distance viewed on the monitor is
for reference only and may be
different than the actual distance
between the vehicle and displayed
objects.
.Use the displayed lines and the
bird’s-eye view as a reference. The
lines and the bird’s-eye view are
greatly affected by the number of
occupants, fuel level, vehicle posi-
tion, road condition and road grade.
.If the tires are replaced with differ-
ent sized tires, the predictive course
lines and the bird’s-eye view may be
displayed incorrectly.
.When driving the vehicle up a hill,
objects viewed in the monitor are
farther than they appear. When
driving the vehicle down a hill,
Heater, air conditioner, audio and phone systems4-15
Page 201 of 508
4-20Heater, air conditioner, audio and phone systems
course.
HOW TO PARK WITH PREDICTIVE
COURSE LINES
WARNING
.If the tires are replaced with differ-
ent sized tires, the predictive course
lines may be displayed incorrectly.
.On a snow-covered or slippery road,
there may be a difference between
the predictive course line and the
actual course line.
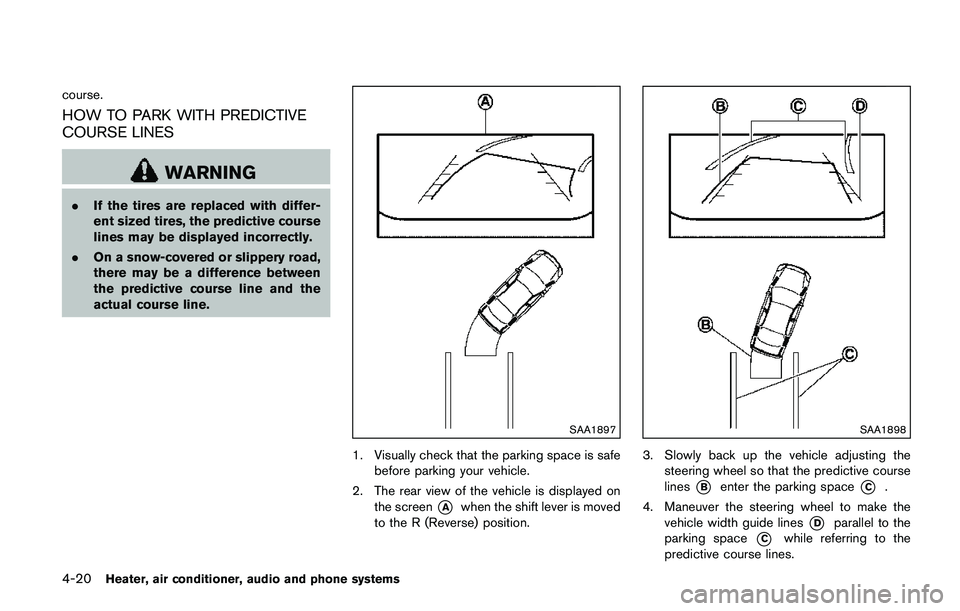
SAA1897
1. Visually check that the parking space is safe
before parking your vehicle.
2. The rear view of the vehicle is displayed on
the screen
*Awhen the shift lever is moved
to the R (Reverse) position.
SAA1898
3. Slowly back up the vehicle adjusting the
steering wheel so that the predictive course
lines
*Benter the parking space*C.
4. Maneuver the steering wheel to make the
vehicle width guide lines
*Dparallel to the
parking space
*Cwhile referring to the
predictive course lines.
Page 290 of 508
THREE-WAY CATALYST
The three-way catalyst is an emission control
device installed in the exhaust system. Exhaust
gases in the three-way catalyst are burned at
high temperatures to help reduce pollutants.
WARNING
.The exhaust gas and the exhaust
system are very hot. Keep people,
animals and flammable materials
away from the exhaust system com-
ponents.
.Do not stop or park the vehicle over
flammable materials such as dry
grass, wastepaper or rags. They
may ignite and cause a fire.
CAUTION
.Do not use leaded gasoline. Depos-
its from leaded gasoline will ser-
iously reduce the three-way
catalyst’s ability to help reduce ex-
haust pollutants.
.Keep your engine tuned up. Mal-
functions in the ignition, fuel injec-tion, or electrical systems can cause
overrich fuel flow into the three-way
catalyst, causing it to overheat. Do
not keep driving if the engine mis-
fires, or if noticeable loss of perfor-
mance or other unusual operating
conditions are detected. Have the
vehicle inspected. It is recom-
mended you visit a NISSAN dealer
for this service.
.Avoid driving with an extremely low
fuel level. Running out of fuel could
cause the engine to misfire, dama-
ging the three-way catalyst.
.Do not race the engine while warm-
ing it up.
.Do not push or tow your vehicle to
start the engine.
TIRE PRESSURE MONITORING SYS-
TEM (TPMS)
Each tire, including the spare (if provided) ,
should be checked monthly when cold and
inflated to the inflation pressure recommended
by the vehicle manufacturer on the vehicle
placard or tire inflation pressure label. (If your
vehicle has tires of a different size than the size
indicated on the vehicle placard or tire inflation
pressure label, you should determine the propertire inflation pressure for those tires.)
As an added safety feature, your vehicle has
been equipped with a Tire Pressure Monitoring
System (TPMS) that illuminates a low tire
pressure telltale when one or more of your tires
is significantly under-inflated. Accordingly, when
the low tire pressure telltale illuminates, you
should stop and check your tires as soon as
possible, and inflate them to the proper pres-
sure. Driving on a significantly under-inflated tire
causes the tire to overheat and can lead to tire
failure. Under-inflation also reduces fuel effi-
ciency and tire tread life, and may affect the
vehicle’s handling and stopping ability.
Please note that the TPMS is not a substitute for
proper tire maintenance, and it is the driver’s
responsibility to maintain correct tire pressure,
even if under-inflation has not reached the level
to trigger illumination of the TPMS low tire
pressure telltale.
Your vehicle has also been equipped with a
TPMS malfunction indicator to indicate when the
system is not operating properly. The TPMS
malfunction indicator is combined with the low
tire pressure telltale. When the system detects a
malfunction, the telltale will flash for approxi-
mately one minute and then remain continuously
illuminated. This sequence will continue upon
subsequent vehicle start-ups as long as the
Starting and driving5-5
Page 291 of 508
5-6Starting and driving
malfunction exists. When the malfunction indi-
cator is illuminated, the system may not be able
to detect or signal low tire pressure as intended.
TPMS malfunctions may occur for a variety of
reasons, including the installation of replace-
ment or alternate tires or wheels on the vehicle
that prevent the TPMS from functioning properly.
Always check the TPMS malfunction telltale
after replacing one or more tires or wheels on
your vehicle to ensure that the replacement or
alternate tires and wheels allow the TPMS to
continue to function properly.
Additional information
.Since the spare tire is not equipped with the
TPMS, the TPMS does not monitor the tire
pressure of the spare tire.
.The TPMS will activate only when the
vehicle is driven at speeds above 16 MPH
(25 km/h) . Also, this system may not detect
a sudden drop in tire pressure (for example a
flat tire while driving) .
.The low tire pressure warning light does not
automatically turn off when the tire pressure
is adjusted. After the tire is inflated to the
recommended pressure, the vehicle must be
driven at speeds above 16 MPH (25 km/h)
to activate the TPMS and turn off the low tire
pressure warning light. Use a tire pressure
gauge to check the tire pressure..The “Tire Pressure Low - Add Air” warning
appears in the vehicle information display
when the low tire pressure warning light is
illuminated and low tire pressure is detected.
The “Tire Pressure Low - Add Air” warning
turns off when the low tire pressure warning
light turns off.
The “Tire Pressure Low - Add Air” warning
does not appear if the low tire pressure
warning light illuminates to indicate a TPMS
malfunction.
.Tire pressure rises and falls depending on
the heat caused by the vehicle’s operation
and the outside temperature. Do not reduce
the tire pressure after driving because the
tire pressure rises after driving. Low outside
temperature can lower the temperature of
the air inside the tire which can cause a
lower tire inflation pressure. This may cause
the low tire pressure warning light to
illuminate. If the warning light illuminates in
low ambient temperature, check the tire
pressure for all four tires.
For additional information, see “Low tire pres-
sure warning light” (P.2-13) and “Tire Pressure
Monitoring System (TPMS)” (P.6-3) .
WARNING
.If the low tire pressure warning light
illuminates while driving, avoid sud-
den steering maneuvers or abrupt
braking, reduce vehicle speed, pull
off the road to a safe location and
stop the vehicle as soon as possi-
ble. Driving with under-inflated tires
may permanently damage the tires
and increase the likelihood of tire
failure. Serious vehicle damage
could occur and may lead to an
accident and could result in serious
personal injury. Check the tire pres-
sure for all four tires. Adjust the tire
pressure to the recommended COLD
tire pressure shown on the Tire and
Loading Information label to turn
the low tire pressure warning light
OFF. If you have a flat tire, replace it
with a spare tire as soon as possi-
ble. (See“Flat tire”(P.6-3) for chan-
ging a flat tire.)
.Since the spare tire is not equipped
with the TPMS, when a spare tire is
mounted or a wheel is replaced, the
TPMS will not function and the low
tire pressure warning light will flash