NISSAN QASHQAI 2020 Owner´s Manual
Manufacturer: NISSAN, Model Year: 2020, Model line: QASHQAI, Model: NISSAN QASHQAI 2020Pages: 492, PDF Size: 2.02 MB
Page 381 of 492
MCE0001A
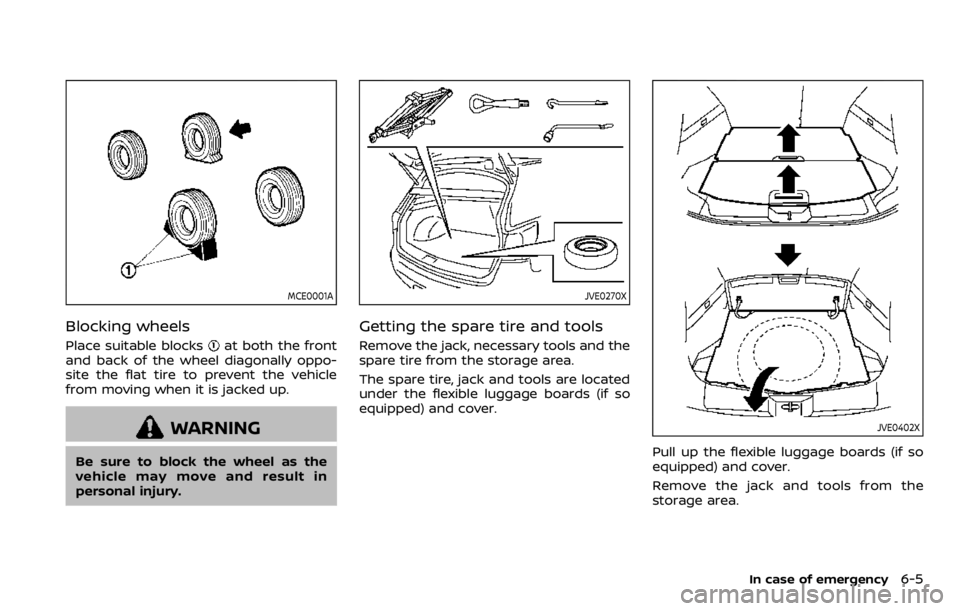
Blocking wheels
Place suitable blocksat both the front
and back of the wheel diagonally oppo-
site the flat tire to prevent the vehicle
from moving when it is jacked up.
WARNING
Be sure to block the wheel as the
vehicle may move and result in
personal injury.
JVE0270X
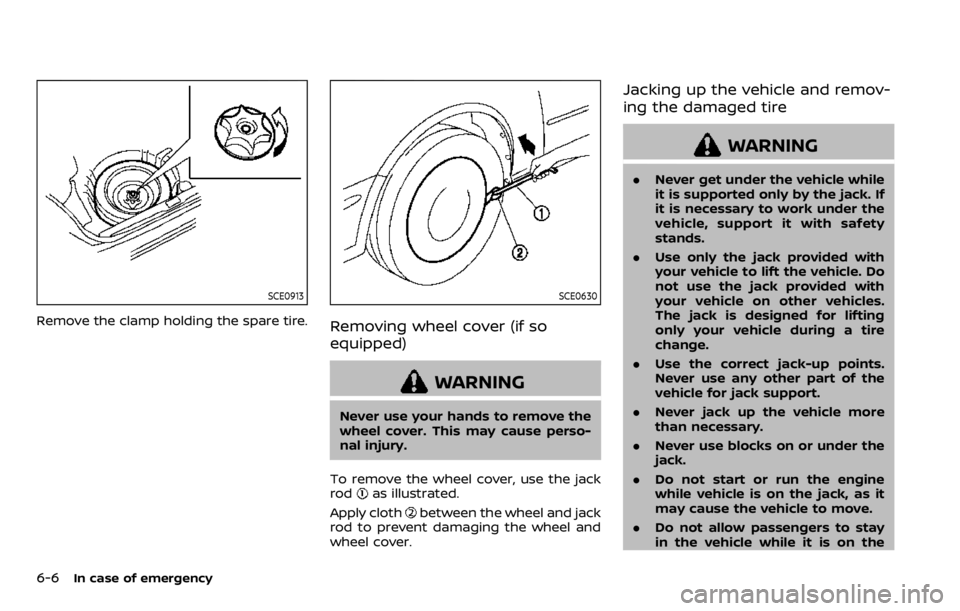
Getting the spare tire and tools
Remove the jack, necessary tools and the
spare tire from the storage area.
The spare tire, jack and tools are located
under the flexible luggage boards (if so
equipped) and cover.
JVE0402X
Pull up the flexible luggage boards (if so
equipped) and cover.
Remove the jack and tools from the
storage area.
In case of emergency6-5
Page 382 of 492
6-6In case of emergency
SCE0913
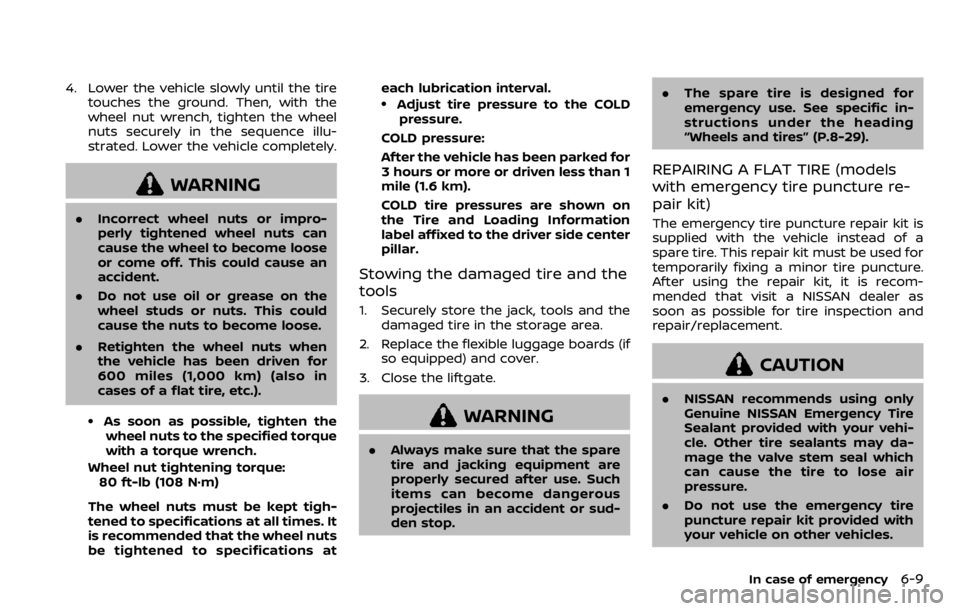
Remove the clamp holding the spare tire.
SCE0630
Removing wheel cover (if so
equipped)
WARNING
Never use your hands to remove the
wheel cover. This may cause perso-
nal injury.
To remove the wheel cover, use the jack
rod
as illustrated.
Apply cloth
between the wheel and jack
rod to prevent damaging the wheel and
wheel cover.
Jacking up the vehicle and remov-
ing the damaged tire
WARNING
. Never get under the vehicle while
it is supported only by the jack. If
it is necessary to work under the
vehicle, support it with safety
stands.
. Use only the jack provided with
your vehicle to lift the vehicle. Do
not use the jack provided with
your vehicle on other vehicles.
The jack is designed for lifting
only your vehicle during a tire
change.
. Use the correct jack-up points.
Never use any other part of the
vehicle for jack support.
. Never jack up the vehicle more
than necessary.
. Never use blocks on or under the
jack.
. Do not start or run the engine
while vehicle is on the jack, as it
may cause the vehicle to move.
. Do not allow passengers to stay
in the vehicle while it is on the
Page 383 of 492

jack.
Carefully read the caution label at-
tached to the jack body and the follow-
ing instructions.
JVE0165X
Jack-up point
1. Place the jack directly under the jack- up point as illustrated so the top of
the jack contacts the vehicle at the
jack-up point. Align the jack head
between the two notches in the front
or the rear as shown. Also fit the
groove of the jack head between the
notches as shown.
The jack should be used on level firm
ground.
In case of emergency6-7
Page 384 of 492

6-8In case of emergency
SCE0504
2. Loosen each wheel nut one or twoturns by turning it counterclockwise
with the wheel nut wrench. Do not
remove the wheel nuts until the tire
is off the ground.
3. To lift the vehicle, securely hold the jack lever and rod with both hands as
shown above. Carefully raise the ve-
hicle until the tire clears the ground.
Remove the wheel nuts, and then
remove the tire.
SCE0933
Installing the spare tire
The spare tire is designed for emer-
gency use. (See specific instructions
under the heading “Wheels and tires”
(P.8-29).)
1. Clean any mud or dirt from the sur-face between the wheel and hub.
2. Carefully put the spare tire on and tighten the wheel nuts finger tight.
Check that all the wheel nuts contact
the wheel surface horizontally.
3. With the wheel nut wrench, tighten wheel nuts alternately and evenly in
the sequence illustrated (
,,,,),
more than 2 times, until they are tight.
Page 385 of 492
4. Lower the vehicle slowly until the tiretouches the ground. Then, with the
wheel nut wrench, tighten the wheel
nuts securely in the sequence illu-
strated. Lower the vehicle completely.
WARNING
.Incorrect wheel nuts or impro-
perly tightened wheel nuts can
cause the wheel to become loose
or come off. This could cause an
accident.
. Do not use oil or grease on the
wheel studs or nuts. This could
cause the nuts to become loose.
. Retighten the wheel nuts when
the vehicle has been driven for
600 miles (1,000 km) (also in
cases of a flat tire, etc.).
.As soon as possible, tighten the
wheel nuts to the specified torque
with a torque wrench.
Wheel nut tightening torque: 80 ft-lb (108 N·m)
The wheel nuts must be kept tigh-
tened to specifications at all times. It
is recommended that the wheel nuts
be tightened to specifications at each lubrication interval.
.Adjust tire pressure to the COLD
pressure.
COLD pressure:
After the vehicle has been parked for
3 hours or more or driven less than 1
mile (1.6 km).
COLD tire pressures are shown on
the Tire and Loading Information
label affixed to the driver side center
pillar.
Stowing the damaged tire and the
tools
1. Securely store the jack, tools and the damaged tire in the storage area.
2. Replace the flexible luggage boards (if so equipped) and cover.
3. Close the liftgate.
WARNING
. Always make sure that the spare
tire and jacking equipment are
properly secured after use. Such
items can become dangerous
projectiles in an accident or sud-
den stop. .
The spare tire is designed for
emergency use. See specific in-
structions under the heading
“Wheels and tires” (P.8-29).
REPAIRING A FLAT TIRE (models
with emergency tire puncture re-
pair kit)
The emergency tire puncture repair kit is
supplied with the vehicle instead of a
spare tire. This repair kit must be used for
temporarily fixing a minor tire puncture.
After using the repair kit, it is recom-
mended that visit a NISSAN dealer as
soon as possible for tire inspection and
repair/replacement.
CAUTION
.NISSAN recommends using only
Genuine NISSAN Emergency Tire
Sealant provided with your vehi-
cle. Other tire sealants may da-
mage the valve stem seal which
can cause the tire to lose air
pressure.
. Do not use the emergency tire
puncture repair kit provided with
your vehicle on other vehicles.
In case of emergency6-9
Page 386 of 492
6-10In case of emergency
.Do not use the emergency tire
puncture repair kit for a purpose
other than to inflate and check
the tire pressure for the vehicle.
. Use the emergency tire puncture
repair kit only on DC12V.
. Keep water and dust off the
emergency tire puncture repair
kit.
. Do not disassemble or modify the
emergency tire puncture repair
kit.
. Do not drop the kit or allow hard
impacts to the kit.
. Do not use the emergency tire
puncture repair kit under the
following conditions. It is recom-
mended that contact a NISSAN
dealer or professional road assis-
tance.
— when the sealant has passed
its expiration date (shown on
the label attached to the bot-
tle)
— when the cut or the puncture is approximately 0.2 in (5 mm)
or longer
— when the side of the tire is damaged — when the vehicle has been
driven with a considerable
loss of air from the tire
— when the tire is completely displaced inside or outside
the rim
— when the tire rim is damaged
— when two or more tires are flat
WAG0040X
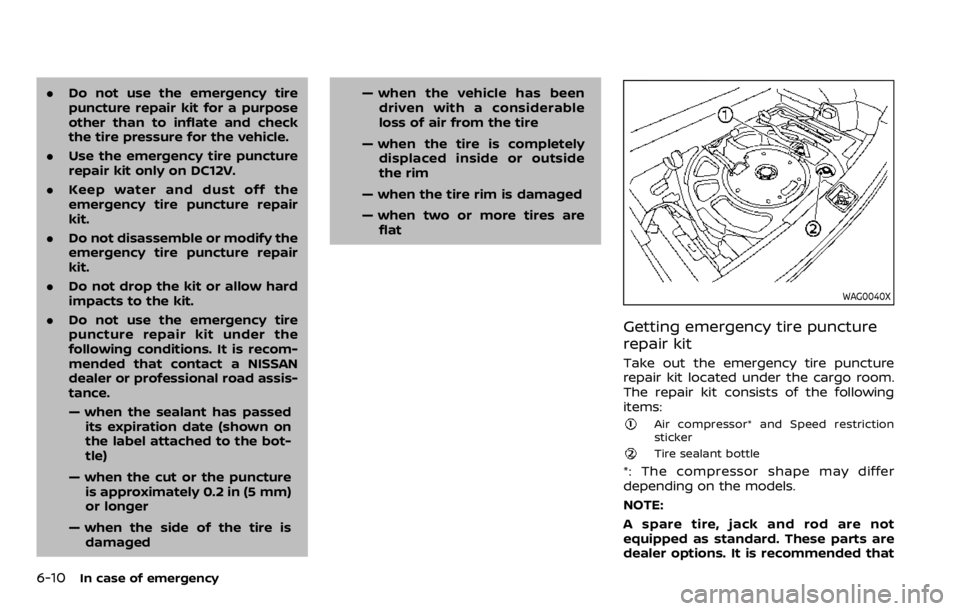
Getting emergency tire puncture
repair kit
Take out the emergency tire puncture
repair kit located under the cargo room.
The repair kit consists of the following
items:
Air compressor* and Speed restriction
sticker
Tire sealant bottle
*: The compressor shape may differ
depending on the models.
NOTE:
A spare tire, jack and rod are not
equipped as standard. These parts are
dealer options. It is recommended that
Page 387 of 492
contact a NISSAN dealer about obtain-
ing these parts. See “Changing a flat tire
(models with spare tire)” (P.6-4) for
usage of jacking tools and tire replace-
ment.
Before using emergency tire punc-
ture repair kit
.If any foreign object (for example, a
screw or nail) is embedded in the tire,
do not remove it.
. Check the expiration date of the
sealant (shown on the label attached
to the bottle). Never use a sealant
whose expiration date has passed.
Repairing tire
WARNING
Observe the following precautions
when using the emergency tire
puncture repair kit.
.Swallowing the compound is
dangerous. Immediately drink as
much water as possible and seek
prompt medical assistance.
. Rinse well with lots of water if the
compound comes into contact
with skin or eyes. If irritation
persists, seek prompt medical
attention.
. Keep the repair compound out of
the reach of children.
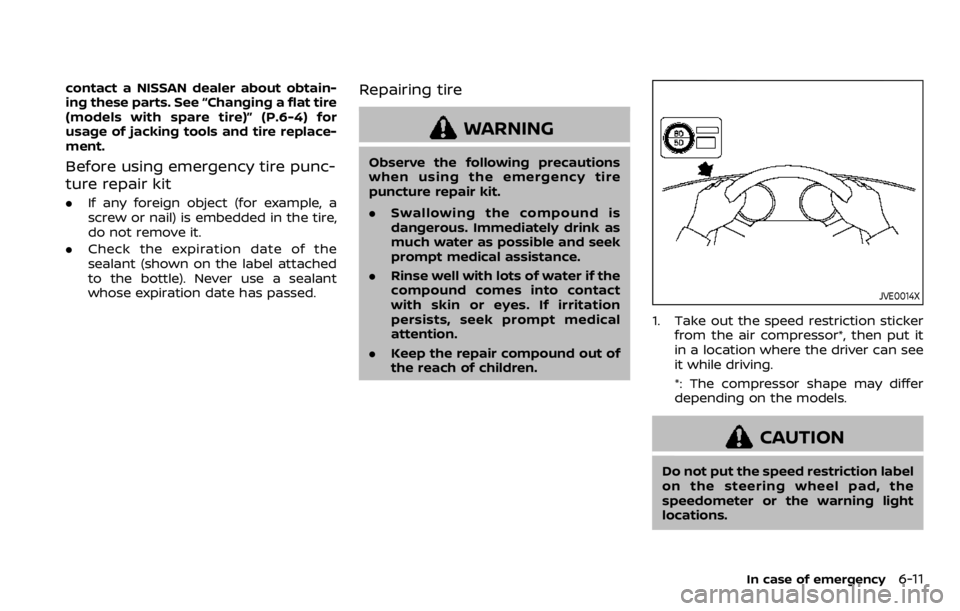
JVE0014X
1. Take out the speed restriction sticker
from the air compressor*, then put it
in a location where the driver can see
it while driving.
*: The compressor shape may differ
depending on the models.
CAUTION
Do not put the speed restriction label
on the steering wheel pad, the
speedometer or the warning light
locations.
In case of emergency6-11
Page 388 of 492

6-12In case of emergency
SCE0868
2. Take the hoseand the power plugout of the air compressor. Remove the
cap of the bottle holder from the air
compressor.
SCE0869
3. Remove the cap of the tire sealantbottle, and screw the bottle clockwise
onto the bottle holder. (Leave the
bottle seal intact. Screwing the bottle
onto the bottle holder will pierce the
seal of the bottle.)
4. Remove the cap of the tire valve on the flat tire.
SCE0870
5. Remove the protective capof the
hose and screw the hose securely
onto the tire valve. Make sure that
the pressure release valve
is se-
curely tightened. Make sure that the
air compressor switch is in the OFF
(*) position, and then insert its power
plug into the power outlet in the
vehicle.
Page 389 of 492
SCE0871
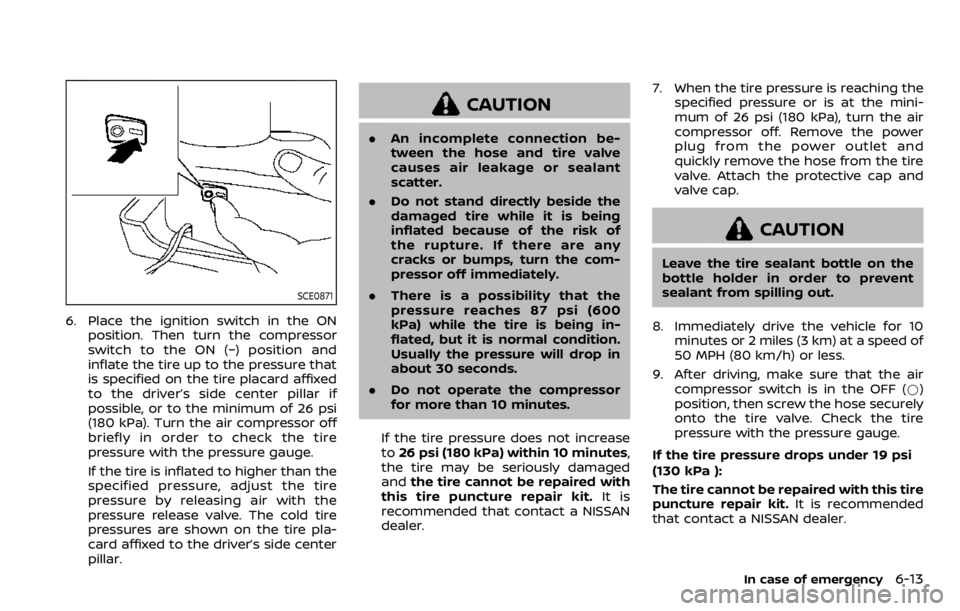
6. Place the ignition switch in the ONposition. Then turn the compressor
switch to the ON (−) position and
inflate the tire up to the pressure that
is specified on the tire placard affixed
to the driver’s side center pillar if
possible, or to the minimum of 26 psi
(180 kPa). Turn the air compressor off
briefly in order to check the tire
pressure with the pressure gauge.
If the tire is inflated to higher than the
specified pressure, adjust the tire
pressure by releasing air with the
pressure release valve. The cold tire
pressures are shown on the tire pla-
card affixed to the driver’s side center
pillar.
CAUTION
.An incomplete connection be-
tween the hose and tire valve
causes air leakage or sealant
scatter.
. Do not stand directly beside the
damaged tire while it is being
inflated because of the risk of
the rupture. If there are any
cracks or bumps, turn the com-
pressor off immediately.
. There is a possibility that the
pressure reaches 87 psi (600
kPa) while the tire is being in-
flated, but it is normal condition.
Usually the pressure will drop in
about 30 seconds.
. Do not operate the compressor
for more than 10 minutes.
If the tire pressure does not increase
to 26 psi (180 kPa) within 10 minutes,
the tire may be seriously damaged
and the tire cannot be repaired with
this tire puncture repair kit. It is
recommended that contact a NISSAN
dealer. 7. When the tire pressure is reaching the
specified pressure or is at the mini-
mum of 26 psi (180 kPa), turn the air
compressor off. Remove the power
plug from the power outlet and
quickly remove the hose from the tire
valve. Attach the protective cap and
valve cap.
CAUTION
Leave the tire sealant bottle on the
bottle holder in order to prevent
sealant from spilling out.
8. Immediately drive the vehicle for 10 minutes or 2 miles (3 km) at a speed of
50 MPH (80 km/h) or less.
9. After driving, make sure that the air compressor switch is in the OFF (*)
position, then screw the hose securely
onto the tire valve. Check the tire
pressure with the pressure gauge.
If the tire pressure drops under 19 psi
(130 kPa ):
The tire cannot be repaired with this tire
puncture repair kit. It is recommended
that contact a NISSAN dealer.
In case of emergency6-13
Page 390 of 492
6-14In case of emergency
If the tire pressure is 19 psi (130 kPa) or
more but less than the specified pres-
sure:
Turn the compressor switch to the ON (−)
position and inflate the tire up to the
specified pressure. Then repeat the steps
from 8.
If the pressure drops again,the tire
cannot be repaired with this tire punc-
ture repair kit. It is recommended that
contact a NISSAN dealer.
When the tire pressure is the specified
pressure:
The temporary repair is completed.
It is recommended that visit a NISSAN
dealer for tire repair/replacement as soon
as possible.
CAUTION
Do not reuse the tire sealant bottle
or the hose.
For a new tire sealant bottle and
hose, it is recommended that con-
tact a NISSAN dealer. To start your engine with a booster
battery, the instructions and precautions
below must be followed.
WARNING
.
If done incorrectly, jump starting
can lead to a battery explosion,
resulting in severe injury or
death. It could also damage your
vehicle.
. Explosive hydrogen gas is always
present in the vicinity of the
battery. Keep all sparks and
flames away from the battery.
. Do not allow battery fluid to come
into contact with eyes, skin,
clothing or painted surfaces. Bat-
tery fluid is a corrosive sulfuric
acid solution which can cause
severe burns. If the fluid should
come into contact with anything,
immediately flush the contacted
area with water.
. Keep the battery out of the reach
of children.
. The booster battery must be
rated at 12 volts. Use of an im-
properly rated battery can da-
mage your vehicle. .
Whenever working on or near a
battery, always wear suitable eye
protectors (for example, goggles
or industrial safety spectacles)
and remove rings, metal bands,
or any other jewelry. Do not lean
over the battery when jump start-
ing.
. Do not attempt to jump start a
frozen battery. It could explode
and cause serious injury.
. Your vehicle has an automatic
engine cooling fan. It could come
on at any time. Keep hands and
other objects away from it.
JUMP STARTING