Park brake manual release NISSAN QASHQAI 2020 Owner´s Manual
[x] Cancel search | Manufacturer: NISSAN, Model Year: 2020, Model line: QASHQAI, Model: NISSAN QASHQAI 2020Pages: 492, PDF Size: 2.02 MB
Page 98 of 492

2-16Instruments and controls
properly. Have the system checked. It is
recommended you visit a NISSAN dealer
for this service. If a malfunction occurs in
the system, the VDC system function will
be canceled but the vehicle is still drive-
able. For additional information, see “Ve-
hicle Dynamic Control (VDC) system” (P.5-
129) of this manual.
INDICATOR LIGHTS
All-Wheel Drive (AWD) LOCK
indicator light (if so equipped)
When the ignition switch is in the ON
position, the All-Wheel Drive (AWD) LOCK
indicator light illuminates and then turns
off.
When selecting LOCK mode while the
engine is running, the LOCK indicator
light illuminates. (See “Intelligent 4x4”
(P.5-121).)
CAUTION
Do not drive on dry hard surface
roads in the LOCK mode.
Automatic brake hold indica-
tor light (white) (if so equipped)
The automatic brake hold indicator light
(white) illuminates when the automatic
brake hold system is on standby. (See
“Automatic brake hold” (P.5-29).)
Automatic brake hold indica-
tor light (green) (if so equipped)
The automatic brake hold indicator light
(green) illuminates while the automatic
brake hold system is operating. (See
“Automatic brake hold” (P.5-29).)
orElectronic parking
brake indicator light (if so
equipped)
The electronic parking brake indicator
light indicates that the electronic parking
brake system is operating.
When the ignition switch is placed in the
ON position, the electronic parking brake
indicator light illuminates. When the en-
gine is started and the parking brake is
released, the warning light turns off.
If the parking brake is not fully released,
the electronic parking brake indicator
light remains on. Be sure that the electro-
nic parking brake indicator light has turned off before driving. (See “Parking
brake” (P.5-27).)
If the electronic parking brake indicator
light illuminates or flashes while the
electronic parking brake warning light
or(yellow) illuminates, it may
indicate that the electronic parking brake
system is not functioning properly. Have
the system checked, and if necessary
repaired. It is recommended you visit a
NISSAN dealer for this service.
Exterior light indicator
This indicator illuminates when the head-
light switch is turned to the AUTO,orposition and the front parking lights,
rear combination lights, license plate
lights or headlights are on. The indicator
turns off when these lights are turned off.
Front fog light indicator light
(if so equipped)
The front fog light indicator light illumi-
nates when the front fog lights are on.
(See “Fog light switch” (P.2-58).)
Page 113 of 492

VEHICLE INFORMATION DISPLAY
WARNINGS AND INDICATORS
1. Engine start operation indicator
(for Continuously Variable Trans-
mission (CVT) models)
This indicator appears when the shift
lever is in the P (Park) position.
This indicator means that the engine will
start by pushing the ignition switch with
the brake pedal depressed. You can start
the engine directly in any position of the
ignition switch.
2. Engine start operation indicator
(for Manual Transmission (MT)
models)
This indicator means that the engine will
start by pushing the ignition switch with
the clutch pedal depressed. You can start
the engine directly in any position of the
ignition switch.
You can also start the engine by pushing
the ignition switch with the brake pedal
depressed when the shift lever is in the N
(Neutral) position.
3. No Key detected warning (if so
equipped)
This warning appears when the door is
closed with the Intelligent Key left outside
the vehicle and the ignition switch in the
ON position. Make sure that the Intelligent
Key is inside the vehicle.
See “Intelligent Key system” (P.3-11) for
more details.
4. Shift to Park warning (CVT mod-
els) (if so equipped)
This warning appears when the ignition
switch is pushed to stop the engine with
the shift lever in any position except the P
(Park) position.
If this warning appears, move the shift
lever to the P (Park) position or place the
ignition switch in the ON position.
An inside warning chime will also sound.
(See “Intelligent Key system” (P.3-11).)
5. Key battery low warning (if so
equipped)
This warning appears when the Intelli-
gent Key battery is running out of power.
If this indicator appears, replace the
battery with a new one. See “Intelligent
Key battery replacement” (P.8-23).
6. Engine start operation for Intelli-
gent Key system indicator (if so
equipped)
This indicator appears when the Intelli-
gent Key battery is running out of power
and when the Intelligent Key system and
vehicle are not communicating normally.
If this indicator appears, touch the igni-
tion switch with the Intelligent Key while
depressing the brake pedal. (See “Intelli-
gent Key battery discharge” (P.5-17).)
7. Key ID incorrect warning (if so
equipped)
This warning appears when the ignition
switch is placed from the LOCK position
and the Intelligent Key cannot be recog-
nized by the system. You cannot start the
engine with an unregistered key. Use the
registered Intelligent Key.
See “Intelligent Key system” (P.3-11).
8. Release Parking Brake warning
This warning appears when the vehicle
speed is above 4 MPH (7 km/h) (models
not equipped with electronic parking
brake) or 2 MPH (4 km/h) (models
equipped with electronic parking brake)
and the parking brake is applied. Stop the
vehicle and release the parking brake.
Instruments and controls2-31
Page 117 of 492

reached normal levels, the warning
should disappear.
If the warning continues to display, have
the system checked. It is recommended
that you visit a NISSAN dealer for this
service.
For additional information, refer to “Lane
Departure Warning (LDW)” (P.5-35), “Intel-
ligent Lane Intervention (I-LI)” (P.5-88) or
“Traffic Sign Recognition” (P.2-44).
35. Not Available: Poor Road Con-
ditions warning (if so equipped)
This message appears when Intelligent
Cruise Control (ICC) system becomes
unavailable because the road is slippery.
For additional information, refer to “In-
telligent Cruise Control (ICC)” (P.5-77).
36. Currently unavailable warning
This message appears when the Intelli-
gent Lane Intervention (I-LI) system or the
Intelligent Cruise Control (ICC) system
becomes unavailable because the VDC is
turned off. For additional information,
refer to “Intelligent Lane Intervention (I-
LI)” (P.5-40) or “Intelligent Cruise Control
(ICC)” (P.5-77).
37. Unavailable: Front Radar Ob-
struction warning
If the sensor area of the front bumper is
covered with dirt or obstructed, making it
impossible to detect a vehicle ahead,
Automatic Emergency Braking (AEB) with
pedestrian detection system, Intelligent
Forward Collision Warning (I-FCW) or Pro-
PILOT assist system is automatically
turned off. The warning message will
appear in the vehicle information display.
If the warning message appears, park the
vehicle in a safe location and turn the
engine off.
Check to see if the sensor area of the
front bumper is blocked. If the sensor
area of the front bumper is blocked,
remove the blocking material. Restart
the engine. If the warning message con-
tinues to appear, have the Automatic
Emergency Braking (AEB) with pedestrian
detection system, Intelligent Forward Col-
lision Warning (I-FCW) or ProPILOT assist
system checked. It is recommended that
you visit a NISSAN dealer for this service.
For more details, see “Automatic Emer-
gency Braking (AEB) with pedestrian de-
tection system” (P.5-96), “Intelligent
Forward Collision Warning (I-FCW)” (P.5-
105) or “ProPILOT assist” (P.5-66).
38. Unavailable: Side Radar Ob-
struction warning
This warning appears when the Blind
Spot Warning (BSW)/Rear Cross Traffic
Alert (RCTA) system becomes unavailable
because a radar blockage is detected.
(See “Blind Spot Warning (BSW)” (P.5-46) or
“Rear Cross Traffic Alert (RCTA)” (P.5-56).)
39. Press Brake Pedal warning (for
electronic parking brake equipped
models)
This indicator appears in the following
situations:
.The driver tries to release the electro-
nic parking brake manually without
depressing the brake pedal.
. The vehicle is stopped on a steep hill
and there is a possibility of moving
backward, even if the electronic park-
ing brake is applied.
. This warning appears if the vehicle
moves while the automatic brake hold
(if so equipped) is activated.
Instruments and controls2-35
Page 244 of 492

5-8Starting and driving
TPMS with Easy Fill Tire Alert
When adding air to an under-inflated tire,
the TPMS with Easy Fill Tire Alert provides
visual and audible signals outside the
vehicle to help you inflate the tires to
the recommended COLD tire pressure.
Vehicle set-up:
1. Park the vehicle in a safe and levelplace.
2. Apply the parking brake and place the shift lever in the P (Park) position (CVT
model) or N (Neutral) position (MT
model).
3. Place the ignition switch in the ON position. Do not start the engine.
Operation:
1. Add air to the tire.
2. After a few seconds, the hazard in- dicators will start flashing.
3. When the designated pressure is reached, the horn beeps once and
the hazard indicators stop flashing.
4. Perform the above steps for each tire.
. If the tire is over-inflated more than
approximately 4 psi (30 kPa), the horn
beeps and the hazard indicators flash
3 times. To correct the pressure, push
the core of the valve stem on the tire
briefly to release pressure. When the pressure reaches the designated
pressure, the horn beeps once.
. If the hazard indicator does not flash
within approximately 15 seconds after
starting to inflate the tire, it indicates
that the TPMS with Easy Fill Tire Alert
is not operating.
. The TPMS will not activate the Easy Fill
Tire Alert under the following condi-
tions:
— If there is interference from an
external device or transmitter
— The air pressure from the inflation device such as those using a power
socket is not sufficient to inflate the
tire
— If an electrical equipment is being used in or near the vehicle
— There is a malfunction in the TPMS system
— There is a malfunction in the horn or hazard indicators
. If the TPMS with Easy Fill Tire Alert
does not operate due to TPMS inter-
ference, move the vehicle about 3 ft
(1m) backward or forward and try
again.
If the TPMS with Easy Fill Tire Alert is not
working, use a tire pressure gauge.
AVOIDING COLLISION AND ROLL-
OVER
WARNING
Failure to operate this vehicle in a
safe and prudent manner may result
in loss of control or an accident.
Be alert and drive defensively at all times.
Obey all traffic regulations. Avoid exces-
sive speed, high speed cornering, or
sudden steering maneuvers, because
these driving practices could cause you
to lose control of your vehicle. As with
any vehicle, a loss of control could
result in a collision with other vehicles
or objects, or cause the vehicle to roll-
over, particularly if the loss of control
causes the vehicle to slide sideways. Be
attentive at all times, and avoid driving
when tired. Never drive when under the
influence of alcohol or drugs (including
prescription or over-the-counter drugs
which may cause drowsiness). Always
wear your seat belt as outlined in “Seat
belts” (P.1-12) of this manual, and also
instruct your passengers to do so.
Seat belts help reduce the risk of injury in
collisions and rollovers. In a rollover
crash, an unbelted or improperly belted
Page 254 of 492
5-18Starting and driving
1. Apply the parking brake.
2.Continuously Variable Transmission
(CVT) model:
Move the shift lever to the P (Park) or N
(Neutral) position. (P is recommended.)
The starter is designed so that it does
not operate unless the shift lever is in
either of the above positions.
Manual Transmission (MT) model:
Move the shift lever to the N (Neutral)
position, and depress the clutch pedal
to the floor while starting the engine.
3. Crank the engine with your foot off
the accelerator pedal by turning the
ignition switch to START. Release the
switch when the engine starts. If the
engine starts, but fails to run, repeat
the above procedure.
.If the engine is very hard to start in
extremely cold weather or when
restarting, depress the accelerator
pedal a little (approximately 1/3 to
the floor) and hold it and then
crank the engine. Release the ac-
celerator pedal when the engine
starts.
.If the engine is very hard to startbecause it is flooded, depress the
accelerator pedal all the way to the
floor and hold it. Crank the engine
for 5 - 6 seconds. After cranking the engine, release the accelerator
pedal. Crank the engine
with your
foot off the accelerator pedal by
turning the ignition switch to
START. Release the ignition switch
when the engine starts. If the
engine starts, but fails to run, re-
peat the above procedure.
CAUTION
Do not operate the starter for more
than 15 seconds at a time. If the
engine does not start, turn the igni-
tion switch off and wait 10 seconds
before cranking again, otherwise the
starter could be damaged.
Do not turn the ignition switch to the
START position unless the engine
and starter have stopped moving.
Attempting to start the engine while
the engine or starter is moving may
cause damage.
4. Warm-up
Allow the engine to idle for at least 30
seconds after starting. Do not race the
engine while warming it up. Drive at
moderate speed for a short distance
first, especially in cold weather. In cold
weather, keep the engine running for a minimum of 2 - 3 minutes before
shutting it off. Starting and stopping
the engine over a short period of time
may make the vehicle more difficult to
start.
5. To stop the engine, shift the shift lever to the P (Park) position (CVT model) or
N (Neutral) position (MT model) and
turn the ignition switch to the OFF
position.
NOTE:
Care should be taken to avoid situations
that can lead to potential battery dis-
charge and potential no-start condi-
tions such as:
1. Installation or extended use of elec-
tronic accessories that consume
battery power when the engine is
not running (Phone chargers, GPS,
DVD players, etc.)
2. Vehicle is not driven regularly and/
or only driven short distances.
In these cases, the battery may need to
be charged to maintain battery health.
STARTING THE ENGINE (model
without Intelligent Key system)
Page 255 of 492
1. Apply the parking brake.
2.Continuously Variable Transmission
(CVT) model:
Move the shift lever to the P (Park) or N
(Neutral) position. (P is recommended.)
The starter is designed not to operate
unless the shift lever is in either of the
above positions.
Manual Transmission (MT) model:
Move the shift lever to the N (Neutral)
position. Depress the clutch pedal fully
to the floor.
The starter is designed not to operate
unless the clutch pedal is fully de-
pressed.
The Intelligent Key must be carried
when operating the ignition switch.
3. Push the ignition switch to the ON position. Depress the brake pedal (CVT
models) or the clutch pedal (MT mod-
els) and push the ignition switch to
start the engine.
To start the engine immediately, push
and release the ignition switch while
depressing the brake pedal (CVT mod-
els) or the clutch pedal (MT models)
with the ignition switch in any posi-
tion.
.If the engine is very hard to start in
extremely cold weather or when restarting, depress the accelerator
pedal a little (approximately 1/3 to
the floor) and while holding, crank
the engine. Release the accelerator
pedal when the engine starts.
.If the engine is very hard to start
because it is flooded, depress the
accelerator pedal all the way to the
floor and hold it. Push the ignition
switch to the ON position to start
cranking the engine. After 5 or 6
seconds, stop cranking by pushing
the ignition switch to OFF. After
cranking the engine, release the
accelerator pedal. Crank the engine
with your foot off the accelerator
pedal by depressing the brake
pedal and pushing the push-button
ignition switch to start the engine.
If the engine starts, but fails to run,
repeat the above procedure.
CAUTION
Do not operate the starter for more
than 15 seconds at a time. If the
engine does not start, push the
ignition switch to OFF and wait 10
seconds before cranking again,
otherwise the starter could be da-
maged. 4.
Warm-up
Allow the engine to idle for at least 30
seconds after starting. Do not race the
engine while warming it up. Drive at
moderate speed for a short distance
first, especially in cold weather. In cold
weather, keep the engine running for
a minimum of 2 - 3 minutes before
shutting it off. Starting and stopping
the engine over a short period of time
may make the vehicle more difficult to
start.
When racing the engine up to 4,000
rpm or more under no load condition,
the engine will enter the fuel cut
mode.
5. To stop the engine, move the shift lever to the P (Park) position (CVT
models) or move the shift lever to
the N (Neutral) position (MT models),
and push the ignition switch to the
OFF position.
NOTE:
Care should be taken to avoid situations
that can lead to potential battery dis-
charge and potential no-start condi-
tions such as:
1. Installation or extended use of elec-
tronic accessories that consume
battery power when the engine is
not running (Phone chargers, GPS,
DVD players, etc.)
Starting and driving5-19
STARTING THE ENGINE (model
with Intelligent Key system)
Page 256 of 492

5-20Starting and driving
2.Vehicle is not driven regularly and/
or only driven short distances.
In these cases, the battery may need to
be charged to maintain battery health.
REMOTE ENGINE START (if so
equipped)
Vehicles started with the remote engine
start function require the ignition switch
to be placed in the ON position before the
shift lever can be moved from the P (Park)
position. To place the ignition switch in
the ON position, perform the following
steps:
1. Make sure that the Intelligent Key is carried with you.
2. Depress the brake pedal.
3. Push the ignition switch once to the ON position.
For additional information about the
remote engine start function, see “Re-
mote engine start” (P.3-23).
CONTINUOUSLY VARIABLE TRANS-
MISSION (CVT)
The Continuously Variable Transmission
(CVT) in your vehicle is electronically
controlled to produce maximum power
and smooth operation.
The recommended operating procedures
for this transmission are shown on the
following pages. Follow these procedures
for maximum vehicle performance and
driving enjoyment.
Engine power may be automatically
reduced to protect the CVT if the engine
speed increases quickly when driving
on slippery roads or while being tested
on some dynamometers.
Starting the vehicle
1. After starting the engine, fully depress the foot brake pedal before moving
the shift lever out of the P (Park)
position.
This CVT is designed so that the foot
brake pedal must be depressed
before shifting from P (Park) to any
driving position while the ignition
switch is in the ON position.
The shift lever cannot be moved out
of the P (Park) position and into any
of the other positions if the ignition
switch is placed in the LOCK or OFF position.
2. Keep the foot brake pedal depressed and move the shift lever to a driving
position.
3. Release the parking brake and foot brake pedal, and then gradually start
the vehicle in motion.
WARNING
.Do not depress the accelerator
pedal while shifting from P (Park)
or N (Neutral) to R (Reverse), D
(Drive), or manual shift mode. Al-
ways depress the brake pedal
until shifting is completed. Failure
to do so could cause you to lose
control and have an accident.
. Cold engine idle speed is high, so
use caution when shifting into a
forward or reverse gear before
the engine has warmed up.
. Never shift to either the P (Park)
or R (Reverse) position while ve-
hicle is moving forward and P
(Park) or D (Drive) while the vehi-
cle is reversing. This could cause
an accident or damage the trans-
mission.
DRIVING THE VEHICLE
Page 261 of 492
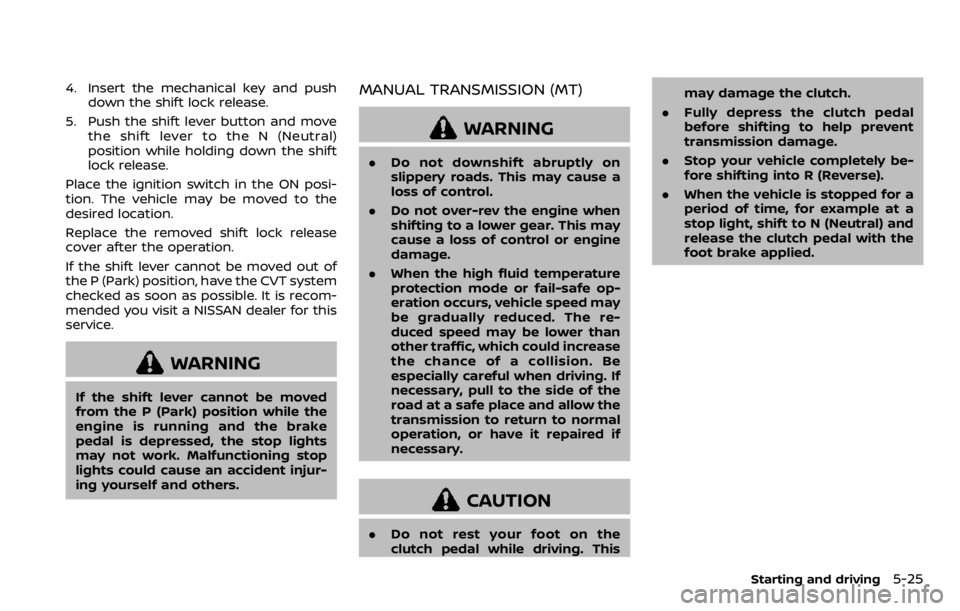
4. Insert the mechanical key and pushdown the shift lock release.
5. Push the shift lever button and move the shift lever to the N (Neutral)
position while holding down the shift
lock release.
Place the ignition switch in the ON posi-
tion. The vehicle may be moved to the
desired location.
Replace the removed shift lock release
cover after the operation.
If the shift lever cannot be moved out of
the P (Park) position, have the CVT system
checked as soon as possible. It is recom-
mended you visit a NISSAN dealer for this
service.
WARNING
If the shift lever cannot be moved
from the P (Park) position while the
engine is running and the brake
pedal is depressed, the stop lights
may not work. Malfunctioning stop
lights could cause an accident injur-
ing yourself and others.
MANUAL TRANSMISSION (MT)
WARNING
. Do not downshift abruptly on
slippery roads. This may cause a
loss of control.
. Do not over-rev the engine when
shifting to a lower gear. This may
cause a loss of control or engine
damage.
. When the high fluid temperature
protection mode or fail-safe op-
eration occurs, vehicle speed may
be gradually reduced. The re-
duced speed may be lower than
other traffic, which could increase
the chance of a collision. Be
especially careful when driving. If
necessary, pull to the side of the
road at a safe place and allow the
transmission to return to normal
operation, or have it repaired if
necessary.
CAUTION
.Do not rest your foot on the
clutch pedal while driving. This may damage the clutch.
. Fully depress the clutch pedal
before shifting to help prevent
transmission damage.
. Stop your vehicle completely be-
fore shifting into R (Reverse).
. When the vehicle is stopped for a
period of time, for example at a
stop light, shift to N (Neutral) and
release the clutch pedal with the
foot brake applied.
Starting and driving5-25
Page 264 of 492
5-28Starting and driving
automatic brake hold function.
The electronic parking brake is automati-
cally released as soon as the vehicle
starts while the accelerator pedal is
depressed.
WARNING
.The electronic parking brake will
not be automatically applied
when the engine is stopped with-
out using the ignition switch (for
example, by engine stalling).
Without the vehicle stationary,
the electronic parking brake will
not be automatically applied
even if the engine is turned off
with the ignition switch.
. Before leaving the vehicle, move
the shift lever to the 1 (1st) or R
(Reverse) position and check that
the electronic parking brake in-
dicator light is illuminated to
confirm that the electronic park-
ing brake is applied. The electro-
nic parking brake indicator light
will remain on for a period of time
after the driver’s door is locked.
CAUTION
When parking in an area where the
outside temperature is below 32°F
(0°C), do not apply the parking brake
to prevent it from freezing.
For safe parking, place the shift lever
in the 1 (1st) or R (Reverse) position
and securely block the wheels.
NOTE:
. To keep the electronic parking brake
released after the engine is turned
off, place the ignition switch in the
OFF position, depress the brake
pedal and push down the parking
brake switch before opening the
driver’s door.
. If a malfunction occurs in the elec-
tronic parking brake system (for
example, due to battery discharge),
it is recommended to contact a
NISSAN dealer.
. If the shift lever is moved to the P
(Park) position when the brake force
is maintained by the automatic
brake hold function, the electronic
parking brake will apply automati-
cally. .
If the driver’s seat belt is unfastened
when the brake force is maintained
by the automatic brake hold func-
tion, the electronic parking brake
will apply automatically.
. If the ignition switch is placed in the
OFF position when the brake force is
maintained by the automatic brake
hold function, the electronic parking
brake will apply automatically.
Manual operation
The electronic parking brake will not be
automatically applied if the engine is
stopped without using the ignition switch
(for example, by engine stalling). In such a
case, you have to apply the parking brake
manually.
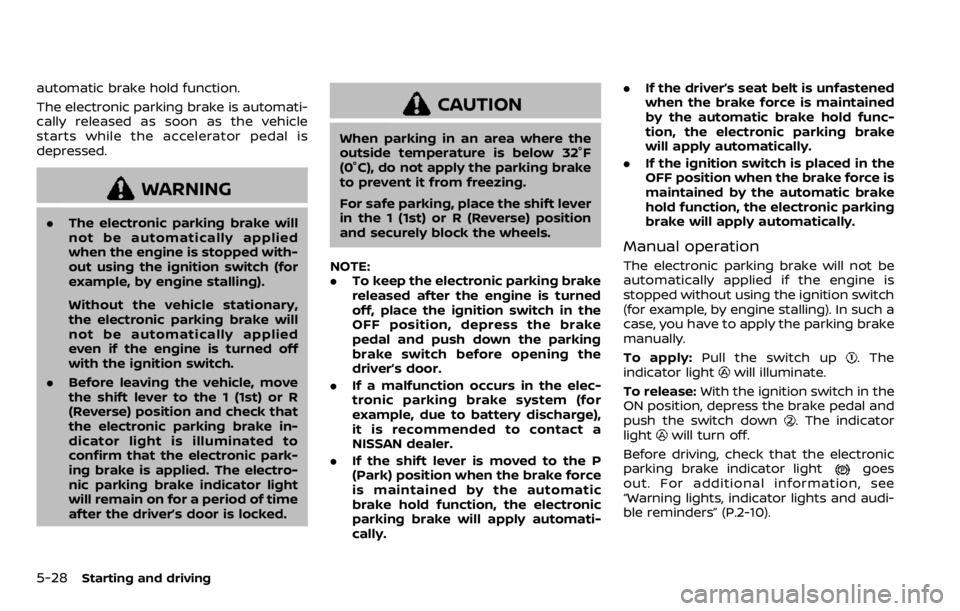
To apply: Pull the switch up
. The
indicator lightwill illuminate.
To release: With the ignition switch in the
ON position, depress the brake pedal and
push the switch down
. The indicator
lightwill turn off.
Before driving, check that the electronic
parking brake indicator light
goes
out. For additional information, see
“Warning lights, indicator lights and audi-
ble reminders” (P.2-10).
Page 309 of 492

WAF0052X
When the SET- switch is pushed under the
following conditions, the ProPILOT assist
system cannot be set and the set vehicle
speed indicator
blinks for approxi-
mately 2 seconds:
. When traveling below 20 MPH (32
km/h) and the vehicle ahead is not
detected
. When the shift lever is not in the D
(Drive) position or manual shift mode
. When the parking brake is applied
. When the brakes are operated by the
driver
. When the VDC system is off. For
additional information, see “Vehicle
Dynamic Control (VDC) system” (P.5- 129).
. When the VDC system (including the
traction control system) is operating
. When a wheel is slipping
. When any door is open
. When the driver’s seat belt is not
fastened
How to change the set vehicle
speed
The set vehicle speed can be adjusted.
To change to a faster cruising speed:
.Push and hold the RES+ switch. The
set vehicle speed increases by ap-
proximately 5 MPH (5 km/h).
. Push, then quickly release, the RES+
switch. Each time you do this, the set
speed increases by approximately 1
MPH (1 km/h).
To change to a slower cruising speed:
. Push and hold the SET- switch. The
set vehicle speed decreases by ap-
proximately 5 MPH (5 km/h).
. Push, then quickly release, the SET
switch. Each time you do this, the set
speed decreases by approximately 1
MPH (1 km/h).
How to momentarily accelerate or
decelerate
.Depress the accelerator pedal when
acceleration is required. Release the
accelerator pedal to resume the pre-
viously set vehicle speed.
. Depress the brake pedal when decel-
eration is required. Control by the
ProPILOT Assist system is canceled.
Push the RES+ switch to resume the
previously set vehicle speed.
WARNING
When the accelerator pedal is de-
pressed and you are approaching
the vehicle ahead, the ICC system
will neither control the brake nor
warn the driver with the chime and
display. The driver must manually
control the vehicle speed to maintain
a safe distance to the vehicle ahead.
Failure to do so could result in severe
personal injury or death.
Starting and driving5-73