tow NISSAN QUEST 1996 V40 / 1.G Owners Manual
[x] Cancel search | Manufacturer: NISSAN, Model Year: 1996, Model line: QUEST, Model: NISSAN QUEST 1996 V40 / 1.GPages: 235, PDF Size: 1.77 MB
Page 13 of 235
WARNING
cIf you judge it to be safe, drive care-
fully to the nearest service station
for repairs. Otherwise, have your ve-
hicle towed because driving it could
be dangerous.
cPressing the brake pedal with the
engine stopped and/or low brake
fluid level may increase your stop-
ping distance and braking will re-
quire greater pedal effort as well as
pedal travel.
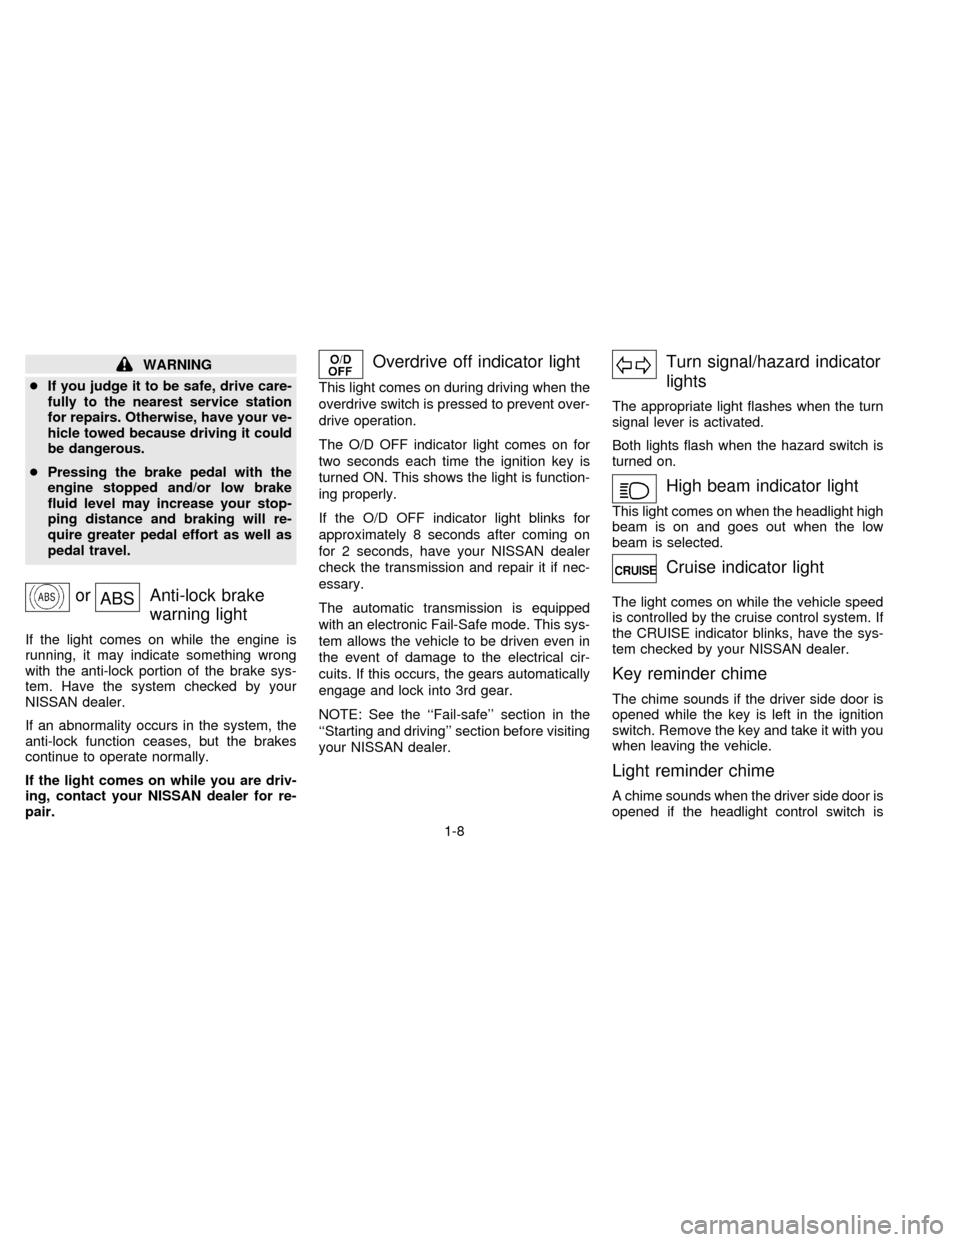
orABSAnti-lock brake
warning light
If the light comes on while the engine is
running, it may indicate something wrong
with the anti-lock portion of the brake sys-
tem. Have the system checked by your
NISSAN dealer.
If an abnormality occurs in the system, the
anti-lock function ceases, but the brakes
continue to operate normally.
If the light comes on while you are driv-
ing, contact your NISSAN dealer for re-
pair.
Overdrive off indicator light
This light comes on during driving when the
overdrive switch is pressed to prevent over-
drive operation.
The O/D OFF indicator light comes on for
two seconds each time the ignition key is
turned ON. This shows the light is function-
ing properly.
If the O/D OFF indicator light blinks for
approximately 8 seconds after coming on
for 2 seconds, have your NISSAN dealer
check the transmission and repair it if nec-
essary.
The automatic transmission is equipped
with an electronic Fail-Safe mode. This sys-
tem allows the vehicle to be driven even in
the event of damage to the electrical cir-
cuits. If this occurs, the gears automatically
engage and lock into 3rd gear.
NOTE: See the ``Fail-safe'' section in the
``Starting and driving'' section before visiting
your NISSAN dealer.
Turn signal/hazard indicator
lights
The appropriate light flashes when the turn
signal lever is activated.
Both lights flash when the hazard switch is
turned on.
High beam indicator light
This light comes on when the headlight high
beam is on and goes out when the low
beam is selected.
Cruise indicator light
The light comes on while the vehicle speed
is controlled by the cruise control system. If
the CRUISE indicator blinks, have the sys-
tem checked by your NISSAN dealer.
Key reminder chime
The chime sounds if the driver side door is
opened while the key is left in the ignition
switch. Remove the key and take it with you
when leaving the vehicle.
Light reminder chime
A chime sounds when the driver side door is
opened if the headlight control switch is
1-8
ZX
Page 20 of 235

To turn on the spotlights, press the switches
next to the lights. To turn them off, press the
switches again.Turn signal
Move the lever up or down to signal the
turning direction. When the turn is com-
pleted, the turn signal cancels automati-
cally.
Lane change signal
To indicate a lane change, move the lever
up or down to the point where the light
begins to flash, but the lever does not latch.
Passing signal
Pulling the lever toward you turns the head-
light high beam on. Release it and the
headlight high beam goes off.
AIC0049AIC0560
SPOTLIGHTS TURN SIGNAL SWITCH
1-15
ZX
Page 21 of 235
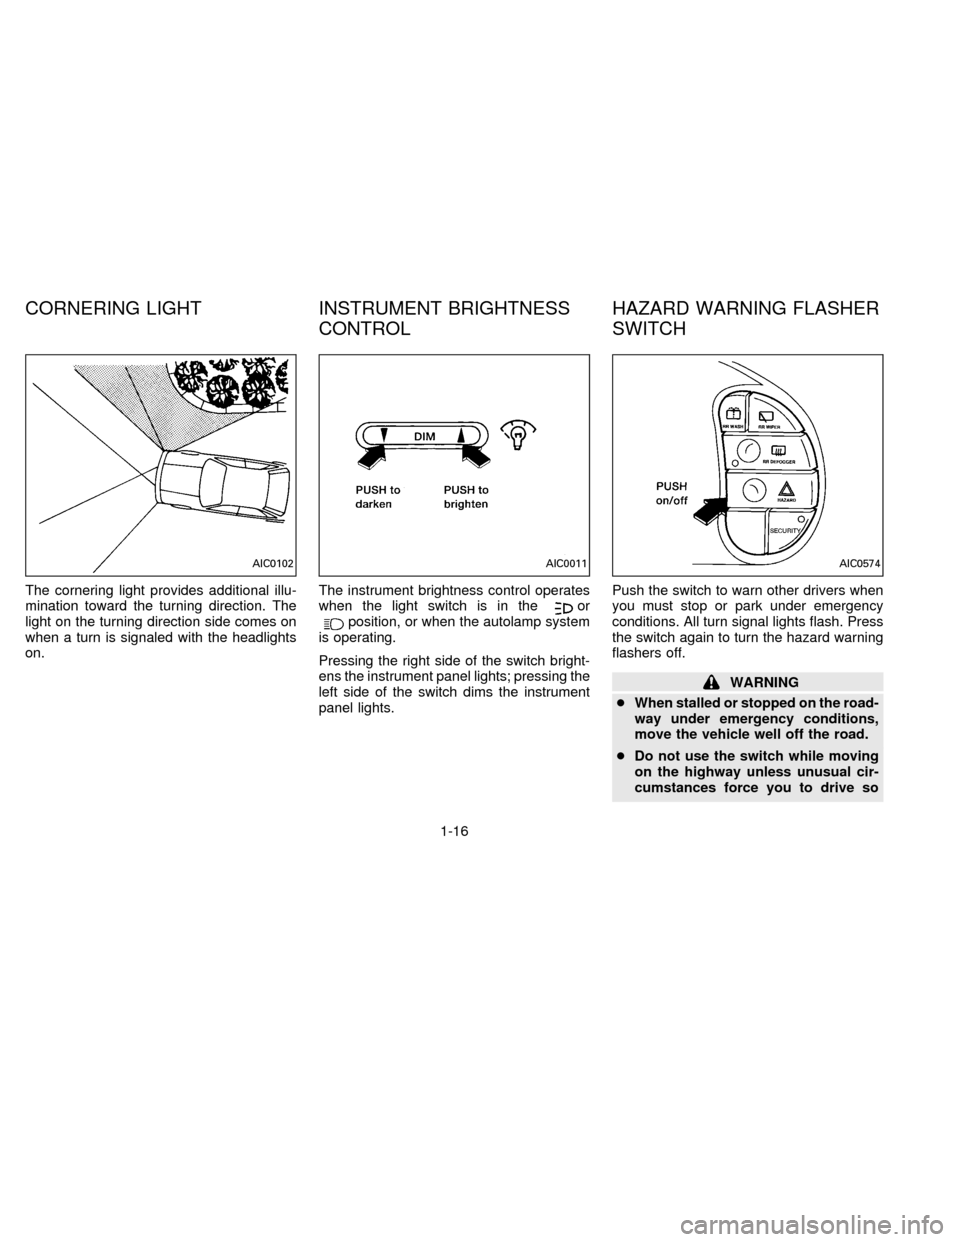
The cornering light provides additional illu-
mination toward the turning direction. The
light on the turning direction side comes on
when a turn is signaled with the headlights
on.The instrument brightness control operates
when the light switch is in theorposition, or when the autolamp system
is operating.
Pressing the right side of the switch bright-
ens the instrument panel lights; pressing the
left side of the switch dims the instrument
panel lights.Push the switch to warn other drivers when
you must stop or park under emergency
conditions. All turn signal lights flash. Press
the switch again to turn the hazard warning
flashers off.
WARNING
cWhen stalled or stopped on the road-
way under emergency conditions,
move the vehicle well off the road.
cDo not use the switch while moving
on the highway unless unusual cir-
cumstances force you to drive so
AIC0102AIC0011AIC0574
CORNERING LIGHT INSTRUMENT BRIGHTNESS
CONTROLHAZARD WARNING FLASHER
SWITCH
1-16
ZX
Page 26 of 235
Tilting the sunroof
To tilt up, first close the sunroof, then push
the UP side of the tilt switch. To close the
sunroof, push the DOWN side of the tilt
switch.
Sun shade
Open and close the sun shade by sliding it
forward or backward. The shade opens
when the sunroof opens, but it must be
closed manually.
WARNING
cBe extremely careful not to have any
part of your body in the sunroof
opening while it is closing.
cDo not stand up or extend any por-
tion of your body out of the opening
while driving.
cRemove water drops, snow, ice or
sand from the sunroof before
opening.
cDo not place any heavy object on the
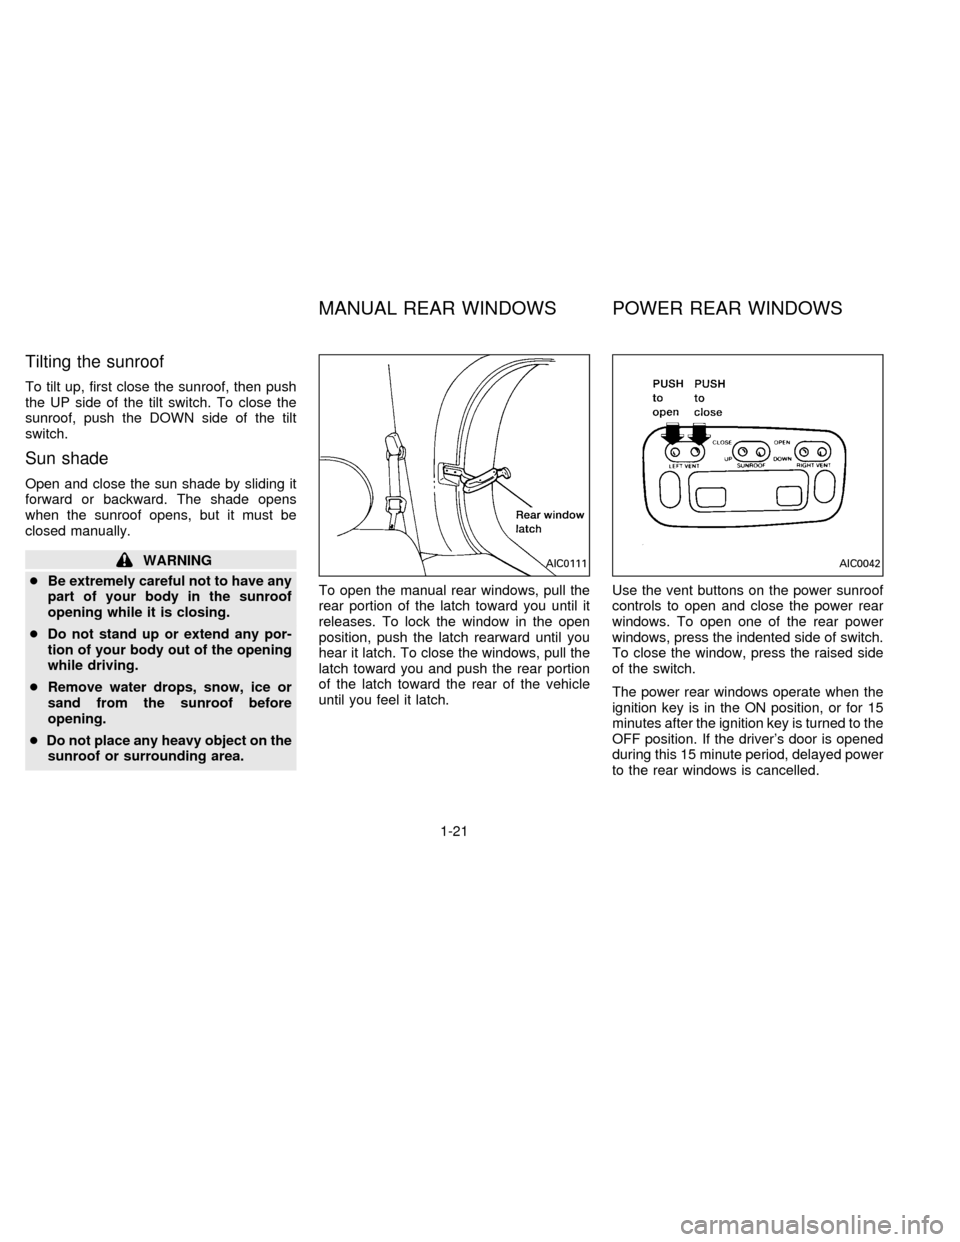
sunroof or surrounding area.To open the manual rear windows, pull the
rear portion of the latch toward you until it
releases. To lock the window in the open
position, push the latch rearward until you
hear it latch. To close the windows, pull the
latch toward you and push the rear portion
of the latch toward the rear of the vehicle
until you feel it latch.Use the vent buttons on the power sunroof
controls to open and close the power rear
windows. To open one of the rear power
windows, press the indented side of switch.
To close the window, press the raised side
of the switch.
The power rear windows operate when the
ignition key is in the ON position, or for 15
minutes after the ignition key is turned to the
OFF position. If the driver's door is opened
during this 15 minute period, delayed power
to the rear windows is cancelled.AIC0111AIC0042
MANUAL REAR WINDOWS POWER REAR WINDOWS
1-21
ZX
Page 31 of 235

Record the key number on the key number
plate and keep it in a safe place (such as
your wallet), NOT IN THE CAR. A key
number plate is supplied with your key. Keep
the plate in a safe place. NISSAN does not
record key numbers so it is very important to
keep track of your key number plate.
A key number is necessary only when you
have lost all vehicle keys and do not have
one to duplicate from. If you still have a key,
this key can be duplicated by your NISSAN
dealer or locksmith shop.
Two keys are supplied with your vehicle Ð
one has a plastic head and one is all metal.
Both keys perform the same functions.
MANUAL DOOR LOCK
To lock the front doors or sliding door from
the outside, turn the key toward the front of
the vehicle. To unlock, turn it toward the
rear.
APD0142APD0002
KEY DOOR LOCKS
2-2
ZX
Page 79 of 235
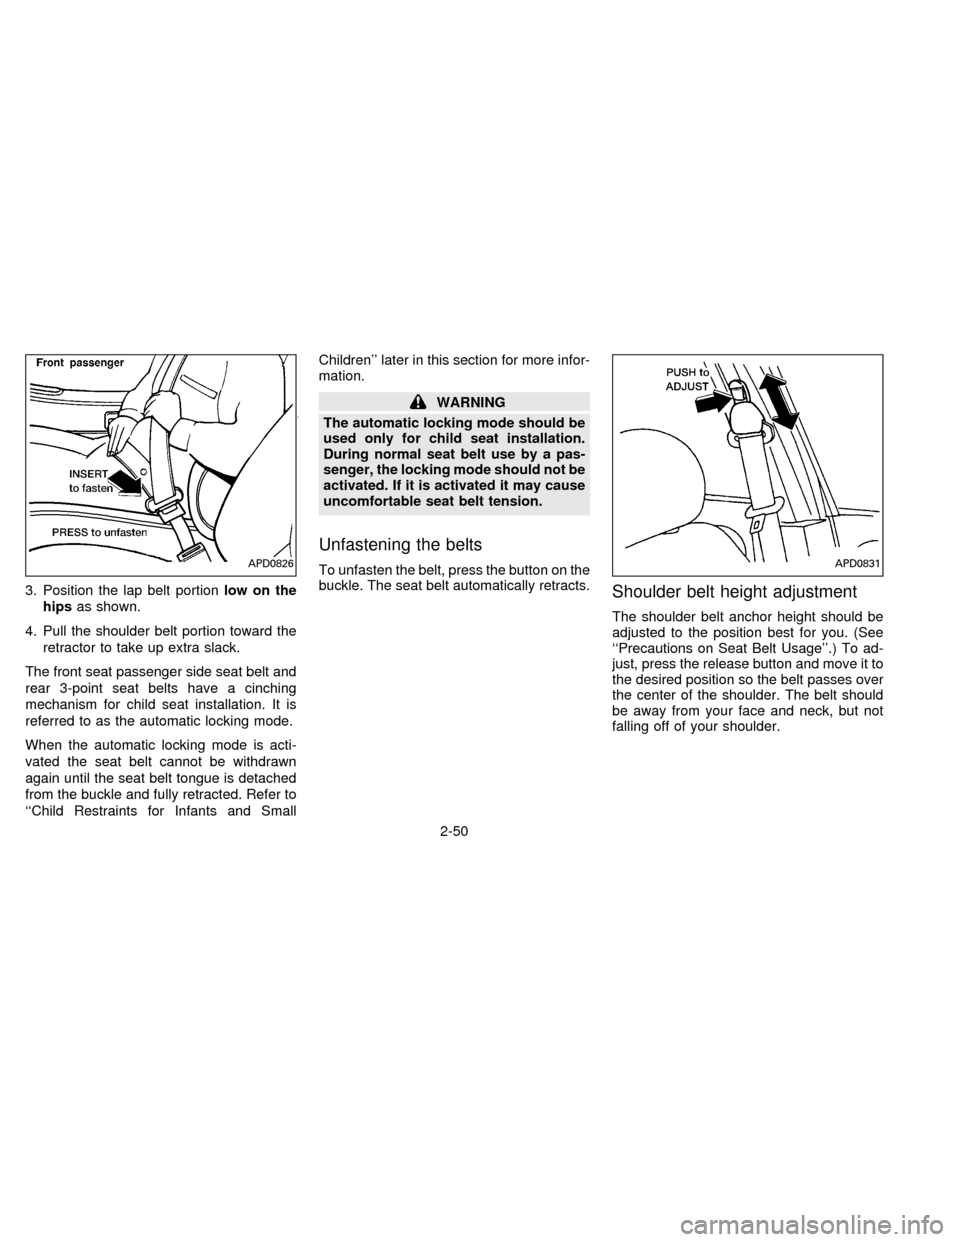
3. Position the lap belt portionlow on the
hipsas shown.
4. Pull the shoulder belt portion toward the
retractor to take up extra slack.
The front seat passenger side seat belt and
rear 3-point seat belts have a cinching
mechanism for child seat installation. It is
referred to as the automatic locking mode.
When the automatic locking mode is acti-
vated the seat belt cannot be withdrawn
again until the seat belt tongue is detached
from the buckle and fully retracted. Refer to
``Child Restraints for Infants and SmallChildren'' later in this section for more infor-
mation.
WARNING
The automatic locking mode should be
used only for child seat installation.
During normal seat belt use by a pas-
senger, the locking mode should not be
activated. If it is activated it may cause
uncomfortable seat belt tension.
Unfastening the belts
To unfasten the belt, press the button on the
buckle. The seat belt automatically retracts.
Shoulder belt height adjustment
The shoulder belt anchor height should be
adjusted to the position best for you. (See
``Precautions on Seat Belt Usage''.) To ad-
just, press the release button and move it to
the desired position so the belt passes over
the center of the shoulder. The belt should
be away from your face and neck, but not
falling off of your shoulder.
APD0826APD0831
2-50
ZX
Page 81 of 235
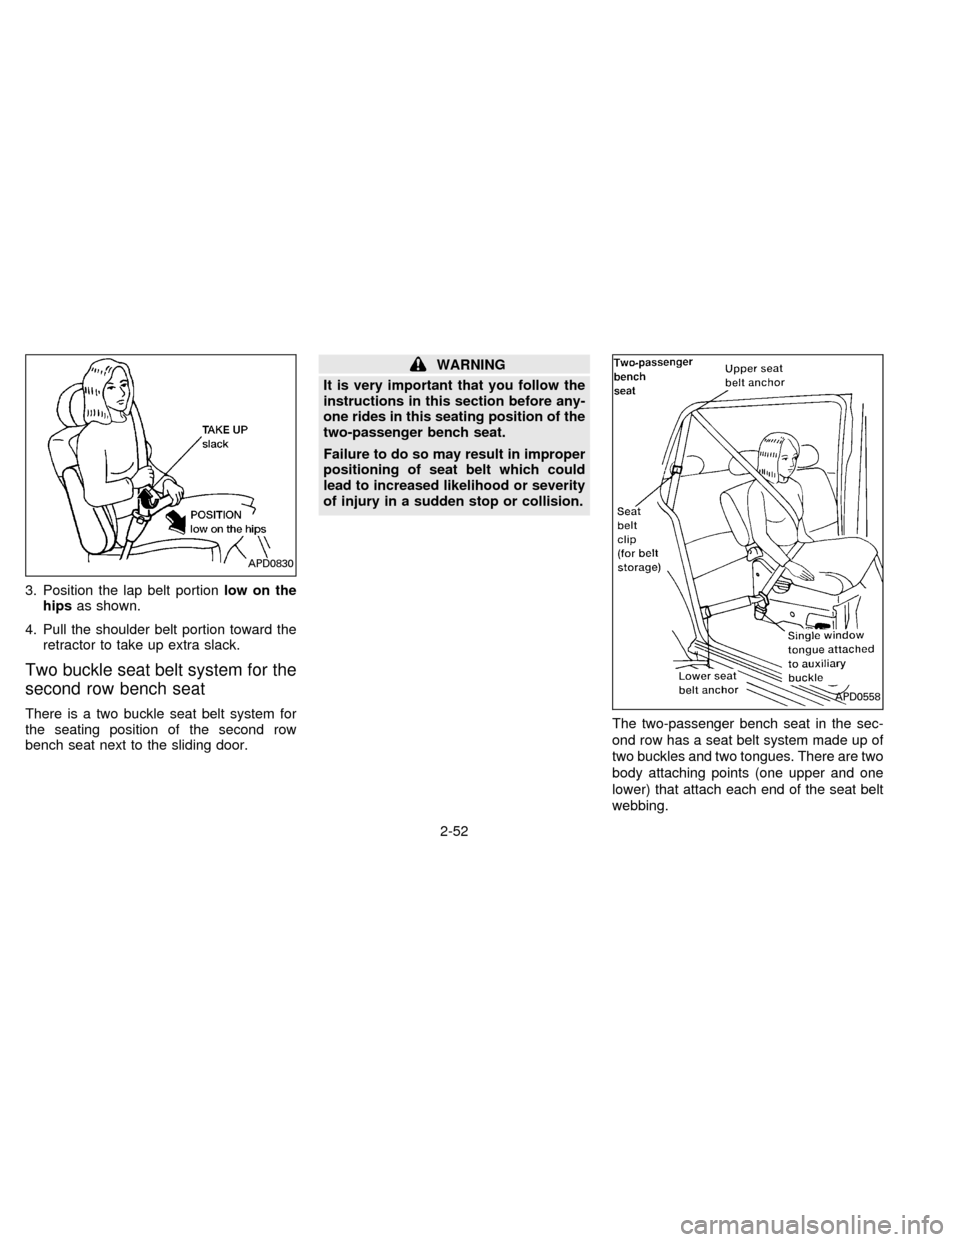
3. Position the lap belt portionlow on the
hipsas shown.
4. Pull the shoulder belt portion toward the
retractor to take up extra slack.
Two buckle seat belt system for the
second row bench seat
There is a two buckle seat belt system for
the seating position of the second row
bench seat next to the sliding door.
WARNING
It is very important that you follow the
instructions in this section before any-
one rides in this seating position of the
two-passenger bench seat.
Failure to do so may result in improper
positioning of seat belt which could
lead to increased likelihood or severity
of injury in a sudden stop or collision.
The two-passenger bench seat in the sec-
ond row has a seat belt system made up of
two buckles and two tongues. There are two
body attaching points (one upper and one
lower) that attach each end of the seat belt
webbing.
APD0830
APD0558
2-52
ZX
Page 85 of 235

3. Position the lap belt portionlow on the
hips as shown.
4. Pull the shoulder belt portion toward the
retractor to take up extra slack.2-POINT TYPE WITHOUT
RETRACTOR (Center of three-
passenger bench seat)
Fastening the belts
1. Insert the tongue into the buckle until it
snaps.2. To lengthen, hold the tongue at a right
angle to the belt and pull on the belt. To
shorten, pull the free end of the belt away
from the tongue.
APD0131APD0094APD0095
2-56
ZX
Page 102 of 235

properly positioned over the child's left
shoulder.
11. Check that the shoulder harness is in
the automatic locking mode by trying to
pull the shoulder harness out of the
retractor. If you cannot pull any of the
shoulder harness webbing out of the
retractor, the shoulder harness is in the
automatic locking mode. If the shoulder
harness is not locked, repeat step 10. If,
after repeated attempts, the integrated
child safety seat shoulder harness can-
not be placed in the automatic locking
mode, do not use the integrated child
safety seat and have it inspected by
your NISSAN dealer.
To cancel the automatic locking mode, un-
buckle the chest clip and both shoulder
harness tongues. Allow the shoulder har-
nesses to retract completely. The automatic
locking mode is now canceled and the
shoulder harness retractor is in the emer-
gency locking mode.
The automatic locking mode (child re-
straint mode) must be reactivated each
time you place a child in the integrated
child safety seats.In addition to the automatic locking retrac-
tors, the integrated child safety seat shoul-
der harnesses are equipped with emer-
gency locking retractors. The automatic
locking mode is best to use, especially for
children who need help staying properly
positioned in the seat and its harnesses (for
example, children who are younger and
smaller), because the belts are always
locked. In the emergency locking mode, the
shoulder belts only lock in a sudden stop or
accident, allowing a child more freedom of
movement. Use the emergency locking
mode only if you judge your child able to
remain properly positioned in the integrated
child safety seat.
Removing the Child
1. Release the chest clip.
2. Release the left and right shoulder har-
ness tongues from the belt buckle by
pressing the red belt buckle button.
3. Move the left and right shoulder har-
nesses aside and assist the child from
the integrated child safety seat.
Storing the Integrated Child Safety
Seat
1. Be sure the shoulder harnesses are fully
retracted and resting inside the inte-
grated child safety seat recess. It is not
necessary to reconnect the shoulder har-
nesses and belt buckle prior to storing
the integrated child safety seat.
2. While holding onto, but not pulling, the
cushion release strap, rotate the cushion
upward until it fits flush with the second
row seat back cushion and locks into
position.
3. Be sure the integrated child safety seat is
locked in the stowed position by grasping
the safety seat cushion and attempting to
lower it without pulling the cushion re-
lease strap. If the integrated child safety
seat is not locked in the stowed position,
repeat steps 1 through 3.
Integrated Child Safety Seat Main-
tenance
cTo clean the shoulder harnesses and belt
buckle webbing, apply a mild soap solu-
tion or any solution recommended for
cleaning upholstery or carpets. Then
2-73
ZX
Page 110 of 235

temperature conditions, improved cooling
can be obtained by pushing the recirculation
button to the on position.
Push the air recirculation button to the off
position when heating is required.
1. Push the
button in.
2. Turn the fan control dial to the desired
position.
3. Move the temperature control dial to the
desired position.
Heating and demisting
This mode heats the interior and demists
the windshield.
1. Push the
button in.
2. Turn the fan control dial to the desired
position.
3. Move the temperature control dial to the
desired position.
When the
button is pushed, the air
recirculate mode automatically turns off.
Outside air is drawn into the passenger
compartment to improve the defogging
performance.
Operating tips
cClear snow and ice from the wiper
blades and air inlet in front of the
windshield. This improves heater op-
eration.
cTo defog the side windows more effec-
tively when in bi-level or ventilation
mode, close the center vent and direct
the side vents toward the side windows.
cA slight delay may be experienced when
changing air control buttons. This is not a
problem, it is only the system motors and
solenoids switching from one outlet to
another.
AIR CONDITIONER OPERATION
Start the engine, move the fan control dial to
the desired (1 to 4) position, and select an
air control button before pushing in the air
conditioner button to activate the air condi-
tioner. When the air conditioner is on, cool-
ing and dehumidifying functions are added
to the system operation.
The air conditioner cooling function op-
erates only when the engine is running.
NOTE: When switching air flow outlets, the
A/C system remains activated unless theA/C button is pressed again to turn it off.
The indicator light on the A/C button re-
mains illuminated unless the button is
pressed to turn it off, or the OFF air control
button is pressed.
Cooling
This mode is used to cool and dehumidify.
1. Push the
button in.
2. Turn the fan control dial to select speed.
3. Push the air conditioner button. The indi-
cator light comes on.
4. Move the temperature control dial to the
desired position.
cFor quick cooling when the outside tem-
perature is high, move the air recircula-
tion button to the on position. Be sure to
return the air recirculation button to the
off position for normal cooling.
cOpening the windows helps to vent heat
buildup when parked in the sun.
Dehumidified heating
This mode is used to heat and dehumidify.
1. Push the air recirculation button to the off
position.
3-5
ZX